1
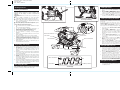
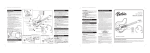
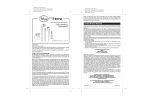
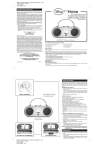
PF-315 IB - Front Printing color: Black
June 25, 2012
size: 355W x 240H mm
FCC Information
This device complies with Part 15 of the FCC rules. Operation
is subject to the following two conditions: (1) this device may
not cause harmful interference, and (2) this device must
accept any interference received, including interference that
may cause undesired
operation.
NOTE: This equipment has been tested and found to comply
with the limits for a Class B digital device, pursuant to Part
15 of the FCC rules. These limits are designed to provide
reasonable protection against harmful interference in a
residential installation. This equipment generates, uses, and
can radiate radio frequency energy and, if not installed and
used in accordance with the instructions, may cause harmful
interference to radio communications. However, there is no
guarantee that interference will not occur in a particular
installation. If this equipment does cause harmful interference
to radio or television reception, which can be determined by
turning the equipment off and on, the user is encouraged to
try to correct the interference by one or more of the following
measures:
• Reorient or relocate the receiving antenna.
• Increase the separation between the equipment and
receiver.
• Connect the equipment into an outlet on a circuit different
from that to which the receiver is connected.
• Consult the dealer or an experienced radio/TV technician
for help.
WARNING: Changes or modifications to this unit not
expressly approved by the party responsible for compliance
could void the user's authority to operate the equipment.
This Class B digital apparatus complies with Canadian
ICES-003.
Cet appareil numérique de la classe B est conforme à
la norme NMB-003 du Canada.
Questions or Comments
For questions or comments regarding this or other
KIDdesigns products, please call our toll-free number:
1-888-TOP-TOYS
Also visit our website: www.kiddesigns.com
If problems persist, please do not attempt to repair
unit; see warranty for factory service.
Maintenance
It is important to keep the unit as dry and clean as possible.
You may clean the cabinet with a cloth or sponge moistened
with mild soap and water. Do not attempt to use strong
cleansers or solvents, as they may cause damage.
Troubleshooting
• If you experience improper operation, try inserting a paper
clip or similar into the Reset port located on the bottom
of the unit.
• If the unit does not work at all, check the batteries. They
are most likely weak and need to be replaced with 3 brand
new “AA” batteries. If the unit still does not work after
changing the batteries, then take them out and make sure
you have installed them properly.
• If there is a distorted or fuzzy sound the batteries are weak.
Once again, replace them with new alkaline batteries.
• If improper operation continues, momentarily remove then
install batteries, while making sure that you have installed
them correctly.
• If the trouble persists, DO NOT ATTEMPT TO REPAIR
THE UNIT. See warranty for factory services.
Limited One-Year Warranty
KIDdesigns warrants this product to be free from defects in
workmanship and materials, under normal use and conditions,
for a period of one year from the date of original -purchase.
Should service be required by reason of any defect or
malfunction, it is best to first return this product and all parts
thereof to the store where it was originally purchased. If you
need to send the product for service during the warranty
period, KIDdesigns will repair or, at its discretion, replace this
product without charge (except for a $6.00 charge for
handling, packing, return UPS/postage and insurance). This
decision is subject to verification of the defect or malfunction
upon delivery of this product to the Factory Service Center
listed below. The product must include proof of purchase,
including date of purchase.
Before returning this product for service, please first replace
the batteries (if applicable) with fresh ones, as exhausted or
defective batteries are the most common cause of problems
encountered.
If service is still required:
1. Remove batteries (if applicable) and pack unit in a
well-padded, heavy corrugated box.
2. Enclose a photocopy of your sales receipt, credit card
statement, or other proof of the date of purchase.
3. Enclose a check or money order payable to the order of
KIDdesigns, for the sum of $6.00.
4. Send the unit prepaid to the Factory Service Center listed
below.
NOTE: This warranty is valid only if the product is used for
the purpose for which it was designed. It does not cover (i)
products which have been damaged by negligence, misuse
or accident, or which have been modified or repaired by
unauthorized persons; (ii) cracked or broken cabinets, or
units damaged by excessive heat; (iii) damage to tape
cassettes (if applicable); (iv) the cost of shipping this product
to the Factory Service Center and its return to the owner.
This warranty is valid only in the United States of America
and does not extend to owners of the product subsequent
to the original purchaser. Any applicable implied warranties
are also limited to one year, and KIDdesigns will not be liable
for consequential damages. (Some states do not allow
limitations on implied warranties or exclusion of consequential
damages, so these restrictions may not apply to you.) This
warranty gives you specific legal rights, and you may also
have other rights which vary from state to state.
Send unit to:
Consumer Repair Department
KIDdesigns, Inc.
1330 Goodyear Dr.
El Paso, TX 79936-6420
© Disney
Visit the Disney website at DisneyXD.com
Distributed by KIDdesigns, Inc. Rahway, NJ 07065-5024
eKids is a wholly owned subsidiary of KidDesigns, Inc,
1299 Main Street Rahway NJ 07065
Printed in China
PF-315 062512-A
Model: PF-315
Agent-P
Snooze-inator
Alarm Clock
Important Message to Customers
Thank you for purchasing one of Disney’s many top-quality electronic products. We would appreciate it if you take a
few moments to read through these instructions. This will help you explain to the child the safe and proper way to use
this toy, and to help give it the long-lasting life that Disney products are designed for.
PF-315 IB - back Printing color: Black
June 25, 2012
size: 355W x 240H mm
Getting Started
Setting the Time
Installing the Batteries
1. Press and hold the Time Set Button until the display
flashes.
2. Press the FWD or REV Button to adjust the clock to
the current time (hold for rapid adjustment). Remember
to set the correct AM or PM time. A PM indicator appears
at the bottom left of the display; there is no AM indicator.
3. Press the Time Set Button (or no button within 10
seconds) to confirm time and exit time setting mode.
This unit operates on 3 AA batteries. If the sound
becomes weak or distorted or the Low Battery icon
appears on the display, it’s time to replace the
batteries.
ATTENTION: Batteries should only be installed by an
adult.
Use a Phillips screwdriver to open the battery
compartment door located on the back of the unit.
Install 3 AA size batteries, making sure that the +
and – polarities match the diagram printed inside
the battery compartment.
Close the battery compartment door and tighten
the battery door screw. Do not over-tighten.
For the Best Possible Performance
• We recommend the use of alkaline batteries for longer
life.
• Do not mix old and new batteries.
• Do not mix alkaline, standard (carbon-zinc) or
rechargeable (nickel-cadmium) batteries.
• Batteries are to be inserted with correct polarity.
• Remove exhausted batteries from the unit.
• Do not attempt to recharge non-rechargeable
batteries.
• Remove the rechargeable batteries from the unit
before charging.
• The supply terminals are not to be short-circuited.
• Batteries should be removed if the item will not be
used for an extended period of time, such as a month
or longer, to prevent battery leakage or damage.
• Rechargeable batteries should only be charged under
adult supervision.
• Only batteries of the same or equivalent type as
recommended are to be used.
Insert Tail Stand In Back Of Unit
For Proper Stability
Battery Installation (back of unit)
MP3 Line-in Jack
Reset Port
MP3 Timer/Off Button
SFX Button
Rev Button
Snooze Button
Time Set Button
Alarm On/Off Switch
Setting and Using the Alarm
The alarm on this unit features sound effects, flashing lights
and speech. It has a gradual alarm which starts off quiet and
gets louder.
To view the current set alarm time, press the Alarm
Set/Reset Button. You can toggle the alarm ON or OFF by
sliding the Alarm On/Off Switch. An alarm icon will appear
in the upper left of the display, indicating the alarm is armed.
1. Press and hold the Alarm Set/Reset Button until the
display flashes.
2. Press the FWD or REV Button to adjust the clock to
the desired alarm time (hold for rapid adjustment).
Remember to set the correct AM or PM alarm time. A
PM indicator appears in the display; there is no AM
indicator.
3. Press the Alarm Set/Reset Button (or no button within
10 seconds) to confirm alarm setting time and exit alarm
setting mode.
4. When the alarm is sounding, press the Alarm Set/Reset
Button to stop the alarm sounding and reset it to come
on the next day at the same time.
5. Press the Snooze Button to temporarily silence the
alarm for about 9 minutes. After this, the alarm will sound
again. You can press the Snooze Button several times
during the duration of the alarm (about an hour).
Unpacking and Setup
1. Remove the product and all packing materials from
the carton.
2. It is a good idea to save the packing materials in case
the unit needs to be returned for service. If you do
dispose of the packing materials, please do so
properly.
3. Remove the demo tab from the battery compartment
on the back of the unit and the clear protective film
from the clock display.
4. Insert the tail stand in the back of the unit for proper
stability
5. The unit should be placed on a level surface, away
from direct sunlight, and away from the sources of
excess dust, dirt, heat, water, moisture, vibration, and
strong magnetic fields.
6. Protect your furniture when placing the unit on natural
wood or wood with a lacquered or coated finish. A
cloth or other protective material should be placed
between the unit and the furniture.
Resetting the Unit
If the unit becomes locked up or frozen, insert a paper
clip or similar into the Reset Port on the back of the unit
and press in. Doing so will reset the music chip.
Using the MP3 Line-in
Clock Display
Alarm Set/Reset Button
Alarm ON indicator
Fwd Button
Time
1. Connect one end of a standard 3.5mm stereo audio
cable (not included) to the headphone or line-out jack
of your audio device and plug the other end into the
MP3 Line-in Jack on the back of the unit.
2. Press the MP3 Timer Button (press down on Perry’s
right hand) as needed to cycle through the MP3 Timer
Settings: 60, 45, 30, 15 minutes or OFF.
3. Turn on your audio device and put it in PLAY mode.
Adjust the volume on the audio device as needed.
The unit will play the audio from your audio device for
the preset time, then turn off. To turn off the unit before
the set time, press the MP3 Timer Button until OFF
appears. Remember to turn off your audio device, too!
Using the Sound Effects
Low Battery indicator
PM indicator
The Display
1. Press the SFX Button (press down on Perry’s left hand)
to cycle through the various sound effects, speech and
cool lighting effects.