1
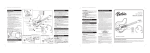
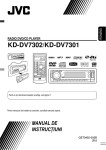
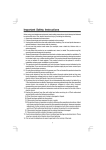
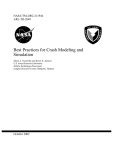
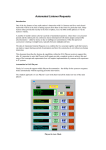
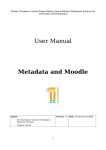
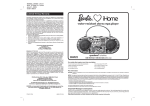
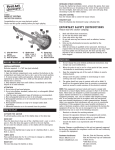
BE-644N1 I/B_front Print color: Purple (Pantone 265C) May 18, 07.
Jamming Mode
1. Press the Jamming button to start to play Jamming mode.
2. Press any one of the play guitar strings to get guitar
sounds and play cool jamming sounds.
3. Press Riff Buttons or Whammy Bar to get fun
sound and guitar effects.
Strumming Mode
1. Press the Strumming button for Strumming mode. A
backing track will play.
2. Press any Riff Buttons to play one of the guitar riffs.
3. Press any one of the play guitar strings to re-start the song.
Guitar Mode
1. Press the Guitar button to play guitar mode.
2. You can play guitar strings and Riff Buttons like a real
guitar.
Turning the Guitar Off
1. The Barbie™ Guitar will auto power off after 30 seconds
if no button/string is pressed.
2. Press the Demo/Off button to turn Guitar off immediately.
Troubleshooting
If improper operation occurs, press the Reset Button located
on the back of the unit.
If the toy still does not play, check the batteries. It is most
likely weak batteries, and you’ll need to replace them with
new batteries.
If the unit still does not work after changing the batteries,
make sure you have installed them properly, with the + and
– polarities matched up with the diagram printed inside the
battery compartment.
If there is a distorted of fuzzy sound, the batteries may be
weak. Replace with new batteries.
If problems persist, do not attempt to repair the toy
yourself. See the warranty for factory service information.
Questions or Comments
• For questions or comments regarding this or other
KIDdesigns products, please call our toll-free number:
1-888-TOP-TOYS.
Also visit our website: www.toptoysonline.com
WARNING: It is a violation of Federal Copyright Law to synchronize any
music from these cartridges with video tape or film, to copy any music from
these cartridges onto phonorecords, or to print material from these cartridges
in the form of standard music notation and/or words without the express
written permission of the Copyright owners.
Limited 90-Day Warranty
KIDdesigns warrants this product to be free from defects in workmanship
and materials, under normal use and conditions, for a period of 90 days
from the date of original purchase.
Should service be required by reason of any defect or malfunction, it
is best to first return this product and all parts thereof to the store
where it was originally purchased. If you need to send the product for
service during the warranty period, KIDdesigns will repair or, at its
discretion, replace this product without charge (except for a $9.00
charge for handling, packing, return UPS/postage and insurance). This
decision is subject to verification of the defect or malfunction upon
delivery of this product to the Factory Service Center listed below. The
product must include proof of purchase, including date of purchase.
Before returning this product for service, please first replace the batteries
(if applicable) with fresh ones, as exhausted or defective batteries are
the most common cause of problems encountered.
If service is still required:
1. Remove batteries (if applicable) and pack unit in a well-padded,
heavy corrugated box.
2. Enclose a photocopy of your sales receipt, credit card statement,
or other proof of the date of purchase.
3. Enclose a check or money order payable to the order of
KIDdesigns, for the sum of $9.00.
4. Send the unit prepaid to the Factory Service Center listed below.
NOTE: This warranty is valid only if the product is used for the purpose
for which it was designed. It does not cover (i) products which have
been damaged by negligence, misuse or accident, or which have been
modified or repaired by unauthorized persons; (ii) cracked or broken
cabinets, or units damaged by excessive heat; (iii) damage to tape
cassettes (if applicable); (iv) the cost of shipping this product to the
Factory Service Center and its return to the owner.
This warranty is valid only in the United States of America and does
not extend to owners of the product subsequent to the original
purchaser. Any applicable implied warranties are also limited to one
year, and KIDdesigns will not be liable for consequential damages.
(Some states do not allow limitations on implied warranties or exclusion
of consequential damages, so these restrictions may not apply to you.)
This warranty gives you specific legal rights, and you may also have
other rights which vary from state to state.
Send unit to:
Consumer Repair Department
KIDdesigns, Inc.
1330 Goodyear Dr.
El Paso, TX 79936-6420
MP3
on/off
KAR
E
AOK
JAM
’
MIN
FF
O/O
DEM
AR
GUIT
nano
IN’
MM
STRU
2G
1G
1:35
G
N
SO
G
N
SO
G
N
SO
M
OLUM
E
IC V
3
2
1
Play
VOLUME
ECHO
BARBIE and associated trademarks and trade dress are owned by,
and used under license from Mattel, Inc. ©2007 Mattel, Inc.
All Rights Reserved.
Manufactured and Distributed by KIDdesigns, Inc.
Rahway, NJ 07065-5024
“SURVIVOR” Beyonce Knowles, Anthony Dent, Matthew Knowles © 2001 Beyonce
Publishing / Sony / ATV Tunes LLC For Chase Muzic Inc. / Hitco South All rights
on behalf of Beyonce Publishing / Sony / ATV Tunes LLC admin. By Sony / ATV
Music Publishing LLC All Rights Reserved Used By Permission. Written by Anthony
Dent © 2001 by Music of Windswept (ASCAP) o/b/o Hitco South and For Chase
Muzic, Inc. All rights administered by Music of Windswept. All rights reserved.
Used by permission of Music of Windswept.
“WHAT A GIRL WANTS” By Shelly Peiken and Guy Roche Published by EMI
BLACKWOOD MUSIC INC. Courtesy of BMG Songs, Inc. (ASCAP). Under license
from BMG Film & TV Music.
“UP” Courtesy of Zomba Enterprises Inc. (ASCAP) Under License from BMG Film
& TV Music Written by Shania Twain and Robert John Lange Courtesy of Universal
- Songs of PolyGram International, Inc.
on behalf of itself and Loon Echo, Inc. (BMI)
Printed in China
BE644N1-051807-1
56;,!P7VKUHUVUV[PUJS\KLK
Important Message to Consumers
Thank you for purchasing one of Barbie™’s many top-quality electronic products. We would appreciate it if you take a few moments
to read through these instructions. This will help you understand the safe and proper way to use this product, and to help give it the
long-lasting life that Barbie™ products are designed for.
Keep these instructions for future reference as they contain important information.
BE-644N1 I/B_back Print color: Purple (Pantone 265C) May 18, 07.
Getting Started
Docking Song Cartridges
Battery Installation
ATTENTION: Batteries should only be installed by an adult.
1. Open the battery compartment door located on the back of
the unit.
2. Install 4 “AA” (R6) size batteries, making sure that the +
and – polarities match the diagram printed inside the battery
compartment.
3. Close the battery compartment door and tighten the battery
door screw. Do not over-tighten.
Karaoke Button Note: The Barbie™ Guitar comes with a song cartridge
containing 3 songs alreadly installed into the product.
1. Slide and hold the Dock Lock located on the front of
the dock near the rear strap post to the open position,
then slide a song cartridge into the dock as shown.
Please make sure the cartridge is plugged in properly.
Release the lock switch to the closed position.
2. Press a Song Button to listen to a song.
Jamming Button Guitar Button Strumming Button Docking iPod nano
For the Best Possible Performance
MP3 On/Off button 1. Turn on your iPod nano and select a song to play*
2. Move the nano select switch on the guitar to match
your nano model (1G or 2G). To avoid damage to the
guitar or your nano, never dock a 1G nano when the
switch is in 2G position, or vice versa.
3. Slide and hold the Dock Lock located on the front of
the dock near the rear strap post to the open position,
then slide your iPod nano into the dock as shown. Please
make sure the nano is plugged in properly. Release the
Dock Lock to the closed position.
4. Press play on your nano.
5. Press the MP3 On/Off button to play your nano
will auto shut
through the guitar for 10 minutes (the guitar
off after 10 minutes). Press again to keep playing nano.
6. Please remember to stop play and to power off your nano
manually.
* Note: Follow your iPod nano user manual for details on
operating your nano.
Riff Buttons
nano select switch F
/OF
MO
DE
E
OK
RA
KA
MP3
on/off
’
MIN
JAM
Demo/Off Button
R
ITA
GU
IN’
MM
STRU
2G
no
na
Song cartridge/
nano dock
1G
G
N
SO
NG
3
2
SONG 1-3 Button
1
SO
SO
NG
• We recommend the use of alkaline batteries for longer life.
• Do not mix old and new batteries.
• Do not mix alkaline, standard (carbon-zinc) or
rechargeable (nickel-cadmium) batteries.
• Only batteries of the same or equivalent type
recommended are to be used.
• Batteries are to be inserted with correct polarity.
• Remove exhausted batteries from the unit.
• Do not attempt to recharge non-rechargeable batteries.
• Remove the rechargeable batteries from the unit before
charging (if removable).
• The supply terminals are not to be short-circuited.
• Batteries should be removed if the item will not be used
for an extended period of time, such as a month or longer,
to prevent battery leakage or damage.
• Rechargeable batteries should only be recharged under
adult supervision (if removable).
Dock Lock LUME
VO
M
IC
VOLUME
ECHO
Volume Knob
MIC Jack
1:35
Remove Demo Tab
Echo Knob
AUX Out Jack
The Barbie™ Guitar has a demo tab for in-store
demonstration purposes. Make sure to remove this tab. To
do so, gently pull on tab. Dispose of tab properly.
Whammy Bar Using the AUX Out Jack with other audio devices
Play
You can connect your Barbie™ Guitar to a line-level input
jack on a computer, recording device or home amplifier using
the AUX out jack.
1. Connect the Barbie™ Guitar AUX out jack to a recording
device or home amplifier using an audio cable (not
included).
2. AUX output sound level is volume independent, so please
adjust your recording device/home amplifier for suitable
sound level.
MIC Volume Knob Bottom View
Song Cartridge
Demo Tab
Headset MIC
Docking Song Cartridge
Dock Lock
nano
2G
Playing with the Guitar
Docking an iPod nano
Demo Mode
MP3 On/Off Button
1G
1. Press the Demo/Off button to learn about the guitar.
MP3 ff
on/o
TM
Reset Button
Song cartridge included &
already inserted into the product.
2G
1G
Dock Lock
Karaoke Mode
MP3 ff
on/o
NG
1
SO
NG
2
nano
SO
nano
M
2G
1G
SO
NG
TM
LUM
HO
EC
G
M
VO
OL
IC V
SO
N
Carrying Strap Installation
VO
M
1. Attach the strap ends to the Guitar body.
2. Hang it onto your shoulder.
3. Adjust the strap length to fit you.
LUM
HO
EC
1
SO
NG
2
VO
OL
IC V
Song Cartridge
iPod nano
OL
IC V
HO
EC
LUM
1. Press the Karaoke button to start karaoke mode,
singing to a song cartridge or to an iPod nano.
2. Songs will start playing or you can press SONG 1-3
buttons to select a desired song.
3. Sing into the headset MIC. You can turn the Echo
Knob to adjust the echo effect. Adjust MIC volume.
4. You can also play the guitar strings to get guitar sounds.
5. Press the Riff Buttons or Whammy Bar to get fun
sound effects.
BE-644N1 I/B_front Print color: Purple (Pantone 265C) May 18, 07.
Jamming Mode
1. Press the Jamming button to start to play Jamming mode.
2. Press any one of the play guitar strings to get guitar
sounds and play cool jamming sounds.
3. Press Riff Buttons or Whammy Bar to get fun
sound and guitar effects.
Strumming Mode
1. Press the Strumming button for Strumming mode. A
backing track will play.
2. Press any Riff Buttons to play one of the guitar riffs.
3. Press any one of the play guitar strings to re-start the song.
Guitar Mode
1. Press the Guitar button to play guitar mode.
2. You can play guitar strings and Riff Buttons like a real
guitar.
Turning the Guitar Off
1. The Barbie™ Guitar will auto power off after 30 seconds
if no button/string is pressed.
2. Press the Demo/Off button to turn Guitar off immediately.
Troubleshooting
If improper operation occurs, press the Reset Button located
on the back of the unit.
If the toy still does not play, check the batteries. It is most
likely weak batteries, and you’ll need to replace them with
new batteries.
If the unit still does not work after changing the batteries,
make sure you have installed them properly, with the + and
– polarities matched up with the diagram printed inside the
battery compartment.
If there is a distorted of fuzzy sound, the batteries may be
weak. Replace with new batteries.
If problems persist, do not attempt to repair the toy
yourself. See the warranty for factory service information.
Questions or Comments
• For questions or comments regarding this or other
KIDdesigns products, please call our toll-free number:
1-888-TOP-TOYS.
Also visit our website: www.toptoysonline.com
WARNING: It is a violation of Federal Copyright Law to synchronize any
music from these cartridges with video tape or film, to copy any music from
these cartridges onto phonorecords, or to print material from these cartridges
in the form of standard music notation and/or words without the express
written permission of the Copyright owners.
Limited 90-Day Warranty
KIDdesigns warrants this product to be free from defects in workmanship
and materials, under normal use and conditions, for a period of 90 days
from the date of original purchase.
Should service be required by reason of any defect or malfunction, it
is best to first return this product and all parts thereof to the store
where it was originally purchased. If you need to send the product for
service during the warranty period, KIDdesigns will repair or, at its
discretion, replace this product without charge (except for a $9.00
charge for handling, packing, return UPS/postage and insurance). This
decision is subject to verification of the defect or malfunction upon
delivery of this product to the Factory Service Center listed below. The
product must include proof of purchase, including date of purchase.
Before returning this product for service, please first replace the batteries
(if applicable) with fresh ones, as exhausted or defective batteries are
the most common cause of problems encountered.
If service is still required:
1. Remove batteries (if applicable) and pack unit in a well-padded,
heavy corrugated box.
2. Enclose a photocopy of your sales receipt, credit card statement,
or other proof of the date of purchase.
3. Enclose a check or money order payable to the order of
KIDdesigns, for the sum of $9.00.
4. Send the unit prepaid to the Factory Service Center listed below.
NOTE: This warranty is valid only if the product is used for the purpose
for which it was designed. It does not cover (i) products which have
been damaged by negligence, misuse or accident, or which have been
modified or repaired by unauthorized persons; (ii) cracked or broken
cabinets, or units damaged by excessive heat; (iii) damage to tape
cassettes (if applicable); (iv) the cost of shipping this product to the
Factory Service Center and its return to the owner.
This warranty is valid only in the United States of America and does
not extend to owners of the product subsequent to the original
purchaser. Any applicable implied warranties are also limited to one
year, and KIDdesigns will not be liable for consequential damages.
(Some states do not allow limitations on implied warranties or exclusion
of consequential damages, so these restrictions may not apply to you.)
This warranty gives you specific legal rights, and you may also have
other rights which vary from state to state.
Send unit to:
Consumer Repair Department
KIDdesigns, Inc.
1330 Goodyear Dr.
El Paso, TX 79936-6420
MP3
on/off
KAR
E
AOK
JAM
’
MIN
FF
O/O
DEM
AR
GUIT
nano
IN’
MM
STRU
2G
1G
1:35
G
N
SO
G
N
SO
G
N
SO
M
OLUM
E
IC V
3
2
1
Play
VOLUME
ECHO
BARBIE and associated trademarks and trade dress are owned by,
and used under license from Mattel, Inc. ©2007 Mattel, Inc.
All Rights Reserved.
Manufactured and Distributed by KIDdesigns, Inc.
Rahway, NJ 07065-5024
“SURVIVOR” Beyonce Knowles, Anthony Dent, Matthew Knowles © 2001 Beyonce
Publishing / Sony / ATV Tunes LLC For Chase Muzic Inc. / Hitco South All rights
on behalf of Beyonce Publishing / Sony / ATV Tunes LLC admin. By Sony / ATV
Music Publishing LLC All Rights Reserved Used By Permission. Written by Anthony
Dent © 2001 by Music of Windswept (ASCAP) o/b/o Hitco South and For Chase
Muzic, Inc. All rights administered by Music of Windswept. All rights reserved.
Used by permission of Music of Windswept.
“WHAT A GIRL WANTS” By Shelly Peiken and Guy Roche Published by EMI
BLACKWOOD MUSIC INC. Courtesy of BMG Songs, Inc. (ASCAP). Under license
from BMG Film & TV Music.
“UP” Courtesy of Zomba Enterprises Inc. (ASCAP) Under License from BMG Film
& TV Music Written by Shania Twain and Robert John Lange Courtesy of Universal
- Songs of PolyGram International, Inc.
on behalf of itself and Loon Echo, Inc. (BMI)
Printed in China
BE644N1-051807-1
56;,!P7VKUHUVUV[PUJS\KLK
Important Message to Consumers
Thank you for purchasing one of Barbie™’s many top-quality electronic products. We would appreciate it if you take a few moments
to read through these instructions. This will help you understand the safe and proper way to use this product, and to help give it the
long-lasting life that Barbie™ products are designed for.
Keep these instructions for future reference as they contain important information.