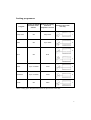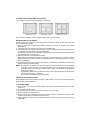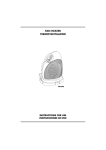
1
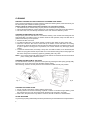
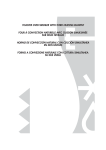
DIRECTIONS FOR USE
TOASTER-OVEN-BROILER
& PIZZA OVEN
Mod. XU15
XU15C
De’ Longhi products are the finest and most versatile products available. Please read this booklet
carefully to ensure that you obtain the fullest benefit from your appliance.
1
ON-OFF AND TOAST COLOUR
SELECTOR (TIMER)
(UPPER KNOB)
PIZZA STONE
WIRE RACK
MULTI-PURPOSE
OVEN TRAY
PILOT LIGHT
2
COOKING MODE AND
TEMPERATURE SELECTOR
(LOWER KNOB)
Cooking programmes
Program
Position of ON/OFF Position of cooking
and toast colour
mode and
selector
temperature selector
Position of wire rack/
oven tray
Keep warm
ON
Keep warm
1
Bake
ON
Up to 450°F
2
3
Broil
ON
Broil
4
Toast
Up to 7 minutes
Toast
5
Sandwich
Up to 7 minutes
Toast
6
ON
Pizza
7
Pizza *
* When cooking pizza, the pizza stone should be placed on the wire rack.
3
IMPORTANT SAFEGUARDS
When using electrical appliances, basic safety precautions should always be followed, including
the following:
1.
Read all instructions.
2.
Do not touch hot surfaces: Use handles or dials.
3.
Before using this appliance, move it two to four inches away from the wall or any object on the
counter top. Remove any object that may have been placed on top of the appliance. Do not
use on surfaces where heat may cause a problem.
4.
To protect against electrical shock, do not place unit in or under water. See instructions for
cleaning.
5.
Close supervision is necessary when any appliance is used by or near children.
6.
Unplug from outlet when not in use and before cleaning. Always turn the unit OFF before
unplugging. Allow to cool before putting on or taking off parts, and before cleaning the
appliance.
7.
Do not operate any appliance with a damaged cord or plug or after the appliance malfunctions,
or has been damaged in any manner. Return appliance to the nearest authorized service
facility for examination, repair or adjustment.
8.
The use of accessory attachments not recommended by the appliance manufacturer may
cause injuries.
9.
Do not use outdoors.
10. Do not let cord hang over edge of table or counter, or touch hot surfaces.
11. Do not place on or near a hot gas or electric burner.
12. Extreme caution must be used when moving an appliance containing hot oil or other hot
liquids.
13. If the plug gets hot, please call a qualified electrician.
14. Do not use this appliance for other than intended use.
15. Use extreme caution when removing the broiling tray or disposing of hot grease.
16. Do not clean with metal scouring pads. Pieces can break off the pad and touch electrical
parts, creating a risk of electric shock.
17. To assure safe operation, oversized foods or utensils must not be inserted into the oven.
18. A fire may occur if this appliance is covered or touching flammable material, including
curtains, draperies, walls, etc., when in operation.
19. CAUTION: Never leave the toaster-oven-broiler unattended when broiling and toasting.
20. When broiling, the bake/broil tray assembly and rack must be used.
21. Extreme caution should be exercised when using containers constructed of other than metal
or glass.
22. Do not store any materials, other than the manufacturer's recommended accessories, in the
oven when not in use.
23. Do not place any of the following materials in the oven: paper, cardboard, plastic and the like.
24. Do not cover any part of the oven with metal foil. This will cause overheating of the oven.
25. To switch off the toaster-oven-broiler, turn the ON/OFF knob to "OFF" and the cooking mode
knob to "●".
THIS PRODUCT IS FOR HOUSEHOLD USE ONLY
SAVE THESE INSTRUCTIONS
4
NOTE: The oven may smoke during initial heat-up due to the oils used in manufacturing.
This is normal for a new appliance.
• If your product is equipped with a polarized alternating current line plug (a plug having one blade
wider than the other). This plug will fit into the power outlet only one way. This is a safety feature.
If you are unable to insert the plug fully into the outlet, try reversing the plug. If the plug should
still fail to fit, contact your electrician to replace your obsolete outlet. Do not defeat the safety
purpose of the polarized plug.
• Plug the cord into a 120 volt AC outlet.
• The cord length of this product has been selected to reduce the possibility of tangling in or tripping
over a longer cord. If more cord length is needed, an extension cord may be used. It should be
rated no less than 15 amps., 120 volts, and have Underwriters Laboratories/CSA listing.
• A six feet long, 15 amp. extension cord may be purchased from your local authorized service
facility. When using a longer cord, be sure not to let it drape over the working area or dangle where
someone could accidentally pull or trip over it.
• Handle the cord carefully for longer life; avoid jerking or straining the cord at the plug and
appliance connections.
COOKING PROGRAMMES
The pilot lamp lights when the appliance is plugged into the mains. It does not mean that the oven
has reached the selected temperature.
1) HOW TO KEEP FOOD WARM
Place the food to be kept warm on the wire rack (in position 1). Turn the upper knob to “ON”. Turn
the lower knob to “KEEP WARM”. This feature is designed to keep foods warm, after they are cooked
for short periods of time without overcooking. We do not recommend keeping foods warm for
prolonged periods or using this feature to reheat frozen or cold foods.
2) INSTRUCTIONS FOR BAKING
You can bake foods in your oven, just as in your regular oven. Casseroles or baking dishes may be
placed directly on the removable wire rack. Use the convenient bake/broil tray provided with your
oven for baking such items as cookies, biscuits, rolls and uncovered casserole dishes. Place the
bake/broil tray directly on the removable wire rack (position 2).
1. Close the door.
2. Set the lower knob to the desired position.
3. Turn the upper knob to “ON”.
4. Both the bottom and top elements are on. However the primary heat comes from the bottom
element.
5. When baking is finished turn the upper knob to “OFF” and the lower knob to position "●".
NOTE: We do not recommend the use of glass covers on casseroles. Glass cooking dishes should
never be closer than one inch from the heating element.
HELPFUL BAKING HINTS
To obtain best performance from this toaster-oven-broiler:
• Do not overfill the oven. Whenever possible, place foods in center of oven.
• Avoid opening the door too frequently to prevent heat loss.
• Foil may be used to cover the baking dish or pan. Be sure the ends of foil are tucked closely
against the edge of the baking dish/pan.
5
TOP BROWNING
Top Browning is ideal for melting, crisping and toasting food surfaces. Use it for open face
sandwiches, pre-buttered muffins or browning cooked casseroles.
1. Place the food on the oven pan and place on the wire rack (position 2).
2. Close the door, set the lower knob to “BROIL”and the upper knob to “MEDIUM”.
3. When experimenting with new uses, watch the food to avoid overbrowning. If necessary the
browning cycle can be shortened by turning the upper knob to a lighter setting.
4. A ring indicates the end of the set time. The top browning cycle has been completed. The heating
elements will shut off automatically.
3) INSTRUCTIONS FOR BROILING
Always use the bake/broil tray assembly with the removable wire oven rack for broiling. No
preheating of the broiler is necessary.
Do not leave the broiler unattended when in use. Before using the broiler for the first time and after
use, wash the tray and the rack with warm, sudsy water. Do not cover the bake/broil tray assembly
or the oven wire rack with foil. This prevents fat and oils from draining, causing spatter and smoking,
and also restricts air circulation for proper ventilation.
BROILING
1. Place the wire oven rack in the upper shelf position (position 3 or 4).
2. Position the aluminium drip pan directly on the lower heating element.
3. Place the food to be broiled on the wire rack.
4. Leave the oven door half open.
5. Turn the lower knob to “BROIL”.
6. Turn the upper knob to “ON”.
7. When broiling is finished, turn the upper knob to “OFF” and the lower knob to position "●". Care
should be taken when removing the broiler pan and disposing of the grease collected while
broiling.
NOTE: While smoke is an inherent characteristic of good broiling, the following tips should
eliminate or greatly reduce smoking.
• Trim excess fat from meat and score the edges to prevent curling.
• For best results, thaw frozen meats before broiling. These two precautions will reduce or eliminate
smoke from the broiler.
• Placing the food on the rack in the tray allows the juices and fat to drip into the tray and decreases
spattering while broiling.
• If frozen steaks and chops are broiled, allow 11/2 to 2 times the required broiling time as that
required for unfrozen meat.
• If grease “pops” during broiling, turn the temperature control dial to a lower setting.
• Remove grease from the tray and wash the tray and rack after use.
• The broiler should be cleaned inside after each use. Too much grease accumulation causes
smoking. Use any non-abrasive cleaner and hot water.
• For very thick steaks and other thick foods, we recommend using the lower shelf position.
6
4) DIRECTIONS FOR AUTOMATIC TOASTING
• For toasting, place the slices of bread as shown below:
Toasting one slice
Toasting two slices
Toasting four slices
For consecutive toasting, turn the “TOAST START” dial to a lower setting.
INSTRUCTIONS FOR TOASTING
Always use the oven wire rack for toasting bread, sandwiches, English muffins, shelf foods and
frozen waffles automatically.
1. Place the wire rack in upper shelf position (position 5 for toast, or position 6 for toasted
sandwiches).
2. Center the food to be toasted on the wire rack. Close the door.
3. Turn the lower knob to “TOAST”. When toasting, both the top and bottom heating elements switch
on to brown both sides of the food at the same time.
Condensation may build up on the inside of the glass door. This is normal. The condensation will
evaporate during the toasting cycle.
4. Set the upper knob to the desired brownness.
When using the toaster-oven-broiler for the first time, set the upper knob to a medium setting.
Toast a few pieces of bread to check for desired brownness. If necessary, adjust the control to
suit your preference.
5. A ring indicates the end of the set time. The toasting cycle has been completed and the heating
elements will shut off automatically.
NOTE: This toaster-oven-broiler is capable of toasting in a wide range of colours, automatically
from light to dark. However, if you prefer a lighter shade of toast, simply interrupt the
automatic toast cycle by turning the upper knob to “OFF”. This will shut the unit off without
damaging the oven.
If you prefer a darker shade, restart the toasting cycle by turning the upper knob clockwise
until the desired colour is obtained.
Then switch off manually as described earlier.
HINTS FOR TOASTING SUCCESS
Heavier breads and frozen breads will require a darker setting. One slice of bread will require a
lighter setting than several slices.
5) COOKING PIZZA
1. Place the wire oven rack in the lower position and place the special pizza stone on the rack
(position 7).
2. Turn the upper knob to "ON".
3. Set the lower knob to 450°F and pre-heat the oven for 5 - 7 minutes.
4. Place the pizza on the pizza stone.
5. Close the oven door. After about 10 minutes, turn the selector to "PIZZA" and leave it in this
position until the pizza is cooked (about 8 minutes).
6. When the pizza is cooked, turn the upper knob back to "OFF" and then turn the lower knob to
position "●".
7
CLEANING
PERIODIC CLEANING OF THE CONTINUOUS-CLEANING OVEN AREAS
Due to excessive spattering or food touching the continuous-cleaning finish, some residue may not
be removed by the continuous-cleaning process.
Always unplug the toaster-oven-broiler and allow it to cool before cleaning.
1. The surface may be cleaned using a nylon pad and a mild liquid soap solution.
2. Never use harsh abrasives, caustic cleaners or oven cleaners on the continuous-clean surface.
3. The oven rack, door, and the top and bottom of the oven must be cleaned by hand.
CLEANING OTHER PARTS OF THE OVEN
Always unplug the oven and allow it to cool before cleaning. This unit has been designed and
engineered with your safety in mind. To assure maximum safe operation, keep unit clean free of
grease and build-up of food particles.
1. Remove the wire oven rack.
2. To clean the glass door, use a glass cleaner or a damp cloth. Wipe dry with a clean cloth.
3. Clean the oven floor after use to avoid build-up of residue, as this will affect the cooking
performance. Brush off crumbs or wipe the oven floor with a damp cloth. For stubborn stains, use
a nylon or plastic scouring pad or a powdered, non-caustic cleaner. Dry thoroughly before
closing.
4. To clean the exterior finish, use a damp, sudsy cloth. For stubborn stains, a non-abrasive liquid
cleaner or spray glass cleaner may be used. Do not use metal scouring pads, as they might mar
the finish. Always remove cleaning agents by polishing with a dry cloth.
NOTE: Do not clean interior with metal scouring pads. Pieces can break off and touch electrical
parts, creating risk of electrical shock.
CLEANING THE BOTTOM OF THE OVEN
To clean the bottom of the oven, open the access panel by pressing the latch spring (see fig.A/B).
Place the oven on its rear panel. This will make cleaning easier.
After cleaning, close the access panel and check that it is locked securely into position.
Fig. A
Fig. B
CLEANING THE PIZZA STONE
1. Do not use oils or fats when cooking with the pizza stone.
2. Cooking residue can be removed using a spatula or a knife. For more thorough cleaning, heat
the pizza stone in the oven and clean with an abrasive pad and rinse in hot water.
3. After a time, the pizza stone may darken. However, this will not affect its characteristics.
OTHER SERVICING
Any servicing requiring disassembly should be performed by an authorized service representative.
8
Limited Warranty
What DoesThis Warranty Cover? We warrant each appliance to be free from defects in material and workmanship. Our
obligation under this warranty is limited to replacement or repair, free of charge at our factory or authorized service
centers, of any defective part or parts thereof other than parts damaged in transit, which shall be returned to us,
transportation prepaid. This warranty shall apply only if the appliance is used in accordance with the factory directions
which accompany it, and on an Alternating Current (AC) circuit.
How Long Does The Coverage Last? This warranty runs for one year from the date of delivery and applies only to the
original purchaser for use.
What Does This Warranty Not Cover? This warranty does not cover defects or damage of the appliance which result
from repairs or alterations to the appliance outside our factory or authorized service centers, nor shall it apply to any
appliance which has been subject to abuse, misuse, negligence or accidents. Also, consequential and incidental
damages resulting from the use of this product or arising out of any breach of contract or breach of this warranty are not
recoverable under this warranty. Some states do not allow the exclusion or limitation of incidental or consequential
damages, so the above limitation may not apply to you.
How Do You Get Service? If repairs become necessary or spare parts are needed, please write to:
De' Longhi America Inc.
625, Washington Avenue
Carlstadt N.J. 07072
or call Service Tel. No. 1-800-322-3848
The above warranty is in lieu of all other express warranties and representations. All implied warranties are limited to the
applicable warranty period set forth above. This limitation does apply if you enter into an extended warranty with De'
Longhi. Some states do not allow limitations on how long an implied warranty lasts, so the above exclusions may not apply
to you. De' Longhi does not authorize any other person or company to assume for it any liability in connection with the
sale or use of its appliance.
How Does State Law Apply? This warranty gives you specific legal rights, and you may also have other rights which
vary from state to state.
FOR U.S. ONLY:
✂
IMPORTANT!
PLEASE COMPLETE THIS CARD AND RETURN WITHIN THE NEXT 10 DAYS TO
ESTABLISH PROPER REGISTRATION OF YOUR NEW DE' LONGHI PRODUCT
❏
Mr.
❏
❏
Mrs.
Miss
Street
City
Ph.
State
Marital status: ❏
Date of Purchase:
DE' LONGHI Model:
This product was
ZIP
❏
Single
Month
❏
Married
Day
Divorced
Year
Purchased from
❏
a planned purchase
The product was selected by
❏
Male
❏
gift
❏
impulse purchase
❏
Female
❏
Both
❏
❏
❏
In store display
Previous ownership
Packaging
❏
45 and over
Selection of this product was prompted by:
❏ Advertising
❏ Appearance
❏ Brand Name
❏ Features
❏ Price
❏ Referral
Age group
❏
16-24
❏
25-34
❏
35-44
Type of residence
❏
house
❏
apartment ❏
other
Room where the product will be used
9
572772/04.92
PLACE
STAMP
HERE
DE' LONGHI AMERICA, INC.
625 WASHINGTON AVENUE
CARLSTADT, N.J. 07072
ATTN. CONSUMER RELATIONS MANAGER
10