1
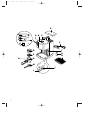
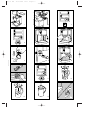
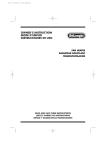
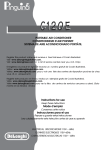
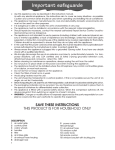
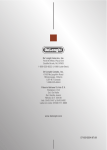
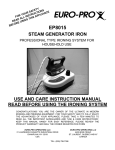
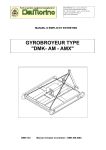
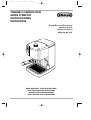
bar 14 USA
30-07-2001 13:51
Pagina 1
OWNER’S INSTRUCTION
MODE D’EMPLOI
INSTRUCCIONES
INSTRUÇÕES
Pump-driven coffee maker
Machine a cafe
Cafetera eléctrica
Máquina de café
READ AND SAVE THESE INSTRUCTIONS
LISEZ ET GARDEZ CES INTRUCTIONS
GUARDE ESTAS INSTRUCCIONES
LEIA E GUARDE ESTAS INSTRUÇÕES
bar 14 USA
30-07-2001 13:51
Pagina 2
D
U
T
S
A B
C
E
R
Q
F
G
P
O
H
N
M
I
L
2
bar 14 USA
30-07-2001 13:51
Pagina 3
1
2
3
4
5
6
7
8
9
10
11
12
13
14
15
bar 14 USA
30-07-2001 13:51
Pagina 4
Description of the appliance
A Control panel
B Steam control knob
C Water tank
D Tank cover
E Power cord
F Steam and hot water nozzle
G “Cappuccino” nozzle (if supplied)
H Drip tray
I Boiler outlet
Description de l’appareil
A Panneau de commande
B Poignée ouverture vapeur
C Réservoir d’eau
D Couvercle
E Cordon électrique
F Tuyau vapeur/eau chaude
G Buse pour cappuccino (si prèvue)
H Egouttoir
I Douchette chaudière
Descripcíon del aparato
A Panel de mandos
B Perilla salida vapor
C Depósito de agua
D Tapa móvil
E Cable de alimentación
F Surtidor de vapor y agua caliente
G Boquilla para capuchino (si está prevista)
H Cubeta de goteo
I Salida de la caldera
L Pisón (si se incluye)
Descrição do aparelho
A Painel de controle
B Botão de controle do vapor
C Reservatório de água
D Tampa do reservatório
E Cabo de alimentação
F Tubo do vapor e da água quente
G Bocal para fazer “cappuccino” (se previsto)
H Bandeja
I Orifício de saída de água
L Calcador de pó (se previsto)
L
M
N
O
P
Q
R
S
T
U
Tamper (if supplied)
Measuring/pressing spoon
Filter holder
Filter locking lever
1-cup filter
2-cup filter
“OK” pilot lamp
Illuminated ON/OFF switch
Steam switch
Coffee/water delivery switch
L
M
N
O
P
Q
R
S
T
U
Pilon (si prèvu)
Doseur/pilon
Porte-filtre
Levier de blocage du filtre
Filtre 1 tasse
Filtre 2 tasses
Voyant “OK”
Interrupteur/voyant ON/OFF
Interrupteur vapeur
Interrupteur “écoulement café/eau”
M
N
O
P
Q
R
S
T
U
Medidor / pisón
Copa portafiltro
Palanca de fijación del filtro
Filtro para 1 taza
Filtro para 2 tazas
Piloto “OK”
Interruptor “ON/OFF” con piloto luminoso
Interruptor del vapor
Interruptor salida de café y agua
M
N
O
P
Q
R
S
T
U
Medidor
Porta-filtro
Alavanca bloca-filtro
Filtro para 1 xícara
Filtro para 2 xícaras
Indicador luminoso “OK”
Interruptor “ON/OFF” com indicador luminoso
Interruptor do vapor
Interruptor da distribuição do café e da
água
4
bar 14 USA
30-07-2001 13:51
Pagina 5
IMPORTANT SAFEGUARDS
When using electrical appliances, basic safety precautions should always be followed, including the
following:
• Read all instructions.
• Do not touch hot surfaces. Use handles and knobs.
• To protect against fire, electrical shock and personal injury, do not immerse cord, plug or
appliance in water or other liquid.
• Close supervision is necessary when any appliance is used by or near children.
• Unplug from the outlet when not in use and before cleaning. Allow to cool before fitting or
taking off parts, and before cleaning the appliance.
• Do not operate with a damaged cord or plug, or after the appliance malfunctions, or has been
damaged in any manner. Return the appliance to the nearest authorized service facility for examination, repair or adjustment.
• The use of accessory attachments or spare parts not recommended by the appliance manufacturer may result in fire, electrical shock or personal injury.
• Do not use outdoors.
• Do not let the cord hang over the edge of the table or counter, or touch hot surfaces.
• Do not place on or near a hot gas or electrical burner, or in a heated oven.
• Always attach plug to appliance first, then plug cord into the wall outlet. To disconnect, turn any
control to “off”, then remove plug from wall outlet.
• Do not use the appliance for other than the intended use.
SAVE THESE INSTRUCTIONS
SHORT CORD INSTRUCTIONS
-
-
5
A short power cord is provided to reduce risks resulting from becoming entangled in or tripping
over a longer cord.
Longer, detachable power supply cords or extension cords are available and may be used if
care is exercised in their use.
If an extension cord is used, the marked electrical rating should be at least as great as the electrical rating of the appliance. If the appliance is provided with 3- wire, grounding type cord, the
extension should be a GROUNDING TYPE 3 - WIRE CORD. The longer cord should be arranged
so that it will not drape over the counter-top or table top where it can be pulled on by children or
tripped over.
Your product is equipped with a polarized alternating current line plug (a plug having one blade
wider than the other). This plug will fit into the power outlet only one way. This is a safety feature. If you are unable to insert the plug fully into the outlet, try reversing the plug. If the plug
should still fail to fit, contact your electrician to replace your obsolete outlet. Do not defeat the
safety purpose of the polarized plug.
bar 14 USA
30-07-2001 13:51
Pagina 6
USE OF THE MACHINE
THIS MACHINE IS FOR HOUSEHOLD USE ONLY
When using for the first time
After unpacking the appliance, remove the plastic bag containing the accessories. All accessories (filterholder, measuring spoon, two filters) must be washed with detergent and lukewarm water, then rinsed
thoroughly. Then the internal circuit should be washed as follows:
Filling the reservoir
Remove the tank cover and pour fresh water into the tank (fig. 1). In some models the tank can be removed by lifting it upwards and, at the same time, lifting the intake tubes (fig. 2).
Rinse the tank and fill with cold water to the upper mark (MAX.), then replace the tank in its housing,
ensuring that the tubes are immersed in the water.
Pre-wash
- Insert the plug into the power socket (do not forget the safety warnings).
- Press the ON/OFF switch (S) and the delivery switch (U). The ON/OFF pilot lamp will light (fig. 3)
and the pump will switch on. Wait until water begins to flow from the boiler nozzle; then turn the
delivery switch off. After about 2 minutes, the pilot lamp will light (fig. 4) to indicate that the water in
the boiler has reached the correct temperature.
- Press the delivery switch again for 10/15 seconds, allowing water to flow from the boiler nozzle
(fig. 5). Then turn the delivery switch off.
- To ensure perfect pre-washing, repeat this procedure at least five or six times.
The machine is now ready for use.
Positioning the filter-holder
To insert the filter-holder in the machine, position it under the nozzle (fig. 6). Then push the filter holder
upwards and at the same time rotate it towards the right as far as it will go.
HOW TO MAKE A PERFECT ESPRESSO COFFEE
Some suggestions
- Always use fresh water and keep the tank clean.
- Before making coffee, always wait for the “OK” pilot lamp to light. (This lamp indicates that the
water in the boiler has reached the correct temperature for brewing coffee).
- Before making coffee, heat the cups, filter-holder and filters by holding them under a hot water tap
for a few moments.
Alternatively, proceed as follows to pre-heat:
- Turn the machine on by pushing the ON/OFF switch (S).
- Insert the 1 or 2-cup filter into the filter holder (fig. 7) and without adding coffee, insert the filter holder in the machine as described previously.
- Wait until the “OK” pilot lamp lights (fig. 4), then push the delivery switch (U) and allow the hot
water to heat the filter-holder, filter and cups.
When making coffee after using the machine to produce steam, it is advisable to
let the water flow from the boiler nozzle in order to bring the machine back to the
ideal temperature required to make a perfect cup of coffee.
Top-quality beans, correctly roasted and ground, will always produce the best coffee.
How to operate
- Switch on the machine by pushing the ON/OFF switch. The ON/OFF pilot lamp will light.
A few drop of water may escape from the boiler nozzle. This is perfectly normal.
-
Insert the 1- or 2-cup filter (fig. 7).
Place 1 or 2 measures of ground coffee in the filter. Spread the coffee evenly and press down lightly
with the measuring/pressing spoon.
6
bar 14 USA
-
-
30-07-2001 13:51
Pagina 7
If the machine features a tamper, this can be used to press the coffee more uniformly (fig. 8), which
gives a even better cup of espresso. Remove any excess of coffee from the filter rim.
Attach the filter-holder as described previously (fig. 6), remembering to rotate it towards the right as
far as it will go.
Place the pre-warmed cup or cups on the drip tray under the filter-holder spouts (fig. 9). When the
“OK” pilot lamp lights, press the delivery switch. When the desired quantity of coffee is obtained
(generally 20 - 30 seconds), turn the delivery switch (U) off.
Wait a few seconds before detaching the filter-holder by turning the handle from right to left.
To remove the used coffee grounds, retain the filter in position using the special lever fitted to the
handle; turn the filter-holder upside down and knock the coffee grounds out (fig. 10).
If the machine is not used for a long period of time, switch it off and drain the water tank.
When starting the machine again, carry out a pre-wash as described previously.
HOW TO MAKE AN AUTHENTIC ITALIAN CAPPUCCINO
-
-
-
Use a deep metal container, preferably of small diameter. Do not fill to more than 1/3rd, otherwise
the milk may overflow when it boils.
Switch the machine on by pressing the “ON/OFF” switch.
Press the steam switch (T). After about 3 minutes, the OK pilot lamp (fig. 11) lights to indicate that the
machine has reached the correct temperature for the generation of steam. Immerse the steam nozzle
in the milk and turn the steam control knob counterclockwise. Adjust the position of the knob to regulate the quantity of steam delivered by the nozzle.
When using the steam function, a few drops of water may escape from the nozzle: this is completely
normal. However, care should be taken to avoid scalding.
Immerse the steam outlet nozzle deeply into the milk in order to heat it (fig. 12).
Lower the container until the nozzle skims the surface of milk (fig. 13), immersing the nozzle slightly
from time to time for a few seconds.
Note: For a few moments, the steam will come out mixed together with a little water. In order to
obtain drier steam, hold the steam knob open for a few seconds.
If your coffee machine is equipped with a cappuccino nozzle, immerse the nozzle into the milk down
to the mark on the “cappuccino” nozzle (fig. 14).
Note: Immediately after use, unscrew and rinse the “cappuccino” nozzle to remove any milk deposit
(fig. 15). From time to time, use a pin to clean the holes in the cappuccino nozzle.
PRODUCING STEAM
Steam is useful for heating liquids such as tea, soup, etc.
Operating instructions
- Press the ON/OFF switch (S) and the steam switch (T).
- After a few minutes, the “OK” pilot lamp lights to indicate that the machine has reached the correct
temperature for the selected function (in this case, the making of steam).
- Immerse the steam nozzle in the liquid to be heated and turn the steam control knob counterclockwise. Adjust the position of the knob to regulate the quantity of steam delivered by the nozzle.
- When the liquid is hot, completely close the steam knob and turn the ON/OFF switch (S) and thesteam switch (T) off.
- Clean the steam nozzle immediately after use.
- For a few moments, the steam will come out mixed together with a little water. In order to obtain drier
steam, hold the steam knob open for a few seconds.
If you have not used the machine to make coffee for a long period of time, you may have difficulty producing steam.
7
bar 14 USA
30-07-2001 13:51
Pagina 8
If so proceed as follows:
- close the steam control knob;
- press the delivery switch allowing water to flow from the boiler nozzle;
- turn the delivery switch off and repeat operations previously described.
Producing hot water
(to prepare tea, hot chocolate, consommé, etc.)
- Press the ON/OFF switch (S).
- Wait until the “OK” pilot lamp lights (fig. 4).
- Place a cup or glass under the steam nozzle.
- Press the delivery switch and, at the same time, open the steam control knob.
- Hot water will flow from the nozzle. As soon as the desired quantity of hot water has been obtained,
close the knob and turn the delivery switch off.
Always remember to fill the water tank.
CLEANING AND MAINTENANCE
-
-
Before carrying out any cleaning or maintenance operations, switch the machine off, remove the
plug from the socket and leave the machine to cool.
Do not use solvents, detergents or abrasive products to clean the machine. A soft damp cloth is sufficient.
Clean the filter holder, filters, drip tray and water tank regularly.
Do not wash the machine - remember that it is an electrical appliance.
-
Never wash components or accessories in a dishwasher.
-
DE-SCALING
If you live in a hard water area, minerals and calcium found in the water will accumulate and affect the
operation of the machine. Approximatyely every 1-2 months (depending on the hardness of the water in
your area), your De’Longhi espresso maker should be cleaned with a commercial de-scaling agent for
coffee makers as follows:
- Fill the water tank with water and mix in the de-scaling agent.
- Operate the appliance, as if making coffee, until the tank is empty, then rinse thoroughly.
- Repeat this procedure 2 - 3 times with fresh water only in order to remove any residual de-scaling
agent.
Note: This operation may be dangerous if other substances are used.
8
bar 14 USA
30-07-2001 13:51
Pagina 9
TROUBLESHOOTING
PROBLEM
SOLUTION
• Machine does not work and switch light does
not come on
• Switch to “ON” position
• Plug in
• Coffee does not come out
• Check that the coffee/water delivery switch
is depressed
• Fill the water tank
• Grind coffee more coarsely
• Tamp coffee lightly
• Reduce the quantity of coffee in the filter
• Check that the water tube is correctly positioned
• Open the steam control knob and press the
coffee/water delivery switch.
• Unit may need de-scaling. Directions for
descaling are on page 7.
• Coffee comes out too quickly
• Use finer ground coffee
• Increase the quantity of coffee in the filter
• Tamp the coffee firmly
• Coffee comes out too thick or too slowly
• Use more coarsely-ground coffee
• Reduce the quantity of coffee in the filter
• Coffee comes out from the filter holder edge
• Insert the filter holder correctly and pull to
the right
• Reduce the quantity of coffee in the filter
• No crema on coffee
• Use fresh, good-quality coffee
• Grind the coffee correctly
• Increase the quantity of coffee in the filter
• Coffee in the cup is cold
• Rinse the filters, filter-holder and cups in hot
water before making espresso coffee
• The milk does not foam
• The air holes in the cappuccino jet frother
are obstructed. Use a needle to clean the
air-holes
• Use fresh low-fat milk
• Check that steam comes out of the tube
• No steam is produced
•
•
•
•
• Pump makes loud noises
• No water in the water tank
• Water tank not inserted correctly
• Water intake tube kinked
9
Check that the switch is in position “ON“
Check that the “OK” lamp is lit
The steam knob has not been opened fully
No water in the water tank or in the boiler
bar 14 USA
30-07-2001 13:51
Pagina 10
Limited Warranty
What Does This Warraty Cover? We warrant each Espresso Coffee Machine to be free from defects in material and workmanship. Our obligation under this warranty is limited to replacement or repair, free of charge at our
factory or authorized service centers, of any defective part or parts there of other than parts damaged in transit,
which shall be returned to us, transportation prepaid. This warranty shall apply only if the Espresso Coffee Machine
is used in accordance with the factory directions which accompany it.
How Long Does The Coverage Last? This warranty runs for one year from the date of delivery and applies
only to the original purchaser.
What Does This Warranty Not Cover? This warranty does not cover defects or damage of the Espresso Coffee Machine which result from repairs or alterations to the machine outside our factory or authorized service centers, nor shall it apply to any Espresso Coffee Machine which has been subject to abuse, misuse, negligence or
accidents. Also, consequential and incidental damages resulting from the use of this product or arising out of any
breach of contract or breach of this warranty are not recoverable under this warranty. Some states do not allow the
exclusion or limitation of incidental or consequential damages, so the above limitation may not apply to you.
How Do You Get Service? If repairs become necessary or spare parts are needed, plase write to:
De’Longhi America Inc.
Park 80, West Plaza One, 4th floor
Saddle Brook NJ 07663
Tel. No. 1-800-322-3848
or visit our internet site www.delonghiusa.com
The above warranty is in lieu of all other express warranties and representations; All implied warranties are limited
to the applicable warranty period set forth above. This limitation does apply if you enter into an extended warranty
with De’Longhi. Some states do not allow limitations on how long an implied warranty lasts, so the above exclusions
connection with the sale or use of its Espresso Coffee Machine.
How Does State Law Apply? This warranty gives you specific legal rights, and you may also have other rights
which vary from state to state.
GARANTIE
Nous garantissons que tous les APPAREILS ELECTRIQUES DE’ LONGHI sont exempts de tout défaut
de matériaux et de manufacture. Notre obligation sous cette garantie est limitée au remplacement ou
à la réparation gratuite dans notre usine de toutes les pièces défectueuses autre que les pièces
endommagées durant le transport, qui nous seront retournées - transport pré-payé - en dedans d’un
an après la livraison à l’acheteur - utilisateur. Cette garantie ne sera applicable que si l’appareil a
été utilisé selon les instructions du fabricant qui accompagnent l’appareil, et sur courant alternatif
(AC). Cette garantie remplace toutes les autres garanties et représentations, exprimées ou impliquées, et toute autre obligation ou responsabilité de notre part. Nous n’autorisons aucune autre personne ou compagnie à assumer pour nous une quelconque responsabilité en relation avec la vente
ou l’utilisation de nos appareils.
Cette garantie ne s’appliquera ni aux appareils qui seront réparés ou endommagés hors de notre
usine, ni aux appareils qui auront été sujets à une mauvaise utilisation, à une négligence ou à un
accident.
Si des réparations ou des pièces de rechange sont nécessaires, vous êtes priés d’écrire à:
De’Longhi America Inc.
Park 80, West Plaza One, 4th floor
Saddle Brook NJ 07663
Tel. No. 1-800-322-3848
ou bien contacter notre site internet www.delonghiusa.com
10