1
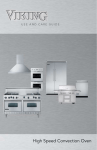
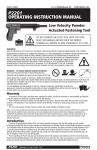
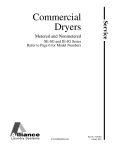
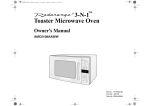
Convection oven Instructions for use and recipes DESCRIPTION A B C D E F G H I P L @@@@@@@@@@@@@@@@@@ ÀÀÀÀÀÀÀÀÀÀÀÀÀÀÀÀÀÀ ,,,,,,,,,,,,,,,,,, yyyyyyyyyyyyyyyyyy @@@@@@@@@@@@@@@@@@@ ÀÀÀÀÀÀÀÀÀÀÀÀÀÀÀÀÀÀÀ ,,,,,,,,,,,,,,,,,,, yyyyyyyyyyyyyyyyyyy @@@@@@@@@@@@@@@@@@@@ ÀÀÀÀÀÀÀÀÀÀÀÀÀÀÀÀÀÀÀÀ ,,,,,,,,,,,,,,,,,,,, yyyyyyyyyyyyyyyyyyyy @@@@@@@@@@@@@@@@@@@ ÀÀÀÀÀÀÀÀÀÀÀÀÀÀÀÀÀÀÀ ,,,,,,,,,,,,,,,,,,, yyyyyyyyyyyyyyyyyyy ,,,,,,,,,,,,,,,,,, @@@@@@@@@@@@@@@@@@ ÀÀÀÀÀÀÀÀÀÀÀÀÀÀÀÀÀÀ yyyyyyyyyyyyyyyyyy ,,,,,,,,,,,,,,,,,,, @@@@@@@@@@@@@@@@@@@ ÀÀÀÀÀÀÀÀÀÀÀÀÀÀÀÀÀÀÀ yyyyyyyyyyyyyyyyyyy ,,,,,,,,,,,,,,,,,,,, @@@@@@@@@@@@@@@@@@@@ ÀÀÀÀÀÀÀÀÀÀÀÀÀÀÀÀÀÀÀÀ yyyyyyyyyyyyyyyyyyyy ,,,,,,,,,,,,,,,,,,, @@@@@@@@@@@@@@@@@@@ ÀÀÀÀÀÀÀÀÀÀÀÀÀÀÀÀÀÀÀ yyyyyyyyyyyyyyyyyyy yyyyyyyyyyyyyyyyyyy ÀÀÀÀÀÀÀÀÀÀÀÀÀÀÀÀÀÀÀ @@@@@@@@@@@@@@@@@@@ ,,,,,,,,,,,,,,,,,,, @@@@@@@@@@@@@@@@@@ ÀÀÀÀÀÀÀÀÀÀÀÀÀÀÀÀÀÀ ,,,,,,,,,,,,,,,,,, yyyyyyyyyyyyyyyyyy yyyyyyyyyyyyyyyyyyy ÀÀÀÀÀÀÀÀÀÀÀÀÀÀÀÀÀÀÀ @@@@@@@@@@@@@@@@@@@ ,,,,,,,,,,,,,,,,,,, yyyyyyyyyyyyyyyyyyy ÀÀÀÀÀÀÀÀÀÀÀÀÀÀÀÀÀÀÀ @@@@@@@@@@@@@@@@@@@ ,,,,,,,,,,,,,,,,,,, yyyyyyyyyyyyyyyyyyy ÀÀÀÀÀÀÀÀÀÀÀÀÀÀÀÀÀÀÀ @@@@@@@@@@@@@@@@@@@ ,,,,,,,,,,,,,,,,,,, ,,,,,,,,,,,,,,,,,, @@@@@@@@@@@@@@@@@@ ÀÀÀÀÀÀÀÀÀÀÀÀÀÀÀÀÀÀ yyyyyyyyyyyyyyyyyy yyyyyyyyyyyyyyyyyyy ÀÀÀÀÀÀÀÀÀÀÀÀÀÀÀÀÀÀÀ @@@@@@@@@@@@@@@@@@@ ,,,,,,,,,,,,,,,,,,, yyyyyyyyyyyyyyyyyyyy ÀÀÀÀÀÀÀÀÀÀÀÀÀÀÀÀÀÀÀÀ @@@@@@@@@@@@@@@@@@@@ ,,,,,,,,,,,,,,,,,,,, yyyyyyyyyyyyyyyyyyy ÀÀÀÀÀÀÀÀÀÀÀÀÀÀÀÀÀÀÀ @@@@@@@@@@@@@@@@@@@ ,,,,,,,,,,,,,,,,,,, M N O Q A UPPER HEATING ELEMENT B OVEN LIGHT (not for all models) C CONTROL PANEL D D THERMOSTAT DIAL E ON/OFF AND TOAST PROGRAMMING DIAL F FUNCTION SELECTOR DIAL G PILOT LIGHT H LOWER HEATING ELEMENT I E CRUMB TRAY L COOKIE SHEET (two provided) M BROILING RACK N SHALLOW PAN O WIRE SHELF (two provided) F P DEHYDRATOR KIT (optional) Q HANDGRIP 2 G IMPORTANT SAFEGUARDS When using electric appliances basic safety precautions should always be followed, including the following: 1) Read all instructions. 2) Do not touch hot surfaces. Use handles, dials and hot pads. 3) To protect against electrical shock, do not place oven in or under water. See instructions for cleaning. 4) Close supervision is necessary when any appliance is used by or near children. 5) Unplug from outlet when not in use and before cleaning. To disconnect the appliance, turn the ON/OFF dial to OFF and the thermostat dial to “●”. Then unplug the cord from the wall outlet. Allow to cool before putting on or taking off parts and before cleaning the appliance. 6) Do not operate any appliance with a damaged cord or plug or after the appliance malfunctions, or has been damaged in any way. Return appliance to the nearest authorized service facility for examination, repair or adjustment. 7) The use of accessory attachments not recommended by the appliance manufacturer may cause injuries. 8) Do not use outdoors. 9) Do not let cord hang over edge of table or counter, or touch hot surfaces. 10) Do not place on or near a hot gas or electric burner. 11) Extreme caution must be used when moving an appliance containing hot oil or other hot liquids. 12) If the plug gets hot, please call a qualified electrician. 13) Do not use this appliance for other than intended use. 14) Use extreme caution when removing the shallow pan (N) or disposing of hot grease. 15) Do not clean oven with metal scouring pads. Pieces can break off the pad and touch electrical parts creating a risk of electric shock. 16) To assure safe operation, oversized utensils or food must not be inserted into the oven. 17) A fire may occur if this appliance is covered or touching flammable material, including curtains, draperies, walls, etc. when in operation. 18) Condensation and a grease deposit may form around the door and the air and steam outlet grilles. This is normal. 19)CAUTION: Never leave the oven unattended when in use (expecially when broiling and toasting). 20) Extreme caution should be exercised when using containers other than ovenproof metal, glass or ceramic. 21) Do not store any materials other than the manufacturer’s recommended accessories in the oven when not in use. 22) Do not place any of the following materials in the oven: paper, cardboard, plastic and the like. 23) Do not cover crumb tray or any part of the oven with metal foil; this can cause overheating of the oven. Use aluminum foil on or under food only as directed in the appliance instructions. THIS PRODUCT IS FOR HOUSEHOLD USE ONLY SAVE THESE INSTRUCTIONS • Your product is equipped with a polarized alternating current line plug (a plug having one blade wider than the other). This plug will fit into the power outlet only one way. This is a safety feature. If you are unable to insert the plug fully into the outlet, try reversing the plug. If the plug should still fail to fit, contact your electrician to replace your obsolete outlet. Do not defeat the safety purpose of the polarized plug. • Plug the cord into a 120 volt AC outlet. • The cord length of this product has been selected to reduce the possibility of tangling in or tripping over a longer cord. If more cord length is needed, an extension cord may be used. It should be rated no less than 15 amps., 120 volts and have Underwriters Laboratories/CSA listing. • A six feet long, 15 amp. extension cord may be purchased from your local authorized service facility. When using a longer cord, be sure not to let it drape over the working area or dangle where someone could accidentally pull or trip over it. • Handle the cord carefully for longer life; avoid jerking or straining the cord at the plug and appliance connections. • Note: Initial start up operation may result in minimal smell and smoke (about 15 min.). This is normal. It is due to the protective substance on heating elements which protects them from salt effects during shipping from factory. 3 SUMMARY OF OPERATION PROGRAM CONVECTION OVEN COOKING FUNCTION DIAL FAN/BAKE DEH TEMPERATURE DIAL POSITION OF WIRE RACK/ ACCESSORIES Ideal for meat, pizza, cakes in general and food which need to be crispy on the surface (as gratined dishes). Roast meats and poultry will cook faster. Use of a meat thermometer will help avoid overcooking. 200° - 450°F Double level Single level with cookie sheets TRADITIONAL OVEN COOKING BROILING AND TOP BROWNING TOASTING 4 BAKE BROIL TOAST 200° - 450°F TOAST/BROIL TOAST/BROIL NOTES/TIPS Baked foods (cakes, pies, cookies, etc.) may require a lower temperature to prevent overbrowning. Select one or two wire shelves with cookies sheets depending upon the quantity. Bake casseroles, fruit desserts, fish, stuffed vegetables, puddings and other moist foods that don’t require browning and crisping. Always use the broiling rack set in the shallow pan. Place it on the wire shelf in position that puts the food about two inches from the top element, more for thick food such as chicken. Foods such as hamburghers, steaks, kebabs, sausages are to be placed directly on the broiling rack. Use the broil settings to top-brown open-face sandwiches, cheese toppings, hors d’ouevres. Set the ON/OFF dial to the color desired. Some breads, muffins, etc. will take longer than others. Reset dial if results are too light. Place the bread to be toasted following instruction on page. 6. PROGRAM KEEPING WARM FUNCTION DIAL FAN/BAKE DEH POSITION OF WIRE RACK/ ACCESSORIES KEEP WARM Be sure to keep dial at this position. Only the fan will operate. DEFROSTING DEHYDRATING TEMPERATURE DIAL FAN/BAKE DEH NOTES/TIPS Turn to this setting to keep hot food warm. Do not hold food more than an hour or reheat cold food. If not hot enough for serving turn temperature dial up. To thaw frozen food in freezer packaging place it on wire shelf or on shallow pan to catch any juices. Do not try to thaw large roasts or allow any food to overthaw (see page. 10). Place prepared food on the dehydrator kit (if provided) without covering shelves with plastic food wrap. The fan and low heat will dry food in 8 to 20 hours. Consult a book on drying foods for treatment of various foods. DEH CORRECT WIRE SHELF POSITION slot 2 slot 1 ONLY for dehydrating (1) (2) (3) Note: the recipes refer to the wire rack positions as numbered above. 5 INSTALLATION 1) Check that the appliance has not suffered any damage due to transportation. 2) Place the appliance on a flat, stable surface out of the reach of children (the glass door becomes very hot while the oven is in operation). 3) Before using this appliance, move it two to four inches away from the wall or any object on the counter top. Remove any object that may have been placed on top of the appliance. Do not use on surfaces where heat may be a problem. 4) The oven light B (optional) is always on when the oven is on. IMPORTANT TIPS AND TECHNIQUES POSITIONING THE WIRE SHELVES: There are two slots on the sides of the oven. Slide one or both shelves into these positions. The upper shelf can be turned over, allowing three different levels. The recipes will suggest the best arrangement (1 to 3; see page 5) where necessary for best results. The shelf reversed in slot 1 must be used only with the dehydrator kit P (optional). ACCESSORIES AND UTENSILS The shallow pan is designed to permit the circulating heat to surround the food (except for the bottom surface) more effectively. Use it as you would any shallow baking or roasting pan. Other utensils you own can be used provided that an inch or so of space remains open to allow circulation of the fan-forced heat. Casserole covers should not be used and glass ovenware should not be placed closer than two inches from the upper heating element. The cookies sheets provided must also be centered on the shelf. When using both sheets on two wire shelves, place wire shelves in position 1 and 3. Cookies sheet Shelf Use handgrip to bring the wire rack out of the oven when it is hot. PREHEATING THE OVEN When you turn the oven on (except in the DEFROST mode) the pilot light will light until the oven has reached the set temperature. It will cycle on and off during cooking and the heating element (s) will glow red or turn black as they respond to the thermostat setting. This is normal. Preheating generally takes 5 to 8 minutes depending on the temperature setting. It is not necessary to preheat for long-cooking foods such as roasts or casseroles. USE ALUMINUM FOIL Do NOT allow foil to touch sides of the oven or the heating elements. Foil can be used to cover foods or the shallow pan (for easier clean-up) provided foil is tucked in securely around the food or the edges of the pan or dish. DO NOT cover the broiling rack as this can cause accumulated grease to catch fire. DO NOT cover the crumb tray (I). Unlike an ordinary toaster-oven, the DE’LONGHI features seven functions: convection and traditional baking and roasting, toasting, broiling, keeping food warm, defrosting frozen foods and even dehydrating sliced fruits for nutritious snacks. PLEASE READ AND KEEP THIS BOOKLET HANDY. THE IDEAS AND INSTRUCTIONS WILL HELP YOU MAKE FULL USE OF THE OVEN. 6 CONVECTION AND TRADITIONAL COOKING GENERAL GUIDELINES With convection cooking, a fan gently circulates the heated air within the oven, providing a more even temperature around the food. This system, used in many large commercial ovens for years, produces more even browning and cooking of baked foods, meats and poultry. The forced air also displaces the layer of cold air surrounding the food, allowing faster cooking in many cases or a lowering of temperature. In general, meats and poultry can be cooked in less time (a meat thermometer will help to prevent overcooking). Cakes, pies, cookies, etc. can be baked at a lower temperature (see charts and recipes). Traditional cooking is used when browning and crisping are less important or undesirable. Use it, following conventional recipes, for casseroles, stuffed vegetables, fish, lasagna, fruit tarts, cheesecakes and other moist mixtures. CONVECTION BAKING OF CONVENIENCE FOODS Many convenience foods can be successfully baked or heated by convection on the FAN/BAKE setting. In general, follow the package directions for temperature and time. However, lower the temperature by 25°F. for more even cooking of larger items, frozen foods (except waffles and pancakes) and packaged casserole mixtures. There is such a wide choice of convenience foods on the market and variations in packaging, quantities and initial temperatures (frozen, refrigerated and shelf temperature) that it’s best to follow the package instructions. Check the food 5 to 10 minutes before the time is up; you may need to adjust the time and/or temperature for best results. Here are some tips for different types of convenience foods: - If directions call for placing the food container on a metal pan or cookie sheet to avoid spills or to aid even cooking, use the shallow pan provided. Use it or the cookie sheets provided for foods, such as rolls, cookies, turnovers or frozen French fries, breaded fish or chicken pieces, that are placed directly on a pan or cookie sheet. - Some frozen foods come in “oven-proof” plastic or paper containers which can be cooked in a microwave oven and, within limits, a conventional oven. Be sure to follow directions for maximum baking temperature. The container can melt or scorch if too high a temperature is used. To be on the safe side, set the oven 25°F. lower than the recommended temperature. - When baking packaged mixtures (such as scalloped potatoes, macaroni and cheese, brownies, corn bread, coffeecake and cake mixes) check the package directions for recommended sizes of pan, casserole or dish and the proper baking times for each. A 9-inch round or an 11- by 7 - by 11/2 inch rectangular pan will fit in the oven with room on all sides for air circulation. Layer cake mixes can be baked one layer at a time in a 8- or 9-inch round pan or all of the batter in a 3-inch deep 9-inch round bundt or spring-form pan. Tips for convection baking and roasting To bake: - Turn thermostat dial (D) to the desired oven temperature - Turn the ON/OFF and toast programming dial (E) clockwise to position ON - Turn the function selector dial (F) to FAN/BAKE/DEH for convection cooking and to BAKE for traditional cooking. - When the cooking is finished, turn the thermostat dial (D) to the “●” position and the ON/OFF dial (E) to “OFF” position. 7 TEMPERATURE AND TIME FOR TYPICAL FOODS (convection baking and roasting) The suggested temperature and times will vary depending on the temperature of the food placed in the oven, the quantity and personal preference. Times given for meat and poultry are for refrigerator temperature. Add five minutes for preheating the oven. FOOD TEMPERATURE SETTING APPROX. TIME NOTES AND TIPS Whole chicken 33,5 lbs. Unstuffed. 350°F 75 min. or until internal temperature of 175°F in thigh and breast Roast in shallow pan with broiling rack inverted, with shelf in position. 1 Pork Loin or Rib Roast, 2 - 4 lbs. 325°F 90 min. or until internal Roast as for whole chicken. temperature of 170°F is Broiling rack may be in its higher reached. position if oven space allows. Pork Baby Back Ribs 300°F for 20 min. then 1.75 - 2 lbs. in 6 - to BROIL for 30 min. 10 - inch strips. Beef Sirloin or Rib Roast 3 - 5 lbs, boned. Total time 50 min. or until brown and very tender. Use pan without rack, lined with foil, on shelf position 1. See recipe to follow for full directions. 350°F 20 min./lb. for rare Have roast tied for even cooking. 25 min./lb for medium Use broiling rack in low or high 30 min./lb. well position as oven space allows. Cornish Hens 1.5 lbs. each, two split into four halves. 350°F Roast on pan with broiling rack 45 - 50 min. or until tenin high position, skin side up. der and juice is clear Brush with orange marmalade or when pierced with fork. honey. Turn and brush several times until done. Baking Potatoes 1 to 4 large 450°F Pizza, homemade. Cakes: Layer, Sheet cake or Loaf cake. Pies: Fruit, 9- inch double crust. Cookies: Drop, Rolled and Cut, Sliced, Formed. Biscuits: Drop or Rolled and Cut Brownies, Bar, Cookies 425°F 300°F to 325°F 350°F to 375°F 300°F to 350°F 350°F to 375°F 300 to 325°F 45 - 50 min. or until fork-tender. Wash and pierce raw potatoes with fork. Rub skins with salad oil if desired. Bake on wire shelf in position 1 or 2. 20 - 25 min. depending on size and topping. Place pizza pan or stone on wire shelf in position 1. Bake until bubbling hot and crust crisp. Place metal or ovenglass dish on Follow traditional recipe wire shelf in position 1 or 2. timing but lower tempeCheck for doneness 5 - 10 min. rature by 25 to 50°F. before time is up. Follow traditional recipe timing but lower tempe- Place 1 - 2 inches apart on 1 or 2 cookie sheets. For 1 sheet rature by 25 to 50°F. For cookies or biscuits place wire shelf in position 2. For that take longer than 15 2 sheets place shelves in 1 and 3 min. reversing the posipositions. Grease sheets if the tion of the 2 sheets at recipe directs. Remove promptly half the baking time will to cooling rack. aid in more even results. Follow traditional recipe timing but lower temperature by 25 to 50°F. Use 7x11 inch or 8- or 9 inch square pan or oven-glass dish. Place wire shelf in position 1. Check for doneness 5 - 10 min. before time is up. Cut while still warm. Let cool 5 - 10 min. to firm up before removing from pan or dish. The chart and recipes cover various types of food. You can adapt your own favorite foods and recipes by following the directions for similiar foods. 8 BROILING TIPS FOR BROILING TYPICAL FOODS - Set both the function and temperature dials to position BROIL. - Turn the ON/OFF and toast programming dial (E)clockwise to position ON. - When the function and the temperature dials are set to BROIL only the top element heats at full power. Be sure to leave the door open to the stop position (as shown in the figure below). - Preheat 5 to 10 minutes on BROIL. - Trim excess fat from meat. Dry meat, fish and poultry surfaces with paper towel. - Place the food on the broiling rack set in the shallow pan. Position wire shelf as shown in the “Summary of operation” (see page 4), so that food will be about 2 inches from top heating element. Thick foods such chicken pieces should be 3 - 4 inches from the element. - The broiling rack can be inverted if necessary, but do not attempt to broil without the rack: the broiling rack shields the fat drippings from direct heat, reducing spattering, smoking and possible flaming. Always use the shallow pan when broiling any fatty foods. - For easier clean-up, the shallow pan can be lined with foil. Be sure not to cover the broiling rack or let foil extend beyond the edges of the pan. - Be careful when turning food or removing the pan. Use hot pads and avoid spilling drippings. - To top-brown casseroles with crumb or cheese toppings, place the dish directly on the wire shelf 2 - 3 inches from the top element. and watch carefully to avoid burning the toppings. NOTE: Oven-glass dishes should not be exposed to direct broiler heat. When broiling is finished, turn the ON/OFF dial to the “OFF” position and the thermostat dial to the “●” position. SUGGESTED BROILING TIMES FOOD WEIGHT OR APPROX. TIME THICKNESS (Turn at half time) Beef Sirloin, Porterhouse 1- 1 1/2 in. Steak Rare 12 - 15 min. Medium 16 - 18 min. Beef Flank Steak, Filet 3/4 - 1 in. Rare 10 - 12 min. Medium 13 - 16 min. Hamburger 1 in. Medium-well 15 - 18 min. Pork Chop 3/4 - in. Well 18 - 22 min. Fish Fillets, Steak (See note) 1/2 - 1 in. 10 - 16 min. Chicken Piece, Broiler3 - 4 lb. fryer 40 - 50 min. until juices run clear when fork-tested and no pink when cut. Bacon, Sausage, Links Up to capacity of broil10 - 15 min. for crisp bacon, well-done sausage. rack. or Patties Since fish is non-fatty it can be broiled directly on shallow pan, broil until it flakes easily with a fork. Thin fillets need not to be turned. 9 TOASTING With the wire shelf in position 2 you can toast up to 6 slices of bread, muffin halves, bagels, frozen waffles and pancakes. For toasting, place the bread and follow the instruction on the drawing below: 1 slice 2 slices 4 slices - The toast programming dial can be set clockwise for light, medium or dark toast or any shade in between. - Set the thermostat dial (D) to TOAST/BROIL and the function selector dial (F) to pos. TOAST. - When the time is up the oven shuts off and a signal bell rings. As you use the oven, the best settings for favorite breads will become familiar. KEEP WARM SETTING - Set the thermostat dial (D) to the KEEP WARM position. Set the ON/OFF and toast programming dial clockwise to pos. ON. Set the function selector dial (F) to pos. FAN BAKE/DEH. When food has finished cooking it can be held at this setting on the temperature control for up to an hour. Any longer can dry out the food and risks spoilage. If the oven set to 200°F seems too hot, to obtain a lower serving temperature turn the thermostat dial back to the KEEP WARM mark. Do not attempt to hold food longer or to rewarm cold food at this setting. When finished, turn the ON/OFF dial to the “OFF” position and the thermostat dial to the “●” position. DEFROSTING Portions and pieces of raw meat, poultry and fish, frozen soups, pastry, fruit or leftovers will thaw more quickly on this setting than on a counter or in the refrigerator. - Set the function selector dial (F) at the defrost symbol and the thermostat dial to the position “●”. - Turn the ON/OFF and toast programming dial clockwise to pos. ON. DO NOT attempt to speed thawing by turning to DEH or KEEP WARM. Thaw only pieces or portions small enough to thaw in an hour or less and do not let food come to room temperature. Thawed food held too long or at a warm temperature can cause serious illenss. Large amounts of food should be defrosted in a refrigerator. 10 6 slices DEHYDRATING Slices of apples, pineapple, pears, peaches or bananas, placed directly on the dehydrator kit (if supplied), will dry in 8 to 20 hours in the gently circulating warm air. Time will depend on the moisture in the fruit. Herbs can also be dried. However, the limited quantity of vegetables that can be dried at one time may not be worth your time and attention. Consult a book on dehydrating food for specific directions as to times, temperature, pretreatment and storage of dried foods. FOR DEHYDRATING: - Set both upper and lower dials to DEH position. - Set the ON/OFF and toast programming dial to pos. ON. - Always leave the door open to the stop position (as shown in figure). - yyyyyyyyy yyyyy ,,,,, ÀÀÀÀÀÀÀÀÀ ÀÀÀÀÀ @@@@@@@@@ @@@@@ ,,,,,,,,, @@@@@@@ @@@@@@@@@@@ ÀÀÀÀÀÀÀ ÀÀÀÀÀÀÀÀÀÀÀ ,,,,,,, ,,,,,,,,,,, yyyyyyy yyyyyyyyyyy yyy yyyyyyy ,,, ÀÀÀ ÀÀÀÀÀÀÀ @@@ @@@@@@@ ,,,,,,, yyyy yyyyyyyy ,,,, ÀÀÀÀ ÀÀÀÀÀÀÀÀ @@@@ @@@@@@@@ ,,,,,,,, yyyyyyyyy yyyyyy ,,,,,, ÀÀÀÀÀÀÀÀÀ ÀÀÀÀÀÀ @@@@@@@@@ @@@@@@ ,,,,,,,,, @@@@@@@@@@ @@@@@@@ ÀÀÀÀÀÀÀÀÀÀ ÀÀÀÀÀÀÀ ,,,,,,,,,, ,,,,,,, yyyyyyyyyy yyyyyyy yyy yyyyyyy ,,, ÀÀÀ ÀÀÀÀÀÀÀ @@@ @@@@@@@ ,,,,,,, yyyyy ,,,,, ÀÀÀÀÀ @@@@@ @@@@@@ ÀÀÀÀÀÀ ,,,,,, yyyyyy @@@@@@@@@@@ @@@@@@@ ÀÀÀÀÀÀÀÀÀÀÀ ÀÀÀÀÀÀÀ ,,,,,,,,,,, ,,,,,,, yyyyyyyyyyy yyyyyyy @@@@@@@@@@@ @@@@@@@ ÀÀÀÀÀÀÀÀÀÀÀ ÀÀÀÀÀÀÀ ,,,,,,,,,,, ,,,,,,, yyyyyyyyyyy yyyyyyy Prepare food and use the dehydrating kit DE’LONGHI as follows: insert wire shelf, inverted in the slot 1; put the dehydrator kit on the wire shelf (see figure). Dehydrating kit Slot 1 wire shelf reversed - When finished, turn the ON/OFF dial to the “OFF” position and the thermostat dial to the “●” position. - After use let the oven cool and unplug the appliance cord before cleaning. This unit has been designed and engineered with your safety in mind. To assure maximum safe operation, keep unit clean free of grease and build up of food particles. Wash the pan, broiler rack and wire shelves in hot, sudsy water or in a dishwasher. Remove stubborn soil with a scouring pad. Do not use steel wool pads as bits of metal may remain and touch electrical parts or contaminate the food. Slide the crumb tray out from the bottom of the oven. Wash by hand. If heavily soiled from a spill, soak the tray in hot suds and scour lightly if necessary to avoid scratching. To clean the inside walls use a damp cloth and a mild liquid soap solution. Never use harsh abrasives, corrosive products or spray detergents. Clean the glass door with a damp sponge or cloth. If necessary use a glass cleaner. Spreading a damp paper towel over the inside of the door for a few minutes will make cleaning easier. Clean the outside finish of the oven with a damp sponge. Never use an abrasive cleaner as it will damage the finish. Dry wet surfaces with a dry cloth after cleaning. CARE AND CLEANING - - INTERIOR LIGHT (not for all models) It remains on during all cooking operations. To replace a burned out bulb unscrew the protective glass cover. Remove the bulb and replace it with the same type, a high-temperature appliance bulb. 11 RECIPES BAKED GNOCCHI ALLA ROMANA ● ● ● ● 4 1 8 1 Traditional BAKE 400°F cups milk ● 2 eggs, slightly beaten teasp. salt ● 1 1/2 cups semolina tablesp. melted butter or margarine cup freshly grated Parmesan cheese In a saucepan, bring milk, and salt to a low boil. Reduce heat, then slowly pour in semolina in a thin stream, stirring constantly with a spoon or wire whisk. Continue cooking and stirring until semolina is very thick, about 15 minutes. Remove from heat and add 3/4 cup Parmesan cheese, eggs and 2 tablesp. melted butter. Butter a large shallow baking sheet and spread the thick mixture evenly to about 1/4 inch thick. Cool until firm. Preheat oven on BAKE at 400°F with wire shelf in position 1. With a 1 1/2 inch biscuit cutter or glass dipped in cold water cut into rounds and arrange them in a buttered 9 inch pan or dish in one layer, overlapping circles slightly. Top with remaining melted butter and cheese. Bake 20 - 30 minutes until lightly browned and crusty. If necessary, turn oven to BROIL for several minutes to brown. LASAGNA Traditional BAKE 350°F ● 3/4 lb. ground beef or beef, pork, veal combination BARBEQUED RIBS Convection FAN/BAKE 300°F. Then BROIL ● 1 1/2 - 2 lbs. back ribs cut in 2-rib portions ● 1/2 teasp. salt ● 1/4 teasp. ground ginger ● 1/3 cup water or beer ● 1 teasp. prepared mustard ● 1/4 teasp. garlic salt or 1 clove garlic, minced ● 1/2 cup bottled BBQ sauce ● 2 tablesp. soy sauce Place wire shelf in position 1 and preheat oven on FAN/BAKE at 300°F. Line shallow pan with foil (do not allow to overhang pan.) Add ribs, bone side up, salt and water or beer. Cover ribs with foil, tucking in on all sides. Place pan in oven and FAN/BAKE 20 minutes. Meanwhile make sauce by combining remaining ingredients in a small saucepan and simmer 5 minutes. Remove pan from oven carefully, uncover ribs and drain off all liquid. Turn oven to BROIL; brush ribs with sauce and return to oven, leaving door open to stop position. Turn and brush ribs every 10 minutes for 30 minutes or until nicely browned and tender. If ribs brown too quickly, turn oven to 350°F with door closed for additional time until they are tender. Note: Back ribs, sometimes called baby back ribs, are preferred for this recipe. Spare ribs will take longer to tenderize, an hour or more. ● 1 - 2 tablesp. minced parsley ● 1/2 lb. lasagna noodles (8 strips) ● 3 - 4 oz. shredded mozzarella DEEP DISH CHILI PIE ● 1/2 medium onion, chopped Convection FAN/BAKE 350°F ● 1 lb. lean ground beef ● 1 teasp. salt ● 4 tablesp. grated parmesan ● 1 medium onion, diced ● 1/4 teasp. pepper ● 14 oz. jar Marinara Sauce ● 1 tablesp. chili powder ● 1 egg white ● 1 15- to 19 oz. can red kidney beans, drained ● 8 oz. ricotta In large skillet cook meat and onion, stirring often until meat is no longer pink and onion is tender. Drain off fat, then add sauce and set aside. Combine ricotta, egg white and parsley. Cook noodles according to package directions; drain, add cold water to cool and drain well. Place wire shelf in position 1. Preheat oven on BAKE at 350°F. Oil a 7 x 11 x 1 1/5 inch pan. Lay 4 noodles in pan, overlapping slightly. Spread 1/2 of ricotta mixture, then 1/2 of meat sauce over noodles. Sprinkle with 1/2 of mozzarella and 2 tablesp. parmesan cheese. Repeat layers with 4 noodles, remaining ricotta mixture, meat sauce, mozzarella and parmesan. Bake 25 minutes or until bubbling hot. 12 ● 1 28 oz. can tomatoes ● 1 12- to 14 oz. package corn muffin mix ● 1 1/2 teasp. sugar In skillet cook beef and onion, stirring to break up meat, until meat is browned. Drain excess fat and add chili powder, undrained tomatoes, sugar, salt and pepper. Reduce heat, cover skillet and simmer 20 minutes, stirring occasionally. Stir in drained beans. Spoon mixture into a 7x11x1 1/2 inch pan or 1 1/2 qt. casserole. Preheat oven on FAN/BAKE at 350°F. with wire shelf in position 1. Prepare corn muffin mix as label directs. Spoon batter evenly over top of meat mixture. Bake uncovered 15 to 20 minutes until golden brown and toothpick inserted in corn bread comes out clean. SALMON LOAF APPLE CRUMB DESSERT Convection FAN/BAKE at 325°F ● 1 1 lb. can salmon, drained boned and flaked Convection FAN/BAKE 325°F ● 4 cups sliced peeled apples ● 1/4 cup plain yogurt ● Pinch salt ● 1 small onion, chopped (1/2 cup) ● 1 teasp. baking powder ● Ground cinnamon ● 1/4 cup mayonnaise ● 1 egg ● 1 small green papper, seeded and chopped (1/2 cup) ● 4 tablesp. melted butter or margarine ● 1 egg or 2 egg whites, lightly beaten ● 1 cup sugar ● 1/2 cup chopped celery ● 1/4 teasp. pepper Preheat oven on FAN/BAKE at 325°F. with wire shelf in position 1. Grease an 8- by 4inch loaf pan or dish. In a mixing bowl combine salmon with remaining ingredients. Bake 30 minutes or until loaf begins to brown and shrink away from sides of pan or dish. To serve, cut into slices and top each with sauce. DILL SAUCE: Combine 1/4 cup yogurt, 1/2 cup mayonnaise, 1/4 cup sour cream, 3/4 cup chopped seeded cucumber, 1/4 cup minced onion and 1 teasp. dried dill weed. Stir over low heat until warm; do not boil or it will separate. Preheat oven on FAN/BAKE at 325°F. Arrange apple slices in an 8- or 9inch square cake pan or dish. Sprinkle with lemon juice and cinnamon to taste. In a medium size bowl combine flour, sugar, salt and baking powder. Break egg into flour mixture and mix lightly with a fork or by hand until egg is evenly distributed. Sprinkle over the apples; pour the melted butter or margarine over the crumb topping. Bake for 30 minutes or until topping is lightly browned and apples are tender. Serve warm or cold. MARIAN’S PLUM TORTE COTTAGE CHEESECAKE ● 1/2 cup packaged dry bread crumbs ● 1 - 2 tablesp. lemon juice ● 1 cup flour Convection FAN/BAKE at 325°F ● 3/4 cup sugar ● 2 eggs CRUST ● 1/2 cup (1 stick) butter or margarine ● 1 cup graham cracker crumbs ● 24 halves pitted purple Italian prune plums ● 3 tablesp. sugar ● 1 cup flour ● 1/3 cup butter or margarine, melted ● 1 teasp. baking powder ● 1/4 teasp. salt FILLING ● 2 eggs ● Sugar, lemon juice, cinnamon for topping Preheat oven on FAN/BAKE at 325°F. with wire shelf in position 1. Cream sugar and butter in a mediumsized bowl. Add flour, baking powder, salt and eggs and beat with spoon or mixer until well combined. Spread batter in 8- or 9inch spring form pan. Place plum halves, skin side up, on top of batter in concentric circles. Sprinkle lightly with sugar, lemon juice and cinnamon, amounts depending on taste and tartness of fruit. Bake 25 to 30 minutes or until golden brown. (Plums will partially sink in cake batter). Cool 10 minutes, then remove side of pan, loosening edge of cake with a small spatula. Serve warm, plain or with whipped or ice cream. Traditional BAKE 350°F ● 2 tablesp. lemon juice ● 1 teasp. grated lemon rind ● 1/2 cup light cream or half & half ● 1/2 cup sugar ● 1 1/2 cups cottage cheese ● 1/2 teaspoon vanilla ● 2 tablesp. flour ● Cinnamon ● 1/8 teasp. salt Preheat oven on BAKE at 350°F. with shelf in position 1. In mixing bowl combine crumbs, butter or margarine and 3 tablesp. sugar. Line bottom and sides of 8-inch layer cake pan with the mixture, pressing firmly in place. Chill. Put filling ingredients, except cinnamon, in electric blender or food processor and blend until smooth. Pour into chilled crust. Sprinkle top lightly with cinnamon. Bake 40 to 45 minutes or until firm. Cool, then chill. 13 Limited Warranty What Does This Warraty Cover? We warrant each appliance to be free from defects in material and workmanship. Our obligation under this warranty is limited to replacement or repair, free of charge at our factory or authorized service centers, of any defective part or parts there of other than parts damaged in transit, which shall be returned to us, transportation prepaid. This warranty shall apply only if the appliance is used in accordance with the factory directions which accompany it, and on an Alternating Current (AC) circuit. How Long Does The Coverage Last? This warranty runs for one year from the date of delivery and applies only to the original purchaser for use. What Does This Warranty Not Cover? This warranty does not cover defects or damage of the appliance which result from repairs or alterations to the appliance outside our factory or authorized service centers, nor shall it apply to any appliance which has been subject to abuse, misuse, negligence or accidents. Also, consequential and incidental damages resulting from the use of this product or arising out of any breach of contract or breach of this warranty are not recoverable under this warranty. Some states do not allow the esclusion or limitation of incidental or consequential damages, so the above limitation may not apply to you. How Do You Get Service? If repairs become necessary or spare parts are needed, plase write to: De’Longhi America Inc. 625, Washington Avenue Carlstadt N.J. 07072 or call Service Tel. No. 1-800-322-3842 The above warranty is in lieu of all other express warranties and representations; All implied warranties are limited to the applicable warranty period set forth above. This limitation does apply if you enter into an extended warranty with De’Longhi. Some states do not allow limitations on how long an implied warranty lasts, so the above exclusions connection with the sale or use of its Espresso Coffee Machine. How Does State Law Apply? This warranty gives you specific legal rights, and you may also have other rights 14