1
DELL-INL-P2210 SFF AIO-QSG (WF-A)-090413.pdf
2009/4/13
下午 07:05:23
Setup Ihres Monitors | Installation de votre moniteur | Instalación de su monitor |
Ustawianie monitora | Instalação do monitor | Impostazione del monitor
CAUTION:
Before setting up your Dell™ monitor,
see the safety instructions that shipped
with your monitor.
VORSICHT:
ATTENTION :
Bevor Sie Ihren Dell™-Computer einrichten
und in Betrieb nehmen, beachten Sie bitte
die Sicherheitsanweisungen, die mit Ihrem
Computer mitgeliefert werden.
OSTRZEZENIE:
PRECAUCIÓN:
Avant de configurer et d'utiliser votre
ordinateur Dell™, consultez les précautions
de sécurité livrées avec votre moniteur.
Antes de configurar y utilizar su equipo
Dell™, consulte las instrucciones de
seguridad que se entregan con el mismo.
CUIDADO:
Przed ustawieniem i uruchomieniem komputera
Dell™, sprawdz instrukcje bezpieczenstwa
dostarczone razem z monitorem.
ATTENZIONE:
Antes de você ajustar e operar seu computador
Dell™, veja as instruções de segurança
que são enviadas com seu monitor.
Prima di installare ed usare il computer
Dell™, leggere le istruzioni di sicurezza
fornite in dotazione al monitor.
Dell™ P2210 AIO Flat Panel Monitor For Dell OptiPlex™ 960 SFF Computer
NOTE: The white DVI cable may
not ship with your monitor.
1
REMARQUE: Le câble DVI blanc
peut ne pas être livré avec votre
moniteur.
2
NOTA: Puede que el cable DVI
blanco no se incluya con el
monitor.
OBSERVAÇÃO: O cabo branco
DVI pode não ser enviado com
seu monitor.
C
HINWEIS: Das weiße DVI-Kabel
wird u. U. nicht mit dem Monitor
ausgeliefert.
M
1
Bringen Sie den Monitor am Ständer an
Attachez le moniteur à la base
Coloque el monitor sobre la base
Przymocuj monitor do podstawki
Conecte o monitor ao suporte
Inserire il monitor sul supporto
Y
NOTA: Il cavo DVI bianco potrebbe
non essere fornito con il monitor.
UWAGA: Biały kabel DVI moze
nie być dołaczony do zakupionego
monitora.
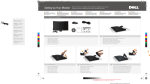
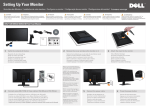
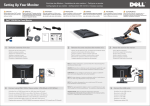
Attach the monitor to the stand
CM
MY
CY
2
Slide the computer onto the stand
Schieben Sie den Computer auf den Ständer
Faites glisser l’ordinateur sur la base
Deslice el equipo sobre la base
Wsun komputer na podstawke
Deslize o computador no suporte
Far scorrere il monitor sul supporto
3
4
Engage the computer to the stand auto locking mechanism
Lassen Sie den Computer in den Ständer einrasten
Engagez le mécanisme de fixation automatique de l'ordinateur sur la base
Encaje el equipo en el mecanismo de bloqueo automático del soporte
Zaczep komputer o mechanizm automatycznego blokowania stojaka
Encaixe o computador para o mecanismo de bloqueio automático do suporte
Appoggiare il computer sul meccanismo di auto-bloccaggio della base
Connect the blue VGA cable or black DP cable (optional purchase
item) to the computer
Schließen Sie das blaue VGA-Kabel oder das schwarze DP-Kabel (getrennt erhältlich) am Computer an
Relier le câble VGA bleu ou le câble DP noir (élément acheté en option) à l'ordinateur
Conecte el cable VGA azul o el cable DP negro (a la venta por separado) al equipo
Podłącz do komputera niebieskie złącze kabla VGA lub czarne kabla DP (opcjonalny zakup)
Conectar o cabo VGA azul ou o cabo DP preto (item de compra opcional) no computador
Collegare il cavo blu VGA o il cavo nero DP (da acquistare separatamente) al computer
CMY
K
1
2
5
Connect the power cable firmly to the monitor as shown
Schließen Sie das Netzkabel wie gezeigt an den
Monitor an
Branchez le câble d’alimentation au moniteur tel
qu’illustré
Conecte el cable de alimentación al monitor, como
muestra la imagen
W pokazany sposób podłacz kabel zasilajacy do monitora
Conecte o cabo de energia elétrica ao monitor como
mostrado
Collegare il cavo di alimentazione al monitor come
mostrato
6
Connect the power cable firmly to the computer
as shown
Schließen Sie das Netzkabel wie gezeigt an den
Computer an
Branchez le cordon d'alimentation sur l'ordinateur
comme indiqué
Conecte el cable de alimentación al equipo como se
muestra en la ilustración
Podłacz, w pokazany sposób, kabel zasilania do
komputera
Conecte o cabo de força no computador como mostrado
Collegare il cavo d'alimentazione al computer
come mostrato
7
Connect the USB, keyboard and mouse cables to the
computer as shown
Schließen Sie USB-, Tastatur- und Mauskabel wie gezeigt
an den Computer an
Branchez les câbles USB de la souris et du clavier à
l’ordinateur tel qu’illustré
Conecte los cables USB, de teclado y ratón al equipo,
como muestra la imagen
W pokazany sposób podłacz do komputera kabel USB,
klawiatury i myszy
Conecte os cabos USB, do teclado e do mouse ao computador
como mostrado
Collegare il cavo USB, quello della tastiera e quello del mouse al
computer come mostrato
8
Connect the power cables to an outlet. Install the cable cover
Verbinden Sie die Netzkabel mit einer Steckdose. Setzen Sie die
Kabelabdeckung auf
Branchez les câbles d’alimentation à une prise murale. Installez
le couvercle du câble
Conecte los cables de alimentación a una toma eléctrica. Instale
la cubierta de los cables
Podacz kable zasilajace do gniazdka elektrycznego. Zamontuj
pokrywe kabli
Conecte os cabos de energia elétrica a uma tomada. Instale a
capa do cabo
Collegare i cavi di alimentazione ad una presa. Inserire il copricavo
語言順序:
West- English, German, French, Spanish, Polish, Portuguese Brazil, Italian.---For P2210 SFF AIO, “Polish replaces Russian”--Confirmed by INL Liang Xie(謝亮) 090320.
East- English, 簡中, 繁中, 日文, 韓文, 泰文,Indonesia
(A) 090319: First version.
090326: fm DELL Shubha 090324: (ITEM 4 need to translate)
Please change the statement “Connect the blue VGA cable to the computer” to “Connect the blue VGA cable or black DP cable (optional purchase item) to the computer”
090407: ITEM 4 Translate OK.
090413: According to 090413 DELL Shubha per 090413 INX謝亮
1) Please replace "Dell OptiPlex SFF Computer" with "Dell OptiPlex 960 SFF Computer" throughout both documents.
DELL-INL-P2210 SFF AIO-QSG (WB-A)-090413.pdf
21°
4°
12
2
5
14
4°
1
HINWEIS: Wir empfehlen, den Monitor über
das weiße DVI-Kabel anzuschließen; so erzielen
Sie eine bessere Leistung.
8
8
9
9
10
REMARQUE : Nous vous recommandons
d’utiliser le câble DVI avec le moniteur pour
obtenir de meilleures performances.
90mm
4
UWAGA: Dla uzyskania lepszej wydajnosci
zaleca sie, aby monitor podłaczyć białym
kablem DVI.
11
11
3
NOTA: se recomienda conectar el monitor
utilizando el cable DVI blanco para conseguir
un mejor rendimiento.
16
2
13
NOTE: It is recommended that you connect
the monitor using the White DVI cable for
better performance.
6
10
90mm
15
3
7
7
4
下午 07:04:48
21°
6
1
2009/4/13
17
OBS.: É recomendável que ligue o monitor
usando o cabo DVI Branco para uma melhor
performance.
12
1
360°
13
NOTA: si consiglia di collegare il monitor usando
il cavo DVI bianco, per ottenere una prestazione
migliore.
5
C
M
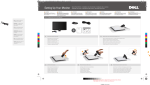
1. USB downstream ports
2. Regulatory and PPID Label
8. Dell Soundbar mounting brackets
10. Security Lock Slot
11. Cable Cover Release Button
3. Brightness/Contrast
4. Auto Adjust
5. Input Source
6. OSD Menu
7. Power Buttoon
(with power light indicator)
9. Stand Release Button
12. Tilt Adjustment
13. Height Adjustment
1. USB downstream ports
2. Regulatory and PPID Label
12. Tilt Adjustment
13. Height Adjustment
6. Brightness/Contrast
7. Auto Adjust
8. Input Source Select
9. OSD Menu
10. Power Buttoon
(with power light indicator)
11. Stand Release Button
4. Security Lock Slot
3. Dell Soundbar mounting brackets
5. Cable Cover Release Button
Y
CM
MY
CY
CMY
K
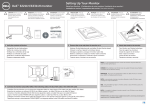
1. USB downstream ports
2. Regulatory and PPID label
3. Tilt adjustment
4. Height adjustment
5. Swivel adjustment
6. Preset Modes
(default, but configurable)
7. Brightness & Contrast
(default, but configurable)
8. Menu
9. Exit
10. Power (with power light indicator)
11. Stand release button
12. Security lock slot
13. Dell soundbar mounting brackets
14. Unlock switch
15. Stand security lock slot
16. Cable cover lock switch
17. Cable management clip
1. USB Downstream Ports
2. Regulierungs-und PPID-Etikett
3. Neigungseinstellung
4. Höheneinstellung
5. Schwenken
6. Voreingestellte Modi
(Voreingestellt, aber konfigurierbar)
7. Helligkeit / Kontrast
(Voreingestellt, aber konfigurierbar)
8. Menü
9. Verlassen
10. Ein/Aus (mit Betriebsanzeige)
11. Gestell-Freigabe-Schalter
12. Sicherheitsschloss-Schlitz
13. Dell Soundbar Schraubbefestigungen
14. Freigabetaste
15. Ständerschlitz für Sicherheitsschloss
16. Kabelabdeckung-Verriegelungstaste
zum Fixieren
17. Schlitz zur Kabelverwaltung
1. Ports USB en aval
2. Étiquette réglementaire et PPID
3. Réglage d'inclinaison
4. Réglage de hauteur
5. Réglage de l'angle
6. Modes de préréglage
(par défaut, mais configurable)
7. Luminosité/Contraste
(par défaut, mais configurable)
8. Menu
9. Quitter
10. Alimentation
(avec témoin lumineux d'alimentation)
11. Bouton de dégagement du support
12. Fente de verrouillage de sécurité
13. Supports de montage Dell Soundbar
14. Bouton de déverrouillage
15. Fente de verrouillage de sécurité de la base
16. Bouton de verrouillage du couvercle de câble
17. Fente de gestion des câbles
1. Puertos de descarga USB
2. Etiqueta administrativa y de PPID
3. Ajuste de inclinación
4. Ajuste de altura
5. Ajuste de giro
6. Modos predefinidos
(Predeterminado, pero configurable)
7. Brillo y Contraste
(Predeterminado, pero configurable)
8. Menú
9. Salir
10. Encendido
(con indicador luminoso de encendido)
11. Botón de liberación del soporte
12. Ranura de bloqueo de seguridad
13. Abrazaderas de montaje para Dell Soundbar
14. Conmutador de desbloqueo
15. Ranura de bloqueo de seguridad de soporte
16. Abajo la cubierta de cable para bloquearla
17. Ranura de gestión de cable
1. Porty USB pobierania
2. Etykieta z przepisami i PPID
3. Regulacja nachylenia
4. Regulacja wysokości
5. Regulacja obrotu
6. Tryby ustawień wstępnych
(domyślnie, jednak bez możliwości konfiguracji)
7. Jasność/Kontrast
(domyślnie, jednak bez możliwości konfiguracji)
8. Menu
9. Wyjście
10. Zasilanie (ze wskaźnikiem zasilania)
11. Przycisk zwalniania podstawy
12. Gniazdo zabezpieczenia
13. Wsporniki montażowe panela Dell Soundbar
14. Przełącznik odblokowania
15. Gniazdo blokady bezpieczeństwa stojaka
16. Przełącznik blokady pokrywy kabli
17. Gniazdo zarządzania kablami
1. Portas USB de downstream
2. Etiqueta PPID e Regulatória
3. Ajustamento da Inclinação
4. Ajustamento da Altura
5. Ajuste da Articulação
6. Modos pré-definidos
(padrão, mas configuráveis)
7. Brilho e Contraste (padrão, mas configuráveis)
8. Menu
9. Saída
10. Liga/desliga
(com luz indicadora de funcionamento)
11. Botão de Libertação da Base
12. Ranhura de Bloqueio de Segurança
13. Suportes de montagem do Dell Soundbar
14. Desbloqueia o Interruptor
15. Abertura do bloqueio de segurança
do suporte
16. Interruptor de bloqueio da cobertura do cabo
17. Slot de gerenciamento do cabo
1. Porte USB downstream
2. Etichetta normativa e PPID
3. Regolazione inclinazione
4. Regolazione altezza
5. Regolazione della rotazione
6. Modalità predefinite
(predefinito, ma configurabile)
7. Luminosità/Contrasto
(predefinito, ma configurabile)
8. Menu
9. Esci
10. Tasto d’alimentazione
(con indicatore luminoso)
11. Tasto di sblocco supporto
12. Fessura per blocco di sicurezza
13. Staffe di montaggio Dell Soundbar
14. Interruttore di sblocco
15. Alloggio per lucchetto della base
16. Interruttore di blocco della copertura cavi
17. Alloggio per la gestione dei cavi
NOTE: For more information see the
User’s Guide in the Drivers and
Documentation media that shipped
with your monitor.
HINWEIS: Weitere Informationen finden
Sie im Benutzerhandbuch im Medium
"Treiber und Dokumentation", das mit
Ihrem Monitor mitgeliefert wird.
REMARQUE : Pour plus d'informations
consultez le Guide Utilisateur sur le
support Pilotes et documentation livré
avec votre moniteur.
NOTA: para más información, consulte
el Manual del usuario en el medio de
Documentación y controladores que
incluye su monitor.
UWAGA: W celu uzyskania dalszych
informacji, patrz Podręcznik użytkownika
na nośniku Drivers and Documentation
(Sterowniki i Dokumentacja) dostarczonym
z monitorem.
OBSERVAÇÃO.: Para mais informações
veja Guia do Usuário na mídia Drivers e
Documentação que é enviada junto ao
seu monitor.
NOTA: Per altre informazioni, fare
riferimento alla Guida all’uso, del
supporto Drivers and User
Documentation (Driver e Documentazione)
fornito in dotazione al monitor.
Printed in China.
Printed on recycled paper.
506280013001R(A)XX
(DELL P/N:D762T Rev.A00)
Information in this document is subject to
change without notice.
© 2009 Dell Inc. All rights reserved.
Änderung der Informationen in diesem Dokument
jederzeit vorbehalten.
© 2009 Dell Inc. Alle Rechte vorbehalten.
Les informations contenues dans ce document
sont sujettes à modifications sans préavis.
© 2009 Dell Inc. tous droits réservés.
La información de este documento se encuentra sujeta
a cambios sin aviso previo.
© 2009 Dell Inc. Todos los derechos reservados.
Informacje zawarte w niniejszym dokumencie
podlegają zmianom bez uprzedzenia.
© 2009 Dell Inc. Wszystkie prawa zatrzeżone.
As informações neste documento estão sujeitas
a alteração sem aviso.
© 2009 Dell Inc. Todo os direitos reservados.
Le informazioni di questo documento sono soggette
a cambiamenti senza preavviso.
© 2009 Dell Inc. Tutti i diritti sono riservati..
Reproduction of these materials in any manner
whatsoever without the written permission of
Dell Inc. is strictly forbidden.
Die Reproduzierung dieser Materialien unter irgendeiner
Form ohre die schriftliche Erlaubnis von Dell Inc. ist
strengstens verboten.
La reproduction de ces contenus de quelque
façon sans la permission écrite de Dell Inc.
est strictement interdite.
La reproducción de dichos materiales sin permiso por
escrito de Dell Inc. queda terminantemente prohibida.
Powielanie tych materiałów w jakikolwiek sposób
bez pisemnej zgody Dell Inc. jest surowo zabronione.
Qualsiasi tipo di riproduzione di questi materiali, senza
l’autorizzazione scritta della Dell Inc. è severamente proibita.
Dell and the DELL logo are trademarks of Dell Inc.
Dell disclaims proprietary interest in the marks and
names of others.
Dell und das DELL Logo sind Warenzeichen von Dell Inc.
Dell hat keine Eigentumsrechte über Marken und
Namen anderer Inhaber.
Dell et le logo DELL sont des marques déposées de Dell Inc.
Dell renonce à tout intérêt de propriété dans les
marques et noms des autres.
Dell et le logo DELL sont des marques déposées de
Dell Inc.
Dell renonce à tout intérêt de propriété dans les
marques et noms des autres.
Dell i logo DELL sa zastrzeżonymi znakami towarowymi
Dell Inc.
Firma Dell zaprzecza zainteresowaniu prawami
własności do marek i nazw należących do innych.
A reprodução destes materiais em qualquer maneira
sem a permissão escrita da Dell Inc. é estritamente
proibida.
August 2009
August 2009
Août 2009
Agosto 2009
Sierpień 2009
Dell e o logotipo DELL são marcas comerciais da Dell Inc.
A Dell nega qualquer interesse de propriedade em
marcas e nomes de terceiros.
Dell ed il logo DELL sono marchi di fabbrica registrati
della Dell Inc.
Dell nega ogni interesse di proprietà in marchi e nomi diversi
dal proprio.
Agosto 2009
Agosto 2009
www.dell.com | support.dell.com
506280013000R(A)XX
(DELL P/N:C970T Rev.A00)
506280013001R(A)XX
(DELL P/N:D762T Rev.A00)
506280013000R
POSTER,QUICK SETUP, EAST,LP2280
C970T
PLCMT,STUP,P2210F,SFF,EAST Placemat (East)
506280013001R
POSTER,QUICK SETUP,WEST, LP2280
D762T
PLCMT,STUP,P2210F,SFF,WEST Placemat (West)
語言順序:
West- English, German, French, Spanish, Polish, Portuguese Brazil, Italian.---For P2210 SFF AIO, “Polish replaces Russian”--Confirmed by INL Liang Xie(謝亮) 090320.
East- English, 簡中, 繁中, 日文, 韓文, 泰文,Indonesia
(A) 090310: First version. (Polish buttom item 5~8 need to be translated.)
090413: According to 090413 DELL Shubhashree per 090413 INX 謝亮:
1) Need to show where is the Regulatory Label (refer to the QSG of P2210 below).