1
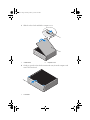
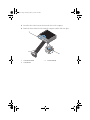
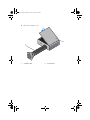
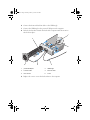
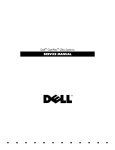
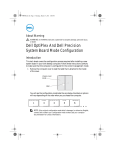
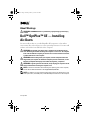
54350.fm Page 1 Monday, January 11, 2010 6:08 PM
About Warnings
WARNING: A WARNING indicates a potential for property damage, personal injury,
or death.
Dell™ OptiPlex™ XE — Installing
Air-Ducts
You can install air-ducts on your Dell OptiPlex XE computer in a low-airflow
environment (like enclosed space) to ensure optimal performance. You can install
air-ducts on both the front and back of the computer.
WARNING: Do not block, push objects into, or allow dust to accumulate in the air
vents. Restricting the airflow can damage the computer or cause a fire. The computer
turns on the fan when the computer gets hot. Fan noise is normal and does not indicate
a problem with the fan or the computer.
WARNING: Before working inside your computer, read the safety information that
shipped with your computer. For additional safety best practices information, see the
Regulatory Compliance Homepage at www.dell.com/regulatory_compliance.
WARNING: To guard against electrical shock, always unplug your computer from the
electrical outlet before removing the computer cover.
NOTE: To find more information about removing and replacing parts on the computer,
see the Service Manual available on the support.dell.com/manuals.
NOTE: You will have access to external power button routing, but will not have access
to the optical drive, front USB ports, and the 24V USB port on the back of the computer.
January 2010
54350.fm Page 2 Monday, January 11, 2010 6:08 PM
1 Slide the release latch and lift the computer cover.
1
2
1
release latch
2
computer cover
2 Gently pry open the front bezel retention tabs away from the computer and
remove the front bezel.
1
1
front bezel
54350.fm Page 3 Monday, January 11, 2010 6:08 PM
3 Insert the tabs on the front air-duct into the slots on the computer.
4 Rotate the front air-duct bezel towards the computer until it clicks into place.
1
3
2
1
front air-duct bezel
3
front air-duct
2
air-duct slots (4)
54350.fm Page 4 Monday, January 11, 2010 6:08 PM
5 Close the computer cover.
1
2
1
computer cover
2
front air-duct
54350.fm Page 5 Monday, January 11, 2010 6:08 PM
6 Connect the front and back fan cables to the USB dongle.
7 Connect the USB dongle to the powered USB port on the computer.
8 Push the back air-duct towards the back of the computer until the retention
tabs click into place.
1
6
2
5
3
4
1
powered USB port
2
USB dongle
3
front fan-cable
4
back fan-cable
5
back air-duct
6
screw
9 Replace the screw to secure the back air-duct to the computer.
54350.fm Page 6 Monday, January 11, 2010 6:08 PM
Temperature and Mounting Recommendation
When installing your computer in a closed environment, always ensure that you
mount the inlet and outlet fan on the inlet and exhaust vents of the kiosk.
CAUTION: Install your computer in an enclosure that ensures there is sufficient
airflow. Restricting the airflow to less than 30% impacts your computer's performance,
possibly causing it to overheat.
CAUTION: The maximum operating temperature of 55 °C is recommended for
optimum performance of your computer.
____________________
Information in this document is subject to change without notice.
© 2010 Dell Inc. All rights reserved.
Reproduction of these materials in any manner whatsoever without the written permission of Dell Inc. is
strictly forbidden.
Trademarks used in this text: Dell, the DELL logo and Optiplex are trademarks of Dell Inc.
Other trademarks and trade names may be used in this document to refer to either the entities claiming the
marks and names or their products. Dell Inc. disclaims any proprietary interest in trademarks and trade
names other than its own.