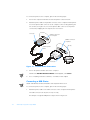
1
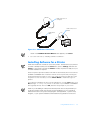
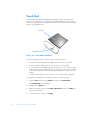
Throughout this guide, blocks of text may be accompanied by an icon and printed in
bold type or in italic type. These blocks are notes, notices, and cautions, and they are
used as follows:
NOTE: A NOTE indicates important information that helps you make better use of
your computer system.
!
"
"
#
____________________
Information in this document is subject to change without notice.
© 1999–2000 Dell Computer Corporation. All rights reserved.
Reproduction in any manner whatsoever without the written permission of Dell Computer
Corporation is strictly forbidden.
Trademarks used in this text: Dell, the DELL logo, BE DIRECT, and Inspiron are trademarks of
Dell Computer Corporation; Microsoft, Windows, and Windows NT are registered trademarks of
Microsoft Corporation.
Other trademarks and trade names may be used in this document to refer to either the entities
claiming the marks and names or their products. Dell Computer Corporation disclaims any
proprietary interest in trademarks and trade names other than its own.
January 2000
P/N 1945T Rev. A02
Information Resources . . . . . . . . . . . . . . . . . . . . . . . . . . . . . . . . . . . . . . . . . . . . . .
Tutorials . . . . . . . . . . . . . . . . . . . . . . . . . . . . . . . . . . . . . . . . . . . . . . . . . . . . . .
System Help. . . . . . . . . . . . . . . . . . . . . . . . . . . . . . . . . . . . . . . . . . . . . . . . . . .
Reference and Troubleshooting Guide. . . . . . . . . . . . . . . . . . . . . . . . . . . . . . .
1-1
1-1
1-1
1-2
Microsoft Windows 98 Second Edition . . . . . . . . . . . . . . . . . . . . . . . . . . . . . . . . . . 2-1
Microsoft Windows NT . . . . . . . . . . . . . . . . . . . . . . . . . . . . . . . . . . . . . . . . . . . . . . 2-3
Microsoft Windows 2000 Professional . . . . . . . . . . . . . . . . . . . . . . . . . . . . . . . . . . 2-4
"
! Adding a Printer . . . . . . . . . . . . . . . . . . . . . . . . . . . . . . . . . . . . . . . . . . . . . . . . . . .
Preparing a Printer . . . . . . . . . . . . . . . . . . . . . . . . . . . . . . . . . . . . . . . . . . . . . .
Connecting a Parallel Printer . . . . . . . . . . . . . . . . . . . . . . . . . . . . . . . . . . . . . .
Connecting a USB Printer. . . . . . . . . . . . . . . . . . . . . . . . . . . . . . . . . . . . . . . . .
Installing Software for a Printer . . . . . . . . . . . . . . . . . . . . . . . . . . . . . . . . . . . . . . . .
Touch Pad . . . . . . . . . . . . . . . . . . . . . . . . . . . . . . . . . . . . . . . . . . . . . . . . . . . . . . . .
PC Cards . . . . . . . . . . . . . . . . . . . . . . . . . . . . . . . . . . . . . . . . . . . . . . . . . . . . . . . . .
Installing PC Cards . . . . . . . . . . . . . . . . . . . . . . . . . . . . . . . . . . . . . . . . . . . . . .
Removing PC Cards . . . . . . . . . . . . . . . . . . . . . . . . . . . . . . . . . . . . . . . . . . . . .
CD-ROM and DVD-ROM Drives . . . . . . . . . . . . . . . . . . . . . . . . . . . . . . . . . . . . . . .
3-1
3-1
3-1
3-2
3-3
3-4
3-5
3-5
3-5
3-6
Figure 3-1.
Figure 3-2.
Figure 3-3.
Figure 3-4.
3-2
3-3
3-4
3-6
Parallel Printer Connections . . . . . . . . . . . . . . . . . . . . . . . . . . . . . . . .
USB Printer Connections . . . . . . . . . . . . . . . . . . . . . . . . . . . . . . . . . .
Touch Pad and Buttons . . . . . . . . . . . . . . . . . . . . . . . . . . . . . . . . . . .
Inserting a Disc Into the Drive . . . . . . . . . . . . . . . . . . . . . . . . . . . . . .
v
vi
This Setup Guide provides instructions for setting up a Dell™ Inspiron™ portable
computer. Both first-time and experienced computer users should complete the
instructions in Chapter 2, “Operating System Setup,” to properly configure the
computer for operation. Chapter 3, “Using Hardware Devices,” describes procedures
for using your computer’s hardware.
In addition to this guide, Dell provides other handy reference tools to help you make
the most of your computing experience.
#
$
If you have an i-Learn My Dell PC icon on your Microsoft® Windows® desktop,
double-click the icon to access easy-to-use, animated tutorials that introduce you to
your computer and the Microsoft products installed on it.
$
The system Help allows you to search for information in multiple ways. You can
quickly access information on the following topics:
%
%
%
%
%
%
%
%
Hardware and software features of your system
Options and upgrades
The Microsoft Windows desktop, changing your wallpaper and screen saver,
creating shortcuts, and positioning icons
Software access, installation, and removal
Basic file management, such as finding, copying, deleting, and renaming files
Tips on using your computer hardware devices
Answers to commonly asked questions about your computer
Phone numbers for contacting Dell for help
To open the Help, click the Start button, point to Programs—> Dell Documents, and
click Dell Inspiron System Help.
Introduction
1-1
You may also double-click the Dell Documentation icon on the Windows desktop,
click System Information, and then click Dell Inspiron System Help.
&'
#($)
Your Reference and Troubleshooting Guide provides information on adding upgrades
like memory, performing basic troubleshooting procedures, and reinstalling drivers. It
also covers technical specifications, the system setup program, and system codes
and messages.
1-2
Dell Inspiron Systems Setup Guide
Your Dell computer has been shipped with the Microsoft Windows 98 Second
Edition, Microsoft Windows NT® Workstation, or Microsoft Windows 2000 Professional operating system already installed. Perform the steps in the following section
that corresponds to your operating system so that the software functions properly on
your Dell computer.
$
"
%
Initial setup of Windows 98 Second Edition takes about 15 minutes. The setup
process is customized according to which computer components you have.
&
'()
"
*
&
'()
+
&
'()
+
,
-
)-
.
/
"
01010+1"
/
2
&")34
To complete the initial setup of Windows 98 Second Edition on your Dell computer,
perform the following steps:
1.
If you have an internal modem installed in your computer, connect a telephone
line to it as instructed in the Getting Started sheet that accompanied your computer.
*4"
Operating System Setup
2-1
2.
Turn on your computer as instructed in the Getting Started sheet that accompanied
your computer.
The Dell Software License window appears.
3.
Read the software license agreement that came with your computer and then
press any key to continue.
4.
When your Express Service Code displays, press any key to continue.
NOTE: Dell’s Express Service Code may not be available in all countries.
The computer restarts automatically.
NOTE: After the computer restarts, the Windows 98 screen appears for about
1 or 2 minutes. Although it may appear as if no activity is occurring, the operating
system is actually loading program files.
5.
When the Getting Started window appears, verify that the regional and
keyboard setup and layout settings are correct for your location; then click Next.
Otherwise, click the appropriate settings and then click Next.
6.
When prompted, enter your name and company information and then click Next.
If your computer includes a modem, proceed to step 7. Otherwise, proceed to
step 9.
7.
A modem preparation window appears that allows you to connect to Microsoft
and register your operating system. Click Skip and proceed to step 10, or enter
the requested information, click Next, and proceed to step 8.
A registration progress window appears while your modem connects to
Microsoft.
8.
To send the registration information to Microsoft, enter the requested
information in the Registration Confirmation window and click Next. If you do
not want the information sent, uncheck the Please send the information on
this screen to Microsoft box and click Next.
9.
Read the license agreement, click I accept the Agreement, and then click Next.
If you do not accept the agreement, you cannot access Windows 98 Second
Edition.
10. Set up your Internet connection.
If you ordered the Dellnet Internet service, click Next and go to step 11.
If a screen appears that prompts you to set up your Internet access or provides
information about how to connect to the Internet, follow the instructions that
appear on the screen or click Skip to bypass Internet setup and information.
If no prompt appears, go to step 11.
2-2
Dell Inspiron Systems Setup Guide
11. If an animated tutorial starts, watch the tutorial for an introduction to your
computer and the Microsoft products installed on it. Then click Next.
If a tutorial does not start, go to step 12.
12. Click Finish.
13. If the Date/Time Properties window shows the correct time and date for your
area, click Close. Otherwise, enter the correct time and date, click Apply, and
then click OK.
Windows 98 Second Edition is now set up and the Windows desktop appears on
the screen.
Windows 98 Second Edition is now completely installed on your computer. See
“Adding a Printer” in Chapter 3 for instructions on how to connect a printer. See
“Information Resources” in Chapter 1 for descriptions of reference tools that are
included with your Dell computer.
The initial setup of the Windows NT Workstation 4.0 operating system takes
approximately 15 minutes to complete. Additional setup time may be required,
depending on your computer’s internal and external devices.
To complete the initial setup of Windows NT Workstation 4.0 on your computer,
perform the following steps:
1.
Turn on your computer.
2.
At the Dell Software License Agreement window, follow the directions on the
display to continue.
3.
At the Technical Support Information window, follow the directions on the
display to continue.
The Technical Support Information window displays the service tag sequence
and Express Service Code for your computer. Click Next.
NOTE: Dell’s Express Service Code may not be available in all countries.
The Select Operating System menu appears. Then the Windows NT Setup
window appears.
4.
At the Microsoft Software License Agreement window, click I accept this
agreement and then click Next to continue.
5.
At the Windows NT Setup window, click Next>.
6.
At the Name and Organization window, type your name and organization and
click Next>.
Your name and organization can each be up to 50 characters long.
Operating System Setup
2-3
7.
In the Registration window, type your product ID number and click Next>.
NOTE: The Product ID number is the bar code number found on the Microsoft
sticker, which is located either on the front cover of the Microsoft Windows NT
Workstation—Start Here booklet or on the bottom of your computer.
8.
When prompted, type the computer name and click Next>.
The computer name is the name used to identify your computer on a network
and, therefore, must be unique to the network. It can be up to 15 characters long.
The Administrator Account window appears.
9.
If you want to use an administrator password, type the password in the
Password field and again in the Confirm Password field, and then click Next>.
The password can be up to 14 characters long. If you do not want to use a
password, leave the Password field blank.
5
"
"
&
10. When the Windows NT Setup window appears, click Finish> to restart the
computer.
11. When prompted, press <Enter> to select the default operating system.
NOTE: The default is selected automatically after 30 seconds if no selection is
made. Do not select anything other than the default operating system.
12. At the Begin Logon window, press <Ctrl><Alt><Del>.
13. When prompted, type the password you chose in step 9 and click OK.
The initial setup of the Windows 2000 operating system takes approximately 7 minutes to complete. Additional setup time may be required, depending on your system’s
internal and external devices.
+-
+
To complete the initial setup of Windows 2000 Professional on your computer, perform the following steps:
1.
Remove any PC Cards installed in the PC Card slot of the computer before turning it on.
NOTE: PC Cards that are left in the computer during setup may cause installation
difficulties. You may reinstall PC Cards after you have completed the operating
system setup and restarted the computer.
2-4
Dell Inspiron Systems Setup Guide
2.
Turn on your computer.
The Software Licenses screen appears. It is important that you read and understand the license agreements. You must accept the agreements to proceed with
the setup of your system.
3.
Press any key if you accept the Dell-installed software license agreements.
The Important Technical Support Information screen appears.
4.
Press any key to continue.
Your system restarts and the Windows 2000 Professional Setup License
Agreement window appears.
5.
Click I accept this agreement. Click Next.
The Personalize Your Software window appears.
Type your name and the name of your organization. You must type in a name, but
the organization field is optional.
6.
Click Next.
The Computer Name and Administrator Password window appears. A suggested name for your computer appears in the name box that you can change or
accept. Leaving the password field empty is acceptable if you prefer not to use a
password. Although the administrator password is optional, it is useful for protecting against unauthorized access to operating system settings. You may add a
password of up to 14 characters in length. You may add or change a password
later.
5
"
"
&
6777*
More information on administrator and user logins is available from the Windows
2000 Help feature.
7.
Click Next.
The Date and Time Settings window appears.
8.
Verify that the settings are correct for your time and time zone and click Next.
The Networking Settings window appears. You may choose whether to use typical or custom settings. See your network administrator if you need to add
custom settings at this point.
9.
Click Next to accept the default typical settings.
The Workgroup or Computer Domain window appears. You may add a workgroup name, but it is not required. Check with your network administrator if you
need to add a computer domain.
Operating System Setup
2-5
10. Click Next to continue.
The Performing Final Tasks window appears. Then the following message
appears:
You have successfully completed Windows 2000 Setup. If there
is a CD in your drive, remove it. Then, to restart your computer, click Finish.
11. Click Finish and your system restarts.
The Welcome to the Network Identification Wizard window appears.
12. Click Next.
The Users of This Computer window appears.
You can change settings as indicated on the screen or enter a user password for
the name entered earlier in the setup. If you prefer to configure users later, you
can accept the defaults on the screen and proceed.
13. Click Next.
The Completing the Network Identification Wizard window appears.
More information on the Network Identification Wizard and on administrator and
user logins is available from the Windows 2000 Help feature
14. Click Finish.
The Getting Started with Windows 2000 window appears. You can click any of
the items, or you can exit from this window and begin working on the desktop.
2-6
Dell Inspiron Systems Setup Guide
This chapter provides information and tips on using your computer hardware devices
(physical parts of a computer). It also includes general instructions for using a port
replicator. For more information on using hardware, see the system Help. See
“System Help” in Chapter 1 for instructions on accessing the system Help.
Many of the computer devices you might want to use or connect come with their
own instructions and/or software. Follow the device manufacturer’s instructions when
connecting and using these devices.
%
"
This section provides instructions on how to prepare and add a parallel printer or a
Universal Serial Bus (USB) printer to the computer.
*
*
See the documentation that came with the printer for any preparation procedures
that are recommended by its manufacturer. You may be instructed to perform the
following tasks:
%
%
%
%
Remove the manufacturer’s shipping packaging
Install the toner or ink cartridge(s)
Align the toner or ink cartridge(s)
Load printer paper
*
$$$*
8
,97.
5
Using Hardware Devices
3-1
To connect the printer to the computer, perform the following steps:
1.
Turn off the computer and make sure that the printer is also turned off.
2.
Attach the printer cable to the parallel connector on the computer and the printer.
Secure the printer cable connector to the computer connector by tightening the
two screws (see Figure 3-1). Secure the printer cable connector to the printer
connector by snapping the two clips into the two notches.
screw (2)
parallel connector
on computer
parallel connector
on printer
clip (2)
parallel printer
cable
notch (2)
3.
Turn on the printer and then turn on the computer.
NOTE: If the Add New Hardware Wizard screen appears, click Cancel.
4.
Go to “Installing Software for a Printer,” found later in this chapter.
+*
NOTE: USB devices can be connected to the computer while it is on.
To connect the printer to the computer, perform the following steps:
1.
Attach the printer cable to the USB connector on the computer and the printer.
The USB connectors are keyed to fit only one way.
An example of a typical USB printer setup is shown in Figure 3-2.
3-2
Dell Inspiron Systems Setup Guide
USB connector on
computer
USB connector on
printer
USB printer
cable
NOTE: If the Add New Hardware Wizard screen appears, click Cancel.
2.
Go to the next section, “Installing Software for a Printer.”
NOTE: Dell installs the software for some new printers. To determine if your printer’s
software is already installed, click the Start button, point to Settings, and then click
Printers. If your printer is listed in the Printers window, the printer is ready to use; no
software installation is required.
Most new printers provide installation CDs that run automatically when inserted in the
CD-ROM or DVD-ROM drive. Install the software for these printers by inserting the
CD and following the prompts on your screen using the instructions that came with
the printer. It is not necessary to use the Printer Wizard to install these types of
printers.
If your printer’s installation CD does not automatically run, click the Start button, click
Run, and type x:\setup.exe, where x is the letter of your CD-ROM or DVD-ROM
drive (typically drive D). Then click OK, and follow the prompts on your screen.
NOTE: If you are adding an older printer and the printer does not respond after you
install the software, make sure that the system’s parallel port is set to operate in
bidirectional mode in the system setup program. See Appendix B, “System Setup
Program,” in your system’s Reference and Troubleshooting Guide for instructions.
Using Hardware Devices
3-3
The Personal System/2 (PS/2)-compatible touch pad (see Figure 3-3) detects the
position of your finger over a touch-sensitive area and provides the computer with
full mouse functionality. The touch pad's two buttons correspond to the left and right
buttons on a standard mouse.
touch pad
touch-pad buttons
Use the touch pad to perform common mouse functions as follows:
%
%
%
%
To move the cursor, lightly slide your finger over the smooth sensor area.
To select an object, gently tap once on the surface of the touch pad.
To select and move (or drag) an object, position the cursor on the object and tap
down-up-down on the touch pad. On the second down motion, leave your finger
on the touch pad and move the selected object by sliding your finger across the
surface.
To double-click an object, position the cursor on the object and then tap twice.
To customize touch pad and cursor features, perform the following steps:
1.
Click the Start button, point to Settings, and then click Control Panel.
The Control Panel window appears.
3-4
2.
Double-click the Mouse icon.
3.
Make your desired selections in the Mouse Properties window. Click Help if you
need more information.
4.
To incorporate your changes, click Apply.
Dell Inspiron Systems Setup Guide
NOTE: Keep your fingers away from the touch pad while the computer is booting or
loading the operating system. If you touch the touch pad at either time, the cursor will
not move until you remove your finger from the touch pad surface.
!
!
The PC Card slot has two PC Card connectors and supports four combinations of
cards. See the following subsections for installation and removal instructions. For
information on configuring a PC Card, see “PC Cards” in the system Help.
$$*
PC Cards are generally marked with a symbol (such as a triangle or an arrow) to indicate
which end to insert into the slot. The cards are keyed to prevent incorrect insertion. If
card orientation is not clear, see the documentation that comes with the card. You can
install a PC Card while the computer is running. The PC Card is automatically detected.
To install a PC Card, perform the following steps:
1.
Hold the card with its orientation symbol pointing into the slot, with the top side
of the card facing up.
2.
Insert the card into the slot, and press in firmly until the card is completely seated
in the internal PC Card connector.
If you encounter too much resistance when inserting the card, do not force the
card. Check the card's orientation, and try again.
The computer recognizes most input/output (I/O) cards and automatically loads the
appropriate device driver.
If your older modem communications software cannot use certain interrupt request
(IRQ) settings, you must disable the serial port or infrared port to use the software.
&!*
To remove a PC Card from the PC Card slot, perform the following steps.
*
-
"
1.
Press the eject button.
2.
When the button slides out, press it again to release the card.
3.
Gently remove the card.
4.
Press the eject button once more until it is flush with the computer casing.
Using Hardware Devices
3-5
!"#$
"%"#$
"&
CD-ROM and DVD-ROM drives read audio CDs and a variety of other CD formats. The
DVD-ROM drive also plays DVDs.
+
+534
+
+534
5
-
-
To use a disc in the drive, perform the following steps:
1.
Press the button on the front of the drive to open the disc tray, and then pull the
tray the rest of the way out.
+
2.
Place the disc in the center of the disc tray with the label side facing up.
3.
Center the disc on the spindle, as shown in Figure 3-4. Then gently press the CD
or DVD down on both sides of the spindle until the disc snaps into place.
"
+534
+:+534
4.
Close the tray by lightly pressing the front edge of the tray. The tray clicks when it
is fully closed.
NOTE: High-speed CD-ROM or DVD-ROM drives spin the disc at a very high rotational
speed and may be noisy. If a disc has printing on only half of the disc, or if the disc is
slightly imbalanced, the imbalance is greatly magnified by the high speed and the
noise is louder. This effect is inherent in the high-speed technology and does not
indicate a problem with the drive.
3-6
Dell Inspiron Systems Setup Guide
When the drive is in use, the drive-access indicator blinks on the front of the drive
bezel.
When using a CD-ROM or DVD-ROM drive, follow these guidelines:
%
%
%
%
Disable the autoplay feature while you are using the drive.
Never use damaged, broken, or deformed discs.
Do not press the open/close button while the computer is accessing a disc.
Keep the disc tray closed when you are not using the drive.
Using Hardware Devices
3-7
3-8
Dell Inspiron Systems Setup Guide