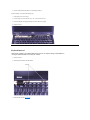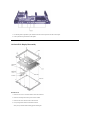
1
Dell™ Inspiron™ 5000 Series
Technical Overview
Removing and Replacing Parts
Drivers and Utilities for Microsoft Windows
98
Drivers and Utilities for Microsoft Windows
2000
Drivers and Utilities for Microsoft Windows
Me
Conserving Power
System Setup Program
System Messages
Ports and Connectors
Technical Specifications
Documentation Links
Model PPM
Information in this document is subject to change without notice.
© 2000–2001 Dell Computer Corporation. All rights reserved.
Reproduction in any manner whatsoever without the written permission of Dell Computer Corporation is strictly forbidden. Trademarks used in this text: Dell, the
DELL logo, and Inspiron are trademarks of Dell Computer Corporation; Microsoft, Windows, MS-DOS, and Windows NT are registered trademarks of Microsoft
Corporation; Intel and Pentium are registered trademarks, and Celeron and Intel SpeedStep are trademarks of Intel Corporation; Adobe is a trademark of Adobe
Systems Incorporated, which may be registered in certain jurisdictions.
Other trademarks and trade names may be used in this document to refer to either the entities claiming the marks and names or their products. Dell Computer
Corporation disclaims any proprietary interest in trademarks and trade names other than its own.
A01 26 Feb 2001
Back to Contents Page
Documentation Links: Dell™ Inspiron™ 5000 Series
Printed Documentation
Online Documentation
Printed Documentation
You must right-click the link for a portable document format (PDF) file and save the file to your hard-disk drive. Attempting to
link directly to large PDF files causes your system to freeze.
To save PDF files (files with an extension of .pdf) to your hard-disk drive, right-click the document title, click Save Target As in Microsoft® Internet Explorer or
Save Link As in Netscape Navigator, and specify a location on your hard-disk drive.
NOTES: PDF files require Adobe™ Acrobat Reader, which can be downloaded from the from the Adobe World Wide Web site at:
http://www.adobe.com/acrobat/.
To view a PDF file, launch Acrobat Reader. Click File –> Open and select the PDF file.
Right-click only the following links: Document Title
File Format
File Size
Getting Started Inspiron 5000
.pdf
815 KB
Start Here Inspiron 5000e
.pdf
397 KB
Dell Inspiron Systems Setup Guide
.pdf
412 KB
Dell Inspiron 5000 Reference and Troubleshooting Guide
.pdf
2.14 MB
Dell Inspiron 5000 Port Replicator User's Guide
.pdf
949 KB
Dell Inspiron 5000e System Solutions Guide
.pdf
1.78 MB
Removing and Replacing Parts
.pdf
2.23 MB
Online Documentation Inspiron 5000
Compiled HTML Help files (files with an extension of .chm) require Microsoft Internet Explorer 4.0 or later.
Downloading the Help and Associated Files
1. Right-click the following link to the popup.ocx file: popup.ocx
2. Click Save Target As in Microsoft Internet Explorer or Save Link As in Netscape Navigator, and specify c:\windows\system for Windows 98 or c:\winnt\
for Windows NT on your hard-disk drive.
3. Click the Start button on the Microsoft Windows® desktop, and then click Run.
4. Type regsvr32 popup.ocx and then press <Enter>.
5. Click OK when the installation is complete.
Downloading the Help File
1. Click the appropriate button to download the zipped file and save it to your hard-disk drive. 2. Go to the directory location you specified when you saved the file.
3. Double-click the .exe file you downloaded. The WinZip Self-Extractor dialog box appears.
4. Specify the location to save the unzipped files to and click Unzip.A message stating that the files unzipped successfully appears.
5. Click OK.
6. Click Close.
Viewing the Help File
1. Start your browser and open the index.htm file in the directory containing the unzipped files.
2. Click the Start button on the Windows desktop, point to Programs, and then click Windows Explorer.
3. Navigate to the directory in which you saved the Help file.
4. Double-click the file.
Inspiron 5000e
Compiled HTML Help files (files with an extension of .chm) require Microsoft Internet Explorer 4.0 or later.
Downloading the Help and Associated Files
1. Click the following link to download the help_dll.exe file: help_dll.exe
2. Save the link to the default directory, c:\windows\systems.
3. Go to the directory location you specified when you saved the file.
4. Double-click the .exe file you downloaded. The WinZip Self-Extractor dialog box appears.
5. Specify the location to save the unzipped files to and click Unzip. A message appears, stating that the files unzipped successfully.
6. Click OK.
7. Click Close.
Downloading the Help File
1. Click the appropriate button to download the zipped file and save it to your hard-disk drive. 2. Go to the directory location you specified when you saved the file.
3. Double-click the .exe file you downloaded. The WinZip Self-Extractor dialog box appears.
4. Specify the location to save the unzipped files to and click Unzip. A message appears, stating that the files unzipped successfully.
5. Click OK.
6. Click Close.
Viewing the Help File
1. Start your browser and open the index.htm file in the directory containing the unzipped files.
2. Click the Start button on the Windows desktop, point to Programs, and then click Windows Explorer.
3. Navigate to the directory in which you saved the Help file.
4. Double-click the file.
Back to Contents Page
Back to Contents Page
Drivers and Utilities for Microsoft® Windows® 2000: Dell™ Inspiron™ 5000 Series
Overview
Installing the Touch Pad Driver
System Software CD
Installing the Software DVD Decoder Driver (Optional)
Installing Windows 2000
Installing the Intel SpeedStep Utility (Optional)
Installing the Audio Driver
Updating Drivers and Utilities
Installing the Video Driver
Overview
This section explains how to install or reinstall Dell-provided device drivers and utilities on your Dell computer running the Microsoft Windows 2000 operating system.
You may need to use this information under the following conditions:
l
You are reinstalling the Windows operating system.
l
You are reinstalling the Dell-provided drivers and utilities.
l
You installed a new primary hard-disk drive and you must install all of the system software.
Installing Drivers and Utilities for Windows
To install the system software, you need the following items:
l
System Software CD
l
CD-ROM or DVD-ROM drive installed in the media bay of the computer
NOTE: The drivers on the System Software CD are the same drivers that Dell installed on your hard-disk drive before shipping the
computer to you. To download the latest versions of these drivers, visit the Dell support Web site at http://support.dell.com.
System Software CD
The following figure shows the directory structure of the System Software CD for Inspiron 5000 series computers. The CD is bootable. The R:\> prompt appears
when you exit to MS-DOS® from the Diagnostics menu.
Installing Windows 2000
Perform the following steps to install the Windows 2000 operating system on the hard-disk drive before you install any device drivers or utilities:
1. Insert the Dell Products Recovery CD into the CD-ROM or DVD-ROM drive.
2. Shut down the computer.
3. Turn on the computer.
4. Press any key when the Press any key to boot from CD message appears on the screen.
5. When the Windows 2000 Setup window appears, ensure that the To setup Win2000 now, press ENTER option is highlighted. Then press <Enter>.
6. Read the information in the License Agreement window, and then press <F8> to continue.
7. When the Windows 2000 Professional Setup window appears, press the arrow keys to select the Windows 2000 partition option that you want. To continue,
press the key specified in the partition option that you chose.
8. When the Windows 2000 Professional Setup window reappears, press the arrow keys to select the type of filing system that you want Windows 2000 to use,
and then press <Enter>.
9. Press <Enter> again to restart your computer.
10. Click Next when the Welcome to the Windows 2000 Setup Wizard window appears.
11. When the Regional Settings window appears, select the settings for your locale, and then click Next.
12. Enter your name and organization in the Personalize Your Software window, and then click Next.
13. When prompted, enter the Windows product key, which is printed on the Microsoft label on your computer. Then click Next.
14. When the Computer Name and Administrator Password window appears, enter a name for your computer and a password, if desired. Then click Next.
15. Enter the date and time in the Date and Time Settings window, and then click Next.
Windows 2000 now begins to install its components and configure the computer.
17. When the Completing the Windows 2000 Setup Wizard window appears, remove the CD from the drive, and then click Finish. The computer automatically
restarts.
Installing the Audio Driver
The audio driver allows you to customize the sound features of your computer.
1. Save and close any open files, and exit any open application programs.
2. Insert the System Software CD into the CD-ROM or DVD-ROM drive.
3. Click the Start button, and then click Run.
4. In the Run dialog box, type x:\win2000\audio\setup.exe, where x is the CD-ROM or DVD-ROM drive letter.
The CD-ROM or DVD-ROM drive letter is usually D.
5. Click OK.
6. In the Welcome window, click Next>.
An information dialog box appears, stating that the audio driver is installed on your computer.
7. Click OK.
8. When prompted, ensure that Yes, I want to restart my computer now is selected, and then click Finish.
NOTE: If the computer is set to boot from the CD-ROM or DVD-ROM drive before the hard-disk drive, remove the System
Software CD before the computer restarts so that the computer does not boot from the CD. For information on changing the boot
sequence, see "System Setup Program."
The audio drivers are installed, and the installation is complete.
Installing the Video Driver
The video driver controls video resolution and color palette.
NOTE: If you need to use extended video modes, check the documentation that accompanied the application program to determine
if the driver is provided. If it is not, contact the software manufacturer for the necessary driver.
1. Save and close any open files, and exit any open application programs.
2. Insert the System Software CD into the CD-ROM or DVD-ROM drive.
3. Click the Start button, and then click Run.
4. In the Run dialog box, type x:\win2000\video\setup.exe, where x is the CD-ROM or DVD-ROM drive letter.
The CD-ROM or DVD-ROM drive letter is usually D.
5. In the Setup Complete window, ensure that Yes, I want to restart my computer now is selected, and then click Finish.
The computer restarts automatically.
NOTES: If the computer is set to boot from the CD-ROM or DVD-ROM drive before the hard-disk drive, remove the System
Software CD before the computer restarts so that the computer does not boot from the CD. For information on changing the boot
sequence, see "System Setup Program."
After the computer restarts, you can change the video resolution.
Installing the Touch Pad Driver
The touch pad driver controls touch pad and mouse functions.
NOTE: When you are prompted to select a directory, Dell recommends using the default directory settings.
1. Save and close any open files, and exit any open application programs.
2. Insert the System Software CD into the CD-ROM or DVD-ROM drive.
3. Click the Start button, and then click Run.
4. In the Run dialog box, type x:\win2000\touchpad\english\setup.exe, where x is the CD-ROM or DVD-ROM drive letter.
If you are using a Japanese-language version of Windows, type x:\win2000\touchpad\japanese\setup.exe, where x is the CD-ROM or
DVD-ROM drive letter.
The CD-ROM or DVD-ROM drive letter is usually D.
NOTICE: Do not install the Japanese-language driver on a computer with a non-Japanese-language operating
system.
5. Click Unzip.
6. Click OK.
7. In the Welcome window, click Next>.
8. At the Important Information window, click Next> twice.
9. At the Start Copying Files window, click Next>.
The touch pad driver is copied to your hard-disk drive.
10. At the Setup Complete window, be sure that the Yes, I want to restart my computer now button is selected, and then click Finish.
The Information about your Touch Pad window appears. If you do no want this window to appear each time you start the computer, remove the
check from the box that says Show this message the next time Windows starts. Then click Close.
NOTE: If the computer is set to boot from the CD-ROM or DVD-ROM drive before the hard-disk drive, remove the System
Software CD before the computer restarts so that the computer does not boot from the CD. For information on changing the boot
sequence, refer to "System Setup Program."
Installing the Software DVD Decoder Driver (Optional)
The DVD decoder driver allows you to play DVD movies using your DVD-ROM drive on the computer.
NOTE: When you are prompted to select a directory, Dell recommends that you use the default directory setting.
1. Insert the Software DVD Decoder CD into the DVD-ROM drive.
The installation program starts automatically and the Choose Setup Language window appears.
NOTE: If the installation program does not start automatically, navigate to the Software DVD Decoder CD and click the Setup
icon.
2. Select English, and then click OK.
The Welcome screen appears.
3. Click Next>.
The Software License Agreement window appears.
4. Click Yes.
The Choose Destination window appears.
5. Click Next>.
The files are copied to your disk and the setup Complete window appears.
6. Ensure that the Yes, I want to restart my computer now is selected, and then click Finish.
Your computer restarts and the deskop appears.
7. Insert your DVD into the DVD-ROM drive.
When you start your DVD for the first time, a Warning dialog box appears, explaining that DVD playback performance is dependent on your overall
system configuration and that some DVD titles are protected with an antitaping product provided by Macrovision, Inc.
NOTES: A variety of factors determine the DVD's playback performance. For more information, read the "Requirements" section
in the release notes that came with your DVD software.
The Macrovision product allows you to view you DVD on most televisions, but it distorts the video image if played back from a
videotape. The DVD decoder software provided with your system does not allow you to play back DVDs with graphics cards that
contain a TV-out connector.
If you have a TV-out connector on your computer and your DVD-ROM drive does not play your DVD title, make sure the TV-out
feature in your graphics card's software is turned off. Dell does not currently provide a TV-out connector as an accessory item.
8. Click OK.
Setting and Changing the DVD-ROM Drive Code
If you reinstall the DVD decoder software, you must set the DVD-ROM drive region code before you can play a movie. The region code can be reset if you relocate
to another region.
NOTICE: You should reset the region code only when absolutely necessary. You can reset the
region code up to four times.
To reset the drive region code, perform the following steps:
1. Insert a DVD coded for the new region into the DVD-ROM drive.
A notification box appears, explaining that the disc belongs to another region and cannot be played. The notification also explains how to reset the region
setting.
2. Follow the instructions on the screen to change the region setting.
Installing the Intel® SpeedStep™ Utility (Optional)
NOTICE: Do not install the Intel SpeedStep utility unless your computer has a Mobile Intel Pentium® III processor
with Intel SpeedStep technology. To determine if your computer has a Mobile Intel Pentium III processor with Intel
SpeedStep technology, check for the Intel SpeedStep item in the Power menu of the system setup program. For
instructions on using the system setup program, see "System Setup Program."
If your computer has a Mobile Intel Pentium III processor with Intel SpeedStep technology, you must reinstall the Intel SpeedStep utility after you install a new harddisk drive or reformat your hard-disk drive.
1. Save and close any open files, and exit any open application programs.
2. Insert the System Software CD into the CD-ROM or DVD-ROM drive.
3. Click the Start button, and then click Run.
4. In the Run dialog box, type x:\win2000\spd_stp\english\setup.exe, where x is the CD-ROM or DVD-ROM drive letter.
The CD-ROM or DVD-ROM drive letter is usually D.
5. Click OK.
6. In the Welcome window, click Next>.
7. At the Setup Complete window, ensure that the Yes, I want to restart my computer now is selected, and then click Finish.
NOTE: If the computer is set to boot from the CD-ROM or DVD-ROM drive before the hard-disk drive, remove the System
Software CD before the computer restarts so that the computer does not boot from the CD. For information on changing the boot
sequence, refer to "System Setup Program."
Updating Drivers and Utilities
The Dell support Web site, http://support.dell.com, provides driver and utility updates, as well as technical assistance with questions about your computer. Dell
regularly tests and releases certified drivers and utilities for Inspiron computers. In addition, if you have access to a computer with a modem and/or fax capabilities, you
can access the Dell TechConnect bulletin board service (BBS), AutoTech service, and TechFax service. The Dell Web site, http://www.dell.com, also contains links
to these services.
Back to Contents Page
Back to Contents Page
Drivers and Utilities for Microsoft® Windows® Me: Dell™ Inspiron™ 5000 Series
Overview
Installing the Touch Pad Driver
System Software CD
Installing Softex BayManager
Installing Windows Me
Installing the Intel SpeedStep Utility (Optional)
Installing the Audio Driver
Updating Drivers and Utilities
Installing the Video Driver
Overview
This section explains how to install or reinstall Dell-provided device drivers and utilities on your Dell computer running the Microsoft Windows Millennium Edition (Me)
operating system. You may need to use this information under the following conditions:
l
You are reinstalling the Windows operating system.
l
You are reinstalling the Dell-provided drivers and utilities.
l
You installed a new primary hard-disk drive and you must install all of the system software.
Installing Drivers and Utilities for Windows
To install the system software, you need the following items:
l
System Software CD
l
CD-ROM or DVD-ROM drive installed in the media bay of the computer
NOTE: The drivers on the System Software CD are the same drivers that Dell installed on your hard-disk drive before shipping the
computer to you. To download the latest versions of these drivers, visit the Dell support Web site at http://support.dell.com.
System Software CD
The following figure shows the directory structure of the System Software CD for Inspiron 5000 series computers. The CD is bootable. The R:\> prompt appears
when you exit to MS-DOS® from the Diagnostics menu.
Installing Windows Me
Perform the following steps to install the Windows Me operating system on the hard-disk drive before you install any device drivers or utilities:
1. Turn on the computer and enter the system setup program.
2. In the system setup program Boot menu, change the boot sequence so that the CD or DVD drive boots first. Then place the Dell Product Recovery CD in the
CD or DVD drive and close the drive tray.
3. Exit the system setup program.
4. At the Welcome window, click OK.
5. Double-click Refresh Windows OS.
6. Click OK.
7. Click OK again.
8. Remove the Dell Product Recovery CD from the CD or DVD drive, and click OK to restart your computer.
The Getting ready to run Windows for the first time window appears.
9. If the mouse tutorial starts, press <Esc> to exit, and then press <y>.
10. Click the regional setting closest to where you live, and click Next.
11. Click the graphic that matches your keyboard layout, and click Next.
12. In the User Information window, type your name and, if applicable, company name, and then click Next
The Name field must be completed; the Company Name field is optional.
The License Agreement window appears.
13. Click I accept the Agreement, and then click Next.
14. Type the Windows product key in the fields provided, and then click Next.
The product key is the bar code number found on the Microsoft Windows label, which is located on the computer.
15. When the Start Wizard appears, click Finish.
The Enter Windows Properties window appears. To continue without creating a Windows user name and password, click OK. Otherwise, type your user
name and password in the appropriate fields and then click OK.
16. If the Date/Time Properties window appears, adjust the date and time properties, click Apply, and then click OK.
Windows updates the system settings and restarts your computer.
17. If you created a Windows user name and password, type your password and click OK.
NOTICE: Make sure that you reinstall the Intel® Chip Set Update Utility driver before you reinstall any other drivers.
18. Reinstall the appropriate drivers.
19. Reenable your virus protection software.
Installing the Audio Driver
The audio driver allows you to customize the sound features of your computer.
1. Save and close any open files, and exit any open application programs.
2. Insert the System Software CD into the CD-ROM or DVD-ROM drive.
3. Click the Start button, and then click Run.
4. In the Run dialog box, type x:\winme\audio\setup.exe, where x is the CD-ROM or DVD-ROM drive letter.
The CD-ROM or DVD-ROM drive letter is usually D.
5. Click OK.
6. In the Welcome window, click Next>.
7. On the Main Menu, Upgrade Drivers is selected. Click Next>.
The audio files are copied to your hard-disk drive.
8. When prompted, ensure that Yes, I want to restart my computer now is selected, and then click Finish.
NOTE: If the computer is set to boot from the CD-ROM or DVD-ROM drive before the hard-disk drive, remove the System
Software CD before the computer restarts so that the computer does not boot from the CD. For information on changing the boot
sequence, see "System Setup Program."
The New Hardware Found window appears, the software for the hardware is installed, and the installation is complete.
Installing the Video Driver
The video driver controls video resolution and color palette.
NOTE: If you need to use extended video modes, check the documentation that accompanied the application program to determine
if the driver is provided. If it is not, contact the software manufacturer for the necessary driver.
1. Save and close any open files, and exit any open application programs.
2. Insert the System Software CD into the CD-ROM or DVD-ROM drive.
3. Click the Start button, and then click Run.
4. In the Run dialog box, type x:\winme\video\setup.exe, where x is the CD-ROM or DVD-ROM drive letter.
The CD-ROM or DVD-ROM drive letter is usually D.
NOTE: DirectX is installed automatically if your computer needs it.
5. In the Setup Complete window, ensure that Yes, I want to restart my computer now is selected, and then click Finish.
The computer restarts automatically.
NOTES: If the computer is set to boot from the CD-ROM or DVD-ROM drive before the hard-disk drive, remove the System
Software CD before the computer restarts so that the computer does not boot from the CD. For information on changing the boot
sequence, see "System Setup Program."
After the computer restarts, you can change the video resolution.
Installing the Touch Pad Driver
The touch pad driver controls touch pad and mouse functions.
NOTE: When you are prompted to select a directory, Dell recommends using the default directory settings.
1. Save and close any open files, and exit any open application programs.
2. Insert the System Software CD into the CD-ROM or DVD-ROM drive.
3. Click the Start button, and then click Run.
4. In the Run dialog box, type x:\winme\touchpad\english\setup.exe, where x is the CD-ROM or DVD-ROM drive letter.
If you are using a Japanese-language version of Windows, type x:\winme\touchpad\japanese\setup.exe, where x is the CD-ROM or
DVD-ROM drive letter.
The CD-ROM or DVD-ROM drive letter is usually D.
NOTICE: Do not install the Japanese-language driver on a computer with a non-Japanese-language operating
system.
5. Click OK.
6. In the Welcome window, click Next>.
7. At the Choose Destination Location window, click Next>.
8. At the Start Copying Files window, click Next>.
The touch pad drivers are copied to your hard-disk drive.
9. At the Setup Complete window, be sure that the Yes, I want to restart my computer now button is selected, and then click Finish.
The Information about your Touch Pad window appears. If you do no want this window to appear each time you start the computer, remove the check from
the box that says Show this message the next time Windows starts. Then click Close.
NOTE: If the computer is set to boot from the CD-ROM or DVD-ROM drive before the hard-disk drive, remove the System
Software CD before the computer restarts so that the computer does not boot from the CD. For information on changing the boot
sequence, see "System Setup Program."
Installing Softex BayManager
Softex BayManager is a utility that makes it possible to swap media bay devices without turning off the computer.
NOTICE: You must uninstall Softex BayManager before you download and install a Softex BayManager software
upgrade from the Dell Support Web site File Library.
To uninstall Softex BayManager, perform the following steps:
1. Save and close any open files, and exit any open application programs.
2. Click Start, select Settings, and then click Control Panel.
3. Double-click Add/Remove Programs.
4. Select Softex BayManager and click Add/Remove.
5. Follow the instructions on the screen to complete the uninstall process.
To install the Softex BayManager from the System Software CD, perform the following steps:
1. Insert the System Software CD into the CD-ROM or DVD-ROM drive.
2. Click the Start button, and then click Run.
3. In the Run dialog box, type x:\winme\baymgr\setup.exe, where x is the CD-ROM or DVD-ROM drive letter.
The CD-ROM or DVD-ROM drive letter is usually D.
4. Click OK.
5. In the Welcome window, click Next>.
6. At the Setup Complete window, ensure that the Yes, I want to restart my computer now is selected, and then click Finish.
NOTE: If the computer is set to boot from the CD-ROM or DVD-ROM drive before the hard-disk drive, remove the System
Software CD before the computer restarts so that the computer does not boot from the CD. For information on changing the boot
sequence, see "System Setup Program."
Installing the Intel® SpeedStep™ Utility (Optional)
NOTICE: Do not install the Intel SpeedStep utility unless your computer has a Mobile Intel Pentium® III processor
with Intel SpeedStep technology. To determine if your computer has a Mobile Intel Pentium III processor with Intel
SpeedStep technology, check for the Intel SpeedStep item in the Power menu of the system setup program. For
instructions on using the system setup program, see "System Setup Program."
If your computer has a Mobile Intel Pentium III processor with Intel SpeedStep technology, you must reinstall the Intel SpeedStep utility after you install a new harddisk drive or reformat your hard-disk drive.
1. Save and close any open files, and exit any open application programs.
2. Insert the System Software CD into the CD-ROM or DVD-ROM drive.
3. Click the Start button, and then click Run.
4. In the Run dialog box, type x:\winme\spd_stp\english\setup.exe, where x is the CD-ROM or DVD-ROM drive letter.
The CD-ROM or DVD-ROM drive letter is usually D.
NOTE: If the driver is not in English, substitute the appropriate language.
5. Click OK.
6. In the Welcome window, click Next>.
7. At the Setup Complete window, ensure that the Yes, I want to restart my computer now is selected, and then click Finish.
Updating Drivers and Utilities
The Dell support Web site, http://support.dell.com, provides driver and utility updates, as well as technical assistance with questions about your computer. Dell
regularly tests and releases certified drivers and utilities for Inspiron computers. In addition, if you have access to a computer with a modem and/or fax capabilities, you
can access the Dell TechConnect bulletin board service (BBS), AutoTech service, and TechFax service. The Dell Web site, http://www.dell.com, also contains links
to these services.
Back to Contents Page
Back to Contents Page
Drivers and Utilities for Microsoft® Windows® 98: Dell™ Inspiron™ 5000 Series
Overview
Installing the Touch Pad Driver
System Software CD
Installing Softex BayManager
Installing Windows 98
Installing the Internal Modem Driver (Optional)
Recreating the Hibernate (Save-to-Disk Suspend) File
Installing the Software DVD Decoder Driver (Optional)
Installing the Audio Driver
Installing the Intel SpeedStep Utility (Optional)
Installing the Video Driver
Updating Drivers and Utilities
Overview
This section explains how to install or reinstall Dell-provided device drivers and utilities on your Dell computer running the Microsoft Windows 98 Second Edition
operating system. You may need to use this information under the following conditions:
l
You are reinstalling the Windows operating system.
l
You are reinstalling the Dell-provided drivers and utilities.
l
You installed a new primary hard-disk drive and you must install all of the system software.
Installing Drivers and Utilities for Windows
To install the system software, you need the following items:
l
System Software CD
l
CD-ROM or DVD-ROM drive installed in the media bay of the computer
l
Microsoft Windows 98 Second Edition CD
l
Microsoft Boot Disk Windows 98 Series diskette
NOTES: Verify that Windows 98 is already installed on the hard-disk drive before you install any device drivers. To install Windows
98 Second Edition, see “Installing Windows 98."
The drivers on the System Software CD are the same drivers that Dell installed on your hard-disk drive before shipping the
computer to you. To download the latest versions of these drivers, visit the Dell support Web site at http://support.dell.com.
System Software CD
The following figure shows the directory structure of the System Software CD for Inspiron 5000 series computers. The CD is bootable. The R:\> prompt appears
when you exit to MS-DOS® from the Diagnostics menu.
Installing Windows 98
Perform the following steps to install the Windows 98 operating system on the hard-disk drive before you install any device drivers or utilities:
1. Turn on the computer and enter the system setup program.
2. In the system setup program Boot menu, change the boot sequence so that the CD or DVD drive boots first. Then place the Dell Product Recovery CD in the
CD or DVD drive and close the drive tray.
3. Exit the system setup program.
4. At the Welcome window, click OK.
5. Double-click Refresh Windows OS.
6. Click OK.
7. Click OK again.
8. Remove the Dell Product Recovery CD from the CD or DVD drive, and click OK to restart your computer.
The Getting ready to run Windows for the first time window appears.
9. If the mouse tutorial starts, press <Esc> to exit and then press <y>.
10. Click the regional setting closest to where you live, and click Next.
11. Click the graphic that matches your keyboard layout, and click Next.
12. In the User Information window, type your name and, if applicable, company name, and then click Next.
The Name field must be completed; the Company Name field is optional.
The License Agreement window appears.
13. Click I accept the Agreement, and then click Next.
14. Type the Windows product key in the fields provided, and then click Next.
The product key is the bar code number found on the Microsoft Windows label, which is located on the computer.
15. When the Start Wizard appears, click Finish.
The Enter Windows Properties window appears. To continue without creating a Windows user name and password, click OK. Otherwise, type your user
name and password in the appropriate fields and then click OK.
16. If the Date/Time Properties window appears, adjust the date and time properties, click Apply, and then click OK.
Windows updates the system settings and restarts your computer.
17. If you created a Windows user name and password, type your password and click OK
NOTICE: Make sure that you reinstall the Intel® Chip Set Update Utility driver before you reinstall any other drivers.
18. Reinstall the appropriate drivers.
19. Reenable your virus protection software.
Recreating the Hibernate (Save-to-Disk Suspend) File
When the hibernate mode is activated, all system data is stored in the hibernate (save-to-disk suspend) file on your hard-disk drive. The hibernate file on your harddisk drive cannot be accessed by the Windows operating system or application programs.
You must recreate the hibernate file if you perform any of the following actions:
l
Delete the hibernate file.
l
Install a new hard-disk drive.
l
Reformat your hard-disk drive.
l
Install additional memory.
NOTE: If you install additional memory, you must delete the hibernate file before you recreate the file.
Boot Your Computer With the System Software CD
1. Save and close any open files, exit any open application programs, and shut down the computer.
2. If the computer is docked, undock it.
For instructions, see the Port Replicator User’s Guide.
3. Turn on the computer.
4. Press <F2> when you see the Dell logo to access the system setup program.
5. Press the right-arrow key to highlight Boot.
6. Press the down-arrow key to highlight a device, and then press <F5> to move the device down the list or press <F6> to move the device up the list. Select the
following boot sequence:
l
Floppy
l
CD ROM/DVD
l
Internal Hard Drive
7. Insert the System Software CD into the CD-ROM or DVD-ROM drive.
8. Press <F10> to save your changes and exit the system setup program.
9. When the Setup Confirmation screen appears, press <Enter> to confirm that you want to save the configuration changes and exit the system setup program.
The computer restarts automatically. The Dell Diagnostics begins automatically. After the diagnostic utility loads, the Diagnostics Menu appears.
Fully Test All Devices
Quickly Test All
Devices
Select Devices to
Test
Exit to MS-DOS
10. Press the down-arrow key to select Exit to MS-DOS and then press <Enter>.
For instructions on deleting the hibernate file, see "Delete the Hibernate File."
Delete the Hibernate File
1. Boot your computer from the CD-ROM or DVD-ROM drive with the System Software CD in the CD-ROM or DVD-ROM drive.
For instructions, see "Boot Your Computer With the System Software CD."
2. At the R:\DIAGS prompt, type cd\ and then press <Enter>.
3. At the R:\ prompt, type cd\utility and press <Enter>.
4. Type phdisk /delete /file and press <Enter>.
NOTE: You must type a space between phdisk and /delete and /file.
5. Follow the instructions on your screen to delete the hibernate file.
The computer automatically restarts.
To create a new hibernate file immediately after deleting it, perform the following steps:
1. When the Diagnostics Menu appears, press the down-arrow key to select Exit to MS-DOS and then press <Enter>.
2. Complete steps 2 through 6 in the next section.
Create the Hibernate File
1. Boot your computer from the CD-ROM or DVD-ROM drive with the System Software CD in the CD-ROM or DVD-ROM drive.
For instructions, see "Boot Your Computer With the System Software CD."
2. At the R:\DIAGS prompt, type cd\ and then press <Enter>.
3. At the R:\ prompt, type cd\win98\utility and press <Enter>.
4. Type phdisk /create /file and press <Enter>.
NOTE: You must type a space between phdisk and /create and /file.
The utility calculates the size of the file, in kilobytes, based on the amount of system memory in your computer, plus the amount of video memory in your
computer, plus 2 MB to handle additional system requirements.
5. Follow the instructions on your screen to create the hibernate file.
6. At the R: \Win98\UTILITY prompt, type phdisk /info and press <Enter>.
7. As soon as you see the Dell logo on the screen, remove the System Software CD from the CD-ROM or DVD-ROM drive.
Windows automatically starts. After you create the hibernate file, you must enable hibernate support.
Enable Hibernate Support
1. Click the Start button, point to Settings, and click Control Panel.
2. Double-click the Power Management icon.
3. Click the Hibernate tab.
4. Ensure that Enable hibernate support is selected and click Apply.
5. Click OK to close the Control Panel.
View the Hibernate File Information
1. Boot your computer from the CD-ROM or DVD-ROM drive with the System Software CD in the CD-ROM or DVD-ROM drive.
For instructions, see "Boot Your Computer With the System Software CD."
2. At the R:\DIAGS prompt, type cd\ and then press <Enter>.
3. At the R:\ prompt, type cd\utility and press <Enter>.
4. Type phdisk /info and press <Enter>.
NOTE: You must type a space between phdisk and /info.
The hibernate file information appears on the screen.
5. Remove the System Software CD from the CD-ROM or DVD-ROM drive.
6. To restart the computer and run Windows, press <Ctrl><Alt><Delete>.
Installing the Audio Driver
The audio driver allows you to customize the sound features of your computer.
1. Save and close any open files, and exit any open application programs.
2. Insert the System Software CD into the CD-ROM or DVD-ROM drive.
3. Click the Start button, and then click Run.
4. In the Run dialog box, type x:\audio\setup.exe, where x is the CD-ROM or DVD-ROM drive letter.
The CD-ROM or DVD-ROM drive letter is usually D.
5. Click OK.
6. In the Welcome window, click Next>.
7. On the Main Menu, Upgrade Drivers is selected. Click Next>.
The audio files are copied to your hard-disk drive.
8. When prompted, ensure that Yes, I want to restart my computer now is selected, and then click Finish.
NOTE: If the computer is set to boot from the CD-ROM or DVD-ROM drive before the hard-disk drive, remove the System
Software CD before the computer restarts so that the computer does not boot from the CD. For information on changing the boot
sequence, see "System Setup Program."
The New Hardware Found window appears, the software for the hardware is installed, and the installation is complete.
Installing the Video Driver
The video driver controls video resolution and color palette.
NOTE: If you need to use extended video modes, check the documentation that accompanied the application program to determine
if the driver is provided. If it is not, contact the software manufacturer for the necessary driver.
1. Save and close any open files, and exit any open application programs.
2. Insert the System Software CD into the CD-ROM or DVD-ROM drive.
3. Click the Start button, and then click Run.
4. In the Run dialog box, type x:\video\setup.exe, where x is the CD-ROM or DVD-ROM drive letter.
The CD-ROM or DVD-ROM drive letter is usually D.
5. In the Setup Complete window, ensure that Yes, I want to restart my computer now is selected, and then click Finish.
The computer restarts automatically.
NOTES: If the computer is set to boot from the CD-ROM or DVD-ROM drive before the hard-disk drive, remove the System
Software CD before the computer restarts so that the computer does not boot from the CD. For information on changing the boot
sequence, see "System Setup Program."
After the computer restarts, you can change the video resolution.
Installing the Touch Pad Driver
The touch pad driver controls touch pad and mouse functions.
NOTE: When you are prompted to select a directory, Dell recommends using the default directory settings.
1. Save and close any open files, and exit any open application programs.
2. Insert the System Software CD into the CD-ROM or DVD-ROM drive.
3. Click the Start button, and then click Run.
4. In the Run dialog box, type x:\touchpad\english\setup.exe, where x is the CD-ROM or DVD-ROM drive letter.
If you are using a Japanese-language version of Windows, type x:\touchpad\japanese\setup.exe, where x is the CD-ROM or DVD-ROM
drive letter.
The CD-ROM or DVD-ROM drive letter is usually D.
NOTICE: Do not install the Japanese-language driver on a computer with a non-Japanese-language operating
system.
5. Click OK.
6. In the Welcome window, click Next>.
7. At the Choose Destination Location window, click Next>.
8. At the Start Copying Files window, click Next>.
The touch pad drivers are copied to your hard-disk drive.
9. At the Setup Complete window, be sure that the Yes, I want to restart my computer now button is selected, and then click Finish.
The Information about your Touch Pad window appears. If you do no want this window to appear each time you start the computer, remove the check from
the box that says Show this message the next time Windows starts. Then click Close.
NOTE: If the computer is set to boot from the CD-ROM or DVD-ROM drive before the hard-disk drive, remove the System
Software CD before the computer restarts so that the computer does not boot from the CD. For information on changing the boot
sequence, see "System Setup Program."
Installing Softex BayManager
Softex BayManager is a utility that makes it possible to swap media bay devices without turning off the computer.
NOTICE: You must uninstall Softex BayManager before you download and install a Softex BayManager software
upgrade from the Dell support Web site File Library.
To uninstall Softex BayManager, perform the following steps:
1. Save and close any open files, and exit any open application programs.
2. Click Start, select Settings, and then click Control Panel.
3. Double-click Add/Remove Programs.
4. Select Softex BayManager and click Add/Remove.
5. Follow the instructions on the screen to complete the uninstall process.
To install the Softex BayManager from the System Software CD, perform the following steps:
1. Insert the System Software CD into the CD-ROM or DVD-ROM drive.
2. Click the Start button, and then click Run.
3. In the Run dialog box, type x:\baymgr\setup.exe, where x is the CD-ROM or DVD-ROM drive letter.
The CD-ROM or DVD-ROM drive letter is usually D.
4. Click OK.
5. In the Welcome window, click Next>.
6. At the Setup Complete window, ensure that the Yes, I want to restart my computer now is selected, and then click Finish.
NOTE: If the computer is set to boot from the CD-ROM or DVD-ROM drive before the hard-disk drive, remove the System
Software CD before the computer restarts so that the computer does not boot from the CD. For information on changing the boot
sequence, see "System Setup Program."
Installing the Internal Modem Driver (Optional)
NOTICE: Do not use this modem driver with a PC Card modem. The modem driver on the System Software CD is
compatible only with the optional internal modem.
If your computer has an internal modem, perform the following steps to install the driver:
1. Save and close any open files, and exit any open application programs.
2. Insert the System Software CD into the CD-ROM or DVD-ROM drive.
3. Click the Start button, and then click Run.
4. In the Run dialog box, type x:\modem\setup.exe, where x is the CD-ROM or DVD-ROM drive letter.
The CD-ROM or DVD-ROM drive letter is usually D.
5. Click OK.
6. In the Welcome window, click Next>.
The New Hardware Found window appears, the software for the modem is installed, and the installation is complete.
Installing the Software DVD Decoder Driver (Optional)
The DVD decoder driver allows you to play DVD movies using your DVD-ROM drive on the computer.
NOTE: When you are prompted to select a directory, Dell recommends that you use the default directory setting.
1. Insert the Dell Inspiron 5000 Software DVD Decoder CD into the DVD-ROM drive.
2. Click the Start button, and then click Run.
3. In the Run dialog box, type x:\setup.exe, where x is the DVD-ROM drive letter.
The DVD-ROM drive letter is usually D.
4. Click OK.
The Welcome window appears.
5. Click Next>.
6. In the Choose Destination Location window, click Next>.
7. In the Select Program Folder window, click Next>.
8. In the Start Copying Files window, click Next>.
9. In the Setup Complete window, ensure that the Yes, I want to restart my computer now is selected, and then click Finish.
Setting and Changing the DVD-ROM Drive Region Code
If you reinstall the DVD decoder software, you must set the DVD region code before you can play a movie. The region code can be reset if you relocate to another
region.
NOTICE: You should reset the region code only when absolutely necessary. You can reset the region code up to four
times.
To reset the drive region code, perform the following steps:
1. Insert a DVD movie disc coded for the new region into the DVD-ROM drive.
A notification box appears, explaining that the disc belongs to another region and cannot be played. The notification also explains how to reset the region setting.
2. Follow the instructions on the screen to change the region setting.
Installing the Intel® SpeedStep™ Utility (Optional)
NOTICE: Do not install the Intel SpeedStep utility unless your computer has a Mobile Intel Pentium® III processor
with Intel SpeedStep technology. To determine if your computer has a Mobile Intel Pentium III processor with Intel
SpeedStep technology, check for the Intel SpeedStep item in the Power menu of the system setup program. For
instructions on using the system setup program, see "System Setup Program."
If your computer has a Mobile Intel Pentium III processor with Intel SpeedStep technology, you must reinstall the Intel SpeedStep utility after you install a new harddisk drive or reformat your hard-disk drive.
1. Save and close any open files, and exit any open application programs.
2. Insert the System Software CD into the CD-ROM or DVD-ROM drive.
3. Click the Start button, and then click Run.
4. In the Run dialog box, type x:\spd_stp\setup.exe, where x is the CD-ROM or DVD-ROM drive letter.
The CD-ROM or DVD-ROM drive letter is usually D.
5. Click OK.
6. In the Welcome window, click Next>.
7. At the Setup Complete window, ensure that the Yes, I want to restart my computer now is selected, and then click Finish.
Updating Drivers and Utilities
The Dell support Web site, http://support.dell.com, provides driver and utility updates, as well as technical assistance with questions about your computer. Dell
regularly tests and releases certified drivers and utilities for Inspiron computers. In addition, if you have access to a computer with a modem and/or fax capabilities, you
can access the Dell TechConnect bulletin board service (BBS), AutoTech service, and TechFax service. The Dell Web site, http://www.dell.com, also contains links
to these services.
Back to Contents Page
Back to Contents Page
Technical Overview: Dell™ Inspiron™ 5000 Series
New Features
Back View
Hardware Overview
Left Side View
LCD Panels
Right Side View
Front View
Bottom View
New Features
Most of the core technology implemented in the Inspiron 5000 series existed previously on other Dell portable computers. The Inspiron 5000 series has the following
new key features:
l
A 3-spindle, 7.5-pound chassis (15-inch liquid crystal display [LCD]) with an internal diskette drive, removable hard-disk drive, and swappable media bay
device.
l
An available Intel® Pentium®-III processor with Intel SpeedStepTM technology.
l
An integrated MiniPCI socket for an optional internal modem.
l
Microsoft® Windows® 98 Second Edition, Microsoft Windows 2000, or Microsoft Windows Millennium Edition (Me) automatically installs in Advanced
Configuration and Power Interface (ACPI) mode, without any setup switches.
Hardware Overview
Processors (Inspiron 5000)
Intel Celeron™: 466 MHz, 450 MHz, and 500 MHz
Intel Pentium III: 450 MHz and 500 MHz
Intel Pentium III with SpeedStep technology: 600/500 MHz and 650/500 MHz
Processors (Inspiron 5000e)
Intel Celeron: 600 MHz and 650 MHz Intel Pentium III with SpeedStep technology: 650 MHz, 700 MHz, and 750 MHz.
System chip set
Intel 82440BX AGP Set:
l
l
82443BX PCI AGP controller—Integrated with the processor on the MMC-2 mobile module
82371MB PIIX4E—Located on the system board
Memory (Inspiron 5000)
PC-100 compliant SODIMMs (SDRAM) running at:
l
l
66 MHz (Intel Celeron processor running at 466 MHz)
100 MHz (Intel Celeron processors running at 450 and 500 MHz, Intel Pentium III processor, and Intel Pentium III processor with Intel SpeedStep technology)
Memory (Inspiron 5000e)
PC-100 compliant SODIMMs (SDRAM) running at 100 MHz
Hard-disk drive
(Inspiron 5000)
Hard-disk drive carrier provides support for 9.5-mm and 12.7-mm devices
System ships with 6-GB, 12-GB, and 18-GB options
Hard-disk drive
(Inspiron 5000e)
Hard-disk drive carrier provides support for 9.5-mm and 12.7-mm devices
System ships with 6-GB, 10-GB, 20-GB, and 30-GB options
PC Card (CardBus)
Texas Instruments PCI-1225 CardBus controller
(zoomed video supported in the lower PC Card connector)
Video (Inspiron 5000)
ATI 3D Rage Mobility-P (video RAM: 4 MB or 8 MB)
Video (Inspiron 5000e)
ATI M3 (video RAM: 8 MB or 16 MB)
Audio
ESS Maestro-2E
Super I/O controller
SMSC FDC37C958FR
Optional modem
Actiontec MP560L-MiniPCI LT WinModem
Lucent L56xMF chip set
Optional NIC (APR)
Actiontec MP100I-MiniPCI 10/100 Ethernet
Intel 82559 chip set
NOTE: For the full name of an abbreviation or acronym used in this table, see the Glossary in the system Help.
LCD Panels
Designator
Diagonal Measurement
Resolution
GT
14.1 inches
XGA: 1024 x 768
LT
15.0 inches
XGA: 1024 x 768
VT
15.0 inches
SXGA+: 1400 x 1050
U (Inspiron 5000e only)
15.0 inches
UXGA+: 1600 x 1200
Front View
1 Display locking tabs
2 Display
8 Display latches
9 Battery bay
3 Display-close button
10 Microphone
4 Keyboard
11 Power button
5 Touch pad
12 Keyboard status indicators
6 Touch pad buttons
13 Device access/status indicators
7 Media bay
Back View
1 Fan exhaust
6 Docking connector
2 Serial port connector
7 Infrared port
3 Parallel port connector
8 USB port connector
4 TV-out S-video connector
9 PS/2 connector
5 Video connector
Left Side View
1 Diskette drive
4 Speaker (one of two)
2 Audio connectors
5 Display latch (one of two)
3 Modem connector (option)
6 Volume control buttons
Right Side View
1 Security cable slot
4 PC Card slot
2 Display latch (one of two)
5 AC adapter connector
3 Speaker (one of two)
6 Air intake
Bottom View
1 Battery bay
4 Hard-disk drive
2 Media bay
5 Modem cover
3 Strike zone
6 Memory module cover
Back to Contents Page
Back to Contents Page
Ports and Connectors: Dell™ Inspiron™ 5000 Series
I/O Connector Locations
Video Connector
Serial Port Connector
Infrared Port
Parallel Port Connector
USB Connector
TV-Out S-Video Connector
PS/2 Connector
I/O Connector Locations
1 Fan exhaust
6 Docking connector
2 Serial port connector
7 Infrared port
3 Parallel port connector
8 USB connector
4 TV-out S-video connector
9 PS/2 connector
5 Video connector
Serial Port Connector
Use the 9-pin serial port connector to attach a serial device to the computer. The serial port passes data in serial format (1 bit at a time over one line). This port
supports a variety of devices, including a serial mouse, that require serial data transmission. If you reconfigure your hardware, you may need pin number and signal
information for the serial port connector.
Pin
Signal
I/O
Definition
1
DCD
I
Data carrier detect
2
RXDA
I
Receive data
3
TXDA
O
Transmit data
4
DTR
O
Data terminal ready
5
GND
N/A
Signal ground
6
DSR
I
Data set ready
7
RTS
O
Request to send
8
CTS
I
Clear to send
9
RI
I
Ring indicator
Shell
N/A
N/A
Frame ground
Parallel Port Connector
Use the 25-hole parallel port connector to attach a parallel device to the computer. The parallel port connector is used primarily for printers. The parallel port transmits
data in parallel format, where 8 data bits (one byte) are sent simultaneously over eight separate lines.
The parallel port can also be configured for compatibility with the Personal System/2 (PS/2) standard. Support for the Enhanced Parallel Port (EPP) feature improves
network adapter performance (adapters connect to the computer's parallel port and require the appropriate software drivers from the adapter's manufacturer).
If you reconfigure your hardware, you may need pin number and signal information for the parallel port connector.
Pin
Signal
I/O
Definition
1
STB#
I/O
Strobe
2
D0
I/O
Printer
data bit 0
3
PD1
I/O
Printer
data bit 1
4
PD2
I/O
Printer
data bit 2
5
PD3
I/O
Printer data bit 3
6
PD4
I/O
Printer
data bit 4
7
PD5
I/O
Printer
data bit 5
8
PD6
I/O
Printer
data bit 6
9
PD7
I/O
Printer
data bit 7
10
ACK#
I
Acknowledge
11
BUSY
I
Busy
12
PE
I
Paper
end
13
SLCT
I
Select
14
AFD#
O
Automatic
feed
15
ERR#
I
Error
16
INIT#
O
Initialize
printer
17
SLIN#
O
Select in
18–25
N/A
N/A
Signal
ground
Shell
N/A
N/A
Frame
ground
TV-Out S-Video Connector
If the television has an S-video cable, plug it directly into the computer at the TV-out S-video connector. If the television has a composite cable, perform the following
steps:
1. Connect the cable that came with your computer to the TV-out S-video connector.
2. Connect the other end of the cable to the television composite cable.
Video Connector
Use the 15-pin video connector to attach an external monitor to the computer. If the image does not appear on the monitor immediately, press <Fn><F8>.
Pin
Signal
I/O
Definition
1
RED
O
Red video
2
GREEN
O
Green video
3
BLUE
O
Blue video
4
DDC2_MONID2
I
Monitor detect ID2
5
GND
N/A
Signal ground
6
GND
N/A
Signal ground
7
GND
N/A
Signal ground
8
GND
N/A
Signal ground
9
CRTVCC
O
5-V power source for CRT
10
GND
N/A
Signal ground
11
M-SEN#
I
Digital monitor sense/monitor detect ID1
12
DDC_DATA
I
Monitor detect serial data
13
HSYNC
O
Horizontal synchronization
14
VSYNC
O
Vertical synchronization
15
DDC_CLK
I
Monitor detect serial clock
Shell
N/A
N/A
Frame ground
Infrared Port
The infrared port is IrDA 1.1-compliant. An infrared data stream is transmitted through a lens in the computer, up to a distance of 1 meter (m), and received by a
compatible computer, printer, mouse, or remote control. The infrared port allows the transfer of files from one computer to another infrared-compatible device, without
using cable connections. Dell has installed data communications software for you to use with the infrared port. You can also use other commercially available infraredcapable application programs. For information on configuring the standard infrared drivers that come with Microsoft® Windows® 98, see your operating system
documentation. To install the fast infrared drivers provided by Dell, see the instructions in the readme.doc file on your System Software CD. If for some reason you
need to change the infrared port address, be careful not to create a conflict with the addresses of the serial port or the parallel port.
To use the infrared port, point the infrared port directly at the infrared port of the compatible device. Infrared devices transmit data in a 30° cone of infrared light. Start the data communications software on both devices, and then begin transferring files. Read the documentation that came with your compatible device to make sure you
operate it correctly.
NOTE: Make sure that no books, papers, or other objects block the transmission of data between the two infrared devices and that
the two devices are within the 30° cone.
USB Connector
Use the Universal Serial Bus (USB) connector to attach one or more USB devices, such as a mouse, to the computer. USB is a peripheral bus standard that enables
automatic detection of USB-compliant peripheral devices.
Pin
Signal
Definition
1
VCC
Cable power
2
-Data
N/A
3
+Data
N/A
4
Ground
Cable ground
PS/2 Connector
Use the 6-hole, miniature Deutsche Industrie Norm (DIN) PS/2 connector to attach PS/2-compatible devices such as a mouse, keyboard, or external numeric keypad.
If you reconfigure your hardware, you may need pin number and signal information for the PS/2 connector.
Pin
Signal
I/O
Definition
1
EXK_MSDATA
I/O
External keyboard/keypad/mouse data
2
KBD_DATA
I
Keyboard data
3
GND
N/A
Signal ground
4
EXK_MSPWR
N/A
External keyboard/keypad/mouse supply voltage
5
EXK_MSCLK
I/O
External keyboard/keypad/mouse clock
6
KBD_CLK
I
Keyboard clock
Shell
N/A
Back to Contents Page
N/A
Chassis ground
Back to Contents Page
Conserving Power: Dell™ Inspiron™ 5000 Series
Conservation Tips
Power Conservation Modes
Power Options Properties
Conservation Tips
l
You automatically conserve battery power each time you attach your computer to an electrical outlet. When the AC adapter is attached, the battery is charged
while the computer uses AC power. Your battery's life expectancy is largely determined by the number of times it is charged, so use an AC power source to run
the computer if one is available.
l
When the computer is using battery power, remove PC Cards that you are not using.
l
When possible, attach your computer to an electrical outlet when you play CDs and DVDs. Playing a CD or DVD uses a lot of battery power.
l
Place the computer in standby mode or hibernate mode when you leave the computer unattended for long periods of time. See "Power Conservation Modes" for
more information.
l
If you are going to connect your computer to a port replicator, click None when you program the display-close option on the Advanced tab in the Microsoft® Windows ® Power Options Properties window.
l
To exit a power conservation mode, press the power button.
Power Conservation Modes
You can use both standby mode and hibernate mode on your computer.
Standby Mode
Standby mode conserves power by turning off the display and the hard drive after a predetermined period of inactivity (a time-out.) When the computer exits standby
mode, the desktop is restored to the same state that it was in before the computer entered standby mode.
To activate standby mode:
l
Click the Start button, click Shut Down, click Stand by, and then click OK.
l
Press the power button or the power conservation key combination,
or
, that you programmed (via the Advanced tab).
For more information on activating standby mode for your operating system, see "Turning Your Computer On and Off" in the Tell Me How help file. To exit standby
mode, press the power button.
NOTE: You can use the Advanced tab to program the display-close option, the power button, and the power conservation key
combination to activate standby mode.
NOTICE: If your computer loses AC or battery power while in standby mode, you may lose data.
Hibernate Mode
Hibernate mode conserves power by copying system data to a reserved area on the hard drive and then completely turning off the computer. When the computer exits
hibernate mode, the programs and files that were open before you activated hibernate mode are still open.
Your computer enters hibernate mode if the battery charge level becomes critically low, or if either the power button, the power conservation key combination,
, or the display-close option are programmed to activate hibernate mode in the Advanced tab of the Power Options Properties window.
To exit hibernate mode, press the power button. The computer may take a short time to return to its typical operating state.
NOTE: Pressing a key or touching the touch pad will not bring the computer out of hibernate mode.
NOTE: Some PC Cards may not operate correctly after resuming operation from hibernate mode. If you encounter problems with a
PC Card, see "Using PC Cards" in the Tell Me How help file for instructions on removing and replacing the card, or simply restart
(reboot) your computer.
Power Options Properties
To access the Power Options Properties window:
1. Click the Start button, point to Settings, and double-click Control Panel.
2. Double-click the Power Options icon.
Power Schemes Tab
The Power schemes pulldown menu displays the selected preset power scheme:
l
Portable/Laptop (default)
l
Home/Office
l
Always On
l
Presentation (Windows 2000 only)
l
Minimal Power Management (Windows 2000 only)
l
Max Battery (Windows 2000 only)
Each preset power scheme has different time-out settings for putting the computer into standby mode, turning off the monitor (display), and turning off the hard drive.
NOTE: Dell recommends that you continue to use the Portable/Laptop power scheme to maximize battery power conservation.
Alarms Tab
The Low battery alarm and Critical battery alarm settings alert you with a message when the battery charge falls below a certain percentage. When you receive
your computer, the Low battery alarm and Critical battery alarm check boxes are selected. Dell recommends that you continue to use these defaults.
NOTE: To enable audible alarms, click each Alarm Action button and select Sound alarm.
NOTE: The Critical battery alarm setting will not function if Power Mode is set for Standby in the Low battery alarm setting.
Power Meter Tab
The Power Meter tab displays the current power source and amount of battery charge remaining.
Advanced Tab
The Advanced tab allows you to:
l
Set icon and standby password options.
l
Program the following functions:
— Activate standby mode (default when you close the display).
— Activate hibernate mode (default for power button).
— Shut down Windows and turn off the computer.
— No action (None).
To program these functions, click an option from the corresponding pull-down menu, and then click OK.
NOTE:If you are going to connect your computer to a port replicator, click None when you program the display-close option. This
setting ensures that your computer does not enter standby mode or hibernate mode when you close (lower) the display.
Hibernate Tab
The Hibernate tab lets you enable hibernate mode by clicking the Enable hibernate support check box.
Intel® SpeedStep™ Tab If your computer has a Mobile Intel® Pentium III processor, the Power Options Properties window includes the Intel® SpeedStep™ tab.
To change the Intel SpeedStep options, click the Advanced button and then click one of the following options:
l
Disable Intel SpeedStep technology control
NOTE: If you disable Intel SpeedStep, the processor always operates at its maximum speed.
l
Remove flag icon
l
Disable audio notification when performance changes
Click Apply to accept any changes, and then click OK to close the Intel SpeedStep technology window.
Back to Contents Page
Back to Contents Page
Removing and Replacing Parts: Dell™ Inspiron™ 5000 Series
Click here to view a printable (.pdf) version of the disassembly instructions.
NOTICE: Only a certified service technician should perform repairs on your computer. Damage or inoperability due to
servicing not authorized by Dell is not covered by your warranty.
Overview
LCD Removal
Precautionary Measures
Video Board Removal
Recommended Tools
Diskette Drive Removal
Customer-Accessible Components
Palmrest Removal
Screw Counts and Locations
Speaker and Volume Board Removal
ZIF Connectors
Support Rail Removal
Modem Removal
Infrared Board Removal
Hinge Cover Removal
System Board Removal
Keyboard Removal
14.1-Inch XGA Display Disassembly
Thermal Shield Removal
15-Inch UXGA, XGA, and SXGA+ Display
Disassembly
Processor Module Removal
Overview
Unless otherwise noted, each procedure assumes the following:
l
You have the recommended tools.
l
You have performed the steps in Precautionary Measures.
l
The computer and any attached peripherals are turned off and the peripherals are disconnected from the input/output (I/O) panel.
l
You can replace or reinstall a part by performing the removal procedure in reverse order unless additional information is provided.
Precautionary Measures
NOTICE: Only a certified service technician should perform repairs on your computer. Damage or inoperability due to
servicing not authorized by Dell is not covered by your warranty.
WARNING: FOR YOUR PERSONAL SAFETY AND PROTECTION OF THE EQUIPMENT:
Before you start to work on the computer, perform the following steps in the sequence indicated:
1. Ground yourself by attaching an antistatic grounding strap to your wrist and to an unpainted metal surface on the computer
I/O panel. If an antistatic grounding strap is not available, periodically discharge static electricity from your body by touching
one of the connectors on the I/O panel.
2. Turn off the computer and any attached peripherals.
3. Disconnect the computer and any attached peripherals from electrical outlets to reduce the potential for personal injury or
shock.
Recommended Tools
NOTICE: Only a certified service technician should perform repairs on your computer. Damage or inoperability due to
servicing not authorized by Dell is not covered by your warranty.
Most of the procedures require the use of one or more of the following tools:
l
Small flat-blade screwdriver
l
Number 1 Phillips-head screwdriver
l
Antistatic grounding strap
l
Dental pick
l
Small scribe or nylon flat blade
l
Nut drivers (5 mm and 5.5 mm)
Be careful not to scratch the computer plastic case by allowing screws to get between the work surface and the plastic case. Dell suggests a soft padded work surface.
NOTICE: The correct-length screw must be used when reinstalling a screw. Otherwise, hardware damage could result.
Make sure that the screw is properly aligned with its corresponding hole, and avoid excessive tightening.
NOTICE: During the removal and replacement procedures, you will see Kapton tape (grounding tape) in many places
on the computer. When reinstalling or replacing parts, be sure to replace the Kapton tape correctly to retain the
electrical protection and noise reduction the tape provides.
Customer-Accessible Components
NOTICE: The steps in this section may be performed by customers.
1. Disconnect the AC adapter cable from the computer.
2. If the computer is connected to a port replicator, pull both release handles on the sides of the replicator to undock the computer.
3. Remove the battery from the battery bay:
a. Close the display and turn the computer upside-down.
b. Slide and hold the battery bay latch away from the battery.
The battery bay latch is located between the battery bay and the media bay.
c. Pull the battery out of the bay.
NOTICE: Use the PC Card configuration utility on the taskbar to select and stop a card before removing it from the
computer. If you do not remove the card in the configuration utility, you could lose data from open application
programs.
4. Remove any PC Cards:
a. Press the eject button.
b. When the button slides out, press it again to release the card.
c. Gently remove the card.
d. Press the eject button once more until it is flush with the computer casing.
5. Remove the hard-disk drive assembly:
a. Turn the computer upside-down.
b. Remove the screw securing the hard-disk drive cover.
c. Pull the hard-disk drive carrier out of the computer.
NOTICE: When the hard-disk drive is not in the computer, store it in a hard-disk drive case or protective wrapping to
protect it from exposure to static electricity.
NOTICE: Handle the hard-disk drive gently; do not bump or drop the drive. Rough handling of the drive could induce
failure or loss of data.
6. Remove the memory module cover:
a. Turn the computer upside-down.
b. Remove the two screws from the memory module cover (the larger cover).
c. Slide the memory module cover as far as it will go towards the middle of the computer, and then remove the cover.
7. Remove the memory modules:
a. Push the release tabs on either side of the memory module away from the module.
b. The module will pop up at an angle.
c. Pull the module from its socket.
8. Remove the device from the media bay:
a. Close the display and turn the computer upside-down.
b. Slide and hold the latch release away from the media bay device.
c. Pull the device out of the media bay.
Screw Counts and Locations
NOTICE: Only a certified service technician should perform repairs on your computer. Damage or inoperability due to
servicing not authorized by Dell is not covered by your warranty.
You may find it helpful to print the following table to use for keeping the screws organized as you disassemble the computer. The table lists the components from right
to left in the order that they are to be removed from the computer.
Hard-Disk Drive
Memory
Modem
1
2
2
Hinge Covers
Keyboard
Thermal Shield
2
2 (from top)
4 (silver) for Inspiron 5000
(piece across top of keyboard)
5 (silver) for Inspiron 5000e
(Remove the diskette-drive-cable retaining
bracket before removing the thermal shield.)
Processor Module
LCD Hinges
Video Board
3 for Inspiron 5000
4 (2 per hinge)
1 (silver)
Diskette Drive
Palmrest
Speakers and Volume Board
2 (bottom of system)
3 (from the top)
4 (bottom of media bay)
5 (bottom of battery bay)
3 (bottom of hard-disk drive bay)
5 (deep wells in base)
9 (do not unscrew the speakers)
Support Rail
Infrared Board
System Board
7 (back of computer)
4 (through top of support rail)
No screws
2 (serial port nuts)
2 (parallel port nuts)
2 (VGA port nuts)
2 (APR/PPR port nuts)
2 (screws into base)
15-Inch Display LCD Bezel
15-Inch Display LCD Panel
15-Inch Display LCD Locking Tabs
2
8 (4 per side)
4 (2 each)
14.1-Inch Display LCD Bezel
14.1-Inch Display LCD Panel
14.1-Inch Display LCD Locking Tabs
4
6 (3 per side)
4 (2 each)
LED/Inverter Board
2
2 for Inspiron 5000e
(including the fan and the plastic strip)
(including both speakers and the volume
board)
ZIF Connectors
NOTICE: ZIF connectors are fragile. To avoid breaking the connectors, touch them carefully. Do not apply too much
pressure to the movable part of the connector when opening or closing it.
Some of the interface connectors are zero insertion force (ZIF) connectors. These connectors are not removable; they must be released to disconnect a cable from
them.
To disconnect a cable from a ZIF connector, perform the following steps:
1. Insert a small flat-blade screwdriver, dental pick, or fingernail under the movable part of the connector.
2. Pull up gently on the movable part of the connector until the cable is released.
Some ZIF connectors may need to be lifted in the center.
3. Grasp the cable and pull it out of the connector.
To reconnect an interface cable to a ZIF connector, perform the following steps:
1. Open the ZIF connector.
2. Insert the end of the cable into the connector.
3. While holding the cable in place, close the ZIF connector.
To ensure a firm connection, make sure the ZIF connector is completely closed.
Modem Removal
NOTICE: Only a certified service technician should perform repairs on your computer. Damage or inoperability due to
servicing not authorized by Dell is not covered by your warranty.
Ensure that all precautionary measures have been followed and that all customer-accessible parts are removed.
1. Remove the modem cover.
2. Spread the release tabs on either side of the modem away from the modem.
3. Remove the modem.
4. Remove the modem cable.
To reinsert the modem when you reassemble the computer, perform the following steps:
1. Attach the modem cable.
2. Insert the modem into the socket, and rock it up and down until it is completely in place.
NOTICE: Fold the modem cable out of the way of the modem door to make sure you do not cut it when you close the
modem door.
Hinge Cover Removal
NOTICE: Only a certified service technician should perform repairs on your computer. Damage or inoperability due to
servicing not authorized by Dell is not covered by your warranty.
1. Remove the hinge cover screws.
2. Open the display, and lift off the hinge cover by rotating it toward you. To replace the hinge cover, perform the following steps:
1. Insert the hinge cover at a 45° angle.
2. Press the hinge cover down above the <F4>, <F5>, and <Print Screen> keys.
3. Press down along the entire length of the hinge cover until it fits securely in place.
4. Replace the screws.
Keyboard Removal
NOTICE: Only a certified service technician should perform repairs on your computer. Damage or inoperability due to
servicing not authorized by Dell is not covered by your warranty.
1. Remove the screws.
2. Slide the keyboard out from under the palmrest.
3. Detach the cable from the ZIF connector.
Thermal Shield Removal
NOTICE: Only a certified service technician should perform repairs on your computer. Damage or inoperability due to
servicing not authorized by Dell is not covered by your warranty.
1. Remove the thermal shield screws. Inspiron 5000 computers have 4 screws (first photo), and Inspiron 5000e computers have 5 screws (second photo).
2. Remove the diskette-drive cable clip (held in place by the leftmost thermal shield screw).
3. Lift off the thermal shield.
NOTICE: Be sure to replace the diskette-drive cable clip (held in place by the leftmost thermal shield screw) when you
replace the thermal shield. Failure to do so may cause the connector to become disengaged as a result of shock or
vibration to the computer.
Processor Module Removal
NOTICE: Only a certified service technician should perform repairs on your computer. Damage or inoperability due to
servicing not authorized by Dell is not covered by your warranty.
1. Remove the processor module screws. Inspiron 5000 computers have 3 screws (first photo), and Inspiron 5000e computers have 2 screws (second photo).
2. Lift out the module.
3. When you replace the processor, be sure to attach it to the connector.
When you replace the processor during reassembly, be sure to attach it to the connector.
LCD Removal
NOTICE: Only a certified service technician should perform repairs on your computer. Damage or inoperability due to
servicing not authorized by Dell is not covered by your warranty.
1. Open the display and disconnect the LCD flex cable.
2. Close the display and remove the four LCD hinge screws.
NOTICE: Route the cable under the cable clip on computers that have extended cable clips so that the LCD flex cable
will stay connected to the system board. Video Board Removal
NOTICE: Only a certified service technician should perform repairs on your computer. Damage or inoperability due to
servicing not authorized by Dell is not covered by your warranty.
1. Remove the screw.
2. Disconnect the touch pad cable.
Diskette Drive Removal
NOTICE: Only a certified service technician should perform repairs on your computer. Damage or inoperability due to
servicing not authorized by Dell is not covered by your warranty.
1. Detach the data cable.
2. Remove the drive retaining screws from the bottom of the computer.
3. Remove the drive from the chassis.
Palmrest Removal
NOTICE: Only a certified service technician should perform repairs on your computer. Damage or inoperability due to
servicing not authorized by Dell is not covered by your warranty.
1. Remove the three screws from the top of the computer.
2. Remove the two screws (outer corners) from the bottom of the computer.
If you plan to remove the system board, also remove the three screws adjacent to the memory module slots and the modem.
3. Remove the three screws from the hard-disk drive compartment.
4. Remove the four screws from the battery bay.
5. Remove the five screws from the media bay.
Speaker and Volume Board Removal
NOTICE: Only a certified service technician should perform repairs on your computer. Damage or inoperability due to
servicing not authorized by Dell is not covered by your warranty.
1. Remove the nine screws.
2. Disconnect the speaker cable. Be sure to carefully remove the Kapton tape that holds the speaker cable in position on the left side.
3. Disconnect the volume cable.
NOTICE: When you replace the speaker and volume board, be sure not to cut the modem cable.
Support Rail Removal
NOTICE: Only a certified service technician should perform repairs on your computer. Damage or inoperability due to
servicing not authorized by Dell is not covered by your warranty.
1. Remove the four screws.
2. Disconnect the fan cable.
3. Remove the seven screws from the back of the computer.
Infrared Board Removal
NOTICE: Only a certified service technician should perform repairs on your computer. Damage or inoperability due to
servicing not authorized by Dell is not covered by your warranty.
Disconnect the infrared board from the system board.
System Board Removal
NOTICE: Only a certified service technician should perform repairs on your computer. Damage or inoperability due to
servicing not authorized by Dell is not covered by your warranty.
1. Remove the two screws.
2. Remove the eight I/O port nuts.
3. Flex the base plastics to separate the system board from the audio connector posts on the left side of the computer.
4. Lift the system board up and out from the base plastics.
14.1-Inch XGA Display Disassembly
Bezel Removal
1. Remove the two screw covers from the bottom corners of the LCD bezel.
2. Remove the two bumpers from the top corners of the LCD bezel.
3. Remove the four screws from the corners of the LCD bezel.
4. Ease your fingers under the bezel on the bottom of the bezel.
Work your way around the bezel and disengage all the retaining tabs.
5. Once you have disengaged all of the retaining tabs, lift the bezel from the LCD panel.
Panel Removal
NOTICE: It is not necessary to remove the display locking tabs when removing the panel.
1. Remove the two screws from each side of the panel.
2. Disconnect the cold cathode fluorescent lamp (CCFL) cable from the bottom of the panel.
3. Disconnect the flex cable from the back of the LCD panel.
4. Lift the panel from the back cover.
LED/Inverter Board Removal
1. Remove the two screws from the LED/inverter board.
2. Disconnect the flex cable from the ZIF connector on the bottom side of the LED/inverter board.
Flex Cable Removal
1. Remove the grounding tape that secures the wire harness to the back cover.
2. Carefully snap out the flex cable pass-though housing from the back cover.
3. Ease the flex cable over to one side.
4. Insert a flat instrument into the wide opening of the pass-through housing.
Be careful not to damage the flex cable.
5. Carefully ease the cover from the pass-through housing.
15-Inch UXGA, XGA, and SXGA+ Display Disassembly
Bezel Removal
1. Remove the two screw covers from the bottom corners of the LCD bezel.
2. Remove the two screws from the bottom corners of the LCD panel.
3. Ease your fingers under the bezel at the top of the panel.
Work your way around the bezel and disengage all the retaining tabs.
4. Once you have disengaged all of the retaining tabs, lift the bezel from the LCD panel.
Panel Removal
1. Remove the two latch assembly screws from each of the two display locking tabs.
2. Remove the four screws from each side of the LCD panel.
3. Disconnect the CCFL cable from the bottom of the panel.
4. Disconnect the flex cable from the LCD panel.
5. Lift the LCD panel from the back cover.
LED/Inverter Board Removal
1. Remove the two screws from the LED/inverter board.
2. Disconnect the flex cable from the ZIF connector on the bottom side of the LED/inverter board.
Flex Cable Removal
1. Remove the grounding tape that secures the wire harness to the back cover.
2. Carefully snap out the flex cable pass-though housing from the back cover.
3. Ease the flex cable over to one side.
4. Insert a flat instrument into the wide opening of the pass-through housing.
Be careful not to damage the flex cable.
5. Carefully ease the cover from the pass-through housing.
Back to Contents Page
Back to Contents Page
System Setup Program: Dell™ Inspiron™ 5000 Series
Using the System Setup Program
Security Menu
Accessing the System Setup Program
Power Menu
Main Menu
Boot Menu
System Devices Menu
Exit Menu
Using the System Setup Program
The computer retains system configuration information in the nonvolatile random-access memory (NVRAM) maintained by the reserve battery. Each time you turn on
the computer, the system compares the installed hardware with the system configuration information stored in NVRAM. If the system detects a discrepancy, it
generates an error message that identifies the incorrect configuration setting.
The system setup program can be used to perform the following tasks:
l
Change the system configuration information after adding, changing, or removing hardware connected to or installed inside the computer.
l
Verify information about the current configuration, such as the amount of system memory.
l
Set or change selectable features—for example, power management or security features.
NOTE: When the computer is running the Windows® operating system, the Windows power settings override the system setup
program settings.
Accessing the System Setup Program
NOTICE: To avoid data loss, exit any application programs before rebooting the computer to enter the system setup program.
To access the system setup program, turn on the computer and press <F2> when the Dell logo appears.
The Main menu of the system setup program shows how the computer is configured. In addition to the Main menu, you can also access the System Devices menu,
Security menu, Power menu, Boot menu, and Exit menu.
Navigating Through the System Setup Program
Use the integrated keyboard to make all selections in the system setup program.
NOTE: External Universal Serial Bus (USB) keyboards only function when Windows is running.
Key
Function
<F1>
System setup program Help information appears.
up-arrow and down arrow
Highlights an item.
<F5> or <F6>
Changes the setting value.
<F9>
Selects the default settings for all settings in the system setup program.
<Esc>
Exits the system setup program without saving changes.
left-arrow and right-arrow
Highlights a menu item.
<Enter>
Highlights a submenu item (or executes a command on the Exit menu only).
<F10>
Saves changes and exits the system setup program.
Main Menu
NOTICE: Video driver settings override the Television Type setting.
Option
Function
System Time
Resets the time on the internal clock.
System Date
Resets the date on the internal calendar.
Floppy Drive
Identifies the type of diskette drive being used by the computer. This option is not configurable.
Hard Disk
Displays the capacity of the internal hard-disk drive. This option is not configurable.
NOTE: If a second hard-disk drive is installed, it does not appear in this option even if installed.
Quiet Boot
When set to Disabled, allows POST messages and the summary screen to appear at system start-up. When
set to Enabled (default), prevents the diagnostic POST messages and summary screen from appearing at
system start-up. If Quiet Boot is enabled, a boot device cannot be selected during start-up.
Video Display Device
Allows you to specify whether video is visible only on the integrated display (LCD Mode), only on an
external monitor or projector (CRT Mode), or on both the display and an external device simultaneously
(Simul Mode, the default).
Press <Fn><F8> to change the video display device when Windows is running.
Television Port
When set to Enabled (default), allows the computer to display the screen image on a TV (if one is attached to
the TV-out S-video connector) and disables the integrated display as well as an external monitor. When set to
Disabled, allows the screen image to appear on the device specified in the Video Display Device option.
Television Type
Allows you to set the TV-out signal to NTSC (default) or PAL.
Consult your television documentation for information on which setting you should use.
NOTICE: Video driver settings override the Television Type setting.
System Memory
Displays the base amount of DRAM installed in the computer. Each computer has 640 KB of base memory.
This option has no selectable settings.
Extended Memory
Displays the total amount of memory above 1 MB. Each computer comes standard with at least 32 MB of
memory installed. If you install or remove memory, the amount of extended memory displayed changes. This
option has no selectable settings.
System Tag Number
Also known as the system service tag sequence. This sequence is the same sequence found on the bar code
label on the computer. It is used to identify the computer.
NOTE: For the full name of an abbreviation or acronym used in this table, see the Glossary in the system Help.
System Devices Menu
Option
Function
IDE Controller
Configures the integrated local-bus IDE adapter. Options are Both (default), Disabled, or Primary. If Both
is selected, you can access both the hard-disk drive and the media bay device(s). If Primary is selected, only
the hard-disk drive and megabit device is accessible. When Disabled, the media bay device(s) and hard-disk
drive are disabled.
FDD Controller
Enables the diskette-drive controller. If this option is set to Disabled, the diskette drive is unavailable.
Internal touchpad
When set to Enabled (default), allows the touch pad to continue working when an external mouse or other
pointing device is connected. Auto Disabled disables the touch pad when an external pointing device is
connected.
Serial Port
Lets you map the address of the serial port to avoid address conflicts with other devices or disable the port for
security. When set to Auto, allows the operating system or the BIOS to configure the port automatically.
When set to Customized (default), sets the Base I/O address/IRQ to 3F8 IRQ4. If there is a conflict
between two or more addresses, an asterisk appears next to the port type. Off disables the serial port to
conserve power.
Infrared Port
Lets you map the address of the infrared port to avoid address conflicts with other devices. The default is Off.
Dell recommends that you retain the default unless you are using an infrared device with the computer. When
this option is set to Customized, the Mode is SIR and the Base I/O address/IRQ is 2F8 IRQ3. If you
change the infrared port address, be careful not to create a conflict with the addresses of the serial port or the
parallel port. If there is a conflict between two or more addresses, an asterisk appears next to the port type.
Parallel Port
Controls whether the parallel port acts as an AT-compatible (unidirectional), PS/2-compatible (bidirectional),
EPP-compatible, or ECP-compatible port. When this option is set to Customized (default), the Mode is
ECP, the Base I/O address is 378, the Interrupt is IRQ 7, and the DMA channel is DMA 3. The Auto
setting allows the operating system or the BIOS to configure the port automatically. When the option is set to
Off, the port is disabled and you can use its assigned LPT resources for another device. If you change the
parallel port address and/or DMA channel, be careful not to create a conflict with the address or DMA
channel of the infrared port.
Modem
This option has no selectable settings.
NOTE: For the full name of an abbreviation or acronym used in this table, see the Glossary in the system Help.
Security Menu
Option
Function
System Password is
If no system password is set, the setting is Clear. Otherwise, the setting is Set.
Set System Password
Press <Enter> to set up a new system password, and then follow the instructions on your screen. This
password restricts access to the system setup program settings.
Password On Boot
When this option is enabled, you must enter a password before the computer loads the operating system into
memory. Settings for this option are Disabled (default) and Enabled. To enable this option, the System
Password option must be set.
Processor Serial Number (Intel
Pentium III processor only)
Settings for this option are Disabled (default) and Enabled. If disabled, prevents the transmission of the
processor serial number when connected to the Internet.
NOTE: For the full name of an abbreviation or acronym used in this table, see the Glossary in the system Help.
Power Menu
NOTE: The power settings of the Windows 98 operating system take precedence over the settings described here. For more
information, see "Conserving Power" in the system Help.
Option
Function
Power Management Mode
Disabled (default) turns off power management. Customized allows you to control each power management
setting. Max. Power Savings conserves the maximum amount of system power, and Max. Performance
conserves power but allows the greatest system performance.
Standby Time-out
Lets you determine how long the computer remains idle (no I/O activity) before activating standby mode to
conserve battery power. Settings for this option are Disabled (default), 1 Minute, 2 Minutes, 4 Minutes, 6
Minutes, 8 Minutes, 12 Minutes, and 16 Minutes. To increase battery operating time, set this option to a
lower number of minutes. Press any key on the integrated keyboard to resume normal computer operation.
NOTE: Set this option to Disabled if it causes compatibility problems with your software.
Suspend Time-out
Lets you determine how long the computer remains idle (no I/O activity) before activating save-to-disk
suspend mode. Settings for this option are Disabled, 5 Minutes, 10 Minutes, 15 Minutes, 20 Minutes,
30 Minutes, 40 Minutes, and 60 Minutes. To increase battery operating time, set this option to a lower
number of minutes.
NOTE: Set this option to Disabled if it causes compatibility problems with your software.
Suspend Mode
When this option is set to Save to RAM (default), the computer conserves battery power by entering
standby mode. In suspend mode, almost all computer activity stops, but the computer remains ready to resume operations in seconds. Resume normal computer activity by pressing the power button (the computer
may take several seconds to return to normal operation).
When this option is set to Save to Disk, the computer copies all system data to a reserved area on the harddisk drive and then turns off all power to the computer. When the computer resumes normal operation, the
same programs will be running and the same files will be open that were loaded before you activated this
mode. Use save-to-disk suspend mode to conserve battery power or to preserve system data by quickly
saving it to the hard-disk drive if you are about to run out of battery power.
Resume On Modem Ring
Setting this option to Enabled tells the computer to resume normal operation when an incoming call is
detected by a modem and the computer is in standby mode. The default is Disabled. To use this option,
Suspend Mode must be set to Save to RAM.
Resume On Time of Day
When the Resume On Time of Day option is set to Enabled, a computer in standby mode resumes normal
operation at the time specified in the Resume Time field. The default is Disabled. To use this option,
Suspend Mode must be set to Save to RAM.
Resume Time
Lets you specify a time when the computer resumes from standby mode to normal operation. To use this
option, Suspend Mode must be set to Save to RAM.
NOTE: For the full name of an abbreviation or acronym used in this table, see the Glossary in the system Help.
Boot Menu
Option
Function
Floppy
The computer attempts to boot first from a bootable diskette. If it does not detect a bootable disk, the
computer tries to boot from the hard-disk drive. If a disk is in the diskette drive, but does not have the
required system files, an error message appears.
Internal Hard Drive
The computer boots only from the hard-disk drive. If it fails to boot from the hard-disk drive, the computer
does not attempt to boot from the diskette drive.
CD-ROM/DVD
Causes the computer to attempt to boot first from a bootable CD. If it does not detect a bootable CD in the
CD-ROM or DVD-ROM drive, the computer tries to boot from the hard-disk drive. If a CD is in the CDROM or DVD-ROM drive, but the CD does not have the required boot files, an error message appears.
NOTE: For the full name of an abbreviation or acronym used in this table, see the Glossary in the system Help.
Exit Menu
Option
Function
Save Changes and Exit
Saves any changes you have made and exits the system setup program.
Discard Changes and Exit
Discards any changes you have made and exits the system setup program.
Load Factory Defaults
Discards any changes you have made and reverts all options to their original default settings, but does not exit
the system setup program.
Load Last Saved Values
Discards the settings you have made and restores the settings you previously saved. Press <Enter> when
prompted to continue.
Save Changes
Saves settings without exiting the system setup program. Press <Enter> when prompted to continue, and then
return to other menus to make changes.
NOTE: For the full name of an abbreviation or acronym used in this table, see the Glossary in the system Help.
Back to Contents Page
Back to Contents Page
Technical Specifications: Dell™ Inspiron™ 5000 Series
Microprocessor
Physical
Chip Set and Bus
Keyboard
PC Card Slot
Touch Pad
Memory
Battery
Connectors
AC Adapter
Integrated Audio
Environmental
Video
Regulatory
Microprocessor Inspiron 5000 Microprocessor type and speed:
Dell Inspiron 5000G
Intel® Mobile Pentium® III microprocessor with Intel SpeedStep™ technology running at 600/500 MHz and 650/500 MHz
Dell Inspiron 5000R
Intel Mobile Pentium III microprocessor running at 450 and 500 MHz
Dell Inspiron 5000C
Intel Celeron™ microprocessor running at 450, 466, and 500 MHz
L1 cache:
Dell Inspiron 5000G, R, and C
32 KB (internal)
L2 cache:
Dell Inspiron 5000G and R
256 KB (integrated)
Dell Inspiron 5000C
128 KB (integrated)
Math coprocessor
internal to the microprocessor
Inspiron 5000e
Microprocessor type and speed:
Dell Inspiron 5000eG
Intel® Mobile Pentium® III microprocessor with Intel SpeedStep™ technology running at 600/500 MHz, 700/550 MHz, 750/600 MHz, 800/650 MHz, and 850/700 MHz
Dell Inspiron 5000eC
Intel Celeron™ microprocessor running at 500 and 600 MHz
L2 cache:
Dell Inspiron 5000eG
256 KB (integrated)
Dell Inspiron 5000eC
128 KB (integrated) (only for Celeron microprocessors)
Math coprocessor
internal to the microprocessor
Chip Set and Bus
System chip set
Intel Mobile 440BX AGP
Data bus width
64 bits
DRAM bus width
64 bits
Address bus width
32 bits
Flash EPROM
4 Mb
PC Card Slot
PCI controller
Texas Instruments PCI 1225 CardBus controller
PC Card connectors
two (supports two Type I cards, two Type II cards, or one Type III card)
Cards supported
3.3 V and 5 V
PC Card connector size
68 pins
Data width (maximum)
32 bits
Memory
Architecture
SDRAM
Memory module capacities
32-, 64-, 128-, 192-, and 256-MB SODIMM
Minimum RAM
32 MB
Maximum RAM
512 MB
Memory access time/clock frequency
66 MHz or 100 MHz
BIOS address
F000:0000
The computer can accommodate up to 512 megabytes (MB) of synchronous dynamic random-access memory (SDRAM).
Valid Memory Configurations*
Slot 1
Slot 2
Total
32 MB
32 MB
64 MB
32 MB
64 MB
96 MB
32 MB
128 MB
160 MB
32 MB
192 MB
224 MB
32 MB
256 MB
288 MB
64 MB
32 MB
96 MB
64 MB
64 MB
128 MB
64 MB
128 MB
192 MB
64 MB
192 MB
256 MB
64 MB
256 MB
320 MB
128 MB
32 MB
160 MB
128 MB
64 MB
192 MB
128 MB
128 MB
256 MB
128 MB
192 MB
320 MB
128 MB
256 MB
384 MB
192 MB
32 MB
224 MB
192 MB
64 MB
256 MB
192 MB
128 MB
320 MB
192 MB
192 MB
384 MB
192 MB
256 MB
448 MB
256 MB
32 MB
288 MB
256 MB
64 MB
320 MB
256 MB
128 MB
384 MB
256 MB
192 MB
448 MB
256 MB
256 MB
512 MB
*Not all valid memory configurations are available at all times. Contact Dell for details.
Upper Memory Map
Location
Description
10FFF0–
Extended memory
100000–10FFEF
High memory area
0F0000–0FFFFF
System BIOS
0E0000–0EFFFF
Video BIOS
0DC000–0DFFFF
Available
0D0000–0DBFFF
PC Card memory
0C0000–0CFFFF
Available
0A0000–0BFFFF
Video RAM
09FC00–09FFFF
PS/2 mouse-data area
000000–09FBFF
Conventional memory
Conventional Memory Map
Segment Address Range
Use
0
00000h–003FFh
Interrupt vector table
00400h–004FFh
BIOS data area
00500h–005FFh
MS-DOS® work area
00600h–0FFFFh
User memory
1
10000h–1FFFFh
User memory
2
20000h–2FFFFh
User memory
3
30000h–3FFFFh
User memory
4
40000h–4FFFFh
User memory
5
50000h–5FFFFh
User memory
6
60000h–6FFFFh
User memory
7
75000h–7FFFFh
User memory
8
80000h–8FFFFh
User memory
9
90000h–9FBFFh
User memory
9FC00h–9FFFFh
PS/2 mouse-data area
Connectors
Serial (DTE)
9-pin connector; 16550-compatible, 16-byte buffer
Parallel
25-hole connector; normal (unidirectional), bidirectional, EPP 1.9, or ECP
Monitor
15-hole connector
PS/2 keyboard/mouse
6-hole mini-DIN connector
Infrared
IrDA 1.1 port
Expansion/docking connector
240 pins
TV-out
S-video (composite video supported with adapter cable)
Audio
microphone in, line-out, and line-in connectors
USB
4-pin connector
RJ11
RJ11 modem port (optional)
Integrated Audio
Audio type
Sound Blaster Pro-compatible voice and music functions, HRTF 3D
positional audio, hardware wavetable
Audio controller
ESS Technology Maestro-2E
Conversion
16-bit (stereo analog-to-digital and digital-to-analog)
Hardware wavetable synthesizer
wavetable synthesizer 64-voice
Interfaces:
Internal
PCI bus, microphone, dual stereo speakers
External
microphone in, line-out, and line-in connectors
Internal speaker amplifier
1.0-W total (0.5 W for each speaker)
External microphone input voltage range
280 mV peak-to-peak
Line/audio input voltage range
2.8 V peak-to-peak
Controls
keyboard commands, button, and application program menus
Video
Video type
64-bit (128-bit hardware-accelerated) AGP
Video controller 8- or 16-MB ATI Rage-Mobility P AGP
Video memory 8- or 16-MB 125-MHz SGRAM
LCD interface
65-MHz LVDS
TV support
NTSC or PAL in S-video and composite modes
Maximum resolution/colors
32-bit*
*The video controller supports SXGA (1280 x 1024) and UXGA (1600 x 1200) display resolutions on external monitors
that support these resolutions.
Text Modes
Resolution
Color Depth
Refresh Rate (Hz)
360 x 400
16
60
720 x 400
16
60
720 x 400
mono
60
Graphics Modes
Resolution
Color Depth
Refresh Rate (Hz)
640 x 480
256 colors
60
640 x 480
16 bit
60
640 x 480
24 bit
60
640 x 480
32 bit
60
800 x 600
256 colors
60
800 x 600
16 bit
60
800 x 600
24 bit
60
800 x 600
32 bit
60
1024 x 768
256 colors
60
1024 x 768
16 bit
60
1024 x 768
24 bit
60
1024 x 768
32 bit
60
1280 x 1024
256 colors
60
1280 x 1024
16 bit
60
1280 x 1024
24 bit
60
1400 x 1050
256 colors
60
1400 x 1050
16 bit
60
1600 x 1200
256 colors
60
1600 x 1200
16 bit
60
4-MB Video Controllers
8-MB and 16-MB Video Controllers
640 x 480
256 colors
60
640 x 480
16 bit
60
640 x 480
24 bit
60
640 x 480
32 bit
60
800 x 600
256 colors
60
800 x 600
16 bit
60
800 x 600
24 bit
60
800 x 600
32 bit
60
1024 x 768
256 colors
60
1024 x 768
16 bit
60
1024 x 768
24 bit
60
1024 x 768
32 bit
60
1280 x 1024
256 colors
60
1280 x 1024
16 bit
60
1280 x 1024
24 bit
60
1280 x 1024
32 bit
60
1400 x 1050
256 colors
60
1400 x 1050
16 bit
60
1400 x 1050
24 bit
60
1400 x 1050
32 bit
60
1600 x 1200
256 colors
60
1600 x 1200
16 bit
60
1600 x 1200
24 bit
60
1600 x 1200
32 bit
60
NOTES: If using an external monitor, see the documentation that came with the external monitor to determine the
correct refresh rate.
You may need to adjust the vertical and horizontal size and position controls on your external monitor to properly
display extended-video modes.
Physical
14-Inch Display (XGA and SXGA+)
Type
active-matrix color (XGA)
Dimensions (viewable image area):
Height
37.7 mm (1.5 inches)
Width
324 mm (12. inches)
Depth
259 mm (10.2 inches)
Weight*
3.068 kg (6.75 lb)
Maximum supported resolution
1024 x 768
Refresh rate
60 Hz
* Includes hard-disk drive, diskette drive, and CD-ROM drive. Total computer weight is less with the travel module
installed.
15-Inch Display (XGA)
Type
active-matrix color (XGA)
Dimensions (viewable image area):
Height
40.4 mm (1.6 inches)
Width
324 mm (12.8 inches) with a 3-mm overhang on each side
Depth
259 mm (10.2 inches) with an 8-mm overhang on the front
Weight*
3.378 kg (7.43 lb)
Maximum supported resolution
1024 x 767
Refresh rate
60 Hz
* Includes hard-disk drive, diskette drive, and CD-ROM drive. Total computer weight is less with the travel module
installed.
15-Inch Display (UXGA)
Type
active-matrix color (XGA)
Dimensions (viewable image area):
Height
40.4 mm (1.6 inches)
Width
324 mm (12.8 inches) with a 3-mm overhang on each side
Depth
259 mm (10.2 inches) with an 8-mm overhang on the front
Weight*
3.378 kg (7.43 lb)
Maximum supported resolution
1600 x 1200
Refresh rate
60 Hz
* Includes hard-disk drive, diskette drive, and CD-ROM drive. Total computer weight is less with the travel module
installed.
15-Inch Display (SXGA+)
Type
active-matrix color (SXGA)
Dimensions (viewable image area):
Height
40.4 mm (1.6 inches)
Width
324 mm (12.8 inches) with a 3-mm overhang on each side
Depth
259 mm (10.2 inches) with an 8-mm overhang on the front
Weight*
3.427 kg (7.54 lb)
Maximum supported resolution
1400 x 1050
Refresh rate
60 Hz
* Includes hard-disk drive, diskette drive, and CD-ROM drive. Total computer weight is less with the travel module
installed.
Keyboard
Number of keys
87 (U.S. and Canada); 88 (Europe); 90 (Japan)
Key travel
3.0 ± 0.5 mm (0.12 ± 0.02 inch)
Key spacing
19.1 mm (0.75 inch)
Layout
QWERTY/AZERTY/Kanji
Touch Pad
Interface
PS/2-compatible
X/Y position resolution (graphics table mode)
20 points/mm (500 points/inch)
Size:
Thickness
4.65 mm (0.18 inch) at highest component
Width
64-mm (2.52-inch) sensor-active area
Height
47.0-mm (1.85-inch) rectangle with 0.5-mm (0.02-inch) tabs
Weight
15 g (0.52 ounce) ± 0.5 g (0.001 ounce)
Power:
Supply voltage
5 V ± 10%
Supply current
4 mA (maximum operating current)
Battery
Type
Dimensions:
lithium ion
Height
23.8 mm (0.94 inch)
Depth
148.2 mm (5.83 inches)
Width
116.2 mm (4.58 inches)
Weight
0.60 kg (1.32 lb)
Voltage
14.4 VDC
Capacity
52 WH
Charge time (approximate)*
2.5 to 3.5 hours (computer on); 3 hours (computer off)
Operating time (approximate)*
3 to 3.5 hours with one battery; 4 to 6 hours with two batteries
Life span (approximate)*
400 discharge/charge cycles
Ambient temperature range:
Charge
Discharge
Storage
0° to 40°C (32° to 104°F)
0° to 60°C (32° to 140°F)
–20° to 50°C (–4° to 122°F) * Battery performance features such as charge time, operating time, and life span can vary according to the conditions
under which the computer and the battery are used.
AC Adapter
Input voltage
100 to 240 VAC
Input current (maximum)
1.5 A at 90 VAC, full load
Input frequency
50 to 60 Hz
Output current
3.5 A (continuous)
Output power
70 W
Rated output voltage
19 VDC
Dimensions:
Height
30.0 mm (1.12 inches)
Width
62.0 mm (2.4 inches)
Depth
110 mm (4.3 inches)
Weight (with cables)
0.32 kg (0.71 lb)
Temperature range:
Operating
0° to 40°C (32° to 104°F) Storage
–20° to 65°C (–4° to 149°F)
Environmental
Temperature:
Operating
5° to 35°C (41° to 95°F)
Storage
–20° to 50°C (–4° to 122°F)
Relative humidity
10% to 90% (noncondensing)
Maximum vibration:
Operating
0.9 GRMS using a random-vibration spectrum that simulates air/truck
shipment
Storage
1.3 GRMS using a random-vibration spectrum that simulates air/truck
shipment
Maximum shock:*
Operating
1.52 m/sec (4.98 ft/sec) (less than or equal to a pulse width of 2 ms)
Storage
2.03 m/sec (6.66 ft/sec) (less than or equal to a pulse width of 2 ms)
Altitude:
Operating
0 to 3048 m (0 to 10,000 ft)
Storage
0 to 12,192 m (0 to 40,000 ft)
* Measured with the hard-disk drive in head-parked position
Regulatory
U.S.
FCC Class B
Canada
IC Notice
Europe
CE NOTICE: EN 55022, EN 50082-1, IEC 801-2, IEC 801-3, IEC 801-4,
EN 60950:1992 + Amd.1:1993 + Amd.2:1993
Czech Republic
EN 55022 Compliance
Japan
VCCI Class A or Class B ITE
Poland
PN-93/T-42107 and PN-EN 55022
Mexico
NOM 024
Back to Contents Page
Back to Contents Page
System Messages: Dell™ Inspiron™ 5000 Series
Overview
System Messages
Overview
The operating system, application programs, and the computer itself can generate status and error information. This section explains the system messages generated by
the basic input/output system (BIOS). For other messages, refer to the application program or operating system documentation.
System Messages
If a message appears on the display or external monitor, make a note of the message. See the following table for an explanation of the message and suggestions for
correcting errors. The system messages are listed alphabetically.
NOTE: If the message is not listed in the following table, check the documentation for the application programs that were running
at the time the message appeared and/or the operating system documentation for an explanation of the message and recommended
action.
Message
Cause
Action
Diskette drive A error
A connector may be loose, or the
diskette may be faulty.
If the diskette-drive access indicator lights up when you access a file on the
diskette, but you still get this error message, try a different diskette. If using a
different diskette does not solve the problem, restart the computer. If the
problem persists, call Dell for technical assistance.
Fixed disk 0 failure
The hard-disk drive failed to
initialize.
See "Resolve Hard-Disk Drive Problems" in Chapter 2 of the Dell Inspiron
5000 Reference and Troubleshooting Guide or "Drive Problems" in Chapter
2 of the Dell Inspiron 5000e Solutions Guide.
Fixed disk controller failure
The hard-disk drive controller may Call Dell for technical assistance.
be faulty.
Keyboard controller error
The keyboard controller is faulty.
Keyboard error
If an external keyboard is being
Run the Stuck Key Test in the PC-AT Compatible Keyboards device
used, a cable or connector may be group in the Dell Diagnostics.
loose or the keyboard may be
faulty. If the integrated keyboard is
being used, it may be faulty. A key
on the integrated keyboard may
have been pressed while the
computer was booting.
Operating system not found
The operating system may be
corrupted. Or, the operating
system cannot be found on the
hard-disk drive or on the diskette
in the diskette drive.
Reinstall the operating system. See the documentation that came with the
operating system. If the problem persists, call Dell for technical assistance.
Real time clock error
The CMOS battery that supports
data stored in NVRAM may be
dead.
Call Dell for technical assistance.
CMOS battery is dead—
Replace and run Setup
The CMOS battery is dead.
Call Dell for technical assistance.
System CMOS checksum
bad—run Setup
The BIOS has been updated.
CMOS has been corrupted or
modified, possibly by an
application program that changes
data stored in CMOS.
Enter the system setup program by restarting the computer and pressing <F2>
as soon as the Dell logo appears. Reconfigure the system. If the problem
persists, call Dell for technical assistance.
Call Dell for technical assistance.
NOTE: For the full name of an abbreviation or acronym used in this table, see the Glossary in the system Help.
Back to Contents Page