1
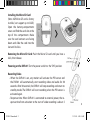
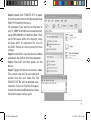
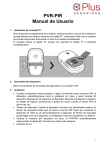
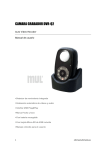
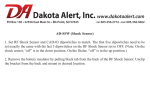
DVR-01
Digital Video Recorder
User Guide
www.dakotaalert.com
DVR-01 Manual.indd 1
3/1/2010 9:43:19 AM
Contents:
1 - DVR-01
1 - Base
1 - USB Cable
1 - 4GB Micro SD Card
1 - Built-in Lithium Battery
1 - Charger Plug
Charging the Battery
The battery can be charged by connecting the DVR-01 to your computer using the included USB
cable. You may also connect the USB cable to the included charger plug and plug this into a
standard outlet.
Battery Life
If the DVR-01 is recording continually, battery life will be 2-3 hours. If it is recording infrequently,
battery life will be 7-10 days.
Set Up:
When mounting the DVR-01 or placing it in the base, make sure the PIR sensor is above the camera
(see front cover) or the video will record upside down with the time stamp right side up.
2
DVR-01 Manual.indd 2
3/1/2010 9:43:19 AM
Installing the Micro SD Card
(Note: 4GB Micro SD card is factory
installed, can support up to 32GB.)
Open the battery-compartment
cover and find the card slot at the
top of the compartment. Make
sure the card contacts are facing
down and slide the card into the
slot until it clicks.
Removing the Micro SD Card: Push the Micro SD card until you hear a
click, then release.
Powering on the DVR-01: Turn the power switch to the “ON” position.
Recording Video
• When the DVR-01 is on, any motion will activate the PIR sensor and
the DVR-01 will automatically start recording video and audio for 30
seconds. After 30 seconds, the DVR-01 will stop recording and return to
standby mode. The DVR-01 will start recording when the PIR sensor is
activated again.
• Response time: When DVR-01 is connected to external power, the response time from activation to the start of video recording is about .5
DVR-01 Manual.indd 3
3
3/1/2010 9:43:19 AM
seconds. The response time will be about 2 seconds when operating on battery only.
• When the memory is full, the DVR-01 will automatically overwrite the oldest videos on the
Micro SD card.
Indicator Light Status
Action
Status
Red
Color
Constant Light
Start recording or save recording file.
Green
Flash
Recording Video
Viewing/Downloading Videos
Step1: Set the power switch to “OFF” position.
Step2: Connect the DVR-01 to your computer using the included USB cable.
Step3: Press and hold “SET” key and turn the power switch to the “ON” position. Release the “SET”
key when the indicator light turns green (about 2 seconds). The computer will notify “found new
hardware”, which means that the device has been opened in USB mode.
Step 4: Find the
folder on the DVR-01 “removable disk”, double click to expand the
files as shown below:
4
DVR-01 Manual.indd 4
3/1/2010 9:43:19 AM
The videos are saved in the auto created folders such as
. These folders are named
according to the date and video recording order. The first two numbers are the year, the third and
fourth numbers are the month, the fifth and sixth numbers are the day, and the last two numbers
are the order the videos were created. For example, the folder named 10012700 means that the
videos saved in this folder were created on January 27th, 2010.
Step 5: Double click the folder
to see the video files such as
. The files are
named with exact time that the videos are created. For example, “07-41-23.AVI” means the video
was recorded at 07:41:23. Double clicking the file can replay the video.
Modifying the Time of the DVR-01
The DVR-01 has a default date setting of January 1st, 2008. If the power to the device (including
battery power) is cut off, it will default to this time. You will need to reset the time of the DVR-01
according to the following method.
5
DVR-01 Manual.indd 5
3/1/2010 9:43:19 AM
Editing the Time Configuration File
Step1: Switch device to USB mode (See “Viewing/Downloading Videos” Steps 1-3 on page 4).
Step2: Create a new text file named “TIMECFG.TXT” on the removable disk. (Right click your mouse,
choose “New – Text Document” to create a new text file. Change the file name to “TIMECFG.TXT”.)
6
DVR-01 Manual.indd 6
3/1/2010 9:43:19 AM
Step3: Double click “TIMECFG.TXT” to open.
Enter the current time in the following format:
TIME,YYYY/MM/DD/hh:mm:ss;
For example: If you want to set the time to
July 15, 2009 18:20:30 (hour:minute:second),
input TIME,2009/07/15/18:20:30; (Note: There
can be NO spaces within this character string.
All letters MUST be capitalized This must be
the EXACT format or it will not accept the time
change.)
Step4: Save the file. Close the device window
and detach the DVR-01 from the computer.
Step5: Power off and then power on the
device.
Step6: Trigger the device to record a video.
The current time will be activated and
written into the new video file. The
TIMECFG.TXT file will be deleted automatically. If you can find this file again,
it means that the modification has failed.
Go back to step 2 and try again.
7
DVR-01 Manual.indd 7
3/1/2010 9:43:20 AM
TECHNICAL SUPPORT: If you encounter any difficulty in the operation of this product after reading the manual, please contact us. You can reach us by phone at 605-356-2772 from 8:30 AM to
5:00 PM Monday through Friday (Central Standard Time). We will be happy to answer your questions and help you in any way we can.
WARRANTY: Dakota Alert warrants this product to be free of defects in material and workmanship for a period of one year from the date of purchase. This warranty does not cover damage
resulting from accident, abuse, act of God or improper operation. If this product does become
defective, simply return it to Dakota Alert. Please include a note describing the troubles along
with your name and return address as well as the original sales receipt. If the product is covered
under warranty it will be repaired or replaced at no charge. If it is not covered by warranty, you
will be notified of any charges before work is done.
Dakota Alert, Inc.
32556 E. Main Street
P0 Box 130
Elk Point, SD 57025
Phone: (605) 356-2772
Fax: (605) 356-3662
www.dakotaalert.com
8
DVR-01 Manual.indd 8
3/1/2010 9:43:20 AM