1
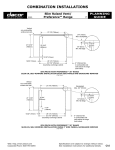
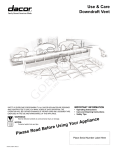
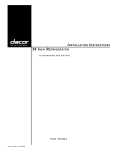
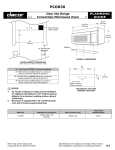
WARNING:
Installation Instructions
Outdoor Grill Cart
Covers Models OBC36, OBC52, OBCW52
1. Since the cart and the grill are heavy, this installation process should be accomplished
by a minimum of two people. Remove all individual components to lighten the grill before
installation. Remove the cart from the shipping pallet before installation.
2. Sheet metal edges can be dangerous in heavy lifting situations. Please wear gloves during
installation. 3. Attach the appliance to the cart with all of the supplied bolts before use.
4. Read the use and care manual completely before operation.
noteS:
1. The Dacor cart ships assembled ready for installation of the outdoor grill.
2. All gas and electrical connections should be made after the grill is installed and bolted to the
cart.
3. Your cart is prepared for either natural gas or liquid propane (LP) gas connections. However, it
is important to verify that your outdoor grill was ordered correctly. If you will be utilizing LP gas,
your grill must indicate LP in the model number. Do not proceed with installation if the model is
not correct. Field conversion from one gas type to another is not permissible.
ASSEMBLY:
1. Remove the cart from the shipping carton and pallet.
2. Set the cart in an open location and lock the wheels
on the cart to minimize potential movement.
3. Remove the drawers.
4. Remove the outdoor grill from its shipping carton and
pallet. Remove the parts box to lighten the appliance.
5. As you place the outdoor grill on the cart, feed the
gas line and electrical cord into the utility cut-out on
the cart.
6. Center the unit on the cart, making sure to line up the
threaded mounting holes under the bottom of the grill
with the holes in the top of the cart.
7. Thread all of the supplied bolts into the bottom of the
outdoor grill from inside the cart. Tighten the bolts into
place.
8. Install the side shelves if desired. See next page.
9. Before installing the front drawers and tank shelf,
connect the regulator and gas supply line according
to the Outdoor Grill Installation Instructions.
Utility
Cut-Out
WARNING:
• To avoid an explosion hazard, do not connect the cart
or appliance(s) to electrical power until after the gas
supply system has been checked for leaks.
10. Install the drawers. Put the LP tank on the tank shelf
and connect it, if applicable.
CAUTION:
• The largest recommended LP tank size for the rollout
tank shelf is five gallons.
Part No. 102044 Rev C
continued...
Tank
Shelf
Locking Wheel
Fixed Wheel
11. Turn on the gas and check for leaks according to the Outdoor Grill
Installation Instructions.
WARNING:
The grill cart is equipped with a grounded three-wire electrical system
and ground fault interrupter (GFI) electrical outlets for safety. To avoid
an electric shock hazard:
• Connect the power cords from the outdoor grill, rotisserie motor and
optional warming oven only to the electrical outlets mounted on the
cart.
• Do not under any circumstances:
- Cut or remove the third (ground) prong from the appliance(s) and
rotisserie power cords.
- Do not use an adapter plug.
- Do not use an extension cord.
- Do not use a power cord that is frayed or damaged.
12. Connect a three-prong extension cord (minimum 5 Amp. capacity) to
the power input on the back of the cart. Connect the extension cord to
a grounded, three-prong, electrical outlet.
13. With the tank shelf open, connect the power cord from the outdoor grill
and the warming oven (if equipped with one) to the electrical outlet on
the back panel inside the cart.
14. Connect the rotisserie motor power cord to the electrical outlet on the
back side of the cart.
Side shelf Installation:
1. Install the front mounting bracket for the right side shelf. Use two (2) of
the provided button head fasteners and two (2) lock washers. Tighten
into place using a 5/32” allen wrench.
Bracket
Lock
Washer
Button Head
Fastener
2. Slide the slot on the inside of the shelf over the pin
on the mounting bracket.
Pin
3. While holding the shelf in place, insert the pin on
the back mounting bracket into the slot on the back
side of the shelf.
4. While holding the shelf and back mounting bracket
in place, attach the back mounting bracket using
two (2) of the provided button head fasteners and
two (2) lock washers.
5. Repeat steps 1 through 4 for the left side shelf.
note: Dacor offers a protective grill cover and a grill/cart cover. For more information
concerning these options, contact your Dacor appliance dealer.
Dacor Corporation ● 1440 Bridge Gate Drive, Diamond Bar, CA 91765 ● Tel: (800) 793-0093 ● FAX: (626) 403-3130 ● www.Dacor.com