1
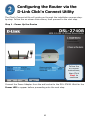
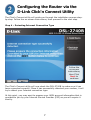
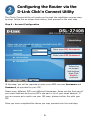
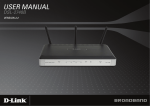
This product can be
e set up using
any current web bro
owser, i.e.,
Internet Explorer 6 or
o Netscape
Navigator 6.2.3.
DS
SL-2740B
B
AD
DSL Modem Routerr
Before Yo
ou Begin
1.
2.
If you purc
chased this Router to share yyour high-speed Internet con
nnection with other
computers
s, you must have an establisshed Internet account from an
n Internet Service
Provider (ISP).
(
It is best to
t use the same computer that is connected to your ISP for
f configuring the
DSL-2740
0B ADSL Modem Router. The
e DSL-2740B acts as a DHC
CP server and will assign all
the neces
ssary IP address information on your network. See the Ap
ppendix for setting each
network adapter
a
to automatically obtaiin an IP address.
Check Yo
our Package
e Contents
DSL-2740B 802.11n (draft) Wireles
ss
ADSL2/2+ Mode
em Router
CD-ROM with C
Click’n Connect Utillity and
Product Docum
mentation
3 Wireless Ante
ennas
Telephone Cablle (RJ-11)
CAT 5 UTP Ethe
ernet Cable (RJ-45))
12V 1.2A
Power Adapter
Using a pow
wer adapter with
a different voltage
v
rating will
damage and
d void the
warranty forr this product.
If any of the
e above items are m
missing, please conta
act your reseller.
©2007 D-Link Austra
alia Pty Ltd. All rights reserved. T
Trademarks or registered tradema
arks are the property of their
resp
pective holders. Software and spe
ecifications subject to change with
hout notice.
DSL-2740B A
ADSL Modem Router.
Connecting the Router to your
Computer
1.
2.
3.
4.
First, connect the power adapter to the power socket on the
back panel of the DSL-2740B and then plug the other end of
the power adapter to a wall outlet or power strip. Depress the
Power Button to turn ON the device. On the front of the device,
the Power LED will turn ON to indicate proper operation.
Insert one end of the Ethernet cable into an Ethernet port on
the back panel of the DSL-2740B and the other end of the
cable to an Ethernet Adapter or available Ethernet port on your
computer.
Insert the telephone cable included with the Router into the
ADSL port, and then connect the cable to your telephone line.
(Line must be activated for ADSL use)
Check the LED display on the front of the Router to confirm
that the connections have been made. (This will be shown with
solid lights for the corresponding port)
2
Configuring the Router via the
D-Link Click’n Connect Utility
Insert the CD-ROM into your PCs CD Drive. The Click’n Connect utility should
appear automatically. If it does not appear, explore your CD-ROM drive within
Windows, and double-click on the file “dslutility.exe” to start the utility
manually.
You can select one of five options:
1.
2.
3.
4.
5.
View Manual: This option will open up the DSL-2740B user manual.
You will need Adobe Acrobat Reader installed to view the manual.
View QIG: This option will show you a software-based version of this
Quick Install Guide.
Install Acrobat Reader: Selecting this option will install Adobe Acrobat
Reader onto your PC.
Technical Support: Selecting this option will link you to D-Link
Australia/New Zealand Technical Support online.
Start Installation: This will commence the installation of the DSL2740B.
3
Configuring the Router via the
D-Link Click’n Connect Utility
The Click’n Connect utility will guide you through the installation process stepby-step. Follow the on-screen instructions, then proceed to the next step.
Step 1 - Power Up the Device
Follow the
on-screen
instructions,
then Click
Next to
continue
Connect the Power Adapter from the wall socket to the DSL-2740B. Wait for the
Power LED to appear before proceeding onto the next step.
4
Configuring the Router via the
D-Link Click’n Connect Utility
The Click’n Connect utility will guide you through the installation process stepby-step. Follow the on-screen instructions, then proceed to the next step.
Step 2 – Connect the Device to your Computer
Follow the
on-screen
instructions,
then Click
Next to
continue
Connect the Ethernet cable from the computer to one of the LAN ports
(numbered 1 to 4) on the DSL-2740. Wait for the LAN Link LED for the
corresponding LAN port number to flash, before proceeding onto the next step.
5
Configuring the Router via the
D-Link Click’n Connect Utility
The Click’n Connect utility will guide you through the installation process stepby-step. Follow the on-screen instructions, then proceed to the next step.
Step 3 – Connect the Device to the ADSL Line
Follow the
on-screen
instructions,
then Click
Next to
continue
Connect your ADSL telephone line from the wall socket to the DSL-2740B
ADSL socket. Please note that if you are using an ADSL Splitter/Filter, you will
need to connect the telephone line from the DSL socket on the filter to the
DSL-2740B ADSL socket.
Once you have completed this, wait for the ADSL LED to light up, before
proceeding onto the next step.
6
Configuring the Router via the
D-Link Click’n Connect Utility
The Click’n Connect utility will guide you through the installation process stepby-step. Follow the on-screen instructions, then proceed to the next step.
Step 4 – Detecting Internet Connection Type
Follow the
on-screen
instructions,
then Click
Next to
continue
The Click’n Connect utility will now check the DSL-2740B to make sure it has
been connected correctly. Once it has successfully detected your modem, it will
try to detect your Internet connection type.
At this point, you may want to prepare your ADSL account information that is
provided to you by your Internet Service Provider (ISP) as you will require it
shortly.
7
Configuring the Router via the
D-Link Click’n Connect Utility
The Click’n Connect utility will guide you through the installation process stepby-step. Follow the on-screen instructions, then proceed to the next step.
Step 5 – ISP Configuration
Select your
Country
Select your
ISP
Follow the
on-screen
instructions,
then Click
Next to
continue
You will now be prompted to select your Country as well as your Internet
Service Provider (ISP). If your ISP is not listed for your country, select Other
and enter the details that are relevant to your ISP.
Please ensure you have entered the correct information before proceeding onto
the next step.
8
Configuring the Router via the
D-Link Click’n Connect Utility
The Click’n Connect utility will guide you through the installation process stepby-step. Follow the on-screen instructions, then proceed to the next step.
Step 6 – Account Configuration
Enter your ISP Username
Enter your ISP Password
Follow the
on-screen
instructions,
then Click
Next to
continue
At this step, you will be required to enter your ADSL account Username and
Password, as provided by your ISP.
Please note, different ISP’s use different Usernames. Some use the first part of
your email address while some ISP’s use part or all of your email address. If
you are unsure as to which one your ISP uses, please confirm this with your
ISP.
Once you have completed the above you may proceed onto the next step.
9
Configuring the Router via the
D-Link Click’n Connect Utility
The Click’n Connect utility will guide you through the installation process stepby-step. Follow the on-screen instructions, then proceed to the next step.
Step 7 – Set Wireless Connection
Enter your
Wireless Network
Name Name
Select your Channel
Follow the
on-screen
instructions,
then Click
Next to
continue
Select your
Network Authentication
Preferences
You will now be asked to set security for your wireless network. Type in your
desired Wireless Network Name, select a Channel, and set your preferred
Network Authentication settings for your wireless network. Please refer to
your User Manual for more information.
Important Note: You are strongly advised to enable Network
Authentication on your wireless network, as this will deter hackers
from gaining access to your network.
10
Configuring the Router via
the
D-Link Click’n Connect Utility
The Click’n Connect utility will guide you through the installation process stepby-step. Follow the on-screen instructions, then proceed to the next step.
Step 8 – Completing Setup
The Click’n Connect Utility will now save the settings you have entered to the
DSL-2740B modem, and verify that you have entered your account details
correctly to ensure an Internet connection can be established.
If you receive an error message, please review all the information that you have
entered in very carefully, and try again.
11
Configuring the Router via the
D-Link Click’n Connect Utility
The Click’n Connect utility will guide you through the installation process stepby-step. Follow the on-screen instructions, then proceed to the next step.
Step 9 – Setup Complete
Click Exit to close
the Click’n
Connect Utility
If you have arrived at this screen, this means that your Internet connection has
been successfully established and all the details that you have entered are
correct.
Once you click the Exit button you will be directed to the D-Link webpage. Once
you see this page you may now use your Internet Connection.
12
Appendix
Configuring IP Settings
To connect to the network, make sure the network adapter in
your computer is configured properly. The following section
describes how to configure the network adapter to obtain an IP
address automatically for the DSL-2740B ADSL Router.
For Microsoft Windows XP
Go to Start > select
Settings > click
Control Panel >
Double-click on the
Network Connections
icon
Double-click on
Network Connections
Right-click the Local
Area Connection
icon, and then select
Properties.
Select Properties
13
The dialog box displays with a
list of currently installed network
items.
Click Internet Protocol
(TCP/IP)
Click Properties
Make the choice to get IP
settings assigned automatically.
Select Obtain an IP
address automatically
Click OK
14
Technical Support
You can find software updates and user
documentation on the D-Link website.
D-Link Australia
1 Giffnock Avenue, North Ryde,
NSW 2113
Sydney, Australia
TEL: +61-2-8899-1800
FAX: +61-2-8899-1868
Australia: 1300-766-868
New Zealand: 0800-900-900
URL:
www.dlink.com.au
www.dlink.co.nz
E-MAIL:
[email protected]
15