1
F8914 User Manual
F8914
User Manual
Documentation No.
Product Version
Page
V1.12
Product Name:F8914
Total: 42
F8914 User Manual
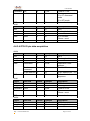
The user manual is suitable for the following model:
Model
Product Type
F8914-N
ZigBee Termianl
F8914-E
ZigBee Terminal(with PA)
Xiamen Four-Faith Communication Technology Co., Ltd.
Add:J1-J3,3rd Floor,No.44,GuanRi Road,SoftWare
Park,XiaMen,China
Zip Code:361008
Tel:+86 592-6300326 ,6300325,6300324
Fax:+86 592-5912735
http://www.fourfaith.com
User Manual
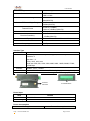
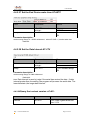
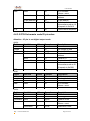
Files Revised Record
Date
Version
Remark
Author
2012-03-21
V1.0
Lake Chen
2012-10-31
V1.1
Power consumption, interface
modification, etc
Harven
2013-01-18
V1.11
Add ZigBee simply description and
Sleep mode description
Tady Chen
2013-03-05
V1.12
Modify the sleep method; Add work
mode AT command
Tady Chen
Xiamen Four-Faith Communication Technology Co.,Ltd.
Page 2 of 42
rd
Add: J1-J3,3 Floor,No.44,GuanRiRoad,SoftWare Park,XiaMen .361008.China
http://www.fourfaith.com
Tel: +86 592-6300326 6300325 6300324
Fax:+86 592-5912735
User Manual
Copyright Notice
All contents in the files are protected by copyright law, and all copyrights are reserved
by Xiamen Four-Faith Communication Technology Co., Ltd. Without written permission,
all commercial use of the files from Four-Faith are forbidden, such as copy, distribute,
reproduce the files, etc., but non-commercial purpose, downloaded or printed by individual
(all files shall be not revised, and the copyright and other proprietorship notice shall be
reserved) are welcome.
Trademark Notice
Four-Faith、四信、
、
、
are all registered trademarks of Xiamen
Four-Faith Communication Technology Co., Ltd., illegal use of the name of Four-Faith,
trademarks and other marks of Four-Faith is forbidden, unless written permission is
authorized in advance.
Xiamen Four-Faith Communication Technology Co.,Ltd.
Page 3 of 42
rd
Add: J1-J3,3 Floor,No.44,GuanRiRoad,SoftWare Park,XiaMen .361008.China
http://www.fourfaith.com
Tel: +86 592-6300326 6300325 6300324
Fax:+86 592-5912735
User Manual
Xiamen Four-Faith Communication Technology Co.,Ltd.
Page 4 of 42
rd
Add: J1-J3,3 Floor,No.44,GuanRiRoad,SoftWare Park,XiaMen .361008.China
http://www.fourfaith.com
Tel: +86 592-6300326 6300325 6300324
Fax:+86 592-5912735
User Manual
Contents
Contents ............................................................................................................................... 5
Chapter 1 Brief Introduction of Product ............................................................................... 7
1.1 General ................................................................................................................... 7
1.2 Features and Benefits ............................................................................................ 7
1.3 Working Principle.................................................................................................... 8
1.4 Specifications.......................................................................................................... 8
Chapter 2 Installation Introduction ..................................................................................... 11
2.1 General ................................................................................................................. 11
2.2 Encasement List ................................................................................................... 11
2.3 Installation and Cable Connection ....................................................................... 11
2.4 Power.................................................................................................................... 15
2.5 Indicator Lights Introduction ................................................................................. 15
Chapter 3 Zigbee Description ............................................................................................ 16
3.1 Device Type Description ....................................................................................... 16
3.1.2 Coordinator................................................................................................. 16
3.1.2 Router......................................................................................................... 16
3.1.3 End Device ................................................................................................. 16
3. 2 ZigBee Network Description ................................................................................ 16
3.2.1 Form a ZigBee Network Procedure ........................................................... 16
3.2.2 Physical Channel ....................................................................................... 17
3.2.3 Pan ID ........................................................................................................ 17
3.2.4 Node address ............................................................................................. 17
Chapter 4 Configuration..................................................................................................... 18
4.1 Configuration Connection ..................................................................................... 18
4.2 Configuration Introduction .................................................................................... 18
4.3 Run the configure Tool: ZigbeeConfigure.exe...................................................... 19
4.4 Modes of Operation .............................................................................................. 19
4.4.1 Transparent mode ...................................................................................... 20
4.4.2 AT command mode .................................................................................... 20
4.4.2.1 Set the PAN ID : AT+PID ................................................................. 20
4.4.2.2 Query current PAN ID: AT+PCD ...................................................... 21
4.4.2.3 Set the physical channel : AT+CHA ................................................. 21
4.4.2.4 Query the node MAC address : AT+MID ......................................... 21
4.4.2.5 Set the node type: AT+TYP ............................................................. 22
4.4.2.6 Set node address : AT+NID ............................................................. 22
4.5.2.7 Query node current address : AT+NCD........................................... 22
4.4.2.8 Set the transparent address : AT+TID ............................................. 23
4.4.2.9 Set the node baudrate : AT+IPR, AT+PAR, AT+STO ...................... 23
4.4.2.10 Set the AT command echo : AT+ECH............................................ 24
4.4.2.11 Set node to get acknowledge : AT+ACK........................................ 24
Xiamen Four-Faith Communication Technology Co.,Ltd.
Page 5 of 42
rd
Add: J1-J3,3 Floor,No.44,GuanRiRoad,SoftWare Park,XiaMen .361008.China
http://www.fourfaith.com
Tel: +86 592-6300326 6300325 6300324
Fax:+86 592-5912735
User Manual
4.4.2.12 Set debug level : AT+DBL.............................................................. 25
4.4.2.13 Set the node auto joins in the network : AT+AST .......................... 25
4.4.2.14 Start the network : AT+STA ............................................................ 25
4.4.2.15 Set the RF data output the serial port: AT+PRF ............................ 26
4.4.2.16 Query the softwarte version : AT+VER .......................................... 26
4.4.2.17 Query the nodes network state : AT+NWS .................................... 26
4.4.2.18 Query the node address : AT+QNA ............................................... 27
4.4.2.19 Query the node MAC address : AT+QMA ..................................... 27
4.4.2.20 Query local node address net state: AT+SNS ............................... 27
4.4.2.21 Send data (HEX mode): AT+TXH .................................................. 28
4.4.2.22 Send data (ASCII mode) : AT+TXA ............................................... 28
4.4.2.23 Node recive data ............................................................................ 29
4.4.2.24 Node IO pins command ................................................................. 29
4.5.2.24.1 Set IO pin mode : AT+DMn, (n :0~4) ................................... 29
4.4.2.24.2 Set IO pin data acquisition time interval : AT+DTn, (n :0~4)30
4.4.2.24.3 Query IO pin value : AT+DVn, (n :0~4) ............................... 31
4.4.2.24.4 Query the net node IO pin value: AT+NVn, (n :0~4) ........... 31
4.4.2.24.5 Set remote node IO pin value : AT+NSn, (n :0~4) .............. 31
4.4.2.25 Set the End Device sleep mode:AT+SLE ...................................... 32
4.4.2.26 Set the End Device sleep time:AT+STC........................................ 32
4.4.2.27 Set the End Device wake time:AT+WTC ....................................... 33
4.4.2.28 Set the Data Interval:AT+ITV ......................................................... 33
4.4.2.29Query the bootload version :AT+BTL ............................................. 33
4.4.2.30 Set device work mode:AT+MOD ................................................. 34
4.4.2.31 Other execute command ............................................................... 34
4.4.3 API mode .................................................................................................... 34
4.4.3.1 data send command ........................................................................ 36
4.4.3.2 data recive command ...................................................................... 36
4.4.3.3 Set the node current operating mode .............................................. 36
4.4.3.4 OTA IO pin data acquisition ............................................................. 37
4.4.3.5 OTA Set remote node IO pin value .................................................. 38
4.4.3.6 OTA Query MAC address ................................................................ 39
4.4.3.7 OTA Query node address ................................................................ 40
4.4.3.8 OTA Query all node address and MAC address ............................. 40
4.5 End device sleep mode configuration description ............................................... 41
4.5.1 Timer sleep ................................................................................................. 41
4.5.2 Deep sleep ................................................................................................. 42
Xiamen Four-Faith Communication Technology Co.,Ltd.
Page 6 of 42
rd
Add: J1-J3,3 Floor,No.44,GuanRiRoad,SoftWare Park,XiaMen .361008.China
http://www.fourfaith.com
Tel: +86 592-6300326 6300325 6300324
Fax:+86 592-5912735
User Manual
Chapter 1 Brief Introduction of Product
1.1 General
F8914 is a kind of data terminal device that provides data transfer function by ZigBee
network.
It adopts high-powered industrial 32 bits CPU and embedded real time operating
system. It supports RS232, RS485 (or RS422) and ZigBee port that can conveniently and
transparently connect one device to a cellular network, allowing you to connect to your
existing serial and ZigBee devices with only basic configuration. It has low power
consumption states in which the power consumption 2.2mA@12VDC. It has compatible
digital I/O channel, ADC function.
It has been widely used on M2M fields, such as intelligent transportation, smart grid,
industrial automation, telemetry, finance, POS, water supply, environment protection, post,
weather, and so on.
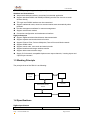
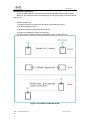
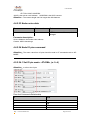
Figure 1-1 F8914 Application Topology
1.2 Features and Benefits
Design for Industrial Application
High-powered industrial ZigBee module
Support low power consumption mode, including multi-sleep and trigger modes to
reduce the power dissipation farthest
Housing: iron, providing IP30 protection
Power range: DC 5~35V
Stability and Reliability
Support hardware and software WDT
Support auto recovery mechanism, including online detect, auto redial when offline to
make it always online
RS232/RS485/RS422 port: 15KV ESD protection
SIM/UIM port: 15KV ESD protection
Power port: reverse-voltage and overvoltage protection
http://www.fourfaith.com
Page 7 of 42
User Manual
Antenna port: lightning protection(optional)
Standard and Convenience
Adopt terminal block interface, convenient for industrial application
Support standard RS232 and RS485(or RS422) port that can connect to serial
devices directly
TTL logic level RS232 interface can be customized
Support intellectual mode, enter into communication state automatically when
powered
Provide management software for remote management
Support several work modes
Convenient configuration and maintenance interface
High-performance
Support ZigBee wireless short-distance data transmission
Support repeater and terminal device function
Support Point-to-Point, Point-to-Multipoint, Peer-to-Peer and Mesh network
Support 65000 nodes
Support center node, route node and terminal node
Support broadcast and target address transfer
Support wide communication range
Supply 5 I/O channels, compatible 2pulse wave output channels, 3 analog inputs and
2 pulse input counters.
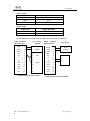
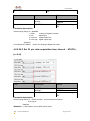
1.3 Working Principle
The principle chart of the F8914 is as following:
Indicator
MCU
RF
Lights
RS232/RS485/RS422
Antenna
Module
User Interface
Power Module
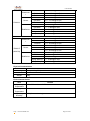
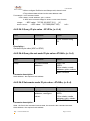
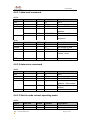
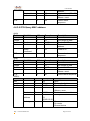
1.4 Specifications
ZigBee Specification
Item
http://www.fourfaith.com
Content
Page 8 of 42
User Manual
ZigBee Module
Industrial ZigBee module
Standard and Band
IEEE 802.15.4
ISM 2.4 GHz
Indoor/Urban Range
30m
90m(With PA)
Outdoor/RF Line-of-Sight Range
Transmit Power
Bandwidth
500m
2000m(With PA)
2.82mw (+4.5dBm)
100 mw (+20dBm) (With PA)
250Kbps
Receiver Sensitivity
-97dBm
-103dBm(With PA)
Network Topologies
Point-to-Point, Peer-to-Peer and Mesh
Channels
Max packge size
11 to 26
300 Bytes
Interface Type
Item
Content
Serial
1 RS232 port and 1 RS485(orRS422) port, 15KV ESD protection
Data bits: 8
Stop bits: 1, 2
Parity: none, odd, even
Baud rate: 300, 600, 1200, 2400, 4800, 9600, 19200, 38400, 57600,
115200 bps
Indicator
"Power", "ACT", "Online"
Antenna
Standard SMA female interface, 50 ohm, lighting protection(optional)
Power
Terminal block interface, reverse-voltage and overvoltage protection
Antenna
Interface
Terminal Block
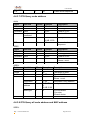
Power Input
Item
Content
Standard Power
Power Range
DC 12V/0.5A
DC 5~35V
Power Consumption
Working States
http://www.fourfaith.com
Power Consumption
Page 9 of 42
User Manual
Idle Mode
13.5~13.8mA@12 VDC
RX Mode
13.6~13.7mA@12 VDC
TX Mode
14.0~14.4mA@12 VDC
Idle Mode
13.2~13.4mA@12 VDC
RX Mode
13.2~13.7mA@12 VDC
TX Mode
13.9~14.1mA@12 VDC
Idle Mode
6.2~6.4mA@12 VDC
RX Mode
7.1~7.4mA@12 VDC
TX Mode
8.9~9.4mA@12 VDC
Timing wake up
3.2~3.3mA@12 VDC
Deep Sleep
2.2~2.3 mA@12 VDC
Coordinato
r
Router
F8914-N
EndDevice
Coordinato
r
Router
F8914-E
(With PA)
EndDevice
Idle Mode
15.9~16.1mA@12 VDC
RX Mode
16.3~16.6mA@12 VDC
TX Mode
21.3~22.2mA@12 VDC
Idle Mode
15.9~16.3mA@12 VDC
RX Mode
16.2~16.6mA@12 VDC
TX Mode
21.5~22.4mA@12 VDC
Idle Mode
6.6~6.9mA@12 VDC
RX Mode
8.0~9.2mA@12 VDC
TX Mode
13.3~14.2mA@12 VDC
Timing wake up
4.1~4.5mA@12 VDC
Deep Sleep
3.2~3.5 mA@12 VDC
Physical Characteristics
Item
Housing
Dimensions
Weight
Content
Iron, providing IP30 protection
91x58.5x22 mm
205g
Environmental Limits
Item
Content
Operating
Temperature
-40~+85ºC(-104~+185 ºF)
Storage
Temperature
-40~+125ºC(-104~+257ºF)
Operating
Humidity
95% ( Non-condensing)
http://www.fourfaith.com
Page 10 of 42
User Manual
Chapter 2 Installation Introduction
2.1 General
The F8914 must be installed correctly to make it work properly.There is need only one
coordinator in a network, the other nodes should be set as routers or end devices.
Install the coordinator first, then install the routers or end devices from near to distant.
Warning: Forbid to install the F8914 when powered!
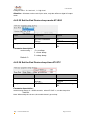
2.2 Encasement List
Name
Quantity
Remark
F8914 host
1
Power adapter
1
RS232 data cable
1
optional
RS485 data cable
1
optional
Manual CD
1
Certification card
1
Maintenance card
1
Table 2-1 Encasement List
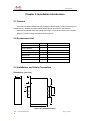
2.3 Installation and Cable Connection
Dimension: (unit: mm)
8
22
28
4
Ф3
Ф5
35
25
28
58.5
Figure 2-1 Installation Chart
http://www.fourfaith.com
Page 11 of 42
User Manual
Installation of antenna:
Screw the SMA male pin of the antenna to the female SMA outlet of F8914 tightly.
Warning: The antenna must be screwed tightly, or the signal quality of antenna will be
influenced!
Antenna install note:
1, Install the antenna far away from the large area metal and ground.
2, Keep the antennas visual.
3, Minimize obstructions between the antennas.
4, Reduce the extension cords of the antenna.
The performance of different antenna installation types, as the figure 2-2.
Figure 2-2 Installation antenna mode
http://www.fourfaith.com
Page 12 of 42
User Manual
User Interface Signal Definition
Pin
Number
Signal Name
Default Function
Extensible Function
1
PWR
Power input anode
N/A
2
GND
Power Ground
N/A
3
GND
Power Ground
N/A
4
RX
RS232 RX
N/A
5
TX
RS232 TX
N/A
6
A
RS485 anode
Reserved compatible DTR
7
B
RS485 cathode
Reserved compatible DSR
8
IO1
GPIO
Reserved compatible RTS and
RS232 RX (TTL logic level)
9
IO2
GPIO
Reserved compatible CTS and
RS232 TX (TTL logic level)
10
IO3
ADC, analog input
function
(voltage
acquisition 0 ~ 5 V)
GPIO, pulse output, pulse
counting. Reserve compatible
RS232 DCD
11
IO2
ADC, analog input
function
(current
collection 0 ~ 20
mA)
GPIO, pulse output, pulse
counting. Reserve compatible
RS232 RI
12
IO1
ADC, analog input
function
(current
collection 0 ~ 20
mA)
GPIO, pulse
counting.
output,
pulse
Installation of cable:
F8914 adopts industrial terminal block interface. The recommended cable is
28-16AWG. The detail description of standard layout adapter and communication cables
as the following:
Adapter(Rating Output 12VDC/0.5A)
:
Cable Color
Power Output Polarity
Black &White Alternate
Anode
Black
Cathode
http://www.fourfaith.com
Page 13 of 42
User Manual
RS232 Cable:
Cable Color
Corresponding DB9-M Pin Number
Brown
Pin 2
Blue
Pin 3
Black
Pin 5
RS485 Cable:
Cable Color
Signal definition
Red
RS485(A)
Black
RS485(B)
Power adapter and communication cable connection chart as following:
F8914 Terminal
Block Interface
PWR
GND
GND
RX
RX
TX
A
B
IO1
IO2
IO3
IO4
IO5
1
2
3
4
5
6
7
8
9
10
11
12
User Device
(DB9M)
+ Anode
- Cathode
1
2
3
4
5
6
7
8
9
RX
TX
GND
Communication Interface: RS232
http://www.fourfaith.com
F8914 Terminal
Block Interface
PWR
GND
GND
RX
TX
A
B
IO1
IO2
IO3
IO4
IO5
1
2
3
4
5
6
7
8
9
10
11
12
User Device
+ Anode
- Cathode
A
B
Communication Interface: RS485
Page 14 of 42
User Manual
2.4 Power
The power range of the IP MODEM is DC 5~35V
Warning: When we use other power, we should make sure that the power can supply
power above 4W.
We recommend user to use the standard DC 12V/0.5A power adaptor.
2.5 Indicator Lights Introduction
The F8914 provides three indicator lights: “Power”, “ACT”, “Online”.
Indicator
Light
Power
ACT
Online
State
ON
F8914 is powered on
OFF
F8914 is powered off
BLINK
Serial Data is communicating
OFF
No data
ON
F8914 has logged on network
OFF
F8914 hasn‟t logged on network
FLASH
http://www.fourfaith.com
Introduction
Joinning or establishing a network
Page 15 of 42
User Manual
Chapter 3 Zigbee Description
3.1 Device Type Description
ZigBee device has three types:coordinator,router and end device.They all can
transmit and receive data.
3.1.2 Coordinator
This is the device that “starts” a ZigBee network. It is the first device on the network.
The coordinator node scans the RF environment for existing networks, chooses a channel
and a network identifier (also called PAN ID) and then starts the network.
Note that the role of the Coordinator is mainly related to starting up and configuring the
network. Once that is accomplished, the Coordinator behaves like a Router node (or may
even go away). The continued operation of the network does not depend on the presence
of the Coordinator due to the distributed nature of the ZigBee network.
3.1.2 Router
A Router performs functions for (i) allowing other devices to join the network (ii)
multi-hop routing (iii) assisting in communication for its child battery-powered end devices.
In general, Routers are expected to be active all the time and thus have to be
mains-powered.
3.1.3 End Device
An end-device has no specific responsibility for maintaining the network infrastructure,
so it can sleep and wake up as it chooses. Thus it can be a battery-powered node.
3. 2 ZigBee Network Description
3.2.1 Form a ZigBee Network Procedure
(1)The coordinator node scans the RF environment for existing networks, chooses
a channel and a network identifier (also called PAN ID) and then starts the network.
(2)Router or end device also scans the RF environment for existing networks,
chooses a channel and a network identifier (also called PAN ID) and then join the network.
(3)The coordinator‟s node address fixed to 0x0000,router‟s or end device‟s node
address can be assigned randomly or configured previously.
http://www.fourfaith.com
Page 16 of 42
User Manual
(4)The nodes in the network can use node address transmit or receive data.。
NOTE:In a Zigbee network,just only one coordinator
3.2.2 Physical Channel
ZigBee is based on IEEE 802.15.4 that has defined the MAC layer and physical layer.
IEEE 802.15.4 also defined 3 work band 2.5GHz(global),868MHz(Europe) and
915MHz(USA),they respectively has highest 250kbit/s, 40kbit/s, 20kbit/s transmission rate.
On the three band has 27 work channels in total. 2.4GHz has 16 channels, 915MHz has
10 channels, 868MHz has only one channel.
F8914 works on 2.4GHz band. In AT command mode ,we send
“AT+CHA=N”,(N=11~26) to configure the channel. We recommend 15 ,20 ,25 ,26
channel .
3.2.3 Pan ID
ZigBee network also calls personal area network, every personal area network has
unique Pan ID.This Pan ID is used on every device in a same ZigBee network.
F8914 can preconfigure a Pan ID and randomly select a Pan ID. In AT command
mode ,we send “AT+PID=N”,(N=0-65531),if PID=65535 ,it will randomly select a Pan ID.
3.2.4 Node address
ZigBee device has two address types: 64 bit MAC address and 16 bit node address.
64 bit MAC address is unique in the world, and used in the product life. 16 bit node
address usually assigned when the device joined in the network. It‟s unique in a same Pan
ID network. We use node address to send and receive data.
F8914 can preconfigure a node address and randomly assigned a node address. In
AT command mode ,we send “AT+NID=N”,(N=0-65527), if NID=65535, it will randomly
assigned a node address.
Note that : the coordinator’s node address is fixed on 0.
http://www.fourfaith.com
Page 17 of 42
User Manual
Chapter 4 Configuration
4.1 Configuration Connection
Before configuration, It‟s necessary to connect the device with the configure PC by
the shipped RS232 or RS232-485 conversion cable.As showing in the figure 4-1.
Figure 3-1 F8914 connect with PC
4.2 Configuration Introduction
There are two ways to configure the F8914:
Configuration software tool: All the settings are configured through the shipped
software tool. It‟s necessary to have one PC to run this tool.
Extended AT command: All the settings are configured through AT command, so any
device with serial port can configure it. Before configuration with AT command, you
should make F8914 enter configure state.
The following describes how to configure F8914 with AT command .At the same time,
it gives out the corresponding the configure software tool of each configuration item.
Note: When F8914 powers up, it has three second configuration time。During this time, the
serial‟s baudrate is 115200,no parity, 1 stop bit. Send the 3-character command
sequence“+++”twice through serial port.Then it goes into AT command configuration.
http://www.fourfaith.com
Page 18 of 42
User Manual
4.3 Run the configure Tool: ZigbeeConfigure.exe
The “Communication Setting” column shows the current serial port settings. To
configure ZigBee modules, please choose the correct serial port parameters ,then open
the serial port. If the button text is“Close”, it shows the serial port now has been opened. If
the text is “Open”, you should open the port first.
When you had configure the correct serial port,please press the
bottom, and follow the prompt,the node will enter configuration
state。
4.4 Modes of Operation
F8914 supports three modes of Operation:Transparent Mode,AT Command Mode and
API (Application Programming Interfaced) Mode.
http://www.fourfaith.com
Page 19 of 42
User Manual
4.4.1 Transparent mode
When operationg in transparent mode the modules act as a serial line replacement.
All UART data received through the DIN pin is queued up for RF transmission. When data
is received, the data is sent out through the DOUT pin.
Re-power module enter the transparent mode by default。
To enter transparent mode:
In the AT command mode,send “AT+ESC<CR><LF>”through serial port.
In the API mode, send “FE 01 21 2A 00 0A” through serial port.
4.4.2 AT command mode
AT command mode is a multiple function operation. This mode can configure the
modules parameters,send data and recive data.
To enter AT command mode:
In the transparent mode,send the 3-character command sequence“+++”twice
through serial port.
In the API mde,send “FE 01 21 2A 00 0A” through serial port.
CHECK the AT command mode,send “AT<CR><LF>” through serial port, it will
return “OK”.
All AT command line should begin with “AT” or “at” and end with “<CR><LF>”.In
general, the AT command includes three forms, as shown in table 3-1.
Table 3-1 AT command forms
Form
Description
Set
Set the custom
parameters
Query
Query the current
parameters value
Execute
Execute the command
Instance
AT+XXX=<……>
AT+XXX?
AT+XXX
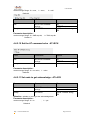
4.4.2.1 Set the PAN ID : AT+PID
Form
Command
Return
Set
AT+PID=<number
strings>
0K
ERROR
http://www.fourfaith.com
Page 20 of 42
User Manual
Query
AT+PID?
+PID: number strings
OK
Parameter description :
number strings Range:0~65531,Set unique PAN ID
65535, System will assign a stochastic PAN ID
Default:65535
4.4.2.2 Query current PAN ID: AT+PCD
Form
Command
Return
Query
AT+PCD?
+PCD: number strings
OK
Attention: This command is different from “AT+PID”. When the PAN ID is assigned by
system and the node joined in the network , we can use this command to query the
current PAN ID.
4.4.2.3 Set the physical channel : AT+CHA
Form
Commad
Return
Set
AT+CHA=<number
strings>
AT+CHA?
0K
ERROR
+CHA: number string
OK
Query
Parameter description :
number string Range: 11~26
Default: 11
4.4.2.4 Query the node MAC address : AT+MID
Form
Command
Return
Query
AT+MID?
+MID: hexadecimal strings
OK
http://www.fourfaith.com
Page 21 of 42
User Manual
Attention: This command is read only. It will return 16 hexadecimal strings.
For example: 051B9B01004B1200
4.4.2.5 Set the node type: AT+TYP
Form
Command
Return
Set
AT+TYP=<number
string>
AT+TYP?
0K
ERROR
+TYP: number string
OK
Query
Parameter description :
number string Range: 0 = Coordiantor
1 = Routerr
2 = End Device
Default:1
4.4.2.6 Set node address : AT+NID
Form
Command
Return
Set
AT+NID=<number
strings>
AT+NID?
0K
ERROR
+NID: number strings
OK
Query
Parameter description :
number string Range: 0~65527,Set unique node address
65535, System will assign a stochastic node address
Default:65535
Attention : When coordiantor form a network, its node address is fixed to 0, the router
and end device‟s node address must be non-zero.
4.5.2.7 Query node current address : AT+NCD
Form
Command
Return
Query
AT+NCD?
+NCD: number strings
OK
http://www.fourfaith.com
Page 22 of 42
User Manual
Attention: This command is different from “AT+NID”. When the node address is
assigned by system and the node joined in the network , we can use this command to
query the current node address.
4.4.2.8 Set the transparent address : AT+TID
Form
Command
Return
Set
AT+TID=<number
strings>
AT+TID?
0K
ERROR
+TID: number strings
OK
Query
Parameter description :
number strings Range: 0~65527,Set unique node trans address
65535, broadcast address
Default:0
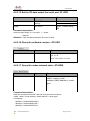
4.4.2.9 Set the node baudrate : AT+IPR, AT+PAR, AT+STO
Form
Command
Return
Set
AT+IPR=<number
string>
AT+IPR?
0K
ERROR
+IPR: number string
OK
Query
Parameter description :
number strings Range: 0 = 300,1 = 600,2 = 1200,3 = 2400,4 = 4800,5 = 9600,6 = 19200,
7 = 38400,8 = 57600,9 = 115200
Default:9
Form
Command
Return
Set
AT+PAR=<number
string>
AT+PAR?
0K
ERROR
+PAR: number string
OK
Query
Parameter description :
http://www.fourfaith.com
Page 23 of 42
User Manual
number strings Range: 0 = none, 1 = even ,
Default:0
2 = odd
Form
Command
Return
Set
AT+STO=<number
string>
AT+STO?
0K
ERROR
+STO: number string
OK
Query
Parameter description :
number strings Range: 0 = ONE stop bit, 1 = TWO stop bit
Default: 0
4.4.2.10 Set the AT command echo : AT+ECH
Form
Command
Return
Set
AT+ECH=<number
string>
AT+ECH?
0K
ERROR
+ECH: number string
Query
Parameter description :
number strings Range: 0 = non-echo, 1 = echo
Default:0
4.4.2.11 Set node to get acknowledge : AT+ACK
Form
Command
Return
Set
AT+ACK=<number
string>
AT+ACK?
0K
ERROR
+ACK: number string
OK
Query
Attention : whether or not to get the acknowledge data
Parameter description :
number strings Range: 0 = no
Default:0
http://www.fourfaith.com
, 1 = yes
Page 24 of 42
User Manual
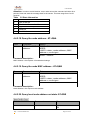
4.4.2.12 Set debug level : AT+DBL
Form
Command
Return
Set
AT+DBL=<number
string>
AT+DBL?
0K
ERROR
+DBL: number string
OK
Query
Parameter description :
number strings Range: 0 = close all debug messages
1 = info the important debug messages
2 = info all debug messages
Default: 0
4.4.2.13 Set the node auto joins in the network : AT+AST
Form
Command
Return
Set
AT+AST=<number
string>
AT+AST?
0K
ERROR
+AST:number string
OK
Query
Parameter description :
number strings Range: 0 = not auto join,
Default:1
1 = auto join
4.4.2.14 Start the network : AT+STA
Form
Command
Return
Execute
AT+STA
OK
ERROR
Attention : When “AT+AST = 0”,this command can start the network.
http://www.fourfaith.com
Page 25 of 42
User Manual
4.4.2.15 Set the RF data output the serial port: AT+PRF
Form
Command
Return
Set
AT+PRF=<number
string>
AT+PRF?
0K
ERROR
+PRF: number string
OK
Query
Parameter description :
number strings Range: 0 = not output, 1 = output
Default:1
Attention : This command parameter don‟t save in flsah.
4.4.2.16 Query the softwarte version : AT+VER
Form
Command
Return
Execute
AT+VER
Four-Faith Zigbee Standard
Ver: V1.10
Time: Jul 24 2012 11:21:04
4.4.2.17 Query the nodes network state : AT+NWS
Form
Command
Return
Execute
AT+NWS
OK
+NWS: <state>,<node
address>,<MAC address >,<node
type>
…
…
…
Command description :
When this command executed, it will recive Asynchronous response.
+NWS: <state>,<node address>,<MAC address >,<node type>
For example:
+NWS:0,0,1122334455667788,0
+NWS:0,2,1122334455667799,1
+NWS:0,8,1122334455667732,2
http://www.fourfaith.com
Page 26 of 42
User Manual
Attention: In order to avoid blocking, every node recived the command will delay for a
period of time and send the message itself to the sender. This time range from 0 to 66
seconds.
Table
0
1
2
3
4
5
3-2 State information
Normal
Not in the net
Don‟t exist the node address
Opposite don‟t response
Reserve
Invaild value
4.4.2.18 Query the node address : AT+QNA
Form
Set
Command
AT+QNA=<MAC
address>
Return
SRSP:OK
AREQ:
+NWS: <state>,<node address>,<MAC
address >,<node type>
SRSP:ERROR
Parameter description :
MAC Address : the required 16 hexadecimal strings
4.4.2.19 Query the node MAC address : AT+QMA
Form
Set
Command
AT+QNA=<node
address>
Return
SRSP:OK
AREQ:
+NWS: <state>,<node address>,<MAC
address >,<node type>
SRSP:ERROR
Parameter description :
Node Address : the required node address
4.4.2.20 Query local node address net state: AT+SNS
Form
Command
Return
Execute
AT+SNS
+SNS:as shown table 3-3
OK
http://www.fourfaith.com
Page 27 of 42
User Manual
Table 3-3 DEV NETWORK STATE:
00
Initialized - not started automatically
01
Initialized - not connected to
anything
02
Discovering PAN's to join
03
Joining a PAN
04
ReJoining a PAN, only for end
devices
05
Joined but not yet authenticated by
trust center
06
Started as device after
authentication
07
Device joined, authenticated and is
a routerr
08
Started as Zigbee Coordinator
09
Started as Zigbee Coordinator
10
Device has lost information about its
parent.
4.4.2.21 Send data (HEX mode): AT+TXH
Form
Command
Return
Set
AT+TXH=<node
address><content>
OK
ERROR
Parameter description :
Node Address: two byte hexadecimal,the lowest byte comes first
Content: the hexadecimal data.
For example:
AT+TXH=0123383838383838<CR><LF>
The node address is 0x2301 and the content is “888888”.
Attention : The content length can‟t be longer than 160 character.
4.4.2.22 Send data (ASCII mode) : AT+TXA
Form
Command
Return
Set
AT+TXA=<node
address>,<content>
OK
ERROR
Parameter description :
Node Address: decimal address
Content: ASCII data.
http://www.fourfaith.com
Page 28 of 42
User Manual
For example:
AT+TXA=12245,123456789
12245 is the reciver node address,123456789 is the ASCII content.
Attention : The content length can‟t be longer than 80 character.
4.4.2.23 Node recive data
Form
Command
Return
+RCV:<source address>,<data
strings>
Parameter description :
Source Address: the sender node address
Content: ASCII data strings
4.4.2.24 Node IO pins command
Attention:The return value from IO pins should be read in AT command mode or API
MODE.
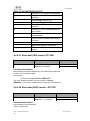
4.5.2.24.1 Set IO pin mode : AT+DMn, (n :0~4)
Attention:n refer to the IO pin
Pins And Commands Relationship
n
IOs
0
1
2
3
IO5
IO4
IO3
IO2
http://www.fourfaith.com
Page 29 of 42
User Manual
4
IO1
Form
Command
Return
Set
AT+DMn=<number
string>
AT+DMn?
0K
ERROR
+DMn: number string
OK
Query
Parameter description :
number string Range: 0 = Disabled
1 = ADC
Analog to Digital Converter
2 = DI
digital input
3 = DO low digital output low
4 = DO high digital output high
Default:0
For example: AT+DM0=1 set the IO1 Analog to Digital Converter
4.4.2.24.2 Set IO pin data acquisition time interval : AT+DTn,
(n :0~4)
Form
Command
Return
Set
AT+DTn=<number
strings>
AT+DTn?
0K
ERROR
+DTn: number strings
OK
Query
Parameter description :
number string Range: 0~65535 seconds,set the report time interval
0,not report
Default:0
Attention : 1.Take effect in IO pin ADC and DI mode.
http://www.fourfaith.com
Page 30 of 42
User Manual
2.When configure EndDevice and Sleep mode,it doesn‟t work.
3.The collected data will send to the trans address node.
For example : in AT command mode
+NVn:<state>,<node address>,<pin>,<value>
3. ADC value converte voltage or electric current value formula
voltage: (ADC value)*3.3*20.16/(2047*12.1)
(V)
electric current: (ADC value)*3.3*1000/(2047*150)
(mA)
4.4.2.24.3 Query IO pin value : AT+DVn, (n :0~4)
Form
Command
Return
Query
AT+DVn?
+DVn: number string
OK
Description :
Get local IO pin value (ADC or GPIO)
4.4.2.24.4 Query the net node IO pin value: AT+NVn, (n :0~4)
Form
Command
Return
Query
AT+NVn=<node
address>
SRSP: OK
AREQ
+NVn:<state>,<node
address>,<pin>,<value>
SRSP: ERROR
Parameter description :
Node Address : the required node address
4.4.2.24.5 Set remote node IO pin value : AT+NSn, (n :0~4)
Form
Command
Return
Set
AT+NSn=<node
address>,<configure
value>
SRSP: OK
AREQ
+NVn:<state>,<node
address>,<pin>,<state>
SRSP: ERROR
Parameter description :
State : the first is the command execute state, the second is the command set state.
Node Address : the required node address
http://www.fourfaith.com
Page 31 of 42
User Manual
Configure value : 0 = low level , 1 = high level
Attention : Wireless set the node IO pin value, only take effect on digital IO output
mode.
4.4.2.25 Set the End Device sleep mode:AT+SLE
Form
Command
Return
Set
AT+SLE=<Number
String>
AT+SLE?
0K
ERROR
+SLE: Number String
OK
Query
Parameter description :
number string : 0 = no sleep
1 = timer sleep
2 = deep sleep
Default: 0
4.4.2.26 Set the End Device sleep time:AT+STC
Form
Command
Return
Set
AT+STC=<number
strings>
AT+STC?
0K
ERROR
+STC: number strings
OK
Query
Parameter description :
number string Range: 0~65535 seconds,when AT+SLE =1, set the sleep time
Default:0
Note: When sleep time is zero ,the module doesn‟t go to sleep.
http://www.fourfaith.com
Page 32 of 42
User Manual
4.4.2.27 Set the End Device wake time:AT+WTC
Form
Command
Return
Set
AT+WTC=<number
strings>
AT+WTC?
0K
ERROR
+WTC: number strings
OK
Query
Parameter description :
number string Range: 0~65535 millisecond,when AT+SLE =1, set the wake time
Default:0
4.4.2.28 Set the Data Interval:AT+ITV
Form
Command
Return
Set
AT+ITV=<number
strings>
AT+ ITV?
0K
ERROR
+ ITV: number strings
OK
Query
Parameter description :
number string Range: 6-1980 millisecond
Default:20
Note: Data Interval is used to judge if the serial has recived the data . If data
interval greater than the setting ,the program will process the serial data. The
lower baudrate ,the longer data interval.
4.4.2.29Query the bootload version :AT+BTL
Form
Command
Return
Execute
AT+BTL
Four-Faith Zigbee BootLoad
Ver: V1.01
http://www.fourfaith.com
Page 33 of 42
User Manual
4.4.2.30 Set device work mode:AT+MOD
Form
Command
Return
Set
AT+ MOD =<Number
String>
AT+ MOD?
0K
ERROR
+ MOD: Number String
OK
Query
Parameter description :
number string : 0 = Transparent Mode
1 = AT command Mode
2 = API mode
Default: 0
Attention: The command set device start up work mode,when configure and
save ,it need restart.
4.4.2.31 Other execute command
Command
Return
Description
AT+SAV
OK
Save parameters
AT+ESC
OK
AT+API
OK
Escape AT command
mode
Then enter transparent
mode
Enter API mode
AT+FAC
OK
Factory
AT+SRS
OK
Restart
Note: every configure item is set, it should send save command.
4.4.3 API mode
API operation requires that communication with the module be done through a
structured interface (data is communicated in frames in a defined order). The API
specifies how
commands, command responses and module status messages are sent and received
from the
http://www.fourfaith.com
Page 34 of 42
User Manual
module using a UART Data Frame.
To enter API mode :
In the transparent mode,send the 3-character command sequence“= = =”twice
through serial port.
In the AT command mode,send “AT+API<CR><LF>” through serial port.
The UART data frame structure is defined as follows:
SOF
Length
Command Frame data
1 Byte
1 Byte
2 Bytes
xx Bytes (xx<250)
Frame
check
sequence
1 Byte
SOF (Start of Frame): This is a one byte field with value equal to 0xFE that defines the
start of each general serial packet.
Length : 1 byte length of the actual data.
Command : 2 byte command Id.
Frame data : the data ranging from 0-250 bytes.
FCS (Frame Check Sequence):
This is a one byte field that is used to ensure packet integrity. This field is computed
as an XOR of all the bytes in the message starting with LEN field and through the last byte
of data. The following is a sample code FCS calculation:
unsigned char calcFCS(unsigned char *pMsg, unsigned char len)
{
unsigned char result = 0;
while (len--)
{
result ^= *pMsg++;
}
return result;
}
Attention : The data content should be send with little-endian, the lowest byte come first.
1: SREQ: A synchronous request that requires an immediate response. For example, a
function call with a return value would use an SREQ command.
2: AREQ: An asynchronous request. For example, a callback event or a function call with no
return value would use an AREQ command.
3: SRSP: A synchronous response. This type of command is only sent in response to a SREQ
command. For an SRSP command the subsystem and ID are set to the same values as the
corresponding SREQ. The length of an SRSP is generally nonzero, so an SRSP with length=0
can be used to indicate an error.
http://www.fourfaith.com
Page 35 of 42
User Manual
4.4.3.1 data send command
SREQ:
Fields
Sub field
SOF
Length
Command Send
Data
Destination
Offset
1
1
2
2
Example
FE
06
24 5F
00 00
<80
1
41 41 41 41
7D
Fields
Sub field
SOF
Length
Command Send
Data
State
Offset
1
1
2
1
Example
FE
01
64 5F
00
Description
0xFE
The length of data
Fixed to 64 5F
00 = success,
Others = error
FCS
1
3A
Frame check sequence
Offset
1
1
2
2
Example
FE
06
44 5F
10 0E
<80
41 41 41 41
1
03
Description
0xFE
The length of data
Fixed to 24 5F
The sender node
address(little-endian)
The content to be
recived
Frame check sequence
Content
FCS
Description
0xFE
The length of data
Fixed to 24 5F
Destination node
address
The content to be send
Frame check
sequence
SRSP:
4.4.3.2 data recive command
AREQ
Fields
Sub field
SOF
Length
Command Recive
Data
Source
Content
FCS
4.4.3.3 Set the node current operating mode
SREQ :
Fields
SOF
Length
Sub field
http://www.fourfaith.com
Offset
1
1
Example
FE
01
Description
0xFE
The length of data
Page 36 of 42
User Manual
Command Set
Data
Mode
2
1
21 2A
00
FCS
1
0A
Fields
Sub field
SOF
Length
Command Set
Data
State
Offset
1
1
2
1
Example
FE
01
61 2A
00
FCS
1
4A
Fixed to 21 2A
00 = transparent mode
01 = AT command
mode
02 = API mode
Frame check sequence
SRSP
Description
0xFE
The length of data
Fixed to 61 2A
00 = success,
Others = error
Frame check sequence
4.4.3.4 OTA IO pin data acquisition
SREQ
Fields
Sub field
SOF
Length
Command Send
Data
Destination
Offset
1
1
2
2
Example
FE
04
24 5E
10 0E
1
00
1
1
02
62
IO pin address(00 - 02)
Frame check
sequence
Fields
Sub field
SOF
Length
Command Send
Data
State
Offset
1
1
2
1
Example
FE
01
64 5E
00
Description
0xFE
The length of data
Fixed to 64 5E
00 = success,
Others = error
FCS
1
3B
Frame check sequence
Offset
1
1
2
Example
FE
06
44 5E
Description
0xFE
The length of data
Fixed to 44 5E
Read
command
IO pin address
FCS
Description
0xFE
The length of data
Fixed to 24 5E
Destination node
address
Fixed to 00
SRSP
AREQ:
Fields
Sub field
SOF
Length
Command send
http://www.fourfaith.com
Page 37 of 42
User Manual
Data
State
1
00
Destination
2
10 0E
IO pin address
Pin value
1
n
02
00 00
1
00
FCS
00 = success,
Others = error
Destination node
address
IO pin addres
Attention : it shows
little-endian,such as 12
34,equale to 0x3412
Frame check sequence
4.4.3.5 OTA Set remote node IO pin value
Attention : IO pin is set digital output mode.
SREQ:
Fields
Sub field
SOF
Length
Command Send
Data
Destination
Offset
1
1
2
2
Example
FE
06
24 60
10 0E
1
1
1
01
02
01 00
1
5E
Fields
Sub field
SOF
Length
Command Send
Data
State
Offset
1
1
2
1
Example
FE
01
64 60
00
FCS
1
05
Offset
1
1
2
1
Example
FE
05
44 60
00
2
10 0E
Write
IO pin address
Pin value
FCS
Description
0xFE
The length of data
Fixed to 24 60
Destination node
address
Fixed to 01
IO pin address(00 - 02)
Attention : it shows
little-endian,such as 01
00,equale to 0x0001
Frame check sequence
SRSP
Description
0xFE
The length of data
Fixed to 64 60
00 = success,
Others = error
Frame check sequence
AREQ:
Fields
Sub field
SOF
Length
Command Send
Data
Send state
Destination
http://www.fourfaith.com
Description
0xFE
The length of data
Fixed to 44 60
00 = success,
Others = error
Destination node
Page 38 of 42
User Manual
IO pin address
Set state
FCS
1
1
02
00
1
3D
address
IO pin address(00 - 02)
00 = success,
Others = error
Frame check
sequence
4.4.3.6 OTA Query MAC address
SREQ
Fields
Sub field
SOF
Length
Command Send
Data
Destination
Offset
1
1
2
2
Example
FE
03
24 5D
10 0E
1
02
1
66
Frame check
sequence
Fields
Sub field
SOF
Length
Command Send
Data
State
Offset
1
1
2
1
Example
FE
01
64 5D
00
FCS
AREQ:
Fields
Sub field
SOF
Length
Command Send
Data
State
1
38
Description
0xFE
The length of data
Fixed to 64 5D
00 = success,
Others = error
Frame check sequence
Query
command
FCS
Description
0xFE
The length of data
Fixed to 24 5D
Destination node
address
Fixed to 02
SRSP
Offset
1
1
2
1
Example
FE
0C
44 5D
00
Destination
MAC
address
2
8
Node type
1
10 0E
8B D9 D1
01
00 4B 12 00
01
00=coordinator
01=router
02=end device
http://www.fourfaith.com
Description
0xFE
The length of data
Fixed to 44 5D
00 = success,
Others = error
Destination node address
Low byte come first
Page 39 of 42
User Manual
FCS
1
D1
Frame check sequence
4.4.3.7 OTA Query node address
SREQ
Fields
Sub field
SOF
Length
Command Send
Data
Query
command
MAC address
Offset
1
1
2
1
Example
FE
09
24 5C
03
Description
0xFE
The length of data
Fixed to 24 5C
Fixed to 03
8
Low byte come first
FCS
1
8B D9 D1 01
00 4B 12 00
A9
SRSP:
Fields
Sub field
SOF
Length
Command Send
Data
State
Offset
1
1
2
1
Example
FE
01
64 5C
00
1
39
Description
0xFE
The length of data
Fixed to 64 5C
00 = success,
Others = error
Frame check sequence
FCS
AREQ:
Fields
Sub field
SOF
Length
Command Send
Data
State
Frame check
sequence
Offset
1
1
2
1
Example
FE
0C
44 5D
00
Destination
MAC
address
2
8
Node type
1
10 0E
8B D9 D1
01
00 4B 12 00
01
00=coordinator
01=router
02=end device
D1
Frame check sequence
FCS
1
Description
0xFE
The length of data
Fixed to 44 5D
00 = success,
Others = error
Destination node address
Low byte come first
4.4.3.8 OTA Query all node address and MAC address
SREQ:
http://www.fourfaith.com
Page 40 of 42
User Manual
Fields
Sub field
SOF
Length
Command Send
Data
Query
command
FCS
SRSP:
Fields
Sub field
SOF
Length
Command Send
Data
State
FCS
AREQ:
Fields
Sub field
SOF
Length
Command Send
Data
State
Offset
1
1
2
1
Example
FE
01
24 5B
01
Description
0xFE
The length of data
Fixed to 24 5B
Fixed to 01
1
7F
Frame check
sequence
Offset
1
1
2
1
Example
FE
01
64 5B
00
1
3E
Description
0xFE
The length of data
Fixed to 64 5B
00 = success,
Others = error
Frame check sequence
Offset
1
1
2
1
Example
FE
0C
44 5D
00
Destination
MAC
address
2
8
Node type
1
10 0E
8B D9 D1
01
00 4B 12
00
01
1
D1
FCS
Description
0xFE
The length of data
Fixed to 44 5D
00 = success,
Others = error
Destination node address
Low byte come first
00=coordinator
01=router
02=end device
Frame check sequence
4.5 End device sleep mode configuration description
F8914 support Timer sleep and Deep sleep
4.5.1 Timer sleep
Function description:
Timer sleep can set the sleep interval,when it wake up,the EndDevice will wake up a
centain time then it goes to sleep again. If device works on AT mode ,when it wakes up the
http://www.fourfaith.com
Page 41 of 42
User Manual
serial port will output „+WAK:1\r\n‟,when it enters sleep the serial port will output
„+WAK:0\r\n‟. If device works on API mode , when it wakes up the serial port will output
FE 01 41 2B 01 6A‟,when it enters sleep the serial port will output „FE 01 41 2B 00 6B‟.
After EndDevice waking up, if EndDevice successfully joined in the network IO2 will
output low level to indicate online. If EndDevice unsuccessfully joined in the network or
went into sleep IO2 will output high level to indicate off-line.
Configuration conditions
(1)Hardware:IO1 must connect to high level (3V ~3.3V).
(2)Software:Devcie should be configured as end device and Timer Sleep.The Interval
must be greater than 0.
4.5.2 Deep sleep
Function description:
Deep sleep is waked up by extern interrupt. When IO1 is low level ,device not goes to
sleep. When IO1 is high level(3V ~3.3V),device goes to deep sleep.
After EndDevice waking up, if EndDevice successfully joined in the network IO2 will
output low level to indicate online. If EndDevice unsuccessfully joined in the network or
went into sleep IO2 will output high level to indicate off-line.
Configuration conditions
(1) Hardware :Operate on IO1‟s level.
(2) Software : Devcie should be configured as end device and Deep Sleep.
Note that: 1.When device is not work on sleep mode, IO1,IO2 are used as digital
input or output.
2.When device is work on sleep mode,IO1 is reused as extern interrupt.IO2 is
reused to indicate on-line or off-line.
http://www.fourfaith.com
Page 42 of 42