1
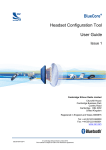
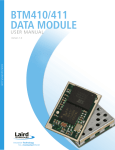
BlueCore5™ BlueCore5™ BlueTunes2 Stereo Headset Quick Start Guide BlueTunes2 Stereo Headset Quick Start Guide This Quick Start Guide is designed to help you set up your BlueTunes2 Stereo Headset Evaluation Kit. For more information please visit the BlueTunes2 section at www.csrsupport.com (1) Additional Information Using the Analogue-Audio Adaptor board The Analogue Audio Adaptor solution from CSR makes it easy to design and manufacture Bluetooth adaptor products for mobile handsets, MP3 players and Hi-Fi systems. This allows products without built-in Bluetooth to connect to wireless headphones and speakers. Connecting to wireless speakers or headphones Please check and identify the following components. Email [email protected] if any components are missing. You will need these components to set up your (2,3) BlueTunes2 Stereo Headset Development Kit. Screw the supplied helicoil antenna clockwise onto the base. The first time the audio adaptor is turned on it will automatically start searching for Bluetooth headphones, speakers or other A2DP sinks in range. When it finds one, it will try to pair with the device using a fixed PIN code stored in Flash memory (as shipped, the PIN code is 8888). If the pairing process is successful, it will set up an A2DP connection and start streaming music. 1 BC5MM-EXT Headset Example Design Demonstrator Board including 1 Lithium/Ion Polymer Battery (120mAH) Pressing the button on the development board will delete any pairing information and start the adaptor looking for further suitable A2DP sources. Make sure the A2DP sink device is in pairing mode, otherwise it will not be visible. LED patterns The LED flashing indicates the state of the audio adaptor board: Idle: the blue LED flashes; 100ms on, 1000ms off. 1 Pair of Stereo Headphones Discovering: both red and blue LEDs flash. Streaming: the blue LED flashes; 1000ms on, 1000ms off. Using the Voice Dongle 1 CSR Nanosira Multimedia Dongle The Voice Dongle 1 is a true plug-and-play dongle that allows a Bluetooth headset to be used for VOIP (Voice-Over-IP) calls. Connecting the Voice Dongle to your headphones 1 Mini-B USB cable 1. Insert the dongle into a USB socket on your PC. 2. Ensure that the headset is in pairing mode, as described on page 2 of this document. 3. Press and hold the button (clear plastic window) on the dongle until the LEDs flash with a red-green-pause sequence (as oppose to red-green-red-green). This flashing sequence indicates that the dongle is in pairing mode; the dongle should now pair with your headset. Pressing and releasing the button on the dongle causes the dongle to attempt pairing with the last-paired device. In this state, the LEDs on the dongle flash in a red-green-red-green sequence. Notes: (1) The evaluation kit is supplied with development firmware which is not suitable for production. Qualified firmware is expected in early 2007 and will be available for download from www.csrsupport.com on release. (2) The following additional components are also supplied: 2 Host-interface boards, 1 USB AVdongle, 1 USB Voice Dongle, 1 Analogue audio-adaptor board, 1 serial UART cable, 1 SPI cable, 1 XSPI adaptor, 1 stereo jack cable and 1 helicoil antenna. These components will help with more advanced evaluation and testing (such as described briefly on page 4) (3) CVC software requires a security key for continued operation. If the audio mutes after 5 minutes, please contact your CSR sales channel to obtain a valid CVC security key. CSR plc Cambridge Science Park Milton Road Cambridge CB4 0WH Tel: +44 (0)1223 692000 Fax: +44 (0)1223 692001 CS-110826-UGP1 © CSR plc 2006 Page 4 CS-110826-UGP1 © CSR plc 2006 Page 1 BlueTunes2 Stereo Headset Quick Start Guide Step 1: Setting Up the Demonstrator board Step 3: Streaming Music from the PC 1. Choose between the on-board antenna (“ANT”) or the SMA RF connector (“CON”) using this slide switch. Set to “ANT” for normal operation. Note: Before commencing, CSR recommend downloading the program avcontrol.exe from www.csrsupport.com/BlueTunes. This program allows fine control over the behaviour of the Nanosira dongle and allows the user easily to determine the state of the device. 1. Before inserting the Nanosira dongle into the PC, ensure that the demonstrator board is in Bluetooth pairing mode (see Step 2: Preparing the Demonstrator Board for Bluetooth Pairing).This reduces the possibility of the dongle pairing with any other Bluetooth device in pairing mode.(1) 2. Connect the Lithium/Ion polymer battery here. 2. Insert the Nanosira dongle into a USB port on the PC. On first insertion the PC will display a message confirming that it has found new hardware.(2) 3. Set this switch to “MIC” to use the microphone on the supplied headphones. 3. The dongle automatically pairs with the demonstrator board. 3. Set this switch to “AMP” 4. Open a media player on the PC (eg.,Windows Media Player) and play an audio/music track. The audio/music track is streamed to the stereo headphones. 4. CSR recommends charging the battery for two hours prior to first use. To charge, connect USB cable to USB/Charge port on PCB and USB port on PC. Ensure that the power switch is in the “ON” position. 5. Use the volume buttons (VOL- and VOL+) on the demonstrator board to control the volume. (The device will beep when the maximum/minimum volume is reached) 6. Use the BACK button to rewind/go back a track. Use the FWD button to fast forward/go forward a track. Use the PLAY/STOP button to stop, pause and play tracks. Notes: 5. Insert headphone speaker jack here. (1) 6. Insert headphone MIC jack here. Step 2: Preparing the Demonstrator Board for Bluetooth Pairing (2) 1. Turn the power on. If the dongle pairs with the wrong device, start the avcontrol program. Select Discover New Headphones; the stored Bluetooth address clears and the pairing process begins again. If required in the future, the dongle can be uninstalled from the PC in the following way: go to Control Panel and run the Add/Remove Hardware Wizard. Remove USB Audio Device from the hardware list. Step 4: Receiving a Mobile Phone Call 1. Ensure the demonstrator board is in pairing mode (see Step 2: Preparing the Demonstrator Board for Bluetooth Pairing).(1) 2. Go to the Bluetooth connectivity settings on the mobile phone. Ensure the phone’s Bluetooth capability is on. 2. Press the PWR button for five seconds. 3. Search for the BlueTunes2 device. Select/pair with the BlueTunes2 device. Enter the passcode/PIN 8888.(1) 4. When a telephone call is made to the mobile phone, any music/audio streaming to the headset from the PC is paused, and the phone call received in the headset. When the phone call is completed/rejected, any music/audio streaming is resumed. 3. Red and blue LEDs flash quickly together. The device is ready for Bluetooth pairing. Note: (1) CS-110826-UGP1 © CSR plc 2006 Page 2 CS-110826-UGP1 If the mobile phone pairs with the wrong Bluetooth device, clear/edit the phone’s list of paired Bluetooth devices, and search again. © CSR plc 2006 Page 3