1
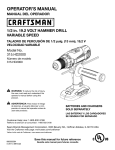
OPERATOR’S MANUAL MANUEL DEL OPERADOR 19.2 VOLT HANDHELD INFLATOR DIGITAL GAUGE INFLADOR PORTÁTIL DE 19,2 V CON MANÓMETRO DIGITAL Model No. 315.115860 Número de modelo 315.115860 WARNING: To reduce the risk of injury, the user must read and understand the operator’s manual before using this product. ADVERTENCIA: Para reducir el riesgo de lesiones, el usuario debe leer y comprender el manual del operador antes de usar este producto. Customer Help Line: 1-800-932-3188 Teléfono de atención al consumidor: 1-800-932-3188 BATTERIES AND CHARGERS SOLD SEPARATELY LAS BATERÍAS Y EL CARGADOR SE VENDEN POR SEPARADO Sears Brands Management., 3333 Beverly Rd., Hoffman Estates, IL 60179 USA Visit the Craftsman web page: www.sears.com/craftsman Visite el sitio web de Craftsman: www.sears.com/craftsman 983000-795 8-31-10 (REV:03) Save this manual for future reference Guarde este manual para futuras consultas TABLE OF CONTENTS / ÍNDICE DE CONTENIDO ENGLISH ESPAÑOL Warranty.......................................................................2 Garantía.......................................................................2 Introduction..................................................................2 Introducción.................................................................2 General Safety Rules............................................... 3-4 Specific Safety Rules...................................................5 Advertencias de seguridad para herramientas elétricas.................................................................... 3-4 Symbols.......................................................................6 Advertencias de seguridad inflador.............................5 Features.......................................................................7 Símbolos......................................................................6 Assembly.....................................................................7 Características.............................................................7 Operation............................................................... 8-10 Armado........................................................................7 Maintenance..............................................................10 Funcionamiento..................................................... 8-10 Illustrated Parts List...................................................11 Mantenimiento...........................................................10 Figure numbers (illustrations)..................................... i-ii Figura numeras (ilustraciones)................................... i-ii Parts Ordering / Service.............................. Back Page Pedidos de piezas / Servicio.................. Pág. posterior WARRANTY / GARANTÍA CRAFTSMAN® ONE YEAR LIMITED WARRANTY FOR ONE YEAR from the date of purchase, this product is warranted against any defects in material or workmanship. With proof of purchase, defective product will be replaced free of charge. For warranty coverage details to obtain free replacement, visit the web site: www.craftsman.com This warranty applies only to the inflator and does not cover the hose or other accessories and attachment, which are expendable parts that can wear out from normal use within the warranty period. This warranty is void if this product is ever used while providing commercial services or if rented to another person. This warranty gives you specific legal rights, and you may also have other rights which vary from state to state. Sears Brands Management Corporation, Hoffman Estates, IL 60179 *** GARANTÍA LIMITADA DE CRAFTSMAN POR UN AÑO Este producto tiene garantía por cualquier defecto en material o mano de obra DURANTE UN AÑO desde la fecha de compra. Los productos defectuosos se remplazarán sin cargo si presenta un comprobante de pago. Si desea conocer los detalles de la cobertura de la garantía para conseguir reparaciones o recambios, visite el sitio Web: www.craftsman.com Esta garantía se aplica solamente para la inflador y no cubre la manguera o otros accesorios y aditamentos, que es una pieza fungible que puede desgastarse por el uso normal durante el período de garantía. La garantía pierde validez si este producto se utiliza mientras se prestan servicios comerciales o si se alquila a otra persona. Esta garantía le otorga derechos legales específicos y también puede gozar de otros derechos que varían según el estado. Sears Brands Management Corporation, Hoffman Estates, IL 60179 INTRODUCTION / INTRODUCCIÓN This tool has many features for making its use more pleasant and enjoyable. Safety, performance, and d ependability have been given top priority in the design of this product making it easy to maintain and operate. *** Esta herramienta ofrece numerosas características para hacer más agradable y placentero su uso. En el diseño de este producto se ha conferido prioridad a la seguridad, el desempeño y la fiabilidad, por lo cual se facilita su manejo y mantenimiento. 2 GENERAL SAFETY RULES WARNING! READ AND UNDERSTAND ALL INSTRUCTIONS. Failure to follow all instructions listed below, may result in electric shock, fire and/ or serious personal injury. SAVE THESE INSTRUCTIONS WORK AREA Keep your work area clean and well lit. Cluttered benches and dark areas invite accidents. Keep bystanders, children, and visitors away while operating an handheld inflator. Distractions can cause you to lose control. Operate product in an open area at least 18 in. away from any wall or object that could restrict the flow of fresh air to ventilation openings. ELECTRICAL SAFETY A battery operated tool with integral batteries or a separate battery pack must be recharged only with the specified charger for the battery. A charger that may be suitable for one type of battery may create a risk of fire when used with another battery. Use battery operated handheld inflator only with specifically designated battery pack. Use of any other batteries may create a risk of fire. Use battery only with charger listed. For use with 19.2V nickel-cadmium and 19.2V lithium-ion battery packs, see tool/appliance/battery pack/charger correlation supplement 988000-272. PERSONAL SAFETY Stay alert, watch what you are doing and use common sense when operating an handheld inflator. Do not use handheld inflator while tired or under the influence of drugs, alcohol, or medication. A moment of inattention while operating handheld inflator may result in serious personal injury. Dress properly. Do not wear loose clothing or jewelry. Contain long hair. Keep your hair, clothing, and gloves away from moving parts. Loose clothes, jewelry, or long hair can be caught in moving parts. Avoid accidental starting. Be sure switch is in the locked or off position before inserting battery pack. Carrying handheld inflators with your finger on the switch or inserting the battery pack into an handheld inflator with the switch on invites accidents. Do not overreach. Keep proper footing and balance at all times. Proper footing and balance enable better control of the handheld inflator in unexpected situations. Use safety equipment. Always wear eye protection. Dust mask, non-skid safety shoes, hard hat, or hearing protection must be used for appropriate conditions. Eye protection is required to guard against flying fasteners and debris which could cause severe eye injury. Do not wear loose clothing or jewelry. Contain long hair. Loose clothes, jewelry, or long hair can be drawn into air vents. Do not use on a ladder or unstable support. Stable footing on a solid surface enables better control of the handheld inflator in unexpected situations. TOOL USE AND CARE Do not force the tool. Use the correct tool for your application. The correct tool will do the job better and safer at the rate for which it is designed. Check hoses for weak or worn condition before each use, making certain all connections are secure. Do not use if defect is found. Purchase a new hose or notify an authorized service center for examination or repair. Release all pressures within the system slowly. Dust and debris may be harmful. Do not use handheld inflator if switch does not turn it on or off. A handheld inflator that cannot be controlled with the switch is dangerous and must be repaired. Disconnect battery pack from handheld inflator or place the switch in the locked or off position before making any adjustments, changing accessories, or storing the handheld inflator. Such preventive safety measures reduce the risk of starting the handheld inflator accidentally. Store idle handheld inflators out of reach of children and other untrained persons. Handheld inflators are dangerous in the hands of untrained users. When battery pack is not in use, keep it away from other metal objects like: paper clips, coins, keys, nails, screws, or other small metal objects that can make a connection from one terminal to another. Shorting the battery terminals together may cause sparks, burns, or a fire. Check for misalignment or binding of moving parts, breakage of parts, and any other condition that may affect the handheld inflator’s operation. If damaged, have the handheld inflator serviced before using. Many accidents are caused by poorly maintained tools. Use only accessories that are recommended by the manufacturer for your model. Accessories that may be suitable for one handheld inflator may create a risk of injury when used on another handheld inflator. 3 - English GENERAL SAFETY RULES Keep the handheld inflator and its handle dry, clean and free from oil and grease. Always use a clean cloth when cleaning. Never use brake fluids, gasoline, petroleum-based products, or any strong solvents to clean your handheld inflator. Following this rule will reduce the risk of loss of control and deterioration of the enclosure plastic. Never point any handheld inflator toward yourself or others. Keep the exterior of the handheld inflator dry, clean, and free from oil and grease. Always use a clean cloth when cleaning. Never use brake fluids, gasoline, petroleum-based products, or any strong solvents to clean the unit. Following this rule will reduce the risk of deterioration of the enclosure plastic. Do not exceed the pressure rating of any component in the system. Protect material lines and air lines from damage or puncture. Keep hose and power cord away from sharp objects, chemical spills, oil, solvents, and wet floors. BATTERY TOOL USE AND CARE Recharge only with the charger specified by the manufacturer. A charger that is suitable for one type of battery pack may create a risk of fire when used with another battery pack. Use power tools only with specifically designated battery packs. Use of any other battery packs may create a risk of injury and fire. When battery pack is not in use, keep it away from other metal objects, like paper clips, coins, keys, nails, screws or other small metal objects, that can make a connection from one terminal to another. Shorting the battery terminals together may cause burns or a fire. Under abusive conditions, liquid may be ejected from the battery; avoid contact. If contact accidentally occurs, flush with water. If liquid contacts eyes, additionally seek medical help. Liquid ejected from the battery may cause irritation or burns. SERVICE Handheld inflator service must be performed only by qualified repair personnel. Service or maintenance performed by unqualified personnel may result in a risk of injury. When servicing an handheld inflator, use only identical replacement parts. Follow instructions in the Maintenance section of this manual. Use of unauthorized parts or failure to follow Maintenance Instructions may create a risk of shock or injury. 4 - English SPECIFIC SAFETY RULES Know your handheld inflator. Read operator’s manual carefully. Learn its applications and limitations, as well as the specific potential hazards related to this product. Following this rule will reduce the risk of electric shock, fire, or serious injury. Risk of Bursting. Do not preset handheld inflator to result in output pressure greater than marked maximum pressure of item to be inflated. Do not use at pressure greater than 200 psi. To reduce the risk of electric shock, do not expose to rain. Store indoors. Inspect yearly for cracks, pin holes, or other imperfections that could cause handheld inflator to become unsafe. Never cut or drill holes in the handheld inflator. Make sure the hose is free of obstructions or snags. Entangled or snarled hoses can cause loss of balance or footing and may become damaged. Use the handheld inflator only for its intended use. Do not alter or modify the unit from the original design or function. Always be aware that misuse and improper handling of this product can cause injury to yourself and others. Never leave a handheld inflator unattended with the air hose attached. Do not continue to use a handheld inflator or hose that leaks air or does not function properly. Always disconnect the air supply and power supply before making adjustments, servicing a handheld inflator, or when an handheld inflator is not in use. Do not attempt to pull or carry the handheld inflator by the hoses. Always follow all safety rules recommended by the manufacturer of your handheld inflator, in addition to all safety rules for the product. Following this rule will reduce the risk of serious personal injury. Do not use handheld inflator as a breathing device. Never direct a jet of compressed air toward people or animals. Take care not to blow dust and dirt towards yourself or others. Following this rule will reduce the risk of serious injury. Protect your lungs. Wear a face or dust mask if the operation is dusty. Following this rule will reduce the risk of serious personal injury. Do not use this handheld inflator to spray chemicals. Your lungs can be damaged by inhaling toxic fumes. Check damaged parts. Before further use of the handheld inflator, a guard or other part that is damaged should be carefully checked to determine that it will operate properly and perform its intended function. Check for alignment of moving parts, binding of moving parts, breakage of parts, mounting, and any other conditions that may affect its operation. A guard or other part that is damaged should be properly repaired or replaced by an authorized service center. Following this rule will reduce the risk of shock, fire, or serious injury. Battery tools do not have to be plugged into an electrical outlet; therefore, they are always in operating condition. Be aware of possible hazards when not using your battery tool or when changing accessories. Following this rule will reduce the risk of electric shock, fire, or serious personal injury. Do not place battery tools or their batteries near fire or heat. This will reduce the risk of explosion and possibly injury. Do not crush, drop or damage battery pack. Do not use a battery pack or charger that has been dropped or received a sharp blow. A damaged battery is subject to explosion. Properly dispose of a dropped or damaged battery immediately. Batteries can explode in the presence of a source of ignition, such as a pilot light. To reduce the risk of serious personal injury, never use any cordless product in the presence of open flame. An exploded battery can propel debris and chemicals. If exposed, flush with water immediately. Do not charge battery tool in a damp or wet location. Following this rule will reduce the risk of electric shock. For best results, your battery tool should be charged in a location where the temperature is more than 50°F but less than 100°F. To reduce the risk of serious personal injury, do not store outside or in vehicles. Under extreme usage or temperature conditions, battery leakage may occur. If liquid comes in contact with your skin, wash immediately with soap and water. If liquid gets into your eyes, flush them with clean water for at least 10 minutes, then seek immediate medical attention. Following this rule will reduce the risk of serious personal injury. Save these instructions. Refer to them frequently and use them to instruct others who may use this handheld inflator. If you loan someone this handheld inflator, loan them these instructions also. 5 - English SYMBOLS The following signal words and meanings are intended to explain the levels of risk associated with this product. SYMBOL SIGNAL MEANING DANGER: Indicates an imminently hazardous situation, which, if not avoided, will result in death or serious injury. WARNING: Indicates a potentially hazardous situation, which, if not avoided, could result in death or serious injury. CAUTION: Indicates a potentially hazardous situation, which, if not avoided, may result in minor or moderate injury. CAUTION: (Without Safety Alert Symbol) Indicates a situation that may result in property damage. Some of the following symbols may be used on this product. Please study them and learn their meaning. Proper interpretation of these symbols will allow you to operate the product better and safer. SYMBOL Li - Ion V min no .../min NAME DESIGNATION/EXPLANATION Safety Alert Indicates a potential personal injury hazard. Read Operator’s Manual To reduce the risk of injury, user must read and understand operator’s manual before using this product. Eye Protection Always wear eye protection with side shields marked to comply with ANSI Z87.1. Wet Conditions Alert Do not expose to rain or use in damp locations. Hot Surface To reduce the risk of injury or damage, avoid contact with any hot surface. Recycle Symbols This product uses nickel-cadmium (Ni-Cd) and lithium-ion (Li-ion) batteries. Local, state or federal laws may prohibit disposal of batteries in ordinary trash. Consult your local waste authority for information regarding available recycling and/or disposal options. Volts Voltage Minutes Time Direct Current Type or a characteristic of current No Load Speed Rotational speed, at no load Per Minute Revolutions, strokes, surface speed, orbits etc., per minute 6 - English FEATURES PRODUCT SPECIFICATIONS Motor...................................................................19.2 V, DC Hose............................................. 18 in. with vehicle chuck Gauges.................... Digital readout (psi, kg/cm2, and BAR) Air Pressure.................. 200 psi, 13.7 BAR, 14 kg/cm2 max. KNOW YOUR HANDHELD INFLATOR AIR HOSE See Figure 1, page i. The safe use of this product requires an understanding of the information on the product and in this operator’s manual as well as a knowledge of the project you are attempting. Before use of this product, familiarize yourself with all operating features and safety rules. The air hose can be used with or without the adaptors to inflate a variety of items. DIGITAL GAUGE The digital gauge measures air pressure, monitors pressure output, and is used to set pressure type. ADAPTORS LOCK-ON BUTTON Adaptors provided with the handheld inflator can be used to inflate a variety of items. The lock-on button is convenient for continuous inflating up to 40 psi, 2.75 BAR, and 2.81 kg/cm2 for extended periods of time. ADAPTOR STORAGE AREA Some adaptors provided with the handheld inflator can be placed in the storage area, located on the base. ASSEMBLY UNPACKING This product has been shipped completely assembled. n Carefully remove the product and any accessories from the box. Make sure that all items listed in the packing list are included. WARNING: Do not use this product if it is not completely assembled or if any parts appear to be missing or damaged. Use of a product that is not properly and completely assembled could result in serious personal injury. n Inspect the product carefully to make sure no breakage or damage occurred during shipping. n Do not discard the packing material until you have carefully inspected and satisfactorily operated the product. n If any parts are damaged or missing, please call 1-800-932-3188 for assistance. PACKING LIST Handheld Inflator Detachable Air Hose Tapered Adaptor Sport Ball Needle Presta Valve Adaptor Schrader Valve Tool Main Adaptor Large Tapered Adaptor Small Tapered Adaptor Pinch Valve Adaptor Operator’s Manual 7 - English WARNING: If any parts are damaged or missing do not operate this product until the parts are replaced. Use of this product with damaged or missing parts could result in serious personal injury. WARNING: Do not attempt to modify this product or create accessories not recommended for use with this product. Any such alteration or modification is misuse and could result in a hazardous condition leading to possible serious personal injury. WARNING: To prevent accidental starting that could cause serious personal injury, always remove the battery pack from the product when assembling parts. OPERATION WARNING: Do not allow familiarity with products to make you careless. Remember that a careless fraction of a second is sufficient to inflict serious injury. If the product stops during use, release the trigger to reset and resume operation. If the product still does not work, the battery needs to be recharged. TO INSTALL BATTERY PACK WARNING: Always wear eye protection with side shields marked to comply with ANSI Z87.1. Failure to do so could result in objects being thrown into your eyes, resulting in possible serious injury. See Figure 2, page i. Place battery pack in the handheld inflator. Align raised rib on battery pack with groove inside handheld inflator. CAUTION: When placing battery pack in the product, be sure raised rib on battery pack aligns with groove inside handheld inflator and latches snap into place properly. Improper assembly of battery pack can cause damage to internal components. WARNING: Do not use any attachments or acces- sories not recommended by the manufacturer of this product. The use of attachments or accessories not recommended can result in serious personal injury. WARNING: The handheld inflator is capable of inflating to 200 psi, 13.7 BAR, or 14 kg/cm2 max. To avoid over inflation, carefully follow instructions on items to be inflated. Never exceed recommended pressures. Use only recommended air handling parts acceptable for pressures not less than 200 psi. Make sure the latches on each side of the battery pack snap in place and battery pack is secured in product before beginning operation. WARNING: Always remove battery pack from the product when you are assembling parts, making adjustments, cleaning, or when not in use. Removing battery pack will prevent accidental starting that could cause serious personal injury. CAUTION: Do not leave items to be inflated unattended while handheld inflator is in use. These items can burst and could cause serious injury. WARNING: The handheld inflator is not designed to inflate large volume items such as boats, pools, rafts, large air beds, etc. It is also not designed for commercial application. TO REMOVE BATTERY PACK See Figure 2, page i. Locate the latches on the side of the battery pack and depress to release the battery pack from handheld inflator. Remove battery pack. WARNING: Since the pressure display is not cali- WARNING: Improperly attached hoses or adaptors brated, and is therefore not binding for exact values, tire pressure must be checked using a calibrated measuring device before driving a vehicle with vehicle tires inflated with the handheld inflator. WARNING: Risk of injury-do not direct air stream at body. WARNING: Hot surface-to reduce risk of burns do not touch metal clamps of hose assembly. APPLICATIONS You may use this tool for the purposes listed below: Inflating sports balls, tires, floats, and toys For complete charging instructions, refer to the Operator’s Manual for the battery packs and chargers listed in the General Safety Rules. can become detached under pressure and cause serious injury. Possible air leaks can cause faulty pressure readings. Make sure all connections are tightly secured. INSTALLING/REMOVING AIR HOSE See Figure 3, page i. n Remove battery pack. Loosen knob slightly by turning counterclockwise. n Insert the end of the air hose into the open end of the product. Push air hose inward until it stops. Tighten knob by turning clockwise. To remove, turn knob counterclockwise and remove air hose. BATTERY PROTECTION FEATURES Craftsman® 19.2 V lithium-ion battery packs are designed with features that protect the lithium-ion cells and maximize battery life. 8 - English OPERATION INFLATING WITH THE AIR HOSE See Figure 4, page i. The air chuck on the air hose can be used without adaptors to inflate tires or with any item with a valve stem that fits the air chuck opening. Place air chuck on valve stem. Push air chuck down so that the threaded section of the valve stem is inside the air chuck. Clamp the end of the air chuck down onto the valve stem by pressing air chuck clamp down until it stops or is parallel with the air hose. INFLATING WITH THE AIR HOSE AND ADAPTORS See Figure 5, page i. The air hose can be used with the provided adaptors to inflate a variety of items. n Insert adaptor into air chuck and push air chuck clamp down until it locks into place. To remove, lift air chuck clamp and remove adaptor from air chuck. ADAPTOR FUNCTIONS See Figures 6 - 9, page i - ii. The Schrader valve tool can be used to remove valve cores for quick deflation. The tapered adaptor can be used on smaller air valves to inflate items like floats and children’s toys, which usually require the user to inflate them by blowing air into them. The sport ball needle can be used to inflate any type of sports ball or any other item that requires a sport ball needle. The Presta valve adaptor can be used for Presta valve stems as shown. Before inflating a tire with a Presta valve, loosen the locking nut to inflate. Once inflation is complete, tighten the locking nut to seal the tire valve. To use the Presta valve adaptor: Loosen Presta valve locking nut. Thread Presta valve adaptor onto valve stem with larger open end toward wheel. Clamp the end of the air chuck down onto the Presta valve adaptor by pressing air chuck clamp down until it locks into place. After inflation, (See switch trigger) remove air chuck and tighten locking nut. In order to use the high volume adaptor, you must first install the main adaptor onto the air chuck, and then fit the appropriate adaptor onto the main adaptor. To attach adaptors to air hose: Insert main adaptor into air chuck and push air chuck clamp down until it locks into place. Attach desired adaptor. To remove, lift air chuck clamp up and remove adaptor(s) from air chuck. SWITCH TRIGGER See Figure 10, page ii. To turn the handheld inflator ON, depress and hold the switch trigger. To turn it OFF, release the switch trigger. NOTE: When inflating items of 10 psi, .69 BAR, .70 kg/cm2 or less, inflate in short bursts and check after each burst by feel or with a calibrated measuring device to determine accurate pressure. LOCK-ON BUTTON See Figure 10, page ii. The handheld inflator is equipped with a lock-on feature, which is convenient for continuous inflating for extended periods of time. The lock-on button is located below the switch trigger. To lock-on: Depress the switch trigger. Push the lock-on button up. Release the switch trigger and the handheld inflator will continue running. To release the lock, push the lock-on button down. If the lock-on feature is engaged during use and the handheld inflator becomes disconnected from the power supply, disengage the lock-on feature immediately. NOTE: The lock-on feature only works for pressures up to 40 psi, 2.75 BAR, and 2.80 kg/cm2. The handheld air compressor is designed to automatically stop at 40 psi 2.75 BAR, or 2.80 kg/cm2 for all lock-on inflating operations. ADAPTOR STORAGE See Figure 11, page ii. When not in use, adaptors provided (except those that come with the high volume adaptor) can be placed in the storage area located on the base. HIGH VOLUME ADAPTOR See Figures 9, page ii. The high volume adaptor can be useful in inflating small, low pressure items such as beach balls and children’s toys. 9 - English OPERATION DIGITAL GAUGE See Figures 12 - 14, page ii. The digital gauge is multifunctional. It serves as a pressure gauge, monitors the amount of pressure being applied to the item being inflated, and can change air pressure measurement units from psi to BAR to kg/cm2. To turn the digital gauge ON, press the ON/RESET button or depress the switch trigger. NOTE: Make sure digital gauge is set at 0 before use. If gauge reads “Err” or needs resetting, press and hold ON/ RESET button for 3-6 seconds. NOTE: The digital gauge will automatically shut off when not in use for 2 1/2 minutes or more. To use the pressure gauge feature: Turn digital gauge on by pressing ON/RESET button or depressing and releasing switch trigger. Place air chuck over valve stem and press down. Readout will appear on gauge. If inflating, the air pressure will appear on the gauge as the item is being inflated. To switch from psi, kg/cm2, and BAR: With gauge ON, press and hold down ON/RESET button for at least 6 seconds. The current measuring unit will flash. Press the ON/ RESET button to select the desired measuring unit. The setting takes effect 5 seconds after the display stops flashing. To set pressure gauge for automatic shut off: With gauge ON, press and hold down ( + ) or ( - ) buttons to select desired shutoff pressure. NOTE: Numbers will flash while setting pressure. Holding buttons down will make the pressure number increase faster. When desired setting has been selected, begin inflating. Handheld inflator will shut off once setting is reached. NOTE: If using the lock-on button with a preset pressure setting, the unit will stop after the item being inflated has reached 40 psi, 2.75 BAR, or 2.80 kg/cm2. The lock-on feature must then be disengaged, and the switch trigger must be held manually for pressures over 40 psi, 2.75 BAR, or 2.80 kg/cm2. MAINTENANCE WARNING: Do not at any time let brake fluids, WARNING: When servicing, use only identical gasoline, petroleum-based products, penetrating oils, etc. come in contact with plastic parts. Chemicals can damage, weaken or destroy plastic which may result in serious personal injury. Craftsman replacement parts. Use of any other part may create a hazard or cause product damage. WARNING: Always wear eye protection with side shields marked to comply with ANSI Z87.1. Failure to do so could result in objects being thrown into your eyes, resulting in possible serious injury. Only the parts shown on the parts list are intended to be repaired or replaced by the customer. All other parts should be replaced at a Sears Service Center. WARNING: To avoid serious personal injury, always BATTERY PACK REMOVAL AND PREPARATION FOR RECYCLING remove the battery pack from the product when cleaning or performing any maintenance. WARNING: Upon removal, cover the battery pack’s GENERAL MAINTENANCE Avoid using solvents when cleaning plastic parts. Most plastics are susceptible to damage from various types of commercial solvents and may be damaged by their use. Use clean cloths to remove dirt, dust, oil, grease, etc. 10 - English terminals with heavy-duty adhesive tape. Do not attempt to destroy or disassemble battery pack or remove any of its components. Lithium-ion and nickel-cadmium batteries must be recycled or disposed of properly. Also, never touch both terminals with metal objects and/or body parts as short circuit may result. Keep away from children. Failure to comply with these warnings could result in fire and/ or serious injury. CRAFTSMAN HANDHELD INFLATOR – MODEL NUMBER 315.115860 The model number will be found on a label attached to the motor housing. Always mention the model umber in all correspondence regarding your handheld inflator or when ordering repair parts. n SEE BACK PAGE FOR PARTS ORDERING INSTRUCTIONS 10 6 1 7 14 11 3 2 4 8 12 5 9 13 15 PARTS LIST Key Part No. NumberDescription Qty. 1940055120 Data Label........................................................................................................1 2940054126 Logo Label.......................................................................................................1 3570339001 Rubber Sleeve..................................................................................................1 4513513001 Knob, Hose Retainer........................................................................................1 5671793001 Air Hose Assembly (Includes Key No. 15)........................................................1 6671792001 Sport Ball Needle.............................................................................................1 7200449001 Presta Valve Adaptor Assembly (Includes Key No. 14)....................................1 8513420001 Tapered Adaptor...............................................................................................1 9671891001 Schrader Valve Tool..........................................................................................1 10120774001 Main Adaptor....................................................................................................1 11513988001 Pinch Valve Adaptor.........................................................................................1 12513989001Small Tapered Adaptor.....................................................................................1 13513990001Large Tapered Adaptor.....................................................................................1 14570659001Presta Valve Adaptor O-Ring (4 mm ID x 8 mm OD)........................................1 15940264112 Warning Label..................................................................................................1 983000795 Operator’s Manual 11 - English Fig. 1 Fig. 4 B A 0.0 PSI D BAR C KG/CM 2 - ON/RESET + E F C A A-To lock (para trabar) B-To unlock (para destrabar) C-Air hose (manguera de aire) D-Air chuck clamp (abrazadera del conectorde inflado) E-Air chuck (conector de inflado) F-Valve stem (vástago de válvula) B Fig. 5 D C B A-Air hose (manguera de aire) B-Lock-on button (botón del seguro de encendido) C-Digital gauge (manómetro digital) D -Adaptor storage area (zona de almacenamientode los adaptadores) Fig. 2 Fig. 3 A A-To lock (para trabar) B-To unlock (para destrabar) C-Air chuck (conector de inflado) F D Fig. 6 C D A B A B C B C A-Battery pack (paquete de baterías) B-Latches (pestillos) C-Depress latches to release battery pack (para soltar el paquete de baterías oprima los pestillos) A A-Air hose (manguera de aire) B-To install (para instalar) C-To remove (para quitar) D-To loosen (para aflojar) E-To tighten (para apretar) F -Knob (perilla) C E A-Schrader valve tool (válvula presta) B-Tapered adaptor (adaptadorcónico) C-Sport ball needle (aguja de balón deportivo) D-Presta valve adaptor (adaptor de válvula presta) Fig. 7 A B C A-To tighten (para apretar) B-To loosen (para aflojar) C-Locking nut (contratuerca) i Fig. 8 Fig. 10 B A Fig. 13 A D C C 0.0 E PSI BAR KG/CM 2 A - ON/RESET + F D G B C B A-To lock (para trabar) B-To unlock (para destrabar) C-Air hose (manguera de aire) D-Air chuck clamp (abrazadera del conectorde inflado) E-Air chuck (conector de inflado) F-Presta valve adaptor (adaptador de válvula presta) G-Presta valve (válvula presta) D A-Pressure gauge (manómetro) B-(-) Button [(-) botón] C-(+) Button [(+) botón] D-On/reset button (botón encender/poner a cero) A-Switch trigger (gatillo del interruptor) B-Lock-on button (botón del seguro de encendido) C-To lock (para trabar) D-To unlock (para destrabar) Fig. 14 Fig. 11 A Fig. 9 B 36.0 C A PSI C BAR KG/CM 2 A - ON/RESET + B G D D A-Adaptor storage area (zona de almacenamientode los adaptadores) Fig. 12 E F A-To lock (para trabar) B-To unlock (para destrabar) C-Air chuck (conector de inflado) D-Main adaptor (adaptador principal) E-Pinch valve adaptor (adaptador de válvula de presión) F-Large tapered adaptor (adaptador cónico grande) G-Small tapered adaptor (adaptador cónico pequeño) A 0.0 PSI BAR KG/CM 2 - ON/RESET + DIGITAL GAUGE AIR PRESSURE READOUT UNIDADES DE MEDIDA DE LAPRESIÓN DEL AIRE A-Air pressure measurement units (lectura de presión de aire del manómetro digital) ii A-Air pressure (presión de aire) B-(-) Button [(-) botón] C-(+) Button [(+) botón] D-On/reset button (botón encender/poner a cero) REGLAS DE SEGURIDAD GENERALES ¡ADVERTENCIA! LEA Y COMPRENDA TODAS LAS INSTRUCCIONES. El incumplimiento de las instrucciones señaladas abajo puede causar descargas eléctricas, incendios y lesiones serias. GUARDE ESTAS INSTRUCCIONES ÁREA DE TRABAJO Mantenga limpia y bien iluminada el área de trabajo. Una mesa de trabajo mal despejada y una mala iluminación son causas comunes de accidentes. Mantenga alejados a los circunstantes, niños y demás presentes mientras se utiliza el inflador portátil. Toda distracción puede causar la pérdida del control de la herramienta. Utilice el inflador portátil en un área abierta por lo menos a 460 mm (18 pulg.) de cualquier pared u objeto que pudiera restringir el flujo de aire fresco a las aberturas de ventilación. SEGURIDAD EN EL MANEJO DE EQUIPO ELÉCTRICO Las herramientas de baterías, ya sea de baterías integradas o de paquete de baterías separado, debe recargarse únicamente con el cargador especificado para las baterías. Un cargador que puede ser adecuado para un tipo de baterías puede significar un riesgo de incendio si se emplea con otro tipo de baterías. Utilice el inflador portátil de baterías sólo con el paquete de baterías específicamente indicado. El empleo de baterías diferentes puede presentar un riesgo de incendio. Cargue las baterías solamente con el cargador indicado. Para utilizar con paquetes de baterías de níquel-cadmio de 19,2 V o de iones de litio de 19,2 V, consulte el folleto de la herramienta/aparato/paquete de baterías/cargador complementario 988000-272. SEGURIDAD PERSONAL Permanezca alerta, preste atención a lo que esté haciendo y aplique el sentido común al utilizar un inflador portátil. No utilice el inflador portátil si está cansado o se encuentra bajo los efectos de alguna droga, alcohol o medicamento. Un segundo de inatención mientras se acciona el inflador portátil puede ocasionar lesiones corporales graves. Vístase adecuadamente. No vista ropas holgadas ni joyas. Recójase el cabello si está largo. Mantenga el cabello, la ropa y los guantes alejados de las piezas móviles. Las ropas holgadas, las joyas y el cabello largo pueden engancharse en las piezas móviles. Evite un arranque accidental de la unidad. Asegúrese de que el interruptor esté en la posición de aseguramiento o de apagado antes de instalar el paquete de baterías. Llevar inflador portátiles con el dedo en el interruptor o instalar el paquete de baterías en el inflador portátil con el interruptor accionado es causa común de accidentes. No estire el cuerpo para alcanzar un distancia mayor a la natural. Mantenga una postura firme y buen equilibrio en todo momento. La postura firme y el buen equilibrio permiten un mejor control del inflador portátil en situaciones inesperadas. Use equipo de seguridad. Siempre póngase protección ocular. Cuando lo exijan las circunstancias debe ponerse careta contra el polvo, zapatos de seguridad antiderrapantes, casco o protección auditiva. Se requiere protección ocular contra sujetadores y desechos que salgan disparados, los cuales pueden causar lesiones oculares graves. No vista ropas holgadas ni joyas. Recójase el cabello si está largo. Las ropas holgadas y las joyas, así como el cabello largo, pueden resultar atraídas hacia el interior de las aberturas de ventilación. No utilice la unidad al estar en una escalera o en un soporte inestable. Una postura estable sobre una superficie sólida permite un mejor control del inflador portátil en situaciones inesperadas. EMPLEO Y CUIDADO DE LA HERRAMIENTA No fuerce la herramienta. Utilice la herramienta adecuada al trabajo. La herramienta adecuada efectúa mejor y de manera más segura el trabajo, si además se maneja a la velocidad para la que está diseñada. Antes de usar la unidad revise las mangueras para ver muestran daños o desgaste, asegurándose de que estén seguras todas las conexiones. No utilice la unidad si encuentra algún defecto. Adquiera una manguera nueva o lleve la unidad a un centro de servicio autorizado para que la examinen y reparen. Purgue lentamente todas las presiones internas del sistema. El polvo y la basura pueden ser dañinos. No utilice el inflador portátil si el interruptor no enciende o no apaga. Un inflador portátil que no pueda controlarse con el interruptor es peligroso y debe repararse. Desconecte el paquete de baterías del inflador portátil o ponga el interruptor en la posición de inmovilización o de apagado antes de efectuar ajustes, cambiar accesorios o guardar el inflador portátil. Tales medidas preventivas de seguridad reducen el riesgo de poner en marcha accidentalmente el inflador portátil. 3 - Español REGLAS DE SEGURIDAD GENERALES Guarde los inflador portátiles desocupados fuera del alcance de los niños y de toda persona no capacitada. Los inflador portátiles son peligrosos en manos de personas no capacitadas en su uso. Cuando no esté usando el paquete de baterías, manténgalo alejado de todo objeto metálico como: clips, monedas, llaves, clavos, tornillos y otros objetos metálicos pequeños que puedan establecer conexión entre ambas terminales. Establecer una conexión directa entre las dos terminales puede causar chispas, quemaduras o incendios. Verifique si las piezas móviles están desalineadas o atascadas , si hay piezas rotas o si existe cualquier otra irregularidad que pueda afectar el funcionamiento del inflador portátil. Si se daña el inflador portátil, hágalo reparar antes de volver a utilizarlo. Numerosos accidentes son causados por herramientas mal cuidadas. Sólo utilice accesorios recomendados por el fabricante para cada modelo en particular. Los accesorios que pueden ser adecuados para un inflador portátil pueden producir lesiones si se usan con otro. Mantenga el inflador portátil y su mango secos, limpios y sin restos de aceite o grasa. Siempre utilice un paño limpio para limpiar la unidad. Nunca utilice fluidos para frenos, gasolina, productos a base de petróleo ni solventes fuertes para limpiar el inflador portátil. Con el cumplimiento de esta regla se reduce el riesgo de una pérdida de control y el deterioro del alojamiento de plástico de la unidad. Nunca apunte el inflador portátil hacia sí mismo u otras personas. Mantenga el exterior del inflador portátil seco, limpio y sin restos de aceite o grasa. Siempre utilice un paño limpio para la limpieza de la unidad. Nunca utilice fluidos para frenos, gasolina, productos a base de petróleo ni solventes fuertes para limpiar la unidad. Con el cumplimiento de esta regla se reduce el riesgo de deterioro del alojamiento plástico de la unidad. EMPLEO Y CUIDADO DE LA HERRAMIENTA DE BATERÍAS Sólo cargue el paquete de baterías con el cargador especificado por el fabricante. Un cargador adecuado para un tipo paquete de baterías puede significar un riesgo de incendio si se emplea con un paquete de baterías diferente. Utilice las herramientas eléctricas sólo con los paquetes de baterías específicamente indicados. El empleo de paquetes de baterías diferentes puede presentar un riesgo de incendio. Cuando no esté utilizándose el paquete de baterías, manténgalo lejos de otros objetos metálicos, como clips, monedas, llaves, clavos, tornillos o otros objetos metálicos, pequeños que puedan establecer conexión entre ambas terminales. Establecer una conexión directa entre las dos terminales de las baterías puede causar quemaduras o incendios. Si se maltratan las baterías, puede derramarse líquido de las mismas; evite todo contacto con éste. En caso de contacto, lávese con agua. Si el líquido llega a tocar los ojos, además busque atención médica. El líquido de las baterías puede causar irritación y quemaduras. SERVICIO El servicio del inflador portátil sólo debe ser efectuado por personal de reparación calificado. Todo servicio o mantenimiento efectuado por personal no calificado puede significar un riesgo de lesiones. Al dar servicio al inflador portátil, utilice sólo piezas de repuesto idénticas. Siga las instrucciones señaladas en la sección “Mantenimiento” de este manual. El empleo de piezas no autorizadas o el incumplimiento de las instrucciones de mantenimiento puede significar un riesgo de descarga eléctrica o de lesiones. No sobrepase la presión nominal de ningún componente del sistema. Proteja de daños y perforaciones los conductos de material y de aire. Mantenga la manguera y el cordón de alimentación lejos de objetos afilados, productos químicos derramados, aceite, solventes y pisos mojados. 4 - Español REGLAS DE SEGURIDAD ESPECÍFICAS Familiarícese con el inflador portátil. Lea cuidadosamente el manual del operador. Aprenda sus usos y limitaciones, así como los posibles peligros específicos de esta herramienta. Con el cumplimiento de esta regla se reduce el riesgo de una descarga eléctrica, incendio o lesión seria. Riesgo de estallido. No preajuste el inflador portátil de modo que la presión de salida resulte mayor que la máxima presión indicada para el artículo que se va a inflar. No use una presión superior a 200 PSI. Para reducir el riesgo de una descarga eléctrica, no exponga la unidad a la lluvia. Guarde la unidad en el interior. Inspeccione anualmente para verificar grietas, agujeros u otras imperfecciones que puedan tornar inseguro el uso del inflador portátil. Nunca recortar ni hacer orificios en el inflador portátil. Asegúrese de que la manguera no esté obstruida ni enganchada. Si la manguera se enreda o engancha puede causar una pérdida del equilibrio o postura y puede dañarse. Use el inflador portátil sólo para su fin indicado. No altere ni modifique la unidad con respecto a su diseño y funcionamiento originales. Siempre tenga presente que el uso y manejo indebidos de este inflador portátil puede ocasionarles lesiones a usted y a otras personas. Nunca deje desatendido el inflador portátil con la manguera de aire conectada. No continúe usando inflador portátiles o mangueras que tenga fugas de aire o que no funcionen correctamente. Siempre desconecte el suministro de aire y el de energía eléctrica antes de efectuar ajustes o dar servicio al inflador portátil o cuando no lo esté usando. No intente tirar del inflador portátil o transportarlo por la manguera. Siempre siga todas las reglas de seguridad recomendadas por el fabricante del inflador portátil, además de todas las reglas de seguridad del inflador portátil. Con el cumplimiento de esta regla se reduce el riesgo de lesiones serias. No utilice este inflador portátil cuando un dispositivo que respira. Nunca dirija un chorro de aire comprimido hacia personas o animales. Tenga cuidado de no soplar polvo o tierra hacia sí u otras personas. Con el cumplimiento de esta regla se reduce el riesgo de posibles lesiones serias. Protéjase los pulmones. Use una careta o mascarilla contra el polvo si la operación genera mucho polvo. Con el cumplimiento de esta regla se reduce el riesgo de lesiones corporales serias. No utilice este inflador portátil para rociar productos químicos. Pueden resultar afectados los pulmones debido a la inhalación de emanaciones tóxicas. Revise para ver si hay piezas dañadas. Antes de seguir utilizando el inflador portátil, es necesario inspeccionar cuidadosamente toda protección o pieza que esté dañada para determinar si puede funcionar correctamente y desempeñar su función correspondiente. Verifique la alineación de las partes móviles, que no haya atoramiento de las mismas, que no haya piezas rotas, el montaje de las piezas y cualquier otra condición que pudiera afectar su funcionamiento. Toda protección o pieza que esté dañada debe repararse apropiadamente o reemplazarse en un centro de servicio autorizado. Con el cumplimiento de esta regla se reduce el riesgo de una descarga eléctrica, incendio o lesión grave. No se necesita conectar a una toma de corriente las herramientas de baterías; por lo tanto, siempre están en condiciones de funcionamiento. Esté consciente de los posibles peligros cuando no esté usando la herramienta de baterías o cuando esté cambiando los accesorios de la misma. Con el cumplimiento de esta regla se reduce el riesgo de una descarga eléctrica, incendio o lesión corporal seria. No coloque herramientas de baterías ni las baterías mismas cerca del fuego o del calor. De esta manera se reduce el riesgo de explosiones y de lesiones. No aplaste, deje caer o dañe de baterías. Nunca utilice una batería o cargador que se ha caído, aplastado, recibido un golpe contundente o ha sido dañado(a) de alguna manera. Las baterías dañadas pueden sufrir explosiones. Deseche de inmediato toda batería que haya sufrido una caída o cualquier daño. Las baterías pueden explotar en presencia de fuentes de inflamación, como los pilotos de gas. Para reducir el riesgo de lesiones serias, nunca use un producto inalámbrico en presencia de llamas expuestas. La explosión de una batería puede lanzar fragmentos y compuestos químicos. Si ha quedado expuesto a la explosión de una batería, lávese de inmediato con agua. No cargue herramientas de baterías en lugares mojados o húmedos. Con el cumplimiento de esta regla se reduce el riesgo de una descarga eléctrica. Para obtener resultados óptimos, debe cargar la herramienta de baterías en un lugar donde la temperatura esté entre 10 y 38 °C (entre 50 y 100 °F). No guarde la herramienta a la intemperie ni en el interior de vehículos. En condiciones extremas de uso o temperatura las baterías pueden emanar líquido. Si el líquido llega a tocarle la piel, lávese de inmediato con agua y jabón. Si le entra líquido en los ojos, láveselos con agua limpia por lo menos 10 minutos, y después busque de inmediato atención médica. Con el cumplimiento de esta regla se reduce el riesgo de lesiones corporales serias. Guarde estas instrucciones. Consúltelas con frecuencia y empléelas para instruir a otras personas que puedan utilizar este inflador portátil. Si le presta este inflador portátil a alguien, facilítele también las instrucciones. 5 - Español CARACTERÍSTICAS ESPECIFICACIONES DEL PRODUCTO Motor........................................................ 19,2 V, corr. cont. Manguera..... 457,2 mm (18 pulg.) con conector para vehículo Manómetros.............. Indicador digital (psi, kg/cm2, y BAR) Presión de aire.............200 psi, 13,7 BAR, 14 kc/cm2 max. FAMILIARÍCESE CON SU INFLADOR PORTÁTIL MANGUERA DE AIRE Vea la figura 1, pagina i. El uso seguro que este producto requiere la comprensión de la información impresa en la herramienta y en el manual del operador así como ciertos conocimientos sobre el proyecto a realizar. Antes de usar este producto, familiarícese con todas las características de funcionamiento y normas de seguridad. La manguera de aire puede ser utilizada con o sin los adaptadores para inflar una amplia variedad de artículos. MANÓMETRO DIGITAL Este manómetro digital mide la presión de aire, monitoriza la salida de presión y se usa para establecer el tipo de presión. ADAPTADORES BOTÓN DEL SEGURO DE ENCENDIDO Los adaptadores proporcionados con el inflador portátil portátil pueden ser utilizados para inflar una amplia variedad de artículos. El botón del seguro de encendido resulta conveniente para un inflado continuo de hasta 40 psi, 2,75 BAR, y 2,81 kg/cm2 por períodos prolongados de tiempo. ZONA DE ALMACENAMIENTO DE LOS ADAPTADORES Algunos de los adaptadores proporcionados con el inflador portátil pueden ser colocados en la zona de almacenamiento, la cual se ubica en la base. ARMADO DESEMPAQUETADO Este producto fue embarcado completamente armado. n Extraiga cuidadosamente de la caja la herramienta y los accesorios. Compruebe que estén presentes todos los artículos enumerados en la lista de empaquetado. ADVERTENCIA: No use este producto si no está totalmente ensamblado o si alguna pieza falta o está dañada. Si utiliza un producto que no se encuentra ensamblado de forma correcta y completa, puede sufrir lesiones graves. n Inspeccione cuidadosamente la herramienta, para verificar que no haya sufrido ninguna rotura o daño durante el transporte. n No deseche el material de empaquetado hasta que haya inspeccionado la herramienta con cuidado y la haya utilizado satisfactoriamente. n Si hay piezas dañadas o faltantes, sírvase llamar al 1-800-932-3188, donde le brindaremos asistencia. LISTA DE EMPAQUETADO Inflador portátil Manguera de aire desmontable Adaptador cónico Aguja de balón deportivo Adaptador de válvula Presta Herramienta para válvulas Schrader Adaptador principal Adaptador cónico grande Adaptador cónico pequeño Adaptador de válvula de presión Manual del operador 6 - Español ADVERTENCIA: Si hay piezas dañadas o faltantes, no utilice esta producto sin haber reemplazado todas las piezas. Usar este producto con partes dañadas o faltantes puede causar lesiones serias al operador. ADVERTENCIA: No intente modificar esta herramienta ni fabricar accesorios no recomendados para ella. Cualquier alteración o modificación constituye maltrato y puede causar una condición peligrosa, con las consecuentes lesiones corporales graves. ADVERTENCIA: Para evitar un arranque accidental que puede causar lesiones corporales graves, siempre desmonte de la herramienta el paquete de baterías al montarle piezas a aquélla. SÍMBOLOS Las siguientes palabras de señalización y sus significados tienen el objeto de explicar los niveles de riesgo relacionados con este producto. SÍMBOLO SEÑAL SIGNIFICADO PELIGRO: Indica una situación peligrosa inminente, la cual, si no se evita, causará la muerte o lesiones serias. ADVERTENCIA: Indica una situación peligrosa posible, la cual, si no se evita, podría causar la muerte o lesiones serias. PRECAUCIÓN: Indica una situación peligrosa posible, la cual, si no se evita, podría causar lesiones menores o leves. PRECAUCIÓN: (Sin el símbolo de alerta de seguridad) Indica una situación que puede producir daños materiales. Es posible que se empleen en este producto algunos de los siguientes símbolos. Le suplicamos estudiarlos y aprender su significado. Una correcta interpretación de estos símbolos le permitirá utilizar mejor y de manera más segura el producto. SÍMBOLO Li - Ion V min no .../min NOMBRE DENOMINACIÓN/EXPLICACIÓN Alerta de seguridad Indica un peligro posible de lesiones personales. Lea el manual del operador Para reducir el riesgo de lesiones, el usuario debe leer y comprender el manual del operador antes de usar este producto. Protección ocular Siempre póngase protección ocular con protección lateral con la marca de cumplimiento de la norma ANSI Z87.1. Alerta de condiciones húmedas No exponga la unidad a la lluvia ni la use en lugares húmedos. Símbolo de no acercar las manos Para reducir el riesgo de lesiones corporales o daños materiales evite tocar toda superficie caliente. Símbolo de reciclado Este producto contiene baterías de níquel-cadmio (Ni-Cd) o iones de litio (Li-ion). Es posible que algunas leyes municipales, estatales o federales prohíban desechar las baterías de níquel-cadmio en la basura normal. Consulte a las autoridades reguladoras de desechos para obtener información en relación con las alternativas de reciclado y desecho disponibles. Volts Voltaje Minutos Tiempo Corriente continua Tipo o característica de corriente Velocidad en vacío Velocidad de rotación, en vacío Por minuto Revoluciones, carreras, velocidad superficial, órbitas, etc., por minuto 7 - Español FUNCIONAMIENTO ADVERTENCIA : No permita que su familarización con las herramientas lo vuelva descuidado. Tenga presente que basta un instante de descuido para que se produzca una lesión grave. ADVERTENCIA : Siempre póngase protección ocular con protección lateral con la marca de cumplimiento de la norma ANSI Z87.1. Si no cumple esta advertencia, los objetos que salen despedidos pueden producirle lesiones serias en los ojos. ADVERTENCIA : No utilice ningún aditamento o accesorio no recomendado por el fabricante de esta herramienta. El empleo de aditamentos o accesorios no recomendandos puede causar lesiones graves. ADVERTENCIA : El inflador portátil es capaz de inflar a una presión máxima de 200 psi, 13,7 BAR, o 14 kg/cm2. Para evitar inflar demasiado, siga cuidadosamente las instrucciones del artículo que vaya a inflar. Nuca exceda las presiones recomendadas. PRECAUCIÓN : No deje desatendidos los artículos que se inflan mientras el inflador portátil está funcionando. Podrían explotar y ocasionar lesiones graves. CARACTERÍSTICAS DE PROTECCIÓN DE LAS BATERÍAS Las baterías de iones de litio Craftsman® de 19,2 V están diseñadas con características que protegen las celdas de iones de litio y maximizan la duración de las baterías. Si la herramienta se detiene durante el uso, suelte el gatillo para reiniciarla y reanude el funcionamiento. Si aun así no funciona, se debe recargar la batería. PARA INSTALAR EL PAQUETE DE BATERÍAS Vea la figura 2, pagina i. Coloque el paquete de baterías en el inflador portátil. Alinee la costilla realzada del paquete de baterías con la ranura situada dentro del inflador portátil. en el taladro, asegúrese de que la costilla realzada del paquete quede alineada con la ranura del interior del taladro y de que los pestillos entren completamente en su lugar con un chasquido. Si el paquete de baterías no se monta debidamente, pueden dañarse los componentes internos. Asegúrese de que los pestillos situados en ambos lados del paquete de baterías entren completamente en su lugar con un chasquido, y de que el paquete quede bien fijo en el taladro antes de empezar a utilizar éste. ADVERTENCIA : Retire siempre el paquete de baterías de la herramienta antes de instalar las piezas, realizar ajustes. Limpiarla o cuando no la utilice. Retirar el paquete de baterías evitará que la unidad se accione accidentalmente y provoque lesiones graves. ADVERTENCIA : El inflador portátil no está diseñado para inflar artículos de gran volumen como lo son embarcaciones, piscinas, balsas, colchones de aire grandes, etc. Tampoco está diseñado para usos comerciales. PARA RETIRAR EL PAQUETE DE BATERÍAS ADVERTENCIA : Ya que el indicador de presión no está calibrado y,por lo tanto, no arroja necesariamente valores exactos, debe verificarse la presión de los neumáticos con un medidor calibrado antes de conducir el vehículo correspondiente Vea la figura 2, pagina i. Oprima los pestillos situados en ambos lados del paquete de baterías, para soltar éste del inflador portátil. Retire el paquete de baterías. ADVERTENCIA : Si no se fijan correctamente las ADVERTENCIA : El riesgo de la herida no dirige la mangueras o los adaptadores, se pueden soltar al someterse a presión y ocasionar lesiones graves. Las fugas de aire potenciales pueden ocasionar lecturas de presión erradas. Cerciórese de que todas las conexiones estén firmes. corriente aérea en el cuerpo. ADVERTENCIA : La superficie caliente reducir el riesgo de quemaduras no toca abrazaderas de metal de la asamblea de manga. USOS Esta herramienta puede emplearse para los fines siguientes Inflado de balones deportivos, neumáticos, flotadores y juguetes Para ver las instrucciones de carga completas, consulte el manual del operador de los paquetes de baterías y cargadores enumerados en las Reglas de seguridad generales. PRECAUCIÓN : Al colocar el paquete de baterías INSTALACIÓN/EXTRACCIÓN DE LA MANGUERA DE AIRE Vea la figura 3, pagina i. n Retire el paquete de baterías del inflador portátil. Afloje levemente la perilla girándola hacia la derecha. n Inserte el extremo de la manguera de aire en el extremos abierto del inflador portátil. Empuje hacia adentro la manguera de aire hasta que se detenga. Apriete la perilla girándola hacia la derecha. Para aflojar, gire la perilla hacia la derecha y quite la manguera de aire. 8 - Español FUNCIONAMIENTO INFLADO CON LA MANGUERA DE AIRE Vea la figuras 4, pagina i. El conector de inflado de la manguera de aire de alta presión puede usarse sin los adaptadores para inflar neumáticos o para cualquier aplicación que tenga un vástago de válvula que encaje en la abertura del conector de inflado. Sitúe el conector de inflado en el vástago de válvula. Oprima el conector de inflado de modo que la sección roscada del vástago de válvula quede dentro del mismo. Fije el extremo del conector de inflado sobre el vástago de válvula presionando la abrazadera del conector de inflado hacia abajo hasta que pare o quede paralela a la manguera de aire de alta presión. INFLADO CON LA MANGUERA DE AIRE Y ADAPTADORES Vea la figura 5, pagina i. La manguera de aire puede ser utilizada con los adaptadores suministrados para inflar una amplia variedad de artículos. n Inserte el adaptador en el conector de inflado y empuje la abrazadera del mismo hasta que se trabe en su lugar. Para separar, levante la abrazadera del conector de inflado y separe el adaptador del conector de inflado. FUNCIONES DE LOS ADAPTADORES Vea la figuras 6 á 9, pagina i y ii. La herramienta para válvulas Schrader puede usarse para retirar los núcleos de válvula y lograr un desinflado rápido. El adaptador cónico puede usarse en válvulas de presión más pequeñas para inflar artículos como, por ejemplo, flotadores y juguetes infantiles, los cuales normalmente exigen que el usuario los infle soplando en su interior. La aguja de balón deportivo puede usarse para inflar cualquier tipo de balón deportivo o cualquier artículo que requiera una aguja de balón deportivo. El adaptador de válvula Presta puede usarse para los vástagos de válvula Presta como se muestra. Aflojar la contratuerca para inflar, antes de inflar un neumático con una válvula Presta. Una vez inflado, apriete la contratuerca para cerrar la válvula del neumático. Para usar el adaptador de válvula Presta: n Aflojar la contratuerca de la válvula Presta. n Enrosque el adaptador de la válvula Presta en el vástago de la válvula con el extremo más grande abierto hacia la rueda. n Sujete hacia abajo el extremo del conector de inflado en el adaptador de la válvula Presta. Para hacer esto, oprima hacia abajo la abrazadera del conector de aire hasta que se trabe en su lugar. n Al terminar de inflar, (Consulte GATILLO DEL INTERRUPTOR) retire el conector de aire y apriete la contratuerca. ADAPTADOR DE GRAN VOLUMEN Para poder utilizar el adaptador de gran volumen, es necesario instalar primeramente el adaptador principal al inflador portátil, y luego encajar el adaptador adecuado en el adaptador principal. Para montar el adaptador en el manguera de aire: n Inserte el adaptador principal en el conector de inflado y empuje la abrazadera del mismo hasta que se trabe en su lugar. n Acople el adaptador deseado. n Para separar, levante la abrazadera del conector de inflado y separe de este último el(los) adaptador(es). GATILLO DEL INTERRUPTOR Vea la figura 10, pagina ii. Oprima y mantenga el gatillo del interruptor para ENCENDER (ON) el inflador portátil. Para APAGAR (OFF) la unidad, suelte el gatillo del interruptor. NOTA: Al inflar artículos a 10 psi, 0,69 BAR, ,70 kg/ cm2 o menos, infle con descargas breves y, después de cada una, compruebe manualmente o con un medidor calibrado para determinar la presión exacta. BOTÓN DEL SEGURO DE ENCENDIDO Vea la figura 10, pagina ii. Este inflador portátil portátil está equipado con un seguro de encendido, el cual es muy útil cuando se requiere un inflado continuo durante períodos de tiempo prolongados. El botón del seguro de encendido está ubicado debajo del gatillo del interruptor. Para poner el seguro de encendido: Oprima el gatillo del interruptor. Oprima hacia arriba el botón del seguro de encendido. Suelte el gatillo de interruptor para que el compresor de aire de mano siga en marcha. Para liberar el seguro, oprima hacia abajo el botón del seguro de encendido. Si el seguro de encendido está puesto al usar el inflador portátil y éste se desconecta accidentalmente del suministro de voltaje, quite el seguro de encendido de inmediato. NOTA: El seguro de encendido únicamente funciona en presiones superiores a las 40 psi, 2,75 BAR, y 2,80 kg/ cm2. Para todas las operaciones de inflado con el seguro de encendido, el compresor de aire está diseñado para detenerse automáticamente a las 40 psi 2,75 BAR, o 2,80 kg/cm2. ALMACENAMIENTO DE LOS ADAPTADORES Vea la figura 11, pagina ii. Cuando no estén en uso los adaptadores proporcionados (con excepción de aquellos que vienen con el adaptador de gran volumen) pueden ser colocados en la zona de almacenamiento, ubicada en la base. Vea la figuras 9, pagina ii. El adaptador de gran volumen puede ser muy útil en el inflado de artículos de baja presión y pequeños como los son pelotas de playa y juguetes infantiles. 9 - Español FUNCIONAMIENTO MANÓMETRO DIGITAL Vea la figuras 12 á 14, pagina ii. El manómetro digital del inflador portátil es multifuncional. Sirve de manómetro, monitoriza la presión que se aplica al artículo que se infla y puede cambiar las unidades de medida de presión de aire entre psi, BAR y kg/cm2. Para ENCENDER el manómetro digital, oprima el botón ON/RESET (ENCENDER/PONER A CERO) o el gatillo del interruptor. NOTA: Asegúrese que el manómetro digital esté en 0 antes de su uso. Si se ve en el manómetro “Err” (error) o necesita ponerse a cero, oprima y mantenga el botón ON/RESET (ENCENDER/PONER A CERO) de 3 a 6 segundos. NOTA: El manómetro digital se apaga automáticamente si no se usa en un lapso de 2,5 segundos. Para usar el manómetro: Encienda el manómetro digital oprimiendo el botón ON/ RESET (ENCENDER/PONER A CERO) oprimiendo y soltando el gatillo del interruptor. Sitúe el conector de inflado en el vástago de válvula y oprímalo hacia abajo. Se enciende el indicador del manómetro. Si se está inflando, en el manómetro aparecerá la presión de aire como que el artículo está siendo inflado. Para cambiar entre psi, kg/cm2, y BAR: Con el manómetro ENCENDIDO, mantenga oprimido el botón ON/RESET (ENCENDER/PONER A CERO) 6 segundos. Empieza a parpadear la unidad de medida actual. Oprima el botón ON/RESET (ENCENDER/PONER A CERO) para seleccionar la unidad de medida que interese. El ajuste entra en vigor de 5 segundos después que deja de parpadear el indicador Para fijar el manómetro para el apagado automático: Con el manómetro ENCENDIDO, mantenga oprimido los botones ( + ) o ( - ) para seleccionar la presión de apagado que se desee. NOTA: En el indicador parpadean números mientras se fija la presión. Manteniendo oprimidos los botones, el número de la presión aumenta más rápido. Al seleccionar la configuración deseada, el infladoinicia. El inflador portátil se apagará automáticamente cuando se alcanza la configuración. NOTA: Si se utiliza el botón del seguro de encendido con una configuración de presión preestablecida, la unidad se detendrá después de que el artículo ha ser inflado haya alcanzado 40 psi, 2,75 BAR, o 2,80 kg/cm2. Se debe desactivar el seguro de encendido, y se debe sostener manualmente el gatillo del interruptor para presiones encima de 40 psi, 2,75 BAR, o 2,80 kg/cm2. MANTENIMIENTO ADVERTENCIA: No permita en ningún momento ADVERTENCIA: Para dar servicio a la herramienta, que líquido para frenos, gasolina u otros derivados del petróleo, aceites penetrantes, etc., lleguen a tocar las piezas de plástico. Las sustancias químicas pueden dañar, debilitar o destruir el plástico, lo cual a su vez puede producir lesiones corporales graves. utilice solamente piezas de repuesto Craftsman idénticas. El empleo de piezas diferentes puede implicar peligro o causar daños al producto. ADVERTENCIA: Siempre póngase protección ocular con protección lateral con la marca de cumplimiento de la norma ANSI Z87.1. Si no cumple esta advertencia, los objetos que salen despedidos pueden producirle lesiones serias en los ojos. Solamente las piezas enumeradas en la lista de piezas pueden ser reparadas o cambiadas por el consumidor. Todas las piezas restantes deben ser reemplazadas en un centro de servicio Sears. ADVERTENCIA: Para evitar lesiones corporales REMOCIÓN Y PREPARACIÓN DEL PAQUETE DE BATERÍAS PARA EL RECICLADO graves, siempre retire el paquete de baterías de la herramienta al limpiarla o darle mantenimiento. ADVERTENCIA: Al retirar el paquete de baterías, MANTENIMIENTO GENERAL Evite el empleo de solventes al limpiar piezas de plástico. La mayor parte de los plásticos son vulnerables a diferentes tipos de solventes comerciales y pueden resultar dañados. Utilice paños limpios para eliminar la suciedad, polvo, aceite, grasa, etc. 10 - Español cubra las terminales del mismo con cinta adhesiva reforzada. No intente destruir o desarmar el paquete de baterías, ni de desmontar ninguno de sus componentes. Las baterías deben reciclarse o desecharse debidamente. Asimismo, nunca toque ambas terminales con objetos metálicos y partes del cuerpo, ya que puede producirse un corto circuito. Manténgase fuera del alcance de los niños. La inobservancia de estas advertencias puede causar incendios y lesiones corporales serias. NOTES / NOTAS 11 - Español NOTES / NOTAS 12 - Español Get it fixed, at your home or ours! Your Home For expert troubleshooting and home solutions advice: www.managemyhome.com For repair – in your home – of all major brand appliances, lawn and garden equipment, or heating and cooling systems, no matter who made it, no matter who sold it! For the replacement parts, accessories and owner’s manuals that you need to do-it-yourself. For Sears professional installation of home appliances and items like garage door openers and water heaters. 1-800-4-MY-HOME® (1-800-469-4663) Call anytime, day or night (U.S.A. and Canada) www.sears.com www.sears.ca Our Home For repair of carry-in items like vacuums, lawn equipment, and electronics, call anytime for the location of your nearest Sears Parts & Repair Service Center 1-800-488-1222 (U.S.A.) www.sears.com 1-800-469-4663 (Canada) www.sears.ca To purchase a protection agreement on a product serviced by Sears: 1-800-827-6655 (U.S.A.) 1-800-361-6665 (Canada) Para pedir servicio de reparación a domicilio, y para ordenar piezas: Au Canada pour service en français: 1-800-LE-FOYER MC 1-888-SU-HOGAR® (1-800-533-6937) www.sears.ca (1-888-784-6427) ® Registered Trademark / TM Trademark / SM Service Mark of Sears Brands, LLC ® Marca Registrada / TM Marca de Fábrica / SM Marca de Servicio de Sears Brands, LLC MC Marque de commerce / MD Marque déposée de Sears Brands, LLC 13 - Español © Sears Brands, LLC