1
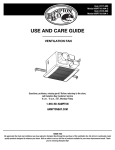
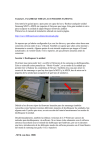
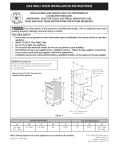
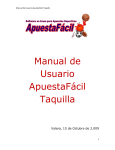
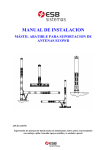
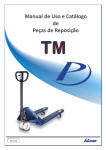
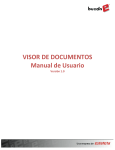
Operator’s Manual
4 Ton Low Profile Service Jack
Model 50168
For Trouble Shooting / Service / Parts:
Call 8 AM - 5 PM PST., Monday - Friday
1-888-448-6746
PARA VENTA DE PARTES Y SERVICIO:
Llame 8 AM - 5 PM Tiempo Pacifico., Lunes - Viernes
1-888-448-6746
•
•
•
•
WARNING : Before using this
appliance, read this Operator’s
Manual and follow all its Safety
Rules and Operating Instructions.
Safety
Operation
Maintenance
Español, p. 4
Sears, Roebuck and Co., Hoffman Estates, IL 60179 U.S.A.
www.sears.com
Printed in China
FRONT OF THE JACK
SAFETY INSTRUCTIONS
Read Operating Instructions
Study, understand and follow all instructions in this
manual before operating the jack. Failure to heed these
warnings may result in loss of load, damage to the jack
and/or jack failure resulting in personal injury or property
damage.
Position the Jack
Position the jack to only lift on the areas of the vehicle
specified by the vehicle manufacturer.
Use Support Stands
After lifting the vehicle always support the load with
appropriately rated vehicle supports stands before
working on the vehicle.
Do Not Overload Jack
Do not overload this jack beyond its rated capacity.
Overloading this jack beyond its rated capacity can
cause damage to or failure of the jack.
Use on Hard Level Surface
This jack is designed only for use on hard level surfaces
capable of sustaining the load. Use on other than hard
level surfaces can result in jack instability and possible
loss of load.
Center Load on Jack Saddle
Center load on jack saddle before lifting vehicle.
Off-center loads and loads lifted when the jack is not
level can cause loss of load or damage to the jack.
Saddle
Lifting Arm
Front Wheels
BACK OF THE JACK
Handle
Handle
Socket Screw
KEEP HANDS AND FEET CLEAR OF THE JACK
HINGE MECHANISM AND GROUND CONTACT AREA
WHEN LOWERING THE LOAD !
THIS JACK IS A LIFTING DEVICE ONLY!
Plunger
Rear Swivel Casters
POWER UNIT
THIS JACK IS DESIGNED ONLY FOR LIFTING PART OF THE
TOTAL VEHICLE. DO NOT MOVE OR DOLLY THE VEHICLE
WHILE IT IS ON THE JACK.
U-Joint Release Valve
WARRANTY
CRAFTSMAN ONE YEAR FULL WARRANTY
If this Craftsman product fails due to a defect in material
or workmanship within one year from the date of
purchase, return it to any Sears store or other Craftsman
outlet in the United States for free replacement.
This warranty applies for only 90 days from the date of
purchase if this product is ever used for commercial or
rental purposes.
This warranty gives you specific legal rights, and you
may also have other rights which vary from state to state.
Sears, Roebuck and Co., Hoffman Estates, IL 60179
Oil Fill Plug
Grease Fitting
DESCRIPTION
ASSEMBLY
Craftsman model 50167 features an 8,000 lbs.
maximum capacity. Lifting range for this jack is 4 inches
to 21 inches. Jack features an overload valve which
helps prevent equipment failure. Bypass system
provides safe operation.
Assembly
Handle Assembly
• Prior to assembly please remove the clip attached to
the handle socket (picture 1).
• Refer to picture 2 when performing this step. Take off
the screw located on handle piece 1. Attach handle
piece 1 and 2 making sure to align the holes on both
pieces. Reinsert the screw and tighten it.
• Fully unfasten the screw located in the Handle
Socket to insert the assembled handle (picture 3).
• Line up the square hole located at the bottom of the
handle over the square bolt inside the Handle Socket.
• Secure the handle in place by tightening the screw
in the Handle Socket.
Specifications
Compact design allows use in confined spaces
Maximum load capacity.......................4 tons (8000 lbs.)
Lift range..................................................4 to 21 inches
Size (LxWxH)..............................29.27” x 15.82” x 7.07”
Weight w/handle..............................................99.23 lbs.
1
MAINTENANCE
PICTURE 1
Handle
Socket Screw
Clip
PICTURE 2
PICTURE 3
Bottom of
Handle
Screw
Handle
pc. 1
Handle
pc. 2
FEATURES & OPERATION
Operation
Raising the Jack
• Close the release valve by turning the handle
clockwise as far as it will go.
• Block the vehicle’s wheels for lifting stability.
• Refer to the vehicle manufacturer owner’s manual to
locate approved lifting points on the vehicle.
Position the jack so that the saddle is centered and
will contact the load lifting point firmly.
• Pump jack handle until saddle nears contact with
the vehicle. Check to see that the saddle is centered
and will contact the load lifting point firmly.
• Continue to pump the jack handle to lift the vehicle
to the desired height. After lifting, support the load
with appropriately rated vehicle support stands
before working on the vehicle.
Lowering the Jack
• Carefully open the release valve by slowly turning
the handle counterclockwise.
How it Works
With Release Valve Closed
• An upward stroke of the jack handle draws oil from
the reservoir tank into the plunger cavity. Hydraulic
pressure holds the valve closed, which keeps the
oil in the plunger cavity.
• A downward stroke of the jack handle releases oil
into the cylinder, which forces the ram out.
This raises the saddle.
• When the ram reaches maximum extension, oil is
bypassed back into the reservoir to prevent an over
extended ram stroke and possible damage to the
jack.
• Opening the release valve allows oil to flow back
into the reservoir. This releases hydraulic pressure
on the ram, which results in lowering the saddle.
To Add Oil:
• Position the jack on level ground and lower the
saddle.
• Use a Phillips head screwdriver to remove the
cover plate.
• Remove the oil plug.
• Fill the oil case until oil level is just beneath the
lower rim of oil fill hole. Replace oil plug.
• Perform the Air Purge Procedure described below.
To Replace Oil:
• Fully open release valve by turning handle
counterclockwise as far as it will go.
• Turn the jack over so that old oil will drain from
the oil fill hole.
• Refill through oil fill hole. Keep dirt and other
material clear when pouring. Fill to just beneath
lower rim of hole. Replace oil plug.
• Perform Air Purge Procedure described below.
Lubrication
• Add lubricating oil (WD-40) to all moving parts
when needed.
• For light duty use lubricate every six months.
• For heavy and constant use lubrication
recommended every month.
Rust Prevention:
• Check ram and pump plunger on the Power Unit
Assembly every two months (or sooner, based on
usage) for any signs of rust or corrosion. Lift the jack
as high as it goes and look under and behind the
lifting arm. If signs of rust are visible clean as needed
and wipe down with an oily cloth or WD-40.
• When storing the jack, always have the saddle and
pump plunger in the down position.
ALWAYS USE A GOOD GRADE HYDRAULIC JACK
OIL. DO NOT USE HYDRAULIC BRAKE FLUID,
ALCOHOL, GLYCERINE, DETERGENT, MOTOR OIL
OR DIRTY OIL. USE OF AN UN-RECOMMENDED
FLUID CAN CAUSE DAMAGE TO YOUR JACK.
Grease Fitting
There is grease fitting located on top of the jack. It is
for manufacturing purposes only. The jack has been
filled with sufficient grease by the factory for the lifetime
of the jack. Do not add more grease.
Air Purge Procedure
During shipment or after oil refill, air may get into the
hydraulic system causing poor lifting performance.
Then system air purge is required as follows:
1. Turn the release valve fully counterclockwise to fully
open the release valve.
2. Pump handle rapidly several times.
3. Turn the release valve clockwise to close the release
valve.
4. Pump handle until the lift arm reaches maximum
height and continue to pump several times to remove
trapped air in the ram.
5. Turn the release valve fully counterclockwise to lower
lift arm to lowest position. Use force on saddle
if necessary.
6. Turn the release valve clockwise to closed position
and check for proper pump action. It may be
necessary to perform the above steps more than
once to assure air is evacuated totally.
2
EXPLODED VIEW AND PARTS LIST
TROUBLESHOOTING
FOR AFTER SALE PARTS AND SERVICE:
Call 8 AM - 5 PM PST., Monday - Friday
1-888-448-6746
3
INSTRUCCIONES DE SEGURIDAD
Lea las Instrucciones de Operacion
Estudie, entienda y siga todas las instrucciones en este
manual antes de operar el gato. No hacer caso a estas
indicaciones y advertencias podria resultar en la perdida de la carga, dano al gato y/o mal funcionamiento
de este resultando en dano personal o de propiedad.
La Posicion del Gato
Ponga el gato solamente en areas de levantamiento
especificadas por el fabricante de su vehiculo.
Use Gatos de Soporte
Despues de levantar el vehiculo es importante que
siempre soporte la carga con sopportes apropiados
relacionados e indicados antes de empezar a trabajar
en el vehiculo.
No Sobrecargue el Gato
No sobrecargue este gato mas hay de su capacidad
mecionada. La sobrecarga a este gato rebazando su
capacidad dpuede resultar en dano o mal
funcionamiento del producto.
Usese en Superficies Duras y Firmes
Este gato esta disenado para uso solamente en
superficies duras y firmes capaces de sostener la
carga. El uso en cualquier otro tipo de superficies que
no sean especificadas anteriormente puede danar el
gato y causar inestabilidad y posible perdida de carga.
Centre la Carga en la Plataforma
Centre la carga en la plataforma del gato antes de
levantar el vehiculo. Las cargas que no sean centradas
y cargas que sean levantadas cuando el gato no este
nivelado puede causar perdida de la carga o dano
al gato y/o su vehiculo.
Especificaciones
Diseno compacto para espacios pequenos
Capacidad maxima de carga......4 toneladas (8000 lbs.)
Margen de Levantamiento.....................4 a 21 pulgadas
Tamano (LxAnxAl)...........29.27 x 15.82 x 7.07 pulgadas
Peso c/mango..................................................99.23 lbs.
PARTE FRONTAL DEL GATO
Plataforma
Brazo
Levantador
Ruedas Frontales
PARTE TRASERA DEL GATO
Manija
Tornillo para
Ensamblar la
Manija
CONSERVE MANOS Y PIES FUERA DE LA
MAQUINARIA DEL GATO Y CHEQUE EL AREA DE
CONTACTO CON EL PISO AL BAJAR LA CARGA !
ESTE GATO ES SOLO PARA LEVANTAR!
Embolo
Ruedas Traseras
UNIDAD DE PODER
ESTE GATO ESTA DISENADO PARA LEVATAR SOLO
PARTE DE TODO EL VEHICULO. NO MUEVA O TAMBALEE
EL VEHICULO MIENTRAS ESTE ENCIMA DEL GATO.
Valvula de Aire
de Liberacion
GARANTIA
GARANTIA COMPLETA DE UN ANO DE LOS
GATOS CRAFTSMAN
Si este gato Craftsman no le satisface pleanamente
dentro de un ano de la fecha de compra, devuelvalo
al centro o departamento de sevicio SEARS mas
cercano en los Estados Unidos. Si este gato Craftsman
se usa para fines comerciales o de alquiler, esta
garantia esta vigente solo por 90 dias desde la fecha
de compra. Esta garantia le concede derechos legales
especificos y usted tambien puede tener otros derechos
que varian de un estado a otro.
Sears, Roebuck and Co., Hoffman Estates, IL 60179
DESCRIPCION
El modelo de gato con carro Craftsman 50167 posee
una capacidad maxima de 8000 libras. El margen de
levantamiento de este gato es de 4 a 21 pulgadas.
El gato cuenta con una valvula de sobrecarga que
ayuda a evitar fallas del equipo. El sistema de
derivacion contribuye a la seguridad del funcionamiento.
Tapon
del Aceite
Agujero
para Grasa
ENSAMBLAJE
Ensamblaje
Ensamblaje de la Manija
• Asegurese retirar el clip que sostiene el enchufe
para la manija (ilustracion 1).
• Vease la ilustracion 2 para este paso. Quite el
tornillo de la pieza de la manija1. Conecte la manija
1 y 2 asegurandose de alinear los horificios de las
2 piezas. Coloque el tornillo nuevamente y aprietelo.
• Desatore completamente el tornillo que se encuentra
en el enchufe para la manija para colocar la manija
ensamblada anteriormente (ilustracion 3).
4
ENSAMBLAJE (continuacion)
• Alinee el orificio de forma cuadrada que esta en la
parte baja de la manija con el tornillo de la misma
forma que se encuentra en el enchufe.
• Asegure la manija, aprentando el tornillo.
ILUSTRACION 1
Tornillo para
Ensamblar la
Manija
Clip
ILUSTRACION 2
Tornillo
ILUSTRACION 3
Parte Baja
de la Manija
Tornillo
Manija
pza. 1
Manija
pza. 2
CARACTERISTICAS Y OPERACIONES
Operacion
Levantamiento del Gato
• Sierre la valvula de liberacion girando el mango
hacia la derecha.
• Bloquee las ruedas del vehiculo para tener
estabilidad al levantar.
• Consulte el manual del propietario del fabricante del
vehiculo para localizar los puntos de leventamiento
aprobados en el vehiculo. Coloque el gato de tal
modo que la montura quede centrada y toque el
punto de levantamiento de carga firmemente.
• Bombee el mango del gato hasta que la montura casi
toque el vehiculo. Revise si la montura esta centrada
para que toque el pnto de levantamiento de la
carga firmemente.
• Continue bombeando el mango del gato para levantar
el vehiculo a la altura deseada. Despues de levantar,
soporte la carga con los puntales de apoyo
clasificados adecuadamente para el vehiculo antes
de trabajar en el mismo.
Bajar el Gato
• Cuidadosamente abra la valvula de liberacion girando
poco a poco la manija contra las manecillas del reloj.
Como Funicona
Con la Valvula de Liberacion Cerrada
• Si se acciona hacia arriba el mango del gato se
extra aceite del tanque hacia la cavidad del emobolo.
• La presion hidraulica mantiene la valvula cerrada,
la cual mantiene el aceite en la cavidad del embolo.
• Cuando el ariete alcance la extension maxima, el
aceite se deriva nuevamente dentro del tanque
para evitar un movimiento extendido del ariete y
posible dano al gato.
• Si se abre la valvula de liberaicon se permite que
fluya aceite de nuevo dentro del tanque. Esto libera
presion hidraulica en el ariete, lo cual produce que
baje la montura.
MANTENIMIENTO
Para Anadir Aceite:
• Coloque el gato sobre suelo nivelado y baje la
montura.
• Use un desarmador de cabeza Phillips para remover
el plato de inspeccion.
• Retire el tapon de aceite.
• Llene la caja de aceite hasta que quede nivelada con
el agujero del taponde recarga de aceite.
• Realize la Purga de Aire descrito debajo.
Para Cambiar el Aceite:
• Libere el conjunto de engranajes de la valvula y
retire el tapon de recarga del aceite.
• Ponga boca abajo el gato para que el aceite usado
escurra por el agujero de recarga.
• Llene atraves del agujero de recarga. Mantenga
alejada la suciedad y otras materias al verter el aceite.
• Realize la Purga de Aire descrito abajo.
• Bombee el mango del gato varias veces y sueltelo.
Lubricacion
• Anada aceite lubricate (WD-40) a todas las partes
cada vez que sea necessario.
• Para uso ligero lubriquese cada 6 meses.
• Para uso pesado o constante se recomienda
lubricarse cada mes.
Prevencion de la Corrosion:
• Cheque por signos de oxhido o corrosion el embolo
y partes alrededor en la Unidad de Poder de
Ensamblaje cada dos meses o cada vez que sea
necesario dependiendo en el uso. Levante el gato
hasta donde llegue y mire debajo y atras del brazo
de levantamiento. Si hay oxido simpie con una toalla
con aceite o use WD-40 todo alrededor.
• Cuando guarde el gato, siempre tenga la montura y
el embolo de la bomba en la posion hacia abajo
SIEMPRE USE UN ACEITE PARA GATO HIDRAULICO
DE ALTA CALIDAD. NO USE LIQUIDO DE FRENOS
HIDRAULICOS, ALCOHOL, GLICERINA, DETERGENTE, ACEITE DE MOTOR NI ACEITE SUCIO. EL USO
DE CUALQUIER LIQUIDO NO RECOMENDADO
PUEDE DANAR EL GATO
Agujero para Grasa
Hay un agujero para grasa localizado en la parte superior
del gato. Esto es solo para uso del manufactor. El gato
ha sido llenado con suficiente grasa en la fabrica para
todo el uso del gato. No anada mas grasa.
Procedimiento de Purga de Aire
El aire puede penetrar el sistema hidraulico durante el
transporte o despued de llenar con aceite, causando un
rendimiento mas bajo. Esto requiere una purga de aire:
1. Para abrir completamente la valvula de escape girela
completamente en sentido contrario a las agujas
del reloj.
2. Bombee rapidamente la manija varias veces.
3. Para cerrar la valvula de escape girela en sentido de
las agujas del reloj.
4. Para eliminar el aire atrapado en el piston bombee la
manija hasta que el brazo izador alcanze su maxima
y continue bombeando varias veces.
5. Gire la valvula de escape una vuelta completa en
sentido contrario a las agujas del reloj y baje el brazo
izador a la posicion mas baja. Presione sobre la
montura si fuera necesario.
6. Gire la valvula de escape a la derecha a la posicion
cerrada y revise para asegurar que la accion de la
bomba es correcta. Para asegurarse que el aire ha
sido completamente evacuado puede ser necesario
efectuar los pasos de arriba mas de una vez.
5
VISTA DETALLADA Y LISTA DE PIEZAS
PARA VENTA DE PARTES Y SERVICIO:
Llame 8 AM - 5 PM Tiempo Pacifico., Lunes - Viernes
1-888-448-6746
6
FOR AFTER SALE PARTS AND SERVICE:
Call 8 AM - 5 PM PST., Monday - Friday
1-888-448-6746
PARA VENTA DE PARTES Y SERVICIO:
Llame 8 AM - 5 PM Tiempo Pacifico., Lunes - Viernes
1-888-448-6746