1
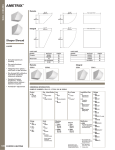
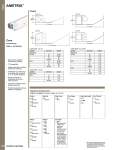
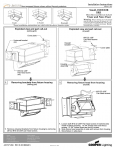
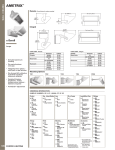
Installation Instructions
Sheet 1 of 5
Small, INDOOR
CPP/CPS
(Continuous Pendant)
Visor and Non-Visor
Warning: Before starting any work ensure
C-Scroll w/ visor
Vault w/ visor
Roundel w/ visor
These installation instructions are valid with the above Ametrix styles
that all sources of power are turned off. All
work must meet local/national codes and be
performed by a certified electrician. Do not
mount fixtures vertically.
Exploded view and part call-out
J-box
(by others)
Swivel pendant shown
End pendant
assembly
Pendant tube
Pendant tube
Pendant nut
(x2)
Center pendant
assembly
Power wire
from J-box
Yoke arm
10-32 x5/8"
End screw
Fixture wire
Center cover plate
ADY071477 REV A (ECN080352)
#10-32 x 5/8"
End screw
(2x)
#10-32 x 3/8"
Pan head screws
(2x)
Installation Instructions
Sheet 2 of 5
Small, INDOOR
CPP/CPS
(Continuous Pendant)
Visor and Non-Visor
Warning: Before starting any work ensure
that all sources of power are turned off. All
work must meet local/national codes and be
performed by a certified electrician. Do not
mount fixtures vertically.
Vault w/ visor
C-Scroll w/ visor
Roundel w/ visor
These installation instructions are valid with the above Ametrix styles.
PP Exploded assembly
#8-32 x1/2"
Screw
(2x)
PS Exploded assembly
PP mounting
plate
#8-32 x1/2"
Screw
(2x)
PP canopy
PS mounting
plate
PS canopy
Pendant yoke
Pendant yoke
#10-32 x5/8"
End Screw
Pendant
nut
#10-32 x5/8"
End screw
Pendant
nut
1. Secure pendant yoke to pendant tube using both pendant
nuts prior to installation.
1. Secure pendant yoke to pendant tube using both pendant
nuts prior to installation.
1
2
Mounting power-side pendant to J-box
Mounting non power side pendant
PS mounting
plate
Run wiring into
pendant tube
J-box
(by others)
PS mounting
plate
#8-32 x1/2"
Screw
(2x)
Canopy
#8-32 x1/2"
Screw
(2x)
Canopy
These instructions are valid for both PP and PS mounting
assemblies. Secure both pendant assemblies to ceiling before
attaching fixture head.
These instructions are valid for both PP and PS mounting
assemblies
1. Remove canopy and allow it to slide down pendant.
2. Refer to power orientation supplementary sheet for power
location.
3. Run wiring from j-box down pendant tube and using
#8-32 x1/2" Pan head screws, secure mounting plate to j-box.
Reinforce J-box with additional bracing.
1. To secure non-power pendant, remove canopy and allow it
to slide down pendant.
2. Replace #8 Pan head screws with appropriate fasteners(by
others) Use additional bracing to secure pendant.
3. Secure mounting plate on center using dimensions provided
on next page.
ADY071477 REV A (ECN080352)
Installation Instructions
Sheet 3 of 5
Small, INDOOR
CPP/CPS
(Continuous Pendant)
Visor and Non-Visor
Warning: Before starting any work ensure
C-Scroll w/ visor
Vault w/ visor
Roundel w/ visor
These installation instructions are valid with the above Ametrix styles
that all sources of power are turned off. All
work must meet local/national codes and be
performed by a certified electrician. Do not
mount fixtures vertically.
Center dimensions for PP and PS mounting assemblies
2ft fixture
7
28 8"
733.40
3ft fixture
25
40 32"
1036.22
4ft fixture
7
52 8"
1343
PS (Pendant Swivel) mounting plate dimensions
15
32"
36.95
1
3
4"
19.05
15
1 16"
49.43
1
5 32"
127.84
31
32"
49.92
1
3
16"
4.86
19
R 32"
14.99
PP (Pendant) mounting plate dimensions
1
8"
3.30
5
16"
8.25
5
4 32"
105.71
ADY071477 REV A (ECN080352)
7
2 16"
62.08
1"
25.40
1
1 32"
25.91
1
2"
12.70
3
2 32"
52.84
Installation Instructions
Sheet 4 of 5
Small, INDOOR
CPP/CPS
(Continuous Pendant)
Visor and Non-Visor
Warning: Before starting any work ensure
that all sources of power are turned off. All
work must meet local/national codes and be
performed by a certified electrician. Do not
mount fixtures vertically.
Vault w/ visor
C-Scroll w/ visor
Roundel w/ visor
These installation instructions are valid with the above Ametrix styles.
3
Securing first fixture to first pendant
4
Securing first fixture to wired center yoke
bracket
Power wire
from J-box
Fixture wire
Fixture wire
Canopy
First fixture
head
#10-32 x 5/8
End screw
#6-32 x 3/8"
Pan head screws
#10-32 x5/8
End screw
1. Choose first fixture in run. First fixture depends on length of
run, refer to page four(4) for fixture identification. The final
fixture will have to have the extra wire capped off.
2. Secure fixture head to pendant assembly using
#10-32x 5/8" end screw.
5
Securing additional fixtures in run
1. Remove both #6-32 x3/8" Pan head screws and slide center
cover plate down.
2. Run power wire from fixture through hub and into center
yoke bracket.
3. Secure first fixture to center yoke bracket using #10-32 x5/8"
end screw.
Wiring fixtures to J-box
6
Power wire
from J-box
Fixture wire
#10-32 x 5/8"
End screw
Center cover
plate
Center cover
plate
Fixture wire
Fixture wire
Center cover plate
1. Mount next center or end pendant depending on length of
run.
2. Run new fixture wire into center yoke bracket.
3. Using #10-32 x5/8" end screws, secure new fixture head to
both pendants.
ADY071477 REV A (ECN080352)
1. Attach wires and ensure connections are properly matched.
(wire nuts by others)
2. Replace center cover plate and secure using both #6-32 x
3/8" Pan head screws.
Installation Instructions
Sheet 5 of 5
Small, INDOOR
CPP/CPS
(Continuous Pendant)
Visor and Non-Visor
Warning: Before starting any work ensure
that all sources of power are turned off. All
work must meet local/national codes and be
performed by a certified electrician. Do not
mount fixtures vertically.
C-Scroll w/ visor
Vault w/ visor
Roundel w/ visor
These installation instructions are valid with the above Ametrix styles
Continuous Pendant Row Layouts
Actual
Overall
Nominal Row
Row
Length:
Length
Pendant
(ft)
(ft)
2.6
3
3.6
4
4.6
5
5.1
6
6.1
7
7.1
8
8.1
9
9.1
10
10.7
11
11.7
12
12.7
13
13.7
14
14.2
15
15.2
16
16.2
17
17.2
18
18.2
19
19.8
20
20.8
21
21.8
22
21.8
23
23.4
24
23.4
25
25.4
26
Row Breakdown/
Installation Sequence
2C
3C
4C
2C,2C
2C,3C
3C,3C
3C,4C
4C,4C
3C,3C,3C
4C,2C,4C
4C,3C,4C
4C,4C,4C
3C,3C,3C,3C
3C,3C,3C,4C
3C,4C,4C,3C
4C,4C,4C,3C
4C,4C,4C,4C
4C,3C,3C,3C,4C
3C,4C,4C,4C,3C
4C,4C,3C,4C,4C
4C,4C,3C,4C,4C
2C,4C,4C,4C,4C,2C
2C,4C,4C,4C,4C,2C
3C,4C,4C,4C,4C,3C
Actual
Overall
Nominal Row
Row
Length:
Length
Pendant
(ft)
(ft)
25.4
27
27.4
28
28.9
29
29.9
30
30.9
31
31.9
32
31.9
33
32.5
34
34.5
35
35.5
36
36.5
37
38.0
38
39.0
39
39.0
40
40.0
41
41.0
42
42.6
43
43.6
44
44.6
45
45.6
46
46.1
47
47.1
48
48.1
49
49.1
50
Row Breakdown/ Installation
Sequence
3C,4C,4C,4C,4C,3C
4C,4C,4C,4C,4C,4C
4C,4C,3C,3C,3C,4C,4C
3C,4C,4C,4C,4C,4C,3C
4C,4C,4C,3C,4C,4C,4C
4C,4C,4C,4C,4C,4C,4C
4C,4C,4C,4C,4C,4C,4C
2C,4C,4C,4C,4C,4C,4C,2C
3C,4C,4C,4C,4C,4C,4C,3C
4C,4C,4C,4C,3C,4C,4C,4C
4C,4C,4C,4C,4C,4C,4C,4C
4C,4C,4C,3C,3C,3C,4C,4C,4C
3C,4C,4C,4C,4C,4C,4C,4C,3C
3C,4C,4C,4C,4C,4C,4C,4C,3C
4C,4C,4C,4C,3C,4C,4C,4C,4C
4C,4C,4C,4C,4C,4C,4C,4C,4C
4C,4C,4C,4C,3C,3C,3C,4C,4C,4C
3C,4C,4C,4C,4C,4C,4C,4C,4C,3C
4C,4C,4C,4C,4C,3C,4C,4C,4C
4C,4C,4C,4C,4C,4C,4C,4C,4C,4C
3C,3C,4C,4C,4C,4C,4C,4C,4C,3C,3C
4C,4C,4C,4C,3C,3C,3C,4C,4C,4C,4C
3C,4C,4C,4C,4C,4C,4C,4C,4C,4C,3C
4C,4C,4C,4C,4C,3C,4C,4C,4C,4C,4C
(Custom row configurations are available however pricing may be affected)
ADY071477 REV A (ECN080352)