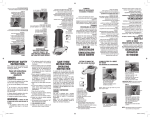
1
14
Cortadora multiuso
¡con botón turbo!
Nuevo
MEDIDAS DE
SEGURIDAD
IMPORTANTES
Just like levers on professional clippers, the Conair taper
control is positioned at the back of the unit, so you can
hold the trimmer in your hand and adjust the lever at
the same time...while you’re clipping/trimming. This
taper control eliminates the need in some situations
for an attachment comb, because it lets you gradually
adjust the closeness of the trim. For the closest cut and
the shortest hair, push taper control up as far as it will
go to level #3. To increase cutting length, slowly push
control down.
4 accesorios, incluso
guías y guías para
la quijada
NO TRATE DE
ALCANZAR LA
UNIDAD EN EL AGUA
ADVERTENCIA–
ADJUSTABLE 3 POSITION TAPER CONTROL
piezas
DETECCIÓN DE PROBLEMAS
GUARDE ESTAS
INSTRUCCIONES
LUBRICAR LAS CUCHILLAS
MANTENIMIENTO DE LAS CUCHILLAS
INSTRUCCIONES DE
MANTENIMIENTO
8. Para usarlo con cable: conecte el cable del adaptador
directamente a la cortadora y conecte el adaptador a una
toma de corriente.
se está administrando oxígeno.
11. ESTE PRODUCTO ES PARA USO DOMÉSTICO
SOLAMENTE.
Now You’re Ready to Trim
Your Beard
Calidad
Growing a Beard and Mustache
1. It is always best to begin with a clean, slightly damp
beard.
2. After you have combed through your beard in the
direction it grows naturally, you will want to outline the
desired shape, beginning under your jawline.
3. Begin defining your beard’s shape
under your chin and work upward on
each side of your face toward your
ears. Then define the upper outline of
your beard across your cheeks, past
your sideburns and toward your hairline.
Profesional
Getting Started:
Outlining Your Beard
There are three key factors that will determine which
beard or mustache style is best for you:
1. The shape and dimensions of your face.
2. The natural growth of your
beard/mustache.
3. The thickness of your beard/mustache. If you are
unsure of the type of beard or mustache that would most
suit your face, speak with a professional hair stylist and
ask for an opinion on what style would be best. Once your
beard or mustache has been styled, it is essential that you
maintain its appearance. To do this, use your trimmer to
trim your beard/mustache weekly.
Cuando se usan aparatos eléctricos,
especialmente en la presencia de niños,
siempre se deben tomar precauciones
básicas de seguridad, entre las cuales las
siguientes:
Si su aparato no se carga, siga los pasos siguientes
antes de llevarlo a un centro de servicio:
1. Averigüe que la toma de corriente está funcionando,
probando otro aparato en la toma.
2. Averigüe que la toma de corriente no está conectada
a un interruptor que controla la luz.
3. Averigüe que el aparato está posicionado en la base
de carga de manera correcta y segura y que el aparato
está apagado (“OFF”).
Because the trimmer blades are precision-made for a
very special use, they should always be handled with
care. Each time you finish using the trimmer, take the
cleaning brush provided and brush away any loose
hair that has collected in the blades. Then store the
trimmer in its recharging storage base to protect the
blades until the next use.
Be especially careful when changing or adjusting
blades. When you have your trimmer serviced, be sure
that both blades are sharpened or replaced at the
same time.
To promote the long life of the appliance, use your
trimmer only for the purpose intended by the manufacturer—to trim your beard and mustache.
3
2
1
Types of Beards/Mustaches
To remove blade set from your trimmer, make sure
the trimmer is in the OFF position. Remove the blade
set by placing thumb against the smaller cutter and
pushing forward, releasing the cutter assembly from
the trimmer housing. Replace with
new cutting system and reverse
the removal procedure, only this
time place your thumb on the
large cutter and snap into place.
Make sure the taper control is set
to the longest #1 position. Note:
the pivoting head may need to be
held in place when removing/replacing the blade.
Cuchilla para
Barba y Bigote
de Acero
INSTRUCCIONES DE OPERACIÓN
Lubrique las cuchillas aproximadamente una vez
al mes, usando el aceite provisto. Para no ensuciar, haga esto encima de un periódico. Encienda el
aparato y manténgalo bocabajo. Coloque unas gotas
de aceite sobre las cuchillas, apague el aparato,
y limpie el exceso de aceite con un paño suave.
No use demasiado aceite y no lubrique el aparato
más de lo necesario, puesto que podría lastimar
el motor. Las piezas del motor son lubricadas permanentemente. No intente lubricarlas. Después de
lubricar las cuchillas, regrese el aparato y el aceite
lubricante en la base de almacenamiento. Mantenga
el aceite fuera del alcance de los niños.
Blade Care
REPLACEMENT (REMOVAL) OF BLADE SET
LEA TODAS LAS
INSTRUCCIONES ANTES DE
USARLO
MANTENGA EL APARATO
ALEJADO DEL AGUA
1. Antes de usar el aparato por primera vez, conecte el
cable al aparato por el orificio en la base y permita que
cargue durante unas 16 horas. Asegúrese que el aparato
esté apagado (“OFF”) antes de colocarlo en la base.
LIMPIAR LAS CUCHILLAS
About once a month you should oil the trimmer
blades with the oil provided in your kit. It is best to
do this over a piece of newspaper. Turn the trimmer
on and hold it so that the blades are pointed downward. Spread one drop of oil across the blades, then
turn the trimmer off and wipe away the excess oil
with a soft cloth.
Be careful not to use too much oil and don’t oil
your trimmer more than necessary, as that could
damage the motor. (Never attempt to oil the motor
bearing, as it is permanently lubricated.) After oiling
the blades, return the trimmer and oil packet to the
trimmer storage base. Keep oil away from children.
PELIGRO–
2. Siempre averigüe que el indicador luminoso de carga
está encendido al colocar el aparato en la base.
BARBAS Y BIGOTES
Para sacar el juego de cuchillas: Asegúrese que el
aparato esté apagado (“OFF”). Con el pulgar debajo
de la cuchilla pequeña, levante el juego de cuchillas hasta desencajarlo. Para reemplazar el juego
de cuchillas: Asegúrese que el botón de ajuste de
lo largo del recorte esté en la
posición más larga (no.1). Coloque
el juego de cuchillas encima del
cabezal y presiónelo hasta que
caiga en posición, con el dedo
pulgar sobre la cuchilla grande.
Para limpiar las cuchillas, siga
estos pasos y enjuague las cuchillas solamente bajo agua corriente.
SACAR (CAMBIAR) EL JUEGO DE
CUCHILLAS
El aparato está dotado de un botón Turbo. La función
Turbo ofrece un 15% más fuerza y facilita el cortado del
cabello espeso. Para activar la función Turbo:
1. Encienda el aparato (“ON”).
2. Oprima el botón Turbo.
3. Siga oprimiendo el botón Turbo mientras necesite
más fuerza.
4. Afloje el botón Turbo para regresar al poder normal.
FUNCIÓN TURBO
BOTON DE AJUSTE DEL RECORTE CON
3 POSICIONES
AHORA, ESTÁ LISTO PARA CORTAR
SU BARBA
1. Se le hará más fácil cortar su barba si está limpia y
ligeramente humedecida.
2. Peine su barba en la dirección del crecimiento natural
del pelo y empiece a darle forma.
3. Déle forma a su barba empezando
debajo de la quijada y subiendo hacia
la oreja, en cada lado de su rostro. Siga dando forma al área de la
mejilla, a las patillas y al nacimiento del pelo.
EL CONTORNEO
CORTAR SU BARBA
Cabezal oscilante
1. Su cortadora incluye dos guías de 5 posiciones las
cuales permiten ajustar lo largo del recorte desde 3
mm (lo más corto) hasta 16 mm (lo más largo).
2. Cuando desea usar la guía,
ensártela sobre las cuchillas (Fig.
A). Use la posición más larga
(16 mm) hasta acostumbrarse
al tamaño del recorte (siempre
podrá volver a acortar la barba).
fig. B
3. Para lograr un recorte más
corto, posicione el pulgar en el centro de la cuchilla
grande y oprima. Esto logrará cortes de 3 mm a 15
mm de largo (Fig.B).
Guías ajustables
BOTÓN DE AJUSTE DE LO LARGO DEL RECORTE
fig. A
TIPOS DE BARBAS Y DE BIGOTES
Para mejores resultados, humedezca ligeramente su
barba o su bigote antes de recortarlos (NO LO MOJE).
Esto logrará un corte más preciso.
INSTALAR
OPRIMA
3
2
1
SACAR
OPRIMA
Largo variable:
1: 1.8mm
2: 1.2mm
3: 0.6mm
Do not reach
into the water
3. Enchufe el cable en un tomacorriente (conforme con
la información incluida sobre la etiqueta del adaptador).
®
Taking Care of Your Trimmer
Oiling the Blades
For the best trimming results, your beard should be
slightly damp (NOT WET) when using your trimmer.
This will prevent the trimmer from removing more hair
than desired.
Model GMT235CSV
Manual de Instrucciones
Conair wants to thank you for choosing our
beard/mustache trimmer. We know
it will provide you with years of
reliable service.
For your safety and continued enjoyment
of this product, always read the instruction
booklet carefully before using.
1. Before using your trimmer for the first time, insert
the cord into the trimmer through the hole in base, then
place trimmer in base and charge it for 16 hours. Always
place the trimmer in the stand with the ON/OFF switch
in the OFF position.
2. Always check to see if the charging light is on when
the cord is connected to the trimmer and the unit is not
in use.
3. Plug unit into any wall outlet (at the voltage listed on
the label affixed to the adapter).
4. The trimmer can remain plugged into the power
source at all times without damage to the battery.
5. If, while using the trimmer without the cord, the
charge seems to be running down, simply put ON/OFF
switch in OFF position. Then, insert cord into the trimmer
and plug into wall outlet. Switch to ON position and use
as a corded trimmer.
6. The battery life can be improved by periodically allowing the trimmer to run until the motor stops. Immediately
shut the switch OFF and fully recharge.
7. The adapter may become warm while charging
— this is normal.
4. El aparto puede permanecer conectado al tomacorriente. Esto no lastima la batería.
Model GMT235CSV
Instruction Booklet
To reduce the risk of death or injury by
electric shock:
1. Always unplug appliance from electrical outlet
immediately after using (except when charging
unit).
2. Do not place or store appliance where it could fall
or be pulled into a tub or sink.
3. Do not use appliance while bathing or in the
shower.
4. Do not place appliance in, or drop into, water or
other liquid.
5. If appliance has fallen into water, do not reach for
it. Unplug immediately.
6. Unplug this appliance before cleaning.
Operating Instructions:
Las cuchillas fueron diseñadas con precisión para un
uso específico, y deberían recibir un cuidado muy especial. Limpie las cuchillas después de cada uso con el
cepillo de limpieza provisto, luego regrese el aparato en
la base de carga. Tenga cuidado cuando sea necesario
cambiar o ajustar las cuchillas. Asegúrese que las dos
cuchillas siempre están cambiadas o afiladas al mismo
tiempo. Para seguir disfrutando de su aparato durante
años, utilícelo únicamente con el propósito para el cual
fue diseñado: cortar la barba y el bigote.
Keep away
from water
DANGER–
Any appliance is electrically
live, even when the switch is off.
5. Si le parece que el aparato pierde poder mientras
lo está usando, apáguelo y déjelo cargar en la base de
recarga durante unas horas.
Solid Steel
Facial Blade
UseR maintenance
instructions
This product is equipped with a turbo boost button.
When activated, this feature will provide 15% more cutting power. This is especially useful for cutting through
thicker hair.
To activate the turbo feature:
1. Turn the Power switch to the “on” position
2. Press the Turbo button
3. Continue to press the Turbo button for as long as you
need the extra power
4. Release the Turbo button to return to normal power
Gracias por escoger la cortadora para la barba
y el bigote de Conair. Le garantizamos que
este aparato le dará años de servicio seguro.
Para su seguridad y para seguir disfrutando de
este producto durante años, siempre lea las
instrucciones cuidadosamente antes de usarlo.
Quality
Troubleshooting
If your cord/cordless, rechargeable trimmer does
not seem to be taking a charge, take the following
troubleshooting steps before returning it for repair:
1. Be sure the electrical outlet is working by plugging in
another appliance to test it.
2. Make sure the electrical plug is not connected to a
switch which turns power off when lights are turned
off.
3. Be sure you have inserted the trimmer properly into
the charging stand, that all connections are secure, and
that the trimmer switch is in the “OFF” position.
6. Usar el aparato hasta que se descargue completamente puede ayudar a prolongar la vida útil de la batería.
Por lo tanto, deje el aparato descargarse periódicamente,
luego cárguelo de nuevo.
Su cortadora está dotada de un cabezal oscilante
con 5 posiciones, lo cual facilita el cortado en áreas
difíciles de alcanzar y logra un cortado mucho más
cómodo. Para mover el cabezal:
1. Coja la cortadora con la parte delantera frente a
usted. Gire el cabezal con la otra mano, oprimiendo
la parte inferior del mismo hasta que llegue a la
posición deseada. Le aconsejamos que pruebe cada
posición hasta que encuentre la posición que mejor
le conviene.
2. Si usted no desea mover el
cabezal, simplemente déjelo en la
posición original.
3. Corte su barba con movimientos
suaves y parejos. Empiece por las
patillas, luego baje hacia la quijada. Nunca corte la
barba en la dirección opuesta a la del crecimiento de
ba hasta conseguir el tamaño deseado.
Read all instructions
before using
Professional
unattended.
2. This appliance should not be used by, on or
near children or individuals with certain disabilities.
3. Use appliance only for its intended use as
described in this manual. Only use attachments recommended by the manufacturer.
Do not use an extension cord to operate the
appliance.
4. Never operate the appliance if it has a damaged
cord or plug, is not working properly, has been
dropped or damaged, or dropped into water.
Return the appliance to a Conair service center
for examination and repair.
5. Keep the appliance cord away from heated
surfaces.
6. Do not pull, twist or wrap the cord around the
appliance.
7. Never drop or insert any object into any opening of the appliance.
8. Do not place the appliance on any surface while
it is operating.
9. Do not use the appliance with a damaged or
broken comb or with teeth missing from the
blades, as injury may result. Before each use,
make certain the blades are aligned properly
and oiled.
10. Do not use the appliance outdoors or where
aerosol (spray) products are being used or
oxygen is being administered.
11. This product is for household use
only.
Turbo Feature
Cualquier electrodoméstico
permanece eléctricamente activo, incluso cuando el
interruptor está apagado. Para reducir el riesgo de
muerte o herida por descarga:
1. Desconecte el aparato inmediatamente después
de usarlo (excepto cuando lo está cargando).
2. No coloque ni guarde el aparato donde pueda caer
o ser empujado a una bañera o un lavabo.
3. No lo use mientras se está bañando o tomando
una ducha.
4. No coloque el aparato ni lo deje caer al agua u
otro líquido.
5. Si el aparato cae al agua, desconéctelo inmediatamente. No toque el agua.
6. Desconecte el aparato antes de limpiarlo.
cuchillas, puesto que nunca usan el mismo ángulo para
cortar.
Su cortadora puede perder velocidad si recortes de
cabello están trabados en las cuchillas. Para limpiar
las cuchillas sin tener que removerlas, use el cepillo
de limpieza provisto. Limpie las cuchillas después de
cada uso, luego ponga unas cuantas gotas de aceite
lubricante en las cuchillas. Hacer esto después de cada
uso, especialmente cuando se corta mucho cabello,
mantendrá las cuchillas en condición óptima. Si la
cortadora deja de funcionar y que esto no soluciona el
problema, afloje las cuchillas para limpiarlas.
Para cualquier otro servicio, lleve su aparato a un centro
de servicio autorizado. El aparato no tiene piezas que
puedan ser ajustadas o reparadas por el usuario.
Si su cortadora deja de cortar, cerciórese que no hay
pelos trabados en las cuchillas. Si esto es el problema,
desenchufe el aparato y remueva las cuchillas para
limpiarlas.
Si su cortadora deja de cortar, pero sigue funcionando,
inspeccione las cuchillas. Si estén embotadas, cámbielas.
Para comprar nuevas cuchillas, mande un cheque o un
giro postal de $6,50US a la dirección más abajo, junto
con el formulario de pedido para partes de repuesto.
Conair Corporation
150 Milford Rd.
East Windsor, NJ 08520
NOTA: Nunca jale, tuerce o enrolle el cable alrededor del
aparato. Cuando no use el aparato, deje el cable libre al
lado del aparato y guarde el aparato sobre una superficie
plana o adentro del cilindro de almacenamiento
previsto.
when children are present, basic safety precautions should always be taken, including the
following:
8. Using on the mains (wall outlet) — plug the clipper
into the mains (wall outlet), then turn on the clipper. (If
the battery is very weak, wait about 2 minutes).
®
Al igual que las cortadoras profesionales, su cortadora
tiene un botón de ajuste del recorte que permite ajustar
lo largo del corte a medida que corta el cabello. El botón
está ubicado en la parte trasera del aparato.
El botón de ajuste permite cortar el cabello más corto o
más largo, sin tener que usar un peine accesorio. Para
un corte más corto, deslice el botón hacia arriba, hasta
la posición 1. Para un corte más largo, deslice el botón
hacia abajo, hasta la posición 3.
Usar el botón de ajuste del recorte prolonga la vida útil de las
4 Separate Attachments:
Including Jawline &
Trimming Combs
El tipo de barba o de bigote que más conviene a su
rostro depende de:
1. La forma y el tamaño de su rostro.
2. La forma del crecimiento natural de su barba o de
su bigote.
3. El espesor de su barba o de su bigote.
Si no está seguro del tipo de barba o bigote que le
conviene, busque el consejo de un estilista profesional.
Después de darle forma a su barba o a su bigote, tendrá
que mantener su aspecto, usando la cortadora una vez
por semana.
with Turbo Power!
Save These
instructions
7. El adaptador puede volverse caliente. Esto es normal.
warning–
Important Safety burns,
To reduce the risk of
electric shock, fire, or injury to persons:
Instructions
1. Never leave a plugged-in appliance
When using electrical appliances, especially
Para reducir
el riesgo de quemaduras, electrocución, incendio o
lesiones personales:
1. Nunca deje el aparato desatendido mientras
está conectado.
2. Este aparato no debería ser usado por, sobre
o cerca de niños o personas con alguna
discapacidad.
3. Use este aparato únicamente con el propósito
para el cual fue diseñado y tal como se
describe en este manual. Sólo use accesorios
recomendados por el fabricante. No utilice una
extensión eléctrica.
4. Nunca utilice el aparato si el cable o la clavija
están dañados, si no funciona correctamente, si
ha caído, si está dañado o si ha caído al agua.
Llévelo a un centro de servicio autorizado para
que lo examinen y lo reparen.
5. Mantenga el cable alejado de superficies
calientes.
6. No jale, retuerza ni enrolle el cable alrededor
del aparato.
7. Nunca deje caer ni inserte un objeto en ninguna
de las aberturas.
8. No coloque el aparato en ninguna superficie
mientras esté funcionando.
9. No use este aparato con un peine accesorio roto
o lastimado o si le faltan dientes a la cuchilla.
Esto podría provocar una herida. Asegúrese que
las cuchillas estén correctamente alineadas y
lubricadas antes de usar el aparato.
10. No lo utilice en exteriores, ni donde se están
usando productos en aerosol (spray) o donde
All In One Trimmer
OPRIMA
14
piece
NEW
fig. A
Because a different cutting edge is used in each setting,
the taper lever lengthens the life of your blades. Packedin hair can slow down any trimmer. To remove it without
removing the blades, take your cleaning brush and
brush the hair from the blades. If you do this after every
trimming, especially with heavy hair cutting, the blades
should remain free of cut hair. If trimmer stops cutting
and this action doesn’t help, try loosening the blades to
remove the hair.
Any other servicing should be performed by an authorized service representative. The appliance has no user
serviceable parts. The product is for household use.
(see note).
If trimmer stops cutting, check to see if there is a clump
of hair lodged between the blades. If that is the problem,
unplug the clipper and then loosen the blades to remove
the hair.
If the trimmer stops cutting but does not stop running,
you will need to check the blades. For new blades, send
check or money order for $6.50 which includes postage
and handling to:
Conair Corporation
150 Milford Rd.
East Windsor, NJ 08520
NOTE: Never pull on the trimmer cord. Never twist or
wrap the cord around the trimmer. To store your trimmer,
lay it flat with the cord coiled up, then place in cylinder.
Adjusting the Cutting Guide
1. Your trimmer includes two 5-position combs so you
can have a beard length from 1/8" (shortest) to 5/8"
(longest).
2. To use the 5-position comb, slide it over the trimmer
blades and snap it down into position (fig.A). At first,
until you become familiar with the adjustments, use the
longest trim setting (5/8"). (You can always go back and
make your beard a little shorter.)
3. This will give you the longest
“cut”, for shorter “cuts”, place
thumb on the center of the top of
the cutting guide, pushing forward
to obtain 1/8"-5/8" (see fig. B).
fig. B
Your GMT235CSV comes with an
optional 5-position pivoting head. This feature allows
you to trim those hard to reach facial contours. To use
this feature:
1.) Pick up your GMT235CSV with the front of the trimmer
facing you. Using your other hand simply push in at the
bottom of the upper head. Push in and set the head to
one of the settings (the unit comes prepackaged at the
first setting, you then have four other settings you can
adjust your trimmer to). It will take some time to get used
to your own personal setting so try each one until you
find what works for you. As you try these settings you will
feel how comfortable this makes trimming your beard or
mustache.
2.) If you do not wish to use this
feature just leave the trimmer as
it was when it came out of the
package.
3.) Begin trimming your beard
using smooth, even strokes. Start
with your sideburns and work downward toward your
chin. (Never attempt to trim against the natural growth
of your beard because the hair will be cut too short.)
Blending the Jawline
4.) If you decide you want a closer trim, you can now
adjust the 5-position comb attachment to a shorter setting and go over your beard again until you achieve the
desired length.
4
Other great features include a small shaver head for
precise facial detailing on sideburns and goatees. A
wide facial hair blade with two 5-position adjustable
combs makes beard and mustache trimming quicker
and easier. The small detailing blade works for creating
“soul patches” as well as a nose and ear hair trimmer.
Congratulations on owning a great, new professional
grade trimmer.
7
11
12
all-in-one multi-use
trimmer with turbo power
Model GMt235csv
Limited Two Year Warranty
Adjustable comb 3 jawline combs
Standard Trimmer Blade
Fine Detailing and Nose/Ear Blade
Wide Facial Blade
Shaver Head
$2.00
HC-OIL
$2.00
GMT235-A128
$2.00
GMT235-A127
$2.00
GMT235-3JL
$5.00
GMT235-BLD
$5.00
GMT235-SBLD
$5.00
GMT235-WBLD
$5.00
GMT235-SH
ITEM
EXCITING NEW ITEMS
FROM CONAIR
PART #
CUT HERE
III
GMT235-3JL
GMT235-SBLD
II
GMT235-BLD
GMT235-WBLD
I
8
Wide Adjustable comb IB-7487A
5
GMT235-SBLD
GMT235-WBLD
GMT235-SH
07NG9018
9
PRICE
QUANTITY
AMOUNT
Pricing in effect through June 1, 2008. Orders postmarked after this date
will be accepted, and the customer will be notified if pricing has changed.
TRIMMER REPLACEMENT PARTS & ACCESSORIES ORDER FORM
12 Adaptador
2
Lubricating Oil
11 Base de carga y almacenamiento
CONTAINS NICKEL CADMIUM
BATTERY. MUST BE
COLLECTED, RECYCLED OR
DISPOSED OF PROPERLY. DO
NOT DISPOSE OF IN
THE MUNICIPAL WASTE.
HGL1
New hot lather/gel unit
provides a close,
smooth shave
with less irritation. Heats up in
about a minute,
fits all size cans and
works with most brands
of lather and gels.
10 Aceite lubricante
10
9 Cepillo de limpieza
©2007 Conair Corporation
Centro de Servicio
Conair Corporation
Service Department
7475 North Glen Harbor Blvd.
Glendale, AZ 85307
6
8 Cepillo para el bigote
3
y el bigote
1
7 Cuchilla ancha para la barba
battery removal
6 2 guías ajustables
Precios válidos hasta el 1ero de junio del 2008. Aceptaremos los pedidos después de esa
fecha y notificaremos los clientes si los precios han cambiado.
Rasuradora
GMT235-SH
1. The Jawline
Attachments will
help you to achieve
a neat, finished trim
under your chin. To
use the attachment,
press it down over the trimmer blades, one side at a
time, until it clicks into position.
2. Hold the trimmer in an upright position and
begin trim
Subtotal
5 3 guías para la quijada
FORMULARIO DE PEDIDO PARA PARTES DE REPUESTO Y ACCESORIOS
DESCRIPCIÓN
HGL1
Nueva máquina de
enjabonado en
caliente para
cremas y geles.
Proporciona
afeitadas suaves
con mayor confort.
Calienta en un minuto.
Funciona con la mayoría
de las marcas de crema
o gel de afeitar,
de todo tamaño.
To Trim Your Mustache
*Sales Tax
4 Rasuradora
1 Multi-Use Handle with Turbo
for 15% More Power
TOTAL
GMT235-A127
GMT235-3JL
GMT235-BLD
de la nariz y de los oídos
2 Solid Steel Hair Trimming Blade
3 Cuchilla minuciosa para el pelo
1. Using a small Phillips head screwdriver, remove
the screws at the bottom of the trimmer.
2. Remove the battery cap and push the battery out.
Bring the battery to the nearest collection center for
proper disposal. DO NOT throw the battery into the
normal municipal waste system.
2 Cuchilla de acero para el pelo
Hair Blade
turbo para 15% más potencia
3 Fine Detailing and Nose/Ear
Enclose check or money order made payable to Conair. (We cannot accept cash, stamps or C.O.D. orders.) CT, IL, AZ, and PA residents
should add applicable state sales tax. Minimum order of $10.00 or a $2.00 handling charge will be added to order.
Al l pr ices inclu de ha ndlin g an d re turn pos tage. Prices are subject to change without notice.
Prices are valid only for shipments within the Continental United States. Please allow 4-6 weeks for delivery.
1 Cortadora multiuso con botón
4 Shaver Head
GMT235-A128
6
5 3 Jawline Combs
To avoid delays, please print clearly. We must have a street address, as UPS cannot deliver to a P.O. box.
Model HC-OIL
3
10
6 2 Adjustable Combs
Mail to:
NAME____________________________________________________________________________
1
9
7 Wide Facial Hair Blade
AdDress_ __________________________________________________ Apt._____________ ___
1. Remueva los tornillos ubicados en la parte trasera
del aparato, usando un destornillador cruciforme
pequeño.
2. Abra el aparato y saque la batería. Lleve la batería
al centro de reciclaje o de recogida de baterías más
cercano. NO tire la batería a la basura.
2
NOVEDADES FASCINANTES
DE CONAIR
Always trim your mustache
from the top down
CITY ________________________________________________ STATE________ ZIP_____________
INSTRUCCIONES DE REMOCIÓN
DE LA BATERÍA
8 Mustache Comb
HCT495R
25 Piece Deluxe Haircut Kit with a powerful
DC motor and turbo charge also includes
a clipper and
trimmer blade
set, 10 attachment combs,
55 taper control settings
and a deluxe
storage case
8
5
9 Cleaning Brush
Conair Corporation
Service Department
150 Milford Road
East Windsor, NJ 08520-9730
4. Cuando haya terminado, saque el peine accesorio y
déle forma a la parte inferior de su bigote, usando las
cuchillas únicamente.
5. Utilice la cuchilla minuciosa para los cortes de detalle
y de arte.
Su cortadora es una herramienta versátil que incluye 4
cabezales para que usted pueda cambiar su estilo cuando
lo desea. Usando, el botón de ajuste de lo largo del recorte,
usted puede lograr la apariencia de una barba de 2 días,
365 días al año. Simplemente corte su barba usando el
ajuste más corto. También incluye una rasuradora para
dar toques de acabado precisos en las patillas y la perilla.
Una cuchilla ancha con 2 guías de 5 posiciones logra un
4
10 Lubricating Oil
For information on other Conair® haircut kit parts call: 1-800-3-CONAIR.
TELEPHONE ( ) _ _ _ _ _ _ _ _ _ _ _ _ _ _ _ _ _ _ _ _ _ _ _ _ _ _ _ _ (We call only if we have a question about your order.)
SIEMPRE CORTE SU BIGOTE DESDE
ARRIBA HASTA ABAJO
7
11 Charging/Storage Stand
1. Se le hará más fácil cortar su bigote si está limpio y
ligeramente humedecido.
2. Peine su bigote en la dirección del crecimiento natural
del pelo.
3. Ensarte el peine
accesorio de 5 posiciones
ancho sobre las cuchillas.
Empiece con la posición
más larga (siempre podrá
volver a acortar el bigote).
12
Conair will repair or replace (at our option) your unit
free of charge for 24 months from the date of purchase if the appliance is defective in workmanship
or materials.
To obtain service under this warranty, return the defective product to the service center listed below that is
nearest you, together with your purchase receipt and
$3.00 for postage and handling. California residents
need only provide proof of purchase and should call
1-800-366-0937 for shipping instructions. In the
absence of a purchase receipt, the warranty period
shall be 24 months from the date of manufacture.
ANY IMPLIED WARRANTIES, OBLIGATIONS, OR
LIABILITIES, INCLUDING BUT NOT LIMITED TO
THE IMPLIED WARRANTY OF MERCHANTABILITY
AND FITNESS FOR A PARTICULAR PURPOSE,
SHALL BE LIMITED IN DURATION TO THE 24
MONTH DURATION OF THIS WRITTEN, LIMITED
WARRANTY. Some states do not allow limitations
on how long an implied warranty lasts, so the above
limitations may not apply to you.
IN NO EVENT SHALL CONAIR BE LIABLE FOR
ANY SPECIAL, INCIDENTAL, OR CONSEQUENTIAL
DAMAGES FOR BREACH OF THIS OR ANY OTHER
WARRANTY, EXPRESS OR IMPLIED, WHATSOEVER.
Some states do not allow the exclusion or limitation
of special, incidental, or consequential damages, so
the above limitation may not apply to you.
This warranty gives you specific legal rights, and
you may also have other rights, which vary from
state to state.
© 2007 Conair Corporation
Service Center
Conair Corporation
Service Department
7475 North Glen Harbor Blvd.
Glendale, AZ 85307
CORTAR SU BIGOTE
11
12 Adapter
III
GARANTÍA LIMITADA POR DOS AÑOS
Conair reparará o remplazará (a su opción) su aparato sin
cargo por un período de 24 meses a partir de la fecha de
compra si presenta defectos de mano de obra o en los
materiales.
Para obtener servicio técnico bajo esta garantía, lleve o mande
su aparato al Centro de Servicio indicado a continuación, junto
con su recibo de compra y un cheque de $3,00US por gastos
de envío y manejo. Los residentes de California sólo necesitan
dar una prueba de compra y deben llamar al 1-800-366-0937
para recibir instrucciones de envío. En ausencia del recibo de
compra, el período de garantía será de 24 meses a partir de
la fecha de fabricación.
CUALQUIERA
GARANTÍA,
OBLIGACIÓN
O
RESPONSABILIDAD
IMPLÍCITAS,
INCLUYENDO
PERO NO LIMITADAS A LA GARANTÍA IMPLÍCITA DE
COMERCIABILIDAD Y APTITUD PARA UN PROPÓSITO
ESPECÍFICO, ESTARÁN LIMITADAS POR LOS 24 MESES
DE LA PRESENTE GARANTÍA ESCRITA. Algunos Estados
no permiten limitaciones sobre la duración de una garantía
implícita, de modo que las limitaciones mencionadas
pueden no regir para usted.
CONAIR NO SERÁ RESPONSABLE EN NINGÚN CASO POR
ALGUN DAÑO ESPECIAL, INCIDENTAL O CONSECUENTE
DEBIDO AL INCUMPLIMIENTO DE ESTA O DE CUALQUIER
OTRA GARANTÍA, EXPRESA O IMPLÍCITA. Algunos Estados
no permiten la exclusión o limitación de daños especiales,
incidentales o consecuentes, de modo que las limitaciones
mencionadas pueden no regir para usted.
Esta garantía le otorga derechos legales específicos y
usted puede tener otros derechos que varían de un Estado
a otro.
1. For best results, start with a clean, slightly
damp mustache.
2. Comb through your mustache in the direction
it grows.
3. Place the 5-position comb over the trimmer blades
and snap it into position. It is a good idea to start with the
longest trim setting adjustment. (You can always go
back and cut your mustache more closely with a
shorter setting.)
IB-7487A
II
ESTE APARATO CONTIENE UNA
BATERÍA DE CADMIO DE NÍQUEL,
LA CUAL DEBE SER RECICLADA,
RECOGIDA O DESECHADA DE
MANERA ADECUADA. NO TIRE LA
BATERÍA CON EL RESTO DE BASURA.
CORTADORA MULTIUSO CON
BOTÓN TURBO
MODELO GMT235CSV
07NG9018
I
cortado de la barba y del bigote más fácil y rápido. La
cuchilla minuciosa permite crear mosca o cortar el pelo
de la nariz y de los oídos. Usted es ahora el dueño de una
estupenda cortadora multiuso de calidad profesional.
4. After your mustache has been trimmed to the desired
length, remove the 5-position comb and, using the
blades only, define the outline of the bottom of your
mustache.
This versatile trimmer comes with 4 heads so facial
hair styles can be changed as often as you like. It
also has a special taper control feature, which allows
you to have the 2 day shave look 365 days a year. To
achieve this look, simply put your trimmer blade to the
lowest setting.
1. Las tres guías para la quijada le permitirán lograr un
recorte neto y preciso. Ensarte la guía
deseada sobre las
cuchillas, un lado tras
otro, hasta que caiga
en posición.
2. Mantenga la cortadora recta y corte el pelo con
pequeños movimientos parejos.
3. Después de terminar, apague la cortadora y saque la
guía, jalando la lengüeta.
CORTE AQUÍ
IGUALAR LA QUIJADA
NÚMERO
PRECIO
GMT235-SH
$5.00
Cuchilla ancha para la barba y el bigote
GMT235-WBLD
$5.00
Cuchilla minuciosa para el pelo de la nariz y de las aídos
GMT235-SBLD
$5.00
Cuchilla para el pelo
GMT235-BLD
$5.00
3 guías para la quijada
GMT235-3JL
$2.00
Guía ajustable
GMT235-A127
$2.00
Guía ajustable ancha
GMT235-A128
$2.00
Aceite lubricante
HC OIL
$2.00
CANTIDAD
TOTAL
Subtotal
GMT235-A127
Impuestos a la venta*
TOTAL
HCT495R
Conjunto de peluquero de 25 piezas con
potente motor de corriente directa, botón
turbo, cuchilla para el cabello, cuchilla
para la barba
y el bigote,
10 peines
accesorios,
palanca
reguladora
para lograr
55 largos de
recorte y caja
de almacenamiento de
lujo.
GMT235-A128
Model HC-OIL
Incluya un cheque o giro postal a la orden de Conair (no podemos aceptar dinero en efectivo, estampillas, ni pedidos con pago con
entrega). Los residentes de CT, IL, AZ y PA deben sumar al subtotal el impuesto estatal a las ventas que corresponda. Pedido mínimo de
$10,00US o de lo contrario se sumará al pedido $2,00US por gastos administrativos. Todos los precios incluyen gastos administrativos y franqueo de envío. Los precios están sujetos a cambio sin previo aviso. Estos precios son válidos únicamente para los envíos en la
parte continental de los Estados Unidos. La entrega demora entre 4 y 6 semanas.
Para evitar demoras, por favor escriba claramente. Necesitamos una dirección completa ya que US no puede hacer entregas en casillas postales.
NOMBRE_______________________________________________________________________________________________
DIRECCIÓN__________________________________________________ APTO._____________________________________
CIUDAD _____________________________________________ ESTADO______ CÓDIGO POSTAL______________________
TELÉFONO ( )________________________________________________________________ (sólo le llamaremos si tengamos alguna pregunta sobre su pedido)
Para información sobre otras partes de los conjuntos de Conair®, llame 1-800-3-CONAIR
Enviar a:
Conair Corporation
Service Department
150 Milford Road
East Windsor, NJ 08520-9730