1
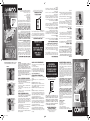
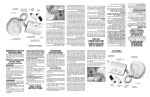
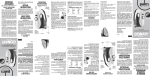
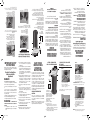
1) Gel nozzle
2) Gel release button
3) Adjustment switch
4) Power “OFF” button
5) Ready indicator light
6) Power “ON” button
7) Variable temperature control
8) Locking tab
9) Lather nozzle
10) Protective cylinder
11) 120v power cord
12) Top of machine: press down here to
dispense lather or press down here
and slide (3) adjustment switch to press
down and lock for gel use.
13) Cap removal key (stored at the bottom
of the protective cylinder)
9
4 56 7
- Use “ cap removal tool” found
in the bottom of base to remove
plastic cap on can
9/29/06 5:12:32 PM
may not all the way to the gel position
NOTE: Slide adjustment switch as far as possible, it
STEP 4
inserted into center seal, gel will leak out of unit.
*IMPORTANT NOTE: If can valve is not properly
- Turn unit upside down, as shown
- Depress “locking tab”
- Carefully line up lather or gel
valve with center seal
- Gently insert can valve into seal
and release “locking tab”
- Press can until it locks in place
STEP 1
VERY IMPORTANT SET-UP INSTRUCTIONS
STEP 3
MEDIDAS DE
SEGURIDAD
IMPORTANTES
Cuando se usan aparatos eléctricos, siempre se deben tomar precauciones básicas de
seguridad, entre las cuales las siguientes:
Lea todas las instrucciones
antes de usarlo
PELIGRO
Para reducir el riesgo de muerte o herida por
descarga:
1. Si el aparato cae al agua, desconéctelo
inmediatamente. No toque el agua.
2. No lo use mientras se está bañando.
3. No coloque ni guarde el aparato donde
puede caer o ser empujado a una bañera o
un lavabo. No coloque el aparato ni lo deje
caer al agua u otro líquido.
4. Siempre desconecte el aparato inmediatamente después de usarlo.
5. Desconecte el aparato antes de limpiarlo.
GUARDE ESTAS
INSTRUCCIONES
INSTRUCCIONES
DE USO
5 SIMPLE STEPS TO A GREAT
HOT SHAVE
ADVERTENCIA:
12
To use with gel:
- Depress black “control cap” firmly
and slide the “adjustment switch “
as far as possible towards the gel
side. This step holds the “control
cap” down in the gel position
To use with lather:
- Move adjustment switch into lather
position
STEP 2
Caution: always use the gel nozzle for gel and
lather nozzle for lather
- Attach proper nozzle, lather or
gel, by twisting into place
- Be sure the “adjustment
switch”is in the “lather” postion
for lather or gel set-up
10
13
1
8
11
2
3
GETTING TO KNOW THE
HOT GEL/LATHER MACHINE
Para reducir el riesgo de choque eléctrico,
este aparato tiene un enchufe polarizado (un
polo es más ancho que otro). Como medida
de seguridad, se podrá enchufar de una sola
manera en la toma de corriente polarizada. Si
no entra por completo, inviértelo. Si aún no
entra completamente, llame a un electricista
calificado. No intente vencer esta función de
seguridad.
Este aparato no tiene piezas que puedan ser
reparadas por el usuario. En caso de problema,
lleve el aparato a un centro de servicio autorizado para que lo revisen y lo reparen.
AJUSTE DE TEMPERATURA
VARIABLE
El aparato está dotado de un ajuste de temperatura variable, el cual le permitirá ajustar
la temperatura del gel o de la crema de afeitar
a su gusto.
NOTA: Al mismo ajuste de temperatura, el gel
estará más caliente que la crema.
APRENDA A CONOCER SU
DISPENSADOR DE ESPUMA
CALIENTE
This unit is equipped with a variable
temperature control dial. Adjust it until the
gel or lather is heated to a comfortable
temperature.
NOTE: At the same temperature control
position, the gel temperature would be
higher than the lather temperature.
VARIABLE TEMPERATURE
CONTROL
To reduce the risk of electric shock, this
appliance has a polarized plug (one blade
is wider than the other). This plug will fit in
a polarized outlet only one way.
If the plug does not fit fully in the outlet,
reverse the plug. If it still does not fit,
contact a qualified electrician to install
the proper outlet. Do not change the plug
in any way. Do not attempt to defeat this
safety feature. Any other servicing should
be performed by an authorized service representative or that the appliance has no user
serviceable parts.
SAVE THESE
INSTRUCTIONS
OPERATING
INSTRUCTION
con alguna discapacidad.
3. Use este aparato únicamente con el
propósito para el cual fue diseñado y
tal como se describe en este manual.
Sólo use accesorios recomendados
por el fabricante. No jale, retuerza ni
enrolle el cable alrededor del aparato.
4. Nunca utilice el aparato si el cable o el
enchufe están dañados, si no funciona
correctamente, si ha caído, si está
dañado o si ha caído al agua. Llévelo
donde lo ha comprado o a un centro de
servicio autorizado para que lo examinen y lo reparen.
5. Nunca deje caer ni inserte un objeto en
ninguna de las aberturas.
6. No lo utilice al aire libre, ni donde se
están usando productos en aerosol
(spray) o donde se está administrando
oxígeno.
7. Úselo únicamente sobre una superficie
plana.
8. Desconecte el aparato antes de ponerlo
sobre la lata de gel o de crema.
9. Mantenga el cable alejado de superficies calientes.
10. Nunca use una herramienta para
remover algo de la boquilla.
11. Para desconectar el aparato, oprima el
botón de apagado y saque el cable de la
toma de corriente.
12. PARA USO DOMÉSTICO SOLAMENTE.
13. Asegúrese que está usando la boquilla
para gel con gel y la boquilla para
crema con crema.
3
12
4 56 7
2
11
2. This appliance should not be used by,
on or near children or the physically
challenged.
3. Use the appliance only for its intended
purpose as described in the Instruction
Booklet. Do not use attachments not
recommended by the manufacturer.
Do not pull or twist cord, or wrap cord
around appliance.
4. Never operate the appliance if it has a
damaged plug or cord, if it is not working properly, or if it has been dropped
or damaged, or dropped into water.
Return appliance to a service center
for examination and repair.
5. Never drop or insert objects into openings.
6. Do not use outdoors. Do not operate
where aerosol (spray) products are
being used or where oxygen is being
administered.
7. Use only on level surface.
8. Unplug the appliance before attaching
to shaving cream/gel cans.
9. Keep cord away from heated surfaces.
10. Never use a tool to remove anything
from the dispenser.
11. To disconnect, turn all controls to “off,”
then remove plug from outlet.
12. FOR HOUSEHOLD USE ONLY
13. Make sure gel nozzle is used for gel
and lather nozzle is used for lather.
PARA REDUCIR EL RIESGO DE
QUEMADURAS, ELECTROCUCIÓN, INCENDIO
O LESIONES PERSONALES:
1. Nunca deje el aparato desatendido
mientras está conectado.
2. Este aparato no debería ser utilizado
por, sobre o cerca de niños o personas
5 PASOS SENSILLOS PARA UNA
EXCEPCIONAL AFEITADA CON
GEL O CREMA CALIENTE
PASO 3
obturador de
la lata
INSTRUCCIONES DE INSTALACIÓN
MUY IMPORTANTES
PASO 1
8
HGL5 - 11 IB.indd 1
OF BURNS, FIRE, ELECTRIC SHOCK OR INJURY TO
PERSONS:
1. The appliance should never be left
unattended when plug is in and power
is on.
WARNING: TO REDUCE THE RISK
To reduce the risk of electric shock:
1. Do not reach for appliance if it has fallen
into the water. Unplug immediately.
2. Do not use while bathing or in the shower.
3. Do not place or store the appliance
where it can fall or be pulled into a tub or
sink. Do not place in or drop into water or
any other liquid.
4. Always unplug the appliance from electrical outlet immediately after using.
5. Unplug the appliance before cleaning.
DANGER
Read all instructions
before using this
Appliance
When using an electrical appliance, basic
precautions should always be followed,
including the following:
IMPORTANT SAFETY
INSTRUCTIONS
lengüeta de bloqueo
sello central
1
13
10
selector
de afeitada
gel/crema
9
- Instale la boquilla deseada (gel
o crema).
- Asegúrese que el selector de
afeitada gel/crema esté en la
posición “Crema” durante la
instalación.
1) Boquilla para
dispensar gel
caliente
2) Botón para
producir gel caliente
3) Selector de afeitada Gel/Crema
4) Botón de APAGADO
5) Indicador luminoso de listo
6) Botón de ENCENDIDO
7) Ajuste de temperatura
8) Lengüeta de bloqueo
9) Boquilla para dispensar crema caliente
10) Cilindro protector
11) Cable eléctrico de 120V
12) Parte superior: Oprima aquí para producir
crema o oprima mientras cambie la posición
del selector de afeitada Gel/Crema para
bloquear la cabeza y usar con gel.
13) Llave para abrir la tapa de la lata de gel
o de crema (escondida en la base del
cilindro).
Precaución: Siempre use la boquilla para gel
cuando esté usando gel, y la boquilla para crema
cuando esté usando crema
- Abra la máquina y ponga la cabeza
al revés, tal como enseñado
- Oprima y mantenga oprimida la
lengüeta de bloqueo
- Alinee el obturador de la lata de
gel o de crema con el sello central
- Inserte cuidadosamente el obturador en el sello central y afloje la
lengüeta de bloqueo
- Presione la lata hasta que quede
asegurada
NOTA IMPORTANTE: El gel saldrá de la máquina si no se
inserta el obturador correctamente en el sello central.
PASO 4
cabeza
selector
de afeitada
gel/crema
PASO 2
- Remuera la parte superior de la
lata de gel o de crema con la
llave provista
Para usar la máquina con gel:
Oprima la cabeza de la máquina
firmemente, luego cambie la
posición del selector de afeitada
a la posición Gel. Esto bloqueará
la cabeza.
NOTA: Deslice el selector de afeitada lo más lejos posible hacia la posición Gel. Es posible que éste no llegue
completamente hasta el final.
STEP 5
IMPORTANT:
Oversize lather can may not fit into the base provided.
The cap will work on the lather can without the base.
Caution: Do not block dispenser nozzle with hand,
as hot steam may be emitted during use or when
the can of gel is low. Replace can when gel is running low. Hold hand to side and under, not in front
of dispenser.
Problem: Gel or lather is too runny.
TROUBLESHOOTING GUIDE
When can is empty or when using for travel, it will
be necessary to remove the can from the machine.
1. Be sure the machine is unplugged from the
outlet.
2. With one hand holding the can, remove the
machine and can from the protective cylinder.
Then depress the locking tab with the other hand
and pull the machine off the top of the can.
3. Clean the machine with a damp cloth.
DO NOT IMMERSE THE MACHINE IN WATER!
TO REMOVE CAN
Un anuncio de servicio público de la Asociación de
los Fabricantes de Electrodomésticos y de
Underwriters Labortories, Inc.
Once you have shaved, turn the unit off, by pressing the
OFF button. Be sure to unplug the unit when not in use.
Solution: Adjust temperature control dial to a lower
setting.
SIEMPRE DESENCHUFE LOS
APARATOS PEQUEÑOS
USING LATHER
Problem: Unit fails to heat.
Todos saben que la combinación de electricidad y de agua es peligrosa. Pero ¿Sabe
usted que un aparato eléctrico está eléctricamente activo aún cuando el interruptor
está apagado? Si el enchufe está conectado,
el aparato está encendido. De modo que
cuando no use sus aparatos electrodomésticos, manténgalos desenchufados.
- Insert cap with can attached
into base and turn to lock
Solution: Make sure the unit is plugged in and
turned on. Top red light should be on. After 1 to 3
minutes or until the red light glows solid, the unit
is ready to dispense hot gel/lather.
MANTENGA ESTE APARATO
ALEJADO DEL AGUA
• Make sure Lather Nozzle for Lather and insert
Lather can into machine as “VERY IMPORTANT SETUP INSTRUCTION”
• Push the power 'on' button on the top of the
machine.
• After a few minutes, the ready indicator will light.
• Press down on the top of the machine to dispense heated lather into the palm of your hand.
• Spread lather over your face as usual for a comfortable hot shave.
Problem: Unit will not dispense lather.
Everyone knows that electricity and water are a
dangerous combination. But did you know that an
electrical appliance is still electrically alive even if
the switch is off? If the plug is in, the power is on.
So when you are not using your appliances, keep
them unplugged.
KEEP AWAY FROM WATER
WARNING:
IF YOU THINK
THE POWER IS OFF
WHEN THE SWITCH
IS OFF,
YOU’RE WRONG.
LIMITED ONE YEAR WARRANTY
HGL5 - 11 IB.indd 2
Problema: El gel o la crema está demasiado
líquido.
Solución: Escoja un nivel de temperatura más
bajo.
Problema: La máquina no calienta.
Solución: Asegúrese que la máquina está enchufada y encendida. El indicador rojo se encenderá
cuando la máquina esté lista.
Problema: La máquina no dispensa crema caliente.
Solución: La máquina no está instalada correctamente sobre la lata. Quite la máquina de la lata y
vuelva a instalarla, asegurándose de que esté bien
fijada a la parte superior de la lata. Averigüe que
está usando la boquilla para crema.
Problema: La máquina no dispensa gel caliente.
Solución: La máquina no está instalada correctamente sobre la lata. Quite la máquina de la lata y
vuelva a instalarla, asegurándose de que esté bien
fijada a la parte superior de la lata. Averigüe que
está usando la boquilla para gel.
Problema: El gel o la crema está demasiado caliente o la máquina produce demasiado vapor.
Solución: Escoja un nivel de temperatura más bajo
o reemplace la lata si el nivel de gel o de crema
esté bajo.
USING GEL
Conair will repair or replace (at our option) your
unit free of charge for 12 months from the date of
purchase if the appliance is defective in workmanship or materials.
To obtain service under this warranty, return
the defective product to the service center listed
below that is nearest you, together with your
purchase receipt and $3.00 for postage and handling. California residents need only provide proof
of purchase and should call 1-800-366-0937 for
shipping instructions. In the absence of a purchase
receipt, the warranty period shall be 12 months
from the date of manufacture.
ANY IMPLIED WARRANTIES, OBLIGATIONS, OR
LIABILITIES, INCLUDING BUT NOT LIMITED TO
THE IMPLIED WARRANTY OF MERCHANTABILITY
AND FITNESS FOR A PARTICULAR PURPOSE,
SHALL BE LIMITED IN DURATION TO THE 12
MONTH DURATION OF THIS WRITTEN, LIMITED
WARRANTY. Some states do not allow limitations
on how long an implied warranty lasts, so the
above limitations may not apply to you.
IN NO EVENT SHALL CONAIR BE LIABLE FOR
ANY SPECIAL, INCIDENTAL, OR CONSEQUENTIAL
DAMAGES FOR BREACH OF THIS OR ANY OTHER
WARRANTY, EXPRESS OR IMPLIED, WHATSOEVER.
Some states do not allow the exclusion or limitation of special, incidental, or consequential damages, so the above limitation may not apply to you.
This warranty gives you specific legal rights, and
you may also have other rights, which vary from
state to state.
- Instalación correcta para usar
con crema
RESOLUCIÓN DE PROBLEMAS
ADVERTENCIA:
SI CREE QUE NO HAY
CORRIENTE CUANDO
EL APARATO ESTÁ
APAGADO, SE EQUIVOCA
- Properly installed gel unit
MODEL HGL1/HGL5/HGL11 INSTRUCTION BOOKLET
boquilla para dispensar
crema caliente
posición Crema
• Instale la boquilla para gel y la lata de gel tal
como se explica en la sección “INSTRUCCIONES
DE INSTALACIÓN MUY IMPORTANTES”.
• Oprima la parte superior de la máquina al mismo
tiempo que desliza el selector de afeitada a la
posición Gel para bloquear la parte superior de
la máquina. Esto propulsará el gel adentro de la
máquina para que lo caliente.
• Oprima el botón de encendido (ON) ubicado
encima de la máquina.
• Después de unos minutos, el indicador luminoso
de listo se encenderá.
• Oprima el botón para producir gel caliente.
• Aplique el gel a su rostro para una afeitada caliente muy placentera.
Solution: Unit is not properly mounted to the can.
Remove unit from can, then reattach, making sure
that the unit is securely attached to the top of can
or check the lather can is using the lather nozzle
and perfectly locked.
For your safety and continued enjoyment of this product,
always read the instruction book carefully before using.
cabeza que se oprime
para dispensar crema
USAR LA MÁQUINA CON GEL
Problem: Unit will not dispense gel.
Service Center
Conair Corporation
Service Department
7475 North Glen Harbor Blvd.
Glendale, AZ 85307
- Instalación correcta para usar
con gel
Solution: Unit is not properly mounted to the can.
Remove unit from can, then reattach, making sure
that the unit is securely attached to the top of can
or check the gel can is using the gel nozzle and
perfectly locked.
®
botón para
producir gel caliente
ALWAYS UNPLUG
SMALL APPLIANCES
© 2006 Conair Corporation
150 Milford Road, East Windsor, NJ 08520
7475 North Glen Harbor Blvd., Glendale, AZ 85307
boquilla para
dispensar
gel caliente
Public Service ad from Association of Home Appliance
Manufacturers and Underwriters Laboratories, Inc.
posición gel
• Instale la boquilla para crema y la lata de crema, tal
como se explica en la sección “INSTRUCCIONES DE
INSTALACIÓN MUY IMPORTANTES”.
• Oprima el botón de encendido (ON) ubicado
encima de la máquina.
• Después de unos minutos, el indicador luminoso
de listo se encenderá.
• Oprima la cabeza de la máquina para producir
crema caliente.
• Aplique la crema a su rostro para una afeitada
caliente muy placentera.
Problem: The gel/lather is too hot or too much
steam emitted.
- Inserte la cabeza, junta con
la lata, en la base. Gire para
sujetar.
USAR LA MÁQUINA CON CREMA
Cuando la lata está vacía o cuando desea viajar
con la máquina:
1. Desconecte la máquina.
2. Coja la lata con una mano y saque la lata y la
boquilla del cilindro protector. Oprima la lengüeta
de cierre para poder quitar la máquina de la lata.
3. Limpie la máquina con un paño húmedo. ¡NO
PONGA LA MÁQUINA EN AGUA!
• Make sure Gel Nozzle for Gel and insert Gel
can into Machine as “VERY IMPORTANT SET-UP
INSTRUCTION”
• Push down on the top of the machine. At the
same time, slide the #3 “adjustment switch” until
the top is locked in place; this will release gel into
the machine to be heated
• Push the power 'on' button on the top of the
machine.
• After a few minutes, the ready indicator will light.
• Press the gel release button on the nozzle to
release heated gel into the palm of your hand.
• Spread gel over your face as usual for a comfortable
hot shave.
Cuando haya terminado, apague la máquina con el botón
de apagado (OFF). Desconecte la máquina cuando no la
está usando.
SACAR LA LATA DE CREMA/GEL
- Properly installed lather unit
IB-6171B
ETAPA 5
IMPORTANTE
Ciertas latas de crema muy grandes no caben en la
base. En tal caso, usted puede instalar la cabeza de la
máquina directamente sobre la lata de crema.
Precaución: No obstruya la boquilla con la mano,
puesto que la máquina puede emitir vapor caliente
durante el uso o cuando el nivel de crema o de gel está
bajo. Reemplace la lata de crema o de gel cuando el
nivel esté bajo. Al sostener la lata, coloque la mano al
costado y debajo de la boquilla, no frente a esta.
Solution: Adjust temperature control dial to lower
setting, or replace can if it has a low amount of
gel/lather.
Para usar la máquina con crema: Coloque el
selector de afeitada en la posición Crema.
GARANTÍA LIMITADA POR UN AÑO
Conair reparará o remplazará (a su opción) su aparato
sin cargo por un período de 12 meses a partir de la
fecha de compra si presenta defectos de mano de obra
o en los materiales.
Para obtener servicio técnico bajo esta garantía, lleve
o mande su aparato al Centro de Servicio más cercano, junto con su recibo de compra y un cheque de
$3,00US por gastos de envío y manejo. Los residentes
de California sólo necesitan dar una prueba de compra
y deben llamar al 1-800-366-0937 para recibir instrucciones de envío. En ausencia del recibo de compra, el
período de garantía será de 12 meses a partir de la
fecha de fabricación.
CUALQUIER GARANTÍA, OBLIGACIÓN O RESPONSABILIDAD
IMPLÍCITAS, INCLUYENDO PERO NO LIMITADAS A LA
GARANTÍA IMPLÍCITA DE COMERCIABILIDAD Y APTITUD
PARA UN PROPÓSITO ESPECÍFICO, ESTARÁN LIMITADAS
POR LOS 12 MESES DE LA PRESENTE GARANTÍA ESCRITA.
Algunos Estados no permiten limitaciones sobre la
duración de una garantía implícita, de modo que
las limitaciones mencionadas pueden no regir para
usted.
CONAIRPRO NO SERÁ RESPONSABLE EN NINGÚN
CASO POR ALGÚN DAÑO ESPECIAL, INCIDENTAL O
CONSECUENTE DEBIDO AL INCUMPLIMIENTO DE ESTA O
DE CUALQUIER OTRA GARANTÍA, EXPRESA O IMPLÍCITA.
Algunos Estados no permiten la exclusión o limitación
de daños especiales, incidentales o consecuentes, de
modo que las limitaciones mencionadas pueden no
regir para usted.
Esta garantía le otorga derechos legales específicos
y usted puede tener otros derechos que varían de un
Estado a otro.
CENTRO DE SERVICIO:
Conair Corporation
Service Department
7475 North Glen Harbor Blvd.
Glendale, AZ 85307
MODELO HGL1/HGL5/HGL11 MANUAL DE INSTRUCCIONES
© 2006 Conair Corporation
150 Milford Road, East Windsor, NJ 08520
7475 North Glen Harbor Blvd., Glendale, AZ 85307
Para su seguridad y para seguir disfrutando de este
producto durante años, siempre lea las instrucciones
cuidadosamente antes de usarlo.
®
IB-6171B
9/29/06 5:12:35 PM