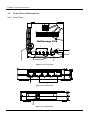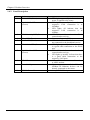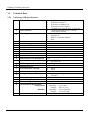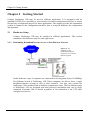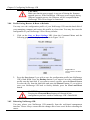
1
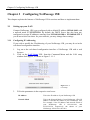
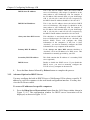
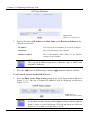
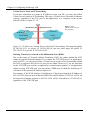
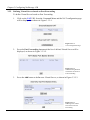
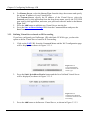
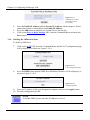
Copyright 2002 Compex Systems Pte Ltd All rights reserved. This document contains information, which is protected by copyright. Reproduction, adaptation or translation without prior permission is prohibited, except as allowed under the copyright laws. Trademark Information Compex, ReadyLINK® and MicroHub® are registered trademarks of Compex, Inc. Microsoft Windows and the Windows logo are the trademarks of Microsoft Corp. NetWare is the registered trademark of Novell Inc. All other brand and product names are trademarks or registered trademarks of their respective owners. Notice: Copyright © 2002 by Compex, Inc. All rights reserved. Reproduction, adaptation, or translation without prior permission of Compex, Inc. is prohibited, except as allowed under the copyright laws. Manual Revision by Hin Manual Number: U-0316-V1.1C Version 1.1, June 2002 Disclaimer Compex, Inc. provides this guide without warranty of any kind, either expressed or implied, including but not limited to the implied warranties of merchantability and fitness for a particular purpose. Compex, Inc. may make improvements and/or changes to the product and/or specifications of the product described in this guide, without prior notice. Compex, Inc will not be liable for any technical inaccuracies or typographical errors found in this guide. Changes are periodically made to the information contained herein and will be incorporated into later versions of the guide. The information contained is subject to change without prior notice. Your Feedback We value your feedback. If you find any errors in this user’s manual, or if you have suggestions on improving, we would like to hear from you. Please contact us at: Telephone: (65) 6381-0139 Fax: (65) 6280-9947 Email: [email protected] i FCC Notice This device has been tested and found to comply with the limits for a Class B digital device, pursuant to Part 15 of the FCC Rules. These limits are designed to provide reasonable protection against harmful interference in a residential installation. This device generates, uses and can radiate radio frequency energy and, if not installed and used in accordance with the instructions, may cause harmful interference to radio communications. However, there is no guarantee that interference will not occur in a particular installation. If this device does cause harmful interference to radio or television reception, the user is encouraged to try to correct the interference by one or more of the following measures: • Reorient or relocate the receiving antenna. • Connect the computer into an outlet on a circuit different from that to which the receiver is connected. • Increase the separation between the computer and receiver. • Consult the dealer or an experienced radio/TV technician for help. Caution: Any changes or modifications not expressly approved by the grantee of this device could void the user's authority to operate the equipment. FCC Compliance Statement: This device complies with Part 15B of the FCC Rules. Operation is subject to the following two conditions: • This device may not cause harmful interference, and • This device must accept any interference received, including interference that may cause undesired operation. Declaration of Conformity Compex, Inc. declares the following: Product Name: Broadband Internet Gateway Model No.: NetPassage 15B conforms to the following Product Standards: Radiated Emission Standards: FCC: 47 CFR Part 15, Subpart B, ANSI C63.4-1992; 47 CFR Part 15, Subpart C (Section 15.247), ANSI C63.4-1992. ;ETSI EN 300 328-2: July 2000;EN55022. Conducted Emission Standards: FCC Part 15 Class B;ETS 300 826: Nov. 1997.;EN55022 conducted emission Immunity Standards: EN 55024 (FOR CE) Low Voltage Directive: EN 60 950:1992+A1: 1993+A2: 1993+A3; 1995+A4; 1996+A11: 1997 (FOR CE).Therefore, this product is in conformity with the following regional standards: FCC Class B - following the provisions of FCC Part 15 directive; CE Mark - following the provisions of the EC directive. This Class B digital apparatus complies with Canadian ICES-003. 18th June 2002 ii Technical Support Information The warranty information and the registration form are found in the Quick Install Guide. For technical support, you may contact COMPEX or its subsidiaries. For your convenience, you may also seek technical assistance from the local distributor, or from the authorized dealer/reseller that you have purchased this product from. For technical support by email, write to [email protected]. Refer to the table below for the nearest Technical Support Centers: Technical Support Centers Contact the technical support center that services your location. U.S.A., Canada, Latin America and South America * Write ( Call Fax Compex, Inc. 4051 E. La Palma, Unit A Anaheim, CA 92807, USA Tel: +1 (714) 630-7302 (8 a.m.-5 p.m. Pacific time) Tel: +1 (800) 279-8891 ext.122 Technical Support Fax: +1 (714) 630-6521 BBS: +1 (714) 630-2570 (24-hour access) Europe * Write ( Call Fax ReadyLINK Networktechnology GmbH Albert Einstein Straβe 34 / M21 63322 Rödermark, Germany Tel: +49 (0) 6074 - 98017 (8 a.m.-5 p.m. local time) Fax: +49 (0) 6074 - 90668 BBS: +49 (0) 6074 - 93974 (24-hour access) Asia, Australia, New Zealand, Middle East and the rest of the World * Write ( Call Fax Internet access/ Website: iii Compex Systems Pte Ltd 135, Joo Seng Road #08-01, PM Industrial Building Singapore 368363 Tel: (65) 6286-1805 (8 a.m.-5 p.m. local time) Tel: (65) 6286-2086 ext.199 Technical Support Fax: (65) 6283-8337 BBS: (65) 6282-8854 (24-hour access) E-mail: [email protected] FTPsite: ftp.compex.com.sg http://www.cpx.com or http://www.compex.com.sg About this Document The product described in this document, Compex NetPassage 15B is a licensed product of Compex Systems Pte Ltd. This document contains instructions for installing, configuring and using the NetPassage 15B. It also gives an overview of the key applications and the networking concepts with respect to the product. This documentation is for both Network Administrators and the end user with basic understanding and knowledge in the networking structure and protocols. A few assumptions had been made, such as the host computer has already been installed with TCP/IP and already up & running and accessing the Internet. Procedures for Windows 95/98/ME/2000/XP operating systems are included in this document. However, for other operating system, you may need to refer to your operating system’s documentation for networking. Please take note that this User’s Manual is written based on NetPassage 15B Firmware Release 2.74 build 1000. Conventions This document uses special conventions to present the information clearly. Please take note of the conventions used below. NOTE This section will consist of important features or instructions CAUTION This section concerns risk of injury, system damage or loss of data WARNING This section concerns risk of severe injury References on Menu Command, Push Button, Radio Button, LED and Label appear in Bold. For example, “Press the Save button” iv Table of Contents Copyright 2002 Compex Systems Pte Ltd Trademark Information Disclaimer Your Feedback FCC Notice Declaration of Conformity Technical Support Information About this Document Conventions Chapter 1 Product Overview 1.1 Introduction 1.2 Key Features 1.3 Package Contents 1.4 Panel Views & Descriptions 1.4.1 1.4.2 1.5 Technical Data 1.5.1 Chapter 2 2.1 3.2 3.3 3.4 3.5 3.6 v Distributing Broadband Internet Access to Fast Ethernet Network TCP/IP Configuration of the Computers 2.2.1 2.2.2 2.3.1 2.3.2 Chapter 3 3.1 NetPassage 15B Specifications Getting Started Hardware Setup 2.1.1 2.2 Panel Views Panel Description Configuring your Computer to Dynamically Obtain IP Address Configuring your Computer with Static IP Address Web-based Configuration Interface TELNET Command Console i i i i ii ii iii iv iv 1 1 1 3 4 4 5 6 6 7 7 7 8 8 10 14 15 Configuring NetPassage 15 Setting up your LAN 17 17 3.1.1 3.1.2 17 18 Configuring IP Addressing Advanced Option for DHCP Server Configuring NetPassage 15B with your Broadband Internet Account 20 3.2.1 3.2.2 3.2.3 3.2.4 3.2.5 20 22 23 25 26 Cable Internet with Dynamic IP Assignment Cable Internet with Static IP Assignment ADSL Internet using PPP over Ethernet (PPPoE) Singapore SingTel Magix SuperSurf Australia Big Pond Cable Internet Network Address Translator (NAT) 26 3.3.1 3.3.2 3.3.3 3.3.4 27 29 30 31 Introduction to Virtual Servers Defining Virtual Server based on Port Forwarding Defining Virtual Server based on IP Forwarding Defining De- Militarized Zone Configuring Routing Protocol 32 3.4.1 3.4.2 33 33 Static Routing Dynamic Routing IP Packet Filtering 34 3.5.1 3.5.2 34 35 Time-based Access Management Internet Application Filtering Managing NetPassage 15B from the Internet 36 3.6.1 36 Activating Remote Router Management Table of Contents 3.7 Load Balancing & Fail-Over Redundancy with Parallel Broadband 3.7.1 3.8 Appendix A Appendix B Appendix C vi Implementing Parallel Broadband 37 38 NetPassage 15B’s System Tools 39 3.8.1 3.8.2 3.8.3 3.8.4 3.8.5 3.8.6 39 39 40 41 41 42 Setting Router Identity Synchronizing Router’s Clock with your Computer Upgrading Router’s Firmware Profile Saving, Restore & Reset to Defaults Rebooting NetPassage 15B Changing Administrative Password Console Commands ISP-Specific Notes Frequently Asked Questions 43 45 46 Chapter 1 Product Overview Chapter 1 Product Overview 1.1 Introduction Compex NetPassage 15B is a Broadband Internet Gateway supporting external Cable/ADSL modem for broadband Internet sharing. It is integrated with a 4-port 10/100Mbps Fast Ethernet Switch and can seamlessly distribute Internet access to the wired networks. With the unique Parallel Broadband, NetPassage 15B delivers scalable Internet bandwidth to your network, supporting Load Balancing and Fail-Over Redundancy with multiple broadband channels. In addition, Compex NetPassage 15B is also designed with advanced features such as Virtual Server, Time-based Access Management, IP Packet Filtering and Remote Management have been designed on NetPassage 15B. It is the perfect Internet solution for your home and office. 1.2 Key Features Compex NetPassage 15B, the Broadband Internet Gateway, is designed with the following features: Broadband Internet Sharing Compex NetPassage 15B comes with a RJ45 Ethernet WAN port supporting external Cable or ADSL modem, sharing a single Cable/ADSL Internet subscription with multiple users. 1 Chapter 1 Product Overview Integrated 4-port 10/100Mbps Switch Integrated with a 4-port 10/100Mbps Fast Ethernet Switch, Compex NetPassage 15B provides an immediate solution for four users on private LAN switching. With the autocrossover mechanism, Hubs or Switches can be cascaded to NetPassage 15B easily to support more users. Parallel Broadband Parallel Broadband, uniquely found on NetPassage series broadband routers, delivers scalable Internet bandwidth to your office network. Multiple units of Compex NetPassage 15B may be installed in your network, enabling Load Balancing and FailOver Redundancy with multiple broadband channels. Built-In DHCP Server Compex NetPassage 15B is integrated with a DHCP server, dynamically assigns IP address, gateway information and DNS server address to your PCs in the wired and wireless networks. Simply configure your PCs to dynamically obtain IP addresses. Virtual Server Compex NetPassage 15B supports Virtual Server that enables hosting of Internet servers in your private network. Virtual Server based on Port Forwarding and IP Forwarding may be defined on NetPassage 15B. Time-based Access Management With Time-based Access Management, the network administrators may define administrative function on NetPassage 15B, restricting certain PCs to access to the Internet during a pre-defined time. IP Packet Filtering The network administrators may also define functions on NetPassage 15B to filter undesired Internet applications in the private network based on the TCP/UDP ports. Web-based Configuration Interface Compex NetPassage 15B is integrated with an embedded HTTP server, facilitating the configuration process with a user-friendly web-based interface. Simply connect to NetPassage 15B with a JAVA-enabled web browser and complete the configuration process in just a few minutes. Remote Management Remote Management may be activated on NetPassage 15B, enabling the network administrator to manage the Broadband Internet Gateway over the Internet with a HTTP or TELNET session. 2 Chapter 1 Product Overview 1.3 Package Contents Your NetPassage 15B retail package contains the following items: - 3 1 x NetPassage 15B 1 x External Power Adapter (5VDC, 3A) 1 x Quick Install Guide with Warranty Registration Form 1 x Product CD (consist of User’s Manual, Firmware Recovery Tool & Utility) Chapter 1 Product Overview 1.4 Panel Views & Descriptions 1.4.1 Panel Views R NetPassage 15-B 2 3 Diag Power 100Mb 1 2 3 4 Conn 7 6 Figure 1.4.1-1 Top View WAN 4 8 3 2 9 Figure 1.4.1-2 Side View 5V/3A DC 10 Figure 1.4.1-3 Side View 4 4 5 Act Link Link/Act 1 WAN 1 Chapter 1 Product Overview 1.4.2 Panel Description Index Indicator Description 1 Power LED (Green) § 2 LAN 100Mb LED (Green) § § 3 WAN Activity LED (Green) § 4 5 Diag LED (Green) Conn LED (Green) § § 6 WAN Link LED (Green) § 7 LAN Link/Act LED (Green) § § 5 8 WAN Port § 9 Local LAN ports § 10 5 V/3A Power Connector § LED lights up steadily indicate that the power is applied to the router. LED lights up steadily indicate that the respective LAN connection is at 100Mbps. LED lights off indicate that the respective LAN connection is at 10Mbps. LED blinks indicate that the WAN connection has activity. Firmware diagnostic LED. LED blinks when WAN disconnects or not connected to the broadband service. LED lights up steadily indicate that there is a good cable connection to the WAN port. LED blinks indicate that the LAN connection has activity. LED lights up steadily indicate that there is a good cable connection to the respective LAN ports. 10Base-T Port connects to cable modem or xDSL modem. Up to a maximum of 4 10Base-T/ 100Base-TX Ethernet devices can be directly connected to the router. Accept 5V DC/3A input. Chapter 1 Product Overview 1.5 Technical Data 1.5.1 NetPassage 15B Specifications ♦ Industry Standards ♦ WAN Interface ♦ WAN Type ♦ ♦ ♦ ♦ ♦ ♦ ♦ ♦ ♦ ♦ LAN Interface IP Addressing Built-In DHCP Server DHCP Reservation NAT Firewall Load Balancing Fail-Over Redundancy Virtual Server Time-based Access Management IP Packet Filtering ♦ ♦ ♦ IP Routing Routing Protocol VPN Client Pass-Through ♦ ♦ Microsoft NetMeeting Configuration Interface ♦ ♦ ♦ ♦ Remote Management Profile Backup & Restore Firmware Upgrade Environmental Requirement Temperature Humidity ♦ 6 Physical Dimensions Complies with: § IEEE 802.3 10Base-T, § IEEE 802.3u 100Base-TX, § IEEE 802.3x Flow Control § CE Mark, FCC Class B, Gost, C-Tick, UL § One RJ45 Ethernet port (for external Cable/ADSL modem) § Static IP § Dynamic IP § PPP Over Ethernet (PPPoE) § RAS § Integrated 4-port 10/100Mbps Switch All Classful/Classless Subnets Yes By MAC Address Yes Parallel Broadband Parallel Broadband Based on Port Forwarding & IP Forwarding Yes § By TCP Port § By Source IP Static & Dynamic Entry RIP1 & RIP2 § PPTP § IPSec Yes § Web-based Configuration Interface § TELNET HTTP & TELNET Session Yes Yes Operating: 0ºC to 40ºC Storage: -20ºC to 70ºC Operating: 10% to 80% RH Storage: 5% to 90% RH 122mm x 119mm x 26mm (LxWxH) Chapter 2 Getting Started Chapter 2 Getting Started Compex NetPassage 15B may be used in different application. It is integrated with an embedded HTTP server providing a user-friendly web-based configuration interface to ensure fast and easy configuration process for these applications. This chapter provides the information on how to connect to the configuration interface, how to setup the hardware for configuration and operation. 2.1 Hardware Setup Compex NetPassage 15B may be installed in different applications. This section summarizes the hardware setup for each application. 2.1.1 Distributing Broadband Internet Access to Fast Ethernet Network Figure 2.1.1-1 NetPassage 15B distributes broadband Internet access to the Fast Ethernet segment In this hardware setup, 4 computers are connected to the integrated 4-port 10/100Mbps Fast Ethernet Switch of NetPassage 15B. These computers are able to share a single broadband Internet account as well as their resources. You may also cascade the NetPassage 15B to another Hub or Switch to support more users. The Fast Ethernet ports of NetPassage 15B are designed with auto-crossover mechanism that can be easily connected to another Hub or Switch regardless of the orientation of the UTP cable (straight or crossover). 7 Chapter 2 Getting Started 2.2 TCP/IP Configuration of the Computers Compex NetPassage 15B is designed with a built-in DHCP server. You may manually configure the TCP/IP settings of your computers, or simply configure them to dynamically obtain IP address from the DHCP server. If you are not an expert user, you are advised to configure your computers to dynamically obtain IP addresses from the built-in DHCP server of NetPassage 15B. Before proceeding, please take note of the following default settings of NetPassage 15B: IP (LAN): Subnet Mask: DHCP Server: 192.168.168.1 255.255.255.0 Enabled 2.2.1 Configuring your Computer to Dynamically Obtain IP Address To configure your computers to dynamically obtain IP address, gateway and DNS information from NetPassage 15B, perform the following actions: For Microsoft Windows 95/98/ME 1. 2. Open the Control Panel from the Start menu Double-click on the Network icon, the network configuration window shall be displayed, as shown in Figure 2.2.1-1. Please ensure that the TCP/IP protocol is installed and bind to the network adapter. Figure 2.2.1-1 Network Configuration Window 3. 8 Double-click on the TCP/IP that is bound to your network adapter, the TCP/IP configuration window shall be displayed, as shown in Figure 2.2.1-2. Chapter 2 Getting Started Press on the Obtain an IP address automatically radio button and press the OK button. Figure 2.2.1-2 Network Configuration Window 4. Press the OK button again to close the network configuration window. The Microsoft Windows will then prompt you to restart the computer. Press the OK button to reboot. When the Microsoft Windows restarts, NetPassage 15B will assign an IP address, Subnet Mask and Gateway information to the computer. For Microsoft Windows 2000/XP 1. 2. 3. Open the Control Panel from the Start menu Double-click on the Network Connections icon. Double-click on the network icon that you will be using to connect to NetPassage 15B for configuration, the network configuration window shall be displayed as shown in Figure 2.2.1-3. Please ensure that the correct network adapter is selected. Figure 2.2.1-3 Network Configuration Window 4. 9 Double-click on the TCP/IP connection, the TCP/IP configuration window shall be displayed, as shown in Figure 2.2.1-4. Chapter 2 Getting Started Press on the Obtain an IP address automatically radio button and press the OK button. Figure 2.2.1-4 Network Configuration Window 5. Press the OK button again to close the network configuration window. The new network configuration will be registered on your network card. 2.2.2 Configuring your Computer with Static IP Address If you have chosen to configure your computer with Static IP address, please take note of the following default settings on NetPassage 15B. IP (LAN): Netmask: 192.168.168.1 255.255.255.0 To log on to the Web-based Configuration Interface of NetPassage 15B and to surf the Internet, you need to configure your computer with the following network settings: IP: Subnet Mask: Gateway: DNS Server: 192.168.168.X 255.255.255.0 192.168.168.1 <IP address of DNS server> X is any integer from 2 to 254, and you cannot configure more than one computer with the same IP address. <IP address of DNS server> is the IP address of a DNS server. This information is usually provided by your broadband Internet service provider. NOTE NetPassage 15B is pre-configured with a subnet of 192.168.168.0. If you wish to configure your network with another subnet, you may do so after logging on to the configuration interface of NetPassage 15B. For Microsoft Windows 95/98/ME 1. 10 Open the Control Panel from the Start menu Chapter 2 Getting Started 2. 3. Double-click on the Network icon, the network configuration window shall be displayed, as shown in Figure 2.2.1-1. Double-click on the TCP/IP that is bound to your network adapter, the TCP/IP configuration window shall be displayed, as shown in Figure 2.2.2-1. Type in the IP Address and Subnet Mask of 192.168.168.X and 255.255.255.0 respectively. Figure 2.2.2-1 Network Configuration Window 4. Select Gateway from the menu and the gateway configuration page shall be displayed, as shown in Figure 2.2.2-2. Type in the New gateway as 192.168.168.1 and press the Add button. Figure 2.2.2-2 Gateway Configuration Window 5. 11 Select DNS Configuration from the menu and the DNS configuration page shall be displayed, as shown in Figure 2.2.2-3. Chapter 2 Getting Started Select the Enable DNS button. Type in a preferred name as the Host. Type in the IP address of your DNS server in the DNS Server Search Order field and press the Add button. Press the OK button to close this window. Figure 2.2.2-3 DNS Configuration Window NOTE You must not configure more than one computer with the same host name. This creates conflict in the network. NOTE The IP address of your DNS Server should be provided by your ISP. If you are still not sure about it, please contact your ISP. 6. Press the OK button again to close the network configuration window. The Microsoft Windows will then prompt you to restart the computer. Press the OK button to reboot. For Microsoft Windows 2000/XP 1. 2. 3. Open the Control Panel from the Start menu Double-click on the Network Connections icon. Double-click on the network icon that you will be using to connect to NetPassage 15B for configuration, the network configuration window shall be displayed as shown in Figure 2.2.2-4. Please ensure that the correct network adapter is selected. Figure 2.2.2-4 Network Configuration Window 12 Chapter 2 Getting Started 4. Double-click on the TCP/IP connection, the TCP/IP configuration window shall be displayed, as shown in Figure 2.2.2-5. Type in the IP Address and Subnet Mask of 192.168.168.X and 255.255.255.0 espectively. Type in the Default gateway as 192.168.168.1. Type in the IP address of your DNS server in the Preferred DNS Server field. Figure 2.2.2-5 Network Configuration Window 5. 2.3 Press the OK button again to close the network configuration window. The new network configuration will be registered on your network card. Connecting to the Configuration Interface Compex NetPassage 15B is integrated with an embedded HTTP Server to provide a user-friendly web-based configuration interface. Alternatively, you may also connect to the Command Console of NetPassage 15B via a TELNET session or a direct serial connection. This section assumes that the IP address of your NetPassage 15B has not been changed. It is still the default IP of 192.168.168.1. This section also assumes that the TCP/IP settings of your computer have been configured properly. To make sure that the TCP/IP of your computer has been configured properly, perform the following command at the DOS prompt: C:\WINDOWS\PING 192.168.168.1 If you receive replies from the above command, it indicates that your computer has been properly configured with TCP/IP. 13 Chapter 2 Getting Started 2.3.1 Web-based Configuration Interface To connect to the Web-based Configuration Interface of NetPassage 15B, all you need is a web browser. The requirement of the web browser is stated below: Web Browser: JAVA: Proxy Settings: Proxy Auto Discovery: Netscape Navigator 4.0 & above or Internet Explorer 4.0 & above Enabled Cleared Disabled Connecting to Web-based Configuration Interface 1. 2. 3. Launch the Internet Explorer or Netscape Navigator Open the URL using the default IP of NetPassage 15B. Eg. Type in http://192.168.168.1 in the Address field of Internet Explorer. The logon page will then be displayed, as shown in Figure 2.3.1-1. The default password of NetPassage 15B is “password” which is pre-filled in the password text box. Press the Log On! button to log in to NetPassage 15B’s Configuration Interface. Figure 2.3.1-1 Logon Page NOTE If the proxy settings of your web browser is not cleared, you will not be able to connect to NetPassage 15B’s web-based configuration interface. Once log on, you will see a web page consist of three frames, the Command Menu, Configuration Window and Message Window, as shown in Figure 2.3.1-2. 14 Command Menu Enable the user to select feature to be configured Configuration Window Enable the user to configure the parameters associated with the selected feature Message Window Display the message (if any) associated with the configuration process Chapter 2 Getting Started Command menu Consists of 3 main menus. • Configuration • System Tools • Help Configuration window Edit various attributes of the menu here. Configuration menu Let’s you set up your NetPassage 15B to connect to your network easily. Hyperlinks connect you to various menus. Help menu Get advice from our friendly technical support engineer. Figure 2.3.1-2 NetPassage 15B Configuration Interface System Tools Edit various internal settings of NetPassage 15B. Message Window Give you a history of the various events. Various configuration messages are also displayed here. 2.3.2 TELNET Command Console Alternatively, the user may connect to the Command Console of NetPassage 15B via a TELNET session to the default IP of NetPassage 15B, 192.168.168.1. This section uses Microsoft TELNET command for instruction. You may use any TELNET client. Connecting to NetPassage 15B’s Command Console via TELNET 1. Connect to NetPassage 15B’s Command Console with the following command at DOS prompt. The TELNET application will then be launched and connect to NetPassage 15B. C:\WINDOWS\TELNET 192.168.168.1 2. 15 At the login prompt, type in “password” (default password) and press the <ENTER> key, as shown in Figure 2.3.2-1. You will then login to the Command Console of NetPassage 15B. Chapter 2 Getting Started Figure 2.3.2-1 Command Console Login NOTE Please refer to Appendix A for the list of commands available at the console. 16 Chapter 3 Configuring NetPassage 15B Chapter 3 Configuring NetPassage 15B This chapter explains the features of NetPassage 15B in sections and how to implement them. 3.1 Setting up your LAN Compex NetPassage 15B is pre-configured with a default IP address 192.168.168.1 with a network mask of 255.255.255.0. By default, the DHCP Server has also been preconfigured to assign IP addresses starting from 192.168.168.100 to 192.168.168.254. If you do not wish to use these for your network, you may change these settings. 3.1.1 Configuring IP Addressing If you wish to modify the IP addressing of your NetPassage 15B, you may do so in the web-based configuration interface. 1. 2. Log on to the web-based configuration interface of NetPassage 15B with a web browser. Click on the LAN Setup URL from the Command Menu and the LAN setup window shall appear, as shown in Figure 3.1.1-1 Figure 3.1.1-1 LAN Setup 3. 17 Fill in the parameters in the respective text boxes: IP Address This is the IP address of your NetPassage 15B Network Mask This is the Network Mask of your NetPassage 15B’s IP address. It decides the subnet of your NetPassage 15B. For example, if the IP address and network mask of your NetPassage 15B is 192.168.168.1 and 255.255.255.0 respectively, the subnet of your NetPassage 15B is 192.168.168.0. Chapter 3 Configuring NetPassage 15B 4. DHCP Start IP Address This is the first IP address where the built-in DHCP server of NetPassage 15B assigns. It should be in the same subnet as your NetPassage 15B. For example, if the IP address and network mask of your NetPassage 15B is 192.168.168.1 and 255.255.255.0 respectively, the DHCP Start IP Address should be 192.168.168.X DHCP End IP Address This is the last IP address where the built-in DHCP server of NetPassage 15B assigns. It should be in the same subnet as your NetPassage 15B. For example, if the IP address and network mask of your NetPassage 15B is 192.168.168.1 and 255.255.255.0 respectively, the DHCP End IP Address should be 192.168.168.X Always use these DNS servers This checkbox is associated with the built-in DHCP Server of NetPassage 15B. If this box is “checked”, the built-in DHCP Server will configure the DNS information of the computers. If this box is NOT “checked”, you need to manually configure the DNS information in every computer in the network. Primary DNS IP Address If the Always use these DNS servers checkbox is “checked”, fill in an IP address of a DNS server. This information is normally provided by your ISP. Secondary DNS IP Address This field contains the IP address of a secondary DNS server (optional) DHCP Server Enable or disable the DHCP server. If you disable the DHCP server, you need to manually configure the TCP/IP of every computer in the network. Press the Save button followed by Reboot button to complete the process. 3.1.2 Advanced Option for DHCP Server You may configure the built-in DHCP Server of NetPassage 15B to release a specific IP address to a specific computer via the web-based configuration interface. You may also view the IP releases online. To reserve IP addresses for specific computers: 1. 18 Press the Dhcp Server Reservations button from the LAN Setup window shown in Figure 3.1.1-1. The configuration window for DHCP server reservation will be displayed, as shown in Figure 3.1.2-1. Chapter 3 Configuring NetPassage 15B Figure 3.1.2-1 DHCP Server Reservations 2. Specify the reserved IP Address, the Host Name or the Hardware Address in the respective text boxes: IP Address This is the reserved IP address for a specific computer Host Name This is the host name of the computer Hardware Address This is the hardware MAC address of the Ethernet interface of the computer NOTE The reserved IP address must not be within the range of DHCP start and end IP addresses. 3. Press the Add button to add this entry, and the Apply button to make it effective. To view the IP released by the DHCP Server: 1. Press the Show Active Dhcp Leases button in the LAN Setup window shown in Figure 3.1.1-1. The list of released IP addresses will be displayed, as shown in Figure 3.1.2-2. Figure 3.1.2-2 DHCP Server Reservations NOTE Invalid date and time shown under Expires column indicates that the router’s clock of your NetPassage 15B has not been set. Refer to Section 3.8.2 on how to set the router’s clock. 19 Chapter 3 Configuring NetPassage 15B 3.2 Configuring NetPassage 15B with your Broadband Internet Account Compex NetPassage 15B shares a single Cable or ADSL Internet account with multiple computers in the network. It supports these broadband Internet connections with different types of WAN protocol. This includes Dynamic IP, Static IP and PPP over Ethernet (PPPoE). NetPassage 15B has also been customized to support Big Pond Cable Internet in Australia and Singtel Magix SuperSurf in Singapore. Successful configuration of NetPassage 15B to work with your broadband Internet account requires you to identify the type of broadband Internet connection you have subscribed. Refer to the following to select the correct WAN type for your broadband Internet subscription. i. ii. iii. iv. v. If you have subscribed to Cable Internet of which your ISP dynamically assigns IP address to you, please go to Section 3.2.1 titled Cable Internet with Dynamic IP Assignment. If you have subscribed to Cable Internet of which your ISP provides you with an IP or a range of IP addresses, please go to Section 3.2.2 titled Cable Internet with Static IP Assignment. If you have subscribed to ADSL Internet that requires standard PPP over Ethernet (PPPoE) for authentication, please go to Section 3.2.3 titled ADSL Internet using PPPoE. If you are a subscriber of Singtel Magix SuperSurf in Singapore, please go to Section 3.2.4 titled Singapore Singtel Magix SuperSurf. If you are a subscriber of Big Pond Cable Internet in Australia, please go to Section 3.2.5 titled Australia Big Pond Cable Internet. You may find some important information concerning the broadband ISP in your country in Appendix B of this User’s Manual. 3.2.1 Cable Internet with Dynamic IP Assignment By default, Compex NetPassage 15B is pre-configured to support a WAN type that dynamically obtain an IP address from the ISP. If you have subscribed to Cable Internet of which your ISP dynamically assign an IP address, you do not need to configure the WAN type. However, there are exceptional cases where additional configuration is required before an IP address is successfully obtained from the ISP: i. ii. 20 Certain ISPs log the MAC address of the first device connected to the broadband channel, and refuse to release an IP address unless the MAC address matches the one in the log. If this is not a new Cable Internet subscription and that the ISP refuses to release an IP address to you, you may clone the “approved” MAC address to NetPassage 15B. Refer to the paragraph titled Cloning MAC Address to NetPassage 15B in this section. Certain ISPs requires a DHCP Client ID to be authenticated before releasing an IP address. To successfully obtain an IP address from such ISPs, you need to configure NetPassage 15B with a DHCP Client ID. NetPassage 15B uses Chapter 3 Configuring NetPassage 15B Router Identity as the DHCP Client ID to request for IP release. Refer to Section 3.8.1 titled Setting Router Identity. If your NetPassage 15B has previously been configured with other WAN type, you may re-configure it to support Cable Internet with Dynamic IP Assignment. 1. Click on the WAN Setup URL from the Command Menu and the WAN configuration page will be displayed, as shown in Figure 3.2.1-1. Figure 3.2.1-1 Changing WAN Type NOTE Figure 3.2.1-1 shows a WAN interface configured with static IP. If your NetPassage 15B has previously configured with PPPoE or other WAN type, this page will show the respective configuration page. 2. Press the Change button and the list of supported WAN type will be displayed, as shown in Figure 3.2.1-2. Figure 3.2.1-2 Selecting the WAN Type 3. 4. Check the Dynamic IP Address radio button and press the Save button. Press the Reboot button to restart the NetPassage 15B. Cloning MAC Address to NetPassage 15B 1. 21 Click on the WAN Setup URL from the Command Menu and the WAN configuration page will be displayed, as shown in Figure 3.2.1-3. Chapter 3 Configuring NetPassage 15B Figure 3.2.1-3 Cloning MAC Address 2. Press the Clone Mac button to clone the MAC address of your managing computer to NetPassage 15B. The configuration interface will then prompt you to reboot the router. Press the Reboot button to restart your NetPassage 15B. 3.2.2 Cable Internet with Static IP Assignment Certain ISPs lease a static IP for their Internet subscriptions. For such Cable Internet subscription, you need to configure the WAN interface of NetPassage 15B with static IP address. 3. 22 Click on the WAN Setup URL from the Command Menu and the WAN configuration page will be displayed, as shown in Figure 3.2.2-1. Chapter 3 Configuring NetPassage 15B Figure 3.2.2-1 Changing WAN Type 4. 5. Press the Change button and the list of supported WAN type will be displayed, as shown in Figure 3.2.1-2. Check the Static IP Address radio button and press the Save button. The Static IP Configuration page will then be displayed, as shown in Figure 3.2.2-2. Figure 3.2.2-2 Static IP Configuration Page 6. Enter the IP Address, the Network Mask and the ISP’s Gateway IP Address into the fields. These information are provided by your ISP. Press the Save button followed by the Reboot button to complete the configuration process. 3.2.3 ADSL Internet using PPP over Ethernet (PPPoE) If you have subscribed to ADSL Internet service using standard PPP over Ethernet (PPPoE) for authentication, you need to configure your NetPassage 15B to support PPPoE. 1. 23 Click on the WAN Setup URL from the Command Menu and the WAN configuration page will be displayed, as shown in Figure 3.2.2-1. Chapter 3 Configuring NetPassage 15B 2. 3. Press the Change button and the list of supported WAN type will be displayed, as shown in Figure 3.2.1-2. Check the PPP over Ethernet radio button and press the Save button. The PPPoE Configuration page will then be displayed, as shown in Figure 3.2.3-1. Figure 3.2.3-1 PPPoE Configuration Page 4. 24 Fill in the parameters for your ADSL Internet service: Username Enter the username of your ADSL Internet subscription in this field Password Enter the password of the username Service Name Enter the service name of your ADSL Internet subscription (optional) On-Demand When this box is “checked”, your NetPassage 15B will automatically connect to the ISP when an Internet request is present in the network. Idle Timeout This field is associated with On-Demand option. This field allows you to specify the idling timeout value for NetPassage 15B to disconnect from the ISP. “0” value in this field disables idling timeout function. When set to “0”, NetPassage 15B remains connected unless disconnected by the ISP. Once disconnected, the NetPassage 15B will stay offline until the next Internet request is detected in the network. Always-On When this box is “checked”, your NetPassage 15B will always connect to the ISP, with and without Internet requests. Chapter 3 Configuring NetPassage 15B 5. Reconnect Time Factor This field is associated with Always-On option. This field allows you to specify a Reconnect Time Factor (RTF). The default value is 30 seconds. If Always-On option is selected with an RTF of 30 seconds, your NetPassage 15B will stay connected to the ISP even when there is no Internet traffic present. If disconnected by the ISP, NetPassage 15B will perform a delay for a random period between 1 to RTF seconds (for RTF value of 30, the random period is drawn between 1 to 30 seconds), and reconnect to the ISP. Use non-standard PPPOE Ethernet type Certain Ethernet-based ADSL modem requires nonstandard PPP over Ethernet for authentication. If you are uncertain about this, DO NOT “check” this box. Press the Save button followed by the Reboot button to complete the configuration process. 3.2.4 Singapore SingTel Magix SuperSurf You should use this WAN type only if you are a subscriber of SingTel Magix SuperSurf in Singapore. If you have subscribed to SingNet Broadband or Pacific Internet Broadband, please go to Section 3.2.3 titled ADSL Internet using PPP over Ethernet (PPPoE). 1. 2. 3. Click on the WAN Setup URL from the Command Menu and the WAN configuration page will be displayed, as shown in Figure 3.2.2-1. Press the Change button and the list of supported WAN type will be displayed, as shown in Figure 3.2.1-2. Check the Singapore ADSL (Ethernet 512K) radio button and press the Save button. The configuration page for SingTel Magix SuperSurf will be displayed, as shown in Figure 3.2.4-1. Figure 3.2.4-1 SingTel Magix SuperSurf Configuration Page 25 Chapter 3 Configuring NetPassage 15B 4. 5. Enter the Username, Password and Idling Timeout value to the fields and press the Save button. Press the Reboot button to complete the configuration process. 3.2.5 Australia Big Pond Cable Internet You should select this WAN type only if you are a subscriber of Big Pond Cable Internet in Australia. If you have subscribed to OPTUS in Australia, please go to Section 3.2.1 titled Cable Internet with Dynamic IP Assignment. Please note that OPTUS requires a DHCP Client ID before releasing an IP address to you. 1. 2. 3. Click on the WAN Setup URL from the Command Menu and the WAN configuration page will be displayed, as shown in Figure 3.2.2-1. Press the Change button and the list of supported WAN type will be displayed, as shown in Figure 3.2.1-2. Check the Australia BPA Cable radio button and press the Save button. The configuration page for Big Pond Australia will be displayed, as shown in Figure 3.2.5-1. Figure 3.2.5-1 Big Pond Australia Configuration Page 4. 5. 3.3 Enter the Username, Password and Idling Timeout to the fields and press the Save button. Press the Reboot button to complete the configuration process. Network Address Translator (NAT) Compex NetPassage 15B has been designed with a Network Address Translator (NAT) that supports Port Address Translation (PAT), sharing a single public IP address with multiple computers in the private network by using different TCP ports for different computers. By default, the NAT is enabled. 26 Chapter 3 Configuring NetPassage 15B CAUTION Disabling the NAT will cause your computers not being able to share the broadband Internet service. DO NOT disable the NAT unless you are certain on what you are doing. Due to the translation, the computers behind the NAT are not reachable from the Internet. However, with the support of Virtual Server, you may host the Internet servers behind the NAT based on Port Forwarding or IP Forwarding. 3.3.1 Introduction to Virtual Servers Compex NetPassage 15B supports two types of Virtual Server, one based on Port Forwarding and the other based on IP Forwarding, where IP Forwarding option is only available when the WAN interface of NetPassage 15B has been configured with a static IP. Virtual Server based on Port Forwarding When Virtual Server based on Port Forwarding is implemented, Internet requests to the IP address of NetPassage 15B’s WAN interface will be forwarded to a specific computer in the private network based on the TCP port of the Internet request. Refer to Figure 3.3.1-1. Figure 3.3.1-1 Virtual Server based on Port Forwarding Figure 3.3.1-1 shows two Virtual Servers implemented, HTTP Virtual Server and FTP Virtual Server. To implement the Virtual Server, you need to know the TCP port that the intended application is using. For example, suppose that your ISP has assigned an IP address of 203.120.12.10 to your NetPassage 15B, and you wish to host a web server in your private network on a computer with an IP address of 192.168.168.10; you need to define a Virtual Server at TCP Port 80 (used by HTTP by default) to be forwarded to 192.168.168.10. Once implemented, all “http://203.120.12.10” requests will be forwarded to the computer with 192.168.168.10 IP address. If you wish to host another FTP server in your private network on a computer with an IP address of 192.168.168.20; you will then need to define a Virtual Server at TCP Port 21 (used by FTP by default) to be forwarded to 192.168.168.20. 27 Chapter 3 Configuring NetPassage 15B Virtual Server based on IP Forwarding If you have subscribed to a range of IP addresses from your ISP, you may also define Virtual Servers based on IP Forwarding. This type of Virtual Server forwards all Internet requests, regardless of the TCP port of the application, to a computer in the private network. Refer to Figure 3.3.1-2. Figure 3.3.1-2 Virtual Server based on IP Forwarding Figure 3.3.1-2 shows two Virtual Servers based on IP Forwarding. One maps the public IP 203.120.12.11 to private IP 192.168.168.10, and the other maps the public IP 203.120.12.12 to private IP 192.168.168.20. Defining Virtual Server based on De-Militarized Zone (DMZ) Due to the nature of Network Address Translator (NAT), the subnet behind the NAT cannot be reached from the Internet. If you know the TCP/UDP port of an application, such as HTTP, you can easily define a Virtual Server based on Port Forwarding behind the NAT to support a Web Server in your private subnet. However, if you are uncertain on the TCP/UDP port used by an application (certain Internet games), or an application utilizes varying TCP/UDP port, you may define a DMZ host of which the NetPassage 15 will direct all the unresolved Internet requests to. For example, if the WAN interface of NetPassage 15 has been assigned an IP address of 203.120.12.20 and you have defined a DMZ host with IP address of 192.168.168.10, all the unresolved Internet requests to 203.120.12.20 will be forwarded to 192.168.168.10, regardless of the TCP/UDP port. 28 Chapter 3 Configuring NetPassage 15B 3.3.2 Defining Virtual Server based on Port Forwarding To define Virtual Server based on Port Forwarding: 1. Click on the NAT URL from the Command Menu and the NAT configuration page will be displayed, as shown in Figure 3.3.2-1. Figure 3.3.2-1 NAT Configuration Page 2. Press the Port Forwarding button and the list of defined Virtual Server will be displayed, as shown in Figure 3.3.2-2. Figure 3.3.2-2 Table Showing Defined Virtual Server based on Port Forwarding 3. Press the Add button to define new Virtual Server, as shown in Figure 3.3.2-3. Figure 3.3.2-3 Defining New Virtual Server based on Port Forwarding 29 Chapter 3 Configuring NetPassage 15B 4. 5. 6. For Known Server, select the Server Type from the drop down menu and specify the private IP address of your Virtual Server. For Custom Server, specify the IP address of the Virtual Server, select the Protocol used by this application from the drop down menu, specify the TCP/UDP port used by this application, and enter your preferred reference name in the Server Type field. Press the Add button to add this new Virtual Server into the list. Press the Save or Reset Settings URL from the Command Menu and press the Save button. 3.3.3 Defining Virtual Server based on IP Forwarding If you have configured your NetPassage 15B with Static IP WAN type, you have the option to define Virtual Server based on IP Forwarding. 1. Click on the NAT URL from the Command Menu and the NAT configuration page will be displayed, as shown in Figure 3.3.3-1. Figure 3.3.3-1 NAT Configuration Window for Static IP WAN Type 2. Press the Static Ip Address Entries button and the list of defined Virtual Server will be displayed, as shown in Figure 3.3.3-2. Figure 3.3.3-2 Table Showing Defined Virtual Server based on IP Forwarding 3. 30 Press the Add button to define new Virtual Server, as shown in Figure 3.3.3-3. Chapter 3 Configuring NetPassage 15B Figure 3.3.3-3 Defining New Virtual Server based on IP Forwarding 4. 5. 6. Enter the Public IP Address and the Private IP Address which it maps to. Please ensure that you have subscribed to this Public IP Address. Press the Add button to add this new Virtual Server into the list. Click on the Save or Reset Settings URL from the Command Menu and press the Save button. 3.3.4 Defining De- Militarized Zone To define a DMZ host: 7. Click on the NAT URL from the Command Menu and the NAT configuration page will be displayed, as shown in Figure 3.3.4-1. Figure 3.3.4-1 NAT Configuration Page 8. Press the DMZ button and the DMZ Host Definition Window will be displayed, as shown in Figure 3.3.4-2. Figure 3.3.4-2 Configuring DMZ 9. Enter the IP address of the your designated computer and press the Apply button. 10. Save the configuration profile. NOTE To disable DMZ, please enter the IP address as 0.0.0.0. 31 Chapter 3 Configuring NetPassage 15B 3.4 Configuring Routing Protocol Compex NetPassage 15B allows the network administrator to add a static routing entry into the routing table. Other than the default gateway to the Internet, NetPassage 15B may reroute the IP packets to another network. This is very useful for a network with more than one router. CAUTION If you are configuring NetPassage 15B for broadband Internet sharing, you DO NOT need to configure any routing information. The default routing settings of NetPassage 15B are sufficient for broadband Internet sharing. Improper routing configuration will cause undesired effect. For example, if you have two routers in the network, where one functions as an Internet gateway and the other as a gateway to a remote office. You may define a static route in NetPassage 15B to re-route the packets to the remote office. Refer to Figure 3.4-1. Figure 3.4-1 Network with multiple gateways. One to the Internet and the other to the remote office. In this network, the main office of subnet 192.168.168.0 contains two routers, one connected to the broadband Internet via NetPassage 15B (IP 192.168.168.1) and the other connected to a remote office via NetPassage 11A (IP 192.168.168.254). The remote location resides on subnet 192.168.100.0. You may add a static routing entry into NetPassage 15B’s routing table to point the gateway 192.168.168.254 to subnet 192.168.100.0. Once added, packets with destination IP address of 192.168.100.X will be re-routed to NetPassage 11A (IP 192.168.168.254). 32 Chapter 3 Configuring NetPassage 15B Alternatively, you may also activate dynamic routing protocol on NetPassage 15B. Compex NetPassage 15B supports two types of routing protocol, RIP1 and RIP2. 3.4.1 Static Routing To add a static routing entry into NetPassage 15B’s routing table: 1. Click on the Routing URL from the Command Menu, and the routing configuration page will be displayed, as shown in Figure 3.4.1-1. Figure 3.4.1-1 Routing Configuration Page 2. To define a new static routing entry into the routing table, press the Add button. The following page will be displayed, as shown in Figure 3.4.1-2. Figure 3.4.1-2 Adding New Static Routing Entry into the Routing Table 3. 4. Enter the destination network address into the Destination IP Address field and the IP address of the gateway connected to this network into the Gateway IP Address field. For example if a gateway of IP 192.168.168.254 is connected to a remote network 192.168.100.0, enter the Destination IP Address and Gateway IP Address as 192.168.100.0 and 192.168.168.254 respectively. Press the Apply button to add the new static routing entry into NetPassage 15B’s routing table 3.4.2 Dynamic Routing To enable dynamic routing protocol: 33 Chapter 3 Configuring NetPassage 15B 1. 2. 3.5 Click to expand the Dynamic Routing drop down menu and select the preferred dynamic routing protocol, RIP1 or RIP2. (Figure 3.4.1-1) Press the Apply button for the changes to be effective. IP Packet Filtering Compex NetPassage 15B enables the users to define administrative functions based on packet filtering rule. With IP packet filtering, you may perform Time-based Access Management and Internet Application Filtering. Time-based Access Management selectively allow or disallow certain computers in the network to access to the Internet in different time frame. For example, you may define a function to allow your children to access to the Internet only between 8:00PM to 10:00PM. Internet Application Filtering selectively allow/disallow certain application to connect to the Internet. For example, if you wish to allow only web browsing in the network, you may define a function to allow only HTTP protocol to pass through the NetPassage 15B. 3.5.1 Time-based Access Management To define a function for Time-based Access Management: 1. 2. Before proceeding to define a function for Time-based Access Management, ensure that your NetPassage 15B’s router clock has been synchronized with your computer. Refer to Section 3.8.2 titled Synchronizing Router’s Clock with your Computer on how to synchronize the router’s clock. Click on the Filtering URL from the Command Menu and the table listing defined packet filter function will be displayed, as shown in Figure 3.5.1-1. In this page, you may Add, Delete or Edit a filtering function. You may also select to send or discard the packet if it matches the filtering rules. Figure 3.5.1-1 Table Listing Defined Filter Functions 3. 34 Press the Add button to define a new function for Time-based Access Management. The following page will be displayed, as shown in Figure 3.5.1-2. Chapter 3 Configuring NetPassage 15B Figure 3.5.1-2 Defining Filtering Function 4. To define a rule for Time-based Access Control, you need to know the IP address of the computers where this rule applies. For example, if you wish to disallow two computers (IP address of 192.168.168.10 and 192.168.168.11) to access to the Internet between 10:00PM to 8:00AM, you may define a rule with the following parameters: Rule Name IP Address (From) (To) Destination Port (From) (To) Day of the Week (From) (To) Time of the day (From) (To) 5. 6. 7. Enter your preferred name for this rule Select Range from the drop down menu 192.168.168.10 192.168.168.11 Any <blank> <blank> Any Sun Sun Select Range from the drop down menu 22:00 08:00 Press the Apply button to add this filtering function into the list. Ensure that the Sent radio button is “checked”. Press the Apply button for the changes to be effective. 3.5.2 Internet Application Filtering To define a function to perform Internet Application Filtering: 1. 2. 35 Press the Add button at the filtering configuration page as shown in Figure 3.5.1-1. To define a rule to perform Internet Application Filtering, you need to know the TCP port of the application of which this rule applies. For example, if you wish to Chapter 3 Configuring NetPassage 15B stop the computers from connecting to the Internet via a TELNET (uses TCP Port 23) session, you may define a rule with the following parameters: Rule Name IP Address (From) (To) Destination Port (From) (To) Day of the Week (From) (To) Time of the day (From) (To) 3. 4. 5. 3.6 Enter your preferred name for this rule Select Any from the drop down menu <blank> <blank> Select Single from the drop down menu 23 <blank> Any Sun Sun Select Any from the drop down menu <blank> <blank> Press the Apply button to add this filtering function into the list. Ensure that the Sent radio button is “checked”. Press the Apply button for the changes to be effective. Managing NetPassage 15B from the Internet Compex NetPassage 15B is integrated with an HTTP Server, enabling router management from the private network with just a JAVA-enabled web browser. It may also be managed via a Command Console. In addition, Compex NetPassage 15B supports Remote Router Management, allowing the network administrators to manage the router from the Internet, either by a web browser or via a TELNET session. 3.6.1 Activating Remote Router Management To activate Remote Router Management from the Internet: 1. Click on the Remote Management URL from the Command Menu and the remote management activation page will be displayed, as shown in Figure 3.6.1-1. Figure 3.6.1-1 Activating Remote Router Management 36 Chapter 3 Configuring NetPassage 15B 2. Enter the desired TCP port that you wish to use for Remote Router Management. Default value of “0” disables this feature. HTTP Port Specify the desired port for remote router management via a web browser. If you have specified a non-standard TCP port for this field, you need to specify the port number when you connect to the management interface from the Internet. For example, if your ISP has assigned 203.120.12.30 to NetPassage 15B’s WAN interface and you have chosen to use port 2000 for HTTP remote management, you may connect to the router management interface by using http://203.120.12.30:2000. TELNET Port Specify the desired port for remote router management via a TELNET session (Command Console). If you have specified a non-standard TCP port for this field, you need to specify the port number when you connect to the command console from the Internet. For example, if your ISP has assigned 203.120.12.30 to NetPassage 15B’s WAN interface and you have chosen to use port 5000 for TELNET remote console management, you may connect to the router command console by TELNET to port 5000 of 203.120.12.30 3. 3.7 Press the Save button followed by the Reboot button to complete the process. Load Balancing & Fail-Over Redundancy with Parallel Broadband Designed with the unique Parallel Broadband technology, Compex NetPassage 15B provides scalable Internet bandwidth with Load Balancing and Fail-Over Redundancy. If multiple units of NetPassage 15B are installed in the network, the Internet traffic will be balanced across multiple broadband channels, delivering virtually a combined aggregated bandwidth while functioning as Fail-Over Redundancy. Figure 3.7-1 Parallel Broadband with Multiple Broadband Channels 37 Chapter 3 Configuring NetPassage 15B 3.7.1 Implementing Parallel Broadband To implement Parallel Broadband, you need to install two or more units of NetPassage 15B in the network, each connected to its broadband Internet service account. There is no restriction on the type of broadband Internet accounts that they are connected to. For example, if you have two NetPassage 15Bs in the network, you may have one connected to Cable Internet whereas the other connected to ADSL line. Once the Parallel Broadband is implemented, these two NetPassage 15Bs will balance the Internet traffic among them while functioning as Fail-Over Redundancy to each other. To activate Parallel Broadband: 1. Click on the Parallel Broadband URL from the Command Menu and the Parallel Broadband activation page will be displayed, as shown in Figure 3.7.1-1. Figure 3.7.1-1 Activating Parallel Broadband 2. Check the Enable radio button and press the Apply button. NOTE You DO NOT need to implement Parallel Broadband for Internet sharing using one unit of NetPassage 15B. 38 Chapter 3 Configuring NetPassage 15B 3.8 NetPassage 15B’s System Tools The web-based configuration interface of NetPassage 15B comes with a set of system tools for you to define name for your NetPassage 15B, setting the router’s clock, upgrading the firmware, saving & restore router’s profile and changing the administrative password. 3.8.1 Setting Router Identity You may define a name for your NetPassage 15B. This name will also be used as a DHCP Client ID when it negotiates for an IP release from your ISP. 1. Click on the Router Identity URL from the Command Menu and the router identity configuration page will be displayed, as shown in Figure 3.8.1-1. Figure 3.8.1-1 Configuring Router’s Identity 2. 3. Enter the Name, the Contact person and the Location of the NetPassage 15B. Press the Apply button for the changes to be effective. 3.8.2 Synchronizing Router’s Clock with your Computer Compex NetPassage 15 is specially designed with a SNTP compatibility and router’s clock that can be synchronized with the managing computer. The administrative function such as Time-based Access Control relies on the router’s clock. Therefore, it is important that the router’s clock is set correctly. 1. 39 Click on the Set Router’s Clock URL from the Command Menu and the System Time Setting window will be displayed, as shown in Figure 3.8.2-1. Chapter 3 Configuring NetPassage 15B Figure 3.8.2-1 Synchronizing Router’s Clock 2. 3. 4. 5. The Proposed Router Time will display the system time of your managing computer. Select the Enable radio button at Auto Time Setting and enter your preferred time server in the text box. (please refer to Figure 3.8.2-1) Press the Apply button for the changes to be effective. Save the configuration profile. 3.8.3 Upgrading Router’s Firmware Compex NetPassage 15B comes with the firmware upgrade capability. You may download the latest firmware from Compex corporate website (http://www.compex.com.sg or http://www.cpx.com) and update the firmware of your NetPassage 15B. 1. Click on the Firmware Upgrade URL from the Command Menu and the firmware upgrade page will be displayed, as shown in Figure 3.8.3-1 Figure 3.8.3-1 Upgrading Router’s Firmware 2. 3. 40 Press the Browse button and locate the firmware image from your computer. Press the Upgrade button to update your NetPassage 15B’s firmware. It is critical that the power supply is not cut off during the firmware upgrade process. Once the firmware upgrade process is completed, your NetPassage 15B will restart. Chapter 3 Configuring NetPassage 15B CAUTION Make sure that the power supply is not cut off during the firmware upgrade process. If the NetPassage 15B looses power supply during firmware upgrade process, the firmware will be corrupted and the NetPassage 15B will no longer be functional. 3.8.4 Profile Saving, Restore & Reset to Defaults You may save the configuration profile of your NetPassage 15B onto the hard disk of your managing computer and restore this profile in a later time. You may also reset the configuration of your NetPassage 15B to factory defaults. 1. Click on the Save or Reset Settings URL from the Command Menu and the following page will be displayed, as shown in Figure 3.8.4-1. Figure 3.8.4-1 Saving, Restore and Reset Profile 2. Press the Save button if you wish to save the configuration profile into NetPassage 15B’s flash ROM. Press the Backup button if you want to save the configuration profile onto the hard disk. If you want to restore a profile, press the Browse button to select the file from the hard disk and press the Restore button. If you wish to reset your NetPassage 15B back to factory defaults, press the Clear and Reset button. CAUTION Pressing the Clear and Reset button will discard all the configuration you have saved to NetPassage 15B’s flash ROM. 3.8.5 Rebooting NetPassage 15B You may reboot your NetPassage 15B manually from the web-based management interface. Please always ensure that the changes have been saved before rebooting the router. 41 Chapter 3 Configuring NetPassage 15B CAUTION If you reboot the NetPassage 15B without saving the configuration, all the unsaved configuration will be lost after reboot. 1. 2. Click on the Reboot Router URL from the Command Menu. Press the Yes button to reboot the router. 3.8.6 Changing Administrative Password By default, the administrative password is “password”. You may change the password to your preferred string. 1. 2. 42 Click on the Change Password URL from the Command Menu. Type in the Old Password, the New Password and Confirm Password. Press the Change Password button to make the changes effective. Appendix A Console Commands Appendix A Console Commands SHOW Command SYNTAX SHOW IP SHOW IP STAT SHOW ICMP STAT SHOW UDP STAT SHOW TCP STAT SHOW IP ROUTE TABLE SHOW IP STATIC NAT TABLE SHOW PORT STATIC NAT TABLE SHOW SYSTEM SHOW RIP SHOW GATEWAY SHOW DHCP SHOW DHCP RESERVE SHOW DHCP LEASE SHOW ETHERNET ADDRESS SHOW TELNET SESSION SHOW TIME SHOW NAT STAT SHOW ARP TABLE SHOW FILTER DESCRIPTION Display the IP information of the LAN and WAN interface Display the statistics of the IP packets Display the statistics of the ICMP packets Display the statistics of the UDP packets Display the statistics of the TCP packets Display the routing table List defined virtual servers based on IP forwarding List defined virtual servers based on port forwarding Display the system information Display the status of the dynamic routing protocol Display the gateway IP address of the WAN interface Display the DHCP information Display the DHCP reservations Display the leased IP information Display the MAC address of the LAN & WAN interface Display the source IP of the open TELNET console session Display current router’s time Display the status of the NAT Display the ARP table in the router List defined IP packet filtering rules SET Command SYNTAX SET IP LAN <IP ADDR> <NETMASK> SET IP WAN <IP ADDR> <NETMASK> SET GATEWAY <IP ADDR> SET SYSTEM NAME <STRING> SET SYSTEM CONTACT <STRING> SET SYSTEM LOCATION <STRING> SET PASSWORD SET TIMEZONE <GMT DIFF> SET TIME <HH:MM:SS> SET DATE <MM/DD/YYYY> SET DHCP SERVER SET PROMPT “<STRING>” SET WAN TYPE SET FILTER MODE DESCRIPTION Set the IP address of the LAN interface Set the IP address of the WAN interface Set the gateway IP address of the WAN interface Set the router’s identity Specify the contact person for this router Specify the location of this router Changing the administrative password Set the timezone based on GMT time difference Set the router’s time Set the router’s date Configure the DHCP server Set the text appear at the command console Select the WAN type Set the option on IP packet filtering rules PING Command SYNTAX PING <IP ADDR> DESCRIPTION Ping a host by its IP address DELETE Command SYNTAX DELETE ARP <IP ADDR> DELETE IP ROUTE <DES> <GATEWAY> DELETE IP STATIC NAT <INDEX> 43 DESCRIPTION Remove an IP address from the ARP table Remove an entry from the routing table Delete an entry from the list of defined virtual server based on IP Appendix A Console Commands DELETE PORT STATIC NAT <INDEX> DELETE DHCP RESERVE <INDEX> DELETE FILTER <INDEX> forwarding. You may obtain the <INDEX> by listing the defined IP forwarding table with the command “SHOW IP STATIC NAT TABLE” Delete an entry from the list of defined virtual server based on port forwarding. You may obtain the <INDEX> by listing the defined port forwarding table with the command “SHOW PORT STATIC NAT TABLE” Delete a DHCP reservation from the list. The <INDEX> is the sequence from top by listing the DHCP reservation table with the command “SHOW DHCP RESERVE” Delete an IP packet filtering rule. You may obtain the <INDEX> by listing the defined IP filtering rule with the command “SHOW FILTER” RESET Command SYNTAX RESET SYSTEM RESET CONFIG DESCRIPTION Reboot the router Reset the configuration back to factory defaults ADD Command SYNTAX ADD IP ROUTE <DES> <GATEWAY> ADD IP STATIC NAT <PRI IP> <PUB IP> ADD PORT STATIC NAT <PRI IP> <TCP/UDP> <FROM PORT> <TO PORT> “<RULE NAME>” ADD DHCP RESERVE <PRIV IP> “<HOST NAME>” <MAC ADDR> ADD FILTER DESCRIPTION Add an entry to the routing table Add a virtual server based on IP forwarding Add a virtual server based on Port Forwarding Add a DHCP reservation Add a IP packet filtering rule ENABLE Command SYNTAX ENABLE RIP <VERSION> ENABLE NAT ENABLE DHCP SERVER DESCRIPTION Enable RIP version 1 or 2 Enable Network Address Translator Enable DHCP server DISABLE Command SYNTAX DISABLE RIP DISABLE NAT DISABLE DHCP SERVER DESCRIPTION Disable RIP Disable Network Address Translator Disable DHCP server SAVE Command SYNTAX SAVE CONFIG DESCRIPTION Save the changes in configuration to the router’s flash ROM DISCONNECT Command SYNTAX DISCONNECT TELNET SESSION DESCRIPTION Disconnect from the TELNET console management EDIT Command SYNTAX EDIT FILTER <INDEX> 44 DESCRIPTION Edit a defined IP packet filtering rule Appendix B ISP-Specific Notes Appendix B B.1 ISP-Specific Notes Singapore SingNet Broadband WAN Type: Username Format: B.2 Singapore Pacific Internet Broadband WAN Type: Username Format: B.3 PPP over Ethernet (PPPoE) <username>@singnet.com PPP over Ethernet (PPPoE) <username>@pacific.net.sg Germany T-DSL & T-Online WAN Type: Username Format: PPP over Ethernet (PPPoE) <Connection ID><T-Online Number>#[email protected] NOTE The <Connection ID> and <T-Online Number> are provided by German Telecom. B.4 Australia Optus@Home WAN Type: DHCP Client ID: 45 Dynamic IP Set as Router’s Identity Appendix C Troubleshooting Appendix C Frequently Asked Questions C.1 Based on which firmware release is this User’s Manual written? This User’s Manual is written based on NetPassage 15B firmware release 2.74 build 1000. C.2 I have forgotten the IP address that I have set on my NetPassage 15B, what should I do? You may run the utility NPFIND.EXE located in the Product CD, it will report the IP address of the NetPassage 15B found in the network. C.3 The “CONN” LED on my NetPassage 15B is flashing rapidly, and I cannot connect to the web-based configuration interface, why? The rapid flashing of the “CONN” LED indicates that the router firmware has been corrupted. The firmware recovery utility may be found on the Product CD. C.4 I have configured NetPassage 15B with my broadband Internet account. I am able to PING the ISP gateway IP address. However, I cannot surf the Internet. If you have not configured the DHCP server to configure the DNS information of the computers in the network, you need to manually configure the DNS entry on every computer. Without the DNS server, your will not be able to resolve domain name (eg www.compex.com.sg) into IP address. Refer to Section 2.2.2 on how to configure for DNS server on the computer. C.5 I am using Cable Internet and have tried to configure NetPassage 15B to work with it. I just couldn’t get the ISP to release an IP to me. When I connected my computer directly to the Cable modem, I am able to surf the Internet. Your ISP has probably logged the MAC address of your computer. You should clone the MAC address of your computer to NetPassage 15B. Refer to paragraph titled Cloning MAC Address to NetPassage 15B under Section 3.2 C.6 I have forgotten the IP address and the log in password. Is there any possibility to reset NetPassage 15B to factory’s default. You can perform a hardware reset by first removing the covering case of NetPassage 15B. Manipulate the jumpers according to the table below to achieve the desired effect. Action Normal JP4 JP5 JP6 Closed Closed Closed Reset Password to default value Closed Open Closed *Note: JP4: Reserved for future use. It is always Closed. 46 Reset to factory default setting Closed Closed Open Appendix C Troubleshooting JP6 JP5 JP4 Procedure for resetting password to default: 1. Switch OFF NetPassage 15B. 2. Remove jumper JP5. 3. Switch ON the router. The DIAG led will light up for a few seconds and off. 4. Switch OFF the router again and put back the jumper. 5. The password for the router will then be reset. To confirm this has been done, switch ON the router and log on to the Remote Access Router Manager again. (Refer to Section 2.3, “Connecting to the Configuration Interface”) Procedure for resetting to factory default: 1. Switch OFF the NetPassage 15B. 2. Remove jumper JP6. 3. Switch ON the router. The DIAG led will light up for a few seconds and off. 4. Switch OFF the router again and put back jumper. 5. The router configuration will then be reset. To confirm this has been done, switch ON the router and log on to the Remote Access Router Manager again. (Refer to Section 2.3, “Connecting to the Configuration Interface”) 47