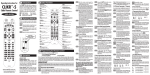
1
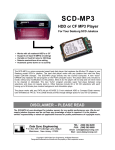
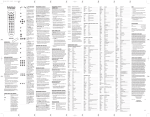
FEATURES AND FUNCTIONS
Comcast Custom DVR 3-Device
Universal Remote Control
Use the remote control’s mode keys
(i.e., AUX, TV, or Cable) to control a specific device. When pressed, the selected
mode key will light, confirming your
choice. Use the other keys to perform
desired actions (see the following key
chart).
NOTE: The selected mode will remain active
until you press another mode key.
Press AUX, TV, or Cable
once to select and
control a device.
Press Power once to
turn on or off the
selected home entertainment device.
Use Setup for all
programming
sequences.
Press All On once to
turn on or off all
programmed devices
in this order: Cable,
TV, and AUX. After all
devices are on, Cable
is the active mode.
Press ON DEMAND once
to access Comcast’s ON
DEMAND menu (not
available in all areas).
User Guide
OVERVIEW
The Comcast Custom DVR 3-Device
universal remote will control up to
three home entertainment devices,
including a Digital Video Recorder
enabled Cable Box (used by Comcast
Systems).
In the AUX or TV mode,
use the transport keys
to control a VCR,
PVR, or DVD player.
To record a program
on a VCR, press REC
twice.
In the Cable mode, use
the keys to control ON
DEMAND programs.
The remote control requires installing
two (2) new AA batteries (included)
and some easy programming to control your devices. For best results,
please read and perform all instructions listed here. Also, keep this guide
for future reference.
Press REPLAY to replay
the previous few
seconds of a program.
INSTALLING BATTERIES
Use A, B, or C to access
interactive program
guide functions on
your Scientific Atlanta
Explorer, Pioneer
Voyager, or PACE
cable box.
1.
Pull back the remote control’s
battery cover and remove it.
2.
Insert the two (2) supplied AA
batteries according to the + and marks in the battery case.
3.
Push the battery cover back into
place.
4.
Test the unit by pressing any
mode key (i.e., AUX, TV, or Cable).
If batteries are inserted correctly,
the selected mode key will light.
NOTE: When the batteries need to be
replaced, the remote control will stop working. Replace the old batteries and the unit
will be restored to its full functionality, complete with your favorite settings.
Press My DVR to show
a list of programs that
have been recorded.
Press LIVE to return to
watching live TV.
Use Page+ (or Page–)
to page up (or down)
through menu screens
and the interactive
program guide.
Use Guide to display
the interactive
program guide.
Use these keys to move
the cursor in the interactive program guide
and menu screens.
Use OK (Select)to select
menu options, PPV
events, and programs
from the interactive
program guide.
TV Code:
Use PIP Move to move
the picture to different
positions in the main
picture.
Use Info to display
current channel and
program information.
Use Menu to display
the Quick Menu (on a
Motorola, GI, or
Jerrold Cable Box), or
to access settings (on a
Scientific Atlanta
Explorer, Pioneer
Voyager, or PACE
cable box).
Use Exit to exit the
menu or guide.
Use Help to access
digital cable help.
Use Last to recall the
last channel or go back
one screen in the menu.
Use VOL+ (or VOL-)
to raise (or lower) the
sound volume. Also
see Changing Volume
Lock.
Press Mute once to
turn sound off or on.
Use PIP CH + (or CH -)
to select the next higher or lower PIP
channel.
PROGRAMMING DEVICE
CONTROL
The Comcast Custom 3-Device universal remote control is preprogrammed at
the factory to operate the Cable Box
supplied by your Comcast system, an
RCA TV, and an RCA VCR (in the AUX
mode). To control devices other than
default brands (excluding the Cable
Box), perform the below steps; otherwise skip this section:
1.
NOTE: Please read steps 2 to 6 completely before proceeding. Highlight or write
down the codes and device you wish to
program before moving on to step 2.
2.
In the Cable mode,
press FAV once to
display programmed
favorite cable channels.
Use CH+ (or CH-) to
select the next higher
(or lower) channel.
Turn on a device (e.g., VCR or DVD
Player) and, if applicable, insert
media, (e.g., video cassette or disc).
3.
Use the keypad (0 ~ 9)
to directly select the
channels (e.g., 09 or
031).
5.
Enter the first four-digit code for
your device. If you perform this
procedure correctly, the selected
mode key will blink twice.
Use Enter to enter
channels on some TV
models or information
on menu screens.
Press PIP On-Off to
display the PIP
Window.
>Use PIP Swap to
switch the images and
sound between the
main and window pictures.
NOTE: If you enter an invalid code, the
selected mode key will display one long
blink and exit the programming mode.
Repeat steps 2 to 5 with a valid code.
Aim the remote control at your
device and press Power once. The
device should turn off. If it does
not respond, repeat steps 2 to 6,
trying each code listed for your
brand until you find one that
works. If it still does not work, try
Searching For Your Code.
NOTE: If the device does not have a
Power key, press the (Play) key.
7.
1.
Turn on your TV.
2.
On the remote control, press TV
once. Then press and hold Setup
until the TV key blinks twice, then
release Setup.
3.
Enter 9 - 9 - 1. The TV key will
blink twice.
4.
Aim the remote control at the the
TV and slowly alternate between
pressing Power and TV.
For future reference, write your
device code in the appropriate
boxes below:
5.
Press Setup once to lock in the
code.The TV key will blink twice.
6.
To search for the codes of another
device, repeat steps 1 to 5, but
substitute the AUX key for the auxiliary device you are searching for.
CHECKING THE CODES
If you have set up the remote control
using the Searching For Your Code
procedure, you may need to find out
which four-digit code is operating your
equipment. Perform the following steps
after setting up your devices to find out
which four-digit code operates your
equipment. For example, to find out
which code is operating your TV:
1.
Turn on your TV.
2.
On the remote control, press TV
once. Then press and hold Setup
until the TV key blinks twice, then
release Setup.
3.
Enter 9 - 9 - 0. The TV key will
blink twice.
4.
To view the code for the first digit,
press 1 once. Wait 3 seconds and
count the number of times the TV
key blinks (e.g., 3 blinks = 3) and
write down the number in the
leftmost TV Code box (at end of
this section).
AUX Code:
NOTE: If a code digit is “0”, the selected mode key will not blink.
Device Type:______________
5.
Repeat step 4 three more times for
the remaining digits. Use 2 for the
To check another device code,
repeat steps 1 to 5, but substitute
the AUX key for the auxiliary
device you are checking. Write
down the codes in the appropriate
boxes below:
Locking Volume Control To TV or
AUX Mode:
1.
Press and hold SETUP until the
Red light flashes twice, then
release SETUP.
2.
Enter 9 - 9 - 3 (Red light will flash
twice).
3.
Press and release either TV or AUX
(Red light for selected device will
flash twice).
AUX Code:
REASSIGNING DEVICE KEYS
Device Type:______________
For example, after trying all of the
codes for your TV, you still cannot get
the remote control to operate your TV,
then:
NOTE: In the search mode, the
remote control will send IR codes
from its library to the selected device,
starting with the most popular code
first.
Locate the code for your device in
Manufacturer’s Codes on the back
of this user guide. Brands are listed in alphabetical order with the
most popular codes listed first.
6.
If your home entertainment device does
not respond to the remote control after
trying all of the codes listed for your
brand, or if your brand is not listed at all,
try searching for your code.
NOTE: Use the AUX key to program
control of an Audio Amplifier or
Receiver, a DVD Player, a HomeTheater-In-A-Box Device, a PVR (or
DVR), or a VCR.
Press and hold Setup until the
selected mode key blinks twice,
then release Setup.
6.
SEARCHING FOR YOUR CODE
Stop when the TV turns off. A
working code has been found.
4.
In the AUX mode, use
this key to switch the
VCR, PVR (or DVR),
or DVD player to view
TV or video. For an
audio device, use it to
switch to an input
source.
Repeat steps 1 to 7 for another
device you want to control.
On the remote control, press a
device key once (i.e., AUX or TV).
When controlling a
DVD player, use CH+
(or CH-) to skip forward (or skip reverse)
through video.
In the TV mode, use
this key to switch the
TV’s input to view TV
or video programs.
8.
second digit, 3 for the third digit,
and 4 for the fourth digit. Finish
writing down the code in the TV
Code boxes (at end of this section).
TV Code:
CHANGING VOLUME LOCK
The Comcast Custom 3-Device universal
remote control is set at the factory to
control the TV volume in all modes.
However, you may change the Volume
Lock setting to Individual Volume
Unlock to unlock a specific device’s volume controls for independent operation in its own mode (e.g., Audio
Receiver volume controls in the AUX
mode).
Or, if desired, you can perform Global
Volume Unlock so that the volume
controls of all devices can be independently operated in their own modes.
Unlocking Volume Control For A
Single Device (Individual Volume
Unlock):
The Comcast Custom 3-Device universal
remote control can be set up to control
a second device.
For example, to have the unit control a
TV, a Cable Box, and second TV, you
will need to reassign the unused AUX
key to operate the second TV as follows:
1.
On the remote control, press AUX
once. Then press and hold Setup
until the AUX key blinks twice,
then release Setup.
2.
Enter 9 - 9 - 2. The AUX key will
blink twice.
3.
Press TV once, then press AUX
once. The AUX key will blink
twice.
4.
The AUX key is now ready to be
programmed for your second TV.
See Programming Device Control
for instructions.
PROGRAMMING CHANNEL
CONTROL LOCK
1.
Press a desired mode key where
you want volume to be unlocked
(e.g., AUX) and controlled within
its own mode.
By default, the remote control’s channel-control capabilities are locked to the
Cable Box. The affected keys are 0 ~ 9,
CH+, CH-, Enter, and Last.
2.
Press and hold Setup until the
selected mode key blinks twice,
then release Setup.
3.
Enter 9 - 9 - 3 and then press VOLonce. The mode key will blink
four times confirming unlock.
This will guarantee that you do not
inadvertently change a channel while in
the TV mode. However, you can turn
off this feature to allow full access to
these keys in the TV and Cable modes.
4.
5.
If desired, repeat steps 1 to 3 (of
this section) for each device that
you want volume to be unlocked.
Now, after you select a device that
has volume unlocked (e.g., AUX),
pressing VOL+, VOL-, or Mute, will
control the device’s volume only
in its own mode.
Unlocking All Volume Controls
(Global Volume Unlock):
1.
Press and hold Setup until the
selected mode key blinks twice,
then release Setup.
2.
Enter 9 - 9 - 3 and then press
VOL+ once. The mode key will
blink four times confirming
unlock.
3.
Now, volume controls for all
devices can be independently
controlled in their own modes.
NOTE: This feature does not affect the AUX
mode.
De-Activating Channel Control Lock
1.
On the remote control, press
Cable once. Then press and hold
Setup until the Cable key blinks
twice, then release Setup.
2.
Enter 9 - 7 - 3. Press CH- once.
The Cable key will blink four
times.
3.
Now, the remote control will
provide TV or cable channel
control capabilities while in the
TV or Cable mode.
Re-Activating Channel Control Lock
1.
On the remote control, press
Cable once. Then press and hold
Setup until the Cable key blinks
twice, then release Setup.
2.
Enter 9 - 7 - 3. Press CH+ once.
The Cable key will blink twice.
3.
Now, regardless if you select the
TV or Cable mode, only the channel control capability of your
cable box will be accessible.
TROUBLESHOOTING
PROBLEM: A mode key does not blink
when you press a key.
SOLUTION: Replace the batteries with
two (2) new AA batteries.
PROBLEM: During programming, a
mode key displays one
long blink.
SOLUTION: An invalid entry has
occurred. Check the key
to be entered and try
programming again.
PROBLEM: A mode key blinks when
you press a key, but home
entertainment component does not respond.
SOLUTION: Make sure the remote
control is aimed at your
home entertainment
device and is not farther
than 15 feet away.
PROBLEM: The remote control does
not control home entertainment devices or the
commands are not working properly.
SOLUTION: Try all listed codes for
the device brands being
set up. Make sure they
can be operated with an
infrared remote control.
PROBLEM: CH+, CH-, and Last do not
work for your RCA TV.
SOLUTION: Due to RCA design
(1983–1987), only the
original remote control
will operate these
functions.
PROBLEM: Changing channels does
not work properly.
SOLUTION: If original remote control
required pressing Enter
to change channels, also
press Enter on this
remote control after
entering the channel
number.
MANUFACTURER’S CODES
Setup Codes For Audio Amplifiers
Carver
GE
JVC
Linn
Luxman
Magnavox
Marantz
Nakamichi
Philips
Polk Audio
Sansui
Soundesign
Victor
Wards
Yamaha
0269
0078
0331
0269
0165
0269
0321, 0269
0321
0269
0269
0321
0078
0331
0078
0354
Setup Codes For Audio Receivers
ADC
Aiwa
Bose
Capetronic
Carver
Denon
Harman/Kardon
Integra
JBL
JVC
Kenwood
Linn
Magnavox
Marantz
Marantz
MCS
Onkyo
Optimus
Panasonic
Panasonic
Philips
Pioneer
Polk Audio
Proscan
Quasar
RCA
Sansui
Sony
Stereophonics
Sunfire
Technics
Technics
Victor
Wards
Yamaha
0531
0158, 0189, 0405
1229
0531
0189
1360, 1104
0110, 0189
0135
0110
0074
1313, 1570, 0027, 1027
0189
0189, 0531
0189
1039
1039
0135, 0842
1023, 0531
1518
1039
0189, 1266
1023, 0014, 1384, 0531
0189
1254
1039
1023, 1254, 0531
0189
1759, 0158, 1758
1023
1313
1308, 1518
1039
0074
0158, 0189, 0014
0176, 1176
Setup Codes For Cable Boxes
ABC
Director
General Instrument
GoldStar
Hamlin
Jerrold
Memorex
Motorola
MultiVision
Pace
Panasonic
Paragon
Pioneer
Pulsar
Quasar
Runco
Samsung
Scientific Atlanta
Starcom
0003, 0008, 0017
0476
0476, 0276, 0003
0144
0009
0476, 0276, 0003, 0012
0000
0476, 0276, 1376
0012
1877
0000
0000
0877, 1877, 0144, 0533
0000
0000
0000
0144
0877, 1877, 0477, 0008, 0017
0003
Supercable
Tocom
Torx
Toshiba
Zenith
0276
0012
0003
0000
0000
Setup Codes For Digital Video Disks
Anam
Apex Digital
0797, 0796
Blaupunkt
Blue Parade
Broksonic
Denon
DVD2000
Emerson
Enterprise
Fisher
Funai
GE
Go Video
Greenhill
Harman/Kardon
Hitach
Hiteker
Initial
JVC
Kenwood
KLH
Koss
Lasonic
Magnavox
Marantz
Memorex
Microsoft
Mintek
Mitsubishi
Nesa
Onkyo
Oritron
Panasonic
Philips
Pioneer
Polk Audio
Proscan
Qwestar
RCA
1913, 1132
Rotel
Sampo
Samsung
Sansui
Sanyo
Sharp
Shinsonic
Sony
Superscan
Sylvania
Symphonic
Technics
Theta Digital
Toshiba
Urban Concepts
Xbox
Yamaha
Zenith
--- HTiB (Y) --Anam
Apex Digital
Koss
Oritron
Panasonic
Philips
Polk Audio
RCA
Samsung
Sony
1913
0672, 0717, 0794, 1915, 0755,
0717
0571
0695
0490, 0634
0521
0591, 0821, 0675
0591
0670
0675
0522, 0717
0783, 0715
0717
0582
0573, 0664
0672
0717
0558, 0623, 0867
0490, 0534, 0682
0717
0651
0798
0503, 0821, 0675, 1914
0539
0695
0522
0717
0521
0717
0503
0651
0490, 1490, 0632, 1907
0503, 0539, 0854, 1914
0525, 0571, 0632
0539
0522
0651
0522, 0571, 0717, 1022, 0822,
0623
0698
0490, 0573, 0820, 1932
0695
0670, 0695
0630
0533
0533, 0864, 1903, 1904
0821
0821, 0675
0675
0490
0571
0503, 1045, 0695
0503
0522
0490, 0539, 0545
0503, 0591
1913
1915
0651
0651
1907
1914
0539
1913
1932
1904, 1903
Setup Codes For DVD Players
Setup Codes For TVs
Anam
Apex Digital
A-Mark
0003
Admiral
0093, 0463
Advent
0761, 1933, 0842
Adventura
0046
Aiko
0092
Aiwa
0701
Akai
0702, 0030
Alaron
0179
Albatron
0843
Ambassador
0177
America Action
0180
Ampro
0751
Anam
0180
AOC
0030, 0003
Apex Digital
0748, 0765, 0879
Archer
0003
Audiovox
0451, 0180, 0092, 0003
Bell & Howell
0154, 0016
Bradford
0180
Broksonic
0236, 0463, 0003
Candle
0030, 0046, 0186, 0056
Carnivale
0030
Carver
0054
Celebrity
0000
Celera
0765
Changhong
0765
Citizen
0060, 0030, 0056, 0186, 0046,
0092, 0280
Clarion
0180
Concerto
0056
Contec
0180
Craig
0180
Crosley
0054
Crown
0180
Curtis Mathes
0047, 0054, 0154, 0451, 0093,
0060, 0702, 0030, 0145, 0166, 0466, 0056, 0016
CXC
0180
Daewoo
0451, 0092
Denon
0145
Dumont
0017
Durabrand
0180, 0178, 0003
Dwin
0720, 0774
Electroband
0000
Elektra
0017
Emerson
0154, 0236, 0463, 0180, 0178,
0171, 0282, 0179, 0280, 0038, 0177
Envision
0030
Fisher
0154
Fujitsu
0809, 0683, 0179
Funai
0180, 0171, 0179
Futuretech
0180
Gateway
1756, 1755
GE
0047, 0051, 0451, 0178, 0282,
0027, 0021
Gibralter
0017, 0030
GoldStar
0030, 0178, 0001
Grunpy
0180, 0179
Hallmark
0178
Harley Davidson
0179
Harman/Kardon
0054
Harvard
0180
Havermy
0093
Hello Kitty
0451
Himitsu
0180
Hisense
0748
Hitachi
0145, 0016, 0056, 0038, 0151
Infinity
0054
Inteq
0017
Janeil
0046
JBL
0054
JCB
0000
Jensen
0761, 1933
JVC
0053
KEC
0180
Kenwood
0030
KLH
0765
Kloss
0046
Konka
0707
Blaupunkt
Blue Parade
Broksonic
DVD2000
Denon
Emerson
Enterprise
Fisher
GE
Go Video
Gradiente
Greenhill
Harman/Kardon
Hitachi
Hiteker
IRT
JVC
KLH
Kenwood
Koss
Lasonic
Magnavox
Marantz
Microsoft
Mintek
Mitsubishi
Nesa
Onkyo
Oritron
Panasonic
Philips
Pioneer
Polk Audio
Proscan
Qwestar
RCA
Rotel
Sampo
Samsung
Sansui
Sanyo
Sharp
Shinsonic
Sony
Sylvania
Technics
Theta Digital
Toshiba
Urban Concepts
XBox
Yamaha
Zenith
1913
0672, 0717, 0755, 0794, 0796,
0797, 1915
0717
0571
0695
0521
0490, 0634
0591
0591
0670
0522, 0717
0715, 0783
0651
0717
0582
0573, 0664
0672
0783
0558, 0623, 0867
0717
0490, 0534, 0682
0651
0798
0503, 0675, 1914
0539
0522
0717
0521
0717
0503
0651
0490, 0632, 1490, 1907
0503, 0539, 0854, 1914
0525, 0571, 0632
0539
0522
0651
0522, 0571, 0717, 0822, 1022,
1913
0623
0698
0573, 0820, 1932
0695
0670, 0695
0630
0533
0533, 0864, 1903, 1904
0675, 0821
0490
0571
0503, 0695, 1045
0503
0522
0490, 0539, 0545
0503, 0591
Setup Codes For Home-TheaterIn-A-Box Devices
Anam
Apex Digital
Panasonic
Philips
RCA
Samsung
Sony
1913
1915
1907
1914
1913
1932
1903, 1904
Setup Codes For PVRs (or DVRs)
Panasonic
Philips
ReplayTV
Sonic Blue
Sony
Tivo
0616
0618
0616
0616
0636
0618, 0636
KTV
0180, 0030, 0280
Logik
0016
Luxman
0056
LXI
0047, 0054, 0154, 0156, 0178
Magnavox
0054, 0030, 0706, 0186, 0179
Majestic
0016
Marantz
0054, 0030
Matsushita
0250
Megatron
0178, 0145, 0003
Memorex
0154, 0463, 0150, 0178, 0179,
0016
MGA
0150, 0030, 0178
Midland
0047, 0017, 0051
Minutz
0021
Mitsubishi
0093, 0150, 0178
Monivision
0843
Motorola
0093
MTC
0060, 0030, 0056
Multitech
0180
NAD
0156, 0178
NEC
0030, 0497, 0056
Nikko
0030, 0178, 0092
Norcent
0748
NTC
0092
Onwa
0180
Optimus
0154, 0250, 0166
Optonica
0093, 0165
Orion
0236, 0463, 0179
Panasonic
0250, 0051
Penney
0047, 0156, 0051, 0060, 0030,
0178, 0003, 0027, 0021
Philco
0054, 0030
Philips
0054, 0690
Pilot
0030
Pioneer
0166, 0038
Portland
0092
Prima
0761, 1933
Prism
0051
Proscan
0047
Proton
0178, 0003, 0466
Pulsar
0017
Quasar
0250, 0051, 0165
RadioShack
0047, 0154, 0180, 0030, 0178,
0165, 0056
RCA
0047, 0038, 0090
Realistic
0154, 0180, 0030, 0178, 0165,
0056
Runco
0017, 0030, 0603, 0497
Sampo
0030, 1755
Samsung
0060, 0702, 0030, 0178, 0056
Sansui
0463
Sanyo
0154
Scotch
0178
Scott
0236, 0180, 0178, 0179
Sears
0047, 0054, 0154, 0156, 0178,
0171, 0056, 0179
Sharp
0093, 0165
Sheng Chia
0093
Signature
0016
Simpson
0186
Sony
0000, 0111
Soundesign
0180, 0178, 0186, 0179
Spectricon
0003
Squareview
0171
SSS
0180
Starlite
0180
Studio Experience 0843
Supre-Macy
0046
Supreme
0000
SVA
0748, 0865
Sylvania
0054, 0030, 0171
Symphonic
0180, 0171
Tandy
0093
Tatung
0003, 1756
Technics
0250, 0051
Technol Ace
0179
Techwood
0051, 0003, 0056
Teknika
0054, 0180, 0150, 0060, 0056,
0186, 0092, 0016, 0179
Telefunken
0702, 0056
TMK
0178, 0056, 0177
TNCi
0017
Toshiba
0154, 0156, 0060
TVS
0463
Universal
0027
Vector Research
0030
Victor
0053
Vidikron
0054
Vidtech
0178
Viewsonic
1755
Viking
0046
Wards
0054, 0030, 0178, 0021, 0165,
0016, 0111, 0179, 0027, 0056
Waycon
0156
White Westinghouse 0463
Yamaha
0030
Zenith
0017, 0463, 0178, 0016, 0092
Zonda
0003
Setup Codes For VCRs
And TV/VCR Combos
Admiral
0048, 0209
Adventura
0000
Aiwa
0037, 0000
American High
0035
Asha
0240
Audiovox
0037
Beaumark
0240
Bell & Howell
0104
Broksonic
0184, 0209, 1479
Calix
0037
Canon
0035
Carver
0081
Citizen
0037, 1278
Craig
0037, 0047, 0240
Curtis Mathes
0060, 0035, 0162, 1035
Cybernex
0240
Daewoo
0045, 1278
Denon
0042
Durabrand
0039
Dynatech
0000
Electrohome
0037
Electrophonic
0037
Emerex
0032
Emerson
0037, 0184, 0000, 0043, 0209,
1479, 1278
Fisher
0047, 0104
Fuji
0035
Funai
0000
Garrard
0000
GE
0060, 0035, 0240, 0807, 1060,
1035
GoldStar
0037, 1237
Gradiente
0000
Harley Davidson
0000
Harman/Kardon
0081
HI-Q
0047
Hitachi
0000, 0042
Hughes Network Systems
0042
JVC
0067
KEC
0037
Kenwood
0067
Kodak
0035, 0037
Lloyd's
0000
LXI
0037
Magnasonic
1278
Magnavox
0035, 0039, 0081, 0000, 1781
Magnin
0240
Marantz
0035, 0081
Marta
0037
Matsushita
0035, 0162
MEI
0035
Memorex
0035, 0162, 0037, 0048, 0039,
0047, 0240, 0000, 0104, 0209, 1237
MGA
0240, 0043
MGN Technology 0240
Minolta
0042
Mitsubishi
0067, 0043, 0807
Motorola
0035, 0048
MTC
0240, 0000
Multitech
0000
NEC
0104, 0067
Nikko
0037
Noblex
0240
Olympus
0035
Optimus
0162, 0037, 0048, 0104
Orion
0184, 0209, 1479
Panasonic
0035, 0162, 1035, 0616, 0225
Penney
0035, 0037, 0240, 0042, 1237,
1035
Pentax
0042
Philco
0035
Philips
0035, 0081, 0618
Pilot
0037
Pioneer
0067
Polk Audio
0081
Profitronic
0240
Proscan
0060, 1060
Pulsar
0039
Quasar
0035, 0162, 1035
RadioShack
0000
Radix
0037
Randex
0037
RCA
0060, 0240, 0042, 1035, 0807,
1060
Realistic
0035, 0037, 0048, 0047, 0000,
0104
ReplayTV
0616
Runco
0039
Samsung
0240, 0045
Sanky
0048, 0039
Sansui
0000, 0067, 0209, 1479
Sanyo
0047, 0240, 0104
Scott
0184, 0045, 0043
Sears
0035, 0037, 0047, 0000, 0042,
0104, 1237
Sharp
0048, 0807
Shogun
0240
Sonic Blue
0616
Sony
0035, 0032, 0000, 0636, 1232
STS
0042
Sylvania
0035, 0081, 0000, 0043, 1781
Symphonic
0000
Teac
0000
Technics
0035, 0162
Teknika
0035, 0037, 0000
Thomas
0000
Tivo
0618, 0636
TMK
0240
Toshiba
0045, 0043
Totevision
0037, 0240
Unitech
0240
Vector
0045
Video Concepts
0045
Videomagic
0037
Videosonic
0240
Villain
0000
Wards
0060, 0035, 0048, 0047, 0081,
0240, 0000, 0042
White Westinghouse 0209
XR-1000
0035, 0000
Zenith
0039, 0000, 0209, 1479
ADDITIONAL INFORMATION
The Comcast Custom 3-Device remote
control does not have any user serviceable parts. Opening the case, except for
the battery cover, may cause permanent
damage to your remote control.
No part of this publication may be
reproduced, transmitted, transcribed,
stored in any retrieval system, or translated to any language, in any form or by
any means, electronic, mechanical,
magnetic, optical, manual, or otherwise,
without the prior written permission of
Comcast, Inc.
The stylized Comcast logo is a registered trademark in the US Patent and
Trademark Office. All other product or
service names are the property of their
respective owners. Copyright Comcast,
Inc., 2003.
M1067A
11/04