1
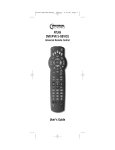
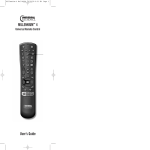
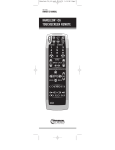
ATLAS
DVR/PVR 5-DEVICE
Universal Remote Control
User’s Guide
Atlas DVD/PVR Manual
2/14/03
5:00 PM
Page 2
TABLE OF CONTENTS
Introduction . . . . . . . . . . . . . . . . . . . . . . . . . . . . . . . . . . . . . . 3
Features And Functions. . . . . . . . . . . . . . . . . . . . . . . . . . . . 4
Key Charts . . . . . . . . . . . . . . . . . . . . . . . . . . . . . . . . . . . . . . 5
Device Table. . . . . . . . . . . . . . . . . . . . . . . . . . . . . . . . . . . . . 8
Installing Batteries . . . . . . . . . . . . . . . . . . . . . . . . . . . . . . . 9
Programming Device Control . . . . . . . . . . . . . . . . . . . . . . 10
Programming TV/VCR Combo Control. . . . . . . . . . . . . . . 12
Manufacturer’s Codes . . . . . . . . . . . . . . . . . . . . . . . . . . . . 13
Setup Codes For Audio Amplifiers . . . . . . . . . . . . . . . . . . . . . . 13
Setup Codes For Audio Receivers . . . . . . . . . . . . . . . . . . . . . . 13
Setup Codes For Cable Boxes (Converters) . . . . . . . . . . . . . . . 15
Setup Codes For DVD Players . . . . . . . . . . . . . . . . . . . . . . . . . 15
Setup Codes For Satellite Receivers . . . . . . . . . . . . . . . . . . . . 16
Setup Codes For TVs. . . . . . . . . . . . . . . . . . . . . . . . . . . . . . . . 17
Setup Codes For TV/VCR Combos . . . . . . . . . . . . . . . . . . . . . . 20
Setup Codes For VCRs And PVRs . . . . . . . . . . . . . . . . . . . . . . 21
Searching For Your Code . . . . . . . . . . . . . . . . . . . . . . . . . . 24
Checking The Codes . . . . . . . . . . . . . . . . . . . . . . . . . . . . . 25
Programming Channel Control Lock . . . . . . . . . . . . . . . . 26
To De-Activate Channel Control Lock . . . . . . . . . . . . . . . . . . 26
To Re-Activate Channel Control Lock . . . . . . . . . . . . . . . . . . 26
Programming ID Lock . . . . . . . . . . . . . . . . . . . . . . . . . . . . 27
Programming“Tune-In” Keys For Specific Channels . . . 27
To Program A “Tune-In” Key . . . . . . . . . . . . . . . . . . . . . . . . . . 28
To Clear A “Tune-In” Key. . . . . . . . . . . . . . . . . . . . . . . . . . . . . 28
Using The Master Power Key. . . . . . . . . . . . . . . . . . . . . . . 29
To Program The Master Power Key. . . . . . . . . . . . . . . . . . . . . . 29
To Operate The Master Power Key . . . . . . . . . . . . . . . . . . . . . . 29
To Clear The Master Power Key . . . . . . . . . . . . . . . . . . . . . . . . 29
Re-Assigning Device Keys . . . . . . . . . . . . . . . . . . . . . . . . 30
Changing Volume Lock . . . . . . . . . . . . . . . . . . . . . . . . . . . 31
To Unlock Volume Control For A Single Device
(Individual Volume Unlock). . . . . . . . . . . . . . . . . . . . . . . . . . . 31
To Unlock All Volume Control
(Global Volume Unlock). . . . . . . . . . . . . . . . . . . . . . . . . . . . . . 31
To Lock Volume Control To One Mode
(Global Volume Lock) . . . . . . . . . . . . . . . . . . . . . . . . . . . . . . . 32
Troubleshooting . . . . . . . . . . . . . . . . . . . . . . . . . . . . . . . . . 33
Instructions To The User . . . . . . . . . . . . . . . . . . . . . . . . . . 34
Additional Information. . . . . . . . . . . . . . . . . . . . . . . . . . . . 35
2
INTRODUCTION
The Atlas DVR/PVR 5-Device Universal Remote Control
by Universal Electronics is our latest generation universal
remote control.Its sophisticated technology allows you to
consolidate up to five of your original home ent
FEATURES AND FUNCTIONS
Use the illustration below to locate features on the
Atlas DVR/PVR 5-Device Universal Remote Control and
then study the Key Charts (on the next three pages) to
learn how they function.
To find out what type of devices can be controlled by each
device key after programming, see the Device Table on
page 8.
4
Atlas DVR/PVR Manual
3/20/03
5:00 PM
Page 5
Key Charts
Use SETUP for all programming
sequences.
Press PWR once to turn on or
off a home entertainment device.
For MASTER POWER control, see
Using The Master Power Key on
page 29.
Press AUX, DVD, AUD, TV, or CBL
once to select a home entertainment device to control.Also see
the Device Table on page 8.
Each device key has an embedded
LED (red light) that blinks upon
selection and indicates the remote
control is working and (after programming) is sending signals.
Use GUIDE to display the program
guide.
Press MENU once to display
available interactive services.
Use INFO to display the current
channel and program information.
Press SETTINGS once to access
additional cable features.
Use the Cursor keys to move the
cursor in the program guide and
menu screens and to navigate
within the interactive service.
Use SELECT to choose options,
PPV events, and to tune programs
from the program guide.
Use PAGE+ (or PAGE-) to page up
(or page down) through menu
screens and the program guide.
Use EXIT to exit out of your cable
converter’s menu and guide.
Use A, B, or C to access additional
cable features (see your cable
converter’s manual).
continued on next page...
5
Atlas DVR/PVR Manual
3/20/03
5:00 PM
Page 6
FEATURES AND FUNCTIONS
Key Charts (continued)
Use VOL+ (or VOL-) to raise (or
lower) the audio volume.
Use FAV to cycle through your
favorite channels stored in your
cable converter.
Use CH+ (or CH-) to select the
next higher (or lower) channel.
For DVD players, use these keys to
skip forward (or reverse) through
chapters.
For amplifiers/receivers, use these
keys to select the next higher (or
lower) preset station.
Press MUTE once to turn the
sound off or on.
Press LAST once to recall the last
channel.
Reserved for use as “Tune-In”keys
(see page 27).
Use
to command your PVR
to instantly replay the last
7 seconds of a program you are
watching.
Press LIST once to display a list
of recorded shows on your PVR.
Press LIVE to return to watching
live TV.
In all modes except CBL, use REW,
PLAY, FFWD, STOP, and PAUSE to
control a VCR, DVD player, or a
PVR (after selecting a desired
device). To record in the VCR
mode, press REC twice.
In the CBL mode, use above keys
to control DVR/PVR functions of
the set-top box.
6
Atlas DVR/PVR Manual
3/20/03
5:00 PM
Page 7
Use the keypad numbers (1~ 9,
and 0) to directly tune channels
(e.g., 09). For amplifiers/receivers,
use the keypad numbers to select
inputs 1 through 10.
In the CBL mode, use ENTER to
enter information and to access
music channels.
In the TV, DVD, or AUX modes for
certain devices, press ENTER once
after entering a channel number.
See your device’s owner’s manual.
Use PIP ON-OFF to switch the
Picture-In-Picture feature on or
off (if available on your TV or
cable service).
Use PIP SWAP to switch images
and sound between the main and
window pictures.
Use PIP MOVE to move the window
picture to different positions in the
main picture.
Use PIP CH+ (or CH-) to select
the next higher (or lower) PIP
channel.
In the CBL mode, use VIDEO
SOURCE to view other video
sources (A or B) instead of cable.
In all other modes, use VIDEO
SOURCE to watch TV or video
programs on a desired device. For
amplifiers/receivers, use VIDEO
SOURCE to select an input source.
7
Atlas DVR/PVR Manual
3/20/03
5:00 PM
Page 8
FEATURES AND FUNCTIONS (continued)
Device Table
NOTE: Please refer to the table below when performing the
instructions in “Programming Device Control” on page 10 or
“Programming TV/ VCR Combo Control” on page 12.
After programming, the Atlas DVR/PVR 5-Device
Universal Remote Control will be able to control the
following types of devices:
DEVICE KEY
CONTROLS THESE TYPES OF DEVICES
VCR, TV/VCR Combo, PVR
(Personal Video Recorder), or
extra DVD Player
DVD Player
Audio Amplifier, Tuner, or
Receiver
Television
Cable Box (Converter) or
Satellite Receiver
8
Atlas DVR/PVR Manual
3/20/03
5:00 PM
Page 9
INSTALLING BATTERIES
❶
❷
❸
1.
On the back of the remote control, push the
tab and lift off the battery cover.
2.
Locate the two (2) enclosed AA batteries.
Match the + and – marks with those in the
battery case, then insert them.
3.
Align the cover’s keys with the case’s holes
and press the cover back into place. The tab
should click when the cover is locked.
4.
Test the remote control by pressing
any mode key (e.g., TV). If the batteries are
inserted correctly, the LED (red light) will
blink once
NOTE: When batteries need replacement, the remote control will
cease to operate. Replace the batteries and the unit will be restored
to its full functionality, complete with your favorite settings.
9
Atlas DVR/PVR Manual
3/20/03
5:00 PM
Page 10
PROGRAMMING DEVICE CONTROL
The Atlas DVR/PVR 5-Device Universal Remote Control
is preprogrammed to operate the Scientific Atlanta cable
box (converter) provided by your cable system, an RCA
TV, a Toshiba DVD player, an RCA VCR (as an AUX
device), and a Pioneer audio receiver. To control devices
other than the default brands, perform the following steps;
otherwise skip this section:
NOTES: For TV/VCR Combo control, skip this section and perform
the instructions on page 12. Also refer to the “Device Table” on
page 8 to find out which devices can be programmed onto each
device key.
If you have another brand of cable converter or a satellite receiver
you would like to control, you’ll first need to unlock the cable ID
Lock before changing the converter code – see “Programming ID
Lock” on page 27.
1.
Turn on a device and, if applicable, insert
video media, (e.g., cassette or disc).
NOTE: Please read steps 2 through 4 completely
before proceeding. Highlight or write down the codes
and device you wish to program before moving on to
step 2.
2.
On the remote control, press a device key once
(i.e.., AUX, DVD, AUD, TV, or CBL); it will blink
once. Then press and hold SETUP until the
selected mode key blinks twice, then release
SETUP.
3.
Use the Manufacturer’s Codes (starting on
page 13) to locate the the type of device and
brand name and then enter the first four-digit
code for your device. If performed correctly,
the selected mode key will blink twice.
NOTE: If the selected mode key emits a long blink,
the entry is invalid. Repeat steps 2 through 3 and try
entering the same code again.
4.
Aim the remote control at the device and
press PWR once. The device should turn off.
If it does not, repeat steps 2 through 3, trying
each code for your brand until you find one
that works. If it still does not respond, try
searching for the code (see Searching For Your
Code on page 24).
NOTE: If the device does not have a POWER key,
press the (Play) key.
10
Atlas DVR/PVR Manual
5.
3/20/03
5:00 PM
Page 11
Repeat steps 1 through 4 for each device you
want the remote control to operate. For future
reference, write down each working device
code in the following boxes:
AUX Code
Device Type:_______________________
DVD Code
Device Type:_______________________
AUD Code
Device Type:_______________________
CBL Code
Device Type:_______________________
TV Code
11
Atlas DVR/PVR Manual
3/20/03
5:00 PM
Page 12
PROGRAMMING TV/VCR COMBO CONTROL
If you own a TV/VCR Combo, perform the following
instructions to control this device:
1.
Turn on your TV/VCR Combo and insert a
video cassette.
2.
On the remote control, press AUX once; it will
blink once. Then press and hold SETUP until
the AUX key blinks twice, then release SETUP.
3.
Use the Setup Codes For TV/VCR Combos (on
page 20) to locate the brand name and then
enter the first four-digit code for your TV/VCR
Combo. If you perform this procedure
correctly, the AUX key will blink twice.
NOTE: If the AUX key did not blink twice after
entering the code’s last digit, then repeat steps 2
through 3 and try entering the same code again.
If you’ve located a TV/VCR setup code that
works for your TV/VCR Combo and a separate
TV code is also listed, you’ll need to program
this code into the remote control to access
volume control (see Programming Device
Control on page 10).
4.
Aim the remote control at your TV/VCR
Combo and press PWR once. The device
should turn off. If it does not respond, repeat
steps 2 through 3, trying each code listed for
your brand until you find one that works.
If it still does not respond, try searching for
the code (see Searching For Your Code on the
page 24).
5.
For future reference, write down each working
device code in the boxes below:
TV/VCR Code
TV Code
(if used)
12
Atlas DVR/PVR Manual
3/20/03
5:00 PM
Page 13
MANUFACTURER’S CODES
Setup Codes For Audio Amplifiers:
Aiwa
Bose
Carver
Curtis Mathes
Denon
Harman/Kardon
JVC
Left Coast
Linn
Magnavox
Marantz
Optimus
Panasonic
Parasound
Philips
Pioneer
Polk Audio
RCA
Sony
Soundesign
Technics
Victor
Wards
Yamaha
0406
0674
0269
0300
0160
0892
0331
0892
0269
0269
0269, 0892
0300
0308, 0521, 0308
0246
0269, 0892
0013, 0300
0269, 0892
0300
0689
0211
0308, 0521
0331
0013, 0211
0354
Setup Codes For Audio Receivers:
ADC
Adcom
Admiral
Aiwa
Akai
Alco
Apex Digital
Arcam
Audiotronic
Audiovox
Bose
Capetronic
Carver
Casio
Clarinette
Compaq
Curtis Mathes
Denon
Emerson
Fisher
0531
0616
0182
1089, 1405, 0158, 1388, 0189, 0121, 0405
0224, 0076
1390
1257
1120
1189
1390
1229
0531
1089, 1189, 0189, 0042, 0360, 0008
0195, 0201
0195
1136
0080, 0201
1104, 1160, 1311, 1360, 0004, 0273, 0771
0424, 0255
0042, 0360, 0219
continued on next page...
13
Atlas DVR/PVR Manual
3/20/03
5:00 PM
Page 14
MANUFACTURER’S CODES
Setup Codes For Audio Receivers (continued):
Garrard
Hafler
Harman/Kardon
Hewlett Packard
Inkel
JBL
JVC
KLH
Kenwood
Koss
LXI
Lexicon
Linn
Lloyd’s
Luxman
MCS
Magnavox
Marantz
Modulaire
Musicmagic
NAD
NEC
Nakamichi
Onkyo
Optimus
Panasonic
Penney
Philips
Pioneer
Polk Audio
Proscan
Quasar
RCA
Realistic
Samsung
Sansui
Sanyo
Scott
Sears
Semivox
Sharp
Sherwood
Sonic
Sony
Soundesign
Stereophonics
0463, 0424, 0146, 0281
0146
0110, 0189, 0891
1181
0062
0110, 1306
0074, 1374, 0464
1390
1313, 1027, 1570, 1569, 0027, 0186, 0042, 0077, 0313, 0314,
0569, 1051, 1052
1366, 0424, 0255
0181
1076
0189
0195
0166
0039, 0346, 0201
1089, 1189, 0531, 0189, 0195, 0391, 0128, 0222
1089, 1189, 0039, 0189, 0128, 0200, 0006
0195
1089
0320
0235
0097, 0347
0135, 1298, 0100, 0380, 0119
1023, 0531, 0670, 0186, 0080, 0738, 0801, 0042, 0181, 0219,
0177
1518, 0039, 0309, 0367, 0518
0195, 0201
1089, 1189, 1269, 0189, 1120, 0391
1023, 0531, 0014, 0150, 0630, 1343, 0080, 0244, 0289
0189
1254
0039
1023, 1254, 1390, 0531, 0080, 0360, 0054, 1154, 0346, 0530
0195, 0181, 0163, 0182
1295
1089, 0189, 0346, 0193
0801, 0219
0322, 0163
0201
0255
0186, 0117
1653, 0491, 0502, 0062
0281
1058, 1158, 1258, 1658, 1758, 0158, 0474, 0168, 1042
0670
1023
14
Atlas DVR/PVR Manual
Sunfire
Sylvania
Symphonic
Teac
Technics
Techwood
Thorens
Venturer
Victor
Wards
Yamaha
Yorx
Zenith
3/20/03
5:00 PM
Page 15
1313, 0313, 0314, 1052
0222
0182
0463, 0163, 0387
1308, 1309, 1518, 0039, 0309, 0208, 0518
0281
1189
1390
0074
0158, 0014, 0189, 0080, 0054
0176, 1176, 0186, 0081, 0082
0195
0857, 0281
Setup Codes For Cable Boxes (Converters):
Director
General Instrument
Jerrold
Motorola
Pioneer
Scientific Atlanta
0476
0476
0476
0476
1877
1877
Setup Codes For DVD Players:
Aiwa
Apex Digital
Audiologic
B&K
Blue Parade
Broksonic
DVD2000
Denon
Emerson
Enterprise
Fisher
GE
GPX
Go Video
Gradiente
Greenhill
Harman/Kardon
Hitachi
Hiteker
JVC
KLH
Kenwood
Konka
Koss
Lasonic
0641
0672, 0794, 0795, 0796, 0797, 0755, 0717
0736
0655, 0662
0571
0695
0521
0490, 0634
0591
0591
0670
0522, 0815, 0717
0769, 0699
0715, 0783
0651
0717
0582
0573, 0664
0672
0558, 0623
0717
0490, 0534, 0682, 0737
0711, 0719
0651
0798
continued on next page...
15
Atlas DVR/PVR Manual
3/20/03
5:00 PM
Page 16
MANUFACTURER’S CODES
Setup Codes For DVD Players (continued):
Magnavox
Marantz
Microsoft
Mintek
Mitsubishi
Nesa
Onkyo
Oritron
Panasonic
Philips
Pioneer
Polk Audio
Princeton
Proscan
RCA
Rotel
Samsung
Sansui
Sanyo
Sharp
Sherwood
Shinsonic
Sony
Sylvania
Technics
Techwood
Theta Digital
Thrustmaster
Toshiba
Tredex
Urban Concepts
XBox
Yamaha
Zenith
0503, 0675
0539
0522
0717
0521
0717
0503, 0627
0651
0490, 0632
0503, 0539, 0854
0525, 0571, 0632
0539
0674
0522
0522, 0571, 0822, 1022, 0717
0623
0573, 0820
0695
0670
0630
0633
0533
0533
0675
0490
0692
0571
0498
0503, 0695, 1045
0799, 0800
0503
0522
0490, 0539, 0545
0503, 0591
Setup Codes For Satellite Receivers:
General Instrument
Motorola
Next Level
RadioShack
Star Choice
0869
0869
0869
0869
0869
16
Atlas DVR/PVR Manual
3/20/03
5:00 PM
Page 17
Setup Codes For TVs:
A-Mark
AOC
Abex
Admiral
Advent
Adventura
Aiko
Aiwa
Akai
Alaron
Ambassador
America Action
Ampro
Anam
Anam National
Apex Digital
Archer
Audiovox
Baysonic
Belcor
Bell & Howell
Bradford
Brockwood
Broksonic
CXC
Candle
Carnivale
Carver
Celebrity
Changhong
Cineral
Citizen
Clairtone
Concerto
Contec
Craig
Crosley
Crown
Curtis Mathes
Daewoo
Daytron
Denon
Dumont
Dwin
Electroband
Electrohome
Emerson
Envision
0003
0030, 0019, 0185, 0003, 0052
0032
0093, 0463
0761
0046
0092
0701
0030
0179
0177
0180
0751
0180
0055
0767, 0765
0003
0451, 0180, 0623, 0092, 0003
0180
0019
0154, 0016
0180
0019
0236, 0463, 0003
0180
0030, 0056, 0046, 0186
0030
0054
0000
0765
0451, 0092
0060, 0030, 0056, 0092, 0039, 0280, 0046, 0186
0185
0056
0180, 0185
0180
0054
0180, 0039
0047, 0747, 1147, 1347, 0054, 0154, 0451, 0093, 0060, 0030,
0056, 0145, 0016, 0166, 0702, 0466, 0039
0451, 0019, 0623, 0092, 0039
0019
0145
0017, 0019
0720, 0774
0000, 0185
0389
0154, 0236, 0463, 0180, 0178, 0179, 0019, 0623, 0177, 0185,
0282, 0039, 0280, 0038
0030
continued on next page...
17
Atlas DVR/PVR Manual
3/20/03
5:00 PM
Page 18
MANUFACTURER’S CODES
Setup Codes For TVs (continued):
Fisher
Fujitsu
Funai
Futuretech
GE
Gibralter
GoldStar
Gradiente
Grunpy
Hallmark
Harley Davidson
Harman/Kardon
Harvard
Havermy
Hitachi
Infinity
Inteq
JBL
JCB
JVC
Janeil
KEC
KTV
Kaypani
Kenwood
Kloss
Konka
LG
LXI
Logik
Luxman
MEI
MGA
MTC
Magnavox
Majestic
Marantz
Matsushita
Megatron
Memorex
Midland
Minutz
Mitsubishi
Motorola
Multitech
NAD
NEC
0154, 0159
0179, 0683
0180, 0179, 0171
0180
0047, 0747, 1147, 1347, 0051, 0451, 0178, 0021, 0055, 0282,
0135, 0279
0017, 0030, 0019
0030, 0178, 0019, 0032
0053, 0056
0180, 0179
0178
0179
0054
0180
0093
0056, 0145, 0016, 0151, 0032, 0038, 0279
0054
0017
0054
0000
0053
0046
0180
0180, 0030, 0185, 0039, 0280
0052
0030, 0019
0046
0707, 0628, 0632, 0638, 0703
0056
0047, 0747, 0054, 0154, 0156, 0178
0016
0056
0185
0150, 0030, 0178, 0019
0060, 0030, 0056, 0019, 0185
0054, 1254, 1454, 0030, 0179, 0187, 0096, 0020, 0186, 0386
0016
0054, 0030
0250
0178, 0145, 0003
0154, 0250, 0463, 0150, 0178, 0179, 0016
0047, 0747, 0017, 0051, 0135, 0039, 0032
0021
0093, 0150, 0178, 0019
0093, 0055
0180
0156, 0178, 0166
0030, 0056, 0019, 0497
18
Atlas DVR/PVR Manual
NTC
Nikko
Noshi
Onwa
Optimus
Optonica
Orion
Panasonic
Penney
Philco
Philips
Pilot
Pioneer
Portland
Princeton
Prism
Proscan
Proton
Pulsar
Quasar
RCA
RadioShack
Realistic
Rhapsody
Runco
SSS
Sampo
Samsung
Samsux
Sansei
Sansui
Sanyo
Scimitsu
Scotch
Scott
Sears
Semivox
Semp
Sharp
Shogun
Signature
Simpson
Sony
Soundesign
Spectricon
Squareview
Starlite
Supre-Macy
3/20/03
5:00 PM
Page 19
0092
0030, 0178, 0092
0018
0180
0154, 0250, 0166
0093, 0165
0236, 0463, 0179
0051, 0250, 0055
0047, 0747, 1347, 0156, 0051, 0060, 0030, 0178, 0021, 0019,
0018, 0135, 0039, 0003, 0032
0054, 0463, 0030, 0145, 0019, 0096, 0020
0054, 1454
0030, 0019, 0039
0166, 0679, 0038
0019, 0092, 0039
0717
0051
0047, 0747
0178, 0466, 0003, 0052
0017, 0019
0051, 0250, 0055, 0165
0047, 0747, 1047, 1147, 1247, 1347, 1447, 0090, 0019, 0679,
0018, 0135, 0038
0047, 0747, 0154, 0180, 0030, 0178, 0056, 0019, 0165, 0039,
0032
0154, 0180, 0030, 0178, 0056, 0019, 0165, 0039, 0032
0185
0017, 0030, 0603, 0497
0180, 0019
0030, 0039, 0052, 0032
0060, 0030, 0178, 0766, 0056, 0019, 0702, 0032
0039
0451
0463
0154, 0159, 0146
0019
0178
0236, 0180, 0178, 0179, 0019
0047, 0747, 0054, 0154, 0156, 0178, 0179, 0056, 0171, 0159,
0146
0180
0156
0093, 0688, 0689, 0165, 0039, 0386
0019
0016
0187, 0186
0000, 1100
0180, 0178, 0179, 0186
0003
0171
0180
0046
continued on next page...
19
Atlas DVR/PVR Manual
3/20/03
5:00 PM
Page 20
MANUFACTURER’S CODES
Setup Codes For TVs (continued):
Supreme
Sylvania
Symphonic
TMK
TNCi
Tandy
Tatung
Technics
Technol Ace
Techwood
Teknika
0000
0054, 0030, 0171, 0096, 0020
0180, 0171
0178, 0056, 0177
0017
0093
0055, 0003
0051, 0250
0179
0051, 0056, 0003
0054, 0180, 0150, 0060, 0179, 0056, 0019, 0016, 0092, 0039,
0186
Telefunken
0056, 0702
Toshiba
0154, 0156, 1356, 0060, 1256
Tosonic
0185
Totevision
0039
Vector Research
0030
Victor
0053
Vidikron
0054
Vidtech
0178, 0019
Viking
0046
Wards
0054, 0030, 0178, 0021, 0179, 0056, 0019, 0016, 0165, 0096,
0020
Waycon
0156
White Westinghouse 0463, 0623
Yamaha
0030, 0019, 0769
Zenith
0017, 0463, 0016, 0092
Zonda
0003
Setup Codes For TV/VCR Combos:
Broksonic
Citizen
Colt
Curtis Mathes
Daewoo
Emerson
Funai
GE
GoldStar
Harley Davidson
Hitachi
Lloyd’s
Magnasonic
Magnavox
Magnin
Memorex
0002, 0479 (for TV use 0463)
0278
0072
0035 (for TV use 0051)
0278 (for TV use 0624)
0002, 0278 (for TV use 0624), 0479 (for TV use 0463)
0000
0035 (for TV use 0051), 0048 (for TV use 0093),
0060 (for TV use 0047), 0240
0037 (for TV use 0056)
0000
0000
0000
0278
0000, 0081 (for TV use 0054)
0240
0037, 0162 (for TV use 0250), 1162
20
Atlas DVR/PVR Manual
3/20/03
5:00 PM
Page 21
MGA
Mitsubishi
Optimus
Orion
Panasonic
Penney
Quasar
RCA
0240
0048 (for TV use 0093)
0162 (for TV use 0250), 1162, 1262
0002, 0479 (for TV use 0463)
0035 (for TV use 0051), 0162 (for TV use 0250), 1162
0035 (for TV use 0051), 0037 (for TV use 0056), 0240
0035 (for TV use 0051), 0162 (for TV use 0250)
0035 (for TV use 0051), 0048 (for TV use 0093),
0060 (for TV use 0047), 0240
Sansui
0000, 0479 (for TV use 0463)
Sanyo
0240
Sears
0000, 0037 (for TV use 0056)
Sharp
0048 (for TV use 0093)
Sony
0000, 0032 (for TV use 0000)
Sylvania
0081 (for TV use 0054)
Symphonic
0000, 0563
Thomas
0000
White Westinghouse 0278 (for TV use 0624)
Zenith
0000
Setup Codes For VCRs And PVRs:
Admiral
Adventura
Aiko
Aiwa
Akai
America Action
American High
Asha
Audiovox
Beaumark
Bell & Howell
Broksonic
CCE
Calix
Canon
Capehart
Carver
Cineral
Citizen
Colt
Craig
Curtis Mathes
Cybernex
Daewoo
Daytron
Denon
Dynatech
Electrohome
Electrophonic
0048, 0209
0000
0278
0037, 0000, 0307
0041, 0106, 0061
0278
0035
0240
0037, 0278
0240
0104
0184, 1479, 0121, 0209, 0002, 0479, 0295, 0361
0072, 0278
0037
0035
0020
0081
0278
0037, 1278, 0278
0072
0037, 0047, 0240, 0072, 0271
0035, 0060, 0760, 0162, 1035, 0041
0240
0045, 1278, 0278, 0020, 0561
0020
0042
0000
0037
0037
continued on next page...
21
Atlas DVR/PVR Manual
3/20/03
5:00 PM
Page 22
MANUFACTURER’S CODES
Setup Codes For VCRs And PVRs (continued):
Emerex
Emerson
Fisher
Fuji
Funai
GE
Garrard
Go Video
GoldStar
Gradiente
HI-Q
Harley Davidson
Harman/Kardon
Harwood
Headquarter
Hitachi
Hughes Net. Sys.
JVC
Jensen
KEC
KLH
Keen
Kenwood
Kodak
LXI
Lloyd’s
Logik
MEI
MGA
MGN Technology
MTC
Magnasonic
Magnavox
Magnin
Marantz
Marta
Matsushita
Memorex
Minolta
Mitsubishi
Motorola
Multitech
NEC
Nikko
Nikon
Noblex
0032
0037, 0184, 0000, 1479, 1278, 0121, 0043, 0209, 0002, 0278,
0479, 0561, 0061, 0208, 0036, 0295, 0361, 0294
0047, 0104, 0054
0035, 0033
0000
0035, 0060, 0760, 1035, 1060, 0240, 0807, 0202, 0761
0000
0432, 0526, 0643
0037, 1237, 0038
0000, 0008
0047
0000
0081, 0038
0072
0046
0000, 0042, 0041, 0105
0042
0067, 0041, 0008
0041
0037, 0278
0072
0693
0067, 0041, 0038
0035, 0037
0037
0000, 0208
0072
0035
0240, 0043, 0061
0240
0000, 0240
1278
0035, 0039, 0081, 0563, 0000, 1781, 0149
0240
0035, 0081
0037
0035, 0162, 0454
0035, 0037, 1037, 0048, 0039, 0047, 0162, 1162, 1262, 0000,
1237, 0240, 0104, 0209, 0454, 0479, 0046, 0307
0042, 0105
0067, 0807, 0043, 0061
0035, 0048
0000, 0072
0067, 0104, 0041, 0038, 0040
0037
0034
0240
22
Atlas DVR/PVR Manual
Olympus
Optimus
Optonica
Orion
Panasonic
Penney
Pentax
Philco
Philips
Pilot
Pioneer
Polk Audio
Portland
Profitronic
Proscan
Protec
Pulsar
Quarter
Quartz
Quasar
RCA
RadioShack
Radix
Randex
Realistic
ReplayTV
Ricoh
Runco
STS
Samsung
Samtron
Sanky
Sansui
Sanyo
Scott
Sears
Semp
Sharp
Shintom
Shogun
Singer
Sonic Blue
Sony
Sylvania
Symphonic
TMK
Tatung
Teac
Technics
Teknika
3/20/03
5:00 PM
Page 23
0035
0037, 0048, 1048, 0162, 1062, 1162, 1262, 0104, 0454, 0432
0062
0184, 1479, 0209, 0002, 0479, 0295
0035, 0225, 0162, 1062, 1162, 1262, 0616, 1035, 0454
0035, 0037, 0042, 1237, 1035, 0240, 0038, 0054, 0040
0042, 0105
0035, 0209, 0479
0035, 0081, 1081, 1181, 0618, 0062
0037
0067
0081
0020
0240
0060, 0760, 1060, 0202, 0761
0072
0039
0046
0046
0035, 0162, 1162, 1035, 0454
0060, 0760, 0042, 1035, 1060, 0240, 0807, 0149, 0106, 0202,
0761, 0105
1037, 0000
0037
0037
0035, 0037, 0048, 0047, 0000, 0104, 0046, 0062
0614, 0616
0034
0039
0042
0045, 0240
0643
0048, 0039
0000, 0067, 1479, 0209, 0041, 0479, 0271
0047, 0240, 0104, 0046
0184, 0045, 0121, 0043
0035, 0037, 0047, 0000, 0042, 1237, 0104, 0046, 0105, 0054
0045
0048, 0848, 0807, 0062, 0738
0072
0240
0072
0614, 0616
0035, 0032, 1032, 0000, 0636, 0033, 1232, 0034
0035, 0081, 0000, 1781, 0043
0000
0240, 0208, 0036
0041
0000, 0041
0035, 0162
0035, 0037, 0000
continued on next page...
23
Atlas DVR/PVR Manual
3/20/03
5:00 PM
Page 24
MANUFACTURER’S CODES
Setup Codes For VCRs And PVRs (continued):
Thomas
Tivo
Toshiba
Totevision
Unitech
Vector
Vector Research
Video Concepts
Videomagic
Videosonic
Villain
Wards
0000
0618, 0636
0045, 0845, 0043
0037, 0240
0240
0045
0038, 0040
0045, 0061, 0040
0037
0240
0000
0035, 0060, 0760, 0048, 0047, 0081, 0000, 0042, 0240, 0072,
0149, 0062
White Westinghouse 1278, 0209, 0072
XR-1000
0035, 0000, 0072
Yamaha
0038
Zenith
0039, 0000, 0033, 1479, 0209, 0479, 0034, 0637
SEARCHING FOR YOUR CODE
If your home entertainment device does not respond to
the Atlas DVR/PVR 5-Device Universal Remote Control
after trying all of the codes listed for your brand, or if
your brand is not listed at all, try searching for your code.
For example, to search for a code for your TV:
1.
Turn on your TV.
2.
On the remote control, press TV once; it will
blink once. Then press and hold SETUP until
the TV key blinks twice, then release SETUP.
3.
Enter 9 - 9 - 1. The TV key will blink twice.
4.
Aim the remote control at the TV and slowly
alternate between pressing PWR and TV.
Stop when the TV turns off.
NOTE: In the search mode, the remote control will
send IR codes from its library to the selected
device, starting with the most popular code first.
24
Atlas DVR/PVR Manual
3/20/03
5:00 PM
Page 25
5.
Press SETUP once to lock in the code. The TV
key will blink twice.
6.
To search for the codes of your other devices,
repeat steps 1 through 5, but substitute the
appropriate key (e.g., AUX, DVD, AUD, or CBL)
for the device you are searching for.
CHECKING THE CODES
If you have set up the Atlas DVR/PVR 5-Device Universal
Remote Control using the Searching For Your Code
procedure (on the previous page), you may need to find
out which four-digit code is operating your equipment.
For example, to find out which code is operating your TV:
1.
On the remote control, press TV once; it will
blink once. Then press and hold SETUP until
the TV key blinks twice, then release SETUP.
2.
Enter 9 - 9 - 0. The TV key will blink twice.
3.
To view the code for the first digit, press 1
once.Wait 3 seconds and count the number
of times the TV key blinks (e.g., 3 blinks = 3)
and write down the number in the leftmost
TV Code box on page 11.
NOTE: If a code digit is “0”, the selected mode key
will not blink.
4.
Repeat step 3 three more times for the
remaining digits. Use 2 for the second digit,
3 for the third digit, and 4 for the fourth digit.
Finish writing down the code in the TV Code
boxes on page 11.
5.
To check for other device codes, repeat steps
1 through 4, but substitute the appropriate key
(e.g., AUX, DVD, AUD, or CBL) for the device
you are checking.Write down the codes in the
appropriate boxes on page 11.
25
Atlas DVR/PVR Manual
3/20/03
5:00 PM
Page 26
PROGRAMMING CHANNEL CONTROL LOCK
By default, the remote control’s channel-control capabilities
are locked to the cable converter. The affected keys* are
0 ~ 9, CH+, CH-, ENTER, and LAST. This will guarantee that
you do not inadvertently change a channel on your TV or
VCR. However, you can de-activate this feature to allow full
access to these keys in the TV and VCR modes.
*NOTE: This feature does not affect the AUD mode.
To De-Activate Channel Control Lock:
1.
On the remote control, press CBL once; it will
blink once. Then press and hold SETUP until
the CBL key blinks twice, then release SETUP.
2.
Enter 9 -7- 3. The CBL key will blink twice.
3.
Press CH- once. The CBL key will blink
four times.
4.
Now, the remote control will provide TV and
VCR channel-control capabilities while in the
TV or VCR mode.
To Re-Activate Channel Control Lock:
1.
On the remote control, press CBL once; it will
blink once. Then press and hold SETUP until
the CBL key blinks twice, then release SETUP.
2.
Enter 9 -7- 3. The CBL key will blink twice.
3.
Press CH+ once. The CBL key will blink twice.
4.
Now, regardless of what mode you select
(except AUD), only the channel control
capability of your cable converter will be
accessible.
26
Atlas DVR/PVR Manual
3/20/03
5:00 PM
Page 27
PROGRAMMING ID LOCK
The Atlas DVR/PVR 5-Device Universal Remote Control
is locked at the factory to operate a Scientific Atlanta
cable converter. However, if you have another brand or
model of cable converter or satellite service that you
would like to control, then you’ll need to perform the following steps to unlock the ID Lock, enter in a new manufacturer’s code, and lock the ID Lock again.
1.
Turn on the cable converter.
2.
On the remote control, press CBL once; it will
blink once. Then press and hold SETUP until
the CBL key blinks twice, then release SETUP.
3.
Enter 9 - 8 - 2. The CBL key will blink
four times, indicating ID Lock is unlocked.
4.
Perform the instructions in Programming
Device Control on page 10 to program device
control for the desired cable converter or
satellite receiver. Upon completion, perform
the remaining steps (5 and 6 on this page) to
again lock the ID Lock.
5.
On the remote control, press CBL once; it will
blink once. Then press and hold SETUP until
the CBL key blinks twice, then release SETUP.
6.
Enter 9 - 8 - 2. The CBL key will blink twice,
indicating ID Lock is again locked.
PROGRAMMING “TUNE-IN” KEYS
FOR SPECIFIC CHANNELS
The Atlas DVR/PVR 5-Device Universal Remote Control
includes three “Tune-In” keys (located directly below the
MUTE and LAST keys). Each can be programmed to
remember three of your favorite cable channel settings
for a total of nine channels. If you want to change the
cable channels in a previously-programmed “Tune-In”
key, you’ll need to clear the key first (see next page).
continued on next page...
27
Atlas DVR/PVR Manual
3/20/03
5:00 PM
Page 28
PROGRAMMING “TUNE-IN” KEYS
FOR SPECIFIC CHANNELS (continued)
To Program A “Tune-In” Key:
1.
On the remote control, press CBL once; it will
blink once. Then press and hold SETUP until
the CBL key blinks twice, then release SETUP.
2.
Enter 9 - 9 - 5. The CBL key will blink
twice. Then select a “Tune-In” key and press
it once.
3.
Press CBL once followed by the channel
number to be programmed (e.g., 3 - 9).
NOTE: If you are programming a channel for a
Digital Cable Converter, you need to enter all
channels in a 3-digit channel format. For example,
if the desired channel is 39, then enter it as 0 - 3 - 9.
4.
Press and hold SETUP until the CBL key blinks
twice, then release SETUP.
5.
To add another channel, repeat steps 1
through 4, substituting the new channel to be
added in step 3.
NOTE: Programming more than three channels on the
same “Tune-In”key will overwrite previous settings.
To Clear A “Tune-In” Key:
1.
On the remote control, press CBL once; it will
blink once. Then press and hold SETUP until
the CBL key blinks twice, then release SETUP.
2.
Enter 9 - 9 - 5. The CBL key will blink
twice. Then select a “Tune-In” key you want to
clear and press it once.
3.
Press and hold SETUP until the CBL key blinks
twice, then release SETUP.
4.
This “Tune-In” key is now clear and ready for
reprogramming (see above – To Program A
“Tune-In” Key). If desired, repeat steps 1
though 3 in this section to clear another
“Tune-In” key.
28
Atlas DVR/PVR Manual
3/20/03
5:00 PM
Page 29
USING THE MASTER POWER KEY
The Atlas DVR/PVR 5-Device Universal Remote Control
has a unique feature that allows you to sequentially turn
on or off up to five of your home entertainment devices
with a single key press.
To Program The Master Power Key:
1.
On the remote control, press and hold SETUP
until the last-selected device key blinks twice,
then release SETUP.
2.
Enter 9 - 9 - 5. The last-selected device key
will blink twice. Then press PWR once.
3.
For the first device you want in the power on
sequence, press a device key (e.g., CBL) once .
4.
Repeat step 3 up to four more times to add the
second,third,fourth,and fifth device,as desired.
5.
To save the settings and exit the program, press
and hold SETUP until the last-selected device
key blinks twice, then release SETUP.
To Operate The Master Power Key:
NOTE: If MASTER POWER is not programmed, pressing it will only
command the last-selected device to power on or off.
1.
After programming, point the remote control
at the devices.
2.
Press and hold PWR for at least 2 seconds.
You will see the devices power on or off
according to the programmed sequence.
To Clear The Master Power Key:
1.
Perform steps 1 and 2 in the first section
above, To Program The Master Power Key.
2.
To clear the settings and exit the program,
press and hold SETUP until the last-selected
device key blinks twice, then release SETUP.
29
Atlas DVR/PVR Manual
3/20/03
5:00 PM
Page 30
RE-ASSIGNING DEVICE KEYS
The Atlas DVR/PVR 5-Device Universal Remote Control
can be set up to control a second device. For example,
to have the unit control a TV, a Cable Converter, and two
DVD Players, you will need to re-assign the unused AUX
key to operate the second DVD Player as follows:
NOTE: AUX is preset at the factory to control an RCA VCR.
Performing the below steps will overwrite those settings.
1.
On the remote control, press AUX once; it will
blink once. Then press and hold SETUP until
the AUX key blinks twice, then release SETUP.
2.
Enter 9 - 9 - 2. The AUX key will blink twice.
3.
Press DVD once, then press AUX once. The
AUX key will blink twice.
4.
The AUX key is now ready to be programmed
for your second DVD player. See Programming
Device Control on page 10.
To re-assign other device keys, repeat steps 1 to 4 and
substitute the key sequence using the following chart:
NOTE: Only one device can be assigned to an unused device key
at a time.
To Re-Assign
Perform Key Sequence
AUX as 2nd AUD key: AUX - SETUP - 9 - 9 - 2 - AUD - AUX
AUX as 2nd TV key:
AUX - SETUP - 9 - 9 - 2 - TV - AUX
AUX as 2nd CBL key: AUX - SETUP - 9 - 9 - 2 - CBL - AUX
AUX back to AUX:
AUX - SETUP - 9 - 9 - 2 - AUX - AUX
To re-assign another unused device key, substitute it for
the AUX key above and then perform the sequence. For
example, to re-assign an unused AUD key as a second DVD
key, perform AUD - SETUP - 9 - 9 - 2 - DVD - AUD.
When a re-assignment is done, the selected device key
(e.g., AUD) will blink twice to confirm your choice.At that
time, you will need to program device control (see
Programming Device Control on page 10).
30
Atlas DVR/PVR Manual
3/20/03
5:00 PM
Page 31
CHANGING VOLUME LOCK
On this remote control, Global Volume Lock is set to TV, so
you can control TV volume while in the AUX, DVD, TV or
CBL mode. If desired, you can still perform Individual
Volume Unlock on a selected device to set its volume control for independent operation.
NOTE: The audio mode’s volume controls are active regardless of
Volume Lock settings. However, if you lock the volume controls to
the AUD mode, you will have control of the audio device’s volume
in all other modes (i.e., AUX, DVD, TV, and CBL).
To Unlock Volume Control For A Single Device
(Individual Volume Unlock):
1.
Assuming Global Volume Lock is active, select
a mode on the remote control that you want to
unlock (e.g.,CBL) and press it once. Next,
press and hold SETUP until the device key
blinks twice, then release SETUP.
2.
Enter 9 - 9 - 3. The last-selected device key
will blink twice.
3.
Press VOL- once. The last-selected device key
will blink four times.
4.
Repeat steps 1 through 3 (of this section) for
each device you want volume to be unlocked.
5.
Now, after you select a device that has volume
unlocked (e.g., CBL), pressing VOL+, VOL-, or
MUTE, will control the device’s volume only in
its own mode.
To Unlock All Volume Control
(Global Volume Unlock):
NOTE: Performing these instructions will set independent volume
control for all programmed devices.
1.
On the remote control, press and hold SETUP
until the last-selected device key blinks twice,
then release SETUP.
2.
Enter 9 - 9 - 3. The last-selected device key
will blink twice.
3.
Press VOL+ once. The last-selected device key
will blink four times.
continued on next page...
31
CHANGING VOLUME LOCK (continued)
To Lock Volume Control To One Mode
(Global Volume Lock):
NOTE: The audio mode’s volume controls are active regardless of
Volume Lock settings. However, if you lock the volume controls to
the AUD mode, you will have control of the audio device’s volume
in all other modes (i.e., AUX, DVD, TV, and CBL).
1.
On the remote control, press and hold SETUP
until the last-selected device key blinks twice,
then release SETUP.
2.
Enter 9 - 9 - 3. The last-selected device key
will blink twice.
3.
Select a mode (e.g., TV) where you want to
globally lock the volume controls. The selected
device key will blink twice.
4.
Now, when you press VOL+, VOL-, or MUTE,
the volume of the selected device (e.g., TV)
can be controlled regardless of mode.
32
Atlas DVR/PVR Manual
3/20/03
5:00 PM
Page 33
TROUBLESHOOTING
PROBLEM:
Device key does not blink when you press a key.
SOLUTION: Replace the batteries with two (2) new AA
alkaline batteries (see page 9).
PROBLEM:
Device key blinks when you press a key, but home
entertainment device does not respond.
SOLUTION: Make sure you are aiming the remote control at
your home entertainment device and that you
are within 15 feet of the device you are trying
to control.
PROBLEM:
The remote control does not control home
entertainment devices or commands are not
performing properly.
SOLUTION: Try all listed codes for the device brand being set
up. Make sure all devices can be operated with
an infrared remote control.
PROBLEM:
TV/VCR Combo does not respond properly.
SOLUTION: Use the VCR codes for your brand. Some combo
units may require both a TV code and a VCR
code for full operation (see page 12).
PROBLEM:
No volume on a second TV.
SOLUTION: Follow instructions in Changing Volume Lock
(see page 31).
PROBLEM:
CH+, CH -, and LAST do not work for your
RCA TV.
SOLUTION: Due to RCA design (1983-1987), only the original
remote control will operate these functions.
PROBLEM:
Tried “Search Method” and still could not find a
working code.
SOLUTION: Try the “Search Method” again after clearing out
the device key as follows: Press and hold SETUP
until device key blinks twice, then release. Next
enter 9 - 9 - 2. Then press and release the device
key to be cleared twice.
PROBLEM:
Remote control does not turn on Sony or Sharp
TV/VCR Combo.
SOLUTION: For power on, these products require programming TV codes on the remote control. For Sony,
use TV code 0000 and VCR code 0032. For Sharp,
use TV code 0093 and VCR code 0048.
33
Atlas DVR/PVR Manual
3/20/03
5:00 PM
Page 34
INSTRUCTIONS TO THE USER
This equipment has been tested and found to comply
with the limits for a class B digital device, pursuant to part
15 of the FCC Rules. These limits are designed to provide
reasonable protection against harmful interference in a
residential installation. This equipment generates, uses
and can radiate radio frequency energy and if not
installed and used in accordance with the instructions,
may cause harmful interference to radio communications.
However, there is no guarantee that interference will not
occur in a particular installation. If this equipment does
cause harmful interference to radio or television reception,
which can be determined by turning the equipment off
and on, the user is encouraged to try to correct the interference by one or more of the following measures:
• Reorient or relocate the receiving antenna.
• Increase the separation between the equipment
and receiver.
• Connect the equipment into an outlet on a circuit
different from that to which the receiver is connected.
• Consult the dealer or an experienced radio/TV
technician for help.
This equipment has been verified to comply with the
limits for a class B computing device, pursuant to FCC
Rules. In order to maintain compliance with FCC
regulations, shielded cables must be used with this
equipment. Operation with non-approved equipment or
unshielded cables is likely to result in interference to
radio and TV reception. The user is cautioned that
changes and modifications made to the equipment
without the approval of manufacturer could void the
user's authority to operate this equipment.
34
Atlas DVR/PVR Manual
3/20/03
5:00 PM
Page 36