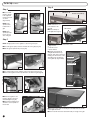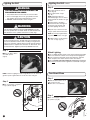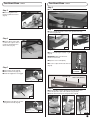
1
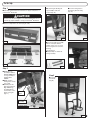
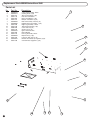
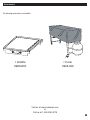
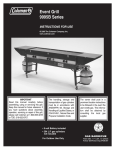
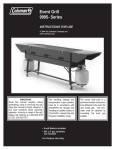
Event Grill
9995B Series
INSTRUCTIONS FOR USE
© 2005 The Coleman Company, Inc.
www.coleman.com
IMPORTANT
Read this manual carefully before
assembling, using or servicing this grill.
Keep this manual for future reference. If
you have questions about assembly,
operation, servicing or repair of this grill,
please call Coleman at 1-800-835-3278
or TDD: 316-832-8707.
The handling, storage and
transportation of gas cylinders
must be in accordance with
ANSI/NFPA 58, Storage and
Handling of Liquified Gases, or
CSA B149.1, Natural Gas and
Propane Installation Code.
• 9-volt Battery included
• 20# L.P. gas cylinders
not included
The owner shall post in a
prominent location instructions
to be followed in the event the
user smells gas. This information shall be obtained by
consulting the local gas
supplier.
®
GAS BARBECUE
For Outdoor Use Only
ANSI Z83.11 • CSA 1.8 (2002)
FOOD SERVICE EQUIPMENT
Contents
FOR YOUR SAFETY
If you smell gas:
General Safety Information
General Installation
Portable L.P. Gas Barbecue Cylinders
L.P. Gas Cylinder
Hose and Regulator
Transporting the Cylinder
Filling and Purging Type 1 L.P. Gas Cylinders
Purging and Evacuating Devices for L.P. Gas Cylinders
with Type 1 Cylinder Valves
To Set up
Leak Testing
Fixing a Fuel Leak
Start-up Check List
Lighting the Grill
Tear Down/Clean
General Use and Correct Burner Flames
Cleaning the Venturi
Storage
Maintenance
Things You Should Know
Troubleshooting
Replacement Parts List
Warranty
2-3
3
4
4-5
5
5-6
6
6
7–8
8
9
9
9–10
10-11
12
12
13
13
13
13
14
16
WARNING: Improper installation, adjustment,
alteration, service or maintenance can cause
property damage, injury or death. Read the
installation, operating and maintenance instructions thoroughly before installing or servicing
this equipment.
General Safety Information
This manual contains important information about the assembly, operation
and maintenance of this product and system. General safety information is
presented in these first few pages and is also located throughout the manual. Particular attention should be paid to information accompanied by the
safety alert symbols: “ DANGER”, “ WARNING”, “ CAUTION”.
Keep this manual for future reference and to educate new users of this
product. This manual should be read in conjunction with the labeling on
the product.
Safety precautions are essential when any mechanical or propane fueled
equipment is involved. These precautions are necessary when using, storing, and servicing. Using this equipment with the respect and caution
demanded will reduce the possibilities of personal injury or property damage.
The following symbols shown below are used extensively throughout this
manual. Always heed these precautions, as they are essential when using
any mechanical or fueled equipment.
DANGER
DANGER indicates an imminently hazardous situation which, if not
avoided, will result in death or serious injury.
WARNING
WARNING indicates a potentially hazardous situation which, if not
avoided, could result in death or serious injury.
CAUTION
2
CAUTION indicates a potentially hazardous situation which, if not
avoided, may result in minor or moderate personal injury, or property
damage.
1.
2.
3.
4.
Shut off gas to the appliance.
Extinguish any open flame.
Open lid.
If odor continues, immediately call your
gas supplier or your fire department.
5. NEVER use Natural Gas in a unit designed
for Liquid Propane (L.P.) Gas.
FOR YOUR SAFETY
1. Do not store or use gasoline or other
flammable vapors and liquids in the vicinity
of this or any other appliance.
2. An L.P. cylinder not connected for use shall
NOT be stored in the vicinity of this or any
other appliance.
WARNING
Combustion by-products produced when using this product contain
chemicals known to the State of California to cause cancer, birth
defects, or other reproductive harm.
DANGER
• FOR OUTDOOR USE ONLY. NEVER operate grill in enclosed
areas, as this could lead to gas accumulating from a leak, causing
an explosion or a carbon monoxide buildup which could result in
injury or death. DO NOT use in garages, breezeways, sheds or
any enclosed area. (Fig. 1)
• NOT FOR USE BY CHILDREN. (Fig. 2)
• If these instructions are ignored, a hazardous fire or explosion could
result in physical injury, death or property damage!
WARNING
• DO NOT move grill while it is operating or hot. (Fig. 3)
• Keep outdoor cooking gas appliance area clear and free from
combustible materials, gasoline and other flammable vapors and
liquids. (Fig. 4)
WARNING
• NEVER place more than 15 pounds on a side table or a side burner.
DO NOT lean on grill. (Fig. 5)
• NEVER use charcoal briquettes or lighter fluid in a gas grill. (Fig. 6)
• Grill is hot when in use; to avoid burns, DO NOT touch any hot grill
surface. Keep children and pets away from hot grill. (Fig. 7)
• NEVER leave the grill unattended while it is in use. (Fig. 8)
• It is your responsibility to assemble, install, operate and care for
your gas grill properly.
• DO NOT vent propane vapor from the cylinder before taking it to be
refilled.
• DO NOT use gas grill indoors or store any propane cylinder(s) indoors,
including in the garage, breezeways, sheds or enclosed areas.
• Under some circumstances, propane may lose the distinctive odor
that was added. Keep the service valve closed and plugged or
capped (as recommended by the manufacturer) when the cylinder is
not connected to the appliance, including “empty” cylinders. Other
strong odors may hide or mask the odor of propane. Colds, allergies, sinus congestion, and the use of tobacco, alcohol or drugs
may impair your ability to detect the odor of propane.
Portable L.P. Gas Barbecue Cylinders
L.P. Gas Cylinder
DANGER
WARNING
A liquid propane tank, not connected for use with this gas barbecue,
shall not be stored in the vicinity of this or any other appliance.
• DO NOT insert any foreign objects into the valve outlet.
You may damage the valve. A damaged valve can cause
a leak, which could result in explosion, fire, severe personal injury or death.
Liquefied Petroleum gas (abbreviated L.P. gas or propane), is
highly flammable. It becomes liquid when stored under high pressure inside a cylinder and vaporizes when released. L.P. gas is
heavier than air and tends to collect in low areas. It is important
that there are no leaking connections on your gas grill that could
cause a fire or explosion (see “LEAK TESTING”, Pg. 9).
Portable LP gas grills require a fuel delivery system which is
comprised of valves [A], manifold [B], a hose [C], a regulator [D]
with vent holes [E], an L.P. gas supply cylinder [F], a Type 1 coupling nut [G] and a Type 1 cylinder valve [H] (Fig. 10). Illustration in
Fig. 10 is for description purposes and only shows the right side of
the grill.
Protect regulator assembly vent holes [E] from freezing rain,
rain, snow and water. See Fig. 10 for vent locations.
WARNING
• If the grill is not in use, the gas must be turned off at the
supply cylinder(s).
• Cylinders must be stored outdoors out of the reach of
children and must not be stored in a building, garage or
any other enclosed area. (Fig. 11)
Cylinder Specifications
• Any L.P. gas supply cylinder used with this grill must be
approximately 12 inches diameter and 18 inches high. The
maximum fuel capacity is 80% and is approximately 20 pounds
of propane.
• The maximum weight of a properly filled cylinder will be
approximately 38 pounds (47.7 lbs. nominal water capacity).
• The L.P. cylinder must have a shut-off valve terminating in a
Type 1 L.P. gas cylinder valve outlet
(see item [H], Fig. 10, pg. 4).
WARNING
Your new barbecue grill is equipped with a Type 1 coupling nut
[G]. DO NOT attempt to connect to any other L.P. cylinder not
equipped with a mating Type 1 cylinder valve [H]. This grill is
not to be used with any other cylinder connection device.
10
A
B
H
F
C
G
E
E
D
4
L.P. Gas Cylinder cont.
Hose and Regulator
The Type 1 connection system has the following features:
1.The system will not allow gas to flow until a positive connection
has been made.
NOTE: The cylinder control valve must be turned off before any
connection is made or removed.
2.The system has a thermal element that will shut off the flow of
gas in the event of a fire.
3.The system has a flow limiting device which, when activated, will
limit the flow of gas to 10 cubic feet per hour.
4.NEVER use grill without leak testing this connection.
11
WARNING
• DO NOT attempt to adjust the regulator as this could
create a situation causing personal injury or property
damage.
• A Type 1 compatible cylinder with a Type 1 cylinder valve has
a back-check valve which does not permit gas flow, until a positive seal has been obtained.
• The cylinder must be arranged for vapor withdrawal. It must
also include a collar to protect the cylinder valve. A safety relief
device having direct communication with the vapor space of
cylinder must be provided. This will expel high pressure gas if
the cylinder is overfilled or overheated which could result in fire
or explosion.
• All L.P. gas cylinders used with this appliance shall be constructed and marked in accordance with the specifications for
L.P. gas cylinders of the U. S. Department of Transportation
(DOT) or the National Standard of Canada, CAN/CSA-B339,
Cylinders, Spheres and Tubes for Transportation of Dangerous
Goods; and Commission, as applicable; and shall be provided
with a listed overfilling prevention device.
• Read labels on the L.P. Gas Supply Cylinder.
• New cylinders are always shipped empty for safety.
• Allow only qualified L.P. gas dealers to fill or repair your L.P.
gas supply cylinder.
• Inform the gas dealer if it is a new or used cylinder to be filled.
• Caution the gas dealer not to overfill cylinder.
• After filling, have the gas dealer check for leaks and to see that
the relief valve remains free to function.
CAUTION
Have the gas dealer weigh cylinder after filling to ensure that
the cylinder is not overfilled.
The pressure regulator and hose assembly with the Type 1 fitting
supplied with the appliance must be used. Do not use another
hose and regulator assembly other than the one supplied with the
grill or a Coleman® replacement pressure regulator assembly. The
pressure regulator and hose assembly provided is factory set at
an outlet pressure of 11 inches water column (1/2 psi).
• Keep the small vent hole in the regulator clean of dirt and debris
(see item [E], Fig. 10, pg. 4).
• Consult your L.P. gas dealer if you think the regulator is not
working properly.
WARNING
During assembly of grill and when attaching or replacing
the L.P. gas cylinder, insure that the gas supply hose is free
of kinks and/or damage and is at least 3" away from hot surfaces such as the grill housing.
Transporting the Cylinder
• Transport only one cylinder at a time.
• Transport cylinder in an upright and secure manner with a control
valve turned off and the cap in place.
• DO NOT transport cylinder in passenger compartment, unless
you have an open window ventilation.
• DO NOT leave cylinder in direct sunlight or in a high heat area
such as a closed car trunk. High heat areas could cause the relief
valve to vent gas.
• Use a cylinder cap on cylinder valve outlet during transport and
when the cylinder is not connected to grill.
• Keep cylinder valve closed when not in use.
• Take the cylinder directly home after it has been filled.
5
To Set Up
Step 1
■ Lower the grill, allowing the
leg assembly to slide into
position. (Fig. 18)
■ Carefully read and follow the instructions for proper setup & use of
your Coleman® Event Grill.
■ Use the locking caster to
prevent the grill from rolling.
(Fig. 19)
CAUTION
Because of its size and weight, it is recommended that there are at
least two (2) people available to set up your Coleman® Event Grill.
■ Remove components from carton. (Fig. 15 & 16)
Fig. 18
Fig. 15
Fig. 19
■ Secure the right leg assembly
with two clevis pins and two
hairpin cotters. Use one set for
the front leg and one set for the
back leg.
(Fig. 20 and 21)
■ Repeat Step 2 to attach the
left leg assembly.
Fig. 16
Fig. 20
Fig. 21
Step 2
■ NOTE: One leg
assembly is marked
“RIGHT FRONT” and
one leg assembly is
marked “LEFT
FRONT”.
■ NOTE: Position
locking caster toward
front of grill.
■ Carefully raise the
right end of grill and
align “RIGHT” leg
assembly with the
receiver tubes on the
bottom of the grill.
(Fig. 17)
Step 3
■ Lower the
tank mount.
(Fig. 22)
Receiver
Tubes
“RIGHT” Leg
Assembly
Locking Caster
Fig. 17
Fig. 22
7
To Set Up continued
Step 6
Step 4
LEFT LID (SHELF)
■ Place a 20 lb.
propane cylinder
in the right tank
mount and secure
as shown.
(Fig. 23 & 24)
CENTER LID
RIGHT LID (SHELF)
Fig. 30
NOTE: Point
cylinder valves
toward front of
grill.
Fig. 23
NOTE: Each
cylinder provides
fuel to only one
side of the grill.
Fig. 24
■ Unlock Right Lid.
NOTE: Undo latches on
front and back of lid.
(Fig. 30)
■ Release lid flaps to
form Right Shelf. (Fig. 31)
LID FLAPS
Step 5
Fig. 31
NOTE: Storage position for the regulator is above the grease pan.
■ Unlock the grease pan (located on the back side of the grill). (Fig. 25)
■ Slide the grease pan half way out. (Fig. 26)
IMPORTANT: Always remove Lids in this order:
Right Lid first.
Left Lid second.
Center Lid last.
•
•
•
■ Carefully insert Shelf Lip
on Right Side Shelf into Top
Channel, while at the same time
making sure the Notches on the
side Flaps fit into the Flanges
on the grill body. (Fig. 32 & 33)
SHELF LIP
TOP CHANNEL
Fig. 25
Fig. 26
■ The storage position for the regulator is above the grease pan. (Fig. 27)
■ Remove the regulator from the clip attached to the bottom of grill. (Fig. 28)
NOTCH
FLANGE
Fig. 27
Clip
Fig. 28
■ Attach the regulator to the
propane cylinder connection
and hand-tighten. (Fig. 29)
■ Repeat Step 4 and Step 5 to
attach the second cylinder on
the left side.
Fig. 33
Fig. 29
8
Fig. 32
■ Repeat the same order for attaching the Left Side Shelf as you did
on the Right Side Shelf.
■ Remove Center Lid and set aside until ready for storage of the grill.
Fixing a Fuel Leak
To Set Up continued
If you detect a leak:
1. Turn off the fuel supply. Push in and turn on control knobs
to release pressure in hose, then return the control knobs
to OFF.
2. Wash off soapy solutions with cold water and towel dry.
3. Stop a leak by tightening the loose joint, or by replacing the
faulty part with a replacement part recommended by
Coleman. DO NOT attempt to repair the cylinder valve if it
should become damaged; the cylinder MUST be replaced.
4. If you are unable to stop a leak, shut off the gas supply at the
cylinder valve. Remove the cylinder from the grill. Call a gas
appliance serviceman or L.P. gas dealer. DO NOT use grill
until the leak is corrected.
Step 7
■ Install two Grease
Pans from front as
shown. (Fig. 34)
Fig. 34
When to test for leaks:
1. Perform a leak test each time the gas supply cylinder is
connected to the regulator. Leak test anytime a part of
the gas system is replaced.
2. Perform a leak test at least once each year whether the L.P.
gas supply cylinder has been disconnected or not.
3. Have a dealer check the cylinder for deterioration after 12
years, according to DOT regulations. Immediately replace
cylinder if any deterioration is found
Step 8
■ Install 9-Volt Battery
with positive (+) terminal
as shown on Igniter
Module. (Fig. 35)
Igniter Module
+-
CAUTION
Fig. 35
Leak Testing
DANGER
TO PREVENT FIRE OR EXPLOSION HAZARD:
• NO SMOKING. DO NOT use or permit sources of ignition
in the area while doing a leak test.
• Perform leak tests outdoors only.
• NEVER perform a leak test with fire or flame.
How to Check for Leaks
1. Make a soapy solution of equal parts mild liquid dishwashing
detergent and water.
2. Turn off all burner control knobs.
3. Turn on fuel supply. Turn cylinder valve knob counterclockwise (right to left) one rotation.
4. Apply soap solution to connections indicated with arrows in
Fig. 36. If bubbles appear at these areas, a leak is indicated.
REPRESENTATIVE
ILLUSTRATION
Inspect the gas supply hoses before each use. If there are
cuts, damage, excessive abrasion or wear, replace the
hoses prior to operating the appliance. During assembly of
grill and when attaching or replacing the L. P. gas cylinder,
insure that all gas supply hoses are free of kinks and/or
damage and are at least 3" away from hot surfaces such as
the grill housing. Use only hose replacements specified in
the parts list.
Start-Up Check List
WARNING
Failure to follow these safety steps before using grill each
time could result in a fire that could be hazardous to you,
your appliance or property. It is especially important to
observe these steps after the grill has been stored, moved
or cleaned.
❑ 1. Inspect the gas supply hoses before each use. Hoses can
be burned or chafed if they are routed improperly. See that
hoses have no kinks, sharp bends or tension. Insure that
hoses are at least 3 inches away from any hot surface. If it
is evident that there is excessive abrasion or wear, or the
hose is cut, it must be replaced prior to the grill being put
into operation.
❑ 2. Use only the gas specified.
❑ 3. Keep the grill on a level surface and lock the Castor.
❑ 4. Keep grease pans empty at start up.
❑ 5. Do not use charcoal or lighting fluid.
❑ 6. The minimum operating temperature is 40°F. Below 40°F
the grill performance is reduced by cold temperatures.
Fig. 36
9
Lighting the Grill
Lighting the Grill continued
Step 3
WARNING
■ Turn right side burner valve to
“High.” (Fig. 39)
■ Press igniter button to light.
(Fig. 40)
NOTE: If the flame doesn’t
immediately light, turn off control
knob and wait five minutes for gas
to clear.
■ Repeat steps 1 through 3.
■ If the burner does not light on
second try, turn off knob and
try match-lighting the burner.
THE FOLLOWING RULES MUST ALWAYS BE
FOLLOWED IN THIS ORDER :
1. Check that the Burner Control Knobs are turned to “OFF.”
2. Turn on fuel supply. For an L.P. gas cylinder, turn the
top cylinder valve knob counterclockwise to open.
3. DO NOT stand with head or arms over grill.
WARNING
This procedure MUST be performed OUTDOORS only! Be
sure L.P. cylinder valve is closed. Attach to Grill. Read and follow directions on the cylinder and fuel hose safety tags.
■ Repeat steps 2 and 3 for left side
L.P. gas cylinder and left side burner.
Fig. 39
Fig. 40
NOTE: You must push Igniter Button
to ignite the second side of the grill.
CAUTION
In the connection process, the grill side of the connection will
seal on the back-check in the valve, resulting in a slight resistance. The connection requires about one-half to three-quarters
additional turn to complete the connection. To disconnect, turn
counterclockwise. Tighten by hand only. DO NOT use tools.
■ All Burner Valves can be adjusted
from “Low” to “High.” (Fig. 41)
Fig. 41
Step 1
Match Lighting
■ Make sure Burner Valves
are in OFF position.
(Fig. 37)
■ Use a LONG wooden match or the match extension provided.
Make sure all burner controls are off except one being lighted.
■ Insert a match in the holder end of the extension, strike the
match and place the match near the burner from above.
■ Turn on BURNER CONTROL KNOB while holding match near burner.
■ You must use another match to ignite the second side of the grill.
Fig. 37
NOTE: Follow this Lighting Procedure to light Burners on one side of the
grill then repeat to light the Burners on the other side of the grill.
Tear Down/Clean
Step 1
■ Make sure Burner Valves are in
OFF position. (Fig. 42)
■ Allow unit to cool completely.
Step 2
■ Turn on fuel supply on righthand
L.P. gas cylinder. (Fig. 38)
Fig. 42
Step 2
■ Turn off fuel supply on both L.P.
gas cylinders. (Fig. 43)
Fig. 38
10
Tear Down/Clean continued
Tear Down/Clean continued
Step 6
■ Center Lid goes on first. (Fig. 49)
Step 3
■ Remove Regulators from
Propane Cylinder Connection.
(Fig. 44)
Fig. 49
Fig. 44
Step 7
■ Lift up on Right Side Shelf to remove from grill and fold in flaps
as shown. (Fig. 50 & 51)
Step 4
■ Remove Grease Pans. Slide
out from front of grill to clean or
install new aluminum liners in
Grease Pans. (Fig. 45)
Fig. 50
Fig. 51
Step 8
■ Place folded up Right Lid (Shelf) on grill.
(Fig. 52)
Fig. 45
IMPORTANT: Make sure Lid fits into
Channel on Center Lid.
■ Repeat to store Left Lid (Shelf).
■ Be sure to replace all three lids after use.
(Fig. 53)
Step 5
CENTER LID
CHANNEL
■ Unlock tab as shown. (Fig. 46)
■ Slide out Grease Tray. (Fig. 47)
■ Clean thoroughly before storing grill.
LEFT LID (SHELF)
CENTER LID
Fig. 52
RIGHT LID (SHELF)
Fig. 46
Fig. 53
Step 9
■ Remove the 20 lb. L.P. gas cylinders from the tank mounts and
replace the protective caps on the cylinders. (Fig. 54 & 55)
■ Fold the tank mounts into the storage position. (Fig. 56)
Fig. 47
■ Slide Grease Tray back into position
under grill and lock tab. (Fig. 48)
Fig. 48
Fig. 54
Fig. 55
Fig. 56
11
WARNING
• Keep grill area clean and free from combustible materials,
gasoline and other flammable vapors, liquids, and spare
L.P. cylinders.
• DO NOT obstruct the flow of combustion and ventilation air.
• Keep the ventilation opening(s) of the L.P. cylinder enclosure free and clear of debris.
• A barbecue grill becomes hot during use. DO NOT touch
grates, or cooking surfaces.
• Be sure to tighten all hardware (screws, nuts, bolts, etc.)
at least once a year or each grilling season.
12
Replacement Parts 9995B Series Event Grill
Parts List
No.
Part No.
Description
1
2
3
4
5
6
7
8
9
10
11
12
13
14
15
16
17
18
19
9995A2181
9995A1511
9995-2411
9995-1191
9995-2021
9995-1571
9995A2051
9995A5601
9995-5201
9995-5701
9990-5491
9995-2161
9995A1551
9995-3861
9995-5151
9995A2031
9995-1681
9995A1651
9943-1501
Center Lid Assembly - Black
Cooking Grate (1 pk)
Spacer w/hardware (1 pk)
Heat Tent w/hardware
Burner w/hardware (1 pk)
Bumper w/hardware (1 pk)
End Lid Assembly - Black (1 pk)
Regulator/Hose Assembly - (1 pk)
Right Leg Assembly - Black
Tank Retainer Straps (1 pk)
Castor w/lock (1 pk)
Grease Pan (1 pk)
Igniter Switch w/wires
Igniter Module
Left Leg Assembly - Black
Drip Pan Assy (1 pk)
Latch (for drain pan) (1 pk)
Bracket w/hardware (for regulator) (1pk)
Control Knobs w/graphics (1 pk)
1
2
3
4
5
6
7
9
10
15
14
14
13
12
11
Accessories
The following accessories are available:
• Griddle
9995A350
• Cover
9995-099
Visit us at www.coleman.com
or
Call us at 1-800-835-3278
15
Warranty
Coleman Limited One-Year Warranty
The Coleman Company, Inc. (“Coleman”) warrants that for a period of
one year from the date of original retail purchase, this product will be free
from defects in material and workmanship. Coleman, at its option, will repair
or replace this product or any component of the product found to be
defective during the warranty period. Replacement will be made with a new
or remanufactured product or component. If the product is no longer
available, replacement may be made with a similar product of equal or
greater value. This is your exclusive warranty.
This warranty is valid for the original retail purchaser from the date of
initial retail purchase and is not transferable. Keep the original sales receipt.
Proof of purchase is required to obtain warranty performance. Coleman
dealers, service centers, or retail stores selling Coleman® products do not
have the right to alter, modify or in any way change the terms and conditions
of this warranty.
This warranty does not cover normal wear of parts or damage resulting
from any of the following: negligent use or misuse of the product, use on
improper voltage or current, use contrary to the operating instructions,
disassembly, repair or alteration by anyone other than Coleman or an authorized service center. Further, the warranty does not cover Acts of God, such
as fire, flood, hurricanes and tornadoes.
COLEMAN SHALL NOT BE LIABLE FOR ANY INCIDENTAL OR
CONSEQUENTIAL DAMAGES CAUSED BY THE BREACH OF ANY
EXPRESS OR IMPLIED WARRANTY OR CONDITIONS. SOME STATES,
PROVINCES OR JURISDICTIONS DO NOT ALLOW THE EXCLUSION OR
THE LIMITATION OF INCIDENTAL OR CONSEQUENTIAL
DAMAGES, SO THE ABOVE LIMITATION OR EXCLUSION MAY NOT
APPLY TO YOU. EXCEPT TO THE EXTENT PROHIBITED BY
APPLICABLE LAW, ANY IMPLIED WARRANTY OF MERCHANTABILITY
OR FITNESS FOR A PARTICULAR PURPOSE IS LIMITED IN DURATION
TO THE DURATION OF THE ABOVE WARRANTY OR CONDITIONS.
SOME STATES, PROVINCES OR JURISDICTIONS DO NOT ALLOW
LIMITATIONS ON HOW LONG AN IMPLIED WARRANTY LASTS, SO THE
ABOVE LIMITATIONS MAY NOT APPLY TO YOU. This warranty gives you
specific legal rights, and you may also have other rights that vary from state
to state or province to province.
HOW TO OBTAIN WARRANTY SERVICE
Take the product to an authorized Coleman service center. You can find
the nearest authorized Coleman service center by calling 1-800-835-3278 or
TDD 316-832-8707 in the United States. If a service center is not
conveniently located, attach to the product a tag that includes your name,
address, daytime telephone number and description of the problem. Include
a copy of the original sales receipt. Carefully package the product and send
either by UPS or Parcel Post insured with shipping and insurance prepaid
to:
For products purchased in the United States:
The Coleman Company, Inc.
3600 North Hydraulic
Wichita, KS 67219
Do not mail products with fuel in tanks, or with disposable propane
cylinders.
DO NOT RETURN THIS PRODUCT TO THE PLACE OF PURCHASE.
If you have any questions regarding this warranty please call
1-800-835-3278 or TDD 316-832-8707 in the United States.
The Coleman Company, Inc.
3600 N. Hydraulic
Wichita, KS 67219 U.S.A.
1-800-835-3278
TDD: 316-832-8707
www.coleman.com
1 YEAR
®
The Coleman Company, Inc. • 3600 N. Hydraulic • Wichita, KS 67219 U.S.A.
1-800-835-3278 • TDD: 316-832-8707
© 2005 The Coleman Company, Inc. All rights reserved.
Coleman® and
16
®
are registered trademarks of The Coleman Company, Inc.
9995B021 (6/27/05)