1
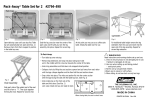
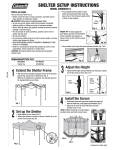
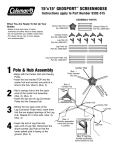
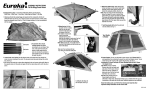
14’ x10’ SkyDome Screenhouse
Instructions apply to Part Number 9392-540
ASSEMBLY PARTS
When You Are Ready To Set Up Your
Shelter
–Select a level area clear of rocks,
branches and other hard or sharp objects.
–Do not set up your shelter under trees.
–For easier set up, two or more people
are recommended.
–Place fabric in center of selected location
and assemble above fabric.
Poles (4) Part No. 9392-1201
Hub (1) Part No. 9392-1261
Pole Sleeves
1 Pole Assembly
Hub clipped
to fabric
–You will need to assemble and connect one
pole at a time to the hub.
–Do not completely assemble poles.
a) Beginning at spring-clip end of pole,
assemble all but the last shock-corded
section. The pole and one section
should curve downward. (illus. 1)
b) Locate the center top clip on the fabric
and attach it to the Hub
(illus. 1), (illus. 3)
c) Starting at the corner, Insert the
spring-clip end of the pole through the
webbing loop and then into the
pole sleeve pushing it toward the center
(illus. 1)
d) Insert the spring-clip end into one of the
hub ports until it clicks into position.
That pole will now partially stand up.
(illus. 2), (illus. 3), (illus. 4)
e) Repeat for each of the three
Illus. 2
remaining poles (illus. 3)
Poles inserted
into hub
Webbing
Loop
Illus. 1
Poles inserted through
webbing loop and
pole sleeves
Hub
Illus. 3
Poles clipped into position in
the hub
2
Attach Shelter to Frame
3
Complete Shelter
illus. 5
Metal bracket
for webbing loop
–When the poles are attached to the hub,
and the shelter is partially standing, hook
the weebing loop into position over the
metal bracket.(illus. 4), (illus. 5)
bracket
–Fully extend each pole by straightening
illus. 4 Screen House clipped to
all shock-corded pole sections.
partially assembled frame
–Insert the pin on the pin and ring
system, at the corner of the SkyDome
fabric into the the pole end.
(illus. 6), (illus. 8)
Corner
clips
–Repeat for remaining poles.
–Adjust poles to pull the shelter
taut and stake down through
the fabric loops at the end of
pin and ring. (illus. 7), (illus. 8)
–Attach corner clips to poles.
–Attach guy lines to fabric
guy loops at each corner
and stake out. (illus. 8)
–Doors can be and secured
open with toggle and loops.
illus. 8
(illus. 8)
Completed shelter with guy
lines staked out.
illus. 6
illus. 7
Insert into the pole end
Stake through stake loop
Things You Should Know
• Never store shelter, even for a short period of time, without drying it thoroughly and
brushing off caked dirt. Do not pack stakes or poles inside your shelter. Use
separate storage bag.
• STAKES SHOULD BE REMOVED BY PULLING ON THE STAKE ITSELF. NEVER
PULL ON THE SHELTER FABRIC OR STAKE LOOP TO REMOVE STAKE.
• SHELTER POLES SHOULD NOT BE LEFT TELESCOPED TOGETHER
DURING STORAGE.
• Do not leave your shelter set-up for weeks at a time, be aware that exposure to the
ultraviolet rays of the sun can seriously damage material and/or cause it to become
discolored.
WARNING: Keep all flame and heat sources away from this shelter fabric.
This shelter meets the flammability requirements of CPAI-84. The fabric will burn if
left in continuous contact with any flame source. The application of any foreign
substance to the shelter fabric may render the flame-resistant properties ineffective.
THE COLEMAN CO., INC.
3600 N. Hydraulic • Wichita, Kansas 67219
1-800-835-3278 • www.coleman.com
MADE IN SRI LANKA
PRINTED IN SRI LANKA
Rev. 11/04