1
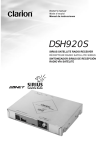
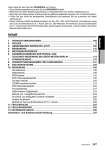
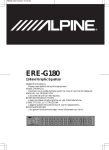
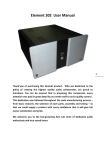
Owner’s manual Mode d’emploi Bedienungsanleitung Istruzioni per l’uso Bruksanvisning DAB BLACK-BOX TUNER FOR CeNET • TUNER DE BOÎTE NOIRE DAB POUR CeNET • DAB BLACK-BOX-TUNER MIT ANSCHLUß UND STEUERUNG ÜBER CeNET • SINTONIZZATORE BLACK-BOX DAB PER CeNET • DAB BLACK-BOX TUNER FÖR CeNET Clarion Co., Ltd. 2001/12 (A·K) All Rights Reserved. Copyright © 2001: Clarion Co., Ltd. Printed in Japan / Imprimé au Japon / Gedruckt in Japan / Stampato in Giappone / Tryckt i Japan GT-977E 280-7788-00 Thank you for purchasing the Clarion DAH923. ∗ Please read this owner’s manual in its entirety before operating this equipment. ∗ Check the contents of the enclosed warranty card and keep it carefully with this manual. ∗ This manual includes the DAB operating procedures for four types of models and the installation procedures of the DAH923, DXZ928R, DXZ828R, DXZ728R and ADZ628R that are connected via the CeNET cables. Note that the following models can also be connected via a CeNET cable for DAB operation; consult your dealer for details: VRX918R, VRX613R, DRX960Rz, MRX8675Rz, DRX8675Rz, ARX8670Rz, ADX5655Rz, DRX9575Rz/RWz, DRX8575Rz/RWz, ARX8570Rz/RWz, ADX5555Rz, VRX6570Rz. Contents 1. 2. 3. 4. 5. PRECAUTIONS ......................................................................................................... 2 FEATURES ................................................................................................................ 3 SPECIFICATIONS ..................................................................................................... 4 CONTROLS ............................................................................................................... 6 NOMEMCLATURE ..................................................................................................... 8 Names of Buttons ....................................................................................................... 8 Display Items .............................................................................................................. 8 6. OPERATIONS ............................................................................................................ 9 Digital Radio / DAB Operations .................................................................................. 9 7. INSTALLATION AND WIRE CONNECTION ........................................................... 13 Before Installation .................................................................................................... 13 Accessories .............................................................................................................. 13 Installation Example ................................................................................................. 14 Connection Example and Identification of Parts ..................................................... 14 How to Make Wirings ............................................................................................... 15 8. SYSTEM EXAMPLES .............................................................................................. 16 1. PRECAUTIONS 1. This unit does not operate independently. The unit must be used with a main unit that has a cable connection for CeNET wire bound. 2. The DAH923 can easily be damaged by moisture, high temperatures or high humidity. Keep the inside of the car clean and well ventilated. 3. Never subject the DAH923 to strong shocks or open its case. Doing so may result in damage. 4. Use a soft, dry cloth to wipe dirt off the DAH923. Never use a hard cloth or thinner, alcohol, etc. For tough dirt, apply some cold or lukewarm water to a soft cloth and wipe off the dirt gently. 5. The volume level of some DAB broadcasts may be different from that of other function modes (FM, CD, etc.) even if the preset volume level is the same. 2 DAH923 6. If the power source (B/U and ACC, etc.) is cut, the contents stored in memory are cleared (The unit is reset to the factory default setting). 7. If receiving conditions become bad, the sound may be muted. CAUTION CHANGES OR MODIFICATIONS NOT EXPRESSLY APPROVED BY THE MANUFACTURER FOR COMPLIANCE COULD VOID THE USER’S AUTHORITY TO OPERATE THE EQUIPMENT. INFORMATION FOR USERS:. CHANGES OR MODIFICATIONS TO THIS PRODUCT NOT APPROVED BY THE MANUFACTURER WILL VOID THE WARRANTY. DAH923 67 Digital Radio / DAB Operations Programme scan This function scans through each receivable programme in a DAB station being received for 10 seconds sequentially. This is useful when you want to search for a desired programme. 1. Press the [FNC] button to receive a DAB station. 2. Perform the following operation depending on the connected model. • DXZ928R/DXZ828R/DXZ728R Press the [PS/AS] button. “SERVICE SCN” lights up and the main unit starts scanning each programme for 10 seconds sequentially. Each time the main unit scans, the programme name is shown in the display. • ADZ628R Press the [PS/AS] button. “SCAN” lights up and the main unit starts scanning each programme for 10 seconds sequentially. Each time the main unit scans, the programme name is shown in the display. 3. To stop programme scan when a desired programme is tuned in. Press the [PS/AS] button. Manual memory The main unit has a manual memory function for DAB programmes. Up to 18 programmes (6 programmes each) can be preset in the preset memory. [M1], [M2] and [M3] 1. Press the [FNC] button to select DAB mode. 2. Press the [BND] button to select any one shown above. 3. Press the [ ] or [ ] button to select a desired programme. • DXZ928R/DXZ828R/DXZ728R 4. Press and hold one of the [DIRECT] buttons (1 to 6) for 2 seconds or longer to store the programme. • ADZ628R 4. Press the [M] button. “CH” is lit in the display. 5. Turn the [PRESET] knob clockwise or counterclockwise to select the desired preset memory. 6. Press and hold the [M] button for 2 seconds or longer to store that station into preset memory. Note: • The interrupt programme (PTY or INFO) cannot be written into a manual memory. Recalling a preset programme 1. Press the [FNC] button to select DAB mode. 2. Press the [BND] button. Each time you press the [BND] button, the display changes in the following order: [M1] ➜ [M2] ➜ [M3] ➜ [M1]... • DXZ928R/DXZ828R/DXZ728R 3. Press one of the [DIRECT] buttons to recall a preset programme. Note: • Press and hold the [DIRECT] button for 2 seconds or longer to store the programme currently being received. (Manual memory) • ADZ628R 3. Turn the [PRESET] knob clockwise or counterclockwise to recall a preset programme. AF function The AF function switches to a different frequency on the same network in order to maintain optimum reception. ∗ The factory default setting is “ON” • DXZ928R/DXZ828R/DXZ728R ∗ If the reception of the current broadcast station deteriorates, “SID SEARCH” appears in the display and the radio searches for the same programme on another frequency. • ADZ628R ∗ If the reception of the current broadcast station deteriorates, “SEARCHING FOR SAME STATION” or “SEARCH” appears in the display and the radio searches for the same programme on another frequency. ∗ For details on “AF function”, refer to the section “RDS operation” of each owner’s manual. ● Switching OFF the AF function ● Switching ON the AF function LINK function between RDS and DAB When the same programme is broadcast by both RDS and DAB, and this function is ON, the main unit switches to receiving the broadcast with the better reception automatically. 3. SPECIFICATIONS 2. FEATURES 3. SPECIFICHE DAB (Digital Audio Broadcasting) Digital radio section (DAB) General Sezione radio digitale (DAB) Generale The Digital Audio Broadcasting (DAB) system transmits several programmes on one frequency simultaneously, by compressing audio signals, etc. The group of programmes, which is transmitted on a single frequency is called an “Ensemble”. Some DAB stations have several ensembles and broadcast diversified programmes. The number of programmes and the contents which an ensemble provides depend on the broadcast stations and times. Since DAB programmes are broadcast on several different frequencies, the same programmes can be enjoyed over larger areas. The listener could listen to digital radio with an audio quality nearly equal to that of a CD. If reception deteriorates, the Clarion Receiver DAH923 will switch automatically to the corresponding FM station (if the signal is provided by broadcasters). Normally, the receiver searches for the next available ensemble in DAB mode. DIGITAL RADIO - the next Generation of Radio Experience!! Tuning system: PLL synthesizer tuner Receiving frequencies: Band III: 174.928 to 239.200 MHz L-Band: 1452.960 to 1490.624 MHz Power supply voltage: 14.4 V DC (10.8 to 15.6 V allowable), negative ground Power consumption: Less than 0.6 A Weight: 0.5 kg Dimensions: 178 (W) × 25 (H) × 100 (D) mm Sistema di sintonizzazione: Sintonizzatore sintetizzatore PLL Frequenze di ricezione: Banda III: da 174.928 a 239.200 MHz Banda L: da 1452.960 a 1490.624 MHz Voltaggio alimentazione: 14,4 V CC (consentiti da 10,8 a 15,6 V) messa a terra negativa Consumo di corrente: Meno di 0,6 A Peso: 0,5 kg Dimensioni: 178 (L) × 25 (A) × 100 (P) mm Nota: ∗ Le specifiche e il design sono soggetti a modifiche senza preavviso, in vista di ulteriori miglioramenti. 3. TEKNISKA DATA 3. CARACTÉRISTIQUES TECHNIQUES Features of DAH923 When digital radio is on air it’s benefits can be used. In case of insufficient coverage the receiver switches automatically to FM. Additionally this unit provides interference free reception even under worse conditions combined with the superior sound quality of CD. When you turn the unit on and select DAB mode, the programme that starts is the one that was selected before when the power was turned off. If this programme is not available, another programme will be selected automatically. Programmes have their own name, just like PS on RDS. Notes: • DAB stations may automatically reconfigure their services from time to time. When this happens and the service (program) you are looking for is no longer available, the receiver automatically looks up another program in the same DAB Ensemble. • For sophisticated audio quality, the receiver needs to tune on a DAB Ensemble. While the receiver is being tuned in to the DAB Ensemble, the audio output is muted. The tuning time is not fixed. • The following list summarizes the features of the DAH923. ■ ■ ■ ■ ■ ■ ■ ■ ■ ■ Note: • Specifications and design are subject to change without notice for further improvement. Section radio numérique (DAB) Données générales Digital radiomottagare (DAB) Allmänt Système de syntonisation: Tuner synthétiseur PLL Fréquences de réception: Bande III: 174,928 à 239,200 MHz Bande L: 1 452,960 à 1 490,624 MHz Tension d'alimentation: 14,4 V CC (10,8 à 15,6 V admissible), masse négative Consommation: Inférieure à 0,6 A Poids: 0,5 kg Dimensions: 178 (L) × 25 (H) × 100 (P) mm Stationsinställningssystem: PLL-synthesizerradio Mottagningsbara frekvenser: Band III: 174,928 till 239,200 MHz L-bandet: 1452,960 till 1490,624 MHz Driftspänning: 14,4 V likström (10,8 till 15,6 V tillåtet), negativ jord Strömförbrukning: Mindre än 0,6 A Vikt: 0,5 kg Yttermått: 178 (B) × 25 (H) × 100 (D) mm Remarque: ∗ La conception et les spécifications sont sujettes à modification sans préavis pour des raisons d'amélioration. Observera: ∗ Rätt till ändringar för ytterligare förbättringar förbehålles. 3. TECHNISCHE DATEN Supports All Types of Announcements (Traffic, News, Weather, Others) Pre Selection of Programme Type (PTY), Search and Watch Function for PTY Easy to Use Mode Sophisticated Audio Quality Simple Operation Based on a Newly Developed Man-Machine-Interface High Sensitive DAB Receiver (Band III / L-Band) Individual Announcement Support Automatic Service Following between DAB / FM-RDS Optical Radio Data Interface (RDI) for External Data Servise Decoder and so on Compact Dimensions Digitalradioteil (DAB) Allgemeines Tuner-System: PLL-Synthesizer-Tuner Empfangsfrequenzen: Wellenbereich III: 174,928 bis 239,200 MHz L-Wellenbreich: 1452,960 bis 1490,624 MHz Versorgungsspannung: 14,4 V Gleichspannung (10,8 bis 15,6 V zulässig) negative Masse Leistungsaufnahme: Weniger als 0,6 A Gewicht: 0,5 kg Abmessungen: 178 (B) × 25 (H) × 100 (T) mm Hinweis: ∗ Änderungen der technischen Daten und des Designs bleiben zur Produktverbesserung ohne Ankündigung vorbehalten. ∗ The factory default setting is “ON” ∗ For details on “AF function”, refer to the section “RDS operation” of each owner’s manual. ● AF function between RDS and DAB 10 DAH923 DAH923 3 DAH923 4 DAH923 5 4. CONTROLS / LES COMMANDES / REGLER / CONTROLLI / KONTROLLER CONTROLS / LES COMMANDES / REGLER / CONTROLLI / KONTROLLER Main unit / Appareil principal / Hauptgerät / Apparecchio principale / Huvudapparat DXZ928R Display / Afficheur / Display / Display / Display [ ], [ ] [FNC] [ ] [DISP] 5. NOMENCLATURE Notes: • Be sure to read this chapter referring to the front diagrams of chapter “4. CONTROLS” on pages 6 and 7 . • Only the buttons to operate the DAB function are shown in this manual. Names of Buttons DXZ928R [ ], [ ] buttons • Selects a station while in the radio mode. These buttons are used to make various settings. [DIRECT] [FNC] button • Switches the operation mode among the radio mode, etc. [ROTARY] [TA] [BND] [ADJ/TITLE] [PS/AS] [ ] button • Enter button while in the adjust mode. DXZ828R/DXZ728R [ROTARY] [FNC] [DISP] button • Switches the display indication (Main display, clock display). DXZ828R/DXZ728R [BND] [ ], [ [PS/AS] ] [TA] button • Use the button to set the TA (Traffic Announcement) standby mode. [PS/AS] button • Performs preset scan while in the radio mode. [ ] [TA] [DISP] [ADJ/TITLE] [DIRECT] [BND] button • Switches the band, or seek tuning or manual tuning while in the radio mode. ADZ628R [ADJ/TITLE] button • Press and hold the button for 1 second or longer to enter the adjust mode. [TA] [ADJ/TITLE] [M] Note: Be sure to unfold this page and refer to the front diagrams as you read each chapter. Remarque: Veuillez déplier cette page et vous référer aux schémas quand vous lisez chaque chapitre. Hinweis: Bitte diese Seite ausfalten und beim Lesen der einzelnen Kapitel die Frontdiagramme beachten. Nota: Si raccomanda di dispiegare questa pagina e far riferimento agli schemi anteriori quando si legge ciascun capitolo. Observera: Vik ut denna sida för att kunna se figurerna över bilstereons framsida medan du läser de olika kapitlen. 6 DAH923 7 8 DAH923 ] [FNC] [VOLUME] [ [PS/AS] ], [ ] [BND] [PRESET] [DISP] [ROTARY] knob (DXZ928R/DXZ828R/DXZ728R) • Press the front part of the knob to adjust. The knob will pop up. • Adjust the volume by turning the knob clockwise or counterclockwise. • Use the knob to perform various settings. Listening to the DAB station Seek tuning 1. Press the [FNC] button to select DAB mode. 2. When the unit receives a DAB station, the display changes in the following order: Frequency channel ➜ service label 1. Press the [FNC] button to select DAB mode. ] or [ ] button for 2. Press and hold the [ 1 second or longer. ∗ “SEARCHING” appears in the display. [DIRECT] button (DXZ928R/DXZ828R/DXZ728R) • Stores a station into memory or recall it directly while in the radio mode. [VOLUME] knob (ADZ628R) • Adjust the volume by turning the knob clockwise or counterclockwise. • Use the knob to perform various settings. [PRESET] knob (ADZ628R) • Stores a station into memory or recall it directly while in the radio mode. • In adjust modes, use to select items for adjustment. Note: To operate [PRESET] knob: 1. Turn knob about 30 deg. (adjust item will change). 2. Release finger (knob will return to original position). 3. Turn knob again (adjust item will change). 3. “DAB” lights up in the display when the main unit receives a DAB station. Switching displays Press the [DISP] button for 1 second during the Main (service label) display to select Main (service label) or Sub (PTY). Note: • The display shown in the normal reception mode and the preset reception mode is the same when a DAB station is received. 3. When the unit does not receive a DAB station, the display changes in the following order: –Normal reception mode– –Preset reception mode– ∗ The main unit stops the seek tuning when it cannot find a DAB station. The display returns to the previous mode. Manual tuning 1. Press the [FNC] button to select DAB mode. 2. Press and hold the [BND] button for 1 second or longer. “MANU” lights up in the display. 3. Press the [ ] or [ ] button to select a station. ∗ If no operation is performed for more than 7 seconds, manual tuning is cancelled and the display returns to the previous mode. Switching programmes 1. Press the [FNC] button to receive a DAB station. 2. Press the [ ] or [ ] button to switch programmes in the DAB station. Note: • The programme name may be the same depending on DAB programmes. Display Items (Function mode) 1 2 3 4 5 6 7 8 [ Notes: • Be sure to read this chapter referring to the front diagrams of chapter “4.CONTROLS” on page 6 and 7. • The displays shown in the following instructions are merely representative examples. The actual displays may differ depending on the model connected. Digital Radio / DAB Operations [M] button (ADZ628R) • Use to change and store items in preset memory. ADZ628R 6. OPERATIONS Operation status indication DAB indication AF (alternative frequency) indication REG (regional) indication TA (traffic announcement) indication TP (traffic programme) indication PTY (programme type) indication INFO (information) indication DAH923 9 SCN (scan) indication (DXZ928R/DXZ828R/DXZ728R) 0 Preset channel indication (1 to 6) ! Function mode indication @ MANU (manual) indication # ST (stereo) indication (DXZ928R) Notes: • The number of programmes and broadcasting times depend on the DAB stations. • When the strength of DAB signals is weak, audio output is muted. $ SUB indication (ADZ628R) DAH923 9 Digital Radio / DAB Operations TA (Traffic Announcement) In TA standby mode, when a traffic announcement broadcast starts, the traffic announcement broadcast is received as top priority regardless of the function mode. Traffic programme (TP) automatic tuning is also possible. ∗ This function can only be used when “TP” is lit in the display. When “TP” is lit, this means that the DAB or RDS broadcast station being received has traffic announcement programmes. ∗ For details on “TA”, refer to the section “RDS operation” of each owner’s manual. ● Setting TA standby mode ● Cancelling TA standby mode ● Searching for a TP station Notes: • If a TP station is not received, the main unit stops the search operation. • “TP” may be lit in the display when a TP broadcast is transmitted from an RDS station. In this case, press the [TA] button to perform TP seek tuning. Press the [TA] button again to return to the previous mode. INFO (Announcement) In INFO standby mode, when the selected announcement programme starts, the main unit switches to the selected announcement programme automatically. ● Setting INFO standby mode If you press and hold the [TA] button for 1 second or longer, “INFO” lights in the display and the main unit is set into INFO standby mode until the selected announcement is broadcast. When the selected announcement broadcast starts, the announcement item appears in the display. If you press and hold the [TA] button for 1 second or longer while the selected announcement broadcast is being received, the selected announcement broadcast reception is cancelled and the main unit goes into INFO standby mode. ● Cancelling INFO standby mode To cancel INFO standby mode, press and hold the [TA] button for 1 second or longer. ● Information select This is a function for selecting INFORMATION ON or OFF in Information interrupt mode. You can set ON up to 6 information items. You can select any of the 6 items below: ENGLISH Travel Warning News Weather Event Special INFORMATION item Contents Transport flash Warning / Service News flash Area weather flash Event announcement Special event 1. Perform the following operation depending on the connected model. Press and hold the [ADJ/TITLE] button for 1 second or longer. 2. Press the [ ] or [ ] button to select ] button to “INFO SEL”, then push the [ enter “INFO SEL” mode. 3. Press the [ ] or [ ] button to select an information item. You can select any of 6 items: 4. Perform the following operation depending on the connected model. • DXZ928R/DXZ828R/DXZ728R Turn the [ROTARY] knob clockwise or counterclockwise to set the information item for ON or OFF. • ADZ628R Turn the [PRESET] knob clockwise or counterclockwise to set the information item for ON or OFF. 5. Press the [ADJ/TITLE] button to return to the previous display. DAH923 11 Digital Radio / DAB Operations PTY This function enables you to listen to the selected programme type, irrespective of the function mode. ∗ One common PTY can be selected for DAB or RDS. ∗ Of DAB PTY and RDS PTY, the PTY which is received earlier takes priority over the other. ∗ PTY broadcasts are not yet available in all countries. ∗ In INFO standby mode, INFO stations have priority over PTY stations. ∗ In TA standby mode, TP stations have priority over PTY stations. ∗ For details on “PTY”, refer to the section “RDS operation” of each owner’s manual. ● ● ● ● ● ● Setting PTY standby mode Cancelling PTY standby mode Cancelling a PTY interrupt broadcast Selecting PTY PTY seek PTY preset memory Emergency broadcast When an emergency broadcast is received, all the function mode operations are stopped. “ALARM” appears in the display and the emergency broadcast can be heard. ∗ For details on “Emergency broadcast”, refer to the section “RDS operation” of each owner’s manual. ● Cancelling an emergency broadcast Switching the PTY and INFO display language You can select one of 4 languages (English, German, Swedish or French) for the PTY and INFO shown in the display. ∗ The factory default setting is “English”. ∗ For details on “Switching the PTY and INFO display language”, refer to the section “RDS operation” of each owner’s manual. 12 DAH923 Volume setting of TA, INFO, emergency broadcast (ALARM) and PTY The volume for TA, INFO, ALARM and PTY interrupts can be set during TA, INFO, ALARM and PTY interrupt. Perform the following operation depending on the connected model. ∗ The factory default setting is “15”. • DXZ928R/DXZ828R/DXZ728R During a TA, INFO, ALARM or PTY interrupt, turn the [ROTARY] knob clockwise or counterclockwise to set the volume to a desired level (0 to 33). • ADZ628R During a TA, INFO, ALARM or PTY interrupt, turn the [VOLUME] knob clockwise or counterclockwise to set the volume to a desired level (0 to 33). ∗ When the TA, INFO, ALARM or PTY interrupt ends, the volume returns to the level it had before the interrupt. 7. INSTALLATION AND WIRE CONNECTION Before Installation 1. Before starting, be sure to disconnect the battery’s negative “−” terminal to prevent accidents due to short-circuits. 2. Location Consider safety and operability when selecting a place for installation. Avoid the following. • Locations where the unit will hamper driving. • Locations where the unit could injure passengers if the car stops suddenly. • Locations exposed to direct sunlight or hot air from the heater, etc. • Locations where the unit may be exposed to rain or water. 3. Be sure to use the included screws and brackets. Screws other than those supplied could damage the unit. Case Case Damage 8mm max. 4. When drilling holes in the dashboard, etc., be sure to check beforehand that there are no harnesses or other wires inside. Accessories 1 Mounting bracket ............................ 2 pieces 2 Mounting screw .............................. 4 pieces 3 Canoe clip ....................................... 4 pieces 4 Cable clip ........................................ 1 piece 5 CeNET cable .................................. 1 piece 6 DAB Blackbox interface cable ........ 1 piece DAB Blackbox interface cable ZCP-102-700 In this package you will find an interface cable for the DAB antenna plug (SMB type➞ FME type). DAH923 In case you are using the Clarion DAB-antenna ZCP-102-700 with the DAB blackbox DAH923, please utilise the included interface cable. DAH923 13 Installation Example (Installing the unit under the driver’s seat) 1. Attach the mounting brackets 1 to the sides of the DAH923 using the screws 2 provided. 2. Select the location on the floor mat. Drill holes in the floor mat to match the positions of the holes in the mounting brackets 1. 3. Insert the canoe clips 3 from the rear of the floor mat and install the DAH923. ∗ There are three mounting holes on each side of the DAH923. Select the appropriate holes to match to the installation location. ÀÀÀÀÀÀ ;;;;;; @@@@@@ ;;;;;; @@@@@@ ÀÀÀÀÀÀ ;;;;;; @@@@@@ ÀÀÀÀÀÀ Connection Example and Identification of Parts 1 CeNET input/output terminal Connect to the main unit or CD/MD changer using the CeNET cable 5. ∗ Equipment to this terminal is not specified. 2 Cable clip insertion holes Insert the cable clip 4 in this hole and fix the digital optical fibre cable. 3 RDI-OUTPUT terminal Connect the unit to the data decoder using the digital optical fibre cable (sold separately). 4 RDI ON/OFF switch When connecting the unit to the data decoder, set the ON/OFF switch to ON. ∗ The factory default setting is OFF. ∗ Use a plastic rod, etc., to switch on/off the RDI ON/OFF switch. 5 RESET switch When no sound is heard, press and hold this switch. ∗ Pressing the reset switch performs the system check. 6 DAB antenna input terminal (SMB) Connect to the DAB-ANTENNA (sold separately). 14 DAH923 DAB ANTENNA cable (sold separately) Ce NET cable Digital optical fibre cable (sold separately) How to Make Wirings 1. CeNET Cable Orient the CeNET cable in the direction shown in the figure and insert it until it is locked in position. To remove the CeNET cable, pull it by lightly grasping the slide cap A in your fingers. To remove the digital optical fibre cable, pull it by lightly grasping the slide cap B of the cable in your fingers. 3. DAB antenna Connect a DAB antenna (sold separately) to the DAB antenna input terminal 6. 2. Digital Optical Fibre Cable When you connect the digital optical fibre cable to the RDI-OUTPUT terminal, firmly insert it until it is locked in position. After connecting, fasten the cable using the included cable clip 4. Note: Do not bend the digital optical fibre cable through a loop smaller than 3cm in radius. Doing so will greatly reduce performance. 3. DAB antenna (ZCP-102-700) Connect the DAB antenna cable with the DAB Blackbox interface cable coming from the DAH923. Digital optical fibre cable Note: • Be sure to turn the main unit power off when the DAB antenna cable is connected. DAH923 15 8. SYSTEM EXAMPLES 6 5 7 1 3 8 4 DAH923 2 1 Main unit compatible with CeNET connection 2 CD changer compatible with CeNET connection 3 CeNET cable (provided with the DAH923) Using this cable, connect the DAH923 to the main unit. 4 CeNET cable (provided with the CD changer) Using this cable, connect the DAH923 to the CD changer. 5 DAB antenna (ZCP-102-700) (sold separately) 6 Front speakers 7 Rear speakers 8 DAB Blackbox interface cable Note: • The longest wiring length of the CeNET cable is less than 20m. When you connect the CeNET cable, be careful not to execeed the wiring length of 20m. 16 DAH923