1
Configuring Source-Route Bridging
This chapter describes source-route bridging (SRB) configuration tasks. For a discussion of remote
source-route bridging (RSRB) configuration tasks, refer to the “Configuring Remote Source-Route
Bridging” chapter in this publication.
For a complete description of the SRB commands mentioned in this chapter, refer to the
“Source-Route Bridging Commands” chapter in the Bridging and IBM Networking Command
Reference. To locate documentation of other commands that appear in this chapter, use the command
reference master index or search online.
SRB Configuration Task List
Perform the tasks in the following sections to configure SRB:
•
•
•
•
•
•
•
•
•
Configure Source-Route Bridging
Configure Bridging of Routed Protocols
Configure Translation between SRB and Transparent Bridging Environments
Configure NetBIOS Support
Configure LNM Support
Secure the SRB Network
Tune the SRB Network
Establish SRB Interoperability with Specific Token Ring Implementations
Monitor and Maintain the SRB Network
See the end of this chapter for “SRB Configuration Examples.”
Warning The Cisco IOS software issues a warning if a duplicate bridge definition exists in a router. You
must remove an old bridge definition before adding a new bridge definition to a router configuration.
Configuring Source-Route Bridging BC-109
Configure Source-Route Bridging
Configure Source-Route Bridging
Our implementation of source-route bridging enables you to connect two or more Token Ring
networks using either Token Ring or Fiber Distributed Data Interface (FDDI) media.
The Cisco IOS software offers the ability to encapsulate source-route bridging traffic using RFC
1490 Bridged 802.5 encapsulation. This encapsulation provides SRB over Frame Relay
functionality.
You can configure the Cisco IOS software for source-route bridging by performing the tasks in one
of the first three sections and, optionally, the tasks in the last section:
•
•
•
•
•
•
•
•
Configure a Dual-Port Bridge
Configure a Multiport Bridge Using a Virtual Ring
Configure SRB over FDDI
Configure Fast-Switching SRB over FDDI
Configure SRB over Frame Relay
Enable the Forwarding and Blocking of Spanning-Tree Explorers
Enable the Automatic Spanning-Tree Function
Limit the Maximum SRB Hops
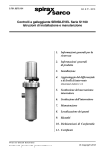
Configure a Dual-Port Bridge
A dual-port bridge is the simplest source-route bridging configuration. When configured as a
dual-port bridge, the access server or router serves to connect two Token Ring LANs. One LAN is
connected through one port (Token Ring interface), and the other LAN is connected through the
other port (also a Token Ring interface). Figure 45 shows a dual-port bridge.
Token
Ring
129
Dual-Port Bridge
T0
Token
Ring
T1 130
S1102a
Figure 45
To configure a dual-port bridge that connects two Token Rings, you must enable source-route
bridging on each of the Token Ring interfaces that connect to the two Token Rings. To enable
source-route bridging, use the following command in interface configuration mode for each of the
Token Ring interfaces:
Command
Purpose
source-bridge local-ring bridge-number target-ring
Enable local source-route bridging on
a Token Ring interface.
Note Ring numbers need to be unique across interfaces and networks, so that when you enable
source-route bridging over an interface the local and target rings are defined. Each node on the
network will know if it is the target of explorer packets sent on the network.
BC-110
Bridging and IBM Networking Configuration Guide
Configure a Multiport Bridge Using a Virtual Ring
A dual-port bridge is a limitation imposed by IBM Token Ring chips; the chips can process only two
ring numbers. If you have a router with two or more Token Ring interfaces, you can work around the
two-ring number limitation. You can configure your router as multiple dual-port bridges or as a
multiport bridge using a virtual ring.
You can define several separate dual-port bridges in the same router. However, the routers on the
LANs cannot have any-to-any connectivity; that is, they cannot connect to every other router on the
bridged LANs. Only the routers connected to the dual-port bridge can communicate with one
another. Figure 46 shows two separate dual-port bridges (T0-T2 and T1-T3) configured on the same
router.
Figure 46
Multiple Dual-Port Bridges
Token
Ring
T1
Token
Ring
T2
T0
Token
Ring
Token
Ring
S2323
T3
To configure multiple dual-port source-route bridges, use the following command in interface
configuration mode for each Token Ring interface that is part of a dual-port bridge:
Command
Purpose
source-bridge local-ring bridge-number target-ring
Enable local source-route bridging on
a Token Ring interface.
If you want your network to use only SRB, you can connect as many routers as you need via Token
Rings. Remember, source-route bridging requires you to bridge only Token Ring media.
Configure a Multiport Bridge Using a Virtual Ring
A better solution for overcoming the two-ring number limitation of IBM Token Ring chips is to
configure a multiport bridge using a virtual ring. A virtual ring on a multiport bridge allows the
router to interconnect three or more LANs with any-to-any connectivity; that is, connectivity
between any of the routers on each of the three LANs is allowed. A virtual ring creates a logical
Token Ring internal to the Cisco IOS software, which causes all the Token Rings connected to the
router to be treated as if they are all on the same Token Ring. The virtual ring is called a ring group.
Figure 47 shows a multiport bridge using a virtual ring.
Configuring Source-Route Bridging BC-111
Configure Source-Route Bridging
Figure 47
Multiport Bridge Using a Virtual Ring
Token
Ring
T1
Token
Ring
T2
Ring
group
T0
Token
Ring
Token
Ring
S2324
T3
To take advantage of this virtual ring feature, each Token Ring interface on the router must be
configured to belong to the same ring group. For information about configuring a multiport bridge
using a virtual ring, see the “Configure a Multiport Bridge Using a Virtual Ring” section later in this
chapter.
To configure a source-route bridge to have more than two network interfaces, you must perform the
following tasks:
Step 1
Define a ring group.
Step 2
Enable source-route-bridging and assign a ring group to a Token Ring interface.
Once you have completed these tasks, the router acts as a multiport bridge not as a dual-port bridge.
Note Ring numbers need to be unique across interfaces and networks.
Define a Ring Group in SRB Context
Because all IBM Token Ring chips can process only two ring numbers, we have implemented the
concept of a ring group or virtual ring. A ring group is a collection of Token Ring interfaces in one
or more routers that share the same ring number. This ring number is used just like a physical ring
number, showing up in any route descriptors contained in packets being bridged. Within the context
of a multiport bridge that uses SRB rather than RSRB, the ring group resides in the same router. See
the “Configuring Remote Source-Route Bridging” chapter to compare ring groups in the SRB and
RSRB context.
A ring group must be assigned a ring number that is unique throughout the network. It is possible to
assign different Token Ring interfaces on the same router to different ring groups, if, for example,
you plan to administer them as interfaces in separate domains.
To define or remove a ring group, use one of the following commands in global configuration mode:
BC-112
Command
Purpose
source-bridge ring-group ring-group
[virtual-mac-address]
Define a ring group.
no source-bridge ring-group ring-group
[virtual-mac-address]
Remove a ring group.
Bridging and IBM Networking Configuration Guide
Configure SRB over FDDI
Enable SRB and Assign a Ring Group to an Interface
After you have defined a ring group, you must assign that ring group to those interfaces you plan to
include in that ring group. An interface can only be assigned to one ring group. To enable any-to-any
connectivity among the end stations connected through this multiport bridge, you must assign the
same target ring number to all Token Ring interfaces on the router.
To enable SRB and assign a ring group to an interface, use the following command in interface
configuration mode:
Command
Purpose
source-bridge local-ring bridge-number target-ring
Enable source-route bridging and
assign a ring group to a Token Ring
interface.
Configure SRB over FDDI
Cisco’s implementation of SRB expands the basic functionality to allow autonomous switching of
SRB network traffic for FDDI interfaces, adding counters to SRB accounting statistics, and
implementing process-level switching of SRB over FDDI. This functionality provides a significant
increase in performance for Token Rings interconnected across an FDDI backbone (see Figure 48).
SRB over FDDI is supported on the Cisco 4000-M, Cisco 4500-M, Cisco 4700-M, Cisco 7000
series, Cisco 7200 series, and Cisco 7500 routers.
Figure 48
Autonomous FDDI SRB
Token
Ring
Token
Ring
FDDI
S3227
Virtual
ring
To configure autonomous FDDI SRB, use the following commands, beginning in global
configuration mode:
Step
Command
Purpose
1
interface fddi slot/port
Configure an FDDI interface.
2
source-bridge local-ring bridge-number
target-ring
Enable source-route bridging.
3
source-bridge route-cache cbus
Enable autonomous switching.
Configuring Source-Route Bridging BC-113
Configure Source-Route Bridging
Configure Fast-Switching SRB over FDDI
Fast-Switching SRB over FDDI enhances performance. For example, if you want to use access-lists,
fast-switching SRB over FDDI provides fast performance and access-list filters capability.
To configure fast-switching SRB over FDDI, use the following commands, beginning in global
configuration mode:
Step
Command
Purpose
1
interface fddi slot/port
Configure an FDDI interface.
2
source-bridge local-ring bridge-number
target-ring
Enable source-route bridging.
3
source-bridge spanning
Enable source-bridge spanning.
4
source-bridge route-cache
Enable fast-switching.
5
multiring protocol-keyword
Enable the collection and use of RIF
information.
Configure SRB over Frame Relay
Cisco IOS software offers the ability to encapsulate source-route bridging traffic using RFC 1490
Bridged 802.5 encapsulation. This provides SRB over Frame Relay functionality that is
interoperable with other vendors’ implementations of SRB over Frame Relay and with some
vendors’ implementations of FRAS BAN.
Note In the initial release, SRB over Frame Relay does not support the Cisco IOS software proxy
explorer, automatic spanning-tree, or LAN Network Manager functions.
To configure SRB over Frame Relay, use the following commands in interface configuration mode:
Step
Command
Purpose
1
interface serial number
Specify the serial port.
2
encapsulation frame-relay
Enable Frame Relay encapsulation.
3
interface serial slot/port.subinterface-number
point-to-point
Configure a Frame Relay
point-to-point subinterface.
4
frame-relay interface-dlci dlci ietf
Configure a DLCI number for the
point-to-point subinterface.
5
source-bridge source-ring-number bridge-number
target-ring-number conserve-ring
Assign a ring number to the Frame
Relay permanent virtual circuit.
Enable the Forwarding and Blocking of Spanning-Tree Explorers
When trying to determine the location of remote destinations on a source-route bridge, the source
device will need to send explorer packets. Explorer packets are used to collect routing information
field (RIF) information. The source device can send spanning-tree explorers or all-routes explorers.
Note that some older IBM devices generate only all-routes explorer packets, but many newer IBM
devices are capable of generating spanning-tree explorer packets.
A spanning-tree explorer packet is an explorer packet that is sent to a defined group of nodes that
comprise a statically configured spanning tree in the network. In contrast, an all-routes explorer
packet is an explorer packet that is sent to every node in the network on every path.
BC-114
Bridging and IBM Networking Configuration Guide
Enable the Automatic Spanning-Tree Function
Forwarding all-routes explorer packets is the default. However, in complicated source-route bridging
topologies, using this default can generate an exponentially large number of explorers that are
traversing the network. The number of explorer packets becomes quite large because duplicate
explorer packets are sent across the network to every node on every path. Eventually each explorer
packet will reach the destination device. The destination device will respond to each of these
explorer packets. It is from these responses that the source device will collect the RIF and determine
which route it will use to communicate with the destination device. Usually, the route contained in
the first returned response will be used.
The number of explorer packets traversing the network can be reduced by sending spanning-tree
explorer packets. Spanning-tree explorer packets are sent to specific nodes; that is, to only the nodes
on the spanning tree, not to all nodes in the network. You must manually configure the spanning-tree
topology over which the spanning-tree explorers are sent. You do this by configuring which
interfaces on the routers will forward spanning-tree explorers and which interfaces will block them.
To enable forwarding of spanning-tree explorers on an outgoing interface, use the following
command in interface configuration mode:
Command
Purpose
source-bridge spanning
Enable the forwarding of
spanning-tree explorer packets on an
interface.
Note While enabling the forwarding of spanning-tree explorer packets is not an absolute
requirement, it is strongly recommended in complex topologies. Configuring an interface to block
or forward spanning-tree explorers has no effect on how that interface handles all-routes explorer
packets. All-routes explorers can always traverse the network.
To block forwarding of spanning tree explorers on an outgoing interface, use the following command
in interface configuration mode:
Command
Purpose
no source-bridge spanning
Block spanning-tree explorer packets
on an interface.
Enable the Automatic Spanning-Tree Function
The automatic spanning-tree function supports automatic resolution of spanning trees in SRB
networks, which provides a single path for spanning explorer frames to traverse from a given node
in the network to another. Spanning explorer frames have a single-route broadcast indicator set in
the routing information field. Port identifiers consist of ring numbers and bridge numbers associated
with the ports. The spanning-tree algorithm for SRB does not support Topology Change Notification
bridge protocol data unit (BDPU).
Note Although the automatic spanning-tree function can be configured with source-route
translational bridging (SR/TLB), the SRB domain and transparent bridging domain have separate
spanning trees. Each Token Ring interface can belong to only one spanning tree. Only one bridge
group can run the automatic spanning-tree function at a time.
Configuring Source-Route Bridging BC-115
Configure Source-Route Bridging
To create a bridge group that runs an automatic spanning-tree function compatible with the IBM
SRB spanning-tree implementation, use the following command in global configuration mode:
Command
Purpose
bridge bridge-group protocol ibm
Create a bridge group that runs the
automatic spanning-tree function.
To enable the automatic spanning-tree function for a specified group of bridged interfaces, use the
following command in interface configuration mode:
Command
Purpose
source-bridge spanning bridge-group
Enable the automatic spanning-tree
function on a group of bridged
interfaces.
To assign a path cost for a specified interface, use the following command in interface configuration
mode:
Command
Purpose
source-bridge spanning bridge-group path-cost path-cost
Assign a path cost for a specified
group of bridged interfaces.
Note Ports running IEEE and IBM protocols form a spanning tree together on the LAN, but they
do not mix in the router itself. Make sure the configurations are correct and that each LAN runs only
one protocol.
See the end of this chapter for an example of source-route bridging with the automatic spanning-tree
function enabled.
Limit the Maximum SRB Hops
You can minimize explorer storms if you limit the maximum number of source-route bridge hops.
For example, if the largest number of hops in the best route between two end stations is six, it might
be appropriate to limit the maximum source-route bridging hops to six to eliminate unnecessary
traffic. This setting affects spanning-tree explorers and all-routes explorers sent from source devices.
To limit the number of SRB hops, use one of the following commands in interface configuration
mode:
BC-116
Command
Purpose
source-bridge max-hops count
Control the forwarding or blocking of
all-routes explorer frames received
on this interface.
source-bridge max-in-hops count
Control the forwarding or blocking of
spanning-tree explorer frames
received on this interface.
source-bridge max-out-hops count
Control the forwarding or blocking of
spanning-tree explorer frames sent
from this interface.
Bridging and IBM Networking Configuration Guide
Configure Bridging of Routed Protocols
Configure Bridging of Routed Protocols
Source-route bridges use Media Access Control (MAC) information, specifically the information
contained in the RIF, to bridge packets. A RIF contains a series of ring and bridge numbers that
represent the possible paths the source node might use to send packets to the destination. Each ring
number in the RIF represents a single Token Ring in the source-route bridged network and is
designated by a unique 12-bit ring number. Each bridge number represents a bridge that is between
two Token Rings in the SRB network and is designated by a unique 4-bit bridge number. The
information in a RIF is derived from explorer packets traversing the source-route bridged network.
Without the RIF information, a packet could not be bridged across a source-route bridged network.
Unlike source-route bridges, Level 3 routers use protocol-specific information (for example, Novell
Internetwork Packet Exchange (IPX) or Xerox Network Systems (XNS) headers) rather than MAC
information to route datagrams. As a result, the Cisco IOS software default for routed protocols is
to not collect RIF information and to not be able to bridge routed protocols. However, if you want
the software to bridge routed protocols across a source-route bridged network, the software must be
able to collect and use RIF information to bridge packets across a source-route bridged network. You
can configure the software to append RIF information to routed protocols so that routed protocols
can be bridged. Figure 49 shows a network topology in which you would want to use this feature.
Figure 49
Topology for Bridging Routed Protocols across a Source-Route Bridged
Network
Cisco routed network
Cisco routed network
S2328
Source-route bridged
Token Ring network
To configure the Cisco IOS software to bridge routed protocols, you must perform the task in the
first section, and optionally, one or both of the tasks in the other sections as follows:
•
•
•
Enable Use of the RIF
Configure a Static RIF Entry
Configure the RIF Timeout Interval
Enable Use of the RIF
You can configure the Cisco IOS software so that it will append RIF information to the routed
protocols. This allows routed protocols to be bridged across a source-route bridged network. The
routed protocols that you can bridge are as follows:
•
•
•
•
•
•
Apollo Domain
AppleTalk
ISO Connectionless Network Service (CLNS)
DECnet
IP
IPX
Configuring Source-Route Bridging BC-117
Configure Bridging of Routed Protocols
•
•
VINES
XNS
Enable use of the RIF only on Token Ring interfaces on the router.
To configure the Cisco IOS software to append RIF information, use the following command in
interface configuration mode:
Command
Purpose
multiring {protocol-keyword [all-routes | spanning] | all |
other}
Enable collection and use of RIF
information.
For an example of how to configure the software to bridge routed protocols, see the “SRB and
Routing Certain Protocols Example” section later in this chapter.
Configure a Static RIF Entry
If a Token Ring host does not support the use of IEEE 802.2 TEST or XID datagrams as explorer
packets, you might need to add static information to the RIF cache of the router.
To configure a static RIF entry, use the following command in global configuration mode:
Command
Purpose
rif mac-address rif-string {interface-name | ring-group
ring}
Enter static source-route information
into the RIF cache.
Configure the RIF Timeout Interval
RIF information that can be used to bridge routed protocols is maintained in a cache whose entries
are aged.
Note The rif validate enable commands have no effect on remote entries learned over RSRB.
To configure the number of minutes an inactive RIF entry is kept in the cache, use the following
commands in global configuration mode:
BC-118
Step
Command
Purpose
1
rif timeout minutes
Specify the number of minutes an inactive
RIF entry is kept.
2
rif validate-enable
Enable RIF validation for entries learned on
an interface (Token Ring or FDDI).
3
rif validate-enable-age
Enable RIF validation on an SRB that is
malfunctioning.
4
rif validate-enable-route-cache
Enable synchronization of the RIF cache with
the protocol route cache.
Bridging and IBM Networking Configuration Guide
Configure Translation between SRB and Transparent Bridging Environments
Configure Translation between SRB and Transparent Bridging
Environments
Source-route translational bridging (SR/TLB) is a Cisco IOS software feature that allows you to
combine SRB and transparent bridging networks without the need to convert all of your existing
source-route bridges to source-route transparent (SRT) nodes. As such, it provides a cost-effective
connectivity path between Ethernets and Token Rings, for example.
When a router is configured for SR/TLB, the router operates in fast-switching mode by default,
causing packets to be processed in the interrupt handler when the packets first arrive, rather than
queuing them for scheduled processing. You can also use the no source-bridge transparent
fastswitch command to disable fast-switched SR/TLB, causing the router to handle packets by
process switching. For more information on disabling fast-switched SR/TLB, refer to the “Disable
Fast-Switched SR/TLB” section in this chapter.
Note When you are translationally bridging, you will have to route routed protocols and
translationally bridge all others, such as local-area transport (LAT).
Overview of SR/TLB
You can bridge packets between an SRB domain and a transparent bridging domain. Using this
feature, a software “bridge” is created between a specified virtual ring group and a transparent bridge
group. To the source-route station, this bridge looks like a standard source-route bridge. There is a
ring number and a bridge number associated with a ring that actually represents the entire transparent
bridging domain. To the transparent bridging station, the bridge represents just another port in the
bridge group.
When bridging from the SRB (typically, Token Ring) domain to the transparent bridging (typically,
Ethernet) domain, the source-route fields of the frames are removed. The RIFs are cached for use by
subsequent return traffic.
When bridging from the transparent bridging domain to the SRB domain, the router checks the
packet to see if it has a multicast or broadcast destination or a unicast (single host) destination. If it
is multicast, the packet is sent as a spanning-tree explorer. If it is a unicast destination, the router
looks up the path to the destination in the RIF cache. If a path is found, it will be used; otherwise,
the router will send the packet as a spanning-tree explorer.
An example of a simple SR/TLB topology is shown in Figure 50.
Configuring Source-Route Bridging BC-119
Configure Translation between SRB and Transparent Bridging Environments
Figure 50
Example of a Simple SR/TLB Topology
Transparent
bridging "ring"
Source-route
bridged domain
Router running
SR/TLB
Transparent
bridging domain
Token
Ring
Frames gain RIFs in this direction
S1108a
Frames lose RIFs in this direction
Note The Spanning-Tree Protocol messages used to prevent loops in the transparent bridging
domain are not passed between the SRB domain and the transparent bridging domain. Therefore,
you must not set up multiple paths between the SRB and transparent bridging domains.
The following notes and caveats apply to all uses of SR/TLB:
•
Multiple paths cannot exist between the source-route bridged domain and the transparent bridged
domain. Such paths can lead to data loops in the network, because the spanning-tree packets used
to avoid these loops in transparent bridging networks do not traverse the SRB network.
•
Some devices, notably PS/2s under certain configurations running OS/2 Extended Edition
Version 1.3, do not correctly implement the “largest frame” processing on RIFs received from
remote source-route bridged hosts. The maximum Ethernet frame size is smaller than that
allowed for Token Ring. As such, bridges allowing for communication between Ethernet and
Token Ring will tell the Token Ring hosts, through the RIF on frames destined to the Token Ring,
that hosts on the Ethernet cannot receive frames larger than a specified maximum, typically
1472 bytes. Some machines ignore this run-time limit specification and send frames larger than
the Ethernet can accept. The router and any other Token Ring/Ethernet bridge has no choice but
to drop these frames. To allow such hosts to successfully communicate across or to an Ethernet,
you must configure their maximum frame sizes manually. For the PS/2, this can be done through
Communications Manager.
•
Any access filters applied on any frames apply to the frames as they appear on the media to which
the interface with the access filter applies. This is important because in the most common use of
SR/TLB (Ethernet and Token Ring connectivity), the bit ordering of the MAC addresses in the
frame is swapped. Refer to the SR/TLB examples in the “SRB Configuration Examples” section
of this chapter.
Caution Bridging between dissimilar media presents several problems that can prevent communication
from occurring. These problems include bit order translation (or usage of MAC addresses as data), maximum
transmission unit (MTU) differences, frame status differences, and multicast address usage. Some or all of
these problems might be present in a multimedia bridged LAN and prevent communication from taking place.
Because of differences in the way end nodes implement Token Ring, these problems are most prevalent when
bridging between Token Rings and Ethernets or between Token Ring and FDDI LANs.
BC-120
Bridging and IBM Networking Configuration Guide
Enable Bridging between Transparent Bridging and SRB
We currently know that problems occur with the following protocols when bridged between Token
Ring and other media: Novell IPX, DECnet Phase IV, AppleTalk, VINES, XNS, and IP. Further,
problems can occur with the Novell IPX and XNS protocols when bridged between FDDI and other
media. We recommend that these protocols be routed whenever possible.
To enable SR/TLB, you must perform the task in the following section:
•
Enable Bridging between Transparent Bridging and SRB
In addition, you can also perform the tasks in the following sections:
•
•
•
Disable Fast-Switched SR/TLB
Enable Translation Compatibility with IBM 8209 Bridges
Enable Token Ring LLC2-to-Ethernet Conversion
Enable Bridging between Transparent Bridging and SRB
Before enabling bridging, you must have completely configured your router using multiport SRB
and transparent bridging. Once you have done this, establish bridging between transparent bridging
and source-route bridging by using the following command in global configuration mode:
Command
Purpose
source-bridge transparent ring-group pseudo-ring
bridge-number tb-group [oui]
Enable bridging between transparent
bridging and SRB.
Disable Fast-Switched SR/TLB
To disable fast-switched SR/TLB and cause the router to handle packets by process switching, use
the following command in global configuration mode:
Command
Purpose
no source-bridge transparent ring-group fastswitch
Disable fast-switched SR/TLB.
Enable Translation Compatibility with IBM 8209 Bridges
To transfer data between IBM 8209 Ethernet/Token Ring bridges and routers running the SR/TLB
software (to create a Token Ring backbone to connect Ethernets), use the following command on
each Token Ring interface in interface configuration mode:
Command
Purpose
ethernet-transit-oui [90-compatible | standard | cisco]
Move data between IBM 8209
Ethernet/Token Ring bridges and
routers running translational bridging
software.
Configuring Source-Route Bridging BC-121
Configure Translation between SRB and Transparent Bridging Environments
Enable Token Ring LLC2-to-Ethernet Conversion
The Cisco IOS software supports the following types of Token Ring-to-Ethernet frame conversions
using Logical Link Control, type 2 (LLC2) Protocol:
•
•
Token Ring LLC2 to Ethernet Type II (0x80d5 processing)
Token Ring LLC2 to Ethernet 802.3 LLC2 (standard)
For most non-IBM hosts, Token Ring LLC2 frames can be translated in a straightforward manner
into Ethernet 802.3 LLC2 frames. This is the default conversion in the Cisco IOS software.
However, many Ethernet-attached IBM devices use nonstandard encapsulation of LLC2 on Ethernet.
Such IBM devices, including PS/2s running OS/2 Extended Edition and RT-PCs, do not place their
LLC2 data inside an 802.3 format frame, but rather place it into an Ethernet Type 2 frame whose
type is specified as 0x80d5. This nonstandard format is called 0x80d5, named after the type of frame.
This format is also sometimes called RT-PC Ethernet format because these frames were first widely
seen on the RT-PC. Hosts using this nonstandard 0x80d5 format cannot read the standard Token Ring
LLC2 to Ethernet 802.2 LLC frames.
To enable Token Ring LLC2 to Ethernet LLC2 conversion, you can perform one or both of the
following tasks:
•
•
Enable 0x80d5 Processing
Enable Standard Token Ring LLC2-to-Ethernet LLC2 Conversion
Enable 0x80d5 Processing
You can change the Cisco IOS software’s default translation behavior of translating Token Ring LLC
to Ethernet 802.3 LLC to translate Token Ring LLC2 frames into Ethernet 0x80d5 format frames.
To enable this nonstandard conversion, use the following command in global configuration mode:
Command
Purpose
source-bridge enable-80d5
Change the Ethernet/Token Ring translation behavior to translate Token
Ring LLC2 frames into Ethernet 0x80d5 format frames.
Enable Standard Token Ring LLC2-to-Ethernet LLC2 Conversion
After you change the translation behavior to perform Token Ring LLC2 frames into Ethernet 0x80d5
format frames, some of the non-IBM hosts in your network topology might use the standard Token
Ring conversion of Token Ring LLC2 to 802.3 LLC2 frames. If this is the case, you can change the
translation method of those hosts to use the standard translation method on a per-DSAP basis. The
translation method for all the IBM hosts would still remain as Token Ring LLC2 to Ethernet 0x80d5
translation.
To define non-IBM hosts in your network topology to use the standard translation method while the
IBM hosts use the nonstandard method, use the following command in global configuration mode:
BC-122
Command
Purpose
source-bridge sap-80d5 dsap
Allow some other devices to use normal LLC2/IEEE 802.3 translation on
a per-DSAP basis.
Bridging and IBM Networking Configuration Guide
Configure NetBIOS Support
Configure NetBIOS Support
NetBIOS is a nonroutable protocol that was originally designed to transmit messages between
stations, typically IBM PCs, on a Token Ring network. NetBIOS allows messages to be exchanged
between the stations using a name rather than a station address. Each station knows its name and is
responsible for knowing the names of other stations on the network.
Note In addition to this type of NetBIOS, which runs over LLC2, we have implemented another
type of NetBIOS that runs over IPX. For information on the IPX type of NetBIOS, refer to the
chapter “Configuring Novell IPX” in the Network Protocols Configuration Guide, Part 2.
NetBIOS name caching allows the Cisco IOS software to maintain a cache of NetBIOS names,
which avoids the high overhead of transmitting many of the broadcasts used between client and
server NetBIOS PCs (IBM PCs or PS/2s) in an SRB environment.
When NetBIOS name caching is enabled, the software performs the following actions:
•
Notices when any hosts send a series of duplicated “query” frames and reduces them to one frame
per period. The time period is configurable.
•
Keeps a cache of mappings between NetBIOS server and client names and their MAC addresses.
By watching NAME_QUERY and NAME_RECOGNIZED request and response traffic between
clients and servers, the Cisco IOS software can forward broadcast requests sent by clients to find
servers (and by servers in reply to their clients) directly to their needed destinations, rather than
forwarding them for broadcast across the entire bridged network.
The software will time out the entries in the NetBIOS name cache after a specific interval of their
initial storage. The timeout value is a user-configurable value. You can configure the timeout value
for a particular Token Ring if the NetBIOS name cache is enabled on the interface connecting to that
Token Ring. In addition, you can configure static name cache entries that never time out for
frequently accessed servers whose locations or paths typically do not change. Static RIF entries are
also specified for such hosts.
Generally, NetBIOS name caching is most useful when a large amount of NetBIOS broadcast traffic
creates bottlenecks on WAN media connecting distant locations, and the WAN media is
overwhelmed with this traffic. However, when two high-speed LAN segments are directly
interconnected, the packet savings of NetBIOS name caching is probably not worth the processor
overhead associated with it.
Note NetBIOS name caching is not recommended to be turned on in backbone routers, particularly
if you have it enabled in all the routers connected to the backbone. NetBIOS caching should be
distributed among multiple routers. NetBIOS name caching can be used only between Cisco routers
that are running Software Release 9.1 or later.
To enable NetBIOS name caching, you must perform the tasks in the following sections:
•
•
Enable the Proxy Explorers Feature on the Appropriate Interface
Specify Timeout and Enable NetBIOS Name Caching
In addition, you can configure NetBIOS name caching as described in the following sections:
•
•
Configure the NetBIOS Cache Name Length
Enable NetBIOS Proxying
Configuring Source-Route Bridging BC-123
Configure NetBIOS Support
•
•
Create Static Entries in the NetBIOS Name Cache
Specify Dead-Time Intervals for NetBIOS Packets
Enable the Proxy Explorers Feature on the Appropriate Interface
In order to enable NetBIOS name caching on an interface, the proxy explorers feature must first be
enabled on that interface. This feature must either be enabled for response to all explorer packets or
for response to NetBIOS packets only.
To determine whether the proxy explorers feature has been enabled, use the following command in
EXEC mode:
Command
Purpose
show startup-config
Determine whether or not the proxy
explorers feature has been enabled.
To determine whether proxy explorers has been configured for response to all explorer packets, look
in the configuration file for the source-bridge proxy-explorer entry for the appropriate interface.
For example, if the appropriate interface is Token Ring 0, look for an entry similar to the following:
interface tokenring 0
source-bridge proxy-explorer
If that entry does not exist, look for the source-bridge proxy-netbios-only entry for the appropriate
interface.
If neither entry exists, proxy explorers has not yet been enabled for the appropriate interface. To
enable proxy explorers for response to all explorer packets, refer to the section “Configure Proxy
Explorers” later in this chapter.
Otherwise, enable proxy explorers only for the NetBIOS name caching function by using the
following command in global configuration mode:
Command
Purpose
source-bridge proxy-netbios-only
Enable use of proxy explorers only
for the NetBIOS name caching
function and not for their general
local response to explorers.
Specify Timeout and Enable NetBIOS Name Caching
After you have ensured that the proxy explorers feature has been enabled for the appropriate
interface, you can specify a cache timeout and enable NetBIOS name caching. To do this, use the
following commands:
BC-124
Step
Command
Purpose
1
netbios name-cache timeout minutes
Specify the timeout for entries in the
NetBIOS name cache.
2
netbios enable-name-cache
Enable NetBIOS name caching for
the appropriate interfaces.
Bridging and IBM Networking Configuration Guide
Configure the NetBIOS Cache Name Length
Configure the NetBIOS Cache Name Length
To specify how many characters of the NetBIOS type name that the name cache will validate, enter
the following command in global configuration mode:
Command
Purpose
netbios name-cache name-len length
Specify the number of characters of
the NetBIOS type name to cache.
Enable NetBIOS Proxying
The Cisco IOS software can act as a proxy and send NetBIOS datagram type frames. To enable this
capability, use the following global configuration command:
Command
Purpose
netbios name-cache proxy-datagram seconds
Enable NetBIOS proxying.
To define the validation time when the software is acting as a proxy for NetBIOS NAME_QUERY
command or for explorer frames, use the following global configuration command:
Command
Purpose
rif validate-age seconds
Define validation time.
Create Static Entries in the NetBIOS Name Cache
If the router communicates with one or more NetBIOS stations on a regular basis, adding static
entries to the NetBIOS name cache for these stations can reduce network traffic and overhead. You
can define a static NetBIOS name cache entry that associates the server with the NetBIOS name and
the MAC address. If the router acts as a NetBIOS server, you can specify that the static NetBIOS
name cache is available locally through a particular interface. If a remote router acts as the NetBIOS
server, you can specify that the NetBIOS name cache is available remotely. To do this, use one of the
following commands in global configuration mode:
Command
Purpose
netbios name-cache mac-address netbios-name
interface-name
Define a static NetBIOS name cache entry
and specify that it is available locally
through a particular interface.
netbios name-cache mac-address netbios-name
ring-group group-number
Define a static NetBIOS name cache entry
and specify that it is available remotely.
If you have defined a NetBIOS name cache entry, you must also define a RIF entry. For an example
of how to configure a static NetBIOS entry, see the “NetBIOS Support with a Static NetBIOS Cache
Entry Example” section later in this chapter.
Specify Dead-Time Intervals for NetBIOS Packets
When NetBIOS name caching is enabled and default parameters are set on the router (as well as the
NetBIOS name server and the NetBIOS name client), approximately 20 broadcast packets per logon
are kept on the local ring where they are generated. The broadcast packets are of the type
ADD_NAME_QUERY, ADD_GROUP_NAME, and STATUS_QUERY.
Configuring Source-Route Bridging BC-125
Configure LNM Support
The Cisco IOS software also converts pairs of FIND_NAME and NAME_RECOGNIZED packets
received from explorers, which traverse all rings, to specific route frames that are sent only between
the two machines that need to see these packets.
You can specify a query-timeout, or “dead-time” interval to prevent repeat or duplicate broadcast of
these type of packets for the duration of the interval.
To specify dead time intervals, use one or both of the following commands in global configuration
mode:
Command
Purpose
netbios name-cache query-timeout seconds
Specify a dead time interval during which the
Cisco IOS software drops any broadcast
(NetBIOS ADD_NAME_QUERY,
ADD_GROUP_NAME, or STATUS_QUERY)
frames if they are duplicate frames sent by the
same host.
netbios name-cache recognized-timeout seconds
Specify a dead time interval during which the
software drops FIND_NAME and
NAME_RECOGNIZED frames if they are
duplicate frames sent by the same host.
Configure LNM Support
LAN Network Manager (LNM), formerly called LAN Manager, is an IBM product for managing a
collection of source-route bridges. Using either a proprietary protocol or the Simple Network
Management Protocol (SNMP), LNM allows you to monitor the entire collection of Token Rings
that comprise your source-route bridged network. You can use LNM to manage the configuration of
source-route bridges, monitor Token Ring errors, and gather information from Token Ring parameter
servers.
Note LNM is supported on the 4/16-Mb Token Ring cards that can be configured for either 4- or
16-Mb transmission speeds. LNM support is not provided on CSC-R16M cards with SBEMON 2.0.
LNM is not limited to managing locally attached Token Ring networks; it also can manage any other
Token Rings in your source-route bridged network that are connected through non-Token Ring
media. To accomplish this task, LNM works in conjunction with the IBM Bridge Program. The IBM
Bridge Program gathers data about the local Token Ring network and relays it back to LNM. In this
manner, the bridge program becomes a proxy for information about its local Token Ring. Without
this ability, you would require direct access to a device on every Token Ring in the network. This
process would make managing an SRB environment awkward and cumbersome.
Figure 51 shows some Token Rings attached through a cloud and one LNM linking to a source-route
bridge on each local ring.
BC-126
Bridging and IBM Networking Configuration Guide
Configure LNM Support
Figure 51
LNM Linking to a Source-Route Bridge on Each Local Ring
Token
Ring
PC running
LNM
SRB B
SRB A
Token
Ring
SRB C
WAN
Token
Ring
SRB D
Token
Ring
S1113a
Token
Ring
If LNM requires information about a station somewhere on a Token Ring, it uses a proprietary IBM
protocol to query to one of the source-route bridges connected to that ring. If the bridge can provide
the requested information, it simply responds directly to LNM. If the bridge does not have the
necessary information, it queries the station using a protocol published in the IEEE 802.5
specification. In either case, the bridge uses the proprietary protocol to send a valid response back to
LNM, using the proprietary protocol.
As an analogy, consider a language translator who sits between a French-speaking diplomat and a
German-speaking diplomat. If the French diplomat asks the translator a question in French for the
German diplomat and the translator knows the answer, he or she simply responds without translating
the original question into German. If the French diplomat asks a question the translator does not
know how to answer, the translator must first translate the question to German, wait for the German
diplomat to answer, and then translate the answer back to French.
Similarly, if LNM queries a source-route bridge in the proprietary protocol and the bridge knows the
answer, it responds directly using the same protocol. If the bridge does not know the answer, it must
first translate the question to the IEEE 802.5 protocol, query the station on the ring, and then translate
the response back to the proprietary protocol to send to LNM.
Figure 52 illustrates requests from the LNM originating in an IBM proprietary protocol and then
translated into IEEE 802.5 MAC-level frames.
Configuring Source-Route Bridging BC-127
Configure LNM Support
Figure 52
LAN Network Manager Monitoring and Translating
LAN Network Manager
1
Query about
Station A
Station A
Token
Ring
Token
Ring
Proprietary protocol
on LLC2
IEEE 802.5
S1114a
2
Query to
Station A
Notice that the proprietary protocol LNM uses to communicate with the source-route bridge is an
LLC2 connection. Although its protocol cannot be routed, LNM can monitor or manage anything
within the SRB network.
How a Router Works with LNM
As of Software Release 9.0, Cisco routers using 4/16-Mbps Token Ring interfaces configured for
SRB support the proprietary protocol that LNM uses. These routers provide all functions the IBM
Bridge Program currently provides. Thus LNM can communicate with a router as if it were an IBM
source-route bridge, such as the IBM 8209, and can manage or monitor any Token Ring connected
to the router.
Through IBM Bridge support, LNM provides three basic services for the SRB network:
•
The Configuration Report Server (CRS) monitors the current logical configuration of a Token
Ring and reports any changes to LNM. CRS also reports various other events, such as the change
of an active monitor on a Token Ring.
•
The Ring Error Monitor (REM) monitors errors reported by any station on the ring. In addition,
REM monitors whether the ring is in a functional or a failure state.
•
The Ring Parameter Server (RPS) reports to LNM when any new station joins a Token Ring and
ensures that all stations on a ring are using a consistent set of reporting parameters.
IBM Bridge support for LNM also allows asynchronous notification of some events that can occur
on a Token Ring. Examples of these events include notification of a new station joining the Token
Ring or of the ring entering failure mode, known as beaconing. Support is also provided for LNM
to change the operating parameters in the bridge. For a complete description of LNM, refer to the
IBM product manual supplied with the LNM program.
LNM support in our source-route bridges is a powerful tool for managing SRB networks. Through
the ability to communicate with LNM and to provide the functionality of the IBM Bridge Program,
our device appears as part of the IBM network. You therefore gain from the interconnectivity of our
products without having to learn a new management product or interface.
BC-128
Bridging and IBM Networking Configuration Guide
Configure LNM Software on the Management Stations to Communicate with the Router
When SRB is enabled on the router, configuring the Cisco IOS software to perform the functions of
an IBM Bridge for communication with LNM occurs automatically. Therefore, if SRB has been
enabled, you do not need to perform any tasks to enable LNM support. However, the LNM software
residing on a management station on a Token Ring on the network should be configured to properly
communicate with the router.
There are several options for modifying LNM parameters in the Cisco IOS software, but none are
required for basic functionality. For example, because users can now modify the operation of the
Cisco IOS software through SNMP as well as through LNM, there is an option to exclude a user from
modifying the Cisco IOS software configuration through LNM. You also can specify which of the
three LNM services (CRS, REM, RPS) the source-route bridge will perform.
To configure LNM support, perform the tasks in the following sections:
•
•
•
•
•
•
•
•
•
•
•
Configure LNM Software on the Management Stations to Communicate with the Router
Disable LNM Functionality
Disable Automatic Report Path Trace Function
Prevent LNM Stations from Modifying Cisco IOS Software Parameters
Enable Other LRMs to Change Router Parameters
Apply a Password to an LNM Reporting Link
Enable LNM Servers
Change Reporting Thresholds
Change an LNM Reporting Interval
Enable the RPS Express Buffer Function
Monitor LNM Operation
Configure LNM Software on the Management Stations to Communicate with the
Router
Because configuring an LNM station is a fairly simple task and is well covered in the LNM
documentation, it is not covered in depth here. However, it is important to mention that you must
enter the MAC addresses of the interfaces comprising the ports of the bridges as adapter addresses.
When you configure the router as a multiport bridge, configuring an LNM station is complicated by
the virtual ring that is involved. The basic problem extends from the fact that LNM is designed to
only understand the concept of a two-port bridge, and the router with a virtual ring is a multiport
bridge. The solution is to configure a virtual ring into the LNM Manager station as a series of
dual-port bridges.
Disable LNM Functionality
Under some circumstances, you can disable all LNM server functions on the router without having
to determine whether to disable a specific server, such as the ring parameter server or the ring error
monitor on a given interface.
To disable LNM functionality, use the following command in global configuration mode:
Command
Purpose
lnm disabled
Disable LNM functionality.
Configuring Source-Route Bridging BC-129
Configure LNM Support
The command can be used to terminate all LNM server input and reporting links. In normal
circumstances, this command should not be necessary because it is a superset of the functions
normally performed on individual interfaces by the no lnm rem and no lnm rps commands.
Disable Automatic Report Path Trace Function
Under some circumstances, such as when new hardware has been introduced into the network and
is causing problems, the automatic report path trace function can be disabled. The new hardware may
be setting bit-fields B1 or B2 (or both) of the routing control field in the routing information field
embedded in a source-route bridged frame. This condition may cause the network to be flooded by
report path trace frames if the condition is persistent. The lnm pathtrace-disabled command, along
with its options, allows you to alleviate network congestion that may be occurring by disabling all
or part of the automatic report path trace function within LNM.
To disable the automatic report path trace function, use the following command in global
configuration mode:
Command
Purpose
lnm pathtrace-disabled [all | origin]
Disable LNM automatic report path
trace function.
Prevent LNM Stations from Modifying Cisco IOS Software Parameters
Because there is now more than one way to remotely change parameters in a router (either using
SNMP or the proprietary IBM protocol), some method is needed to prevent such changes from
detrimentally interacting with each other.You can prevent any LNM station from modifying
parameters in the Cisco IOS software. It does not affect the ability of LNM to monitor events, only
to change parameters on the router.
To prevent the modification of Cisco IOS software parameters by an LNM station, use the following
command in global configuration mode:
Command
Purpose
lnm snmp-only
Prevent LNM stations from
modifying LNM parameters in the
Cisco IOS software.
Enable Other LRMs to Change Router Parameters
LNM has a concept of reporting links and reporting link numbers. A reporting link is simply a
connection (or potential connection) between a LAN Reporting Manager (LRM) and a bridge. A
reporting link number is a unique number used to identify a reporting link. An IBM bridge allows
four simultaneous reporting links numbered 0 through 3. Only the LRM attached on the
lowest-numbered connection is allowed to change LNM parameters in the router, and then only
when that connection number falls below a certain configurable number. In the default configuration,
the LRM connected through link 0 is the only LRM that can change LNM parameters.
BC-130
Bridging and IBM Networking Configuration Guide
Apply a Password to an LNM Reporting Link
To enable other LRMs to change router parameters, use the following command in interface
configuration mode:
Command
Purpose
lnm alternate number
Enable a LRM other than that
connected through link 0 to change
router parameters.
Apply a Password to an LNM Reporting Link
Each reporting link has its own password that is used not only to prevent unauthorized access from
an LRM to a bridge but to control access to the different reporting links. This is important because
it is possible to change parameters through some reporting links.
To apply a password to an LNM reporting link, use the following command in interface
configuration mode:
Command
Purpose
lnm password number string
Apply a password to an LNM
reporting link.
Enable LNM Servers
As in an IBM bridge, the router provides several functions that gather information from a local Token
Ring. All of these functions are enabled by default, but also can be disabled. The LNM servers are
explained in the section “How a Router Works with LNM” earlier in this chapter.
To enable LNM servers, use one or more of the following commands in interface configuration
mode:
Command
Purpose
lnm crs
Enable the LNM Configuration
Report Server (CRS).
lnm rem
Enable the LNM Ring Error Monitor
(REM).
lnm rps
Enable the LNM Ring Parameter
Server (RPS).
Change Reporting Thresholds
The Cisco IOS software sends a message to all attached LNMs whenever it begins to drop frames.
The threshold at which this report is generated is based on a percentage of frames dropped compared
with those forwarded. This threshold is configurable, and defaults to a value of 0.10 percent. You can
configure the threshold by entering a single number, expressing the percentage loss rate in
hundredths of a percent. The valid range is 0 to 9999.
To change reporting thresholds, use the following command in interface configuration mode:
Command
Purpose
lnm loss-threshold number
Change the threshold at which the
Cisco IOS software reports the
frames-lost percentage to LNM.
Configuring Source-Route Bridging BC-131
Configure LNM Support
Change an LNM Reporting Interval
All stations on a Token Ring notify the Ring Error Monitor (REM) when they detect errors on the
ring. In order to prevent excessive messages, error reports are not sent immediately, but are
accumulated for a short interval and then reported. A station learns the duration of this interval from
a router (configured as a source-route bridge) when it first enters the ring. This value is expressed in
tens of milliseconds between error messages. The default is 200, or 2 seconds. The valid range is 0
to 65535.
To change an LNM reporting interval, use the following command in interface configuration mode:
Command
Purpose
lnm softerr milliseconds
Set the time interval during which
stations report ring errors to the Ring
Error Monitor (REM).
Enable the RPS Express Buffer Function
The RPS express buffer function allows the router to set the express buffer bit to ensure priority
service for frames required for ring station initiation. When this function is enabled, the router sets
the express buffer bit in its initialize ring station response. This allows Token Ring devices to insert
into the ring during bursty conditions.
To enable LNM to use the RPS express buffer function, use the following command in interface
configuration mode:
Command
Purpose
lnm express-buffer
Enable the RPS express buffer
function.
Monitor LNM Operation
Once LNM support is enabled, you can monitor LNM operation. To observe the configuration of the
LNM bridge and its operating parameters, use the following commands in the EXEC mode:
BC-132
Step
Command
Purpose
1
show lnm bridge
Display all configured bridges and their
global parameters.
2
show lnm config
Display the logical configuration of all
bridges configured in the router.
3
show lnm interface [type number]
Display LNM information for an interface or
all interfaces of the router.
4
show lnm ring [ring-number]
Display LNM information about a Token
Ring or all Token Rings on the network.
5
show lnm station [address]
Display LNM information about a station or
all stations on the network.
Bridging and IBM Networking Configuration Guide
Secure the SRB Network
Secure the SRB Network
This section describes how to configure three features that are used primarily to provide network
security: NetBIOS access filters, administrative filters, and access expressions that can be combined
with administrative filters. In addition, these features can be used to increase network performance
because they reduce the number of packets that traverse the backbone network.
Configure NetBIOS Access Filters
NetBIOS packets can be filtered when transmitted across a Token Ring bridge. Two types of filters
can be configured:
•
Host access list
Used for source and destination station names
•
Byte offset access list
Used for arbitrary byte patterns in the packet itself.
As you configure NetBIOS access filters, keep the following issues in mind:
•
•
The access lists that apply filters to an interface are scanned in the order they are entered.
•
Access list arguments are case sensitive. The software makes a literal translation, so that a
lowercase “a” is different from an uppercase “A.” (Most nodes are named in uppercase letters.)
•
A host NetBIOS access list and byte NetBIOS access list can each use the same name. The two
lists are identified as unique and bear no relationship to each other.
•
The station names included in the access lists are compared with the source name field for
NetBIOS commands 00 and 01 (ADD_GROUP_NAME_QUERY and ADD_NAME_QUERY),
as well as the destination name field for NetBIOS commands 08, 0A, and 0E (DATAGRAM,
NAME_QUERY, and NAME_RECOGNIZED).
•
If an access list does not contain a particular station name, the default action is to deny the access
to that station.
There is no way to put a new access list entry in the middle of an access list. All new additions
to existing NetBIOS access lists are placed at the end of the existing list.
To minimize any performance degradation, NetBIOS access filters do not examine all packets.
Rather, they examine certain packets that are used to establish and maintain NetBIOS client/server
connections, thereby effectively stopping new access and load across the router. However, applying
a new access filter does not terminate existing sessions immediately. All new sessions will be
filtered, but existing sessions could continue for some time.
There are two ways you can configure NetBIOS access filters:
•
•
Configure NetBIOS Access Filters Using Station Names
Configure NetBIOS Access Filters Using a Byte Offset
Configure NetBIOS Access Filters Using Station Names
To configure access filters using station names, you must do the following:
Step 1
Assign the station access list name.
Step 2
Specify the direction of the message to be filtered on the interface.
Configuring Source-Route Bridging BC-133
Secure the SRB Network
The NetBIOS station access list contains the station name to match, along with a permit or deny
condition. You must assign the name of the access list to a station or set of stations on the network.
To assign a station access list name, use the following command in global configuration mode:
Command
Purpose
netbios access-list host name {permit | deny} pattern
Assign the name of an access list to a
station or set of stations on the network.
When filtering by station name, you can choose to filter either incoming or outgoing messages on
the interface. To specify the direction, use one of the following commands in interface configuration
mode:
Command
Purpose
netbios input-access-filter host name
Define an access list filter for incoming
messages.
netbios output-access-filter host name
Define an access list filter for outgoing
messages.
Configure NetBIOS Access Filters Using a Byte Offset
To configure access filters you must do the following:
Step 1
Assign a byte offset access list name.
Step 2
Specify the direction of the message to be filtered on the interface.
Keep the following notes in mind while configuring access filters using a byte offset:
•
When an access list entry has an offset plus the length of the pattern that is larger than the packet’s
length, the entry will not make a match for that packet.
•
Because these access lists allow arbitrary byte offsets into packets, these access filters can have
a significant impact on the amount of packets per second transiting across the bridge. They
should be used only when situations absolutely dictate their use.
The NetBIOS byte offset access list contains a series of offsets and hexadecimal patterns with which
to match byte offsets in NetBIOS packets. To assign a byte offset access list name, use the following
command in global configuration mode:
Command
Purpose
netbios access-list bytes name {permit | deny} offset
pattern
Define the byte offsets and patterns
within NetBIOS messages to match
with access list parameters.
Note Using NetBIOS Byte Offset access filters disables the autonomous or fast switching of
source-route bridging frames.
When filtering by byte offset, you can filter either incoming or outgoing messages on the interface.
To specify the direction, use one of the following commands in interface configuration mode:
BC-134
Command
Purpose
netbios input-access-filter bytes name
Specify a byte-based access filter on
incoming messages.
Bridging and IBM Networking Configuration Guide
Configure Administrative Filters for Token Ring Traffic
Command
Purpose
netbios output-access-filter bytes name
Specify a byte-based access filter on
outgoing messages.
Configure Administrative Filters for Token Ring Traffic
Source-route bridges normally filter frames according to the routing information contained in the
frame. That is, a bridge will not forward a frame back to its originating network segment or any other
network segment that the frame has already traversed. This section describes how to configure
another type of filter—the administrative filter.
Administrative filters can filter frames based on the following methods:
•
•
•
•
Protocol type—IEEE 802 or Subnetwork Access Protocol (SNAP)
Token Ring vendor code
Source address
Destination address
Whereas filtering by Token Ring address or vendor code causes no significant performance penalty,
filtering by protocol type significantly affects performance. A list of SNAP (Ethernet) type codes is
provided in the “Ethernet Type Codes” appendix in the Bridging and IBM Networking Command
Reference.
Filter Frames by Protocol Type
You can configure administrative filters by protocol type by specifying protocol type codes in an
access list. You then apply that access list to either IEEE 802.2 encapsulated packets or to
SNAP-encapsulated packets on the appropriate interface.
The order in which you specify these elements affects the order in which the access conditions are
checked. Each condition is tested in succession. A matching condition is then used to execute a
permit or deny decision. If no conditions match, a deny decision is reached.
If a single condition is to be denied, there must be an access-list command that permits
everything as well, or all access is denied.
Note
To filter frames by protocol type, use the following command in global configuration mode:
Command
Purpose
access-list access-list-number {permit | deny} {type-code
wild-mask | address mask}
Create an access list for filtering
frames by protocol type.
You can filter IEEE 802-encapsulated packets on either input or output. The access list you specify
is the one you created that includes the protocol type codes.
Configuring Source-Route Bridging BC-135
Secure the SRB Network
To enable filtering on input or output, use one of the following commands in interface configuration
mode:
Command
Purpose
source-bridge input-lsap-list access-list-number
Enable filtering of IEEE
802-encapsulated packets on input by
type code.
source-bridge output-lsap-list access-list-number
Enable filtering of IEEE
802-encapsulated packets on output
by type code.
You can filter SNAP-encapsulated packets on either input or output. The access list you specify is
the one you created that includes the protocol type codes.
To enable filtering on input or output, use one of the following commands in interface configuration
mode:
Command
Purpose
source-bridge input-type-list access-list-number
Filter SNAP-encapsulated packets on
input by type code.
source-bridge output-type-list access-list-number
Filter SNAP-encapsulated frames on
output by type code.
Filter Frames by Vendor Code
To configure administrative filters by vendor code or address, define access lists that look for Token
Ring addresses or for particular vendor codes for administrative filtering. To do so, use the following
command in global configuration mode:
Purpose
Command
access-list access-list-number {permit | deny} address
mask
Configure vendor code access lists.
Filter Source Addresses
To configure filtering on IEEE 802 source addresses, assign an access list to a particular input
interface for filtering the Token Ring or IEEE 802 source addresses. To do so, use the following
command in interface configuration mode:
Command
Purpose
source-bridge input-address-list access-list-number
Enable filtering on IEEE 802 source
addresses.
Filter Destination Addresses
To configure filtering on IEEE 802 destination addresses, assign an access list to a particular output
interface. To do so, use the following command in interface configuration mode:
BC-136
Command
Purpose
source-bridge output-address-list access-list-number
Enable filtering on IEEE 802
destination addresses.
Bridging and IBM Networking Configuration Guide
Configure Access Expressions that Combine Administrative Filters
Configure Access Expressions that Combine Administrative Filters
You can use access expressions to combine access filters to establish complex conditions under
which bridged frames can enter or leave an interface. Using access expressions, you can achieve
levels of control on the forwarding of frames that otherwise would be impossible when using only
simple access filters. Access expressions are constructed from individual access lists that define
administrative filters for the following fields in packets:
•
•
•
•
LSAP and SNAP type codes
MAC addresses
NetBIOS station names
NetBIOS arbitrary byte values
Note For any given interface, an access expression cannot be used if an access list has been defined
for a given direction. For example, if an input access list is defined for MAC addresses on an
interface, no access expression can be specified for the input side of that interface.
In Figure 53, two routers each connect a Token Ring to an FDDI backbone. On both Token Rings,
SNA and NetBIOS bridging support is required. On Token Ring A, NetBIOS clients must
communicate with any NetBIOS server off Token Ring B or any other, unpictured router. However,
the two 3174 cluster controllers off Token Ring A must only communicate with the one FEP off of
Token Ring B, located at MAC address 0110.2222.3333.
Without access expressions, this scenario cannot be achieved. A filter on Router A that restricted
access to only the FEP would also restrict access of the NetBIOS clients to the FEP. What is needed
is an access expression that would state “If it is a NetBIOS frame, pass through, but if it is an SNA
frame, only allow access to address 0110.2222.3333.”
Access Expression Example
NetBIOS clients
NetBIOS servers
Token
Ring
Router A
3174
Token
Ring
FDDI
3174
Router B
IBM FEP
address
0110.2222.3333
S1111a
Figure 53
Note Using access-expressions that combine access filters disables the autonomous or fast
switching of source-route bridging frames.
Configuring Source-Route Bridging BC-137
Secure the SRB Network
Configure Access Expressions
To configure an access expression perform the following tasks:
•
•
•
Design the access expression.
Configure the access lists used by the expression.
Configure the access expression into the router.
When designing an access expression, you must create some phrase that indicates, in its entirety, all
the frames that will pass the access expression. This access expression is designed to apply on frames
coming from the Token Ring interface on Router A in Figure 53:
“Pass the frame if it is a NetBIOS frame or if it is an SNA frame destined to address
0110.2222.3333.”
In Boolean form, this phrase can be written as follows:
“Pass if ‘NetBIOS or (SNA and destined to 0110.2222.3333).’”
The preceding statement requires three access lists to be configured:
•
•
•
An access list that passes a frame if it is a NetBIOS frame (SAP = 0xF0F0)
An access list that passes a frame if it is an SNA frame (SAP = 0x0404)
An access list that passes a MAC address of 0110.2222.3333
The following configuration allows for all these conditions:
! Access list 201 passes NetBIOS frames (command or response)
access-list 201 permit 0xF0F0 0x0001
!
access-list 202 permit 0x0404 0x0001 ! Permits SNA frames (command or response)
access-list 202 permit 0x0004 0x0001 ! Permits SNA Explorers with NULL DSAP
!
! Access list 701 will permit the FEP MAC address
! of 0110.2222.3333
access-list 701 permit 0110.2222.3333
The 0x0001 mask allows command and response frames to pass equally.
To apply the access expression to the appropriate interface, enter the following command in interface
configuration mode:
Command
Purpose
access-expression {in | out} expression
Define a per-interface access expression.
Optimize Access Expressions
It is possible to combine access expressions. Suppose you wanted to transmit SNA traffic through to
a single address, but allow other traffic through the router without restriction. The phrase could be
written as follows:
“Allow access if the frame is not an SNA frame, or if it is going to host 0110.2222.3333.”
More tersely, this would be:
“Not SNA or destined to 0110.2222.3333.”
BC-138
Bridging and IBM Networking Configuration Guide
Tune the SRB Network
The access lists defined in the previous section create the following configuration:
interface tokenring 0
access-expression in ~lsap(202) | dmac(701)
!
access-list 202 permit 0x0404 0x0001 ! Permits SNA frames (command or response)
access-list 202 permit 0x0004 0x0001 ! Permits SNA Explorers with NULL DSAP
!
! Access list 701 will permit the FEP MAC address
! of 0110.2222.3333
access-list 701 permit 0110.2222.3333
This is a better and simpler access list than the one originally introduced and will probably result in
better run-time execution as a result. Therefore, it is best to simplify your access expressions as much
as possible before configuring them into the Cisco IOS software.
Note An “access-expression” type filter cannot exist with a “source-bridge” type filter on the same
interface. The two types of filters are mutually exclusive.
Alter Access Lists Used in Access Expressions
Because access expressions are composed of access lists, special care must be taken when deleting
and adding access lists that are referenced in these access expressions.
If an access list that is referenced in an access expression is deleted, the access expression merely
ignores the deleted access list. However, if you want to redefine an access list, you can create a new
access list with the appropriate definition and use the same name as the old access list. The newly
defined access list replaces the old one of the same name.
For example, if you want to redefine the NetBIOS access list named MIS that was used in the
preceding example, you would use the following sequence of configuration commands:
! Replace the NetBIOS access list
interface tokenring 0
access-expression in (smac(701) & netbios-host(accept))
no netbios access-list host accept permit CISCO*
Tune the SRB Network
The following sections describe how to configure features that enhance network performance by
reducing the number of packets that traverse the backbone network:
•
•
•
•
•
•
Enable or Disable the Source-Route Fast-Switching Cache
Enable or Disable the Source-Route Autonomous-Switching Cache
Enable or Disable the SSE
Establish the Connection Timeout Interval
Optimize Explorer Processing
Configure Proxy Explorers
Note In some situations, you might discover that default settings for LLC2 configurations are not
acceptable. In such a case, you can configure LLC2 for optimal use. The chapter “Configuring LLC2
and SDLC Parameters” in this publication describes how you can use them to optimize your network
performance.
Configuring Source-Route Bridging BC-139
Tune the SRB Network
Enable or Disable the Source-Route Fast-Switching Cache
Rather than processing packets at the process level, the fast-switching feature enables the Cisco IOS
software to process packets at the interrupt level. Each packet is transferred from the input interface
to the output interface without copying the entire packet to main system memory. Fast switching
allows for faster implementations of local SRB between 4/16-MB Token Ring cards in the same
router, or between two routers using the 4/16-Mb Token Ring cards and direct encapsulation.
By default, fast-switching software is enabled when SRB is enabled. To enable or disable
source-route fast-switching, use one of the following commands in interface configuration mode:
Command
Purpose
source-bridge route-cache
Enable fast-switching.
no source-bridge route-cache
Disable fast-switching.
Note Using either NetBIOS Byte Offset access filters or access expressions that combine access
filters disables the fast switching of source-route bridging frames.
Enable or Disable the Source-Route Autonomous-Switching Cache
Autonomous switching is a feature that enables the Cisco IOS software to transmit packets from the
input ciscoBus card to the output ciscoBus card without any involvement on the part of the router
processor.
Autonomous switching is available for local SRB between ciscoBus Token Ring (CTR) cards in the
same router. Autonomous switching provides higher switching rates than does fast switching
between 4/16-Mb Token Ring cards. Autonomous switching works for both two-port bridges and
multiport bridges that use ciscoBus Token Ring cards.
In a virtual ring that includes both ciscoBus Token Ring and 4/16-Mb Token Ring interfaces, frames
that flow from one CTR interface to another are autonomously switched, and the remainder of the
frames are fast switched. The switching that occurs on the CTR interface takes advantage of the
high-speed ciscoBus controller processor.
To enable or disable source-route autonomous switching, use one of the following commands in
interface configuration mode:
Command
Purpose
source-bridge route-cache cbus
Enable autonomous switching.
no source-bridge route-cache cbus
Disable autonomous switching.
Note Using either NetBIOS Byte Offset access filters or access-expressions that combine access
filters disables the autonomous switching of SRB frames.
BC-140
Bridging and IBM Networking Configuration Guide
Enable or Disable the SSE
Enable or Disable the SSE
The Silicon Switch Engine (SSE) acts as a programmable cache to speed the switching of packets.
To enable or disable the SSE, use one of the following commands in interface configuration mode:
Command
Purpose
source-bridge route-cache sse
Enable the SSE function.
no source-bridge route-cache sse
Disable the SSE function.
Establish the Connection Timeout Interval
It may be necessary to adjust timeout intervals in a complex topology such as a large multihop WAN
with virtual rings or satellite links. The timeout interval is used when a connection to a remote peer
is attempted. If the timeout interval expires before a response is received, the connection attempt is
aborted.
To set the connection timeout interval, use the following command in global configuration mode:
Command
Purpose
source-bridge connection-timeout seconds
Set the connection timeout interval.
Optimize Explorer Processing
Efficient explorer processing is vital to the operation of SRB. The default configuration is
satisfactory for most situations. However, there might be circumstances that create unexpected
broadcast storms. You can optimize the handling of explorer frames, thus reducing processor
overhead and increasing explorer packet throughput. Optimizing explorer processing enables the
router to perform substantially better during explorer broadcast storms.
In networks with redundant topologies—two or more routers connected to the same set of Token
Rings and doing source-route bridging—a station on one Token Ring trying to get to a station on
another Token Ring may choose a less than optimal route through unnecessary routers, causing
explorer storms due to excessive forwarding of explorer frames. For example, in the redundant
topology example shown in Figure 54, if Station X on Token Ring 1 attempts to get to Station Z on
Token Ring 4 by going through Router A, Token Ring 2, and Router B—a less than optimal route,
excessive forwarding of explorer frames may cause explorer storms.
Configuring Source-Route Bridging BC-141
Tune the SRB Network
Figure 54
Controlling Explorer Storms in Redundant Network Topologies
Station X
Token
Ring 1
Token
Ring 2
Router A
Router B
Token
Ring 3
Station Z
S5002
Token
Ring 4
The source-bridge explorer-dup-ARE-filter command can be used to reduce explorer traffic by
filtering explorer frames.
To optimize explorer processing, use one or more of the following commands in global configuration
mode:
Command
Purpose
source-bridge explorerq-depth depth
Set the maximum explorer queue
depth.
source-bridge explorer-dup-ARE-filter
Prevent explorer storms in redundant
network topologies by filtering
explorers that have already been
forwarded once.
source-bridge explorer-maxrate maxrate
Set the maximum byte rate of
explorers per ring.
You must also disable explorer fast-switching which is, by default, enabled. To disable explorer
fast-switching, use the following command in global configuration mode:
Command
Purpose
no source-bridge explorer-fastswitch
Disable explorer fast switching.
To enable explorer fast-switching after it has been disabled, use the following command in global
configuration mode:
BC-142
Command
Purpose
source-bridge explorer-fastswitch
Enable explorer fast switching.
Bridging and IBM Networking Configuration Guide
Configure Proxy Explorers
Configure Proxy Explorers
You can use the proxy explorers feature to limit the amount of explorer traffic propagating through
the source-bridge network.
To configure proxy explorers, use the following command in interface configuration mode:
Command
Purpose
source-bridge proxy-explorer
Enable the interface to respond to any
explorer packets that meet certain
conditions necessary for a proxy
response to occur.
The Cisco IOS software does not propagate proxy responses for a station. Instead, the software
obtains the RIF path from the RIF cache, changes the explorer to a specific frame, and forwards this
frame to the destination. If a response is not received before the validation timer expires, the RIF
entry is marked as invalid. The invalid RIF entry is flushed from the cache table when another
explorer for this station is received, and an explorer is forwarded to discover a path to this station.
Establish SRB Interoperability with Specific Token Ring
Implementations
This section describes how you can establish interoperability between routers and specific Token
Ring implementations. It includes the following sections:
•
•
Establish SRB Interoperability with TI MAC Firmware
Report Spurious Frame-Copied Errors
Establish SRB Interoperability with TI MAC Firmware
You can use a workaround to establish interoperability with Texas Instruments MAC firmware.
There is a known defect in earlier versions of the Texas Instruments Token Ring MAC firmware.
This implementation is used by Proteon, Apollo, and IBM RTs. A host using a MAC address whose
first two bytes are zeros (such as a Cisco router) will not properly communicate with hosts using that
version of Texas Instruments firmware.
There are two solutions. The first involves installing a static RIF entry for every faulty node with
which the router communicates. If there are many such nodes on the ring, this may not be practical.
You also can set the MAC address of our Token Ring to a value that works around the problem.
Resetting the MAC address forces the use of a different MAC address on the specified interface,
thereby avoiding the TI MAC firmware problem. However, you must ensure that no other host on
the network is using that MAC address.
To reset the MAC address, use the following command in interface configuration mode:
Command
Purpose
mac-address ieee-address
Reset the MAC address of the Token
Ring interface to a value that
provides a workaround to a problem
in Texas Instruments Token Ring
MAC firmware.
Configuring Source-Route Bridging BC-143
Monitor and Maintain the SRB Network
Report Spurious Frame-Copied Errors
An IBM 3174 cluster controller can be configured to report frame-copied errors to IBM LAN
Network Manager software. These errors indicate that another host is responding to the MAC
address of the 3174 cluster controller. Both the 3174 cluster controller and the IBM LAN Network
Manager software can be configured to ignore frame-copied errors.
Monitor and Maintain the SRB Network
You can display a variety of information about the SRB network. To display the information you
require, use one or more of the following commands in EXEC mode:
BC-144
Command
Purpose
show access-expression [begin | exclude | include]
Display the defined input and output
access list expressions.
show controllers token
Display internal state information
about the Token Ring interfaces in
the system.
show interfaces token
Provide high-level statistics for a
particular interface.
show interfaces
Provide high-level statistics about the
state of source bridging for a
particular interface.
show lnm bridge
Display all currently configured
bridges and all parameters that are
related to the bridge as a whole and
not to one of its interfaces.
show lnm config
Display the logical (multiport bridge)
configuration of the Cisco IOS
software.
show lnm interface [type number]
Display all LNM-relevant
information about a specific
interface.
show lnm ring [ring-number]
Display all LNM-relevant
information about a specific ring
number.
show lnm station [address]
Display all LNM-relevant
information about a specific station
or about all known stations on the
ring.
show local-ack
Show the current state of any current
local acknowledgment for both LLC2
and SDLLC connections.
show netbios-cache
Display the contents of the NetBIOS
cache.
show rif
Display the contents of the RIF
cache.
show source-bridge [interface]
Display the current source bridge
configuration and miscellaneous
statistics.
Bridging and IBM Networking Configuration Guide
SRB Configuration Examples
Command
Purpose
show span
Display the spanning-tree topology
for the router.
show sse summary
Display a summary of Silicon Switch
Processor (SSP) statistics.
To maintain the SRB network, use any of the following commands in privileged EXEC mode:
Command
Purpose
clear netbios-cache
Clear the entries of all dynamically
learned NetBIOS names.
clear rif-cache
Clear the entire RIF cache.
clear source-bridge
Clear the SRB statistical counters.
clear sse
Reinitialize the SSP on the Cisco
7000 series.
In addition to the EXEC-mode commands to maintain the SRB network, you can use the following
command in global configuration mode:
Command
Purpose
source-bridge tcp-queue-max number
Limit the size of the backup queue
for RSRB to control the number of
packets that can wait for transmission
to a remote ring before they start
being thrown away.
SRB Configuration Examples
The following sections provide SRB configuration examples:
•
•
•
•
•
•
•
•
•
•
•
•
•
•
Basic SRB with Spanning-Tree Explorers Example
SRB with Automatic Spanning-Tree Function Configuration Example
Optimized Explorer Processing Configuration Example
SRB-Only Example
SRB and Routing Certain Protocols Example
Multiport SRB Example
SRB with Multiple Virtual Ring Groups Example
SRB over FDDI Configuration Examples
SRB over FDDI Fast-Switching Example
SRB over Frame Relay Configuration Example
Adding a Static RIF Cache Entry Example
Adding a Static RIF Cache Entry for a Two-Hop Path Example
SR/TLB for a Simple Network Example
SR/TLB with Access Filtering Example
Configuring Source-Route Bridging BC-145
SRB Configuration Examples
•
•
•
•
•
•
•
•
•
•
NetBIOS Support with a Static NetBIOS Cache Entry Example
LNM for a Simple Network Example
LNM for a More Complex Network Example
NetBIOS Access Filters Example
Filtering Bridged Token Ring Packets to IBM Machines Example
Administrative Access Filters—Filtering SNAP Frames on Output Example
Creating Access Filters Example
Access Filters Example
Fast-Switching Example
Autonomous Switching Example
Basic SRB with Spanning-Tree Explorers Example
Figure 55 illustrates a simple two-port bridge configuration. Token Rings 129 and 130 are connected
through the router.
Token
Ring
129
Dual-Port Source-Route Bridge Configuration
T0
Token
Ring
T1 130
S1102a
Figure 55
The example that follows routes IP, but source-route bridges all other protocols using spanning-tree
explorers:
interface tokenring 0
ip address 131.108.129.2 255.255.255.0
source-bridge 129 1 130
source-bridge spanning
multiring all
!
interface tokenring 1
ip address 131.108.130.2 255.255.255.0
source-bridge 130 1 129
source-bridge spanning
! use RIFs, as necessary, with IP routing software
multiring all
BC-146
Bridging and IBM Networking Configuration Guide
SRB with Automatic Spanning-Tree Function Configuration Example
SRB with Automatic Spanning-Tree Function Configuration Example
The following example of a Cisco series 7000 router configuration illustrates how to enable the
automatic spanning tree function on an SRB network:
source-bridge ring-group 100
interface tokenring 0/0
no ip address
ring-speed 16
multiring all
source-bridge active 1
source-bridge spanning
!
interface tokenring 0/1
no ip address
ring-speed 16
multiring all
source-bridge active 2
source-bridge spanning
!
bridge 1 protocol ibm
10 100
1
10 100
1
Optimized Explorer Processing Configuration Example
The following configuration example improves the handling of explorer frames, enabling the
Cisco IOS software to perform substantially better during explorer broadcast storms. In this
configuration, the maximum byte rate of explorers is set to 100000.
source-bridge explorer-maxrate 100000
source-bridge explorerQ-depth 100
no source-bridge explorer-fastswitch
SRB-Only Example
The following example shows that all protocols are bridged, including IP. Because IP is being
bridged, the system has only one IP address.
no ip routing
!
interface tokenring 0
ip address 131.108.129.2 255.255.255.0
source-bridge 129 1 130
source-bridge spanning
!
interface tokenring 1
ip address 131.108.129.2 255.255.255.0
source-bridge 130 1 129
source-bridge spanning
!
interface ethernet 0
ip address 131.108.129.2 255.255.255.0
Configuring Source-Route Bridging BC-147
SRB Configuration Examples
SRB and Routing Certain Protocols Example
In the following configuration, IP, XNS, and IPX are routed, while all other protocols are bridged
between rings. While not strictly necessary, the Novell IPX and XNS network numbers are set
consistently with the IP subnetwork numbers. This makes the network easier to maintain.
xns routing 0000.0C00.02C3
!
novell routing 0000.0C00.02C3
!
interface tokenring 0
ip address 131.108.129.2 255.255.255.0
xns network 129
novell network 129
source-bridge 129 1 130
source-bridge spanning
multiring all
!
interface tokenring 1
ip address 131.108.130.2 255.255.255.0
xns network 130
novell network 130
source-bridge 130 1 129
source-bridge spanning
multiring all
!
interface ethernet 0
ip address 131.108.2.68 255.255.255.0
xns network 2
novell network 2
Multiport SRB Example
Figure 56 shows an example configuration of a four-port Token Ring source-route bridge.
Rings 1000, 1001, 1002, and 1003 are all source-route bridged to each other across ring group 7.
Figure 56
Four-Port Source-Route Bridge
Ring
1001
T1
Ring
1002
T2
T0
Ring
1000
Ring Group 7
BC-148
Ring
1003
Bridging and IBM Networking Configuration Guide
S1103a
T3
SRB with Multiple Virtual Ring Groups Example
The following is a sample configuration file:
source-bridge ring-group 7
!
interface tokenring 0
source-bridge 1000 1 7
source-bridge spanning
!
interface tokenring 1
source-bridge 1001 1 7
source-bridge spanning
!
interface tokenring 2
source-bridge 1002 1 7
source-bridge spanning
!
interface tokenring 3
source-bridge 1003 1 7
source-bridge spanning
SRB with Multiple Virtual Ring Groups Example
Two virtual ring groups can only be connected through an actual Token Ring. Figure 57 shows
Virtual Rings 100 and 200 connected through Token Ring 3.
Two Virtual Rings Connected by an Actual Token Ring
Virtual ring 100
Virtual ring 200
Router A
S0
Router A
T0
Token
Ring 3
T0
S0
T1
T2
Token
Ring 1
Token
Ring 2
S1399a
Figure 57
Configuration for Router A
source-bridge ring-group 100
!
interface tokenring 0
source-bridge 3 4 100
source-bridge spanning
!
interface tokenring 1
source-bridge 1 4 100
source-bridge spanning
Configuring Source-Route Bridging BC-149
SRB Configuration Examples
Configuration for Router B
source-bridge ring-group 200
!
interface tokenring 0
source-bridge 3 1 200
source-bridge spanning
!
interface tokenring 2
source-bridge 2 1 200
source-bridge spanning
SRB over FDDI Configuration Examples
The following examples show the configuration for SRB over FDDI as illustrated in Figure 58.
Router A
dlsw local-peer peer-id 132.11.11.2
dlsw remote-peer 0 tcp 132.11.11.3
interface Fddi0
no ip address
multiring all
source-bridge 26 1 10
source-bridge spanning
Router B
dlsw local-peer peer-id 132.11.11.2
dlsw remote-peer 0 tcp 132.11.11.3
interface TokenRing0
no ip address
ring-speed 16
multiring all
source-bridge 25 1 10
source-bridge spanning
SRB over FDDI Configuration
Token
Ring
WAN
FDDI
Router A
Router B
End station 2
SRB over FDDI Fast-Switching Example
The following example shows SRB over FDDI fast-switching:
interface fddi
source-bridge
source-bridge
source-bridge
multiring ip
BC-150
2/0
1 10 2
spanning
route-cache
Bridging and IBM Networking Configuration Guide
S6261
Figure 58
SRB over Frame Relay Configuration Example
SRB over Frame Relay Configuration Example
Figure 59 illustrates a network with the following characteristics:
•
•
•
•
•
Virtual Ring Number of Router A = 100
Virtual Ring Number of FRAD B = 200
Virtual Ring Number of FRAD C = 300
DLCI number for PVC between Router A and FRAD B = 30
DLCI number for PVC between Router A and FRAD C = 31
Figure 59
FRAD Using SRB over Frame Relay to Connect to a Cisco Router
Token
Ring
10
Token
Ring
20
Router A
FRAD C
Token
Ring
30
S6260
FRAD B
In this example, we configure a new option, conserve-ring, on the source-bridge interface
configuration command. When this option is configured, the SRB software does not add the ring
number associated with the Frame Relay PVC (the partner’s virtual ring) to outbound explorer
frames. This option is permitted for Frame Relay subinterfaces only.
The router configures the partner FRAD’s virtual ring number as the ring number for the PVC.
This approach does not require a separate ring number per DLCI. The router configures the partner
FRAD’s virtual ring number as the ring number for the PVC.
FRAD B would configure its virtual ring as 200 and the ring for the PVC as 100. FRAD C would
configure its virtual ring as 300 and the ring for the PVC as 100.
Configuring Source-Route Bridging BC-151
SRB Configuration Examples
Configuration of Router A
source-bridge ring-group 100
!
interface Serial1
encapsulation frame-relay
!
interface Serial1.1 point-to-point
frame-relay interface-dlci 30 ietf
source-bridge 200 1 100 conserve-ring
source-bridge spanning
!
interface Serial1.2 point-to-point
frame-relay interface-dlci 31 ietf
source-bridge 300 1 100 conserve-ring
source-bridge spanning
!
interface TokenRing0
source-bridge 500 1 100
Configuration on Router B
source-bridge ring-group 200
!
interface Serial0
encapsulation frame-relay
!
interface Serial0.30 point-to-point
frame-relay interface-dlci 30 ietf
source-bridge 100 1 200 conserve-ring
source-bridge spanning
!
interface TokenRing0
source-bridge 600 1 200
Configuration on Router C
source-bridge ring-group 300
!
interface Serial0
encapsulation frame-relay
!
interface Serial0.31 point-to-point
frame-relay interface-dlci 31 ietf
source-bridge 100 1 300 conserve-ring
source-bridge spanning
!
interface TokenRing0
source-bridge 900 1 300
Adding a Static RIF Cache Entry Example
In the example configuration in Figure 60, the path between rings 8 and 9 connected via Bridge 1 is
described by the route descriptor 0081.0090. A full RIF, including the route control field, would be
0630.0081.0090.
BC-152
Bridging and IBM Networking Configuration Guide
Adding a Static RIF Cache Entry for a Two-Hop Path Example
Assigning a RIF to a Source-Route Bridge
Token
Ring 8
Token
Ring 9
IBM PC
1000.5A12.3456
Bridge 1
S1100a
Figure 60
The static RIF entry would be submitted to the router on the left as follows:
rif 1000.5A12.3456 0630.0081.0090
Adding a Static RIF Cache Entry for a Two-Hop Path Example
In Figure 61, assume that a datagram was sent from a router on ring 21 (15 hexadecimal), across
Bridge 5 to ring 256 (100 hexadecimal), and then across Bridge 10 (A hexadecimal) to ring 1365
(555 hexadecimal) for delivery to a destination host on that ring.
Assigning a RIF to a Two-Hop Path
Ring
256
Ring
21
Ring
1365
Bridge 10
Bridge 5
S1101a
Figure 61
IBM PC
1000.5A01.0203
The RIF in the router on the left describing this two-hop path is 0830.0155.100a.5550 and is entered
as follows:
rif 1000.5A01.0203 0830.0155.100a.5550
SR/TLB for a Simple Network Example
In the simple example illustrated in Figure 62, a four-port router with two Ethernets and two Token
Rings is used to connect transparent bridging on the Ethernets to SRB on the Token Rings.
Figure 62
Example of a Simple SR/TLB Configuration
Virtual ring 10
E1
E0
Router
T0
T1
Token
Ring 2
Pseudo
ring 3
S1274a
Token
Ring 1
Configuring Source-Route Bridging BC-153
SRB Configuration Examples
Assume that the following configuration for SRB and transparent bridging existed before you
wanted to enable SR/TLB:
interface tokenring 0
source-bridge 1 1 2
!
interface tokenring 1
source-bridge 2 1 1
!
interface ethernet 0
bridge-group 1
!
interface ethernet 0
bridge-group 1
!
bridge 1 protocol dec
To enable SR/TLB, one aspect of this configuration must change immediately—a third ring must be
configured. Before SR/TLB, the two Token Ring interfaces were communicating with two-port local
source-route bridging; after SR/TLB, these two interfaces must be reconfigured to communicate
through a virtual ring, as follows:
source-bridge ring-group 10
!
interface tokenring 0
source-bridge 1 1 10
!
interface tokenring 1
source-bridge 2 1 10
!
interface ethernet 0
bridge-group 1
!
interface ethernet 1
bridge-group 1
!
bridge 1 protocol dec
Now you are ready to determine two things:
BC-154
•
A ring number for the pseudo-ring that is unique throughout the source-route bridged network.
For the preceding example configuration, use the number 3.
•
A bridge number for the path to the pseudo-ring. For the preceding example configuration, use
the number 1.
Bridging and IBM Networking Configuration Guide
SR/TLB with Access Filtering Example
Once you have determined the ring number and the bridge number, you can add the source-bridge
transparent command to the file, including these two values as parameters for the command. The
following partial configuration includes this source-bridge transparent entry:
!
source-bridge ring-group 10
source-bridge transparent 10 3 1 1
!
interface tokenring 0
source-bridge 1 1 10
!
interface tokenring 1
source-bridge 2 1 10
!
interface ethernet 0
bridge-group 1
!
interface ethernet 1
bridge-group 1
!
bridge 1 protocol dec
SR/TLB with Access Filtering Example
In the example shown in Figure 63, you want to connect only a single machine, Host E, on an
Ethernet to a single machine, Host R, on the Token Ring.
Figure 63
Example of a Bit-Swapped Address
Transparent
bridging domain
Source-route
bridged domain
Token
Ring
Host R
MAC Addr:
0110.1234.5678
Host E
MAC Addr:
0110.2222.3333
S1110a
Router
running SR/TLB
You want to allow only these two machines to communicate across the router. Therefore, you might
create the following configuration to restrict the access. However, this configuration will not work,
as explained in the paragraph following the sample configuration file.
Note For readability, the commands that control bridging are not shown here, just the commands
that control the filtering.
interface tokenring 0
access-expression output smac(701)
!
interface ethernet 0
bridge-group 1 input-address-list 701
!
access-list 701 permit 0110.2222.3333
Configuring Source-Route Bridging BC-155
SRB Configuration Examples
The command for the Token Ring interface specifies that the access list 701 be applied on the source
address of frames going out to the Token Ring, and the command for the Ethernet interface specifies
that this access list be applied on the source address frames entering the interface from Ethernet. This
would work if both interfaces used the same bit ordering, but Token Rings and Ethernets use opposite
(swapped) bit orderings in their addresses in relationship to each other. Therefore, the address of
Host E on the Token Ring is not 0110.2222.3333, but rather 8008.4444.cccc, resulting in the
following configuration. The following configuration is better. This example shows that access lists
for Token Ring and Ethernet should be kept completely separate from each other.
interface tokenring 0
source-bridge input-address-list 702
!
interface ethernet 0
bridge-group 1 input-address-list 701
!
access-list 701 permit 0110.2222.3333
!!
access-list 702 permit 0110.1234.5678
NetBIOS Support with a Static NetBIOS Cache Entry Example
Figure 64 shows a NetBIOS client on a Token Ring connected through a cloud to a NetBIOS server
on another Token Ring.
Specifying a Static Entry
Server DEF
0110.222.333
Client ABC
Token
Ring 1
Bridge 1
Bridge 1
Token
Ring 3
S1199a
Figure 64
Ring group 2
In Figure 64, a static entry is created in the router attached to ring 1 on the client side of the ring
group. The static entry is to the server DEF, which is reached through the router attached to ring 3.
If server DEF has the MAC address 0110.2222.3333, the configuration for the static entry on the
client side is as follows:
rif 0110.2222.3333 0630.0021.0030 ring-group 2
netbios name-cache 0110.2222.3333 DEF ring-group 2
BC-156
Bridging and IBM Networking Configuration Guide
LNM for a Simple Network Example
LNM for a Simple Network Example
Figure 65 shows a router with two Token Rings configured as a local source-route bridge.
Figure 65
Router with Two Token Rings Configured as a Local Source-Route Bridge
Physical configuration
Token
Ring 1
T1
T0
Token
Ring 3
Token
Ring 1
SRB 2
Token
Ring 3
S1115a
Logical configuration
The associated configuration file follows:
interface tokenring 0
source-bridge 1 2 3
!
interface tokenring 1
source-bridge 3 2 1
The show lnm config command displays the logical configuration of this bridge, including the LNM
configuration information that needs to be entered at the LNM Station. A sample show lnm config
display follows:
Wayfarer# show lnm config
Bridge(s) currently configured:
From
ring 001, address 0000.3000.abc4
Across bridge 002
To
ring 003, address 0000.3000.5735
In this example, the MAC addresses 0000.3000.abc4 and 000.3000.5735 must be configured as
Adapter Addresses at the LNM Station.
Configuring Source-Route Bridging BC-157
SRB Configuration Examples
LNM for a More Complex Network Example
Figure 66 shows a router with three Token Rings configured as a multiport bridge, thus employing
the concept of the virtual ring.
Figure 66
Router with Three Token Rings Configured as a Multiport Bridge
Physical configuration
Token
T0
Ring 1
Token
T1 Ring 2
T2
Token
Ring 3
Logical configuration
Token
Ring 1
SRB 1
Token
Ring 8
SRB 2
Token
Ring 3
The associated configuration file follows.
source-bridge ring-group 8
!
interface tokenring 0
source-bridge 1 1 8
!
interface tokenring 1
source-bridge 2 2 8
!
interface tokenring 2
source-bridge 3 3 8
BC-158
Bridging and IBM Networking Configuration Guide
S1116a
SRB 3
Token
Ring 2
NetBIOS Access Filters Example
The show lnm config command displays the logical configuration of this bridge, including all the
pertinent information for configuring this router into LNM:
Wayfarer# show lnm config
Bridge(s) currently configured:
From
ring 001, address 0000.0028.abcd
Across bridge 001
To
ring 008, address 4000.0028.abcd
From
ring 002, address 0000.3000.abc4
Across bridge 002
To
ring 008, address 4000.3000.abc4
From
ring 003, address 0000.3000.5735
Across bridge 003
To
ring 008, address 4000.3000.5735
In this example, six station definitions must be entered at the LNM Station, one for each of the MAC
addresses listed in this sample show lnm config display.
NetBIOS Access Filters Example
The following command permits packets that include the station name ABCD to pass through the
router, but denies passage to packets that do not include the station name ABCD:
netbios access-list host marketing permit ABCD
The following command specifies a prefix where the pattern matches any name beginning with the
characters DEFG. Note that the string DEFG itself is included in this condition.
netbios access-list host marketing deny DEFG*
The following command permits any station name with the letter W as the first character and the
letter Y as the third character in the name. The second and fourth letters in the name can be any
character. This example would allow stations named WXYZ and WAYB; however, stations named
WY and WXY would not be included in this statement, because the question mark must match some
specific character in the name.
netbios access-list host marketing permit W?Y?
The following command illustrates how to combine wildcard characters:
netbios access-list host marketing deny AC?*
The command specifies that the marketing list deny any name beginning with AC that is at least three
characters in length (the question mark would match any third character). The string ACBD and
ACB would match, but the string AC would not.
The following command removes the entire marketing NetBIOS access list.
no netbios access-list host marketing
To remove single entries from the list, use a command such as the following:
no netbios access-list host marketing deny AC?*
This example removes only the list that filters station names with the letters AC at the beginning of
the name.
Configuring Source-Route Bridging BC-159
SRB Configuration Examples
Access lists are scanned in order. In the following example, the first list denies all entries beginning
with the letters ABC, including one named ABCD. This voids the second command, because the
entry permitting a name with ABCD comes after the entry denying it.
netbios access-list host marketing deny ABC*
netbios access-list host marketing permit ABCD
Filtering Bridged Token Ring Packets to IBM Machines Example
The example in Figure 67 disallows the bridging of Token Ring packets to all IBM workstations on
Token Ring 1.
Figure 67
Router Filtering Bridged Token Ring Packets to IBM Machines
3174
3174
Token
Ring 1
T2
Token
Ring 2
3174
S1276a
T1
This example assumes that all hosts on Token Ring 1 have Token Ring addresses with the vendor
code 1000.5A00.0000. The first line of the access list denies access to all IBM workstations, while
the second line permits everything else. The access list is assigned to the input side of Token Ring 1.
! deny access to all IBM workstations
access-list 700 deny 1000.5A00.0000
8000.00FF.FFFF
! permit all other traffic
access-list 700 permit 0000.0000.0000
FFFF.FFFF.FFFF
!
interface token ring 1
! apply access list 700 to the input side of Token Ring 1
source-bridge input-address-list 700
BC-160
Bridging and IBM Networking Configuration Guide
Administrative Access Filters—Filtering SNAP Frames on Output Example
Administrative Access Filters—Filtering SNAP Frames on Output Example
Figure 68 shows a router connecting four Token Rings.
Figure 68
Router Filtering SNAP Frames on Output
Token
Ring 3
Ring
group 5
T2
Router A
Token
Token
Ring 2
T3 Ring 4
T1
Token
Ring 1
S1277a
T0
The following example allows only AppleTalk Phase 2 packets to be source-route bridged between
Token Rings 0 and 1, and allows Novell packets only to be source-route bridged between Token
Rings 2 and 3.
source-bridge ring-group 5
!
interface tokenring 0
ip address 131.108.1.1 255.255.255.0
source-bridge 1000 1 5
source-bridge spanning
source-bridge input-type-list 202
!
interface tokenring 1
ip address 131.108.11.1 255.255.255.0
source-bridge 1001 1 5
source-bridge spanning
source-bridge input-type-list 202
!
interface tokenring 2
ip address 131.108.101.1 255.255.255.0
source-bridge 1002 1 5
source-bridge spanning
source-bridge input-lsap-list 203
!
interface tokenring 3
ip address 131.108.111.1 255.255.255.0
source-bridge 1003 1 5
source-bridge spanning
source-bridge input-lsap-list 203
!
! SNAP type code filtering
! permit ATp2 data (0x809B)
! permit ATp2 AARP (0x80F3)
access-list 202 permit 0x809B 0x0000
access-list 202 permit 0x80F3 0x0000
access-list 202 deny 0x0000 0xFFFF
!
! LSAP filtering
! permit IPX (0xE0E0)
Configuring Source-Route Bridging BC-161
SRB Configuration Examples
access-list 203 permit 0xE0E0 0x0101
access-list 203 deny 0x0000 0xFFFF
Note that it is not necessary to check for an LSAP of 0xAAAA when filtering SNAP-encapsulated
AppleTalk packets, because for source-route bridging, the use of type filters implies SNAP
encapsulation.
Creating Access Filters Example
In math, you have the following:
3 x 4 + 2 = 14 but 3 x (4 + 2) = 18
Similarly, the following access expressions would return TRUE if lsap(201) and dmac(701) returned
TRUE or if smac(702) returned TRUE:
lsap(201) & dmac(701) | smac(702)
However, the following access expression would return TRUE only if lsap(201) returned TRUE and
either of dmac(701) or smac(702) returned TRUE:
lsap(201) & (dmac(701) | smac(702))
Referring to the earlier example, “An Example Using NetBIOS Access Filters,” we had the phrase:
“Pass the frame if it is NetBIOS, or if it is an SNA frame destined to address 0110.2222.3333.”
This phrase was converted to the simpler form of:
Pass if “NetBIOS or (SNA and destined to 0110.2222.3333).”
So, for the following configuration:
! Access list 201 passes NetBIOS frames (command or response)
access-list 201 permit 0xF0F0 0x0001
!
access-list 202 permit 0x0404 0x0001 ! Permits SNA frames (command or response)
access-list 202 permit 0x0004 0x0001 ! Permits SNA Explorers with NULL DSAP
!
! Access list 701 will permit the FEP MAC address
! of 0110.2222.3333
access-list 701 permit 0110.2222.3333
The following access expression would result:
access-expression in lsap(201) | (lsap(202) & dmac(701))
BC-162
Bridging and IBM Networking Configuration Guide
Access Filters Example
Access Filters Example
Figure 69 shows two routers connecting two Token Rings to an FDDI backbone.
Network Configuration Using NetBIOS Access Filters
NetBIOS server
FILESVR3
NetBIOS clients
Token
Ring
Router A
3174
Token
Ring
FDDI
3174
Router B
IBM FEP
address
0110.2222.3333
S1112a
Figure 69
Suppose you want to permit the IBM 3174 cluster controllers to access the FEP at address
0110.2222.3333, and also want the NetBIOS clients to access the NetBIOS server named
FILESVR3. The following set of router configuration commands would meet this need:
netbios access-list host MIS permit FILESVR3
netbios access-list host MIS deny *
!
access-list 202 permit 0x0404 0x0001 ! Permits SNA frames (command or response)
access-list 202 permit 0x0004 0x0001 ! Permits SNA Explorers with NULL DSAP
!
access-list 701 permit 0110.2222.3333
!
interface tokenring 0
access-expression in (lsap(202) & dmac(701)) | netbios-host(MIS)
Fast-Switching Example
The following example disables fast switching between two Token Ring interfaces in the same
router. Frames entering Token Ring interfaces 0 or 1 will not be fast switched to the other interface.
! global command establishing the ring group for the interface configuration commands
source-bridge ring-group 2
!
! commands that follow apply to interface token 0
interface tokenring 0
! enable srb between local ring 1, bridge 1, and target ring 2
source-bridge 1 1 2
!disable source-route fast-switching cache on interface token 0
no source-bridge route-cache
!
interface token 1
! enable srb between local ring 2, bridge 1, and target ring 1
source-bridge 2 1 1
no source-bridge route-cache
Configuring Source-Route Bridging BC-163
SRB Configuration Examples
Autonomous Switching Example
The following example enables use of autonomous switching between two ciscoBus Token Ring
interfaces in the same router. Frames entering Token Ring interfaces 0 or 1 will be autonomously
switched to the other interface.
! global command to apply interface configuration commands to the ring group
source-bridge ring-group 2
!
! commands that follow apply to interface token 0
interface tokenring 0
! enable srb between local ring 1, bridge 1, and target ring 2
source-bridge 1 1 2
! enable autonomous switching for interface token 0
source-bridge route-cache cbus
!
interface tokenring 1
! enable srb between local ring 2, bridge 1, and target ring 1
source-bridge 2 1 1
source-bridge route-cache cbus
BC-164
Bridging and IBM Networking Configuration Guide