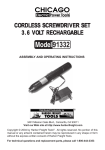
1
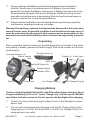
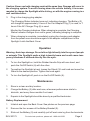
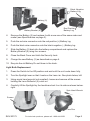
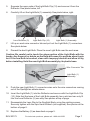
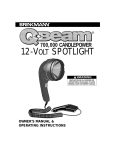
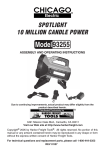
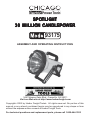
SPOTLIGHT
30 MILLION CANDLEPOWER
93175
ASSEMBLY AND OPERATING INSTRUCTIONS
3491 Mission Oaks Blvd., Camarillo, CA 93011
Visit our Web site at http://www.harborfreight.com
Copyright© 2005 by Harbor Freight Tools®. All rights reserved. No portion of this
manual or any artwork contained herein may be reproduced in any shape or form
without the express written consent of Harbor Freight Tools.
For technical questions and replacement parts, please call 1-800-444-3353
Specifications
Item
Power Source
Light Bulb
Lens
Charging Adapters
Weight
Features
Description
Battery, sealed lead-acid, 12 VDC, 7 AH
Xenon, 12 V, 35 W High Intensity
Discharge (HID); 3000 hour life
9 inch (dia.) with reflector
Power cord: 110 VAC
Car adapter: 12 VDC
12.6 lbs.
LED charging status indicator; Carrying
strap; Built-in charging adapter
compartment; Adjustable stand
Save This Manual
You will need the manual for the safety warnings and precautions, assembly
instructions, operating and maintenance procedures, and parts list. Keep your
invoice with this manual. Write the invoice number on the inside of the front cover.
Keep the manual and invoice in a safe and dry place for future reference.
Safety Warnings and Precautions
WARNING: When using tool, basic safety precautions should always be followed
to reduce the risk of personal injury and damage to equipment.
Read all instructions before using this tool!
1.
Avoid eye damage. Do not shine light directly into the eyes of people or
animals. Temporary blindness can occur. The High Intensity Discharge (HID)
light bulb is three times brighter than a halogen bulb.
2.
Avoid burns. Do not touch the Spotlight lens during operation. It becomes
very hot. Allow the Spotlight to cool down before performing any maintenance.
3.
Avoid overheating the Spotlight. Do not block the lens and reflector during
operation.
4.
Observe work area conditions. Do not use in damp or wet locations. Don’t
expose to rain. Do not use electrically powered tools in the presence of
flammable gases or liquids.
5.
Keep children away. Children must never be allowed to use this Spotlight.
6.
Store idle equipment. When not in use, store in a dry location to inhibit
corrosion.
SKU 93175
For technical questions, please call 1-800-444-3353
Page 2
7.
Use the right tool for the job. Do not attempt to force a small tool or
attachment to do the work of a larger industrial tool. There are certain
applications for which this tool was designed. It will do the job better and more
safely at the rate for which it was intended. Do not modify this tool and do not
use this tool for a purpose for which it was not intended.
8.
Maintenance. For your safety, service and maintenance should be performed
by a qualified technician as a high voltage hazard exists within the unit
circuitry. Battery replacement is not hazardous, however.
9.
Check for damaged parts. Before using any tool, any part that appears
damaged should be carefully checked to determine that it will operate properly
and perform its intended function. Do not use if any parts are broken; or any
other condition that may affect proper operation. Any part that is damaged
should be properly repaired or replaced by a qualified technician. Do not use
the Spotlight if any switch does not turn On and Off properly.
10. Replacement parts and accessories. When servicing, use only identical
replacement parts. Use of any other parts will void the warranty. Only use
accessories intended for use with this tool. Approved accessories are
available from Harbor Freight Tools.
Note: Performance of this Spotlight may vary depending on variations in local line
voltage while charging, or Spotlight Battery power.
Battery Precautions
1.
Read all instructions and warnings on the Battery before charging the battery.
2.
To avoid accidents, charge the supplied Battery only. Use only the attached
charging adapters for charging the internal Battery.
3.
Replace a dead Battery with only the same type (see Specifications, page 2).
4.
Do not expose the Battery to rain or wet conditions.
5.
To avoid damage of cable and plug, never pull the cable to disconnect the
charging cord.
6.
Do not use the charging cable if the cable or plug are damaged.
7.
Repairs should be carried out by a qualified technician.
8.
Do not touch the Battery poles with any conductive source.
9.
Do not store the Battery in a box with other metal objects.
10. Do not throw the Battery in a fire or in the general trash. Contact your local
hazardous waste disposal authority for proper disposal.
SKU 93175
For technical questions, please call 1-800-444-3353
Page 3
11. Always recharge the Battery when the Spotlight performance begins to
diminish. Severe heat is most destructive to a Battery; the more heat
generated, the faster the Battery loses power. A Battery that gets too hot can
be permanently damaged. Never over-discharge a Battery by using the tool
even after tool performance is decreasing. When tool performance begins to
diminish, stop the tool, and recharge the Battery.
12. Always remove the Battery from the Spotlight before performing inspection,
maintenance, cleaning procedures, or storage.
Warning: The warnings, cautions, and instructions discussed in this instruction
manual cannot cover all possible conditions and situations that may occur. It
must be understood by the operator that common sense and caution are factors which cannot be built into this product, but must be supplied by the operator.
Unpacking
When unpacking, check to make sure the following parts are included. If any parts
are missing or broken, please call Harbor Freight Tools at the number on the cover
of this manual.
Shoulder Strap (4)
Lens and Reflector (5)
Rubber Handle
Grip
Battery (2) Cover Latch
Back Cover
On/Off Switch (6)
Charger Status
Indicator LEDs
Stand (3)
Stand Lock
Car Charger Plug (7)
AC Charger Plug (8)
Charging Battery
Caution: Set the Spotlight Switch (6) to the Off position before charging. Never
charge the Battery (2) for over 7 hours. Charge only until the green LED Battery Status Indicator comes on. Do not operate the Spotlight while charging.
1.
Unlatch the Cover Latch and open the Back Cover of the Spotlight as shown
above, right.
2.
Pull out and unwind the desired charging cord: the AC Charging Plug (8) for
charging from a 110 VAC electrical outlet, or the DC Car Charger Plug (7) for
charging from a car outlet.
SKU 93175
For technical questions, please call 1-800-444-3353
Page 4
Caution: Never use both charging cords at the same time. Damage will occur to
the charging system. To avoid running down the vehicle battery, it is recommended to charge the Spotlight while driving, or with the engine running in a
well ventilated area.
3.
Plug in the charging plug adapter.
The Charging Status Indicator turns red, indicating charging. The Battery (2)
will charge for approximately 5 hours if the Car Adapter Plug (7) is used, or 7
hours if the AC Charger Plug (8) is used.
Monitor the Charging Indicators. When charging is complete, the Charging
Status Indicator changes from red to green, indicating charging is complete.
4.
When charging is complete, immediately unplug the charging cord adapter
from the power source and store again in the adapter compartment of the
Spotlight. Latch the Back Cover.
Operation
Warning: Avoid eye damage. Do not shine light directly into the eyes of people
or animals. This Spotlight emits a high intensity beam and could cause temporary blindness if shinned directly into the eyes.
1.
To turn the Spotlight on, hold the Rubber Handle Grip with one hand, and
push the On/Off Switch (6) with the other.
2.
To position the Spotlight at rest, loosen the Stand (3) Lock knob and move the
Stand to the desired position. Tighten the knob again.
3.
To turn the Spotlight off, push in on the On/Off Switch (6).
Maintenance
1.
Store in a clean and dry location.
2.
Charge the Battery (2) after each use, whenever performance starts to
diminish, and every three months if not used.
3.
Repairs to the Spotlight should be done by a qualified technician.
Battery Replacement
1.
Unlatch and open the Back Cover. See photos on the previous page.
2.
Remove the four screws of the Battery Bracket (9).
3.
Slide out the Battery (2) and carefully pull off each wire lug from the terminals.
SKU 93175
For technical questions, please call 1-800-444-3353
Page 5
Black Negative
Battery Lug
Battery (2)
Battery Bracket (9)
Red Positive
Battery Lug
4.
Remove the Battery (2) and replace it with a new one of the same make and
model (see Specifications on page 2).
5.
Push the red wire connector onto the red positive (+) Battery lug.
6.
Push the black wire connector onto the black negative (–) Battery lug.
7.
Slide the Battery (2) back into the battery compartment and replace the
Battery Bracket (9) using four screws.
8.
Close the Back Cover and latch the Security Lock.
9.
Charge the new Battery (2) as described on page 4.
10. Recycle the old Battery. Do not throw in the trash.
Light Bulb Replacement
1.
Press the Switch to the Off position and wait until the unit cools down fully.
2.
Turn the Spotlight over so that it rests on the Lens rim. See photo below, left.
3.
Using a spin hand wrench (not supplied), loosen and remove all the screws
holding the Lens Reflector (5) cover on.
4.
Carefully lift the Spotlight by the handle and set it on its side as shown belowright.
Spin Hand Wrench
Screws
Lens Rim
SKU 93175
For technical questions, please call 1-800-444-3353
Page 6
5.
Squeeze the open ends of the Light Bulb Clip (10) and remove it from the
Reflector. See photo below, left.
6.
Carefully lift out the Light Bulb (1) assembly. See photo below, right.
Lens Reflector (5)
Light Bulb Clip (10)
Light Bulb (1) Assembly
7.
Lift up on each wire connector tab and pull out the Light Bulb (1) connectors.
See photo below.
8.
Discard the bad Light Bulb. Place the new Light Bulb near the work area.
Caution: Be careful not to touch the glass portion of the Light Bulb with the
hands. Any finger oil or debris on the bulb will cause it to explode when it gets
hot. If the new bulb is touched, clean with isopropyl alcohol and allow to dry
before installing. Hold the new Light Bulb assembly by its plastic base.
Wire Connector Tab
Light Bulb (1)
Assembly
9.
Push the new Light Bulb (1) connector wires onto the wire connectors coming
out of the Spotlight as shown above.
10. Insert the Light Bulb (1) into the Reflector and secure with the Light Bulb Clip
(10). Note that the base of the Light Bulb assembly has a slot and can only fit
into the Lens Reflector (5) one way. See photos at top of page.
11. Reassemble the Lens Rim to the Spotlight Body using the existing screws.
Securely tighten with the Spin Hand Wrench (not supplied). See photos at the
bottom of page 6.
12. Replace the Battery (2) as described on page 5.
SKU 93175
For technical questions, please call 1-800-444-3353
Page 7
Parts List
Part No.
1.
2.
3.
4.
5.
6.
7.
8.
9.
10.
Description
Xenon Light Bulb, 12 VDC, 35 W, HID
Battery, 12 VDC, lead-acid, 1.7 AH
Stand
Strap, Shoulder
Lens and Reflector
Switch, On/Off
Car Charger Plug
AC Charger Plug
Battery Bracket
Light Bulb Clip
NOTE: Some parts are listed for illustration purposes only and are not available
individually as replacement parts.
PLEASE READ THE FOLLOWING CAREFULLY
THE MANUFACTURER AND/OR DISTRIBUTOR HAS PROVIDED THE PARTS LIST IN
THIS MANUAL AS A REFERENCE TOOL ONLY. NEITHER THE MANUFACTURER NOR
DISTRIBUTOR MAKES ANY REPRESENTATION OR WARRANTY OF ANY KIND TO
THE BUYER THAT HE OR SHE IS QUALIFIED TO MAKE ANY REPAIRS TO THE
PRODUCT OR THAT HE OR SHE IS QUALIFIED TO REPLACE ANY PARTS OF THE
PRODUCT. IN FACT, THE MANUFACTURER AND/OR DISTRIBUTOR EXPRESSLY
STATES THAT ALL REPAIRS AND PARTS REPLACEMENTS SHOULD BE UNDERTAKEN BY CERTIFIED AND LICENSED TECHNICIANS AND NOT BY THE BUYER. THE
BUYER ASSUMES ALL RISK AND LIABILITY ARISING OUT OF HIS OR HER REPAIRS
TO THE ORIGINAL PRODUCT OR REPLACEMENT PARTS THERETO, OR ARISING
OUT OF HIS OR HER INSTALLATION OF REPLACEMENT PARTS THERETO.
SKU 93175
For technical questions, please call 1-800-444-3353
Page 8