1
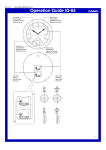
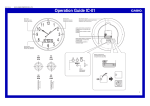
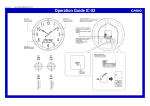
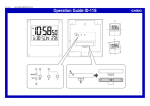
MA1412-EA © 2015 CASIO COMPUTER CO., LTD. Operation Guide IC-150 Hour hand Manecilla de hora Ponteiro das horas Minute hand Manecilla de minutos Ponteiro dos minutos Hour/minute adjuster Ruedecilla de ajuste de las horas/minutos Regulador das horas/minutos Analog clock battery compartment Compartimento de la pila del reloj analógico Compartimento da pilha do relógio analógico Digital display battery compartment Compartimento de la pila de la pantalla digital Compartimento da pilha do mostrador digital Second hand Manecilla de segundos Ponteiro dos segundos OK BIEN BOM Battery Compartments Compartimentos de la pila Compartimentos das pilhas NG MAL RUIM SET AJUSTE SET +/– OK BIEN BOM RESET REPOSICIÓN REPOSIÇÃO NG MAL RUIM 1 Operation Guide IC-150 A sticker is affixed to the glass of this clock when you purchase it. Be sure to remove the sticker before using the clock. Depending on the clock model, the configuration of your clock may differ somewhat from that shown in the illustration. Important! The times indicated by the analog clock and the digital display are not coordinated with each other. Use the procedures below to configure the time settings of each one. CONFIGURING THE DIGITAL TIME SETTING 1. Press the SET button to cycle through the setting screens as shown below. Current Time Screen DATE (month-date) Day of the week CONFIGURING ANALOG CLOCK SETTINGS To start clock Insert a battery into analog clock battery compartment with polarity as indicated. To set time Turn the hour/minute adjuster in either direction. To adjust seconds Remove the battery to stop the second hand at 12 o’clock position. Replace the battery at a time signal to restart the second hand on the correct second. The current time setting may be slightly off, depending on the timing when you load the battery to restart timing. PM indicator Current time (Hour, minutes) 12-hour/24-hour Setting Screen Year Setting Screen Time Setting Screen Month and Day Setting Screen 2 Operation Guide IC-150 2. While the screen you want is on the display, use the + and – buttons to change the digits that are flashing. SPECIFICATIONS <Analog Clock> Press + to increase the flashing digits. Press – to decrease the flashing digits. Holding down + or – changes the flashing digits at high speed. You can set the year in the range of 2000 to 2099. The day of the week is set automatically in accordance with the date setting. Pressing + or – while the Time Setting Screen is on the display causes the seconds count to be reset to 00. Each press of + or – while the 12-hour/24-hour Setting Screen is on the display toggles between 12-hour and 24-hour timekeeping. 3. After making the settings you want, use the SET button to display the Current Time Screen. The clock automatically returns to the Current Time Screen if you leave a setting screen on the display for about five minutes without performing any operation. Accuracy at Normal Temperature: ±30 seconds a month Display Contents: Hour, minute, second (3 hands) Battery Life: Approximately 1 year Battery: One AA size battery (Type: R6P) Ambient Temperature Range: 0°C to 40°C (32°F to 104°F) <Digital Clock> Accuracy at Normal Temperature: ±30 seconds a month Display Contents: Month, day, day of the week, hour, minute, pm (PM) Time system: Switchable between 12-hour and 24-hour formats Calendar System: Auto-calendar pre-programmed from the year 2000 to 2099 Battery Life: Approximately 1 year Battery: One lithium battery (Type: CR2032) Ambient Temperature Range: 0°C to 40°C (32°F to 104°F) BATTERY REPLACEMENT <Analog clock battery> 1. Remove the old battery. 2. Load a new battery, making sure that its positive (+) and negative (–) ends are facing correctly. Loading a battery incorrectly can cause it to burst and damage the clock. <Digital display battery> Replace a battery whenever the display of the clock becomes dim and difficult to read. 1. Open the battery compartment cover as shown in the illustration. 2. Remove the old battery. 3. Load a new battery, making sure that its positive (+) and negative (–) ends are facing correctly. Loading a battery incorrectly can cause it to burst and damage the clock. 4. Replace the battery compartment cover. 5. Press the RESET button. Be sure to press the RESET button after replacing a battery. Battery precautions Keep batteries out of the reach of small children. If a battery is accidentally swallowed, contact a physician immediately. Be sure to load the batteries with their positive (+) and negative (–) ends facing correctly. Never charge the batteries that come with the product. Should batteries ever leak while in the product, wipe out the fluid with a cloth, taking care not to let any get onto your skin. Replace the batteries at least once a year, even if the current batteries are working properly. The batteries that come with the product lose some of their power during transport and storage. 3