1
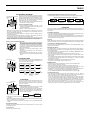
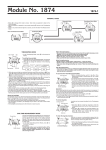
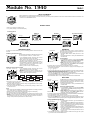
Module No. 1940
1940-1
ABOUT THIS MANUAL
A
• Button operations are indicated using the letters shown in the illustration.
• Each section of this manual provides you with the information you need to perform operations in each mode. Further details and technical information can
be found in the “REFERENCE” section.
B
P
C
D
E
GENERAL GUIDE
• Press C to change from mode to mode.
• In any mode, press B to illuminate the display.
Timekeeping Mode
BPM Mode
A
Beat Mode
Countdown Alarm Mode
B
Press C.
▲
C
▲
▲
BEEP
P
BEEP
MIN
D
Alarm Mode
E
▲
▲
▲
P
TIMEKEEPING MODE
BPM MODE
In addition to normal timekeeping, use the Timekeeping Mode to set the current time
and date.
Mode indicator
A
B
Calibrating the Seconds Count
A
B
Use the following procedure to calibrate the seconds count
on a time signal from a radio, TV, or other source.
D
1. In the Timekeeping Mode, hold down A until the
seconds digits start to flash on the display.
2. Press D to set the seconds count to 00 when the
time signal you are calibrating to sounds.
• Pressing D while the seconds count is in the range of
30 to 59 resets the seconds to 00 and adds 1 to the
minutes. If the seconds count is in the range of 00 to
29, the minutes count is unchanged.
3. Press A to return to the current time display.
P
C
E
Setting the Current Time and Date
Day of week
Month – Day
A
B
1. In the Timekeeping Mode, hold down A until the
seconds digits start to flash on the display.
• The seconds digits are flashing because they are
selected.
2. Press C to move the flashing in the sequence shown
below to select other digits and settings.
P
C
D
Seconds
Hour
Minutes
E
Day
Hour : Minutes
PM indicator
SEC
Stopwatch Mode
Month
12/24-Hour
Format
BEEP
C
D
E
BPM value
BEEP indicator
3. While hour, minutes, year, month, or day is selected (flashing), press D to increase
the setting or B to decrease it.
• When the 12/24-hour setting is selected, use D to toggle between 12-hour (12H)
and 24-hour (24H) timekeeping.
4. After the time and date are set the way you want them, press A to return to the
current time screen.
Notes
• When 12-hour format is selected, the P (PM) indicator appears on the display to indicate
“p.m.” times. There is no indicator for “a.m.” times.
• Selecting 24-hour format causes the 24 indicator to appear on the display.
• The year can be set in the range of 1995 to 2039.
• The day of the week is automatically displayed in accordance with the month and day
setting.
• The watch’s built-in full automatic calendar automatically make allowances for different
month lengths and leap years. Once you set the date, there should be no reason to
change it except after the replacement of the watch’s battery.
Counting Beats
1. In the BPM Mode, press D to toggle between BEEP
(BEEP indicator displayed) and LIGHT (LIGHT indicator
displayed) as the button confirmation operation.
• BEEP causes the watch to beep each time you press
E in the step 2 below, while LIGHT causes the backlight
to flash when E is pressed.
2. Press E five times in accordance with the beat of the music or rhythm.
• Each press of E causes the number of beats in the upper part of the display to cycle
in the following sequence:
1→2→3→4→x
3. After you press E the fifth time, the watch calculates an average number of beats per
minute and displays the applicable BPM value.
• The BPM value is stored in memory. You can use the BPM value to perform a beat
operation using the procedure under “Performing a Beat Operation”.
• If you selected LIGHT in step 1, the backlight lights after step 3 for about two seconds
to indicate that the BPM value is stored in memory.
• See “BPM Mode Notes” for more important information about the BPM value.
BEAT MODE
Year
Seconds
The BPM Mode makes it easy to count the number of
beats per minute and determine the tempo of music and
any other rhythmical process.
• The letters “BPM” stand for “beats per minute” in this
manual.
• The same BPM value is used by the BPM Mode and
the Beat Mode.
Beats per
measure
Mode indicator
A
B
The Beat Mode can be used to produce an audible signal
or flashing backlight in accordance with BPM value, which
is like a digital metronome that can be used for a variety
of different musical applications.
• The same BPM value is used by the BPM Mode and
the Beat Mode.
BEEP
Performing a Beat Operation
C
D
E
BPM value
BEEP indicator
1. In the Beat Mode, press D to toggle between BEEP
(audible signal) and LIGHT (flashing backlight) as the
beat operation type.
• BEEP (BEEP indicator displayed) causes the watch to
beep for each beat, while LIGHT (LIGHT indicator
displayed) causes the backlight to flash.
2. Press E to perform the selected beat operation at the speed indicated by the BPM value.
• The higher the BPM value, the faster the beat.
• The beat operation continues for one minute or until you press E again.
• When you select BEEP in step 1, the beat operation is performed in accordance with the
number of beats per measure you specify under “Changing BPM Settings Manually” below.
Changing BPM Settings Manually
Beats per measure
A
B
BEEP
C
D
E
BPM value
1. In the Beat Mode, hold down A until the BPM value
starts to flash.
2. Press D to increase the BPM value or B to decrease it.
• You can set the BPM value within a range of 60 to 200.
• Pressing B and D at the same time changes the BPM
value to its standard setting of 120.
3. Press C, and the beats per measure value starts to flash.
4. Press D to increase the number of beats per measure
and B to decrease it.
• You can set the number of beats per measure within a
range of 1 to 8.
5. After the BPM and number of beats per measure values are the way you want, press
A to return to the initial Beat Mode screen.
1940-2
Turning the Daily Alarm and Hourly Time Signal on and off
COUNTDOWN ALARM MODE
Countdown start time indicator
Mode indicator
A
B
SEC
MIN
C
D
E
Minutes Seconds
1/10 second
With the Countdown Alarm Mode, you get five built-in start
times (60, 74, 90, 120, 180 minutes) that match the lengths
of today’s cassette tapes and mini disks (MD). You also
get one user memory area in which you can store a starting
time of your own. The countdown start time indicator
shows which memory is currently selected.
• See “Countdown Start Time” for details about the start
time indicator in the upper display.
1. In the Countdown Alarm Mode, press D to cycle
through the available start times until the one you want
to use is on the display.
2. Press E to start the countdown timer.
Setting a User Countdown Start Time
B
SEC
MIN
C
D
E
1. While the start time indicator and countdown start time
are identical, hold down A until the minutes digits of
the countdown start time start to flash on the display.
• If the start time indicator and start time are not identical,
it means that a countdown operation is paused. Press
A to clear the current countdown operation and make
the two values identical.
2. Press D to increase the minutes setting or B to
decrease it.
• You can set a time in the range of 1 to 180 minutes, in
1-minute steps.
3. After the countdown start time is the way you want it,
press A to return to the initial Countdown Alarm Mode
screen.
STOPWATCH MODE
Mode indicator
1/100 second
A
B
The Stopwatch Mode lets you measure elapsed time, split
times, and two finishes. The range of the stopwatch is 23
hours, 59 minutes, 59.99 seconds.
(a) Elapsed time measurement
➤D
➤E
E
➤E
➤E
Start
C
D
E
Hours
Stop
Re-start
Stop
Clear
➤E
Split release Stop
➤D
Clear
(b) Split time measurement
E
➤D
➤D
Start
Split
(c) Split time and 1st-2nd place times
➤D
E
➤E
➤D
Seconds
Minutes
Start
Split
First runner
finishes.
Stop
Second runner
finishes.
Record time of
first runner.
➤D
Split release Clear
Record time
of second
runner.
ALARM MODE
Current time
Mode indicator
A
B
P
You can set a Daily Alarm that sounds at the same time
each day, while it is turned on. You can also turn on an
Hourly Time Signal that causes the watch to beep twice
every hour on the hour.
Setting the Daily Alarm
C
D
E
Hour : Minutes
[Alarm On Indicator/Hourly Time Signal On Indicator]
Alarm On
Signal On
Alarm Off
Signal Off
Alarm On
Signal Off
Alarm Off
Signal On
Using the Countdown Timer
• When the countdown reaches zero, an alarm sounds for 10 seconds or until you stop
the alarm by pressing any button. The countdown time is automatically reset to its
starting value after the alarm stops.
• Press E while a countdown operation is in progress to pause it. Press E again to
resume the countdown.
• To completely stop a countdown operation, first pause it (by pressing E), and then
press A. This returns the countdown time to its starting value.
• The countdown operation is paused when the countdown time in the lower part of the
display is different from the countdown start time indicator in the upper part of the
display. The countdown time is at its starting value when both times are identical.
A
In the Alarm Mode, press D to cycle through the on and off settings a shown below.
1. In the Alarm Mode, hold down A until the hour digits
of the alarm time start to flash on the display.
• The hour digits are flashing because they are selected.
• This operation automatically turns on the Daily Alarm.
2. Press C to move the flashing in the sequence shown
below to select other digits.
Alarm on indicator
Hourly time signal on indicator
Hour
Minutes
3. While hour or minutes is selected (flashing), press D to increase the setting or B to
decrease it.
• When setting the alarm time using the 12-hour format, take care to set the time correctly
as a.m. (no indicator) or p.m. (P indicator).
4. After the alarm time is the way you want it, press A to return to the initial Alarm Mode
screen.
Daily Alarm Operation
The alarm sounds at the preset time each day for about 20 seconds, or until you stop it
by pressing any button.
To test the alarm
Hold down E to sound the alarm.
REFERENCE
This section contains more detailed and technical information about watch operation. It
also contains important precautions and notes about the various features and functions
of this watch.
Auto Return Operations
• If you leave the watch in BPM or Beat Mode for about one hour without performing any
operation, it automatically changes to the Timekeeping Mode.
• If you leave a screen with flashing digits on the display for two or three minutes without
performing any operation, the watch automatically saves anything you have set up to
that point and exits the setting screen.
Scrolling
The B and D buttons are used in various modes and screens to scroll through available
settings on the display. In most cases, holding down these buttons scrolls at high speed.
12-hour/24-hour Timekeeping Formats
The 12-hour/24-hour timekeeping format you select in the Timekeeping Mode is also
applied in the Alarm Mode.
Backlight Precautions
The backlight use an EL (electro-luminescent) panel that causes the entire display to
glow for easy reading in the dark. In any mode (except when making settings), press B
to illuminate the display.
• The backlight remains lit for about eight seconds in the BPM and Beat Modes, and for
about two seconds in other modes.
• The electro-luminescent panel loses illuminating power after very long use.
• The illumination provided by the backlight may be hard to see when viewed under
direct sunlight.
• The watch will emit an audible sound whenever the display is illuminated. This is caused
by a transformer that vibrates when the EL panel lights up. It does not indicate
malfunction of the watch.
• The backlight automatically turns off whenever an alarm sounds.
• Frequent use of the backlight shortens the battery life.
BPM Mode Notes
• The watch cannot calculate a BPM value in either of the two following cases.
When you press E fewer than five times.
When you allow more than two seconds to pass between presses of E.
• The watch will calculate a BPM value even if you press E more than five times. In this
case, it uses the average timing of the last five presses of the E button.
• The BPM value is set within a range of 60 to 200 beats per minute. A beat below 60 is
indicated by Lo on the display, while a beat above 200 is indicated by H .
• You can enter the BPM Mode from the Timekeeping Mode by pressing E.
Countdown Start Time
• The Countdown Alarm Mode has five built-in start times (60, 74, 90, 120, 180) that
match the lengths of today’s cassette tapes and mini disks (MD). You also get one
user memory area in which you can store a starting time of your own.
• You can set a user start time in the range of 1 to 180 minutes, in 1-minute steps. When
you do, it is automatically inserted into its proper location among the built-in start times.
If you set a user start time of 86, for example, it will be inserted between 74 and 90.
This means when you scroll through the available start times on the watch display to
select one, they will cycle in the sequence: 60 → 74 → 86 → 90 → 120 → 180.
• You can have only one user start time. If you set a new user start time while there is
already one in memory, the new time replaces the old one, which is deleted.