1
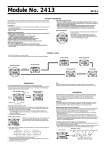
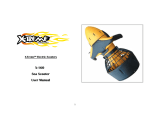
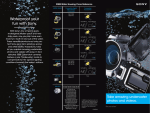
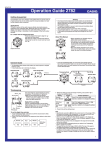
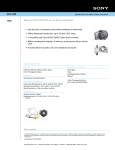
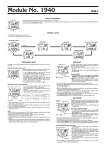
Module No. 1874
1874-1
GENERAL GUIDE
Stopwatch Mode
• Press C to change from mode to mode. Each mode is explained in detail on the
following pages.
• After you perform an operation in any mode, pressing C returns to the Timekeeping
Mode.
• While in any mode hold down C for 2 seconds, to enter the Dive Time Measurement
Mode.
PA INTERVAL
PA INTERVAL
PA INTERVAL
▲
▲
Hold down
C for 2
seconds.
PA
A
AUTO SPL
DATA
PA
24
A
RECALL
AUTO SPL
DATA
Alarm Mode
PA INTERVAL
A
PA
PA
24
RECALL
PA INTERVAL
PA INTERVAL
Timekeeping Mode
Dive Time Measurement Mode
Countdown Alarm Mode
PA
PA
B
PA INTERVAL
PA
RECALL
AUTO SPL
D
C
DATA
▲
P
▲
24
A
P
24
A
RECALL
TIMEKEEPING MODE
Day of week
• In the Timekeeping Mode, press B to illuminate the
display.
Day
Month
A
PA INTERVAL
B
PA
24
A
P
C
RECALL
D
AUTO SPL
Hour
Minutes
Seconds
PM indicator
To set the time and date
1. Press A while in the Timekeeping Mode. The seconds
digits flash on the display because they are selected.
2. Press C to change the selection in the following
sequence.
Seconds
Day
Hour
Minutes
Month
12/24-Hour
Format
Year
3. While the seconds digits are selected (flashing), press D to reset them to 00. If you
press D while the seconds count is in the range of 30 to 59, the seconds are reset to
00 and 1 is added to the minutes. If the seconds count is in the range of 00 to 29, the
minutes count is unchanged.
4. While any digits (besides seconds) are selected (flashing), press D to increase the
selection. Holding down D changes the current selection at high speed.
The 12/24-hour setting is selected (flashing), press D to switch between the 12-hour
1
( 2H) and 24-hour (24H) formats.
• With the 12-hour format, the P (PM) indicator appears to the left of the hour digits for
times in the range of noon to 11:59 pm and the A (AM) indicator appears to the left of
the hour digits for times in the range of midnight to 11:59 am.
• The 24-hour format is indicated by 24 on the display. Times are shown in the range of
00:00 to 23:59.
5. After you set the time and date, press A to return to the Timekeeping Mode.
• The day of the week is automatically set in accordance with the date.
• The date can be set within the range of January 1, 1995 to December 31, 2039.
• If you do not operate any button for a few minutes while a selection is flashing, the
flashing stops and the watch goes back to the Timekeeping Mode automatically.
About the backlight
The backlight uses an EL (electro-luminescent) panel that causes the entire display to
glow for easy reading in the dark. In the Timekeeping Mode or Dive Time Measurement
Mode, press B to illuminate the display for about two seconds.
• The electro-luminescent panel loses illuminating power after very long use.
• The illumination provided by the backlight may be hard to see when viewed under
direct sunlight.
• The backlight automatically turns off whenever an alarm sounds.
While Diving/Snorkeling
• Always use the “buddy system” when diving — never dive alone.
• Check to make sure that timer operation is being performed properly.
• Take care when diving/snorkeling near rocks or coral to avoid scratching the
watch.
After Diving/Snorkeling
• To avoid corrosion, rinse your watch thoroughly with fresh water to remove salt
water, dirt, etc. (When possible, soak the watch in fresh water overnight to make
sure that all salt is removed.)
To use the Dive Time Measurement Mode
Dive start time
A
PA INTERVAL
B
PA
24
A
C
RECALL
AUTO SPL
D
DATA
Dive time (hours,
minutes, seconds)
To review log data
Surface interval
Dive start time
A
B
PA
24
A
RECALL
PA INTERVAL
B
PA
24
A
C
RECALL
AUTO SPL
DATA
D
Mode indicator
Precautions
For your own safety, never operate the buttons of the
watch while underwater or while on the water’s
surface. Perform button operations in a safe place
after leaving the water.
AUTO SPL
D
DATA
Dive time
DIVE TIME MEASUREMENT MODE
A
1. Before diving/snorkeling, switch to the Dive Time
Measurement Mode by holding down C for at least
two seconds.
2. To start the dive time measurement operation, press D.
3. To stop the measurement, hold down D for at least
one second (until the watch emits a long beep).
• At this time, timing of the surface interval starts. This
timing is performed internally, and it is not indicated on
the Dive Time Measurement Mode display. For details
on how to view surface interval data, see “To review log
data”.
Important!
Do not recall log data (to view the surface interval) while this procedure is in progress. If
you do, the dive time to that point will be stored into memory and the data will be cleared
when you re-start the dive time measurement operation.
4. To resume timing from the dive time shown on the display, press D.
• You can repeat steps 3 and 4 as many times as you like.
5. To clear the Dive Time Measurement Mode, stop the measurement operation (step 3,
above) and then press A.
C
Current time
DATA
Before Diving/Snorkeling
• Be sure to check if the battery power is low (check for low light intensity or a dim
display). If it is, do not use the watch for diving/snorkeling.
• Make sure that the watch is set to the correct time of day.
• Check the glass, case and band for cracks or chips.
• Make sure that the band is fastened securely around your wrist.
INTERVAL
The Dive Time Measurement Mode lets you measure the
total time you spend underwater while diving or snorkeling,
and the amount of time spent on the surface (surface
interval). The watch also stores one set of diving time
data (total dive time and dive start time) into log memory
for later recall.
• In the Dive Time Measurement Mode, press B to
illuminate the display.
AUTO SPL
Log data can be reviewed (recalled) in the Timekeeping
Mode.
1. Hold down C for at least two seconds to enter the
Timekeeping Mode from the Dive Time Measurement
Mode.
2. Hold down D to display the Log Data Display. The
Log Data Display remains visible as long as you hold
down D . When you release D , the normal
Timekeeping Mode display returns.
To clear the log data memory
A
B
INTERVAL
Log data in memory is automatically replaced by the
newest measurement. Use the following operation if you
want to manually clear the log data memory.
24
A
C
RECALL
AUTO SPL
DATA
D
[ Cleared Display ]
1. While in the Timekeeping Mode, hold down D to display
the Log Data Display.
2. Press A to clear the log data memory. At this time, the
display clears so that no data is shown.
1874-2
STOPWATCH MODE
Mode indicator
1/100 second
PA INTERVAL
The Stopwatch Mode lets you measure elapsed time, split
times, and two finishes. The range of the stopwatch is 23
hours, 59 minutes, 59.99 seconds.
PA
A
PA INTERVAL
B
PA
24
A
C
RECALL
AUTO SPL
DATA
D
(a) Elapsed time measurement
D
➤D
➤D
Start
Seconds
Current time
➤D
Stop
➤B
Clear
➤D
Split release Stop
➤B
Clear
Re-start
(b) Split time measurement
D
➤B
➤B
Start
Hours
Minutes
Stop
Split
(c) Split time and 1st-2nd place times
➤B
D
➤D
➤B
Start
Split
First runner
finishes.
Stop
Second runner
finishes.
Record time of
first runner.
➤B
Split release Clear
Record time
of second
runner.
• To set a Date alarm
Set the month, day, hour and minutes for the alarm time. This type of setting causes
the alarm to sound at the specific time, on the specific date you set.
• To set a 1-Month alarm
Set the month, hour and minutes for the alarm time. Set xx for the day (see step 4
under “To set an alarm time”). This type of setting causes the alarm to sound every day
at the time you set, only during the month you set.
• To set a Monthly alarm
Set the day, hour and minutes for the alarm time. Set x for the month (see step 4
under “To set an alarm time”). This type of setting causes the alarm to sound every
month at the time you set, on the day you set.
To set an alarm time
1. Press D while in the Alarm Mode to select the alarm whose time you want to set.
Alarm 1
COUNTDOWN ALARM MODE
1/10 second
PA INTERVAL
PA
A
PA INTERVAL
B
PA
The countdown timer can be set within a range of 1 second
to 24 hours. When the countdown reaches zero, an alarm
sounds for 10 seconds or until you press any button.
• You can also select auto repeat, which automatically
restarts the countdown from the original value you set
whenever zero is reached.
To set the countdown time
24
A
C
RECALL
AUTO SPL
DATA
D
Hours
Minutes
1. Press A while in the Countdown Alarm Mode. The hours
digit flashes on the display because it is selected.
2. Press C to change the selection in the following
sequence.
Seconds
Hours
Current time
Minutes
Seconds
3. Press D to increase the selection. Holding down D changes the selection at high speed.
• To set the starting value of the countdown time to 24 hours, set to 0:00 00.
4. After you set the countdown time, press A to return to the Countdown Alarm Mode.
• If you do not operate any button for a few minutes while a selection is flashing, the
flashing stops and the watch goes back to the Countdown Alarm Mode automatically.
To use the countdown timer
Press D while in the Countdown Alarm Mode to start the countdown timer.
• When the countdown reaches zero and auto repeat is turned off, the alarm sounds or
until you stop it by pressing any button. The countdown time is automatically reset to its
starting value after the alarm stops.
• Press D while a countdown operation is in progress to pause it. Press D again to
resume the countdown.
• To completely stop a countdown operation, first pause it (by pressing D), and then
press B. This returns the countdown time to its starting value.
To turn auto repeat on and off
A
B
P
24
A
C
D
SPL
AUTO
Auto repeat on indicator
1. Press A while in the Countdown Alarm Mode. The
hours digit flashes on the display because it is selected.
2. Press B to turn auto repeat on (AUTO displayed) and
off (AUTO not displayed).
3. Press A to return to the Countdown Alarm Mode.
• When the end of the countdown is reached while auto
repeat is on, the alarm sounds, but the countdown starts
again automatically whenever the countdown reaches
zero. You can stop timing by pressing D, and manually
reset to the starting countdown time by pressing B.
• Normally, an alarm tone sounds for about 10 seconds when the end of the countdown
is reached. If you use auto repeat with start time of 10 seconds or less, the alarm tone
sounds for only one second.
ALARM MODE
Mode indicator
Month-Day
PA INTERVAL
PA
A
PA INTERVAL
B
PA
24
A
C
D
You can set up to three independent alarms with hour,
minutes, month, and day. When an alarm is turned on, an
alarm tone sounds for 20 seconds when the time is
reached. Press any button to stop the alarm after it starts
to sound.
When the Hourly Time Signal is turned on, the watch
beeps every hour on the hour.
Alarm Types
The alarm type is determined by the settings you make,
as described below.
• To set a Daily alarm
Set the hour and minutes for the alarm time. Set x for
Alarm No.
the month and xx for the day (see step 4 under “To set
Current time
an alarm time”). This type of setting causes the alarm to
Alarm on indicator
sound every day at the time you set.
RECALL
AUTO SPL
DATA
Hour : Minutes
Alarm 3
Hourly Time Signal
2. After you select an alarm, press A. The hour digits flash on the display because they
are selected.
• This operation automatically turns on the alarm.
3. Press C to change the selection in the following sequence.
Hour
Mode indicator
Alarm 2
Minutes
Month
Day
4. Press D to increase the selection. Holding down D changes the selection at high speed.
• To set an alarm that does not include a month (Daily alarm, Monthly alarm), set x for
the month. Press D until the x mark appears (between 12 and 1) while the month
digits are flashing.
• To set an alarm that does not include day (Daily alarm, 1-Month alarm), set xx for the
day. Press D until the xx mark appears (between 31 and 1) while the day digits are
flashing.
• The format (12-hour and 24-hour ) of the alarm time matches the format you select for
normal timekeeping.
• When setting the alarm time using the 12-hour format, take care to set the time correctly
as morning (A indicator) or afternoon (P indicator).
5. After you set the alarm, press A to return to the Alarm Mode.
• If you do not operate any button for a few minutes while a selection is flashing, the
flashing stops and the watch goes back to the Alarm Mode automatically.
To turn an alarm and Hourly Time Signal on and off
1. In the Alarm Mode, press D to select an alarm or the Hourly Time Signal.
2. When the alarm or Hourly Time Signal you want to is selected, press B to turn it on
and off.
Indicates alarm is ON.
Indicates Hourly Time Signal is ON.
) and the Hourly Time Signal on indicator (
• The alarm on indicator (
on the display in all modes while these functions are turned on.
To test the alarm
Hold down D while in the Alarm Mode to sound the alarm.
) are shown