1
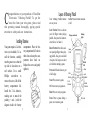
Excalibur
Vibrating
Pinball
OPERATING MANUAL
www.ExcaliburElectronics.com
Model No. 159
C
ongratulations on your purchase of Excalibur
E l e c t r o n i c s ’ Vi b r a t i n g P i n b a l l ! To g e t t h e
most fun from your new game, please read
this operating manual thoroughly, paying special
attention to safety and care instructions.
Installing Batteries
Your game requires 2 AA batteries (not included). To install the batteries, carefully
turn the game over so that the
top side is face-down on a
soft surface. Use a small
Phillips screwdriver to
remove the screw. Lift off the
battery compartment lid.
Install the 2 AA batteries,
making sure to match the
polarity (+ and -) with the
diagram inside the battery
compartment. Place the battery compartment lid’s tabs in
their slots and snap the compartment door back on.
Replace the screw and gently
tighten it.
Layout of Vibrating Pinball
Your Vibrating Pinball buttons
are easy to use.
SOUND Press to turn the sound on
or off.
LEFT FLIPPER Press to activate
your left flipper when playing
pinball. Also press this button to
select Game 1 or Game 2.
Flip-up scoreboard
RIGHT FLIPPER Press this to activate your right flipper when playing pinball. Also, press and hold
it to eject a ball, or press to select
a level before starting a game.
Score
LCD
PLUNGER Pull and release to put
a ball in play.
PAUS
SOUND
START Press to start a game.
LEFT
FLIPPER
ON Press to turn your game on.
RESET Press to reset your game.
PAUSE Press to pause during a
game, or to resume a game.
2
Flashing
Lights
Pinball
LCD
STAR
ON
RESET
RIGHT
FLIPPER
PLUNGER
3
Playing Vibrating Pinball
on the score LCD. After you have
made your selection, press START
to begin your game.
Getting started
To begin playing, flip up the
automatic scoreboard so that you
can see the score LCD at the top
of the unit. Then press ON to turn
on the game. Next press LEFT
FLIPPER to select either Game 1
or Game 2. The game selection
will be displayed on the upper
right of the pinball LCD.
Putting the ball in play
You can launch a ball either by
pulling and then releasing the
PLUNGER, or by pressing and
holding RIGHT FLIPPER. Once
the ball is released, use your flippers to keep the ball in play.
Choosing levels
Press RIGHT FLIPPER to choose
one of six levels, ranging in difficulty from Level 1, the easiest, to
Level 6, the most difficult. The
level selected will be displayed
Playing the game
You’ll be challenged by three
balls per game. To score points,
you need to knock the bricks and
hit the bubbles with each pinball.
If no button is pushed for a few minutes, your
Vibrating Pinball game will
switch off to save your batteries.
4
Computers can sometimes “lock up” due to static
discharge or other electrical disturbances. If this
should happen, reset the game by pressing RESET.
You get extra points for knocking
the pinball inside the spinning
wheel.
sounds off. Press again if you’d
like to turn the sound back on.
Your Excalibur Pinball will provide you hours of fun. Please
review the safety, care and battery instructions on the following
page. And please remember to
close the flip-up scoreboard display when not in use to avoid
damaging it.
Pausing during a game
If you’d like to pause during the
game, simply press PAUSE. Press
again to resume your game.
Sound on/off
Press the SOUND button if you’d
like to switch the pinball arcade
&
SPECIAL CARE
• Avoid rough handling
such as bumping or dropping.
• Avoid
moisture
and
extreme temperatures. For
best results, use between the
5
HANDLING
temperatures of 39ºF and
100ºF (4º C and 38º C).
• Clean using only a slightly
damp cloth. Do not use cleaners with chemical agents.
BATTERY INFORMATION
• CAUTION: Batteries should
be removed and replaced by
adults only.
• Turn unit off when installing
batteries.
• Your Pinball game uses 2 AA
batteries, not included.
• Do not mix alkaline, standard
(carbon-zinc) or rechargeable
(nickel-cadmium) batteries.
• Do not mix old and new batteries.
• Do not use rechargeable batteries.
• Remove exhausted batteries
from the unit.
• Do not short circuit battery
terminals.
• Remove batteries and store
them in a cool, dry place when
not in use.
• To avoid explosion or leakage, do not dispose of batteries in
a fire or attempt to recharge
alkaline or other non-rechargeable batteries.
• Install batteries so that the
polarity (+ and -) matches the
diagram in the battery compartment.
• Use only batteries of the same
type and equivalency.
Due to continuing improvements, actual
product may differ slightly from the
product described herein.
6
LIMITED
90-DAY
EXCALIBUR
ELECTRONICS,
INC., warrants to the original consumer that its products are free from
any electrical or mechanical defects
for a period of 90 DAYS from the date
of purchase. If any such defect is discovered within the warranty period,
EXCALIBUR
ELECTRONICS,
INC., will repair or replace the unit
free of charge upon receipt of the unit,
shipped postage prepaid and insured
to the factory address shown at right.
The warranty covers normal consumer use and does not cover damage
that occurs in shipment or failure that
results from alterations, accident, misuse, abuse, neglect, wear and tear,
inadequate maintenance, commercial
use, or unreasonable use of the unit.
Removal of the top panel voids all
warranties. This warranty does not
cover cost of repairs made or attempted outside of the factory.
Any applicable implied warranties,
WARRANTY
including warranties of merchantability and fitness, are hereby limited to
90 DAYS from the date of purchase.
Consequential or incidental damages
resulting from a breach of any applicable express or implied warranties
are hereby excluded. Some states do
not allow limitations on the duration
of implied warranties and do not allow
exclusion of incidental or consequential damages, so the above limitations
and exclusions in these instances may
not apply.
The only authorized service center in
the United States is:
Excalibur Electronics, Inc.
13755 SW 119th Ave
Miami, Florida 33186 U.S.A.
Phone: 305.477.8080
Fax: 305.477.9516
Play games live at:
www.ExcaliburElectronics.com
7
Ship the unit carefully packed, prefer-
ably in the original carton, and send it
prepaid, and adequately insured.
Include a letter, detailing the complaint and including your daytime
telephone number, inside the shipping
carton.
If your warranty has expired and you
want an estimated fee for service,
write to the above address, specifying
the model and the problem.
PLEASE DO NOT SEND
YOUR UNIT WITHOUT
RECEIVING AN ESTIMATE FOR
SERVICING. WE CANNOT
STORE YOUR UNIT!
We make you think.