1
BUBBLE JET PRINTER
Quick Start Guide
Table of Contents
Preface
1
Shipping Materials
1
Introduction
1
Setting Up
Preparing the Printer
2
2
Connecting the Printer to the Computer
2
Installing the Print Head
4
Loading Paper
7
Installing the Printer Driver
Aligning the Print Head
Basic Operations
8
12
16
Printing with Windows
16
Printing with Macintosh
18
Print Head Maintenance
20
Notes on Handling the USB Interface (for Windows Users)
21
For Further Details...
22
BE
QA7-1589-V01
Canadian Radio Interference Regulations
This digital apparatus does not exceed the Class B limits for radio noise emissions from a digital
apparatus as set out in the interference-causing equipment standard entitled “Digital Apparatus”,
ICES-003 of the Industry Canada.
Cet appareil numérique respecte les limites de bruits radioélectriques applicables aux appareils
numériques de Classe B prescrites dans la norme sur la matériel brouilleur: “Appareils Numériques”,
NMB-003 édicatée par l’Industrie Canada.
International ENERGY STAR® Program
As an ENERGY STAR® Partner, Canon Inc. has determined that this product meets the ENERGY
STAR guidelines for efficiency.
The International ENERGY STAR® Office Equipment Program is a global program that promotes energy saving through the use of computer and other office
equipment. The program backs the development and dissemination of products
with functions that effectively reduce energy consumption. It is an open system in
which business can participate voluntarily. The targeted products are office equipment such as computers, monitors, printers, faxes and copiers.
Their standards and logos are uniform among participating nations.
Power Requirements
Never use a power supply voltage other than that supplied in the country of purchase. Using the
incorrect voltage could cause a fire or electric shock. The correct power supply voltages and frequencies are as follows:
Europe
USA/Canada
Australia
AC 230V±10%, 50Hz
AC 120V, 60Hz
AC 240V, 50Hz
Preface
■■ Shipping Materials ■
■
■
■
■
■
■
■
■
■
■
■
■
■
■
■
■
■
■
■
■
■
■
■
■
■
■
■
■
■
■
■
■
■
■
■
■
■
■
■
■
■
■
■
■
■
■
■
■
■
■
■
■
■
■
■
■
■
■
■
■
■
■
■
■
■
■
■
■
■
■
■
■
■
■
■
■
■
■
■
■
■
■
■
■
■
■
■
■
■
■
■
■
■
■
■
■
■
■
■
■
■
■
■
■
■
■
■
■
■
■
Thank you for purchasing a Canon Bubble Jet Printer.
Check that all the following items are in the box. If anything is missing or is damaged, contact
your Canon Authorised Dealer or Sales Representative.
❏ Printer
❏ Setup Software & User’s Guide CD-ROM
❏ Quick Start Guide
❏ Print Head
❏ 4 Ink Tanks
* Cables should be purchased separately according to your computer. For details on cable
types and specifications, refer to page 2.
■■ Introduction ■
■
■
■
■
■
■
■
■
■
■
■
■
■
■
■
■
■
■
■
■
■
■
■
■
■
■
■
■
■
■
■
■
■
■
■
■
■
■
■
■
■
■
■
■
■
■
■
■
■
■
■
■
■
■
■
■
■
■
■
■
■
■
■
■
■
■
■
■
■
■
■
■
■
■
■
■
■
■
■
■
■
■
■
■
■
■
■
■
■
■
■
■
■
■
■
■
■
■
■
■
■
■
■
■
■
■
■
■
■
■
■
■
■
■
■
■
■
■
■
■
■
■
■
■
■
■
■
■
This Quick Start Guide uses the following symbols to indicate important information. Always
observe the instructions indicated by these symbols.
Instructions that, if ignored, could result in death or serious personal injury caused by
incorrect operation of the equipment. These must be observed for safe operation.
Instructions that, if ignored, could result in personal injury or material damage caused by
incorrect operation of the equipment. These must be observed for safe operation.
Also read the Safety Precautions in the User’s Guide. Observe the warnings and cautions to
avoid personal injury or damage to the printer.
Notice
The diagrams and computer screens in this guide refer to the S600. The operations are
exactly the same with the S630.
Trademark Notices
• Canon® is a registered trademark of Canon Inc.
• BJ™ is a trademark of Canon Inc.
• Microsoft®, Windows® and Windows NT® are registered trademarks of Microsoft
Corporation in the U.S. and other countries.
• Apple, Mac, Macintosh and iMac are trademarks of Apple Computer, Inc., registered in the
U.S. and other countries.
• All other trademarks and registered trademarks appearing in this Quick Start Guide are
the property of their respective owners.
Copyright ©2001 CANON INC.
All rights reserved. No part of this publication may be transmitted or copied in any form
whatsoever without the express written permission.
1
Setting Up
■■ 1 ■ Preparing the Printer ■
■
■
■
■
■
■
■
■
■
■
■
■
■
■
■
■
■
■
■
■
■
■
■
■
■
■
■
■
■
■
■
■
■
■
■
■
■
■
■
■
■
■
■
■
■
■
■
■
■
■
■
■
■
■
■
■
■
■
■
■
■
■
■
■
■
■
■
■
■
■
■
■
■
■
■
■
■
■
■
■
■
■
■
■
■
■
■
■
■
■
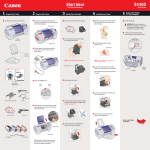
1 Place the printer on a flat surface.
2 Remove the packing material and tape
from the printer as shown.
3 Attach the paper rest to the sheet
feeder.
paper rest
output tray
4 Attach the output tray as shown.
■■ 2 ■ Connecting the Printer to the Computer ■■■■■■■■■■■■■■■■■
Use either a USB cable or parallel printer cable. You cannot connect the computer to the printer
using both the parallel cable AND the USB cable.
USB cable
• Windows 98, Windows Me,
Windows 2000
• Mac OS 8.1 or later
Recommended: Canon or other computer
manufacturer cable, up to 5 meters in length.
2
Printer cable (parallel)
• Windows 95, Windows NT 4.0
(Can also be used with Windows 98,
Windows Me and Windows 2000.)
Should conform with Centronics IEEE 1284
and support bi-directional communication.
Recommended: Canon or other computer
manufacturer cable, up to 2 meters in length.
➥Notes
• The USB cable delivers relatively faster printing speeds and is recommended for use
with Windows 98, Windows Me and Windows 2000.
• If your computer has an earth connection, make sure that this is attached.
• If you do not intend to use the printer for a long period of time, unplug the power cord
from the power outlet after turning off the printer.
Follow the steps below to install the printer
driver correctly.
1 Ensure the printer and the computer
are switched off.
Figure A
2 Connect the cable.
Figure A shows the USB cable connection and
Figure B shows the printer cable (parallel)
connection.
Figure B
➥Note
If the Add New Hardware Wizard or Found New Hardware
Wizard screen appears when carrying out the following
operations, click Cancel and turn off the computer.
3
■■ 3 ■ Installing the Print Head ■
■
■
■
■
■
■
■
■
■
■
■
■
■
■
■
■
■
■
■
■
■
■
■
■
■
■
■
■
■
■
■
■
■
■
■
■
■
■
■
■
■
■
■
■
■
■
■
■
■
■
■
■
■
■
■
■
■
■
■
■
■
■
■
■
■
■
■
■
■
■
■
■
■
■
■
■
■
■
■
■
■
• Never attempt to plug the power cord into the power outlet or unplug the power cord
when your hands are wet.
• Never damage, modify, stretch, or excessively bend or twist the power cord. Do not place
heavy objects on the power cord.
• Never use any power supply other than the standard power supply available in the
country of purchase. Using the incorrect voltage and frequency could cause a fire or
electric shock.
• Always push the plug all the way into the power outlet.
■ Installing the Print Head
1 Plug the printer in.
2 Turn on the printer. Do NOT turn on
the computer yet.
The POWER lamp flashes and the printer begins
to operate. Wait until the POWER lamp remains
fully lit.
3 Open the front cover.
4 Remove the tape.
5 Raise the lock lever.
Do not touch internal parts other than the lock
lever.
4
6 Remove the protective cap from the
print head.
➥Notes
• Do not touch the
print head nozzles or
electrical contacts.
• Do not attempt to
reattach the
protective cap once it
has been removed.
electrical contacts
print head
nozzles
7 Place the print head in the holder.
print head
print head
holder
8 Lock the print head into place by
lowering the lever.
Do not touch the lock lever once the print head
has been installed.
■ Installing the Ink Tanks
• For safety reasons, store ink tanks out of the reach of small children.
• Do not drop or shake ink tanks.
1 Take out the yellow ink tank.
2 Pull the orange tape in the direction of
the arrow and remove the clear film.
5
3 Hold the ink tank as shown in the
diagram and remove the protective
cap.
➥Notes
• Do not squeeze the sides
of the ink tanks as this
may cause the ink to leak
out and stain your clothes
and hands.
• Do not touch the ink port.
• Do not attempt to reattach
the protective cap once it
has been removed.
ink port
4 Insert the yellow ink tank into the righthand slot. Press the top until it clicks
into place.
5 Use the same procedure to install the
other ink tanks in their appropriate
slots.
Check the labels to make sure that each tank is in
the correct position.
➥Notes
Black
Cyan
Magenta
Yellow
• Only install the ink tanks in the positions
specified by the labels.
• If ink tanks are not installed in the right
position, colours will not be printed
correctly. Immediately reinstall the tank in
the correct position and carry out print head
cleaning. For details, refer to the User’s
Guide.
6 Close the front cover.
Wait until the POWER lamp remains fully lit
(about 60 seconds).
6
■■ 4 ■ Loading Paper ■
■
■
■
■
■
■
■
■
■
■
■
■
■
■
■
■
■
■
■
■
■
■
■
■
■
■
■
■
■
■
■
■
■
■
■
■
■
■
■
■
■
■
■
■
■
■
■
■
■
■
■
■
■
■
■
■
■
■
■
■
■
■
■
■
■
■
■
■
■
■
■
■
■
■
■
■
■
■
■
■
■
■
■
■
■
■
■
■
■
■
■
■
■
■
■
■
■
■
■
■
■
■
■
■
■
■
■
■
■
■
■ Loading A4 (Letter) Size Plain Paper
paper thickness lever
1 Open the front cover.
2 Move the paper thickness lever at the
top of the print head holder to the left
position. Close the front cover.
➥Note
Set the paper thickness lever to the left when
using plain paper, to the right when using
thick paper. Refer to the User’s Guide for
information on loading envelopes and other
media.
print side
3 Load the paper, aligning it with the
right side of the sheet feeder.
You can load up to 100 sheets of plain paper. Do
not exceed this limit.
4 Press the paper guide and slide it
against the left side of the stack of
paper.
You now need to install the printer driver:
Windows:
Go to page 8
Macintosh:
Go to page 10
7
■■ 5 ■ Installing the Printer Driver ■
■
■
■
■
■
■
■
■
■
■
■
■
■
■
■
■
■
■
■
■
■
■
■
■
■
■
■
■
■
■
■
■
■
■
■
■
■
■
■
■
■
■
■
■
■
■
■
■
■
■
■
■
■
■
■
■
■
■
■
■
■
■
■
■
■
■
■
■
■
■
■
■
■ Installing the Printer Driver - Windows
➥Notes
• Do not disconnect the cable or remove the CD-ROM during the installation. The driver
cannot be correctly installed.
• The screens below refer to Windows 98 installation. Screen may differ depending on the
environment you are using.
• When installing the printer driver in Windows 2000 or Windows NT 4.0, log on to the
system as a member of the Administrators group.
If the following screen appears automatically, click Cancel and carry out the installation
following steps 1 to 7.
Special Notes for Windows 98 USB Users
Click Cancel to quit the screen and turn off the printer. Next, remove and replace the USB
cable connected to your computer.
OFF
1 Ensure the printer and computer are
switched off.
2 Turn on the computer and start
Windows. If any applications
automatically run, quit them.
Disable any virus detection programs.
Do NOT turn the printer on at this stage.
8
3 Place the Setup Software & User’s
Guide CD-ROM in the CD-ROM drive.
➥Notes
• If the CD-ROM does not run automatically,
double-click My Computer in the Windows
screen, then double-click the CD-ROM icon.
• If the language selection screen appears,
select a language, then click the Next button.
4 Follow the instructions displayed on
screen. When the screen shown on
the left is displayed, click the Install
Software button.
5 Ensure the Printer Driver button is
red, then click Start.
6 When the screen shown on the left
appears, turn the printer on.
If the printer is recognised, the printer driver will
be automatically installed.
➥Note
ON
If the connection is not recognised, refer to the
section “Notes on Handling the USB Interface
(for Windows Users)” on page 21.
9
7 Click OK.
Before you use the printer, you must carry out
print head alignment on page 12.
➥Note
If a message prompting you to restart the
computer appears, click Yes to restart your
computer.
■ Installing the Printer Driver - Macintosh
➥Notes
• If you are using an iMac installed with Mac OS 8.1, use the iMac update 1.0, available
from the Apple Inc. home page, to upgrade your system.
• Do not remove or insert the USB cable during installation, as this may result in the
computer or printer not operating normally.
• Before installing the driver, disable all virus detection programs and automatically
loading programs or remove them from your system folder.
1 Turn on the Mac. If the screen shown
on the left is displayed, click OK.
2 Place the Setup Software & User’s
Guide CD-ROM in the CD-ROM drive.
3 Double-click the printer driver folder,
then select a language.
4 Double-click Installer.
5 Read the Licence Agreement and click
Accept to continue.
10
6 Click Install.
Wait for the installation to finish.
➥Note
If the above message appears, check that there
are no unsaved documents, then click the
Continue button. If a document needs to be
saved, click Cancel then save the document.
After saving the document, begin again from
Step 4.
7 Click Restart.
The computer restarts.
8 Select Chooser in the Apple Menu.
9 Click the icon for the printer you are
using and close Chooser.
Before you use the printer, you must carry out
print head alignment on page 14.
➥Note
Refer to the User’s Guide when using this
printer as a network printer.
11
■■ 6 ■ Aligning the Print Head ■
■
■
■
■
■
■
■
■
■
■
■
■
■
■
■
■
■
■
■
■
■
■
■
■
■
■
■
■
■
■
■
■
■
■
■
■
■
■
■
■
■
■
■
■
■
■
■
■
■
■
■
■
■
■
■
■
■
■
■
■
■
■
■
■
■
■
■
■
■
■
■
■
■
■
■
■
■
■
■
■
■
■
■
■
This operation must be carried out when using the printer for the first time. Aligning the
print head positions allows you to print without shifts in the colour registration.
■ Aligning the Print Head - Windows
1 Click Start and select Printers in
Settings.
2 Click the icon for your printer.
3 Open the File menu and select:
• Windows 95/Windows 98/
Windows Me → [Properties]
• Windows 2000 → [Printing Preferences...]
• Windows NT 4.0 → [Document Defaults...]
to open the setting screen.
4 Click OK.
5 Click the Maintenance tab, and click
the Print Head Alignment icon.
6 Check that paper is loaded in the
printer and click OK. If a message
warning you not to perform other
operations appears, click OK.
7 After the pattern is printed, click Yes.
If the pattern is not printed successfully, open the
front cover and ensure that the ink tanks are
correctly installed.
12
8 Look at the print-out. From the
patterns in Row A, select the most
even, least irregular pattern and enter
the number.
9 In the same way, one by one, select
the most even patterns printed with the
least irregularities from each of Rows
B to F, enter their numbers, and click
OK.
If it is difficult to pick the best pattern on Row F,
pick the setting that produces the least noticeable
vertical white stripes.
Less noticeable
white stripes
More noticeable
white stripes
10 Check that paper is loaded in the
printer and click OK.
11 In the same way, select the best
patterns from Rows G and H, enter
their numbers, then click OK.
The best patterns will be smooth and have no
streaks in the border indicated by the arrows.
13
12 Click OK.
This completes the printer setup. The printer is
now ready to use.
■ Aligning the Print Head - Macintosh
1 Select Page Setup in the File Menu.
2 Click Utilities.
3 Select Test Print from the menu and
click the Print Head Alignment icon.
4 Check that paper is loaded in the
printer and click OK.
If the pattern is not printed successfully, open the
front cover and ensure that the ink tanks are
correctly installed.
5 Look at the print-out. From the
patterns in Row A, select the most
even, least irregular pattern and enter
the number.
14
6 In the same way, one by one, select
the most even patterns printed with the
least irregularities from each of Rows
B to F, enter their numbers and click
Send.
If it is difficult to pick the best pattern on Row F,
pick the setting that produces the least noticeable
vertical white stripes.
Less noticeable
white stripes
More noticeable
white stripes
7 Check that paper is loaded in the
printer and click OK.
8 In the same way, select the best
patterns from Rows G and H, enter
their numbers and click Send.
The best patterns will be smooth and have no
streaks in the border indicated by the arrows.
9 Click Close.
10 Click OK.
This completes the printer setup. The printer is
now ready to use.
15
Basic Operations
• If you detect smoke, unusual smells or strange noises around the printer, immediately
switch the printer off and always unplug the printer.
• To avoid injury, never put your hand or fingers inside the printer while it is printing.
■■ Printing with Windows ■
■
■
■
■
■
■
■
■
■
■
■
■
■
■
■
■
■
■
■
■
■
■
■
■
■
■
■
■
■
■
■
■
■
■
■
■
■
■
■
■
■
■
■
■
■
■
■
■
■
■
■
■
■
■
■
■
■
■
■
■
■
■
■
■
■
■
■
■
■
■
■
■
■
■
■
■
■
■
■
■
■
■
■
■
■
■
■
■
■
■
■
■
■
■
■
■
■
■
■
Adjusting the print settings according to your needs allows you to produce better quality prints.
In this section, we will use WordPad for the purpose of explanation. The procedures you use
and the screens that appear on your computer may differ according to the application that you
use.
■ Printing
1 Print the document from the
application.
On the File menu, click Print.
Check the application’s users manual for the
actual procedures.
2 Ensure your printer is selected, then
click Properties.
3 Specify the required settings and click
OK.
➥Note
If you use anything other than plain paper,
please refer to “Basic Print Settings” on
page 17.
4 To start printing, click OK.
Printing will start in a few moments.
16
■ Basic Print Settings
For the best print quality, specify the minimum requirement settings in the Main tab. To get
the best results, ensure you select the type of media loaded in the printer when printing on
paper other than plain paper.
(5)
(1)
(2)
(3)
(4)
(1) [Media Type]
Select the type of media loaded in the printer.
(2) [Print Quality]
Select one option from High, Standard and Draft. Select Custom to
set the print quality manually.
(3) [Colour Adjustment]
If you wish to control the colour adjustment settings in more detail,
select Manual.
(4) [Help] button
Click this for a more detailed explanation of the functions in this
settings tab. (This may not appear when using Windows 2000 or
Windows NT 4.0. If this happens, click Start then select Programs Canon S600/Canon S630 - Help).
(5) [?] button
Click this to change the cursor shape to ?. By clicking on the item’s
name with this ? cursor, an explanation will be displayed.
➥Notes
• Clicking the Print Advisor allows you to change to the most appropriate print settings
simply by answering questions when prompted.
• Use the application to set the paper size and paper orientation. Before printing, open
the settings screen and check that the Page Size in the Page Setup tab is the same as
that specified within application.
• Refer to the User’s Guide for more information about printer driver functionality.
17
■■ Printing with Macintosh ■
■
■
■
■
■
■
■
■
■
■
■
■
■
■
■
■
■
■
■
■
■
■
■
■
■
■
■
■
■
■
■
■
■
■
■
■
■
■
■
■
■
■
■
■
■
■
■
■
■
■
■
■
■
■
■
■
■
■
■
■
■
■
■
■
■
■
■
■
■
■
■
■
■
■
■
■
■
■
■
■
■
■
■
■
■
■
■
■
■
■
■
■
■
■
■
Adjusting the print settings according to your needs allows you to produce better quality prints.
■ Printing
1 Open the Page Setup dialog box in
your application.
On the File menu, click Page Setup. Check the
application’s users manual for the actual
procedures.
2 Specify the page setup.
For details, refer to “Page Setup” on page 19.
3 Open the Print dialog box in your
application to print the document.
On the File menu, click Print. Check the
application’s users manual for the actual
procedures.
4 Specify the print settings according to
your requirements.
For details, refer to “Basic Print Settings” on
page 19.
5 Click the Print button.
Printing will start in a few moments.
18
■ Page Setup
Use the Page Setup dialog box to specify the paper size settings.
Select paper
size you wish
to use.
■ Basic Print Settings
For the best print quality, specify the minimum requirement settings in the Print dialog box.
To get the best results, ensure you select the type of media loaded in the printer when
printing on paper other than plain paper.
(3)
(2)
(1)
(1) [Media Type]
Select the type of media loaded in the printer.
(2) [Print Mode]
Select the icon closest to the type of document you want to print.
To specify more detailed settings for the print quality or colour, select
Manual
and click Details.
(3) [Print] button
Click this to start printing.
➥Note
• See Balloon Help for more information about other printer driver functions.
Select Show Balloons in the Help menu for an explanation of each of the items in the
setting screen. To see the explanation, point to the item with the mouse.
• Refer to the User’s Guide for more information about printer driver functionality.
19
Print Head Maintenance
■ If Blurring Occurs or If a Specific Colour Does Not Print
Perform print head cleaning to improve the print quality. Ensure that the printer is turned
on and follow the instructions below.
• Windows
Open the printer driver settings screen and click the Maintenance tab. Click the Cleaning icon.
See page 12 for details on how to open the setting screen.
• Macintosh
Open the Page Setup dialog box and click the Utilities button. Click the Cleaning icon.
■ When the Printer Runs out of Ink
Replace the empty ink tank with a new one.
Specify the following ink tanks when purchasing.
Yellow
Magenta
Cyan
Black
BCI-3eY
BCI-3eM
BCI-3eC
BCI-3eBK
1 Open the front cover and remove the
empty ink tank.
Do not touch the lock lever.
2 Install the new ink tank.
Close the front cover when finished.
➥Note
For more details about maintenance, refer to
the User’s Guide.
20
Notes on Handling the USB Interface (for Windows Users)
If installation of the printer driver does not proceed as instructed in this Quick Start Guide,
there may be a problem with the USB driver installation.
Try reinstalling the printer driver.
■ Reinstalling
If you cannot proceed beyond the Printer Port screen:
1 Click Cancel.
2 When the Abort Installation screen is
displayed, click Abort.
3 When the Terminate Installation screen
is displayed, click OK.
4 Turn the printer off.
5 Reinstall the printer driver (see page 8).
If the installation still does not proceed as instructed, check the status of the USB driver
following the procedures described below.
■ Checking the USB Driver Status
1 Ensure the computer and printer are
connected using the USB cable and that
the printer is turned on.
2 Select Start, Settings and Control Panel.
3 Double-click System.
If displayed with an exclamation
mark ( ! )
If the System icon is not displayed for
Windows Me users, click on view all Control
Panel options on the left-hand side of the screen.
4 Click the Device Manager tab.
For Windows 2000, click the Hardware tab then
click Device Manager.
5 Double-click Universal Serial Bus
controllers.
6 Check that Canon S600/Canon S630 is
displayed.
If Other Devices is displayed
• If displayed, installation is complete.
• If displayed with an exclamation mark (!),
installation was not successful. Delete and
reinstall.
• If nothing is displayed or Other Devices is
displayed instead, installation was not
successful. Delete and reinstall.
Refer to the User’s Guide for details on how to
delete unknown devices.
21
For Further Details...
For more information, place the Setup Software & User’s Guide CD-ROM in the CD-ROM
drive.
■ User’s Guide Contents
The “User’s Guide” is in PDF format and can be found on the same CD-ROM as the printer
driver. You can view this Guide on screen and print out any sections you require.
Contents
• Printer parts and their functions
• Printer driver functions
• Routine maintenance
• Printing media
• Troubleshooting
• Specifications
■ How to View the User’s Guide
For Windows
(1) Load the CD-ROM in your computer.
(2) Click View Documentation.
If Acrobat Reader is not installed or
Acrobat Reader 4.0 is installed, a
message appears. Click Yes. Follow
the instructions on screen to install
the program. The User’s Guide will
appear once installation is complete.
For Macintosh
(1) Load the CD-ROM in your computer.
If Acrobat Reader 3.0 or later is not
already installed, double-click the
Acrobat Reader 4.0 folder in the CDROM folder, then double-click
Reader 4.0 Installer. Follow the
instructions on the screen to install
Acrobat Reader.
(2) Double-click the Manual folder.
(3) Select a language folder.
(4) Double-click the icon for the
S630_UG_UK.PDF file.
■ BJ Printer Driver Systems Requirements
For Windows
• Windows 95, Windows 98, Windows Me, Windows NT 4.0, Windows 2000
• USB interface or standard 25 pin parallel interface
* For the USB interface, use a computer on which Windows 98, Windows Me or
Windows 2000 has been preinstalled (including computers preinstalled with
Windows 98, Windows Me upgraded to Windows 2000).
• 12MB of available hard-disk space for Windows 95/Windows 98/Windows Me
• 25MB of available hard-disk space for Windows NT 4.0/Windows 2000
• 16MB of available RAM
For Macintosh
• Macintosh series computer equipped with USB interface
• Preinstalled Mac OS 8.1 or later
• 21MB of available hard-disk space (including temporary storage space)
• 10MB of available RAM (unused block)
Additional Systems Requirements for User's Guide
To install Adobe Acrobat Reader and view the User's Guide:
• 8MB of available hard-disk space for Windows
• 13MB of available hard-disk space for Mac OS
• 640 x 480 pixels or greater, minimum 256 colours video display
22
CANON INC.
30-2, Shimomaruko 3-chome, Ohta-ku, Tokyo 146-8501, Japan
CANON COMPUTER SYSTEMS, INC.
2995 Redhill Ave., Costa Mesa, CA 92626, U.S.A.
CANON CANADA INC.
6390 Dixie Road, Mississauga, Ontario, L5T 1P7, Canada
CANON EUROPA N.V.
P.O.Box 2262, 1180 EG, Amstelveen, The Netherlands
CANON (UK) LTD.
Woodhatch, Reigate, Surrey, RH2 8BF, United Kingdom
CANON FRANCE S.A.
17, Quai du Président Paul Doumer, 92414 Courbevoie Cedex, France
CANON DEUTSCHLAND GMBH
Postfach 528, 47705 Krefeld, Germany
CANON LATIN AMERICA, INC.
6505 Blue Lagoon Drive Suite 325, Miami, Florida 33126 U.S.A.
CANON HONGKONG COMPANY LTD.
9/F, The Hong Kong Club Building, 3A Chater Road, Central, Hong Kong
CANON SINGAPORE PTE., LTD.
79 Anson Road #09-01/06, Singapore 079906
CANON AUSTRALIA PTY. LTD.
1 Thomas Holt Drive, North Ryde, Sydney, N.S.W. 2113, Australia
QA7-1589-V01
12345678
©CANON INC.2001
PRINTED IN THAILAND