1
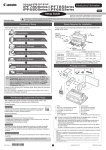
Introductory Information
ENG
Setup Guide
Read this manual before attempting to operate the printer.
Keep this manual in a handy location for future reference.
Introduction
Overview of Setup
Space Required for Installation
These are the steps in printer installation.
Preparations
+300mm
(P.2)
+300mm
+150mm
Install the Printheads
(P.3)
+800mm
Install the Ink Tanks
(P.4)
+150mm
Printer
Installation space (W x D x H mm)
Printer alone
iPF6300/
iPF6350 With stand attached
Install the Printer Driver and
the User Manual
(P.4)
1477 × 1770 × 644 mm
1477 × 1970 × 1291 mm
• A space of 1300 mm in the front and 700 mm in the back are needed
to print from the front paper feed slot.
Caution
Load Paper to Adjust the Printheads (P.12)
Package Contents
• Even if you do not use the printer driver, be sure to install Media
Configuration Tool from the provided User Software CD-ROM.
With Media Configuration Tool, the paper types that are available
in your area can be registered to the printer. For instructions on
installation, refer to "Install the Printer Driver and the User Manual"
on page 4. (In Windows, select Install Individual Software in the
Setup Menu window to install Media Configuration Tool only.)
b
h
c
k
i
j
d
MEMO
• We recommend doing a color calibration after completing the
setup to adjust variations in the colors.
l
Details for each step are given in this Setup Guide. Simply follow the instructions
to install the printer.
If an error message is displayed during setup or other problems occur, refer to
"Responding to Messages" on page 12.
e
Printer Documentation
f
After installing the printer as shown in this Setup Guide, refer to the
documentation for instructions on operation and maintenance.
m
g
a
Daily operation
The Basic Guide includes three booklets containing the following
information:
1 Instructions on basic operation
2 Troubleshooting tips and maintenance procedures
3 Preparations for transferring the printer, and instructions for
reinstalling the printer driver
Detailed instructions
The User Manual (electronic manual) includes the following information:
• Printer operating instructions
• Printer driver instructions
• Printing instructions
• Maintenance procedures
• Instructions for network printing
• Troubleshooting tips
• Printer menu descriptions
• Printer driver function details
• Specifications, details on
consumables and optional
accessories, and other
information
a. Printer
g. Roll holder
b. Spacer for borderless printing
h. Set of printer documentation
c. 3-inch paper core attachment
i. Set of CD-ROMs
d. Starter ink tanks
j. Setup Guide (this document)
(Y, PC, C, PGY, GY, BK, PM, M,
k. Power cord
MBK, R, G, B)
l. Printhead (x2)
e. 2-inch paper holder stopper
m. Sample paper
f. 3-inch paper holder stopper
MEMO
Supported paper
The Paper Reference Guide (electronic manual) provides information
about paper.
• Some of the items included in the package are not explained in this
Setup Guide, such as the spacer for borderless printing.
Keep these items in a safe place after setup because they are used in
various printing applications.
• For instructions on using items not described in this manual, refer to the
User Manual.
• A cable to connect the printer to a computer is not provided with the
printer.
You can access the User Manual and Paper Reference Guide as follows:
• Canon, the Canon logo, and imagePROGRAF are trademarks or registered trademarks of CANON
INC.
• Microsoft and Windows are trademarks of Microsoft Corporation, registered in the U.S. and other
countries.
• Macintosh is a trademark of Apple Inc., registered in the U.S. and other countries.
• All other trademarks or registered trademarks described in this Setup Guide are the property of their
respective owners.
• In Windows, double-click the iPFxxxx Support desktop icon. (iPFxxxx
represents the printer model.)
• In Mac OS X, click iPF Support, added to the Dock.
QT5-2356-V1
1
©CANON INC. 2010
Printed in JAPAN
Preparations
1
Prepare the printer for use by installing it and connecting the power cord.
2
Install the printer. You can use the
following two methods for installing the
printer.
Remove the printer from the box and
remove the packing materials from the
top of the printer.
3
• Install with the optional stand
Assemble the stand and install the
printer referring to the Printer Stand
Setup Guide included with the stand.
After installation, proceed to step 4.
At least three people are needed to lift the
printer by its carrying handles (a), located
under its right and left ends, and to place
it on a table or other flat surface.
The printer weighs 51 kg and requires at
least three people to lift it by its carrying
handles (a) under its right and left ends.
• Install without a stand on a table
Proceed to step 2.
MEMO
• The stand is a standard accessory
in some locations.
a
4
Remove all the orange tape from the roll
feed unit (a). Remove the roll holder (b)
from the roll feed unit (a) and remove the
protective materials and all the orange
tape on the two holder stoppers (c).
5
Remove the orange tape on the top cover
(a) and the ejection guide (b) and all the
packing materials.
After removing the orange tape and
packing material from inside the ejection
guide (b), reattach it.
b
6
a
Lift the belt stopper (b) from the carriage
shaft (a) and pull it towards you to remove
it.
b
a
a
a c
b
MEMO
7
Close the top cover.
8
Plug the power cord into the power supply
connector on the back of the printer and
plug the other end into an electric outlet.
2
• The belt stopper is used when
transporting the printer. Keep
the belt stopper after removing
it, in case the printer needs to be
moved again.
Install the Printheads
1
Press the Power button to turn on the
printer.
Install both printheads.
2
When the following screen appears, use
the ▲ and ▼ keys to select a language
and press OK.
Language
3
Select your local time zone and press
OK.
㪈㪆㪉
Time Zone
English
ᣣᧄ⺆
Français
Italiano
Deutsch
4
When the display screen shows Open
Upper Cover, open the top cover.
7
Hold the printhead by the grips (a) as you
remove it from the pouch.
㪈㪆㪌
0:London (GMT)
+1:Paris,Rome
+2:Athens,Cairo
+3:Moscow
+4:Eerevan,Baku
5
Pull the printhead fixer lever forward all
the way to open it completely.
6
Lift the printhead fixer cover to open it
fully.
8
Remove the orange protective part (a). To
remove the other orange protective part
(b), push the grip (c) as you remove it.
9
Insert the printhead into the carriage (b)
with the ink holes (a) up and facing the
front of the printer as shown in the figure.
Carefully push the printhead firmly into
the carriage (b), ensuring that the parts
that were covered by the protective parts
do not touch the carriage (b).
b
a
c
a
a
a
• Never touch the parts covered by the
protective parts. Doing so may damage
the printhead and affect printing quality.
• The printhead contains ink, so be
careful not to spill it once the protective
parts are removed.
• Do not reattach the protective parts
after removing them. Dispose of these
materials according to local regulations.
10
Pull the printhead fixer cover down toward
the front to lock the printhead in place.
11
Press the printhead fixer lever inwards
until it clicks into place.
b
12
Repeat steps 5 to 11 to install the second
printhead set.
Close the top cover.
The display screen shows Open tank
cover and install all ink tanks. Install the
ink tanks.
3
Install the Ink Tanks
1
Load all 12 ink tanks.
2
Open the ink tank cover.
While pressing the stopper of the ink tank
lock lever inwards, open the ink tank lock
lever upwards.
3
Shake each ink tank gently 7 to 8 times
before opening its pouch.
• Failure to shake the ink tanks may
result in reduced print quality because
ink ingredients have settled on the
bottom of the tank.
4
Open the pouch and remove the ink tank.
• Never touch the ink holes (a)
or metal contacts (b). Touching
these parts may cause stains,
damage the ink tank, and affect
print quality.
6
Close the ink tank lock lever until it clicks
into place. Make sure the ink lamp lights
red.
a
b
• Avoid dropping the ink tank after removing
it from the pouch. Otherwise, ink may leak
and cause stains.
• Do not remove ink tanks to shake them
after they have been installed. Doing so
may cause ink to spill.
7
5
Insert the ink tank into the holder oriented
as shown, with the ink holes down.
Repeat steps 2 to 6 to install each of the
ink tanks.
Close the ink tank cover.
• If the ink tank does not fit in the holder,
make sure the color of the ink tank lock
lever matches the color of the ink tank,
and check the orientation of the ink
tank.
After all the ink tanks have been installed, the
printer automatically starts charging the system
with ink. Charging the system with ink for the
first time takes about 20 minutes. Use this time
to install the printer driver and manuals on your
computer. If you decide to install the printer
driver and manuals later, wait for the system to
be charged with ink and then proceed to page
12 "Load Paper to Adjust the Printheads".
• If the ink lamp is not lit, repeat steps 2,
5, and 6.
MEMO
During printer installation, ink fills the
system between the ink tanks and
printheads. The ink level quickly falls to
80% (40% for starter ink tanks), this is
normal.
Install the Printer Driver and the User Manual
Windows
MEMO
You can print from Windows via USB or TCP/IP (network) connections.
The installation procedure varies depending on how your printer is
connected. Install the printer driver and the User Manual as follows.
The following screen may be displayed during installation depending on
the security settings of your computer.
• Select Deactivate the block and click Next.
<Compatible Operating Systems>
Windows 7, Windows Vista, Windows Server 2008, Windows Server
2003, Windows XP, Windows 2000
• Installation requires administrative rights (such as those of
Administrator). Be sure to log on using an account with administrative
rights before installation.
4
For USB connections
• Use a USB cable that conforms to the
Hi-Speed USB specification.
• Connect the USB cable to the printer
according to the on-screen instructions
during installation of the printer driver.
If you connect the USB cable before
installing the printer driver, the printer
driver may not be installed correctly.
1
After making sure the printer is not
connected to the computer, turn the
computer on. Insert the provided User
Software CD-ROM for your operating
system in the CD-ROM drive.
2
MEMO
3
Confirm that the required installation
items are selected in the Installation List
window, and then click Next.
MEMO
6
4
In the Select Country or Region of Use
window, select the country or region of
use and click Next.
5
In the Setup Menu window, click Install
Printer Driver.
• To choose a different language, click
Language.
After reading the license agreement, click
Yes.
• Point at a software title to view a
summary of the software.
In the Printer Selection window, select
The printer is connected directly to a
computer and click Next.
7
In the Printer Installation dialog box,
select Install with USB Connection, and
click Next.
8
MEMO
9
After reviewing the installation results in
the Complete Installation window, click
Next.
When the following dialog box is
displayed, make sure the printer is on and
use the USB cable to connect the printer
to the computer.
• If a warning message is displayed, click
Retry to try again.
10
In the Finish window, select Restart my
computer now and click Restart.
13
Click Next.
• Be careful not to insert the USB cable
into the Ethernet port.
Install the User Manual
11
The printer driver settings take effect after
the computer restarts. This completes
printer driver installation.
An iPFxxxx Support desktop icon
is created after installation. (iPFxxxx
represents the printer model.)
Next, install the User Manual.
12
When the Install User Manual dialog
box is displayed, insert the provided User
Manuals CD-ROM in the CD-ROM drive
and click Next.
5
14
After reading the software license
agreement, select I accept the terms of
the license agreement, and then click
Next.
15
Click Install.
The installation process begins.
16
After installation is completed, click
Finish.
The User Manual is now installed.
After you have finished setting up the printer and installing the printer driver and User Manual, we recommend performing color calibration. Color
calibration compensates for changes in color from individual variation among printheads or from the printing environment, ensuring better color
consistency. Perform color calibration using the provided Sample Paper, which is compatible with this process. For information on other compatible
paper, refer to the Paper Reference Guide.
(settings/adj. tab) and select Adjust Printer - Calibration - Auto Adjust.
During color calibration, on the control panel's display screen, open
The process of color calibration takes about ten minutes.
MEMO
For TCP/IP (network) connections
When you first connect the printer to the network
1
3
MEMO
6
Use the LAN cable to connect the LAN
port on the back of the printer to the hub
port.
In the Setup Menu window, click Install
Printer Driver.
• To choose a different language, click
Language.
After reading the license agreement, click
Yes.
MEMO
• If the printer is on, the Link indicator
under the LAN port lights.
1000Base-T
connection
100Base-TX
connection
10Base-T
connection
4
MEMO
7
2
The top and bottom LEDs
light.
The LED on the bottom
lights green.
The LED on the top lights
orange.
Confirm that the required installation
items are selected in the Installation List
window, and then click Next.
5
Make sure the printer is on.
Turn the computer on and insert the
provided User Software CD-ROM for
your operating system in the CD-ROM
drive.
In the Select Country or Region of Use
window, select the country or region of
use and click Next.
• Point at a software title to view a
summary of the software.
In the Printer Selection window, select
The printer is connected to computers
in a network and click Next.
6
8
After reading the precautions in the
Getting Ready window, select Find
available printers in the network and
click Next.
9
10
11
Available printers are listed in the Search Results window.
Select a printer from the list on either their IPv4 Devices or IPv6
Devices tabs and click Next.
MEMO
In the Method of Configuring IP Addresses window, enter the IP
address in Configure manually, under Method of Configuring
IP Addresses. Click Install to start the installation process. Also
enter your preferred name for the printer in Device Name and the
installation location in Printer Location under Information About
Printer to Configure, as desired.
The installation process begins.
After reviewing the installation results in
the Complete Installation window, click
Next.
12
• The IPv6 Devices tab is displayed in Windows 7, Windows Vista, and
Windows Server 2008.
• If the printer you want to use is not displayed in the list on the IPv6
Devices tab, connect via IPv4 instead.
• If the printer you want to use is not displayed in the list of printers on
the IPv4 Devices tab, refer to "When the printer cannot be found on the
network" on page 7 to setup and configure an IP address for the printer.
• If you use a DHCP server for automatic assignment of the printer's IP
address, printing may no longer be possible after the printer is turned off
and on. This is because a different IP address has been assigned. When
using DHCP server functions, consult your network administrator and
configure the settings in one of the following ways:
• Configure the setting for dynamic DNS updating
In the printer menu, either set DNS Dync update to On, or activate the
setting Enable DNS Dynamic Update in RemoteUI.
(→"Menu Settings", User Manual)
(→"Configuring the Printer's TCP/IP Network Settings", User Manual)
• Configure the setting for assignment of the same IP address each time
the printer starts up
In the Finish window, select Restart my
computer now and click Restart.
13
The printer driver settings take effect after
the computer restarts. This completes
printer driver installation.
An iPFxxxx Support desktop icon
is created after installation. (iPFxxxx
represents the printer model.)
Next, follow steps 12-16 on pages
5-6 to install the User Manual.
When the printer cannot be found on the network
1
On the tab selection screen of the control
panel, press the
and
keys to select
(settings/adj. tab) and press OK.
▲
▲
If your printer cannot be found when connecting to
the network for the first time, setup an IP address
for the printer and then configure it on the printer.
When ink fills the system for the first time, after
printhead adjustment is finished, specify the IP
address on the printer's control panel.
No Paper Loaded
OK:Setting/Adj. Menu
Maint. cart.
Remaining Amount
㪈㪇㪇㩼
1.Select IPv4 and press OK.
2.Select IPv4 Settings and press OK.
3.Select IP Address and press OK.
4.Enter the IP address.
MEMO
How to enter IP addresses
1. Press the
and
keys to select a
field for inputting values.
2. Use the ▲ and ▼ keys to input values.
• Pressing ▲ increases the value by
one.
• Pressing ▼ decreases the value by
one.
• Holding down either the ▲ or ▼ keys
continually increases or decreases
the value.
3. Press OK once you have finished.
▲
4
Enter the IP address. Navigate through
the following menus using the ▲ and ▼
keys on the control panel.
▲
• When ink fills the system for the first time,
do not operate the printer until printhead
adjustment is finished.
7
2
Use the ▲ and ▼ keys to select Interface
Setup and press OK.
3
Use the ▲ and ▼ keys to select TCP/IP
and press OK.
5
Press Menu.
6
Press OK on the registration confirmation
message that appears.
The IP address is set on the printer.
Next, restart installation of the printer
driver.
7
In the Search Results window, select
Specify the IP address of available
printers in the network and click Next.
The IP Address Specification window
appears. Follow steps 8-11 on page 9 to
finish installing the printer driver.
MEMO
• If the following screen appears, click
Retry and select Specify the IP
address of available printers in
the network on the next screen that
appears.
If the printer is already connected to the network
• If the printer is already connected to
the network, confirm the IP address
assigned to the printer. Ask your
network administrator for further
information.
MEMO
2
MEMO
5
8
10
In the Setup Menu window, click Install
Printer Driver.
• To choose a different language, click
Language.
After reading the license agreement, click
Yes.
Available printers are listed in the Search
Results window.
Select a printer from the list on either their
IPv4 Devices or IPv6 Devices tabs and
click Next.
The installation process begins.
In the Finish window, select Restart my
computer now and click Restart.
3
6
4
In the Select Country or Region of Use
window, select the country or region of
use and click Next.
• Point at a software title to view a
summary of the software.
In the Printer Selection window, select
The printer is connected to computers
in a network and click Next.
MEMO
11
The top and bottom LEDs
light.
The LED on the bottom
lights green.
The LED on the top lights
orange.
Confirm that the required installation
items are selected in the Installation List
window, and then click Next.
MEMO
Make sure the printer is on.
Turn the computer on and insert the
provided User Software CD-ROM for
your operating system in the CD-ROM
drive.
• If the printer is on, the Link indicator
under the LAN port lights.
1000Base-T
connection
100Base-TX
connection
10Base-T
connection
Next, follow steps 12-16 on pages
5-6 to install the User Manual.
1
• The IPv6 Devices tab is displayed
in Windows 7, Windows Vista, and
Windows Server 2008.
• Printers already connected to the
network are labeled Available in IP
Address Status.
• If the printer you want to use is not
displayed in the list of printers, select
Specify the IP address of available
printers in the network and click Next.
The IP Address Specification window
appears. Follow steps 8-11 on page 9 to
finish installing the printer driver and the
User Manual.
The printer driver settings take effect after
the computer restarts. This completes
printer driver installation.
An iPFxxxx Support desktop icon
is created after installation. (iPFxxxx
represents the printer model.)
Next, follow steps 12-16 on pages 5-6 to
install the User Manual.
8
7
9
After reading the precautions in the
Getting Ready window, select Find
available printers in the network and
click Next.
After reviewing the installation results in
the Complete Installation window, click
Next.
When entering the printer's IP address manually
• If the printer is already connected to
the network, confirm the IP address
assigned to the printer. Ask your
network administrator for further
information.
MEMO
The top and bottom LEDs
light.
The LED on the bottom
lights green.
The LED on the top lights
orange.
Confirm that the required installation
items are selected in the Installation List
window, and then click Next.
MEMO
6
Make sure the printer is on.
Turn the computer on and insert the
provided User Software CD-ROM for
your operating system in the CD-ROM
drive.
2
In the Setup Menu window, click Install
Printer Driver.
• If the printer is on, the Link indicator
under the LAN port lights.
1000Base-T
connection
100Base-TX
connection
10Base-T
connection
3
1
MEMO
4
In the Select Country or Region of Use
window, select the country or region of
use and click Next.
5
• To choose a different language, click
Language.
After reading the license agreement, click
Yes.
• Point at a software title to view a
summary of the software.
In the Printer Selection window, select
The printer is connected to computers
in a network and click Next.
7
After reading the precautions in the
Getting Ready window, select Specify
the IP address of available printers in
the network and click Next.
8
In the IP Address Specification window,
select either IPv4 Address or IPv6
Address to enter the printer's IP address
and click Install.
The installation process begins.
MEMO
• IPv6 Address is displayed in Windows
7, Windows Vista, and Windows Server
2008.
• Ask your network administrator for the
IP address, as needed.
9
After reviewing the installation results in
the Complete Installation window, click
Next.
10
In the Finish window, select Restart my
computer now and click Restart.
11
The printer driver settings take effect after
the computer restarts. This completes
printer driver installation.
An iPFxxxx Support desktop icon
is created after installation. (iPFxxxx
represents the printer model.)
Next, follow steps 12-16 on pages 5-6 to
install the User Manual.
9
Macintosh
You can print from Macintosh via USB or network connections such as
Bonjour or IP.
Install the printer driver that suits your printing environment.
<Compatible Operating Systems>
Mac OS X 10.3.9 or later
Connect the printer to a computer
Connect the cable
1
Use a cable to connect the printer to a computer or the network.
• For USB connections
MEMO
2
Make sure the printer is on.
Turn the computer on.
2
On the desktop, double-click the CD-ROM
icon and then the iPF Printer Setup icon.
• For network connections
• Be careful not to insert the USB cable into the Ethernet port.
Configure the computer
Install the printer driver
• Be sure to log in as a user with
administrative rights when installing the
printer driver.
1
Insert the provided User Software
CD-ROM for your operating system in the
CD-ROM drive.
User Software
3
If the following screen is displayed, enter
the user name and password of a user
with administrative rights and click OK.
6
Click Next.
9
Click Continue.
4
Confirm that the required installation
items are selected, and then click Next.
5
Select the country or region where the
printer will be used and click Next.
7
After reading the software license
agreement, click Continue.
8
Click Agree.
10
Exit other applications and click Continue.
Items selected in step 4 are installed.
10
11
Click OK.
12
Click Quit.
14
Select the printer to setup and
click Next.
MEMO
This completes printer driver installation.
Next, select the printer to set up.
15
After entering your preferred name for
the printer in Printer Name and the
installation location in Location, click
Register.
• To register the printer by entering its IP
address, click Registering IP Address.
Enter the IP address of the desired
printer in IP Address and click Next.
13
16
MEMO
Click Next.
Click Finish.
• To register another printer, click
Continue Registration, and repeat
steps 14 to 16.
Install the User Manual
17
MEMO
20
23
26
Click OK.
18
The following screen is displayed and
paper information is updated. When the
paper information has been updated, the
screen is no longer displayed.
19
Next, install the User Manual.
Insert the provided User Manuals
CD-ROM in the CD-ROM drive.
• If the same model of printer is already
registered on the computer, a screen is
displayed for printer selection. Select
the desired printer and click Next.
Double-click the iPFxxxx Manual
Installer icon on the CD-ROM. (iPFxxxx
represents the printer model.)
After reading the software license
agreement, click Continue.
21
24
After installation is completed, click Quit.
MEMO
Select the region where the printer will
be used and the language of the user
manual to install, and then click OK.
Click Agree.
22
Check the message and click Continue.
25
Click Install.
After you have finished setting up the printer and installing the printer driver and User
Manual, we recommend performing color calibration. Color calibration compensates for
changes in color from individual variation among printheads or from the printing environment,
ensuring better color consistency. Perform color calibration using the provided Sample Paper,
which is compatible with this process. For information on other compatible paper, refer to the
Paper Reference Guide.
(settings/adj. tab)
During color calibration, on the control panel's display screen, open
and select Adjust Printer - Calibration - Auto Adjust. The process of color calibration takes
about ten minutes.
The User Manual is now installed.
11
Load Paper to Adjust the Printheads
1
As the system is charged for the first time,
Select type of paper for printhead adj.
appears on the display screen. Use the
▲ and ▼ keys to select Roll Paper and
then press OK.
2
Follow these steps to load the provided sample paper for printhead adjustment.
Remove the 2-inch paper holder stopper
(a) and the 3-inch paper holder stopper (b)
from the roll holder.
a
3
Lift the end of the paper roll and slide it
onto the roll holder from the left. Insert the
roll holder all the way until the flange (a)
on the roll holder is securely against the
roll of paper. If it is not in firm contact with
the paper, feeding problems may occur.
b
a
• We recommend wearing clean
cotton gloves when handling rolls
of paper to protect the printable
surface.
4
Slide the holder stopper for the 2-inch
paper core onto the roll holder from the
left until its flange (a) is against the roll of
paper.
5
6
Open the roll feed unit cover.
Hold the flange (a) of the roll holder and
align its axis with the left and right guide
grooves (b) in the roll holder slots. Make
sure that the colors of the guide grooves
and the roll holder axis are the same
before loading the paper.
c
b
c
a
b
a
Caution
7
Insert the edge of the paper into the
paper feed slot (a) and feed it until you
hear the paper start to feed. The paper
starts feeding.
8
The screen for selecting the paper type
is shown on the display screen. Press ▲
or ▼ to select the type of paper loaded in
the printer.
Select Coated Paper and press OK.
Then from the menu that appears, select
HW Coated and press OK.
• Be careful to not pinch your fingers
between the axis of the roll holder (c)
and the guide grooves (b) when loading
paper.
The printhead position adjustment starts
automatically.
Adjusting the position of the printhead
takes about 14 minutes.
When the printhead adjustment is
finished, Ready appears on the display
screen.
Printer setup is now complete.
a
Close the roll feed unit cover.
Responding to Messages
Error messages may appear on the display screen of the control panel during printer installation. If so, it may not indicate a problem with the printer, and the issue
may be easily resolved. Common messages and the causes are listed here with corrective actions. To respond to error messages other than these, refer to the
Basic Guide (2). For other detailed printer instructions, refer to the User Manual installed at "Install the Printer Driver and the User Manual".
Message
Cause
Corrective Action
Paper loaded crooked.
The loaded paper is crooked.
Adjust the paper. (see steps 7-8 on page 12)
No maintenance cartridge installed.
The maintenance cartridge is not connected.
Install the maintenance cartridge correctly.
Roll paper is not securely in contact with roll
holder.
The roll of paper was not firmly pushed against the
roll holder when the paper was loaded.
Reload the roll of paper. (see steps 2-7 on page 12)
Hardware error. xxxxxxxx-xxxx
(x represents a letter or number)
The belt stopper or the tape inside the top cover has
not been removed.
Turn off the power, open the top cover, and remove the tape
and the belt stopper, then turn the power on.
You may have encountered an error that cannot be
resolved.
Turn off the printer and wait at least three seconds before
restoring the power.
If the message appears again, write down the error code and
message, turn off the printer, and contact your Canon dealer
for assistance.
You may have encountered an error that cannot be
resolved.
Write down the error code and message, turn off the printer,
and contact your Canon dealer for assistance.
ERROR Exxx-xxxx
(x represents a letter or number)
12