1
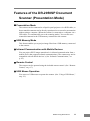
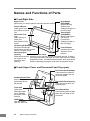
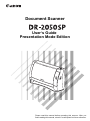
Document Scanner User’s Guide Presentation Mode Edition Please read this manual before operating this scanner. After you finish reading this manual, store it in a safe place for future reference. FCC REGULATIONS (For 120 V model) Document Scanner, Model M11060 This device complies with Part 15 of the FCC Rules. Operation is subject to the following two conditions: (1) This device may not cause harmful interference, and (2) this device must accept any interference received, including interference that may cause undesired operation. Note: This equipment has been tested and found to comply with the limits for a Class B digital device, pursuant to Part 15 of the FCC Rules. These limits are designed to provide reasonable protection against harmful interference in a residential installation. This equipment generates, uses, and can radiate radio frequency energy and, if not installed and used in accordance with the instructions, may cause harmful interference to radio communications. However, there is no guarantee that interference will not occur in a particular installation. If this equipment does cause harmful interference to radio or television reception, which can be determined by turning the equipment off and on, the user is encouraged to try to correct the interference by one or more of the following measures: - Reorient or relocate the receiving antenna. - Increase the separation between the equipment and receiver. - Connect the equipment into an outlet on a circuit different from that to which the receiver is connected. - Consult the dealer or an experienced radio/TV technician for help. Use of shielded cable is required to comply with class B limits in Subpart B of Part 15 of FCC Rules. Do not make any changes or modifications to the equipment unless otherwise specified in the manual. If such changes or modifications should be made, you could be required to stop operation of the equipment. Canon U.S.A. Inc. One Canon Plaza, Lake Success NY 11042, U.S.A. Tel. No. (516)328-5000 RADIO INTERFERENCE REGULATIONS (For 120 V models) This digital apparatus does not exceed the Class B limits for radio noise emissions from digital apparatus as set out in the Interference-causing equipment standard entitled “Digital Apparatus”, ICES-003 of the Industry Canada. RÈGLEMENT SUR LE BROUILLAGE RADIOÉLECTRIQUE (For 120 V models) Cet appareil numérique respecte les limites de bruits radioélectriques applicables aux appareils numériques de Classe B prescrites dans la norme sur le matériel brouilleur: “Appareils Numériques”, NMB-003 édictée par l’Industrie Canada. i Copyright Copyright 2007 by CANON ELECTRONICS INC. All rights reserved. No part of this publication may be reproduced or transmitted, in any form or by any means, electronic or mechanical, including photocopying and recording, or by any information storage or retrieval system without the prior written permission of CANON ELECTRONICS INC. Trademarks Canon and the Canon logo are registered trademarks of Canon Inc. in the United States and may also be trademarks or registered trademarks in other countries. Access and IrFront are trademarks of ACCESS Co., Ltd. in Japan and other countries. Other product and company names herein may be the trademarks of their respective owners. User contract TOPPERS/JSP Kernel Toyohashi Open Platform for Embedded Real-Time Systems/Just Standard Profile Kernel Copyright © 2000-2003 by Embedded and Real-Time Systems Laboratory Toyohashi Univ. of Technology, JAPAN Copyright © 2004-2005 by Embedded and Real-Time Systems Laboratory Graduate School of Information Science, Nagoya Univ., JAPAN The copyright holders mentioned above grant permission for this software (including modified versions of the software) to be used, copied, modified or redistributed (hereinafter referred to as “use”) free of charge except in the following conditions (1) – (4) or if the conditions given in Version 2 of the GNU General Public License publicly announced by the Free Software Foundation have been satisfied. (1) If the software is used as a source code, the names of the previously mentioned copyright holders, usage terms and the following disclaimers must be included in the source code as they are. (2) If the software is redistributed in a form that can be used in the development of other software, such as in the form of a library, the names of the previously mentioned copyright holders, usage terms and the following disclaimers must be included in any documentation accompanying redistribution (users’ manual, etc.). (3) If the software is redistributed in a form that cannot be used in the development of other software, such as preinstalled in devices, any one of the following conditions must be satisfied. (a) The names of the previously mentioned copyright holders, usage terms and the following disclaimers must be included in any documentation accompanying redistribution (users’ manual, etc.). (b) The form of redistribution must be reported to the TOPPERS Project in compliance with separately established laws. (4) The previously mentioned copyright holders and TOPPERS Project shall bear no responsibility for damages that may be directly or indirectly incurred as a result of using the software. The software is not guaranteed. The previously mentioned copyright holders and TOPPERS Project offer no guarantee concerning the software including possible applications. The previously mentioned copyright holders and TOPPERS Project shall furthermore bear no responsibility for damages that may be directly or indirectly incurred as a result of using the software. This software is based in part on the work of the Independent JPEG Group. Other Notices The information given in these Operating Instructions is subject to change without notice. ii Thank you for purchasing the Canon DR-2050SP Document Scanner. The DR2050SP is a compact, sheet-feed type color scanner that can be used in combination with a liquid crystal projector to directly reproduce scanned documents on a screen without going through a computer. Please read this manual thoroughly before using the scanner to familiarize yourself with its capabilities, and to make the most of its many functions. After reading this manual, store it in a safe place for future reference. Refer to this manual (User's Guide Presentation Mode Edition) for instructions on using the DR-2050SP in the presentation mode. For instructions on using the DR-2050SP in the scanner mode, refer to the User's Guide. Scanner mode PC Presentation mode Liquid crystal projector Introduction 1 Chapter Introduction Symbols Used in This Manual The following symbols are used in this manual to explain procedures, restrictions, handling precautions, and instructions that should be observed for safety. (See page xx) This indicates a reference page. The number within the brackets is the page number where the explanation is described. WARNING Indicates a warning concerning operations that may lead to death or injury to persons if not performed correctly. To use the machine safely, always pay attention to these warnings. CAUTION Indicates a caution concerning operations that may lead to injury to persons, or damage to property if not performed correctly. To use the machine safely, always pay attention to these cautions. IMPORTANT Indicates operational requirements and restrictions. Be sure to read these items carefully to operate the machine correctly, and avoid damage to the machine. Note Indicates a clarification of an operation, or contains additional explanations for a procedure. Reading these notes is highly recommended. 2 Introduction Contents Introduction .............................................................................. 1 Symbols Used in This Manual ........................................................ 2 Chapter 1 Before Using the Scanner ................................. 5 Important Safety Instructions ............................................................. 6 Installation Location .................................................................... 6 Power .......................................................................................... 7 Moving the Scanner .................................................................... 7 Remote Control ........................................................................... 8 Handling ...................................................................................... 8 Disposal .................................................................................... 10 Features of the DR-2050SP Document Scanner (Presentation Mode) ................................................................... 11 Names and Functions of Parts ......................................................... 12 Chapter 2 Setting up the Scanner .................................... 15 Connecting the Scanner to the Projector ......................................... 16 Remote Control ................................................................................ 17 Inserting the Batteries ............................................................... 17 Using the Remote Control ........................................................ 17 Scanner Power ................................................................................. 19 Turning the Scanner ON ........................................................... 19 Turning the Scanner OFF ......................................................... 20 Chapter 3 Using the Scanner ............................................ 21 Scanning Documents ....................................................................... 22 Screen Operations ........................................................................... Using the Remote Control ........................................................ Using a USB Mouse ................................................................. Menu Tool Bar .......................................................................... Page Operation ......................................................................... Thumbnail Display .................................................................... Brightness Adjustment .............................................................. Infrared Communication ........................................................... Mode Switching ........................................................................ 23 23 23 23 24 25 26 26 27 Using the USB Memory .................................................................... 28 Reading Images from a USB Memory Device .......................... 28 Saving Data in the USB Memory .............................................. 29 Contents 3 Chapter 4 Scanner Settings .............................................. 31 Making Scanner Settings ................................................................. 32 Available Settings ............................................................................. Scanning Side ........................................................................... Scanning Width ......................................................................... Color Mode ............................................................................... Display Size .............................................................................. Power Save .............................................................................. Projector Type .......................................................................... Language .................................................................................. Quit ........................................................................................... Chapter 5 34 34 34 34 35 35 35 36 36 Troubleshooting ............................................... 39 Clearing Paper Jams ........................................................................ 40 Screen Messages ............................................................................ 41 If Nothing is Displayed on the Screen .............................................. 45 Chapter 6 Appendix ........................................................... 47 Specifications ................................................................................... 48 Scanner .................................................................................... 48 Remote Control ......................................................................... 49 4 Contents Chapter 1 Before Using the Scanner Important Safety Instructions ................... 6 Installation Location ..................................... 6 Power .......................................................... 7 Moving the Scanner .................................... 7 Remote Control ........................................... 8 Handling ...................................................... 8 Disposal ..................................................... 10 Features of the DR-2050SP Document Scanner (Presentation Mode) ............ 11 Names and Functions of Parts ............... 12 Important Safety Instructions To ensure the safe operation of this scanner, be sure to read the safety warnings and precautions described below. Installation Location The performance of this scanner is affected by the environment in which it is installed. Make sure that the location where the scanner is installed meets the following environmental requirements. At least 3.9" (100 mm) At least 3.9" (100 mm) At least 3.9" (100 mm) • Provide adequate space around the scanner for operation and maintenance, and for ventilation. • Provide adequate space behind the scanner in order to eject scanned documents to the front of the scanner. • Avoid installing the machine in direct sunlight. If this is unavoidable, use curtains to shade the scanner. • Avoid locations where a considerable amount of dust accumulates. • Avoid warm or humid locations, such as in the vicinity of a water faucet, water heater, or humidifier, and avoid locations where the fumes from ammonia, paint thinner, or other volatile chemicals may be present. • Avoid locations where ammonia gas is emitted. • Avoid locations near volatile or flammable materials, such as alcohol or paint thinner. • Avoid locations that are subject to vibration. • Avoid exposing the scanner to rapid changes in temperature. If the room in which the scanner is installed is cold but rapidly heated, water droplets (condensation) may form inside the scanner. This may result in a noticeable degradation in scanning quality. The following conditions are recommended for optimal scanning quality: Room temperature: 10 °C to 32.5 °C (50 °F to 90.5 °F) Humidity: 20% to 80% RH • Avoid installing the scanner near equipment that generates a magnetic field (e.g. speakers, televisions, or radios). 6 Before Using the Scanner Power • Connect only to a power outlet of the rated voltage and power supply frequency. (either 120 V, 60 Hz or 220-240 V, 50/60 Hz depending on your region) • Do not connect other electrical equipment to the same power outlet to which the scanner is connected. Also, when using an extension cord, make sure that the extension cord is rated for the current requirements of the scanner. • Never try to disassemble the AC adapter or modify it in any way, as this is extremely dangerous. • The power cord and AC adapter may become damaged if they are often stepped on or if heavy objects are placed on them. Continued use of a damaged power cord and AC adapter can lead to an accident, such as a fire or electrical shock. • Do not use the power cord while it is coiled. • Do not pull directly on the power cord. When disconnecting the power cord, grasp the plug and remove it from the outlet. • Keep the area around the power plug clear of objects so that the power cord can be disconnected easily in an emergency. • Use only the AC adapter provided with this scanner. Also, do not use the AC adapter provided with the scanner with any other electrical devices. Model: MG1-3607 • If you have any questions regarding the power supply, contact your local authorized Canon dealer or service representative for further information. Moving the Scanner • When moving the scanner, always hold it with both hands to avoid dropping it. The scanner weighs approximately 5.7 lb (2.6 kg). • Before moving the scanner, make sure to disconnect the interface cables and AC adapter. If the scanner is transported with these items connected, the plugs and connectors may be damaged due to excessive force applied to them during movement. Before Using the Scanner 7 Remote Control • Do not leave the remote control on the floor, as damage may result if it is stepped on. • Do not disassemble the remote control. • Take care not to misplace the remote control. • Do not drop or cause physical shock to the remote control. • Do not use any remote control other than the one provided with the scanner. Also, do not use the remote control with any other product. • Remove the batteries from the remote control when it is not in use for extended periods of time. • When replacing the remote control batteries, replace both batteries together. • Insert the positive (+) and negative (-) poles of the batteries correctly. • Do not combine old and new batteries, or batteries of different types. • Do not use Ni-Cd or Ni-MH batteries. • Make sure to comply with local regulations when disposing of batteries used for the remote control. Handling WARNING Note the following precautions whenever using the scanner. Failure to do so may result in a fire or electric shock. • Never use alcohol, benzene, paint thinner, aerosol sprays, or any other highly flammable substance near the scanner. • Do not cut, damage, or modify the power cord or AC adapter. Do not place heavy objects on the power cord or AC adapter, and do not pull or excessively bend the power cord. • Never connect the power cord when your hands are wet. • Do not connect the scanner to a multi plug power strip. • Do not knot or coil the power cord as this may result in a fire or electric shock. When connecting the power cord, make sure that the power plug is securely and completely inserted into the power outlet. • Do not use power cords and AC adapters other than the power cord and AC adapter provided with this scanner. • Never try to take the scanner apart or modify it in any way. • Never try to take the AC adapter apart or modify it in any way, as this is dangerous and may lead to a fire or electric shock. • Do not use flammable aerosol sprays products near the scanner. • When cleaning the scanner, turn the power switch OFF and disconnect the power cord from the power supply. • Clean the scanner using a slightly dampened cloth which has been well wrung out. Never use alcohol, benzene, paint thinner, or any other flammable substances. 8 Before Using the Scanner • If the scanner makes strange noises, or gives off, smoke, heat, or strange odors, or the scanner does not function or other abnormalities occur when you use the machine, immediately turn the power switch OFF, and disconnect the power plug from the power outlet. Then, contact your local authorized Canon dealer or the service representative for further information. • Do not drop the scanner, or subject it to impact or strong shock. Should the scanner ever become damaged, immediately turn the power switch OFF, and disconnect the power plug from the power outlet. Then, contact your local authorized Canon dealer or service representative to have the unit serviced. • Before moving the scanner, be sure to turn the power switch OFF, and disconnect the power plug from the power outlet. CAUTION • Do not install the scanner on a surface that is unstable or tilted, or in an area subject to excessive vibrations, as this may cause the scanner to fall, resulting in personal injury or damage to the scanner. • Do not block the ventilation openings. Doing so could cause the scanner to overheat, creating a risk of fire. • Never place small metal objects such as staples, paper clips, or jewelry on the scanner. These items may fall into the scanner, and cause a fire or electric shock. Should such objects ever fall inside the scanner, immediately turn the power switch OFF, and disconnect the power plug from the power outlet. Then, contact your local authorized Canon dealer or service representative to have the unit serviced. • Do not locate the scanner in a humid or dusty location. Doing so might cause fire or electric shock. • Do not place objects on top of the scanner. Such objects may tip or fall over, resulting in personal injury. • To prevent any risk of fire or electric shock, make sure that the power source meets the power requirements of the unit. • When unplugging the power cord, grasp it firmly by its plug. Do not pull directly on the power cord, as this may damage or expose the cord’s internal wiring, resulting in a fire or electric shock. • Leave sufficient space around the power plug so that it can be unplugged easily. If objects are placed around the power plug, you will be unable to unplug it in an emergency. • Do not allow water or flammable substances (alcohol, paint thinner, benzene, etc.) to spill into the scanner, as this may result in a fire or electric shock. • Turn OFF the power switch for safety when not using the Before Using the Scanner 9 scanner for a long period of time, such as overnight. Also, turn OFF the power switch, and disconnect the AC adapter from the scanner and disconnect the power cord from the power outlet for safety when the machine will not be used for an extended period of time, such as during consecutive holidays. • Do not wear loose clothing or jewelry that may get caught in the scanner while you are using it. This may result in personal injury. Be extra careful of neckties and long hair. If anything becomes caught in the scanner, immediately disconnect the power cord to stop the scanner. Disposal • When disposing of this scanner, be sure to follow all local ordinances and laws or consult with the retailer who sold you the scanner. • If you are using the DR-2050SP, make sure to comply with local regulations when disposing of batteries used for the remote control. 10 Before Using the Scanner Features of the DR-2050SP Document Scanner (Presentation Mode) Presentation Mode The scanner can be connected to a liquid crystal projector via a RGB cable, so that scanned documents can be directly reproduced on a screen for presentation without using a computer. (When the scanner is connected to a computer via a USB cable, it is automatically set to the scanning mode.) You can also save scanned documents in the USB memory connected to the scanner. USB Memory Mode This feature enables you to project image files from a USB memory connected to the scanner. Infrared Communication with Mobile Devices You can project JPEG images transferred via infrared communication from a mobile device that supports infrared communication. (The scanner may not be compatible with all mobile devices.) (See “Infrared Communication,” on p. 26.) Remote Control The scanner can be operated using the included remote control. (See “Remote Control,” on p. 17.) USB Mouse Operation You can use a USB mouse to operate the scanner. (See “Using a USB Mouse,” on p. 23.) Before Using the Scanner 11 Names and Functions of Parts Front/Right Side Upper Cover Open when you need to place a document into the scanner. Power Indicator Lights green when the scanner is turned ON. Document Feed Tray Open this tray to place your documents into the feeder. Stop Button (REVERSE) Stops scanning. Switches the displayed image to a previous page. Scan button (FORWARD) Starts scanning the documents. Forward the displayed image to the next page. Infrared Light Sensor Receives infrared light Feed Indicator transmission from the remote Indicates the Feed control or mobile device. Selection Lever Document Eject position. Feed Selection Lever Opening Scanned documents Use this lever to set the way the documents are fed. To feed a multi-page document one page at a time, lower the lever (Page are output to the Separation mode). To feed bound documents, such as invoices, document eject without separating the pages, raise the lever (Bypass mode). opening. Front (Upper Cover and Document Feed Tray open) Document Guide Adapter If documents are skewed, insert the adapter into the document guide. Feed Extension Plate Pull out this plate if documents tend to fall forward. Front Unit Open when clearing a paper jam or cleaning the inside of the scanner. OPEN Knob Use this knob to open the front unit. 12 Before Using the Scanner Document Feed Opening Place the document to be scanned here. Document Guide Adjust these guides to align them with the width of the document. Back/Left Side Ventilation Openings Infrared Light Sensor Receives infrared light transmission from the remote control Power Switch Turns the scanner ON and OFF. Power Connector Connect the AC adapter that is provided with the scanner. USB memory slot Use to connect a USB memory device (optional) to project images saved in the memory or to save scanned images from the scanner. This slot can also be used to connect a USB mouse (optional). USB connector Use to connect to a PC when using the scanner as a document scanner. Use a USB cable provided with the scanner or one that supports Hi-Speed USB 2.0. Cannot be used for presentation mode. RGB connector Use to connect the liquid crystal projector using the RGB cable provided with the scanner. Kensington Slot Use for anti-theft measures. Theft can be prevented by attaching a chain or lock. CAUTION Make sure that ventilation openings are not blocked. Blocked openings can cause the scanner to overheat, creating a risk of fire. IMPORTANT Do not use any AC adapter or RGB cable other than those that are supplied with the scanner. Before Using the Scanner 13 Remote Control Key REVERSE Shows the image preceding the one currently being shown on the screen. FORWARD Scans the document set in the document feed tray or shows the next image saved in the main memory. ZOOM +: Enlarges the size of the image on the screen. –: Reduces the size of the image on the screen. RESET: Returns to the selected display size. (See “Display Size,” on p. 35.) ROTATION ( , ) Rotates the image on the screen 90° clockwise. Rotates the image on the screen 90° counterclockwise. (Arrow Keys) 14 Function When an image is zoomed in, press these keys to scroll the image in the direction of the arrow. If a cursor is displayed, press these keys to move the cursor. If the cursor is moved to the edge of the image, the image scrolls. OK Selects an item on the menu tool bar or setting tool bar. Selects a folder or image when the folder screen or thumbnail screen is displayed. Works the same as the FORWARD key when the menu tool bar is not displayed. MENU Displays or hides the menu tool bar. CANCEL Cancels the menu operation. MODE Toggles between the Main (internal) Memory mode and USB (external) Memory mode. THUMBNAIL Displays images on the screen as thumbnails. Pressing this key while thumbnails are displayed switches to display folder (USB memory mode only). , (Brightness) Adjusts the brightness of the image on the screen. The key makes the image on the screen brighter and the key darkens the image. Before Using the Scanner Chapter 2 Setting up the Scanner Connecting the Scanner to the Projector .............................................. 16 Remote Control ........................................ 17 Inserting the Batteries ............................... 17 Using the Remote Control ......................... 17 Scanner Power ......................................... 19 Turning the Scanner ON ........................... 19 Turning the Scanner OFF .......................... 20 Connecting the Scanner to the Projector Before connecting the liquid crystal projector, make sure the scanner is not connected to a PC. The presentation mode cannot be used while the scanner is connected to a PC. 1. Make sure the power of the scanner and liquid crystal projector is set to OFF. 2. Connect one end of the RGB (Red, Green, Blue) cable (D-sub, 15-pin) provided with the scanner to the RGB connector of the scanner and connect the other end to the liquid crystal projector a. 3. Connect the AC adapter plug to the power connector of the scanner b. 4. Connect the plug of the power cable to the AC adapter c. 5. Connect the power plug into the electrical outlet. d Note The scanner is automatically set to the “Scanning mode” when it is connected to a PC. Be sure to disconnect the USB cable connecting the scanner to the PC in order to use the scanner in the Presentation mode. 16 Setting up the Scanner Remote Control Inserting the Batteries Before using the remote control, insert the 2 type AAA dry cell batteries included with the remote control. 1. Remove the battery cover of the remote control. 2. Insert the 2 type AAA dry cell batteries so that the (+) and (-) marks on the batteries are aligned with the corresponding (+) and (-) marks in the battery compartment of the remote control. 3. Replace the battery cover in its original position. IMPORTANT • The remote control ceases to function properly when the batteries become weak. When this happens, replace the batteries and dispose of the old batteries in compliance with local regulations. • Remove the batteries from the remote control if you do not plan to use it for an extended period of time. • When replacing the batteries, replace them with a pair of new batteries. Do not use a different type of batteries or combination of different types of batteries. • Do not use nickel-cadmium batteries or hydrogen batteries. Using the Remote Control Point the infrared transmitter of the remote control toward the infrared sensor of the scanner to operate it. The remote control is effective within approximately 16.4 feet (5 meters). Sensor Reception range Sensor Setting up the Scanner 17 Note The remote control signal may not be properly recognized if the sensor is exposed to strong light or there is an obstruction, such as a book or computer, in the way. 18 Setting up the Scanner Scanner Power Turning the Scanner ON 1. Turn the liquid crystal projector’s power on and project an image onto the screen. 2. Slide the scanner’s power switch to the right (“I” side). IMPORTANT When the power is turned ON, the initial screen is displayed while the scanner detects the connection. Make sure to turn the projector’s power ON first before turning the scanner ON. 3. The initial screen appears on the screen. The size of the initial screen differs according to the resolution setting. (See “Projector Type,” on p. 35.) IMPORTANT Internal initialization is executed while the initial screen is displayed. Do not attempt to operate the machine during this time. Initialization usually takes approximately 20 seconds, but may take up to 2 minutes. 4. The opening screen switches to the message screen. Setting up the Scanner 19 Turning the Scanner OFF 1. Slide the scanner’s power switch to the left (“O” side). The scanner’s power is turned OFF. WARNING The scanner makes strange noises, or gives off smoke, heat, or strange smells, immediately turn OFF the scanner’s power and disconnect the power cord from the power outlet. Then, contact your local authorized Canon dealer. Continued use of the machine in this condition may result in a fire or electrical shock. CAUTION • For safety reasons, turn OFF the scanner’s power when it will not be used for a long period of time, such as overnight. As an added safety measure, disconnect the power cord when the scanner will not be used for an extended period of time, such as during consecutive holidays. • Leave sufficient space around the power plug so that it can be unplugged easily. If objects are placed around the power plug, you will be unable to unplug it in an emergency. 20 Setting up the Scanner Chapter 3 Using the Scanner Scanning Documents .............................. 22 Screen Operations ................................... 23 Using the Remote Control ......................... Using a USB Mouse .................................. Menu Tool Bar ........................................... Page Operation ......................................... Thumbnail Display ..................................... Brightness Adjustment .............................. Infrared Communication ............................ Mode Switching ......................................... 23 23 23 24 25 26 26 27 Using the USB Memory ........................... 28 Reading Images from a USB Memory Device ....................................................... 28 Saving Data in the USB Memory ............... 29 Scanning Documents 1. Place your document into the scanner. For more information on the types of documents that can be scanned, and about placing your documents, see the DR-2050C/DR-2050SP User’s Guide. 2. Press the SCAN button on the scanner or the FORWARD key of the remote control. Back side SCAN button Face the top of the document downward. FORWARD key The scanner begins to scan the document and the first page of the scanned document is displayed on the screen. If the document consists of more than one page, the scanner continues to scan the pages and saves them in the internal memory (main memory). This is the “prescan” function. Note • You can adjust the brightness of the displayed image. (See “Brightness Adjustment,” on p. 26.) • While there are documents on the feed tray, the documents are automatically prescanned until the memory is full. • The scanner’s internal memory can store up to 40 pages (including the displayed image). When you scan another page while the memory holds maximum 40 pages, the first scanned page is deleted from the memory. • You can check the number of scanned documents in the thumbnails view. • If the menu tool bar is not displayed, the OK key has the same function as the FORWARD key. 3. Press the SCAN button on the scanner or the FORWARD key of the remote control. The next image saved in the main memory is displayed. If any documents remain in the scanner at this time, they are then scanned into the memory. When you scan another page while the memory holds maximum 40 pages, the first scanned page is deleted from the memory. 22 Using the Scanner Screen Operations The scanned images displayed on the screen can be manipulated using the remote control or the menu tool bar displayed on the screen. Using the Remote Control Please refer to “Remote Control,” on p. 14 Using a USB Mouse You can connect a USB mouse to the scanner. Click the right button of the mouse to display the menu tool bar. Move the mouse to move the cursor and select the desired function. Left click: Same as FORWARD/OK keys of the remote control Right click: Same as MENU/CANCEL keys of the remote control Wheel: Same as ZOOM keys of remote control. (Rotation: Zoom in/out; click: Same as RESET key) Note A USB mouse that requires a special driver will not operate properly when connected to the scanner. Menu Tool Bar Pressing the MENU key of the remote control displays the menu tool bar in the upper right corner of the screen. Use the arrow keys (<, >) to select a button on the menu tool bar and press OK to enter your selection. The menu tool bar differs according to whether the scanner is in Main memory mode or USB memory mode. a b c d e f g h i j k l m n o p q a b c d r e f g h i j k l m s a Mode display: Displays the current memory mode (the display differs according to the resolution setting). This icon appears in the upper left corner of the screen when the menu is displayed. b Button name: Displays the name of the button selected by the cursor. Using the Scanner 23 c Switch Mode: Toggles between the Main memory (internal memory) mode and the USB memory mode. (See p. 27.) d Settings: Displays the settings tool bar. (See “Making Scanner Settings,” on p. 32.) e Thumbnail: Displays scanned images as thumbnails. (See “Thumbnail Display,” on p. 25.) f Brightness: Displays the brightness adjustment dialog box to adjust the image brightness. (See “Brightness Adjustment,” on p. 26.) g Reverse: Displays the previous page saved in the memory. h Forward: Displays the next page saved in the memory. (See p. 24.) i Zoom In: Zooms in the image on the screen. j Zoom Reset: Returns the image size to its initial display size. (See “Display Size,” on p. 35.) k Zoom Out: Zooms out the image on the screen. l Rotate Left: Rotates the image 90° counterclockwise. m Rotate Right: Rotates the image 90° clockwise. n IR Communication: Receives image data with Infrared Communication from a mobile device such as a cellular telephone. (See p. 26.) o Save to USB memory: Saves the currently displayed image in the USB memory. (See p. 29.) p Delete current page: Deletes the currently displayed image from the main memory of the scanner. q Delete all pages: Deletes all images saved in the main memory of the scanner. r Folder select: Displays folders containing images in the USB memory. s Hide: Hides selected images. Images are deleted from the main (internal) memory of the scanner but not from the USB memory. Note Buttons that cannot be used cannot be selected. Page Operation Page operation is accomplished by using the SCAN/STOP button on the scanner, the FORWARD/REVERSE keys of the remote control and the Forward/Reverse buttons of the menu tool bar. With these buttons/keys, you can go back and forth to display image saved in the main memory. Note • If there are any documents remaining in the scanner, they are scanned when the FORWARD or Forward buttons are pressed. 24 Using the Scanner • When the memory capacity is full, the oldest image that has already been displayed is deleted. • The same functions can be executed with the OK key on the remote control when the menu tool bar is not displayed. Thumbnail Display Select the Thumbnail button on the menu tool bar and press OK to display thumbnails of the images saved in the main memory. Up to 40 thumbnail images can be displayed. Thumbnail display (in Main Memory mode) Thumbnail Menu Press the MENU key of the remote control while thumbnails are displayed, to display the thumbnail menu in the upper right corner of the screen. (Main Memory mode) a b c d e f g h i (USB Memory mode) a b j c d e k a Button name: Displays the name of the button selected with the cursor. b Switch Mode: Toggles between the Main Memory (internal memory) mode and the USB Memory mode. c Move Page: You can change the position of the image in thumbnail display. Select the image to be moved with the arrow keys (< >) and press OK. Select the destination with the arrow keys (< >) and press OK. d Rotate Left: Rotates the image 90° counterclockwise. e Rotate Right: Rotates the image 90° clockwise. f Save to USB memory: Saves the selected image in the USB memory. g Save all pages to USB memory: Saves all of the images shown as thumbnail images in the USB memory. h Delete current page: Deletes the selected image. The image is deleted from the scanner’s main (internal) memory. i Delete all pages: Deletes all of the images shown as thumbnail images. The images are deleted from the scanner’s main (internal) memory. j Select Folder: Displays folders containing the images saved in the USB memory. k Hide: Hides selected images. Images are deleted from the main (internal) memory of the scanner but not from the USB memory. Using the Scanner 25 Brightness Adjustment Select [Brightness] on the menu tool bar and press OK to display the slider at the bottom of the menu tool bar (the slider automatically disappears if no operation is conducted for 3 seconds after the slider is displayed). If the menu tool bar is not displayed, press the , (brightness keys) on the remote control to display the slider. Adjust the brightness of the image displayed on the screen by pressing the arrow keys (< >) on the remote control or moving the slider to the left or right. Note • When the brightness adjustment screen is displayed, the current brightness setting is indicated. • The slider on the adjustment screen is linked to operation of the keys on the remote control. • Move the slider to the right to make the image lighter and to the left to make the image darker. Infrared Communication Infrared light sensor Image data can be transferred into the main memory via infrared communication from a mobile device. For example, you can display photo images taken by the built-in digital Approx. 10 cm camera of a cellular telephone by transmitting the data to the scanner. A message is displayed when infrared communication starts. Aim the mobile device toward the infrared sensor and start to transmit the data. When the data has been transmitted successfully, a message will appears. Note • Your mobile device must support infrared communication. (The scanner is not guaranteed to be compatible with all mobile devices.) • Infrared communications can only be used when the scanner is in the Main Memory mode. • The scanner supports JPEG files (baseline mode), and file sizes of up to 4MB. 26 Using the Scanner Mode Switching You can toggle the memory mode between the Main Memory mode, for displaying and saving scanned documents, and the USB memory mode, for displaying image files saved in a USB memory device connected to the scanner, by pressing the MODE key on the remote control or the menu toolbar. Using the Scanner 27 Using the USB Memory Reading Images from a USB Memory Device 1. Connect the USB memory device to the scanner. A message is displayed telling you that the USB memory device has been connected. 2. Select Yes and press OK on the remote control. 3. Select the folder containing the image that you want to display using the remote control. The images in the folder are displayed as thumbnail images. Folder Display screen • The menu toolbar is not displayed. • Pressing the FORWARD/REVERSE key on the remote control or the SCAN/STOP button on the scanner displays the next or previous image respectively, in the selected folder. • Up to 40 folders can be recognized. • If an image in the folder cannot be displayed, is displayed. Folder display (USB memory mode) Thumbnail display (USB memory mode) 4. Select the image that you want to display. Note • You can connect a USB 2.0 or USB 1.1 memory device. • When a USB memory device is connected, the memory mode can be toggled between the Main Memory mode and the USB Memory mode by pressing the MODE key on the remote control. All of the images stored in the main memory are deleted at this time. • When you want to switch to the Main Memory mode from the USB Memory mode, press the MODE key on the remote control or select the [Mode] switch on the Menu toolbar. When you switch to the Main Memory mode, a message “Switch to Main Memory mode” appears. 28 Using the Scanner • You cannot switch to the USB Memory mode if the USB memory device cannot be recognized by the scanner, or if there are no image files stored in the USB memory device. • When the scanner is in the USB Memory mode and the USB memory device is disconnected, the scanner automatically switches to the Main Memory mode. All of the images stored in the main memory are deleted at this time. • USB devices with security functions, such as password protection, cannot be used. USB devices that support mass storage class can be used. The scanner is not guaranteed to be compatible with all USB devices. • Supported file formats are JPEG, BMP (uncompressed), PNG, and TIFF (uncompressed, single page). PDF is not supported. • If the USB memory device contains any large image files, it may take a while to display the folder (recommended resolution is no more than 150 dpi for LTR size). Saving Data in the USB Memory When the scanner is in the Main Memory mode, press the MODE key on the remote control or select [Save to USB Memory] from the menu toolbar and press OK to save the currently displayed image in the USB memory. Note • The size of the image files to be saved depends on the “Scanning Size” setting on the setting toolbar. • The resolution is set to 150 dpi, file format to JPEG and date/time saved to 1/ 1/2007, 10:00AM and they cannot be changed. • A folder named DR-2050SP/XX (XX is a sequential number 01 – 40) is created, and a file named DR**.jpg (** is a sequential number 01 – 40) is saved within the folder. • USB devices with security functions, such as password protection cannot be used. USB devices that support mass storage class can be used. The scanner is not guaranteed to be compatible with all USB devices. IMPORTANT The power lamp flashes green while saving images in the USB memory. Do not attempt to operate the scanner, or disconnect the USB memory while the lamp is flashing. Doing so may destroy the contents of the memory device. When the data is successfully saved, the lamp stops flashing. If the data was not saved, a message appears telling you the data could not be saved in the USB memory. Using the Scanner 29 30 Using the Scanner Chapter 4 Scanner Settings Making Scanner Settings ........................ 32 Available Settings .................................... 34 Scanning Side ........................................... Scanning Width ......................................... Color Mode ................................................ Display Size ............................................... Power Save ............................................... Projector Type ........................................... Language .................................................. Quit ............................................................ 34 34 34 35 35 35 36 36 Making Scanner Settings Scanner settings can be set with the remote control while viewing the setting toolbar that appears in the upper right corner of the screen. Key MENU Function Displays the menu toolbar on the screen. Also switches from the setting toolbar to the menu toolbar. (Arrow Keys) Moves the cursor on the menu toolbar or setting toolbar. OK Selects the function selected with the cursor. 1. Press the [MENU] key. The menu toolbar is displayed in the upper right corner of the screen. Setting icon (Main memory mode) 2. Select [Setting] with the cursor and press [OK]. The toolbar switches to the setting toolbar. a b cde f g h i Move the cursor to the desired setting and press OK to change a setting. a Button name: Displays the name of the button selected with the cursor. b Scanning Side: Specifies Simplex or Duplex scan. (See p. 34.) c Scanning Width: Specifies the scanning width of the document to be scanned. (See p. 34.) d Color Mode: Specifies normal scanning or smoothing. (See p. 34.) e Display Size: Specifies the image display mode. (See p. 35.) f Power Save: Specifies the time until the scanner switches to power save mode. (See p. 35.) g Projector Type: Specifies the output resolution of the image to display. (See p. 35.) h Language: Sets the language for menus and messages (Japanese/English). (See p. 36.) i Quit: Saves the settings and returns to the menu toolbar. (See p. 36.) Note • bcd cannot be set when the scanner is in the USB Memory mode. 32 Scanner Settings • To return to the Menu toolbar, select [Quit], press the [MENU] key on the remote control without altering any settings, or press [CANCEL]. 3. Select [Quit] with the cursor and press the [OK] key or press the [MENU/CANCEL] key. The Quit screen is displayed. If no settings have been modified, the setting toolbar disappears and is replaced by the menu toolbar. 4. Select [OK] with the cursor and press the [OK] key. The settings are saved and the display returns to the menu toolbar. Select [CANCEL] to go back to the menu toolbar without saving the settings. Note If you press the [CANCEL] key without selecting [Quit] with the cursor, the setting toolbar switches back to the menu toolbar without saving the settings. Scanner Settings 33 Available Settings The following items can be set: To modify a setting, move the cursor to the item with the arrow keys ( ) and press the [OK] key to enter your selection. Scanning Side Specifies whether to scan one or both sides of the document. Settings Description Simplex Scans one side of the document. Duplex Scans both sides of the document. Scanning Width Specifies the scanning width. Settings Description Scanner’s Maximum Maximum scanning width is 216 mm. This setting cannot be changed. Auto-detection Automatically recognizes the scanning width and performs deskew. Note In some cases the document may not be automatically recognized by the scanner, depending on the contents of the document. Color Mode Sets the color scanning mode. 34 Settings Description Normal Scans at 150 dpi. Smoothing Scans slower than standard to reduce the moiré effect (a shimmering, wavy pattern). Scanner Settings Display Size Specifies the image display mode. Settings Description Fit to Width Adjusts the image to the width of the screen. Fit to Height Adjusts the image to the height of the screen. Fit to Display Adjusts the size of the image to fit the entire image on the screen. Power Save Specifies the amount of time that the scanner must be idle before the scanner switches to Power Save mode. Settings Description Disable Does not switch to the power save mode. 10 min Switches to power save mode after 10 minutes. 1 hour Switches to power save mode after 1 hour. 3 hours Switches to power save mode after 3 hours. 6 hours Switches to power save mode after 6 hours. Note • When the scanner is in the Power Save mode, there is no output to the projector. • To exit the Power Save mode, press any button on the scanner or any key on the remote control. Projector Type Sets the display resolution. Scanner Settings 35 Settings Description SVGA Sets the display resolution to SVGA (800 x 600 dots). XGA Sets the display resolution to XGA (1024 x 768 dots). SXGA Sets the display resolution to SXGA (1280 x 1024 dots). Auto Displays the image according to the resolution of the projector. Note • If you don’t know the resolution of the projector, set this seting to either “Automatic recognition” or “SVGA.” • If this setting is set to automatic recognition, SVGA is automatically set if the projector’s power is OFF, if the projector does not support automatic recognition, or if automatic recognition failed to recognize the resolution. Language Sets the language for toolbars and messages. Settings Description English Displays the menu toolbar in English. Displays the menu toolbar in Japanese. Quit Displays a confirmation screen if a setting is modified. 36 Settings Description OK Saves the modified setting and returns to menu toolbar. CANCEL Returns to the menu toolbar without saving the modified setting. Scanner Settings Note If a setting has been modified, a confirmation screen is displayed when the [OK] key on the remote control is pressed, when [Quit] is selected, or when the [Menu] or [Cancel] key on the remote control is pressed. Scanner Settings 37 38 Scanner Settings Chapter 5 Troubleshooting Clearing Paper Jams ............................... 40 Screen Messages ..................................... 41 If Nothing is Displayed on the Screen ... 45 Clearing Paper Jams If a paper jams occurs during scanning, clear it as follows. For more details, see the DR-2050C/ DR-2050SP User’s Guide. 40 Troubleshooting Screen Messages Proceed as follows when a message is displayed on the screen. Cause: No documents have been scanned into the scanner memory, so there are no images to display and the scanner is standing by. Response: Scan a document. Cause: Document is not placed correctly. Response: Place the document correctly. Note This message is displayed if there are no more pages to be displayed, after initialization when starting up, or after clearing a paper jam. Cause: Paper feed error. Response: Remove documents and place them properly. Cause: Paper jam. Response: Removed the jammed documents. Cause: Confirm whether you want to switch to the main memory mode when the MODE key of the remote control is pressed while you are in the USB memory mode. Response: Select [OK] if you wish to switch to the main memory mode. Troubleshooting 41 Cause: You are prompted to confirm whether you want to switch to USB memory mode when the MODE key of the remote control is pressed while you are in the main memory mode. Response: Select [OK] if you want to switch to the USB memory mode. All images saved in the main memory will be deleted. Also displayed when the USB memory is protected by security. Also displayed when the USB memory is protected by security. Cause: The scanner attempted to switch to USB memory mode when the MODE key of the remote control was pressed while you are in the main memory mode, but the scanner could not recognize the USB memory. Response: Disconnect the USB memory and reconnect it. Cause: The user attempted to save an image from the main memory to the USB memory, but it failed to save. Response: Check that the USB memory is securely connected or that there is enough available memory (4MB or more), and try again. Cause: A USB memory device with a security function or a device other than a USB memory device was connected. Response: Use a USB memory device that does not have a security function. 42 Troubleshooting Cause: Images in the USB memory cannot be recognized. Response: Connect a USB memory device containing images that can be recognized. Also displayed when the USB memory is protected by security. Cause: Ready to start infrared communication. Response: Start transferring the image from an infrared communications device, such as a cellular telephone. Cause: The scanner is in Scanner mode. Response: Disconnect the USB cable connected to the PC from the scanner to switch to presentation mode. Cause: The scanner has switched to power save mode and stopped displaying images, because no operation was conducted for a certain period of time. Response: To switch back to active mode, press any button on the scanner or any key on the remote control. Cause: An internal error occurred in the scanner. Response: If a USB memory device, USB mouse or other device is connected to the USB port, disconnect the USB device and turn the power ON again. If the error continues to be displayed, record the Error No. and contact your local authorized Canon dealer. Troubleshooting 43 Cause: Over 30,000 sheets have been fed and it is time to replace the roller. Response: Purchase an exchange roller kit and replace the feed roller and retard roller. For details, see the DR-2050C/DR-2050SP User’s Guide. 44 Troubleshooting If Nothing is Displayed on the Screen Check the following: • Make sure that the RGB cable is correctly connected and the projector is set correctly (see the instruction manual for the projector). • If a resolution not supported by the projector is set for the scanner, the images will not be displayed correctly. Turn the scanner’s power OFF, and turn the power back ON while pressing and holding the SCAN button. • This starts the scanner in SVGA mode. If nothing appears on the screen, contact your local authorized Canon dealer. Troubleshooting 45 46 Troubleshooting Chapter 6 Appendix Specifications .......................................... 48 Scanner ..................................................... 48 Remote Control ......................................... 49 Specifications The following are the specifications of the DR-2050SP Document Scanner in Presentation mode. For specifications in the Scanning mode, see the DR2050C/DR-2050SP User’s Guide. Scanner Type Desktop sheet fed scanner Scanning Document Specifications Width: 2.16" to 8.50" (55 mm to 216 mm) Length: (separated documents) 2.75" to 11.6" (70 mm to 297 mm) (nonseparated documents) 2.75" to 11.6" (70 mm to 297 mm) Weight: (separated documents) 52 to 128 g/m2 (0.06 mm to 0.15 mm) (nonseparated documents) 42 to 157 g/m2 (0.05 mm to 0.20 mm) Document Feeding method Automatic Scanning Method Contact image sensor Light Source LED Scanning Side Simplex/duplex Scanning Mode 24-bit color scanning Resolution Main scan: 150 dpi; sub-scan 150 dpi Scanning Gradation 24-bit color (16,777,216 colors) Display Gradation 16-bit color (65,536 colors) Display Resolution SVGA (800 × 600), XGA (1,024 × 768), SXGA (1,280 × 1,024) Synchronization Frequency (horizontal/vertical) SVGA 35kHz/56Hz XGA 48kHz/60Hz SXGA 64kHz/60Hz Buffer Memory 32MB for image display (max. 40 sheets) Interface Analog RGB D-sub 15 pins, USB host Dimensions 11.7" × 7.7" × 3.9" (W × H × D) 298 mm × 197 mm × 100 mm (W × H × D) Dimensions (with trays open) 11.7" × 12.7" × 5.2" (W × H × D) 298 mm × 323 mm × 132 mm (W × H × D) Weight Approximately 5.7 lb (2.6 kg) (Excluding the AC adapter) Power Supply DC 16V, 0.8 A, (AC adapter used) Power Consumption Operating: Max. 16 W Standby: 4 W Power switch off: 0.4 W Noise 66 dB or less Service Environment Temperature: 10°C to 32.5°C (50°F to 90.5°F) Humidity: 20 – 80% RH (no condensation) 48 Appendix Remote Control Type Infrared remote control Communications protocol PPM Dimensions 1.7" × 5.4" × 0.9" (W × H × D) 43 mm × 135 mm × 23 mm (W × H × D) Power Supply 2 type AAA dry cell batteries *Specifications are subject to change without notification for product improvement. Appendix 49 CANON ELECTRONICS INC. 1248, SHIMOKAGEMORI, CHICHIBU-SHI, SAITAMA 369-1892, JAPAN CANON U.S.A. INC. ONE CANON PLAZA, LAKE SUCCESS, N.Y. 11042, U.S.A. CANON CANADA INC. 6390 DIXIE ROAD, MISSISSAUGA, ONTARIO L5T 1P7, CANADA CANON EUROPA N.V. BOVENKERKERWEG 59-61, P.O.BOX 2262, 1180 EG AMSTELVEEN, THE NETHERLANDS CANON LATIN AMERICA, INC. 703 WATERFORD WAY, SUITE 400 MIAMI, FLORIDA 33126, U.S.A. CANON AUSTRALIA PTY. LTD. 1 THOMAS HOLT DRIVE, NORTH RYDE, SYDNEY. N.S.W, 2113. AUSTRALIA CANON SINGAPORE PTE. LTD. 1 HARBOUR FRONT AVENUE #04-01, KEPPEL BAY TOWER, SINGAPORE 098632 CANON HONGKONG COMPANY LTD. 19TH FLOOR, THE METROPOLIS TOWER, 10 METROPOLIS DRIVE, HUNGHOM, KOWLOON, HONG KONG. PUB.CE-IE-552 © CANON ELECTRONICS INC. 2007