1
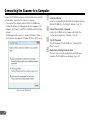
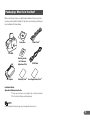
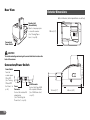
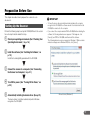
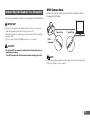
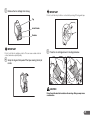
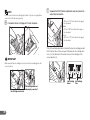
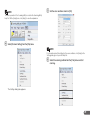
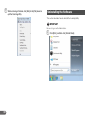
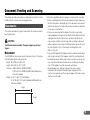
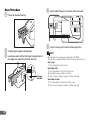
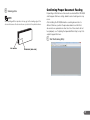
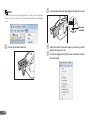
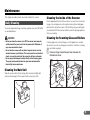
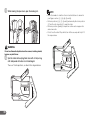
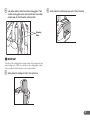
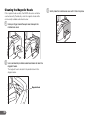
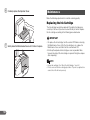
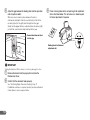
Instructions
Please read this manual before operating this scanner.
Connecting the Scanner to a Computer
Connect the CR-50/80 to a computer as follows. Make sure to install the
software before connecting the scanner to a computer.
• If you connect the computer and turn ON the CR-50/80 before
installing the software, the following wizard screen appears. If this
happens, click [Cancel], turn OFF the CR-50/80, and then install the
software.
The following wizard screen is an example in Windows 7. When a
similar wizard screen appears in Windows XP/Vista, click [Cancel].
Wizard Screen (Windows 7)
2
A
Install the software
B
Connect the scanner to a computer
C
Turn ON the power
D
Automatically installing the device driver
Install the Scanning Utility for CR-50/80 in the setup disc provided
with the CR-50/80. (See “Installing the Software,” on p. 19.)
Connect the CR-50/80 and the computer with a USB. (See
“Connecting the Scanner to a Computer,” on p. 21.)
Turn ON the power of the CR-50/80. (See “Turning ON the
Power,” on p. 22.)
The device driver is installed automatically when Windows
recognizes the CR-50/80 as new hardware. (See p. 23.)
READ CAREFULLY BEFORE OPENING THE
SEALED DISK PACKAGE
CANON SOFTWARE LICENSE AGREEMENT
IMPORTANT-READ THIS AGREEMENT BEFORE
OPENING THE SEALED DISK PACKAGE! BY
OPENING THE SEALED DISK PACKAGE, YOU ARE
DEEMED TO AGREE TO BE BOUND BY THIS
AGREEMENT.
This legal document is a license agreement between you and CANON
ELECTRONICS INC. (“Canon”). BY OPENING THE SEALED DISK
PACKAGE, YOU ARE DEEMED TO AGREE TO BE BOUND BY THE
TERMS OF THIS AGREEMENT. IF YOU DO NOT AGREE TO THE
TERMS OF THIS AGREEMENT, DO NOT OPEN THE SEALED DISK
PACKAGE AND PROMPTLY RETURN THE CANON SCANNER, THE
DISK PACKAGE CONTAINING SCANNER DRIVER SOFTWARE
PROGRAMS AND/OR SCANNER UTILITY SOFTWARE PROGRAM
PROPRIETARY TO CANON OR ITS LICENSOR (THE “SOFTWARE”)
AND THE ACCOMPANYING DOCUMENTATION AND OTHER ITEMS
TO THE PLACE WHERE YOU OBTAINED THEM FOR A REFUND
BEFORE THEY ARE USED OR OPENED OR UNPACKED.
In consideration of the right to use the SOFTWARE, you agree to abide
by the terms and conditions of this Agreement.
1. GRANT OF LICENSE: Canon grants you the personal, nonexclusive right to use the SOFTWARE only on a single computer. You
may physically transfer the SOFTWARE from one computer to another
provided that the SOFTWARE is used on only one computer at any
time.
You shall not assign, sublicense, sell, rent, lease, loan, convey or
transfer to any third party, or send or bring the SOFTWARE out of the
country where you originally obtain it to other countries without
required authorization of applicable governments, or copy, duplicate,
translate or convert to another programming language the SOFTWARE
or accompanying documentation, except as expressly provided
herein.
Except as expressly permitted under the applicable law, you shall not
alter, modify, disassemble, decompile or otherwise reverse engineer
the SOFTWARE or accompanying documentation and you also shall
not have any third party do so.
2. BACK-UP COPY: You may make one copy of the SOFTWARE
solely for a back-up purpose or copy the SOFTWARE onto the
permanent storage device (e.g. a hard disk) of your computer and
retain the original for a back-up purpose. Except as expressly
permitted under the applicable law, any other copying of the
SOFTWARE is a violation of this Agreement. You must reproduce and
include the copyright notice on the back-up copy.
3. SUPPORT AND UPDATE: Canon, Canon’s affiliate, their
distributor or dealer is not responsible for maintaining or helping you
to use the SOFTWARE. No updates, fixes or support will be made
available for the SOFTWARE.
4. LIMITED WARRANTY AND DISCLAIMER OF INDEMNITY:
Canon, Canon’s affiliate, their distributor or dealer will not guarantee
uninterrupted service, or absence or correction of errors. Therefore,
the SOFTWARE is licensed on an “AS IS” basis without warranty of
any kind. The diskette on which the SOFTWARE is recorded is
warranted against defective material or workmanship under normal
use for a period of ninety (90) days from the date you purchased the
same as evidenced by a receipt or otherwise. The limited warranty
does not apply if the failure of the diskette resulted from accident,
abuse or misapplication of the SOFTWARE and shall not extend to
anyone other than the original user of the SOFTWARE.
CANON, CANON’S AFFILIATE, THEIR DISTRIBUTOR OR DEALER
DISCLAIMS ALL IMPLIED WARRANTIES, INCLUDING ANY
WARRANTY OF MERCHANTABILITY OR FITNESS FOR A
PARTICULAR PURPOSE, WITH RESPECT TO THE SOFTWARE OR
ACCOMPANYING DOCUMENTATION.
NEITHER CANON, CANON’S AFFILIATE, THEIR DISTRIBUTOR NOR
DEALER IS LIABLE FOR ANY LOSS OR DAMAGE INCLUDING
CONSEQUENTIAL OR INCIDENTAL LOSS OR DAMAGE SUCH AS
LOSS OF PROFITS, EXPENSE OR INCONVENIENCE, WHATSOEVER
CAUSED BY OR ARISING OUT OF THE SOFTWARE,
ACCOMPANYING DOCUMENTATION OR THE USE THEREOF.
CANON, CANON’S AFFILIATE, THEIR DISTRIBUTOR OR DEALER
SHALL HAVE NO OBLIGATION TO INDEMNIFY YOU AGAINST ANY
CLAIM OR SUIT BROUGHT BY A THIRD PARTY ALLEGING THAT THE
SOFTWARE, ACCOMPANYING DOCUMENTATION OR THE USE
THEREOF INFRINGES ANY INTELLECTUAL PROPERTY OF SUCH
THIRD PARTY.
THE ABOVE IS CANON’S ENTIRE LIABILITY AND YOUR EXCLUSIVE
REMEDY IN CONNECTION WITH THE SOFTWARE AND
ACCOMPANYING DOCUMENTATION.
5. TERM: This Agreement is effective upon opening the sealed disk
package and remains in effect until terminated. You may terminate this
Agreement by destroying the SOFTWARE and any copy thereof. This
Agreement will also terminate if you fail to comply with any of the
terms of this Agreement. In addition to Canon enforcing its respective
legal rights, you must then promptly destroy the SOFTWARE and any
copy thereof.
6. U.S. GOVERNMENT RESTRICTED RIGHTS NOTICE: The
SOFTWARE is provided with RESTRICTED RIGHTS. Use, duplication
or disclosure is subject to restrictions as set forth in either
subparagraph (c) (1) (ii) of the Rights in Technical Data and Computer
Software clause at DFARs 252.227-7013 or subparagraph (c) (1) and
(2) of the Commercial Computer Software Restricted Rights Clause at
FAR 52.227-19, as applicable.
7. SEVERABILITY: In the event that provision of this Agreement is
declared or found to be illegal by any court or tribunal of competent
jurisdiction, such provision shall be null and void with respect to the
jurisdiction of that court or tribunal and all the remaining provisions
of this Agreement shall remain in full force and effect.
8. ACKNOWLEDGEMENT: BY OPENING THE SEALED DISK
PACKAGE, YOU ACKNOWLEDGE THAT YOU HAVE READ THIS
AGREEMENT, UNDERSTOOD IT, AND AGREE TO BE BOUND BY ITS
TERMS AND CONDITIONS. YOU ALSO AGREE THAT THIS
AGREEMENT IS THE COMPLETE AND EXCLUSIVE STATEMENT OF
AGREEMENT BETWEEN YOU AND CANON CONCERNING THE
SUBJECT MATTER HEREOF AND SUPERSEDES ALL PROPOSALS
OR PRIOR AGREEMENTS, VERBAL OR WRITTEN, AND ANY OTHER
COMMUNICATIONS BETWEEN YOU AND CANON RELATING TO
THE SUBJECT MATTER HEREOF. NO AMENDMENT TO THIS
AGREEMENT SHALL BE EFFECTIVE UNLESS SIGNED BY A DULY
AUTHORIZED REPRESENTATIVE OF CANON.
Should you have any questions concerning this Agreement, or if you
desire to contact Canon for any reason, please write to Canon’s local
affiliate.
3
FCC REGULATIONS (For 120V model)
International ENERGY STAR® Office Equipment Program
Check Reader, Model M111101/M111102
This device complies with Part 15 of the FCC Rules. Operation is subject to the following two conditions:
(1) This device may not cause harmful interference, and (2) this device must accept any interference
received, including interference that may cause undesired operation.
Note: This equipment has been tested and found to comply with the limits for a Class B digital device,
pursuant to Part 15 of the FCC Rules. These limits are designed to provide reasonable protection against
harmful interference in a residential installation. This equipment generates, uses, and can radiate radio
frequency energy and, if not installed and used in accordance with the instructions, may cause harmful
interference to radio communications. However, there is no guarantee that interference will not occur in a
particular installation. If this equipment does cause harmful interference to radio or television reception,
which can be determined by turning the equipment off and on, the user is encouraged to try to correct the
interference by one or more of the following measures:
- Reorient or relocate the receiving antenna.
- Increase the separation between the equipment and receiver.
- Connect the equipment into an outlet on a circuit different from that to which the receiver is connected.
- Consult the dealer or an experienced radio/TV technician for help.
Use of shielded cable is required to comply with class B limits in Subpart B of Part 15 of FCC Rules.
Do not make any changes or modifications to the equipment unless otherwise specified in the manual. If
such changes or modifications should be made, you could be required to stop operation of the equipment.
Canon U.S.A. Inc.
One Canon Plaza, Lake Success NY 11042, U.S.A.
Tel. No. (516)328-5000
As an ENERGY STAR® Partner, CANON ELECTRONICS INC. has determined that this
machine meets the ENERGY STAR® Program guidelines for energy efficiency.
The International ENERGY STAR® Office Equipment Program is an international program
that promotes energy saving through the use of computers and other office equipment.
The program backs the development and dissemination of products with functions that
effectively reduce energy consumption. It is an open system in which business proprietors can participate
voluntarily. The targeted products are office equipment, such as computers, monitors, printers, fax,
machine, copiers, and scanners. The standards and logos are uniform among participating nations.
RADIO INTERFERENCE REGULATIONS (For 120V models)
This digital apparatus does not exceed the Class B limits for radio noise emissions from digital apparatus
as set out in the interference-causing equipment standard entitled “Digital Apparatus”, ICES-003 of the
Industry Canada.
RÈGLEMENT SUR LE BROUILLAGE RADIOÉLECTRIQUE (For
120V models)
Cet appareil numérique respecte les limites de bruits radioélectriques applicables aux appareils
numériques de Classe B prescrites dans la norme sur le matériel brouilleur: “Appareils Numériques”,
NMB-003 édictée par l’Industrie Canada.
4
Important Notice for ENERGY STAR Office Equipment Program.
This model doesn’t provide “setting options” for power management.
European Union (and EEA) only.
This symbol indicates that this product is not to be disposed of with your household waste,
according to the WEEE Directive (2002/96/EC) and your national law. This product should
be handed over to a designated collection point, e.g., on an authorized one-for-one basis
when you buy a new similar product or to an authorized collection site for recycling waste
electrical and electronic equipment (EEE). Improper handling of this type of waste could have
a possible negative impact on the environment and human health due to potentially hazardous substances
that are generally associated with EEE. At the same time, your cooperation in the correct disposal of this
product will contribute to the effective usage of natural resources. For more information about where you
can drop off your waste equipment for recycling, please contact your local city office, waste authority,
approved WEEE scheme or your household waste disposal service. For more information regarding return
and recycling of WEEE products, please visit www.canon-europe.com/environment.
(EEA: Norway, Iceland and Liechtenstein)
Für EMVG
Dieses Produkt ist zum Gebrauch im Wohnbereich, Geschäfts-und Gewerbebereich sowie in
Kleinbetrieben vorgesehen.
Model Names
The following names may be provided for the safety regulations in each sales region of the Check Reader.
CR-50: Model M111101
CR-80: Model M111102
Trademarks
• Canon and the Canon logo are registered trademarks, of Canon Inc.
in the United States and may also be trademarks or registered
trademarks in other countries.
• imageFORMULA is a trademark of CANON ELECTRONICS INC.
• Microsoft, Windows, Windows XP, Windows Vista, and Windows 7
are registered trademarks or trademarks of Microsoft Corporation in
the United States and other countries.
• Microsoft product screen shot(s) reprinted with permission from
Microsoft Corporation.
• Adobe and Adobe Reader are registered trademarks or trademarks
of Adobe Systems Incorporated in the United States and other
countries.
• Other product and company names herein are, or may be, the
trademarks of their respective owners.
Copyright
Copyright 2011 by CANON ELECTRONICS INC. All rights reserved.
No part of this publication may be reproduced or transmitted in any form or by any means, electronic or
mechanical, including photocopying and recording, or by any information storage or retrieval system
without the prior written permission of CANON ELECTRONICS INC.
Disclaimers
The information in this document is subject to change without notice.
CANON ELECTRONICS INC. MAKES NO WARRANTY OF ANY KIND WITH REGARD TO THIS MATERIAL,
EITHER EXPRESS OR IMPLIED, EXPECT AS PROVIDED HEREIN, INCLUDING WITHOUT LIMITATION,
THEREOF, WARRANTIES AS TO MARKETABILITY, MERCHANTABILITY, FITNESS FOR A PARTICULAR
PURPOSE OF USE OR NON-INFRINGEMENT. CANON ELECTRONICS INC. SHALL NOT BE LIABLE FOR
ANY DIRECT, INCIDENTAL, OR CONSEQUENTIAL DAMAGES OF ANY NATURE, OR LOSSES OR
EXPENSES RESULTING FROM THE USE OF THIS MATERIAL.
CANON ELECTRONICS INC. IS NOT LIABLE FOR THE STORAGE AND HANDLING OF DOCUMENTS
SCANNED WITH THIS PRODUCT, OR THE STORAGE AND HANDLING OF THE RESULTING SCANNED
IMAGE DATA.
IF YOU INTEND TO DISCARD THE ORIGINALS OF THE SCANNED DOCUMENTS, YOU ARE
RESPONSIBLE FOR INSPECTING THE SCANNED IMAGES AND VERIFYING THAT THE DATA IS INTACT.
THE MAXIMUM LIABILITY OF CANON ELECTRONICS INC. UNDER THIS WARRANTY IS LIMITED TO THE
PURCHASE PRICE OF THE PRODUCT COVERED BY THE WARRANTY.
5
INTRODUCTION
Thank you for purchasing the Canon Check Reader CR-50/80.
Please read this manual thoroughly before using the machine in order
to familiarize yourself with its capabilities, and to make the most of its
many functions.
Manuals for the CR-50/80
The following manuals are provided with the CR-50/80. Be sure to read
these manuals thoroughly before using the scanner. (The Installation
Guide and the Operation & Maintenance Guide are extracted from the
Instructions.) Electronic manual is stored as a PDF file on the supplied
Setup Disc and requires Adobe Reader to open. (You can download
Adobe Reader from the Adobe Web site.)
Installation Guide (Supplied with the scanner/Electronic Manual)
Describes the procedure for setting up the CR-50/80 for scanning. Set
up the CR-50/80 in accordance with the Installation Guide. For details
on the CR-50/80, refer to the Instructions (electronic manual).
Operation & Maintenance Guide (Supplied with the scanner/
Electronic Manual)
Describes the basic operations for using the CR-50/80,
troubleshooting, and maintenance. For details on the settings of the
CR-50/80, refer to the Instructions (electronic manual).
Instructions (Electronic Manual): This Manual
Describes how to use the scanner, and includes instructions for
configuring the scanner settings, as well as handling, maintenance,
and troubleshooting information.
6
Symbols Used in This Manual
The following symbols are used in this manual to explain procedures,
restrictions, handling precautions, and instructions that should be
observed for safety.
WARNING
Indicates a warning concerning operations that may lead to death or
injury to persons if not performed correctly. To use the machine safely,
always pay attention to these warnings.
CAUTION
Indicates a caution concerning operations that may lead to injury to
persons, or damage to property if not performed correctly. To use the
machine safely, always pay attention to these cautions.
IMPORTANT
Indicates operational requirements and restrictions. Be sure to read
these items carefully to operate the machine correctly, and avoid
damaging the machine.
NOTE
Indicates a clarification of an operation, or contains additional
explanations for a procedure. Reading these notes is highly
recommended.
Table of Contents
Connecting the Scanner to a Computer............................................... 2
INTRODUCTION ................................................................................. 6
Manuals for the CR-50/80 ........................................................ 6
Symbols Used in This Manual.................................................. 6
Important Safety Instructions ............................................................... 9
Handling ................................................................................... 9
Disposal ................................................................................. 10
Installation Location ............................................................... 10
Power Supply ......................................................................... 11
Moving the Scanner ............................................................... 11
Introduction to the CR-50/80.............................................................. 12
Features of the CR-50/80 ............................................................ 12
Features ................................................................................. 12
Packaging: What Is in the Box? ................................................... 13
Part Names .................................................................................. 14
Front View .............................................................................. 14
Rear View............................................................................... 16
Connectors/Power Switch ...................................................... 16
Exterior Dimensions ..................................................................... 16
Preparation Before Use ..................................................................... 17
Setting Up the Scanner ................................................................ 17
Checking Your Operating Environment ....................................... 18
Installing the Software.................................................................. 19
Installing the Scanning Utility ................................................. 19
Connecting the Scanner to a Computer....................................... 21
USB Connections ................................................................... 21
Connecting the Power Cord ................................................... 22
Turning ON and OFF the Power .................................................. 22
Turning ON the Power ........................................................... 22
Turning OFF the Power.......................................................... 23
Preparing the Ink Cartridge.......................................................... 24
About the Ink Cartridge .......................................................... 24
Setting the Ink Cartridge and Adjusting the Print Position ..... 24
Software............................................................................................. 28
How to Use the Software ............................................................. 28
How to Use the Scanning Utility............................................. 28
Uninstalling the Software ............................................................. 30
Document Feeding and Scanning...................................................... 33
Documents ................................................................................... 33
Document............................................................................... 33
Using Infrared Double Feed Detection................................... 34
Placing Documents ................................................................ 35
Document Feeding and Scanning................................................ 35
Scan Procedure ..................................................................... 36
Confirming Proper Document Feeding................................... 37
Troubleshooting ................................................................................. 40
When the Scanner Is Not Recognized ......................................... 40
Clearing Paper Jams ................................................................... 40
The Scanner Does Not Turn ON.................................................. 42
Feeding Trouble ........................................................................... 43
When the Scanned Image Is Not Normal .................................... 44
7
Maintenance ...................................................................................... 45
Daily Cleaning .............................................................................. 45
Cleaning the Main Unit ........................................................... 45
Cleaning the Inside of the Scanner ........................................ 45
Cleaning the Scanning Glass and Rollers.............................. 45
Cleaning the Magnetic Heads ................................................ 48
Cleaning the Ink Jet Nozzles.................................................. 49
Maintenance ................................................................................ 50
Replacing the Ink Cartridge.................................................... 50
Adjusting the Separation Roller Gap...................................... 52
Specifications ............................................................................... 55
Scanner Specifications........................................................... 55
AC Adapter Specifications ..................................................... 55
Index .................................................................................................. 56
8
Important Safety Instructions
Handling
WARNING
■ Never install and operate the scanner near flammable substances,
such as alcohol, paint thinner, benzene, or any other type of volatile
solution.
■ Never damage or modify the power cord, and never place heavy
objects on the power cord.
■ Always make sure that your hands are dry when you are handling
the power cord or power plug. Never grasp the power plug when
your hands are wet.
■ Never plug the scanner into a multiplug power strip.
■ Never bundle, wrap, or tie the power cord around itself or another
object. Connect the power plug securely into the power outlet.
■ Use only the power cord and power plug provided with the scanner.
■ Never attempt to disassemble or modify the scanner.
■ Never use flammable aerosol products near the scanner.
■ Before you clean the scanner, turn the power OFF and disconnect
the power cord from the power outlet.
■ To clean the scanner’s exterior, use a firmly wrung cloth, moistened
slightly with water or mild detergent. Never use any type of volatile
solution, such as alcohol, benzene or paint thinner.
■ If you hear strange sounds, detect smoke or abnormal heat, sense
vibration, or smell odd odors around the scanner, turn OFF the
power switch immediately and disconnect the power cord from the
power outlet. Contact your local authorized Canon dealer or service
representative to have the scanner serviced.
■ Handle the scanner with care. Avoid shock and vibration to the
scanner caused by reckless handling. If you suspect the scanner
has been accidentally damaged, turn OFF the power switch
immediately and disconnect the power cord from the power outlet.
Contact your local authorized Canon dealer or service
representative to have the scanner serviced.
■ Before you move the scanner, always turn OFF the power and
disconnect the power cord from the power outlet.
■ This product emits low level magnetic flux. If you use a cardiac
pacemaker and feel abnormalities, please be away from this
product and consult your doctor.
CAUTION
■ To avoid damage to the scanner, never place the scanner on an
unstable or vibrating surface. The scanner may tip or fall over,
causing injury.
■ Keep all liquids, beverages, or any type of liquid, and clips, staples,
necklaces, or other metal objects away from the scanner. If you
accidentally spill liquid or drop a metal object into the scanner, turn
OFF the power immediately and disconnect the power cord from the
power outlet. Contact your local authorized Canon dealer or service
representative to have the scanner serviced.
■ Never install the scanner in humid or dusty locations. Doing so may
cause a fire or electrical shock.
■ Never place heavy objects on top of the scanner, as these objects
may tip or fall over, and cause injury.
■ When you remove the power cord, grip it by the power plug head.
Never attempt to disconnect the power cord from the power outlet
by pulling on the power cord. Doing so may damage or expose the
cord’s internal wiring, and cause a fire or electrical shock.
9
■ Keep the area around the power outlet clear of all obstacles so you
can disconnect the power cord easily at all times.
■ Never spill water or volatile solutions (alcohol, benzene, paint
thinner) into the scanner. Doing so may cause a fire or electrical
shock.
■ When the scanner is not being used for a long period of time,
disconnect the power cord from the power outlet.
■ Avoid wearing loose fitting clothing, dangling jewelry, long ties, or
long hair that could become entangled with moving parts, especially
the rollers that feed paper into the scanner. If such objects become
entangled, immediately disconnect the power plug from the power
outlet to stop the scanner.
■ Be careful when you are loading a document or clearing a paper
jam. It is possible that the paper edges may cut your fingers.
■ Do not open the Maintenance Cover while the scanner is operating.
Doing so may result in a malfunction or injury.
■ Do not touch the pins and contacts on the scanner’s connector with
your hands. Doing so may result in a malfunction.
Disposal
When disposing of this scanner, be sure to follow all local ordinances
and laws or consult with the retailer who sold you the scanner.
10
Installation Location
For operation, maintenance, and ventilation, make sure that there is
enough space around the scanner.
Avoid placing the scanner in the following places. It may cause a
malfunction and adversely affect the scanner or your computer.
• Places exposed to direct sunlight
If installation in such places is unavoidable, provide a curtain or
similar object to shade the scanner.
• Places subject to dust and fumes
Dust and cigarette fumes adversely affect the components inside the
scanner.
• Near running water, a heat source, water vapor, or in an area, such
as a laboratory exposed to ammonia gas, paint thinner, or other
volatile chemicals
• Places subject to excessive vibration and shock
• Places subject to rapid changes in temperature or humidity
Condensation occurring inside the scanner may impair image
quality. Place the scanner in a room that is within the following range:
Room temperature: 10°C to 32.5°C (50°F to 90.5°F)
Relative humidity: 20% to 80% RH
20% to 50% RH when using the imprinter
Use the recommended operating environment for the ink cartridge
when using the imprinter.
• Near electronic equipment or heavy equipment that generates a
strong magnetic field, such as a speaker, TV, and radio
Power Supply
• Connect only to a power outlet of the rated voltage and power supply
frequency (either 120V, 60 Hz or 220-240V, 50/60 Hz, depending on
your region).
• Make sure that the scanner is connected to an independent power
outlet. Do not plug the scanner into an outlet shared with another
device. If you use an extension cord, make sure that the extension
cord is rated for the current requirements of the scanner.
• If you are unsure of anything relating to the power supply, contact
your local authorized Canon dealer or service representative for
further information.
• Never place an object on top of the power cord or step on the power
cord.
• Never bundle the power cord or wrap the cord around an object,
such as a table leg.
• Do not tug on the power cord. When you remove the power cord, grip
it by the power plug head.
• Keep the area around the power outlet free of obstacles.
• Connect only to a power outlet of the rated voltage and power supply
frequency (either 120V, 60 Hz or 220-240V, 50/60 Hz, depending on
your region).
• Do not connect to power outlets with other electrical devices. Also,
when using an extension cord, make sure that the extension cord is
rated for the current requirements of the scanner.
• Disassembling and/or reassembling the AC adapter is extremely
dangerous and should not be attempted under any circumstances.
• Do not place heavy objects on the AC adapter or power cord. Do not
place the adapter or cords in an area where they are likely to be
stepped on.
• Do not use the power cord while it is bundled.
• Never pull directly on the power cord. To remove the plug from the
outlet, grasp the plug directly and remove it from the outlet.
• Keep the area around the power plug clear of articles so that the
power plug can be disconnected in an emergency.
• Use only the AC adapter provided with the product. Do not use the
scanner’s AC adapter with any other product.
• If you have any questions about the AC adapter, contact your local
authorized Canon dealer or service representative for further
information.
Moving the Scanner
When you move the CR-50/80, hold it firmly with both hands and carry
it carefully. Do not hold the scanner by the Eject Stopper. The scanner
weighs approximately 2 kg (4.4 lb).
WARNING
When moving the scanner, be sure to turn OFF the power and
remove any cables. If the cables are not removed before moving
the scanner, you may damage the plugs or connector by forcibly
pulling them out.
11
Introduction to the CR-50/80
This chapter describes the features of the CR-50/80 scanner, what
comes packaged in the box, and the names and functions of parts on
the scanner.
Features of the CR-50/80
Supports OCR (Optical Character Recognition)
Character images, such as E13B, OCR-A, OCR-B, and check writer are
recognized as characters by the OCR function.
Easy to Maintain
Maintenance Covers make handling paper jams and cleaning easy.
The Canon Check Reader CR-50/80 is a scanner with magnetic heads
that can read checks and other documents that are printed with MICR
(Magnetic Ink Character Recognition) compatible fonts, and is capable
of OCR (Optical Character Recognition).
Paper Thickness Adjustment Mechanism
Adjust the Separation Roller gap to the thickness of the paper being
fed.
Features
Infrared Double Feed Detection (Scanning Utility for CR50/80)
High-Speed Scanning
The scanner detects double-fed documents using infrared sensor.
The CR-50 performs high-speed scans of check-size documents at
50 cpm (200 dpi resolution).
The CR-80 performs high-speed scans of check-size documents at
80 cpm (200 dpi resolution).
Supports Large Documents
Documents up to 108 mm x 228 mm (4.3" x 9.0") can be scanned.
Compact Size
140 mm (W) x 223 mm (D) x 188 mm (H) (5.5" (W) x 8.8" (D) x 7.4" (H))
Supports Color, Black-and-White (Binary) and Grayscale
Output
Reads MICR Characters
A magnetic head is used to scan MICR characters that have been
printed with magnetic ink or toner.
12
Imprinter Is Standard Equipment
An imprinter mechanism, which prints text on documents as they are
scanned, comes standard equipped with the scanner. The imprinter’s
ink cartridge is not included, and must be purchased separately. (See
“About the Ink Cartridge,” on p. 24.)
Packaging: What Is in the Box?
Make sure that you have everything shown below. Check every item
you have removed from the box. If any items are missing, contact your
local authorized Canon dealer.
Setup Disc
Power Cord*1
CR-50/80
Marking Labels
for Thickness
Adjustment Dial
AC Adapter
Warranty Card*2
USB Cable
User Registration Card*2
Installation Guide
Operation & Maintenance Guide
*1 The power cord varies, according to the country of purchase.
*2 For the United States and Canada only.
NOTE
Items included in this package may change without any notice.
13
Part Names
This section describes the names and functions of each part. Before you connect the CR-50/80, familiarize yourself with its parts and their functions.
Front View
Document Feed Opening
Imprinter Cover
Document Eject Opening
Maintenance Cover
Open this cover to clear paper jams or
clean the scanner.
Eject Stopper
Adjust to match the length of the document.
(See “Placing Documents,” on p. 35.)
Document Feed Tray
Pull out to load documents.
(See “Placing Documents,” on p. 35.)
14
Paper Thickness Adjustment Dial
Adjust the gap between the separation roller and
feeding roller to the thickness of the paper being fed.
(See “Adjusting the Separation Roller Gap,” on
p. 52.)
Power Indicator
Lights blue when the power is turned ON.
(See “Turning ON the Power,” on p. 22.)
Ink Absorber
Absorbs any ink that
leaks out of the ink
cartridge.
Ink Cartridge
The ink cartridge is not included, and must
be purchased separately.
(See “About the Ink Cartridge,” on p. 24.)
Print Position
Adjustment Lever
Adjusts the print
position.
(See “Setting the Ink
Cartridge and
Adjusting the Print
Position,” on p. 24.)
Magnetic Head for
MICR
Reads MICR text
printed in magnetic
ink. (See “Cleaning the
Magnetic Heads,” on
p. 48.)
Separation Roller
Separates a stack of documents into single sheets one by one.
(See “Adjusting the Separation Roller Gap,” on p. 52.)
Feeding Roller
Feeds the document.
Lock Lever
Locks the ink cartridge in place.
15
Rear View
Exterior Dimensions
Units: millimeters (units in parenthesis are inches)
Reading Unit
(Access Hatch)
Open to clear paper jams
or clean the scanner.
(See “Clearing Paper
Jams,” on p. 40.)
140 mm (5.5")
Connectors/
Power Switch
CAUTION
To avoid overheating and causing a fire, never block the air vents on the
back of the scanner.
Power Switch
Turns the
scanner power
ON or OFF.
(See “Turning
ON and OFF
the Power,” on
p. 22.)
16
Power
Connector
Connect the included AC
adapter plug.
(See “Connecting the
Power Cord,” on p. 22.)
USB Connector
Connect a Hi-Speed USB
2.0 compliant USB cable.
(See “USB Connections,”
on p. 21.)
188 mm (7.4")
Connectors/Power Switch
144 mm (5.7")
223 mm (8.8")
Preparation Before Use
This chapter describes how to prepare the scanner to scan
documents.
Setting Up the Scanner
Perform the following steps to set up the CR-50/80. Refer to the section
for each step for details about that step.
A
B
Check your operating environment. (See “Checking Your
Operating Environment,” on p. 18.)
IMPORTANT
• To have the device drivers installed automatically when the computer
recognizes the CR-50/80, the software needs to be installed before the
CR-50/80 is connected to the computer.
• If you connect the computer and turn ON the CR-50/80 before installing the
software, the following wizard screen appears. If this happens, click
[Cancel], turn OFF the CR-50/80, and then install the software.
The following wizard screen is an example in Windows 7. When a similar
wizard screen appears in Windows XP/Vista, click [Cancel].
Install the software. (See “Installing the Software,” on
p. 19.)
Install the Scanning Utility provided with the CR-50/80.
C
D
E
Connect the scanner to a computer. (See “Connecting
the Scanner to a Computer,” on p. 21.)
Turn ON the power. (See “Turning ON the Power,” on
p. 22.)
Automatically installing the device driver. (See p. 23.)
Wizard Screen (Windows 7)
The device driver is installed automatically when Windows
recognizes the CR-50/80.
17
Checking Your Operating Environment
The following computer system requirements are recommended for
using the CR-50/80.
Operating Systems:
•
•
•
•
Microsoft Windows XP (32bit) SP3 or later
Microsoft Windows XP (64bit) SP2 or later
Microsoft Windows Vista (32/64bit) SP1 or later
Microsoft Windows 7 (32/64bit)
Specifications:
• CPU: Intel Core2 Duo 1.8 GHz or faster
• Memory: 1 GB or more
• USB 2.0 interface
Interface Cable
• Use the cable provided or a Hi-Speed USB 2.0 interface cable to
connect to the computer’s USB port.
Precautions for Use in 64-bit Operating Systems
• The ISIS/TWAIN driver supplied with this product supports scanning
with 32-bit applications only.
• Even with 32-bit applications, not all ISIS/TWAIN compliant
applications are guaranteed to operate.
• Scanning speed may vary depending on the specifications of your
computer.
18
IMPORTANT
• If you use the USB interface that was provided as standard with your
computer:
• Use the most recently available USB 2.0 driver provided by Microsoft.
Contact your local authorized Canon dealer for more detailed
information.
• Not all USB interfaces provided as standard with personal computers
are guaranteed. Contact your local authorized Canon dealer for more
detailed information.
• Scanning speeds are slower if your computer’s standard USB interface
is USB 1.1.
• You should use the USB cable originally bundled with the scanner or a
Hi-Speed USB 2.0 compatible cable.
• If the CPU, memory, interface card, and other specifications do not satisfy
the installation requirements, the scanning speed may be greatly reduced
and transmission may take longer.
• Even if the computer satisfies the recommended specifications, the
scanning speed may vary, depending on the scan settings.
Installing the Software
The following software application is provided on the setup disc that is
packaged with the scanner. Make sure to open and read the
Readme.txt file on the setup disc before installing the software.
Scanning Utility
A
Turn ON your computer, and log on to Windows.
IMPORTANT
Be sure to log on as the Administrator.
B
Insert the setup disc into the disk drive.
C
Click [Start], and then click [All Programs].
This manual assumes that “D” is assigned to your disk drive.
Canon Scanning Utility is an application that provides scanning, file
saving, image viewing, printing, and various other functions. A
dedicated scanner driver is installed after you install the utility
software.
IMPORTANT
• The Scanning Utility includes a device driver so that Windows can
recognize the CR-50/80. Be sure to install the Scanning Utility before
connecting the CR-50/80 to the computer.
• Some functions mentioned in this manual may not be operated in some
applications.
The procedure in Windows XP is different from the ones
described in this manual. Refer to the Windows XP “Help and
Support Center” to select [Run].
Installing the Scanning Utility
Follow the instructions below to install the Scanning Utility and the
dedicated driver.
NOTE
The dedicated scanner driver is installed after the Scanning Utility has been
installed.
19
D
Click [Accessories], and then click [Run].
NOTE
Installing the scanning utility will put the [Scanning Utility for CR-50&80] icon
on your Windows Start menu. (See “How to Use the Scanning Utility,” on
p. 28.)
E
Enter “D:\SU80\setup.exe” in the [Open] fields, and then click
[OK].
Installation starts.
F
Follow the instructions on the screen to complete the
installation.
IMPORTANT
The computer may need to be restarted, after the installation, depending on
the operating system. If this is necessary, make sure to restart the computer.
20
Connecting the Scanner to a Computer
The only way to connect the scanner to your computer is with a USB cable.
USB Connections
Connect the scanner and the computer with the cable provided or a
Hi-Speed USB 2.0 cable.
IMPORTANT
• Be sure to use the USB cable bundled with the scanner or a Hi-Speed
USB 2.0 compatible cable with the length less than 5 m.
• When the application is running, do not turn the scanner OFF or unplug the
interface cable.
• Do not connect multiple CR-50/80 scanners to one computer.
Type A Plug
Type B Plug
USB
Connector
CAUTION
• Do not turn OFF the scanner or remove the interface cable when an
application is running.
• Turn OFF the computer and the scanner before changing the cable.
NOTE
Connect the type B plug (square) to the scanner and connect the type A plug
(flat) to the USB port on the computer.
21
Connecting the Power Cord
Connect the power cord.
Make sure to use only the power cord provided with the scanner.
WARNING
When connecting the power cord, follow these precautions. Failure to
do so may cause a fire or electrical shock.
• Never grasp the power plug when your hands are wet.
• Never plug the scanner into a multiplug power strip.
• Never bundle or tie the power cord around itself or another object.
Connect the power plug securely into the power outlet.
• Use only the power cord and power plug provided with the scanner.
• Before you connect the power cord, make sure to turn OFF the power switch.
• Connect only to a power outlet of the rated voltage and power supply frequency
(either 120V, 60 Hz or 220-240V, 50/60 Hz, depending on your region).
• Do not plug the scanner into a power outlet shared with another
device. If you use an extension cord, make sure that the extension
cord is rated for the current requirements of the scanner.
Turning ON and OFF the Power
Follow the procedures below to turn the scanner power ON and OFF.
Turning ON the Power
A
To turn ON the scanner, slide the Power Switch to the right.
(ON)
22
IMPORTANT
NOTE
• When you turn ON the power, the power LED lights and remains lit.
• If the scanner does not work, there is a problem with the scanner. Turn OFF
the power, and contact your local authorized Canon dealer or service
representative to have the scanner serviced.
The CR-50/80 will be registered as “CANON CR-50 USB” or “CANON CR-80
USB” in the Imaging Device directory.
WARNING
If you hear strange sounds, detect smoke or abnormal heat, sense a
vibration, or smell odd odors around the scanner, turn OFF the power
immediately and disconnect the power cord from the power outlet.
Contact your local authorized Canon dealer or service representative to
have the scanner serviced.
B
Windows recognizes the CR-50/80 as new hardware, and
installation starts automatically.
Turning OFF the Power
A
B
Turn OFF your computer.
To turn OFF the scanner, slide the Power Switch to the left.
(Windows 7)
(OFF)
CAUTION
• Wait at least 10 seconds before turning the scanner back ON.
• For your safety, disconnect the power plug from the power outlet if
you are not using the scanner for a long period of time.
23
Preparing the Ink Cartridge
A
Hook your finger around the open lever and open the
Maintenance Cover.
This section describes how to prepare the ink cartridge so that you can
use the imprinter to print text on scanned documents.
About the Ink Cartridge
The ink cartridge is not included with the scanner. Purchase an ink
cartridge separately, as shown below.
Manufacturer
: Hewlett Packard
Ink Cartridge Blue : C6602B (Canon#3693A002)
Ink Cartridge Red : C6602R (Canon#3693A003)
Ink Cartridge Green: C6602G (Canon#3693A004)
Setting the Ink Cartridge and Adjusting
the Print Position
The ink cartridge needs to be set to print. Set the ink cartridge
according to the following procedure. You can adjust the print position
to three different levels.
IMPORTANT
• To set the ink cartridge, turn the scanner OFF before removing the
Maintenance Cover. After the ink cartridge is set, replace the Maintenance
Cover, and then turn the scanner back ON.
• Finish up the unpacked ink cartridge as soon as possible. More frequent
cleaning of the ink cartridge is required if long time elapses after
unpacking.
24
B
Remove the Imprinter Cover.
C
Remove the ink cartridge from its bag.
IMPORTANT
Do not touch the ink jet nozzle or contacts after peeling off the tag and tape.
Tag
Ink Jet Nozzle
Contacts
IMPORTANT
Do not touch the ink cartridge contacts. This can cause a bad electrical
contact and reduced print quality.
D
E
Place the ink cartridge shown in the diagram below.
Grasp the tag and then peel off the tape covering the ink jet
nozzle.
CAUTION
Do not touch the electrical contact on the carriage. Doing so may cause
a malfunction.
25
G
NOTE
Do not use more than one cartridge by rotation. If you do so, applications
cannot check the ink level precisely.
F
Push down the ink cartridge until it clicks into place.
Squeeze the Print Position Adjustment Lever and move it to
adjust the print position.
Top:
50.5 mm (1.99") from the bottom edge of
the document
Middle:
47 mm (1.85") from the bottom edge of
the document
Bottom:
43.5 mm (1.71") from the bottom edge of
the document
If the ink head drops back when installed, the two ink cartridge pins will
not fit into the holes on the carriage. Push back the ink cartridge lock
lever a in the direction of the arrow and reset the cartridge in the
correct position b.
IMPORTANT
Make sure that the ink cartridge lock lever locks the ink cartridge into the
correct position.
Ink Cartridge Ink Cartridge
Holes
Pins
If the cartridge does not
load properly, see step 7.
Ink Cartridge Lock Lever
26
H
Carefully replace the Imprinter Cover.
I
Gently close the Maintenance Cover until it clicks into place.
27
Software
This chapter describes how to use the Scanning Utility.
B
Click [Scanning Utility for CR-50&80].
C
Start the Scanning Utility.
How to Use the Software
This section describes how to start up the Scanning Utility so that you
can use the scanner. Read the Help files for the Scanning Utility for
information on how to use it.
How to Use the Scanning Utility
This section describes the procedure for using the Scanning Utility.
Read the [Help] file in [Scanning Utility] for more information.
A
28
Click [Start], and then click [All Programs].
NOTE
E
Set the scan conditions and click [OK].
The basic operation of the Scanning Utility is noted in the Scanning Utility
help file. On the [Help] menu, click [Help] to view the explanation.
D
Select [Scanner Setting] from the [File] menu.
NOTE
For information about the settings for the scan conditions, click [Help] on the
Settings dialog box to open the Help file.
F
Select the scanning method from the [File] menu and start
scanning.
The Settings dialog box appears.
29
G
When scanning is finished, click [Exit] on the [File] menu to
quit the Scanning Utility.
Uninstalling the Software
This section describes how to uninstall the Scanning Utility.
IMPORTANT
Be sure to log on as the Administrator.
A
30
Click [Start], and then click [Control Panel].
B
Click [Programs], and then click [Programs and Features].
NOTE
Depending on the status of your computer, the following screen may be
displayed. In that case, double-click the [Programs and Features] icon.
C
Select the software that you want to remove from the list in the
dialog box, and then click [Uninstall].
31
NOTE
When the [User Account Control] dialog box appears, click [Continue].
IMPORTANT
If you uninstall the “Scanning Utility for CR-50/80” you also need to uninstall
the “Canon Driver for CR-50/80.”
D
The [Confirm File Deletion] dialog box appears.
If you selected “Canon Driver for CR-50/80,” the above dialog box
appears.
E
Click [Yes], and the uninstaller starts.
Follow the instructions on the screen to finish uninstalling the software.
32
Document Feeding and Scanning
This chapter describes precautions regarding documents that can be
handled on this scanner and scanning operations.
Documents
This section describes the types of documents that can be used and
how to place them.
CAUTION
Treat the documents carefully. The paper edges may cut your
fingers.
Document
The CR-50/80 can feed a wide variety of document sizes. The ranges
of height and length for a document are:
Height : 50 to 108 mm (2.0" to 4.3")
Length : 80 to 228 mm (3.1" to 9.0")
Thickness : 0.08 to 0.20 mm (0.003" to 0.008")
0.10 to 0.14 mm (0.004" to 0.006") with Double Feed
Detection enabled
Weight : 64 to 157 g/m2 (17 to 40 lb bond)
81 to 105 g/m2 (21.5 to 26.8 lb bond) with Double Feed
Detection enabled
Follow these guidelines when you prepare a document for scanning:
• Before scanning documents that contain pasted artwork, make sure
that the ink or paste is thoroughly dry. If the documents are scanned
with wet ink or paste, the inside of the scanner may become dirty and
it may cause a malfunction.
• If you scan a document written in pencil, the letters may not be
scanned properly or the pencil may rub off onto the rollers and stain
subsequent documents. Before you scan this kind of document,
make a copy, and then scan the copy. After scanning a document
written in pencil or some other soft writing material, be sure to clean
the scanning rollers. (See “Cleaning the Scanning Glass and
Rollers,” on p. 45.)
• If you scan thin paper in the Duplex mode, the ink printed on the back
side may be scanned. If this happens, adjust the scanning density.
• Scanning documents with a rough surface may not feed easily, and
may cause friction between the documents, resulting in a feeding
error. If this happens, feed the documents one by one.
• To avoid paper jams, damage to documents, and a scanner
malfunction, do not feed the following types of paper into the
scanner. If you want to scan these types of paper, first make a copy,
and then scan the copy.
Length
Height
33
Wrinkled or creased
paper
Carbon backed
paper
Curled paper
Coated paper or fax
recording paper
Torn paper
Extremely thin paper
Paper with clips or
staples
Paper with binding
holes
NOTE
• When Using the Accompanying Scanning Utility for CR-50/80:
You can disable the double feed detection function from [Scanner
Setting] in the Scanning Utility.
• For more details about how to configure scanning parameters, click the
[Help] button in the settings dialog box to view the Canon driver help.
IMPORTANT
NOTE
• Note that mixing documents of different thickness may cause a
malfunction during feeding.
• Curled, wrinkled, or folded documents may cause an error. If this happens,
straighten out the curls, or reduce the number of documents loaded.
Using Infrared Double Feed Detection
The double feed detection function that the scanner is equipped with
uses the infrared sensor to detect when two or more documents are fed
at the same time.
If false detections happen too often, disable the double feed detection
function.
34
• The following types of document may be misdetected as double fed:
• Documents with a colored background
• Documents with a glossy finish
If misdetection of double feeds occurs often, turn off double feed
detection.
• Double feed detection is valid for documents with a thickness within the
range 0.10 mm to 0.14 mm (0.004" to 0.006"). Double feeds cannot be
detected for thicker or thinner documents.
Placing Documents
Note the following points when placing documents on the scanner.
• Place the front of the document toward you.
• A maximum of 50 documents or a document stack no higher than
5 mm (0.2") can be loaded at one time.
• Move the stopper to the edge of the document in the document
tray in accordance with the document. Otherwise, this may
cause a paper eject error.
• When scanning multiple documents, sort them into batches of
uniform paper quality and thickness and load each batch
separately. Note that loading mixed batches may cause paper
jams.
• When scanning relatively thick (0.15 mm to 0.2 mm (0.005" to
0.008") documents, the feeding process may cause the
document to curl and cause paper jams at the document feed
opening. For such documents, load no more than 10 sheets at
one time.
Document Feeding and Scanning
This section describes how to load and scan documents.
CAUTION
• Avoid wearing loose fitting clothing, dangling jewelry, long ties,
or long hair that could become entangled with moving parts,
especially the rollers that feed paper through the scanner. If such
objects become entangled, immediately disconnect the power
plug from the power outlet.
• Check the paper stack and remove all clips, staples, pins, or any
other type of metal or plastic fastener. These objects may cause
damage to the document, a paper jam, or a scanner malfunction.
• Do not touch documents that are being fed under any
circumstances. The documents that are being fed may cut your
hand.
IMPORTANT
Align the documents and set the bottom of the documents level in the
document tray.
35
Scan Procedure
A
B
C
Carefully align the edges of the document.
Adjust the Eject Stopper in accordance with the document.
E
Instruct scanning to start from the software application.
NOTE
Load the documents with their front sides facing right and with
their edges flush against the document load mark.
Document
Load Mark
36
D
Pull out the document feed tray.
• When Using the Accompanying Scanning Utility for CR-50/80:
There are three scanning methods as follows. Follow the each instruction.
Scan 1 page
Click [Scan Page] from the [File] menu.
Scan Batch to File
A Click [Scan Batch to File] from the [File] menu.
B Input the File name, and then click [Save].
C Select Simplex or Duplex, and then click [Start Scanning].
Scan Batch to Printer
A Click [Scan Batch to Printer] from the [File] menu.
B Select Simplex or Duplex, and then click [Start Scanning].
F
Confirming Proper Document Feeding
Scanning starts.
NOTE
When printing with the imprinter, ink may get on the leading edge of the
document because the documents are ejected onto the printed surface.
Depending on the thickness of documents scanned with the CR-50/80
and the paper thickness setting, double feeds or feeding errors may
occur.
After installing the CR-50/80 or before scanning documents of a
different thickness, perform the procedure below to confirm that
documents are separated one sheet at a time. If documents do not
feed properly, see “Adjusting the Separation Roller Gap,” on p. 52 to
adjust for paper thickness.
A
Ink residue
Start the Scanning Utility.
Printed text (back side)
37
NOTE
C
Load two documents with their edges flush against the mark.
For instructions on using the scanning utility, see “How to Use the Scanning
Utility,” on p. 28. You can also refer to the scanning utility help in the [Help]
menu.
Document
Load Mark
B
Pull out the document feed tray.
D
E
38
Adjust the position of the eject stopper. (If necessary, see the
diagram in step 4 on p. 36.)
Click [Scan Page] from the [File] menu and confirm that only
one sheet is fed.
NOTE
If the sheets do not feed properly (they double-feed or no sheets are fed),
see “Adjusting the Separation Roller Gap,” on p. 52 to adjust for paper
thickness.
F
Exit the scanning utility.
39
Troubleshooting
This chapter describes the problems that might occur in the CR-50/80,
and how to remedy them.
When the Scanner Is Not Recognized
Clearing Paper Jams
If paper has jammed, open the Maintenance Cover and remove the
jammed paper.
The following causes and remedies describe why your computer may
not recognize the scanner.
Cause
The Scanning Utility is not installed.
Remedy Install the Scanning Utility before connecting the scanner to
the computer. (See “Setting Up the Scanner,” on p. 17.)
Cause
The scanner is not correctly connected to the computer.
Remedy Connect the scanner to the computer correctly. (See
“Connecting the Scanner to a Computer,” on p. 21.)
Cause
The USB interface provided as standard with your
computer is not compatible with the scanner.
Remedy Not all USB interfaces provided as standard with personal
computers are guaranteed. Contact your local authorized
Canon dealer for more detailed information. (See “Checking
Your Operating Environment,” on p. 18.)
Cause
USB cable is not compatible with the scanner.
Remedy Use the USB cable provided with the scanner. (See
“Checking Your Operating Environment,” on p. 18.)
Cause
USB hub is not compatible with the scanner.
Remedy Remove the USB hub to use the scanner. (See “Checking
Your Operating Environment,” on p. 18.)
40
IMPORTANT
Do not attempt to pull the jammed paper upwards or backwards against the
feeding direction. Doing so can damage the internal parts of the scanner.
CAUTION
• Be careful when you clear a paper jam. You may be injured
unexpectedly. For example, the paper edges may cut your fingers, or
the document may be damaged.
• Remove all jammed sheets of paper. Paper scraps left inside the
scanner may cause a paper jam or malfunction.
A
Hook your finger around the open lever and open the
Maintenance Cover.
B
C
If the paper is jammed at any other area: Pull the paper forward
and clear the jam from the nearest opening.
While lowering the down the OPEN lever, open the reading
unit.
Remove the paper that has jammed.
D
Gently close the reading unit until it clicks into place.
If the paper is jammed at the pickup area: Pull the paper forward
and clear the jam from the Maintenance Cover.
41
E
Gently close the Maintenance Cover until it clicks into place.
The Scanner Does Not Turn ON
Check the following conditions, and take the appropriate action.
The power switch is not in the ON position.
Turn the switch into the ON position. (See “Turning ON the Power,”
on p. 22.)
The power cord is not connected into a power outlet.
Connect the power cord into a power outlet. (See “Connecting the
Power Cord,” on p. 22.)
42
Feeding Trouble
If the document is not fed properly or the detection functions do not
work properly, remedy the problem by checking the following
conditions.
Condition
A paper jam has occurred.
Cause and
Remedy
• Check to make sure that the size and thickness of the
document are within the supported range of the
scanner, and if the quality of the paper is appropriate.
For cautions on handling documents, see
“Documents,” on p. 33.
• Documents with rough surfaces may cause a paper
feed error to occur.
• Dirty or worn rollers inside the scanner may cause a
paper jam.
Clean the rollers if they are dirty. (See “Cleaning the
Scanning Glass and Rollers,” on p. 45.) Worn rollers
must be replaced. Contact your local authorized Canon
dealer or service representative to have the scanner
serviced.
• The Separation Roller gap is too wide. Adjust the
Separation Roller gap. (See “Adjusting the Separation
Roller Gap,” on p. 52.)
Condition
A double feed error often occurs.
Cause and
Remedy
A double feed error may occur when documents with
different thicknesses are mixed.
If the above-mentioned method is not effective or you are
using the CR-50/80 scanner, adjust the Separation Roller
gap. (See “Adjusting the Separation Roller Gap,” on
p. 52.)
Condition
MICR characters are not recognized correctly.
Cause and
Remedy
• The scanner cannot correctly read MICR characters if
the magnetic heads are dirty. Clean the MICR
magnetic heads. (See “Cleaning the Magnetic Heads,”
on p. 48.)
• If MICR characters cannot be recognized correctly
after cleaning the heads, the MICR heads may be
worn. Contact your local authorized Canon dealer or
service representative to have the scanner serviced.
• The MICR text is on the back of the document. Load the side
with the MICR characters face up in the document tray.
Other
Causes
• Some of the MICR characters are scratched or missing.
Splattered MICR ink or toner may also be the problem.
Condition
The imprinter is not printing correctly (missing
imprint dots).
Cause and
Remedy
Ink is clogged in the ink jet nozzle. Clean the ink jet
nozzle. Cleaning the ink jet nozzle is recommended
before using the CR-50/80. (See “Cleaning the Ink Jet
Nozzles,” on p. 49.)
Other
Causes
The ink cartridge may be empty.
Condition
Documents get dirty when using the imprinter.
Cause and
Remedy
Ink from the imprinter has been placed on the feed path.
Clean the ink off the feed path. (See “Cleaning the Ink Jet
Nozzles,” on p. 49 and “Cleaning the Inside of the
Scanner,” on p. 45.)
43
When the Scanned Image Is Not
Normal
If there is a problem with the scanned image (the image is not sharp or
stripes appear), one of the following conditions may be a probable
cause. Check the following conditions, and take the appropriate action.
The scanning glass or rollers are dirty.
If the scanning glass or rollers are dirty, the dirt will appear on the
scanned image.
Clean the scanning glass and rollers. For details, see “Cleaning
the Scanning Glass and Rollers,” on p. 45.
The scan conditions are inappropriate.
If the scan conditions are inappropriate, the scanned image will not
be sharp or will appear as dark.
Check the brightness and other scanner settings.
If the scanned image is blurry or the document has not been
scanned at all, the brightness may be set too high.
If the scanned image appears dark, the brightness may be set too
low.
Also, check the settings on the driver and the software application.
The driver or application does not run correctly.
If the document cannot be scanned correctly even if the scan
conditions are adjusted, the driver or the application may not be
functioning correctly.
Reinstall the driver or application.
For details on how to install the driver, see “Installing the Software,”
on p. 19.
For details on how to install the application, see the applications
instruction manual.
44
Other Causes
Even if the computer may be recognizing the scanner correctly, and
the driver and the application is installed correctly, scanning may
not be performed correctly. If this happens, the interface card is not
compatible. Use the recommended interface card.
If the above remedies do not rectify the problem, contact your local
authorized Canon dealer or service representative to have the scanner
serviced.
Maintenance
This chapter describes how to clean and maintain the scanner.
Daily Cleaning
To ensure high-quality image scanning, regularly clean your CR-50/80
as described below.
CAUTION
• Before you clean the scanner, turn OFF the scanner and computer,
and disconnect the power cord from the power outlet. Otherwise, it
may cause an electrical shock.
• Never clean the scanner with any kind of organic solvent, such as
alcohol, benzene, or paint thinner. This may cause a fire and electrical
shock, or cause the exterior of the scanner to disfigure or discolor.
• Never spray mild detergent or water directly on the scanning glass.
The spray could penetrate below the glass and contaminate the
internal light source and lenses.
Cleaning the Inside of the Scanner
Dust or paper particles inside the scanner can cause lines in scanned
images. Use compressed air for regular cleaning of dust and paper
particles from inside the scanner. After finishing a large scanning job,
you should turn OFF the scanner and then clean off any paper particles
that are remaining.
Cleaning the Scanning Glass and Rollers
If stripes appear on scanned images or if dirt appears on scanned
documents, clean the scanning glass and rollers. Clean the scanning
glass and rollers regularly.
A
Hook your finger around the open lever and open the
Maintenance Cover.
Cleaning the Main Unit
Wipe the scanner with a firmly wrung cloth, moistened slightly with
water or mild detergent. Then, wipe off with a clean, dry cloth.
45
B
While lowering the open lever, open the reading unit.
NOTE
• Use cotton swabs to clean the rollers in locations that are too narrow for
your fingers, such as a, b, j, n, o, and p.
• Rollers in positions b, d, e, k, and p are turned by the roller in position
e. Turn the roller in position e to wipe the rollers.
• Rollers in positions m and n comprise two rollers each, an upper roller
and a lower roller.
• Do not force the rollers if they will not turn. In this case, wipe dirt only off of
the exposed area.
WARNING
Do not use flammable liquids to clean the scanner, including alcohol,
benzene, or paint thinner.
C
Ԣ
Spin the rollers while wiping them clean with a firmly wrung
cloth dampened with water or a mild detergent.
There are 18 roller positions, as shown in the diagram below.
ԣ
Ԥ
Ԧ
ԧ
ԥ
Ԣ
ԡ
Ԡ
ԙ
Ԙ
Ԛ
ԛ
ԟ
Ԝ
ԝ
46
ԧ
Ԟ
ԙ
ԛ
Ԝ
D
Use cotton swabs to clean the entire scanning glass. There
are two scanning glass areas, one on each side. Use a cotton
swab to wipe dirt from the entire surface of each.
F
Gently close the maintenance cover until it clicks into place.
Scanning
Glass
IMPORTANT
Scratches on the scanning glass may cause marks on the images and could
cause feeding errors. If there are scratches on the scanning glass, contact
your local authorized Canon dealer or service representative.
E
Gently close the reading unit until it clicks into place.
47
Cleaning the Magnetic Heads
If the magnetic heads are dirty, then MICR characters cannot be
scanned correctly. Periodically, clean the magnetic heads with a
commercially available audio head cleaner.
A
B
Hook your finger around the open lever and open the
maintenance cover.
Use a commercially available audio head cleaner to clean the
magnetic heads.
The magnetic head is located in the position shown in the
diagram below.
Magnetic Head
48
C
Gently close the maintenance cover until it clicks into place.
Cleaning the Ink Jet Nozzles
Ink that collects around the ink jet nozzles may stain your documents
or cause the text to appear as scratched. Clean the area around the ink
jet nozzles periodically. Cleaning the ink jet nozzles is also efficient
action when the printed text becomes faint.
A
B
Hook your finger around the open lever and open the
Maintenance Cover.
IMPORTANT
If your documents are stained and smudged from printing even after you
clean the ink absorber, you should replace the ink absorber. Contact your
local authorized Canon dealer or service representative.
C
Remove the ink cartridge.
D
Use a dry cotton swab to wipe off any ink on the ink jet nozzle.
E
Set the ink cartridge.
For more information, see “Replacing the Ink Cartridge,” on p. 50.
If the text still appear faint after this operation, replace the ink
cartridge (See “Replacing the Ink Cartridge,” on p. 50.)
Dampen a cloth with water, wring the cloth out thoroughly,
and then wipe off the dirt around the ink absorber.
Ink Absorber
For more information, see “Setting the Ink Cartridge and
Adjusting the Print Position,” on p. 24.
49
F
Carefully replace the Imprinter Cover.
Maintenance
Make the following adjustments to maintain scanning quality.
Replacing the Ink Cartridge
The ink cartridge needs to be replaced if the printed text becomes
scratchy or faint even if you have cleaned the ink jet nozzle. Replace
the ink cartridge according to the following procedure below.
IMPORTANT
G
Gently close the Maintenance Cover until it clicks into place.
• To replace the ink cartridge, turn the scanner OFF before removing
the Maintenance Cover. After the ink cartridge is set, replace the
Maintenance Cover, and then turn the scanner back ON.
• Finish up the unpacked ink cartridge as soon as possible. More
frequent cleaning of the ink cartridge is required if long time elapses
after unpacking.
NOTE
• Use an ink cartridge. (See “About the Ink Cartridge,” on p. 24.)
• Do not use more than one cartridge by rotation. If you do so, applications
cannot check the ink level precisely.
50
A
B
Hook your finger around the open lever and open the
Maintenance Cover.
Remove the Imprinter Cover.
C
D
Squeeze in both sides of the print position adjustment lever
and move the print cartridge carriage to its lowest position.
Push back the ink cartridge lock lever in the direction of the
arrow in the diagram below, and pull out the ink cartridge by
grasping the tab as shown in the diagram.
CAUTION
Do not touch the ink jet nozzle right after imprinting. The nozzle may be
very hot.
51
E
Set the ink cartridge.
Adjusting the Separation Roller Gap
For more information, see “Setting the Ink Cartridge and
Adjusting the Print Position,” on p. 24.
If double feed should occur too often, adjust the Separation Roller gap
according to the following procedure.
F
Carefully replace the Imprinter Cover.
IMPORTANT
• Make sure that the size, thickness, and weight of your document meets the
conditions of this scanner. See “Document,” on p. 33.
• Your unit has been carefully adjusted to meet most conditions. However,
the below adjustment may be needed depending on your environment
(humidity, temperature, etc.) and the documents you are scanning
(checks, etc.). Perform the adjustment only if necessary.
A
G
52
Gently close the Maintenance Cover until it clicks into place.
Hook your finger around the open lever and open the
Maintenance Cover.
B
D
Pull out the document feed tray.
Slide the two sheets through between the feeding roller and
the separation roller and stop at the position shown below.
Two Sheets
C
Load two checks or check-stock paper together.
NOTE
Separation Roller
Feeding Roller
If you were unable to slide both sheets through the gap between the rollers,
turn the paper thickness adjustment dial counter-clockwise (left) until both
sheets two pieces easily slide through the gap.
E
Gently remove one of the sheets.
Paper Thickness
Adjustment Dial
53
F
Adjust the gap between the feeding roller and the separation
roller to optimum width.
While one sheet remains in place between the rollers,
continuously attempt to slide the second sheet (in front of the
remaining sheet) to the right, back through the roller gap.
Slowly turn the paper thickness adjustment dial clockwise (right)
just until the second sheet stops feeding into the gap.
I
Place a marking label on the unit pointing to the adjustment
dial as illustrated below. This will serve as a reference point
for future adjustments if required.
Second sheet does not feed
into the gap.
Marking labels for thickness
adjustment dial
IMPORTANT
Turning the Adjustment Dial clockwise too much may damage the rollers.
G
H
54
Remove the sheets from the paper path and close the
Maintenance Cover.
Confirm that the document feeds properly.
See “Confirming Proper Document Feeding,” on p. 37.
If additional assistance is required, contact your local authorized
Canon dealer or service representative.
Specifications
Scanner Specifications
Interface
Hi-Speed USB 2.0
Other functions
Dimensions
Infrared double feed detection
140 mm (W) x 223 mm (D) x 188 mm (H)
(5.5" (W) x 8.8" (D) x 7.4" (H))
Weight
Power requirement
Approximately 2.0 kg (4.4 lb)
DC16V 0.8A (excluding AC adapter)
Power consumption
Maximum Power: 20.4 W
Sleep Mode: 4.7 W
Power SW OFF: 0.5 W
Less than 65 dB
Type
Desktop sheet-through scanner
Document size
Document feeding
Height: 50 to 108 mm (2.0" to 4.3")
Length: 80 to 228 mm (3.1" to 9.0")
Thickness: 0.08 to 0.20 mm (0.003" to
0.008")
0.10 to 0.14 mm (0.004" to 0.006") with
double feed detection enabled
Weight: 64 to 157 g/m2 (17 to 40 lb bond)
81 to 105 g/m2 (21.5 to 26.8 lb bond) with
Double Feed Detection enabled
Automatic
Scanning method
Light source
Contact image sensor (CMOS)
LED
Scanning side
Scanning mode
Simplex/Duplex
Black-and-white, Fine Text Filtering, Error
diffusion, 16-Level gray, 256-Level gray,
24-bit color
Input
AC 100-240V 50/60Hz 53VA-72VA
Output
Weight
DC16V 1.4A
Approximately 0.22 kg (0.49 lb) (excluding
power cord)
Scanning resolution
(primary scan lines x
secondary scan lines)
Scanning speed
Excluding 24-bit color: 100 x 100 dpi,
200 x 200 dpi, 300 x 300 dpi
24-bit color: 100 x 100 dpi, 200 x 100 dpi
CR-50: 50 cpm (American checks)
CR-80: 80 cpm (American checks)
■ Use the recommended operating environment for the ink
cartridge when using the imprinter.
■ You can use the functions noted above if your software
supports them.
■ These functions may not work depending on your computer’s
capabilities and the software you are using.
Automatic feeder capacity Load limit of less than 5 mm (0.2") (within
the load limit mark)
Automatic document feed Up to 50 sheets
capacity
Noise
Operating environment
Temperature: 10°C to 32.5°C (50°F to
90.5°F)
Humidity: 20% to 80% RH (20% to 50% RH
when using the imprinter)
AC Adapter Specifications
Specifications are subject to change without notice.
55
Index
A
H
AC Adapter Specifications ............................................... 55
Adjusting the Print Position .............................................. 24
Amount loaded................................................................. 35
Handling .............................................................................9
I
Imprinter Cover.................................................................14
Ink Absorber .....................................................................15
Ink Cartridge .........................................................15, 24, 50
Ink Jet Nozzle ...................................................................49
Installation Location..........................................................10
C
Cleaning
Main unit .................................................................... 45
Cleaning the Inside of the Scanner.................................. 45
Connectors/Power Switch................................................ 16
L
D
Lock Lever ........................................................................ 15
Daily Cleaning.................................................................. 45
Disposal ........................................................................... 10
Document Eject Opening ................................................. 14
Document Feed Opening................................................. 14
Document Feed Tray ....................................................... 14
Documents....................................................................... 33
Document .................................................................. 33
How to place documents ........................................... 35
Double Feed Detection .................................................... 34
E
Magnetic head ..................................................................48
Magnetic Head for MICR ..................................................15
Maintenance .....................................................................50
Maintenance Cover ..........................................................14
Moving the Scanner..........................................................11
N
Number of pages loaded ..................................................35
O
Eject Stopper ................................................................... 14
Exterior Dimensions......................................................... 16
F
Features of the CR-50/80 ................................................ 12
Feeding Roller.................................................................. 15
Feeding Trouble............................................................... 43
56
M
Operating Environment.....................................................18
P
U
Paper Thickness Adjustment Dial .................................... 14
Power Connector ............................................................. 16
Power Cord ................................................................ 13, 22
Power Indicator ................................................................ 14
Power Supply................................................................... 11
Power Switch ................................................................... 16
Print Position Adjustment Lever................................. 15, 51
Unpacking the scanner.....................................................13
USB Connections .......................................................21, 40
USB Connector.................................................................16
R
Reading Unit (Access Hatch)........................................... 16
Recognizing the scanner ................................................. 23
Rollers.............................................................................. 45
S
Scanning Glass................................................................ 45
Scanning Utility .......................................................... 19, 28
Separation Roller ............................................................. 15
Setup Disc........................................................................ 13
Software
How to Use the Software........................................... 28
Install ......................................................................... 19
Uninstall..................................................................... 30
Specifications................................................................... 55
T
The Scanner Does Not Turn ON...................................... 42
Troubleshooting ............................................................... 40
Turning OFF the Power ................................................... 23
Turning ON the Power ..................................................... 22
57
CANON ELECTRONICS INC.
1248, SHIMOKAGEMORI, CHICHIBU-SHI, SAITAMA 369-1892, JAPAN
CANON U.S.A. INC.
ONE CANON PLAZA, LAKE SUCCESS, NY 11042, U.S.A.
CANON CANADA INC.
6390 DIXIE ROAD, MISSISSAUGA, ONTARIO L5T 1P7, CANADA
CANON EUROPA N.V.
BOVENKERKERWEG 59-61, P.O.BOX 2262, 1180 EG AMSTELVEEN, THE NETHERLANDS
CANON LATIN AMERICA, INC.
703 WATERFORD WAY, SUITE 400, MIAMI, FL 33126, U.S.A.
CANON SINGAPORE PTE. LTD.
1 HARBOUR FRONT AVENUE #04-01, KEPPEL BAY TOWER, SINGAPORE 098632
CANON HONGKONG COMPANY LTD.
19TH FLOOR, THE METROPOLIS TOWER, 10 METROPOLIS DRIVE, HUNGHOM, KOWLOON, HONG KONG.
PUB. CE-IE-836
© CANON ELECTRONICS INC. 2011