1
Quick Start Guide
1
2
EOS 6D (WG)
EOS 6D (N)
3
Insert the battery.
Insert a card.
With the card’s label
facing toward the back
of the camera, insert it
into the card slot.
Attach the lens.
Align it with the red dot.
6
While holding down the
center of the Mode Dial,
set it to <A> (Scene
Intelligent Auto).
7
8
Preparation
Image Playback
6
Index
Magnify
Aim the viewfinder center over the
subject and press the shutter
button halfway to autofocus.
u
0
Take the picture.
Y
OP
Press the shutter button
completely to take the
picture.
C
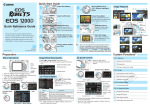
This quick guide explains basic function
settings and how to shoot and play back
images. You can take this guide with you for
shooting. For detailed instructions, refer to the
Camera Instruction Manual (CD-ROM).
CPQ-E056-000
4
E
English Edition
© CANON INC. 2012
5
9
View the image.
The captured image will be
displayed for 2 sec. on the
LCD monitor.
<M >
button
LCD
monitor
C
Y
OP
Y
Px
COPlayback
9
L
Set the lens focus
mode switch to <f>.
6
Focus the subject.
PY
CO
Erase
56
BShooting information
<0> button
1. Press the <M> button to display the menu.
2. Press the <U> key to select a secondary tab, then press
the <V> key to select the desired item.
3. Press <0> to display the setting.
4. After setting the item, press <0>.
C
Y
OP
C
Y
OP
Basic Zone Modes
Possible shots
RAW: Turn the <6> dial
to select the quality.
JPEG: Press the <U> key
to select the quality.
Y
PY
A Picture
OP
CO StyleN
C
Under the [z4] tab, select
[Picture Style], then press <0>.
Press the <V> key to select a
Picture Style, then press <0>.
Select image
Style
Tabs
The M on the right of the function indicates that the function
is available only in Creative Zone modes.
Number of Possible Shots with Viewfinder Shooting
Temperature
At 23°C / 73°F
At 0°C / 32°F
Possible shots Approx. 1090 shots
Approx. 980 shots
Select [z1: Image quality], then press <0>.
Turn the <6> dial or press the <U> key to select the
image-recording quality, then press <0>.
Image-recording quality
Pixels recorded
<V><U>
Creative Zone Modes
Set the power switch
to <1>.
Image-recording Quality
Menu Operations
Menu items Menu settings
Description
Color tones optimized for the particular scene.
D Auto
Vivid colors and sharp images.
P Standard
Nice skin tones and slightly sharp images.
Q Portrait
R Landscape Vivid blue skies and greenery and very sharp images.
V Monochrome Black-and-white images.
For <S> (Neutral) and <U> (Faithful), refer to the
Camera Instruction Manual (CD-ROM).
Custom Functions
Q Quick Control
Press the <Q> button.
The Quick Control screen will
appear.
Shutter speed
Shooting mode
Exposure
compensation/
AEB setting
Picture Style
Aperture
Flash exposure compensation
AE lock
Highlight tone priority
ISO speed
Wi-Fi function
Custom Controls
Image-recording
quality
AF operation
White balance
AF point
White balance correction
Drive mode
Auto Lighting
Optimizer
Metering mode
White balance bracketing
C.Fn I: Exposure
1
Exposure level increments
2
ISO speed setting increments
3
Bracketing auto cancel
4
Bracketing sequence
5
Number of bracketed shots
6
Safety shift
C.Fn II: Autofocus
1
Tracking sensitivity
2
Acceleration/deceleration tracking
3
AI Servo 1st image priority
4
AI Servo 2nd image priority
5
AF-assist beam firing
6
Lens drive when AF impossible
7
Orientation linked AF point
8
Superimposed display
9
AF Microadjustment
Press the <V> or <U> key to select a function, then turn
the <6> or <5> dial to set it.
In Basic Zone modes, the settable functions differ depending
on the shooting mode.
C.Fn III: Operation/Others
Electronic Level
1
Dial direction during Tv/Av
2
Focusing screen
3
Multi function lock
Each time you press the <B>
button, the screen display will
change.
Display the electronic level.
4
Warnings ! in viewfinder
5
Custom Controls
Shooting Operation
Nomenclature
<i>
ISO speed
setting button
LCD Panel
<f> AF operation selection button
<6>
Main Dial
Mode Dial lock
release button
Mode Dial
Aperture
Drive mode
ISO speed
AF operation
Metering mode
AEB
Possible shots
Shutter speed
Shutter
button
Focus mode
switch
Battery check
Exposure level
indicator
OK
Not good
Viewfinder Information
<A/k> Live View shooting/
Movie shooting switch
<0> Start/Stop
button
Power switch
<9>
Multi-controller
<0>
Setting button
Multi function lock switch
<p>
AF start button
AF points
<5> Quick
Control Dial
Focus
confirmation
light
Battery check
Flash-ready
Access lamp
A : Scene Intelligent Auto
C : Creative Auto
8 : Special scene
2 : Portrait
6 : Night Portrait
3 : Landscape
F : Handheld Night Scene
4 : Close-up
G : HDR Backlight Control
5 : Sports
Y
OP
C
Creative Zone Modes
PY
CO
* Set the <R> switch to the left (Multi
function lock released).
AE lock
Flash exposure
compensation
Shutter speed
Maximum burst
ISO speed
Exposure level indicator
Aperture
Set the Mode Dial to <s>.
Turn the <6> dial to set the
desired shutter speed, then focus
the subject.
The aperture will be set automatically.
If the aperture display blinks, turn
the <6> dial until it stops blinking.
All the settings necessary for
shooting are set automatically. You
just press the shutter button, and
the camera does the rest.
You can change the camera settings
as desired to shoot in various ways.
<A> AE lock button
<S>
AF point
selection
button
s: Shutter-priority AE
Basic Zone Modes
<R> Drive mode selection button
d: Program AE
Set the Mode Dial to <d>.
The camera automatically sets the shutter speed and
aperture in the same way as the <A> mode.
Press the <i> button, then
turn the <6> dial.
ISO 100 to ISO 25600 can be set
in 1/3-stop increments.
When “A” is selected, the ISO
speed is set automatically. When
you press the shutter button
halfway, the ISO speed setting is
displayed.
f: Aperture-priority AE
PY
CO
Set the Mode Dial to <f>.
Turn the <6> dial to set the desired
aperture, then focus the subject.
The shutter speed will be set
automatically.
If the shutter speed display blinks, turn
the <6> dial until it stops blinking.
CO
a: Manual Exposure
PY
Set the Mode Dial to <a>.
Turn the <6> dial to set the
desired shutter speed.
Turn the <5> dial to set the
desired aperture.
Focus the subject and check the
exposure level indicator.
f: AF OperationN
i: ISO SpeedN
PY
PY
i Drive
COMode
CO
Press the <R> button, then
turn the <6> dial.
u
i
B
M
:
:
:
:
Single shooting
Continuous shooting
Silent single shooting
Silent continuous
shooting
Q : 10-sec. self-timer/
Remote control
k : 2-sec. self-timer/
Remote control
A Live View Shooting
Set the lens focus mode switch to
<f>.
Press the <f> button, then turn
the <6> dial.
PY
X(One-Shot AF):
For still subjects
9(AI Focus AF):
Switches the AF operation
automatically
Z(AI Servo AF):
For moving subjects
CO SelectionN
S AF Point
PY
CO
Press the <S> button, then look
through the viewfinder.
The AF point selection will change
in the direction you tilt the <9>.
Pressing <0> toggles the AF
point selection between the
center AF point and automatic AF
point selection.
The <6> dial selects an AF
point in the horizontal direction,
and the <5> dial selects an AF
point in the vertical direction.
k Shooting Movies
Set the switch to <A>.
Press the <0> button and the
Live View image will appear on
the LCD monitor.
Set the switch to <k>.
The image will appear on the
LCD monitor.
Press the shutter button halfway
to focus.
Press the shutter button halfway
to focus.
Press the shutter button
completely to take the picture.
Press the <0> button to stop
the Live View shooting.
Press the <0> button to start
shooting a movie. To stop movie
shooting, press the <0> button
again.
To shoot still photos, press the
shutter button completely.
Number of Possible Shots with Live View Shooting
Temperature
At 23°C / 73°F
At 0°C / 32°F
Possible shots
Approx. 220 shots
Approx. 190 shots
When the shooting mode is <a>, you can shoot movies
with manual exposure.
You can set movie shooting settings with the menu options
under the [Z1] or [Z2] tab.