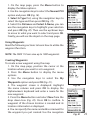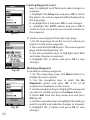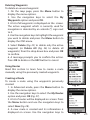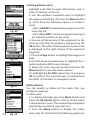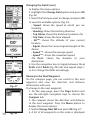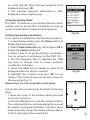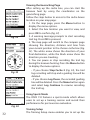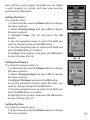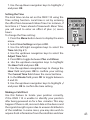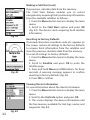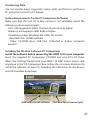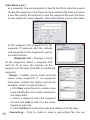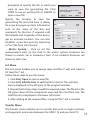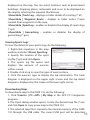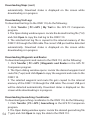
1
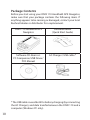
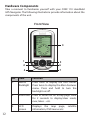
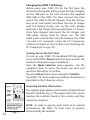
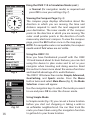
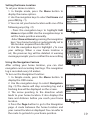
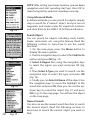
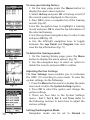
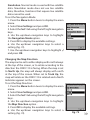
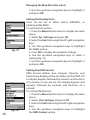
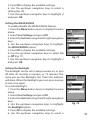
ONIX 110
GPS NAVIGATOR
Instruction Manual
Model 36-1100
Lit# 98-1324/11-08
About This Manual
Thank you for choosing the Bushnell ONIX 110 GPS Receiver. This
manual will help you to familiarize yourself with this product
and set it up to best suit your needs. Keep this manual for future
reference.
Copyright Information
No part of this manual, including the products and software
described in it, may be reproduced, transmitted, transcribed,
stored in a retrieval system, or translated into any language in any
form or by any means, without the express written permission of
Bushnell Outdoor Products.
Copyright © 2008 Bushnell Outdoor Products
All Rights Reserved.
Safety Information
• Read and understand all instructions.
• When using this product, heed the safety precautions to reduce
the risk of fire, electric shock, or personal injury.
• Do not disassemble the device. The product contains no userreplaceable parts.
2
How Does “GPS” Work?
GPS stands for “Global Positioning System”. Launched by the United States
Department of Defense, GPS consists of a constellation of 24 satellites orbiting the
earth at nearly 11,000 miles. These satellites are traveling at a speed that allows
them to circle the earth twice each day while emitting a very low power signal. The
signals are timed by clocks that are highly accurate and are received by one of 5
ground stations. These ground stations use the precisely timed signal to determine
each satellite’s exact position in orbit. Your GPS receiver can “hear” the signal sent
by the satellite. By calculating the position and distance of at least 4 satellites,
accurate latitude, longitude and altitude location information can be determined.
WAAS adds to your GPS’s accuracy. WAAS stands for Wide Area Augmentation
System. WAAS was designed by the United States Federal Aviation Administration,
primarily to add in the accuracy of GPS for planes. WAAS consists of the group
of additional ground stations placed at known and precisely located spots. These
ground stations then work with a master station to correct the satellite signals
improving accuracy to within nearly 3 meters. WAAS reception may be turned on
in the SET page menu-however, the default setting is “Off” due to the additional
battery drain it causes.
Software License Agreement
BY USING THE ONIX, YOU AGREE TO BE BOUND BY THE TERMS AND CONDITIONS
OF THE FOLLOWING SOFTWARE LICENSE AGREEMENT. PLEASE READ THIS
AGREEMENT CAREFULLY.
Bushnell grants you a limited license to use the software embedded in this device
(the “Software”) in binary executable form in the normal operation of the product.
Title, ownership rights and intellectual property rights in and to the Software
remain with Bushnell.
You acknowledge that the Software is the property of Bushnell and is protected
under the United States of America copyright laws and international copyright
treaties. You further acknowledge that the structure, organization and code of the
Software are valuable trade secrets of Bushnell and that the Software in source
code form remains a valuable trade secret of Bushnell. You agree not to decompile,
disassemble, modify, reverse assemble, reverse engineer or reduce to human
readable form the Software or any part thereof or create any derivative works
based on the Software. You agree not to export or re-export the Software to any
country in violation of the export control laws of the United States of America.
3
Warnings and Notices
GPS System & Map Data Accuracy Notice:
The Global Positioning System (GPS) is operated by the government of the United
States, which is solely responsible for its accuracy and maintenance. The system
is subject to changes which could affect the accuracy and performance of all GPS
equipment.
All map data sources contain some level of inaccuracies or incomplete data.
Bushnell strives to provide the most recent map information at a reasonable cost.
Warning:
This device is intended as a supplemental handheld navigation aide only. The
user assumes all responsibility associated with the use of this product. It must not
be used for any purpose requiring precise measurement of location, direction,
distance, velocity or topography. This device should not be used for any aircraft
navigation applications.
Warning:
Do not use this device with any power source other than the included rechargeable
battery. Check the battery compartment after the unit has had any prolonged
exposure to significant amounts of water (rain, snow, etc).
Vehicular Use Notice:
Bushnell is committed to the safe and responsible enjoyment of the outdoors.
Do not use this product while driving. An accident can result in property damage,
injury or death if the operator fails to practice prudent driving practices. It is the
sole responsibility of the driver of any vehicle to operate the motor vehicle in a
safe manner. Information from the GPS unit can distract the operator of a motor
vehicle. It is unsafe to operate the controls of the GPS unit while operating a motor
vehicle. If used in a motor vehicle, it must not be used by the operator of the
motor vehicle. If it is used in a motor vehicle it must be mounted in a manner such
that it does not distract the operator, does not interfere with the operator’s field of
view, and does not block or interfere with the air bags or other safety mechanisms
of the motor vehicle.
4
Table of Contents
Product Overview
9
Package Contents
10
Main Features
11
Hardware Components
12
Front View
12
Rear View
13
Bottom View
13
Setting up the ONIX 110
14
Installing the Battery
14
Turning On For the First Time
14
Acquiring Satellite Information
14~15
Turning the GPS On/Off
15
Viewing the Map Page
15
Zooming In/Out
16
Turning on the Backlight
16
Adjusting the Screen Contrast
16~17
Using the ONIX 110 in Simulation Mode
17
Viewing the compass page
18
Using Simple Mode
18
Setting the Home Location
19
Using the Navigation Feature
19
Using Advanced Mode
20
Search Object
20
5
Table of Contents
Nearest Search
Using Waypoints
Creating Waypoints
21
21~22
Modifying Waypoints
22
Deleting Waypoints
23
Using Routes
23
Creating a Route
23~24
Editing Routes
24~25
Using Trails
Creating a Trail Log
25
26~26
Viewing Trail Log Information
27
Using the Shortcut On Feature
27
Using Map Scale Feature
27
Using the Set Location Feature
28
Using Measure Distance Feature
28
Viewing Trip Status
28~29
Resetting Trip Data
29
Changing the Fields
29~30
Moving to the Next Waypoint
30~31
Using Geocaching Mode
31
Setting Geocaching Coordinates
31
Viewing the Geocaching Page
32
Using Sports Mode
32
Training Setup
6
20~21
32~33
Table of Contents
Setting the Timer
33
Setting the Distance
33
Setting the Pace
Setting the Speed
Setting the Lap
Setting Auto Pause
Miscellaneous Settings
Start Training
Viewing Training History
Adjusting the User Settings
33~34
34
34~35
35
35~36
37
37~38
38
Setting the Navigation Mode
38~39
Changing the Map Direction
40
Setting the Display Units
40
Setting the DMS Format
41
Setting the WAAS/EGNOS
41
Setting the Backlight
42
Setting the Beeper
42
Setting the Startup Page
42
Setting the Time
Making a Cold Start
43
43~44
Resetting to Factory Defaults
44
Viewing Device Information
44
7
Table of Contents
Transferring Data
45
System Requirements
45
Installing the USB Driver & PC Companion
45
Making Connections
45
Starting Data Transfer
46
Using the PC Companion Program
46
Features
47
File Menu
47
Show Menu
47~49
Tools Menu
49~50
List Menu
Transfer Menu
51~52
About Menu
52
Context Menu
52
Viewing Sports Logs
53
Downloading Maps
Downloading Trail Logs
Downloading Waypoints and Routes
Downloading Geocaching Coordinates
Uploading Data
8
51
53
53~54
54
54
54~55
Troubleshooting
56
Specifications
57
Introducing the ONIX 110
Product Overview
Congratulations on your purchase of the Bushnell ONIX 110 GPS
Navigator. The ONIX 110 is an easy-to-use, multi-function handheld
GPS navigator which allows you to enjoy outdoor activities without
worrying about losing your way in unknown locations. The ONIX
110 helps you to locate your position anywhere in the world and
navigate your way easily. It also features a Geocaching function for
users to participate and enjoy treasure hunting games. The sports
mode acts as a personal training aid to help you set up training
programs and calculate the calories you burn during training. The
various features of the ONIX 110 make it your ideal companion for
outdoor activities.
9
Package Contents
Before you start using your ONIX 110 Handheld GPS Navigator,
make sure that your package contains the following items. If
anything appears to be missing or damaged, contact your local
Bushnell dealer or distributor for a replacement.
ONIX 110 Handheld GPS
Navigator
Documentation
(Quick Start Guide)
Software CD-Rom inc.
PC Companion/USB Driver/
PDF Manual
AC Charger / USB cable *
* The USB cable is used both for battery charging (by connecting
the AC Charger), and data transfer between the ONIX 110 and a
computer (Windows PC only).
10
ONIX 110 Features
• Point tracking /Route recording
• Object quick search
• 4 gray level display
• 20 parallel satellite-tracking channels for fast
acquisition and reacquisition (TTFF)
• Waterproof—ideal for outdoor sports
• WAAS (North America) and EGNOS (Europe) GPS
receiver with accuracy to 3 meters
• Battery life up to 20 hours (depending on usage)
• Map includes & stores roads, river, lakes, borders,
cities and POIs.
• SiRF GSC3
• 9 keys (Menu, Esc, Zoom in, Zoom out, Hotkey,
4-way navigation keys)
• 2MB program code in NOR flash
• 2MB pseudo SRAM
• Buzzer
• Waypoint, trail log stored in NOR flash
• 1600 mAh battery
11
Hardware Components
Take a moment to familiarize yourself with your ONIX 110 Handheld
GPS Navigator. The following illustrations provide information about the
components of the unit.
Front View
3
12
1
2
5
6
4
7
No.
Item
Function
1.
Menu/
Backlight
Press once to display the OSD menu.
Press twice to display the Main Features
menu. Press and hold to turn the
backlight on/off.
2.
Zoom out Press to zoom out on a map page. Hold
for 2 seconds to display/clear roads,
river, lakes…etc.
3.
LCD
screen
Displays the map page,
information, OSD menus etc.
satellite
No.
Item
Function
4.
Four way
navigation keys
Up arrow: Press to move the cursor up in
OSD menus or on the map page. Down
arrow: Press to move the cursor down
in OSD menus or on the map page. Left
arrow: Press to move the cursor left in
the OSD menus or on the map page.
Right arrow: Press to move the cursor
right in the OSD menus or on the map
page.
5.
Power/
ESC/Page
Press and hold to turn the power on/
off. Press to exit the OSD menu. Press to
toggle between the map page and the
compass page.
6.
Zoom in
Press to zoom in on the map page. Hold
for 2 seconds to display/clear points of
interest (POIs).
7.
OK/Enter
Press to toggle between the map page
and navigation mode. On the menu
page, press to confirm your selection.
USB Port-Cover Open
Rear View
USB Port-Cover Closed
Speaker
Accessory
Attachment
13
Charging the ONIX 110 Battery
Before using your ONIX 110 for the first time, the
internal rechargeable battery must be fully charged,
via the USB port on the unit. Connect the supplied
USB cable to the ONIX 110, then connect the other
end of the cable to the AC Charger. Plug the charger
into an AC wall outlet, and allow the unit to charge
until the battery charge icon on the unit’s display
indicates a full charge (this typically takes 4-5 hours).
Once fully charged, disconnect the AC charger and
USB cable, storing them for future use. The USB
cable is also used for data transfer between the ONIX
110 and a PC computer, using the PC Companion
software included on the CD-Rom (see “Installing the
PC Companion” on pg. 45).
Turning On For the First Time
To turn on your ONIX 110 Handheld GPS Navigator,
press and hold the Power button for two seconds. The
product information page is displayed.
Next, the Mode Selection menu appears. Use the
navigation keys to select the mode you want and
press the OK button to confirm.
Press the Menu button twice and select Satellite.
The ONIX 110 starts acquiring satellite information as
described in the following section.
Acquiring Satellite Information
The satellite page displays information obtained from
the GPS satellites (Fig. 1). The upper half of the screen
displays the satellites found in the vicinity and their
respective numbers.
14
Fig. 1
NOTE: In order to operate each mode at its optimal
performance, the ONIX 110 must have its position
determined by the satellites.
The vertical bars on the bottom of the screen show
the signal strengths acquired from the satellites.
The GPS requires at least 4 satellites to determine its
position. Once the GPS position has been correctly
determined, the position coordinates are displayed
at the bottom of the screen.
Turning the GPS On/Off
When the ONIX 110 is used indoors, the device may
not receive a sufficient GPS signal and a warning
message will appear on the screen. This warning
message does not go off until GPS is turned off.
To turn off GPS, do the following:
1. Press the Menu button twice to display the OSD
menu.
2. Select GPS Off to turn off the GPS function. The
device will stop acquiring satellite data.
3. To resume the GPS function, press the Menu
button to choose GPS On and press OK.
Viewing the Map Page
Press the Page button to toggle between the map
page and the compass page. On the map page, an
icon indicates your current location and the
icon indicates your home location. Press the Menu
button to start navigation.
When navigation is initiated, a route between the
Home location and your current location is displayed
on the screen. You can refer to the route to help you
go back to your Home location. Press the ESC button
to return to the map page.
15
Zooming In/Out
You can change the map scale while viewing the map
with one of the following ways:
• Press the + button to zoom in and increase the
map scale.
• Press the – button to zoom out and reduce the
map scale.
Fig. 2
Alternatively, you can adjust the map scale from the
OSD menu.
1. In Advanced mode, press the Menu button to
display the OSD menu (Fig. 2).
2. Select Map Zoom Scale and press OK to confirm.
A map scale bar is displayed on the map page
(Fig. 3).
3. Use the left/right navigation keys to adjust the
map scale. Press the navigation key to the right to
increase the map scale and to the left to decrease
the map scale.
4. Press OK to save the changes.
The ONIX 110 features eight zoom levels. You can select
from 50m, 100m, 200m, 500m, 1km, 2km, 5km, and
25km.
Fig. 3
16
Fig. 4
Turning on the Backlight
The ONIX 110 is equipped with a built-in backlight
to illuminate the screen when you are using it in
poor lighting conditions. Press and hold the Menu
button to turn the backlight on or off as required.
The backlight status is displayed as the icon on the
bottom left corner of the screen.
Adjusting the Screen Contrast
To adjust the contrast of the LCD screen:
1. Press the Menu button twice to display the OSD
menu.
2. Select Display (Fig. 4) and press OK to confirm.
An LCD scale bar is displayed on the map page.
3. Use the navigation keys to adjust the LCD level.
Press the navigation key to the right to increase
the LCD contrast and to the left to decrease the
contrast as required.
Using the ONIX 110 in Simulation Mode
In normal or navigation mode, the ONIX 110 tracks its
position through satellite information. In simulation
mode, the device stops acquiring data from the
satellites. When you are planning a trip, use the
simulation mode to look up maps, to adjust system
settings, and to conserve battery consumption.
There are two different ways to switch to
simulation mode:
To switch to simulation mode from the satellite page:
1. Press the Menu button to display the OSD menu
(Fig. 5).
2. Use the navigation keys to select GPS Off and
press OK to confirm. The device stops acquiring
satellite information and enters simulation mode.
3. To return to navigation mode, repeat steps
1 and 2, and select GPS On to resume satellite
navigation.
To switch between simulation and navigation mode
from any page:
1. Press the Menu twice button to display the
OSD menu.
2. Use the navigation keys to select User Settings
(Fig. 6) and press OK.
3. Under the Set 1 tab, use the navigation keys to
highlight Navigation Mode option and press OK.
4. Use the navigation keys to select Simulation
Fig. 5
Fig. 6
Fig. 7
17
Using the ONIX 110 in Simulation Mode (cont.)
or Normal (for navigation mode) as required and
press OK to save your settings (Fig. 7).
Fig. 8
Fig. 9
Viewing the Compass Page (Fig. 8)
The compass page displays information about the
direction in which you are moving, the time and
distance required to reach the next waypoint and
your destination. The inner needle of the compass
points in the direction in which you are moving. The
outer small pointer points in the direction of north
measure by electronic compass. To view the compass
page, press the ESC button once on the map page.
NOTE: If a navigable route is not available, the compass
needle and all field values are not visible.
Using the ONIX 110
Now you have familiarized yourself with the ONIX
110 and learned about its basic features, you can start
using this device to plan routes and to act as your
navigator when traveling and doing exercise. Read
this section to learn more about the various functions
and take full advantage of its useful features.
The ONIX 110 features four modes: Simple, Advanced,
GeoCaching, and Sports modes. Press the Menu
button twice and select Main Menu (Fig. 9), the Mode
Selection screen will appear.
Use the navigation keys to select the mode you want
to use and press OK to enter the chosen mode.
Fig. 10
18
Using Simple Mode
In Simple mode (Fig. 10), you can set a home location
before you start out shopping or taking a walk in
an unfamiliar neighborhood. You can then track the
route you have taken using the navigation function
to get back to your home location.
Setting the Home Location
To set your Home Location:
1. In Simple mode, press the Menu button to
display the menu options.
2. Use the navigation keys to select Set Home and
press OK (Fig. 11).
3. You can set your home location with one of the
following ways (Fig. 12):
• Press the navigation keys to highlight Edit
Home and press OK. Use the navigation keys to
set the home position manually.
• Select Save as Home by pressing the navigation
keys. Your home location is automatically set to
the location acquired from the GPS.
4. Use the navigation keys to highlight √ to save
your settings. When a new home location is
set, the previous log will be deleted. A warning
message prompts you to confirm the new setting
Using the Navigation Feature
After setting your home location, you can start
navigation and recording trail logs. The navigation
log is recorded every 50 meters.
To turn on the Navigation function:
1. In Simple mode, press the Menu button to
display the OSD menu.
2. Use the navigation keys to select Navigation.
(Fig. 13) The device will stop recording log and a
tracking line will be displayed on the screen.
3. The arrow pointing to the direction which
leads to your home location. It also displays the
time and distance before you reach your home
location.
4. Press the Page button to go to the Navigation
page. A route between the home location and
your current location is displayed. You can refer to
the route to go back to your home position.
Fig. 11
Fig. 12
Fig. 13
19
NOTE: After setting your home location, you can begin
navigation and start recording trail logs. Press OK to
clear the log history and start recording a new log.
Fig. 14
Fig. 15
Fig. 16
20
Fig. 17
Using Advanced Mode
In Advanced mode, you can search for objects step by
step or search for a “nearest” object. And you can set
waypoints and create routes for important locations
and store them in the ONIX 110 for future reference.
Search Object
You can search for objects including roads, hotels,
banks, restaurants, etc. using this feature. Read the
following sections to learn how to use the search
functions.
1. On the map page, press the Menu button to
display the menu options.
2. Use the navigation keys to select the Find/Go To
option and press OK (Fig. 14).
3. Select A Region first, using the navigation keys
to select the region you want and press OK (Fig.
15).
4. Then Select A Type you want to search, use the
navigation keys to select the type and press OK
(Fig. 16).
5. Finally you can Select A Name of the object. Use
the navigation keys to move the highlight to the
search bar and press OK, then you can use the up/
down keys to select the object (Fig. 17) and press
OK to go to the map page. You will see the object
on the map page.
Nearest Search
You also can use the nearest search function to search
the nearest object. Read the following sections to
learn how to search the nearest object you want to
find.
1. On the map page, press the Menu button to
display the Menu options.
2. Use the navigation keys to select the Nearest POI
option and press OK (Fig. 18).
3. Select A Type first, using the navigation keys to
select the type and then press OK (Fig. 19).
4. Select the Distance and Select A Name, you can
use the navigation keys to highlight your selection
and press OK (Fig. 20). Then use the up/down keys
to move to what you want to select and press OK.
Finally you will see the object on the map page.
Fig. 18
Using Waypoints
Read the following sections to learn how to utilize the
waypoint function.
NOTE: The ONIX 110 can save up to 1000 waypoints.
Creating Waypoints
To create a new waypoint using the map:
1. On the map page, position the cursor at the
location where you want to set a waypoint.
2. Press the Menu button to display the menu
options.
3. Use the navigation keys to select the My
Waypoints option and press OK (Fig. 21).
4. The waypoint screen is displayed. Highlight
the name column and press OK to display the
alphanumeric keyboard and enter a name for the
new waypoint.
5. Press the Menu button and select New from the
drop down box (Fig. 22). Press OK to confirm. A
waypoint of the chosen location is created and its
location information is displayed.
6. You can specify the name and add a comment for
the waypoint you just created. Use the navigation
Fig. 19
Fig. 20
Fig. 21
21
Fig. 22
Creating Waypoints (cont.)
keys to highlight each field and make changes as
required.
7. Highlight the Active box and press OK to check
the option. An active waypoint will be displayed on
the map page.
8. Highlight the √ and press OK to save changes.
9. Highlight the GOTO option and press OK to
create an auto-route from your current location to
the waypoint.
To create a new waypoint from the map page:
1. On the map page, move the cursor to where you
want to create a new waypoint.
2. Press and hold the OK button. The new waypoint
page will be displayed (Fig. 23).
3. Use the navigation keys to highlight each field
and make changes as required.
4. Highlight the √ option and press OK to save
changes.
Fig. 23
Fig. 24
22
Modifying Waypoints
To modify an existing waypoint:
1. On the map page, press the Menu button to
display the menu options.
2. Use the navigation keys to select the My
Waypoints option and press OK. A list of all
waypoints is displayed on the screen.
3. Use the navigation keys to highlight the waypoint
you want to modify and press the Menu button.
4. Select Edit from the drop down box and press
OK (Fig. 24).
5. Use the navigation keys to highlight the field you
want to modify and make the changes as required.
6. Highlight the √ option and press OK to save
changes.
Deleting Waypoints
To delete an unused waypoint:
1. On the map page, press the Menu button to
display the menu options.
2. Use the navigation keys to select the My
Waypoints option and press OK.
3. A list of all waypoints is displayed on the screen.
The active waypoint which is currently used for
navigation is denoted by an asterisk (*) sign next
to it.
4. Use the navigation keys to highlight the waypoint
you want to delete and press the Menu button to
display the OSD menu.
5. Select Delete (Fig. 25) to delete only the active
waypoint (or Delete All (Fig. 26) to delete all
waypoints) from the drop down box and press OK
to confirm.
6. A message prompts you to confirm the action.
Press OK to delete or the ESC button to cancel.
Fig. 25
Fig. 26
Using Routes
Read this section to learn how to create a route
manually using the previously created waypoints.
Creating a Route
To create a route using the waypoints previously
created:
1. In Advanced mode, press the Menu button to
display the menu options.
2. Use the navigation keys to select the My Routes
option and press OK (Fig. 27).
3. A list of routes will be displayed on screen. Press
the Menu button and use the navigation keys to
select New (Fig. 28).
4. A new route is created and its information is
displayed on screen. Use the navigation keys to
Fig. 27
Fig. 28
23
Creating a Route (cont.)
Fig. 29
Fig. 30
Fig. 31
24
Fig. 32
highlight each field to input information such as
name, comment, and so on.
5. Use the up/down navigation keys to highlight
the waypoints field (Fig. 29). Press the Menu button
to select from the following options to create a
route:
• Select Add WP to add existing waypoints to the
route (Fig. 30).
• Select Insert WP to insert a waypoint starting at
the selected location on the route.
6. You can set the priority of the waypoints on the
route by selecting the waypoint and pressing the
OK button. The order of the waypoints on the route
is displayed on the right column of the respective
waypoint.
7. Press the Page button to highlight the waypoints
field.
8. Use the down navigation key to highlight the √
option and press OK to save changes.
9. Select the route you just created and press the
Menu button to view the menu options.
10. Highlight the Set NAV option (Fig. 31) and press
OK to confirm. The selected route is activated and
the ONIX 110 switches to navigation mode.
Editing Routes
You can modify or delete all the routes that you
created as required.
To edit routes:
1. In Advanced mode, press the Menu button and
select the My Routes option. A list of all the routes
is displayed on screen. The route being navigated is
denoted by an asterisk sign next to it.
2. Press the Menu button to display the routes
menu (Fig. 32). Select from the following options to
modify the routes as required:
• Select Edit to modify the chosen route.
• Select Delete to delete the chosen route
• Select Delete All to delete all routes.
• Select Set NAV to activate navigation mode.
• Select Cancel NAV to disable navigation mode.
Using Trails
In the My Trails menu, you can configure trail settings,
change the trail type, and view the trail information.
Creating a Trail Log
The ONIX 110 also features a trail function that records
information about your trip to help you follow the
same trail in the future.
To create a trail:
1. In Advanced mode, press the Menu button to
display the menu options.
2. Highlight the My Trails option and press OK (Fig.
33).
3. Under the My Trails tab use the navigation keys
to highlight the Trail field and press OK to display
the drop down menus.
4. Select from the following options:
• Select Off to disable logging of the trail.
• Select Fill to save trails with no more than 2500
trail points.
• Select Wrap to create trails in a cyclical manner.
After a trail log with 2500 track points is saved,
new trail points are saved by overwriting the old
trail points starting from 0.
•Select Continue (Fig. 34) to create a single
continuous trail log of all trail points. You can
save up to 8 continuous trail logs.
5. Press the Menu button to view the trail log menu
and select from the following options:
Fig. 33
Fig. 34
25
Fig. 35
Fig. 36
26
Creating a Trail Log (cont.)
• Select Clear Trail to clear the current trail points
(Fig. 35).
• Select Save Trail to save the current trail log to
the system’s internal flash memory. Up to 8 trail
logs can be saved.
• Select Trail Distance to calculate the distance
from the start point to the end point.
• Select Trail Area to calculate the trail area from
the start point to the end point.
• Select Delete to delete the selected trail log.
• Select Show ON to display the trail log.
6. Under the Type tab (Fig. 36), follow the steps
below to select the tracking method using distance
or time intervals:
• Highlight the Dist Interval field and press OK
to view the options. Use the navigation keys to
select the distance interval and press OK to save
your settings. Select the ----- option if you do not
wish to specify the distance interval.
• Highlight the Time Interval field and press OK
view the options. Use the navigation key to
select the time interval and press OK to save
your settings. Select the ----- option if you do not
wish to specify the time interval.
7. Use the down navigation key to highlight the
√ option and press OK to save changes.
NOTE:
• If you select a value for both the distance interval
and time interval, a trail point is recorded when either
of the interval value is reached.
• To ensure the integrity of data structure, the trail
log cannot be saved into non-volatile memory when
battery is low.
• When saving trail logs, select the Continue option
and the trail log setting will automatically be set to
Show ON. If you select Wrap or Fill, the trail log setting
will automatically be set to Show Off.
Viewing Trail Log Information
To view trail log information:
1. In Advanced mode, press the Menu button to
display the menu options.
2. Highlight the Trail logs option and press OK to
confirm.
3. Under the Info tab (Fig. 37) use the navigation
keys to view the distance and the area traveled of
the selected trail log.
Fig. 37
Using the Shortcut On Feature
The Shortcut On features allows user to create a “short
cut” from your current location to the location of the
cursor on the map page.
To enable the Shortcut On feature:
1. On the map page, press OK and the cursor will
change to a cross icon. Move the cursor to the
location you want to go to.
2. Press the Menu button to display the menu
options.
3. Select Shortcut On and press OK (Fig. 38).
4. A route between your current location and the
location of your cursor is displayed on the map.
5. Press the Menu button and select Shortcut Off
to disable it.
Fig. 38
Using the Map Scale Feature
Refer to the section titled “Zooming In/Out” to learn
about the map scale function.
27
Using the Set Location Feature
The Set Location feature enables the user to view a
specified location where the user utilizes frequently.
It can automatically go to the location you specified
instead searching for it on the map.
Fig. 39
Fig. 40
Fig. 41
28
To enable the Set Location feature:
1. On the map page, press OK and the cursor will
change to a cross icon.
2. Move the cursor to the point where you wish to
set as a constantly used location.
3. Press the Menu button to display the menu
options.
4. Select Set Location On and press OK (Fig. 39). It
will automatically return to the map page.
5. Press OK and the cursor will move to the location
you just set.
Using the Measure Distance Feature
The Measure Distance feature enables users to
measure the distance from the current position to the
specified destination.
To enable the measure distance function:
1. On the map page, press the Menu button to
display the menu options.
2. Select Measure Dist On and press OK.
3. A ruler appears at the cursor point on the map
screen (Fig. 40). Use the navigation keys to move to
your destination and press OK.
4. The distance between the start point and end
point is displayed.
Viewing Trip Status
To view trip information such as your speed, direction,
trip time, and so on:
1. From the map page, press the Page button to
view the trip status information.
2. Use the navigation keys to toggle between the 6
fields (Fig. 41) and 2 fields (Fig. 42) tabs and choose
the information you want to view:
• Speed: shows the speed at which you are
traveling
• Heading: shows the tracking direction
• TripOdom: shows the distance traveled so far
• TripTime: shows the time elapsed
• AltGPS: shows the altitude of your current
location
• Signal: shows the current signal strength of the
device
Fig. 42
NOTE:
The
icon at the top of the trip status page indicates
the location whose information is being displayed
on the map in navigation mode. The icon cannot be
selected or modified.
Resetting Trip Data
Resetting trip data will reset the value of Trip Odom
and Trip Time to zero.
To set the trip data and display new data:
1. On the trip status page, press the Menu button
to display the menu options.
2. Select the Trip Reset option and press OK to
confirm (Fig. 43). The trip status data is reset to
default settings.
Changing the Fields
You can specify the items to be displayed in the
trip status fields.
To change the field items:
1. On the trip status page, press the Menu button
Fig. 43
Fig. 44
29
Fig. 45
Fig. 46
Fig. 47
30
Fig. 48
Changing the Fields (cont.)
to display the menu options.
2. Highlight the Change Field option and press OK
(Fig. 44)
3. Select the field you want to change and press OK
to view the available options (Fig. 45):
• Speed: shows the speed at which you are
traveling
• Heading: shows the tracking direction
• Trip Odom: shows the distance traveled so far
• Trip Time: shows the time elapsed
• AltGPS: shows the altitude of your current
location
• Signal: shows the current signal strength of the
device
• Speed Avg.: shows the average speed
• Speed Max: shows the maximum speed
•To Dest.: shows the distance to your
destination
4. Use the navigation key to toggle between the 6
fields and 2 fields (Fig. 46) tabs and repeat steps 1
to 3 to change the fields accordingly.
Moving to the Next Waypoint
On the compass page, you can switch to the next
waypoint and view the direction and distance
information with ease.
To change to the next waypoint:
1. On the map page, press the Page button and
use the left/right navigation keys to choose the
Compass tab.
2. The compass shows the direction and distance
to the next waypoint. Press the Menu button to
display the menu options.
3. Select Change Next WP and press OK (Fig. 47).
4. A list of all waypoints on the route is displayed
on screen (Fig. 48). Select the next waypoint to be
displayed and press OK.
5. The selected waypoint information is then
displayed on the compass page.
Using Geocaching Mode
The ONIX 110 features a geocaching function which
enables users to use location coordinates and set up
caches to participate in treasure hunting games.
Setting Geocaching Coordinates
To set up the Cache Box from the Geocaching menu:
1. In Geocaching mode, press the Menu button to
display the menu options.
2. Select Check Cache Info. (Fig. 49) and press OK to
display the Cache List (Fig. 50).
3. Select a box to set up the location coordinates.
You can set up to 3 cache boxes on the ONIX 110.
4. Use the navigation keys to highlight the field
you want to change such as name, comment,
coordinates, and radius.
5. Check the Alert box to enable an alert to be
displayed when the cache is reached.
6. Highlight the √ option and press OK to save
changes. The cache box you just set up is shown on
the map page (Fig. 51).
Repeat steps 1 to 6 to set up other cache boxes.
You can also set up cache boxes directly from the map
page:
1. Move the cursor to the location where you want
to set up a cache box.
2. Hold the OK button to save the current location.
The cache box that has not been alerted by user will
be used for saving automatically. If all three cache
boxes have been set up, the device will save data to
Cache 3 and replace the current data.
Fig. 49
Fig. 50
Fig. 51
31
Fig. 52
Fig. 53
Fig. 54
32
Viewing the Geocaching Page
After setting up the cache box, you can start the
treasure hunt by using the coordinates on the
geocaching page.
Follow the steps below to access to the cache boxes
location on your map page:
1. On the map page, press the Menu button to
display the menu options.
2. Select the box location you want to view, and
press OK to confirm (Fig. 52) .
3. A warning message prompts to start recording
trail log. Press OK to proceed.
4. The map page will switch to the compass page
showing the direction, distance and time from
your current position to the chosen cache box (Fig.
53). The white arrow shows the direction of your
final destination, while the black arrow show the
direction you are traveling.
5. You can pause or stop recording the trail log
during the treasure hunting. Press the Menu button
to display the menu options.
• If you choose Stop Cache 2 (Fig. 54), the trail
log recording will stop and a guiding line will be
deleted.
• If you choose Log Pause, the recorded guiding
line will be deleted. Press the Menu button again
and select Log Continue to resume recording
the trail log.
Using Sports Mode
The ONIX 110 features a sports mode which allows
users to set up a training session and record their
performance for post exercise evaluation.
Training Setup
The Training Setup menu enables you to set up the
time, distance, pace, speed, lap when you are taking
a walk, jogging, or cycling, and view your exercise
performance afterwards.
Setting the Timer
To set up the timer:
1. In Sports mode, press the Menu button to display
the menu options.
2. Select Training Setup and press OK to display
the menu options.
3. Highlight Timer (Fig. 55) and press the OK
button.
4. Use the navigation keys to select the field you
want to change and press the OK button.
5. Use the navigation keys to adjust each field and
press the OK button to confirm.
6. Highlight the √ option and press the OK button
to save changes (Fig. 56).
Setting the Distance
To set up the training distance:
1. In Sports mode, press the Menu button to display
the menu options.
2. Select Training Setup and press OK to display
the menu options.
3. Highlight Distance and press the OK button.
4. Use the navigation keys to select the field you
want to change and press the OK button.
5. Use the navigation keys to adjust each field and
press the OK button to confirm.
6. Highlight the √ option and press the OK button
to save changes (Fig. 57).
Setting the Pace
To set up the training pace:
1. In Sports mode, press the Menu button to display
the menu options.
Fig. 55
Fig. 56
Fig. 57
33
Fig. 58
Fig. 59
34
Setting the Pace (cont.)
2.Select Training Setup and press OK to display the
menu options.
3. Highlight Pace and press the OK button.
4. Use the navigation keys to select the field you
want to change and press the OK button.
5. Use the navigation keys to adjust each field and
press the OK button to confirm.
6. Highlight the √ option and press the OK button
to save changes (Fig. 58).
Setting the Speed
To set up the training speed:
1. In Sports mode, press the Menu button to display
the menu options.
2. Select Training Setup and press OK to display
the menu options.
3. Highlight Speed and press the OK button.
4. Use the navigation keys to select the field you
want to change and press the OK button.
5. Use the navigation keys to adjust each field and
press the OK button to confirm.
6. Highlight the √ option and press the OK button
to save changes (Fig. 59).
Setting the Lap
This feature allows users to set up the lap counter to
count automatically after specified distance or time
elapsed during training or manually by pressing the
Menu key when a lap has been completed.
To set up the training laps:
1. In Sports mode, press the Menu button to display
the menu options.
2. Select Training Setup and press OK to display
the menu options.
3. Highlight Lap and press OK.
4. Use the navigation keys to select Auto or Manual
and press OK to confirm.
5. Use the navigation keys to adjust each field and
press OK to confirm.
6. Highlight the √ option and press OK button to
save changes (Fig. 60).
A message will pop up to inform the user when a
lap has been completed. (Fig. 61) If you set the lap
counter to manual, press the Menu button when a
lap has been completed and the following screen
appears. Press OK to start a new lap.
Setting Auto Pause
The auto pause function reminds users to pause
recording the sports log after a specified period.
To set up the auto pause during training:
1. In Sports mode, press the Menu button to display
the menu options.
2. Select Training Setup and press OK to display
the menu options.
3. Highlight Auto Pause and press OK.
4. Use the left/right navigation keys to select the
field you want to change and press OK.
5. Use the up/down navigation keys to adjust each
field and press OK to confirm.
6. Highlight the √ option and press OK to save
changes (Fig. 62).
Fig. 60
Fig. 61
Miscellaneous Settings
In the Miscellaneous setting menu, you can
personalize the training type and set up the way your
training is recorded.
You can set up training by selecting the type of
exercise and your weight. By the end of the training,
you can view your training performance and the
calories you consumed in the History menu.
Fig. 62
35
Fig. 63
Fig. 64
36
Fig. 65
To configure miscellaneous settings:
1. In Sports mode, press the Menu button to display
the menu options.
2. Select Training Setup and press OK to display
the menu options.
3. Highlight Misc. and press the OK button.
4. Use the left/right navigation keys to select the
Misc. tab.
5. Use the up/down navigation keys to select the
field you want to change and press OK.
6. Use the navigation keys to adjust each field and
press OK.
7. Highlight the √ option and press OK to save
changes (Fig. 63).
To set the record distance and time interval:
1. In Sports mode, press the Menu button to display
the menu options.
2. Select Training Setup and press OK to display
the menu options.
3. Highlight Misc. and press OK.
4. Use the left/right navigation keys to select the
Record tab.
• Highlight the Dist Interval field and press OK to
view the options. Use the up/down navigation
keys to select the distance interval and press the
OK button to save your settings. Select the ----option if you do not wish to specify the distance
interval.
• Highlight the Time Interval field and press OK
view the options. Use the up/down navigation
keys to select the time interval and press OK to
save your settings (Fig. 64). Select the ----- option
if you do not wish to specify the time interval.
5. Highlight the √ option and press the OK
button to save changes.
Start Training
After you have configured training settings, you can
start the training session and have your sports track
and performance recorded.
To start a training session:
1. On the map page, press OK to start training. The
“Start Training Log” message pops up (Fig. 65). The
icon at the bottom of the screen indicates training
is in progress. The route taken, time elapsed,
current altitude, pace, and speed are displayed on
the screen (Fig. 66).
2. To stop training, press OK again. The “Stop
Training Log” message pops up and the device
stops recording. The icon at the bottom of the
screen indicates that the training has ended.
Viewing Training History
The Training History keeps a record of your training
sessions on a weekly basis. You can view the training
records either from the Training History or the Training
Summary page.
To view the summary of your last training:
1. On the map page, press the Page button to
view the Training Summary page (Fig. 67). You will
see the total distance, time, max. speed, pace, and
calories you burnt for each training session you
completed.
2. Press the Page button again to return to the map
page.
To view the information page:
1. On the map page, press the Page button and then
the right navigation key to view the information
page. Here you can see the current altitude and the
compass direction you are traveling (Fig. 68).
2. Press the Page button again to return to the map
page.
Fig. 66
Fig. 67
Fig. 68
37
Fig. 69
Fig. 70
Fig. 71
38
Fig. 72
To view your training history:
1. On the map page, press the Menu button to
display the sports menu options.
2. Select History and press OK. A training record of
the current week is displayed on the screen.
3. Press OK to view a complete list of the training
records (Fig. 69).
4.Use the navigation keys to highlight a training
record and press OK to view the lap information of
the selected training.
5. Use the up/down navigation keys to select a lap
and press OK (Fig. 70).
6. Use the left/right navigation keys to toggle
between the Lap Detail and Diagram tabs and
view the lap information (Fig. 71).
To delete the training records:
1. On the training history page, press the Menu
button to display the menu options (Fig. 72).
2. Use the navigation keys to select an option to
delete the records and press OK to confirm.
Adjusting the User Settings
The User Settings menu enables you to customize
the ONIX 110 according to your needs. To view the
system settings, do the following:
1. Press the Menu button twice to display the main
menu and scroll to the System Settings option.
2. Press OK to select the option and change the
system settings.
3. There are four tabs in the System Settings
menu – Set 1, Set 2, Set 3, and Time. Refer to
the following sections to learn how to adjust the
various settings.
Setting the Navigation Mode
Navigation mode can be set to Normal or
Simulation. Normal mode is used with live satellite
data. Simulation mode does not use live satellite
data; therefore, functions that require live satellite
data cannot be used.
To set the Navigation Mode:
1. Press the Menu button twice to display the main
menu.
2. Select User Settings and press OK.
3. Select the Set 1 tab using the left/right navigation
keys.
4. Use the up/down navigation keys to highlight
the Navigation Mode option.
5. Press OK to display the available settings.
6. Use the up/down navigation keys to select a
setting (Fig. 73).
7. Use the up/down navigation keys to highlight √
and press OK.
Changing the Map Direction
The map can be set to either display with north always
at the top of the screen, or to rotate according to the
direction the ONIX 110 is facing. When the map is set
to North Up, the map will always display with north
at the top of the screen. When set to Track Up, the
map will rotate as the ONIX 110 is rotated and a North
Indicator appears on the screen.
To set the Map Direction:
1. Press the Menu button twice to display the main
menu.
2. Select User Settings and press OK.
3. Select the Set 1 tab using the left/right navigation
keys.
4. Use the up/down navigation keys to highlight
the Map Direction option .
5. Press OK to display the available settings.
6. Use the up/down navigation keys to select a
setting (Fig. 74).
Fig. 73
Fig. 74
39
Changing the Map Direction (cont.)
7. Use the up/down navigation keys to highlight √
and press OK.
Fig. 75
Fig. 76
40
Setting the Display Units
Units can be set to either metric (KM/KPH), or
traditional (Mi/MPH).
To set the Units option:
1. Press the Menu button twice to display the main
menu.
2. Select Sys. Settings and press OK.
3. Select the Set 2 tab using the left/right navigation
keys.
4. Use the up/down navigation keys to highlight
the Units option.
5. Press OK to display the available settings.
6. Use the up/down navigation keys to select a
setting (Fig. 75).
7. Use the up/down navigation keys to highlight √
and press OK.
Setting the DMS Format
DMS format defines how Degrees, Minutes, and
Seconds are displayed. You can either set the ONIX 110
to display degrees followed by minutes and fractions
of a minute, or you can set it to display degrees and
minutes followed by seconds and fractions of a
second.
To set the DMS format:
1. Press the Menu button twice to display the main
menu.
2. Select User Settings and press OK.
3. Select the Set 2 tab using the left/right navigation
keys.
4. Use the up/down navigation keys to highlight
the DMS Format option.
5. Press OK to display the available settings.
6. Use the up/down navigation keys to select a
setting (Fig. 76).
7. Use the up/down navigation keys to highlight √
and press OK.
Setting the WAAS/EGNOS
To enable/disable the WAAS/EGNOS feature:
1. Press the Menu button twice to display the main
menu.
2. Select User Settings and press OK.
3. Select the Set 2 tab using the left/right navigation
keys.
4. Use the up/down navigation keys to highlight
the WAAS/EGNOS option.
5. Press OK to display the available settings.
6. Use the up/down navigation keys to select On
or Off (Fig. 77).
7. Use the up/down navigation keys to highlight √
and press OK.
Setting the Backlight
The backlight can be set to always remain on, or turn
off after 30 seconds, 3 minutes, or 10 minutes. The
more you use the Backlight, the faster the batteries
will drain. When the Backlight goes out, press any key
to turn it on again.
To set the Backlight:
1. Press the Menu button twice to display the main
menu.
2. Select User Settings and press OK.
3. Select the Set 3 tab using the left/right navigation
keys.
4. Use the up/down navigation keys to highlight
the Backlight option.
5. Press OK to display the available settings.
6. Use the up/down navigation keys to select a
Fig. 77
Fig. 78
41
Setting the Backlight (cont.)
setting (Fig. 78).
7. Use the up/down navigation keys to highlight √
and press OK.
Fig. 79
Fig. 80
42
Setting the Beeper
You can set the beeper on for keypad, warning
messages, or both.
To set the Beeper:
1. Press the Menu button twice to display the main
menu.
2. Select User Settings and press OK.
3. Select the Set 3 tab using the left/right navigation
keys.
4. Use the navigation keys to highlight the Beeper
option.
5. Press OK to display the available settings.
6. Use the up/down navigation keys to select a
setting (Fig. 79).
7. Use the up/down navigation keys to highlight √
and press OK.
Setting the Startup Page
You can choose to display or hide the startup page
when turning on the ONIX 110.
To enable/disable the startup page:
1. Press the Menu button twice to display the main
menu.
2. Select User Settings and press OK.
3. Select the Set 3 tab using the left/right navigation
key.
4. Use the up/down navigation keys to highlight
the Startup Page option.
5. Press OK to display the available settings.
6. Use the up/down navigation keys to select On
or Off (Fig. 80).
7. Use the up/down navigation keys to highlight √
and press OK.
Setting the Time
The local time can be set on the ONIX 110 using the
Time setting function. Local time is set by entering
the offset from Greenwich Mean Time. For instance, if
local time is 7 hours ahead of Greenwich Mean Time,
you will need to enter an offset of plus (+) seven
hours.
To change the Time setting:
1. Press the Menu button twice to display the main
menu.
2. Select User Settings and press OK.
3. Use the left/right navigation keys to select the
Time tab (Fig. 81).
4. Use the up/down navigation keys to select the
Adjust Time field.
5. Press OK to toggle between Plus and Minus.
6. Use the up/down navigation keys to highlight
the Hour field and press OK.
7. Use the up/down navigation keys to change the
Hour field and press OK to confirm your setting.
The Current Time field shows the corrected time.
8. In the Minute field, press OK to toggle between
0 and 30.
9. Use the up/down navigation keys to highlight √
and press OK to confirm the time setting.
Making a Cold Start
Use this feature to locate your position correctly,
if the ONIX 110 is unable to identify your position
after being powered on for a few minutes. This may
happen if there is old, incorrect data in the device and
the signal strength is poor due to uneven distribution
of the satellites. In some cases, you may also wish to
acquire fresh information from the satellites and clear
Fig. 81
43
Fig. 82
Fig. 83
Making a Cold Start (cont.)
the previous, obsolete data from the memory.
The Cold Start feature enables you to restart
navigation by acquiring fresh positioning information
from the available satellites as follows:
1. Press the Menu button twice to display the main
menu.
2. Scroll to the Cold Start option and press OK
(Fig. 82). The device starts acquiring fresh satellite
information.
Resetting to Factory Defaults
If unusual characters or random code, etc. appears on
the screen, restore all settings to the factory defaults
to acquire fresh information from the satellites and
clear the previous, obsolete data from the memory.
To reset all settings to factory defaults:
1. Press the Menu button twice to display the main
menu.
2. Scroll to Satellite and press OK to enter the
satellite page.
3. Press and hold Menu and OK buttons for three
seconds. A warning message appears to confirm
resetting to factory defaults (Fig. 83).
4. Press OK to confirm.
Viewing Device Information
To view information about the device’s Firmware:
1. Press the Menu button twice to display the main
menu.
2. Scroll to the Unit Info option and press OK.
3. The screen displays the device information and
the free memory available for trail logs, routes, and
waypoints (Fig. 84).
44
Fig. 84
Transferring Data
You can transfer maps, waypoints, routes, trails, and fonts to and from a
PC using the Connect to PC feature.
System Requirements (for the PC Companion Software)
Make sure that the host PC (a Mac version is not available) meets the
following system requirements:
•CPU: 500 megahertz (MHz), Pentium III processor or higher
•Memory: 64 megabyte (MB) RAM or higher
•Operating system: Windows ME, 2000, XP, or Vista
• Hard disk: Min. 20 MB available
• Other: CD-ROM drive, USB Port, 1024x768 or higher resolution
monitor
Installing the CD-Rom Software (PC Companion)
Install the software before connecting the ONIX 110 to your computer.
Insert the supplied PC Companion CD-ROM into your PC’s CD Drive.
When the “Getting Started with your ONIX 110 GPS” screen opens, click
anywhere in the “PC Companion” box. Follow the on-screen directions to
install the software on your PC, including the USB driver for the device,
and US/Canadian base maps.
Click here to install software
Click here for full manual (pdf)
45
Making Connections
To connect the ONIX 110 to your laptop, use the USB cable provided in
the package. Connect the smaller end of the cable to the data port on the
device and connect the other end of the cable to a free USB port on your
laptop or desktop computer.
NOTE: Make sure that the USB cable is working properly and connected
correctly to the ONIX 110 and the PC. If it is not, an error message will be
displayed on the PC’s screen. You must connect the ONIX 110 to the PC and
use the PC Companion program to upload or download data. Both devices
are needed to transfer data.
Starting Data Transfer
To transfer data, do the following:
1. Press the Menu button twice to display the main menu.
2. Scroll to the Connect to PC option and press OK.
3. Press the Menu key as prompted.
4. Choose the appropriate option from those displayed on the screen
as follows:
• PC->GPS Map: to transfer map from a PC to the ONIX 110C.
See Downloading Map on page 65.
• PC->GPS My Trails: to transfer trail logs from a PC to the ONIX 110.
See “Downloading Trail Logs” .
• PC->GPS Wp&Rt: to transfer waypoints and routes from a PC to the
ONIX 110. See “Downloading Waypoints and Routes”.
• PC->GPS Geoc: to transfer Geocaching coordinates from a PC to
the ONIX 110. See “Downloading Geocaching Coordinates”.
• GPS->PC My Trails: to transfer trail logs from the ONIX 110 to a PC.
See “Uploading Data”.
• GPS->PC Wp&Rt: to transfer waypoints and routes from the ONIX
110 to a PC. See “Uploading Data”.
• GPS->PC Spt Log: to transfer sports records from the ONIX 110 to a
PC. See “Uploading Data”.
46
To transfer data to your laptop or PC, use the PC Companion program you
installed. The following sections provide more information about using
this utility.
Using the PC Companion Program
After connecting the ONIX 110 to the PC (see “Making Connections”)
and setting it up with the Connect to PC menu (see “Uploading Data”)
to select the type of data transfer, run the PC Companion program to
start data transfer. Refer to the following sections to learn more about the
software and how to transfer different types of data.
Use the following tools in the PC Companion utility to view and manage
the map files as follows:
• Enlarge the map scale
1. Click Tools | Zoom In
2. Use wheel of mouse directly
• Reduce the map scale
1. Click Tools | Zoom Out
2. Use wheel of mouse directly
• View different areas of the map
1. Click Tools | Move
2. Use left bottom of mouse to drag map
• Show the names of roads or interesting points
1. Click Tools | Arrow
2. Move mouse
Features
You can use the menu bar to perform various tasks from the main
program window. The following sections describe how to use the GPS
PC Companion menu items. You can also use the toolbar icons to carry
out various functions. Move your mouse over the toolbar icons to view a
tool-tip about the icon and learn what each icon represents.
47
File Menu
Click File | Open to open map card files (*.ard) or map list files (*.arl, which
contains a list of several map card files).
Select a map list file (*.arl) from the File Open menu and click OK.
The selected map file opens and the roads and points of interests are
displayed on the map.
Show Menu
Click Show and choose the item that you want to display on the map.
Move the cursor over the map and hold it over
a road or any other point of interest to view
information about the location. The exact
latitude, longitude, name of the road, district,
and name (if any) of the location are displayed
next to the cursor.
Use the following items on the Show menu as follows:
• Show Roads – displays all roads on the map.
• Show POIs – displays points of interest on the map.
• Show POIs Name – displays the names of the points of interest
48
• Display Icons – enables you to choose which points of interests are
displayed on the map. You can select various types of locations (see
list below) to be displayed on the map by selecting the required check
boxes.
• Show/Hide | My Trails – displays or hides details of a trail log (*.trl).
• Show/Hide | Waypoints and Routes – displays or hides routes (*.wpr)
created from waypoints on the map.
• Show/Hide | SportLog – enables or disables the display of sports logs
(*.spt).
• Show/Hide | Geocaching – enables or disables the display of
geocaching (*.geo).
Tools Menu
The Tools menu enables you to view the map, move
across the map, search for locations, and so on.
• Arrow – Cursor becomes an arrow. Move the cursor to
a road or point of interest to view information about it.
• Move – Cursor becomes a hand and allows you to pan
across the map. Press the left mouse button to drag
and move the map. The cursor turns into a closed fist
when the left mouse button is pressed.
• Zoom out – Cursor changes to a magnifier with a minus (–) sign in the
center. Click to zoom out and view a larger area of the map.
• Zoom in – Cursor changes to a magnifier with a plus (+) sign in the
center. Click to zoom in and view more details of the map.
• New Waypoint – Click the map on any location that you want to mark
49
Tools Menu (cont.)
as a waypoint. You are prompted to specify the file in which you want
to save the waypoints. Click Open to use an existing file or New to open
a new file, specify the location to save the waypoint file and click Save.
A new waypoint screen appears. Enter information such as the name
of the waypoint and comments for the
waypoint. If required, edit the latitude
and longitude of the waypoint to get an
accurate location.
• Waypoints List – Displays a list of
all the waypoints. Select a waypoint and
click Go To to view the location of the
waypoint on the map. Click Edit to modify the
waypoint.
• Routes – Enables you to create and edit
routes using waypoints. If no waypoints
have been created, this option will not be
available. Create a route as follows:
i. Click New under Route to create a new
route. Modify the route name if desired in
the Name field.
ii. Select a waypoint from the waypoint
list and click Add to add it to the route.
Repeat as required.
iii. Click Set Navi to create the route and display it on the map.
• Geocaching – Click to create or open a geocaching file. You are
50
prompted to specify the file in which you
want to save the geocaching file. Click
OPEN to use an existing file or CREATE to
open a new file.
Specify the location to save the
geocaching file and click Save. A dialog
for a new box pops up. Enter information
such as the name of the box and
comments for the box. If required, edit
the latitude and longitude of the box to
get an accurate location. You can also
establish a new box point by importing
a (*.loc) file from the Internet.
• Metric System – Click to set the
measurement units on the map to the metric system. Distances are
shown in meters (m) or kilometers (km). If not enabled, distances are
shown in miles (mi).
List Menu
The List menu enables you to merge map card files (*.ard) and create a
list map file (*.arl).
Follow these steps to use this menu:
1. Click File | Open to open a map file.
2. Click List | Add An Item to add the file to the list. The selected
item is displayed in the left pane of the program window.
3. Repeat the first two steps to add the required maps. The file list in the
left pane shows all the component map card files and their size. The
total file size is displayed in the lower left corner.
4. After adding all the required files, a map list file (*.arl) is created.
Transfer Menu
The transfer menu enables you to transfer data such as maps, trail logs,
and waypoints and routes between the ONIX 110 and your host PC.
51
Transfer Menu (cont.)
•PC->GPS | My Map – downloads expanded map files (*.are) to the
ONIX 110.
•PC->GPS | My Trails – downloads trail logs (*.trl) to the ONIX 110.
•PC->GPS | Waypoints and Routes – downloads waypoint and route
files (*.wpr) to ONIX 110.
•PC->GPS | Geocaching – downloads geocache files (*.geo) to the
ONIX 110.
•GPS->PC | My Trails – uploads trail logs (*.trl) from the ONIX 110 to
a host PC.
•GPS->PC | Waypoints and Routes – uploads waypoint and route
files (*.wpr) from the ONIX 110 to a host PC.
•GPS->PC | Sport Log – transfers sports logs from the ONIX 110 to a
PC.
The “About” Menu
Click this menu item to view company and software
version information
Context Menu
You can view the context-sensitive menu by
right-clicking anywhere in the map window.
This menu provides the same options as those
available from the menu bar.
•Show Roads – displays all roads on the map.
•Show POIs – displays points of interest on
the map.
•Show POIs Name – displays the names of the points of interest.
52 • Display Icons – enables you to choose which points of interests are
displayed on the map. You can select locations such as government
buildings, shopping places, restaurants and so on to be displayed on
the map by selecting the required check boxes.
•Show/Hide | Track Log – displays or hides details of a trail log (*.trl).
•Show/Hide | Waypoint_Route – displays or hides routes (*.wpr)
created from waypoints on the map.
•Show/Hide | SportLog – enables or disables the display of sports logs
(*.spt).
•Show/Hide | Geocaching – enables or disables the display of
geocaching (*.geo).
Viewing Sports Logs
To view the details of your sports logs, do the following:
1. Right-click anywhere in the map
window and select Show| SportLog.
2. Specify the location of the sport
log file (*.spt) and click Open.
3. The sports log file opens and
displays the amount of exercise
within a week.
4. Double-click a log to view the types of exercise done.
5. Click the exercise type to display the lap information. The track
diagram is displayed on the upper right screen and the lap detail
diagram is displayed on the screen at the lower right corner.
Downloading Maps
To download a map to the ONIX 110, do the following:
1. Click Transfer | PC->GPS | My Map in the GPS PC Companion
program.
2. The Open dialog window opens. Locate the desired map file (*.are)
and click Open to copy a new map to the ONIX 110.
3. The selected map file is copied to the internal memory of the ONIX
110 through the USB cable. The correct USB port will be detected
53
Downloading Maps (cont.)
automatically. Download status is displayed on the screen while
downloading is in progress.
Downloading Trail Logs
To download trail logs to the ONIX 110, do the following:
1. Click Transfer | PC->GPS | My Trail in the GPS PC Companion
program.
2. The Open dialog window opens. Locate the desired trail log file (*.trl)
and click Open to copy the trail log to the ONIX 110.
3. The selected trail log file is copied to the internal memory of the
ONIX 110 through the USB cable. The correct USB port will be detected
automatically. Download status is displayed on the screen while
downloading is in progress.
Downloading Waypoints and Routes
To download waypoints and routes to the ONIX 110, do the following:
1. Click Transfer | PC->GPS | Waypoints and Routes in the GPS PC
Companion program.
2. The Open dialog window opens. Locate the desired waypoint and
route file (*.wpr) and click Open to copy the waypoint and route to the
ONIX 110.
3. The selected waypoint and route file gets copied to the internal
memory of the ONIX 110 through the USB cable. The correct USB port
will be detected automatically. Download status is displayed on the
screen while downloading is in progress.
Downloading Geocaching Coordinates
To download geocaching coordinates to the ONIX 110, do the following:
1. Click Transfer | PC->GPS | Geocaching in the GPS PC Companion
program.
2. The Open dialog window opens. Locate the desired geocaching file
(*.geo) and click Open to copy the data to the ONIX 110.
54
3. The selected geocaching file gets copied to the internal memory
of the ONIX 110 through the USB cable. The correct USB port will be
detected automatically. Download status is displayed on the screen
while downloading is in progress.
Uploading Data
To upload trail logs, waypoints, and routes from the ONIX 110 to a PC,
do the following after setting up the device with the Loading menu (see
“Starting Data Transfer”):
1. Click Transfer | GPS->PC | My Trails to copy trail logs to the PC from
the device.
2. Click Transfer | GPS->PC | Wp & Rt to copy waypoints and routes to
the PC.
3. Click Transfer | GPS->PC | Spt Log to copy sports logs to the PC.
4. The selected data starts getting transferred to your PC. Upload status
is displayed on the screen while uploading is in progress.
55
Troubleshooting
Problems
Possible Solution
I pressed the power button Make sure that you hold the power
but the device doesn’t button for two seconds to turn it off.
switch off.
If the unit still doesn’t turn off, remove
the battery or the power source for five
seconds and install it again.
The unit does not respond The map position may be latched. Check
when I try to move the if the
symbol is shown in the bottom
cursor.
right corner of the map page. If so, press
and hold a direction key to unlatch the
device.
What do I do to return to my
current position on the map
page after I have moved the
map?
Check if the symbol is showing in the
bottom right corner of the map page.
Press the ESC button to return to your
current position
The ONIX 110 fails to locate Make sure that you are not in simulation
mode.
my current position.
Make sure you are in an area with
no obstruction such as trees or tall
buildings.
The ONIX 110 requires synchronization
with at least three satellites to identify
with your current location. Once the
position has been identified, it requires
at least one satellite to maintain status.
If available satellite signals are too low in
orbit or all in a line, it may not be able to
locate your current location
56
Specifications
Item
Description
Navigation
•Waypoints: Max. 1000 waypoints with name
(symbol) coordinate and remarks
•Route: 50 reversible and editable routes up to
150 waypoints each
•Trail log: 8 tracking logs with 2500 points each
Performance
Acquisition Time:
•Cold Start: within 42 seconds
•Warm Start: within 38 seconds
•Hot Start: within 1 second in open sky and 15
seconds indoors
•Update Rate: every second
Accuracy
•Position: within 5 to 25m CEP
•Velocity: 0.1m/sec.
•Time: ±1μs
Dynamic Conditions
•Altitude: -1,000 to +18,000m
•Velocity: 515m/sec.
•Acceleration: ±4G
Interface
•RS-232 (for NMEA 0183) or USB
•Antenna: built-in patch antenna
•Alarm: built-in buzzer for warning messages
Physical
•Dimension: 109 (L) * 59 (W) * 22.8 (H) mm
•Weight: 130g with Li-Ion battery
•Casing: Waterproof up to IPX6 standards
Operating Temp.
• Operating temp.: -10°C to +60°C
• Storage temp.: -20°C to +70°C
* The specifications are subject to change without notice.
57
FCC Compliance Statement
The ONIX complies with Part 15 of the FCC interference limits for Class B digital devices
FOR HOME OR OFFICE USE. These limits are designed to provide reasonable protection
against harmful interference in a residential installation, and are more stringent than
“outdoor” requirements.
Operation of this device is subject to the following conditions; (1) This device may not
cause harmful interference, and (2) this device must accept any interference received,
including interference that may cause undesired operation.
This equipment generates, uses and can radiate radio frequency energy and, if not
installed and used in accordance with the instructions, may cause harmful interference
to radio communications. However, there is no guarantee that interference will not occur
in a particular installation. If this equipment does cause harmful interference to radio
or television reception, which can be determined by turning the equipment off and on,
the user is encouraged to try to correct the interference by one or more of the following
measures:
· Reorient or relocate the receiving antenna.
· Increase the separation between the equipment and receiver.
· Connect the equipment into an outlet on a circuit
different from that to which the receiver is connected.
· Consult the dealer or an experienced radio/TV
technician for help.
The ONIX does not contain any user-serviceable parts. Repairs should only be made by
an Authorized Bushnell repair center. Unauthorized repairs or modifications could result
in permanent damage to the equipment, and will void your warranty and your authority
to operate this device under Part 15 regulations.
The shielded interface cable which is provided must be used with the equipment in order
to comply with the limits for a digital device pursuant to Subpart B of Part 15 of FCC
Rules.
Note: The ONIX complies with Part 15 of the FCC interference limits for Class B
digital devices FOR HOME OR OFFICE USE. These limits are designed to provide
reasonable protection against harmful interference in a residential installation,
and are more stringent than “outdoor” requirements.
Specifications and designs are subject to change without
any notice or obligation on the part of the manufacturer.
ONE Year LIMITED WARRANTY
Your Bushnell® GPS receiver is warranted to be free of defects in materials and workmanship
for one year after the date of purchase. In the event of a defect under this warranty, we will, at
our option, repair or replace the product, provided that you return the product with return
postage prepaid. This warranty does not cover damages caused by misuse, improper handling,
installation, or maintenance provided by someone other than a Bushnell Authorized Service
Department.
Any return made under this warranty must be accompanied by the items listed below:
1) A check/money order in the amount of $10.00 to cover the cost of return postage and
handling
2) Name and address for product return
3) An explanation of the defect
4) Proof of Date Purchased
5) Product should be well packed in a sturdy outside shipping carton, to prevent
damage in transit, with return postage ($10.00) to the address listed below:
IN U.S.A. Send To: Bushnell Outdoor Products
Attn.: Repairs
8500 Marshall Drive
Lenexa, Kansas 66214
IN CANADA Send To: Bushnell Outdoor Products
Attn.: Repairs
A East Pearce Street, Unit 1
Richmond Hill, Ontario L4B 2M9
For products purchased outside the United States or Canada please contact your local dealer
for applicable warranty information. In Europe you may also contact Bushnell at:
Bushnell Germany GmbH
European Service Center
Mathias-Brüggen-Str. 80
GERMANY
D- 50827 Köln
Tel: +49 221 995568-0
Fax: +49 221 995568-20
This warranty gives you specific legal rights.
You may have other rights which vary from country to country.
©2008 Bushnell Outdoor Products
Customer Service: (800) 423-3537
In no event shall bushnell be liable for any incidental, special, indirect or consequential
damages, whether resulting from the use, misuse, or inability to use this product or from
defects in the product.
Some states do not allow the exclusion of incidental or consequential damages, so the above limitations may
not apply to you.
Customer Service: (800) 423-3537
www.bushnell.com
©2008 Bushnell Outdoor Products