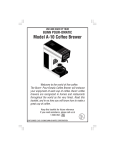
1
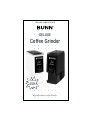
USE AND CARE OF YOUR
DELUXE
Coffee Grinder
CONTAINS A
SECTION
ON COFFEE
FUNDAMENTALS
Keep this booklet for future reference
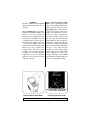
WELCOME
Welcome to the world of fine coffee
preparation. The Bunn® Deluxe Home Model
Coffee Grinder will thoroughly enhance
your knowledge and enjoyment of coffee.
Grinding your own coffee beans is the best
way of ensuring the finest and freshest cup
of coffee possible. Look over this booklet,
and in no time you will be enjoying a great
cup of coffee.
...finest and
freshest cup
Table of Contents
Important Safeguards .................. 4
Additional Precautions ................ 5
Unpacking and Inspection .......... 5
Preparation for Grinding ............ 6
Grinding Fresh Coffee ................ 8
Cleaning .................................... 10
Coffee Fundamentals ................ 12
Coffee Storage .......................... 14
Specifications ............................ 14
Authorized Service .................... 14
Available Spare Parts ................. 15
Limited Warranty ........ Back Cover
of coffee
possible....
14002.9500B 8ø/00 © 1990 BUNN-O-MATIC CORPORATION
2
IMPORTANT SAFEGUARDS
When using electrical appliances, basic safety precautions should always
be observed to reduce the risk of fire, electrical shock and/or personal
injury. The following precautions should be carefully observed.
❑ Be sure to read all the
instructions before using the
grinder.
❑ Do not operate any appliance
with a damaged cord or plug or
after appliance malfunctions, or
is dropped or damaged in any
manner. If there is any evidence
of damage, return appliance to
the nearest authorized service
facility for examination, repair
or any adjustment (See Page 14).
❑ Do not place the grinder in
water or other liquid.
❑ Practice close supervision
when any appliance is used by or
near children.
❑ The use of attachments not
recommended or sold by BunnO-Matic may cause fire, electric
shock or injury.
❑ Always unplug the unit when
not in use, before removing or
installing any parts, and before
cleaning.
❑
❑ Do not allow the cord to
hang over the edge of the table
or counter, or come into contact
with hot surfaces.
Do not touch moving parts.
❑ Do not grind coffee without
grind shield in place. The shield is
located inside the hopper.
❑ Always check the hopper for
the presence of foreign objects
before filling.
❑ Do not place hands inside the
hopper when grinding,
❑
❑ Do not use the grinder for
other than grinding coffee
beans.
Do not use outdoors.
SAVE THESE INSTRUCTIONS
4
ADDITIONAL PRECAUTIONS
• Power Cord - A short power
supply cord is used on the coffee
grinder to reduce possible risks of
tripping over or becoming
entangled in a longer cord.
• Coffee Grinder - This unit is
intended for household use only.
Any required servicing other than
normal cleaning and general user
maintenance procedures should be
performed by an authorized service
facility (See Page 14).
• Extension Cord - When an
extension cord is used, be sure to
select one with at least 16 gauge
wire. When connecting the cord
between the appliance and the
electrical outlet, be sure the cord is
arranged so it does not drape over
the counter top where it may be
pulled on by children or tripped
over by someone. Always use good
safety practices.
• Voltage Source - The grinder
operates on 120 vac, 1.5 amp, 60Hz,
line voltage only. Using any other
source could result in damage to
the unit.
• Operating Time - The unit motor
is thermally protected but use
should be limited to no more than
two successive grind cycles ("20
CUPS" setting) within a short period
of time. Additional grinds may be
performed at 10 minute intervals.
• Coffee Collector - When
grinding coffee, DO NOT allow the
coffee collector to overfill.
Overfilling can cause ground coffee
to back up into the grinding
mechanism and clog the unit.
UNPACKING AND INSPECTION
Remove the coffee grinder from
the carton along with all packing
materials. Discard the packing
materials. The Use and Care
Booklet should be thoroughly read
before using the grinder. Store the
cleaning brush in a suitable location
for later use. Check the unit over
for damage that could have
occurred during shipment. If any
damage is found, place the unit
back in the carton and return it
immediately to the place of
purchase for replacement.
5
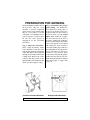
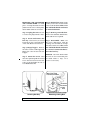
PREPARATION FOR GRINDING
Step 1. Wipe the unit clean Before using the BUNN® Home
Coffee Grinder for the first time,
wipe any lint off all exposed surfaces
of the unit. Remove the hopper lid
and wipe all accessible surfaces with
a damp cloth. Remove the coffee
collector and wipe clean of lint.
When finished, reassemble the unit
and be sure the hopper is empty.
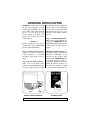
Step 2. Determine the proper
grind setting - The grinder has
been adjusted for “drip grind” at
the factory. To change, remove the
hopper lid and note the setting of
the arrow on the top of the Grind
Adjust Knob inside the hopper.
Note the raised dots at the base of
the knob. Turning the indicating
arrow counter-clockwise toward the
larger dots results in a coarser grind
and turning the knob clockwise
toward the smaller dots results in a
finer grind (Refer to the illustration
below). The knob can always be
returned to any previous grind
position later for repeatable quality
grind results. For safety reasons, the
grind setting should only be changed
when the hopper is empty with
power off.
Location Of Grind Adjustment
Setting Grind Adjustment
Before beginning to grind coffee for
the first time, take just a few
moments to become acquainted
with your new coffee grinder. This
may be a good time to read the
"COFFEE FUNDAMENTALS"
section on Page 12 of this booklet.
Be sure the coffee grinder is
unplugged for the following
procedures:
6
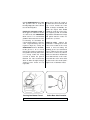
Step 4. Observe the Operating
Knob - Before grinding your first
coffee, take a moment and become
familiar with the function of the
Operating Knob. This knob is
located on the front of the coffee
grinder (See illustration below).
Notice the dial is divided into
increments ranging between Off
and 20 cups. Each incremental
mark (labeled in cups of coffee) is
intended as a general setting. The
actual coffee output varies with the
blend of coffee beans and the grind
setting for the same amount
(weight) of coffee. Finer grinds
require higher cup settings while
coarser grinds use lower cup
settings. Generally, an “8 CUPS"
setting grinds enough for eight cups
of coffee at a drip grind setting.
WARNING
DO NOT reach below the GRIND
ADJUST knob while the unit is
running.
Step 3. Load hopper - Pour coffee
beans into the hopper and fill to the
desired level (See illustration
below). One of two approaches may
be used: (a) pre-weigh the beans for
a desired amount of fresh coffee to
be ground or (b) fill the hopper up
to its capacity (slightly over one
pound of coffee beans). With either
method, be sure to replace the
hopper lid to maintain coffee
freshness. You are now nearly ready
to grind. For a further detailed
explanation of the two grinding
methods, refer to the next section
at the top of Page 8.
NOTE:HIGHER SETTINGS = STRONGER COFFEE
LOWER SETTINGS = WEAKER COFFEE
Pouring Beans Into Hopper
Learning Operating Knob
7
GRINDING FRESH COFFEE
GENERAL - Now that you have read
the previous paragraph, you are
ready to begin grinding coffee the
way you like. After a little time and
effort, you will discover the
correct grind to produce your
perfect cup of coffee. Proceed as
outlined below.
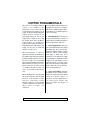
(See illustration below). Unless the
coffee collector is correctly placed
on the collector platform track
and pushed all the way to the
back, the coffee grinder will not
operate.
Step 3. Set OPERATING Knob There are two basic methods for
setting the OPERATING Knob
which is determined by the amount
of beans that are placed in the
hopper.
CAUTION
During operation, if the motor
should stall, turn OPERATING
Knob to OFF immediately.
Step 1. Connect unit to power Connect the power cord of the
coffee grinder to a standard
grounded (3-pronged) 120 vac.
outlet.
(Method 1) Manual grind - If a
measured amount of coffee beans
intended for immediate use is
poured into the hopper, then
simply turn the OPERATING Knob
to a high enough setting to
completely grind all of the beans.
When the grind is complete, as
noted by the change in sound
(tone) of the coffee grinder motor,
Step 2. Insert coffee collector Make sure the ground coffee
collector is empty and inserted into
its proper position before starting
COLLECTOR
PLATFORM
TRACK
GUIDE
Checking Coffee Collector
Grinding Coffee
8
turn the OPERATING Knob to OFF.
The ground coffee is ready for
brewing. Empty the coffee collector
into the brewing filter.
Many factors affect the output of
ground coffee; the bean itself, the
type of roast, and the size of the
grind. A change in humidity also
affects the output. Since humid
conditions swell the coffee bean,
less weight is ground. You should
experiment with different settings
and grinds until the results are
perfected to your taste.
(Method 2) Automatic Grind - If
the hopper has sufficient amount
of coffee beans, the OPERATING
Knob can be set to automatically
grind the desired amount of coffee
for brewing. To determine the
correct grind setting for your taste,
some experimenting may be
required. Begin by setting the
OPERATING Knob for “8 CUPS”.
If this proves to be too weak,
increase the setting (toward 12) for
next grind. Conversely, if the coffee
is too strong, reduce the setting
(toward 4). When the grind is
finished, the unit automatically
shuts off. Once the right setting is
obtained, coffee results are very
repeatable.
Chaff in coffee - Chaff is the
parchment or hull portion of the
coffee bean found in the cavity
which is released during the
grinding process (See illustration
below). Chaff seen in the ground
coffee does not have any adverse
effects on coffee flavor. Chaff results
from small amounts of the coffee
bean hull still on the bean when
ground. Some coffee beans yield a
higher level of chaff than others.
CHAFF
CONTENT
LOCATION
COFFEE
BEAN
Pouring Into Brewer Funnel
Coffee Bean Chaff Location
9
CLEANING
PRECAUTIONS - Your coffee
grinder should be periodically
cleaned.
NOTE
Be sure to heed all the warnings
located within the grinder.
INTERIOR CLEANING - Clean the
interior as follows;
Step 1. Unplug grinder - Always
be certain to unplug the unit before
performing the following steps.
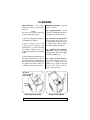
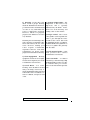
❖ Be sure to unplug the unit before Step 2. Remove the hopper lid Reach deep into the hopper, past
attempting any cleaning.
the Grind Adjust Knob to remove
❖ Always empty beans from the grind shield. This shield is
hopper before beginning any removed by sliding straight up .
maintenance or routine cleaning
procedures. Simply remove the Step 3. Remove loose particles
hopper lid and turn the unit upside with brush - With the cleaning
brush provided, brush thoroughly
down.
around the grinding area.
❖ Do not immerse grinder in water.
The hopper lid and coffee collector Step 4. Wipe exposed surfaces may be washed in a normal fashion. Use a mild detergent and water
The exterior body of the unit should solution on a damp cloth (not
be wiped down with a damp, not soaking wet), to wipe all exposed
surfaces. This cleans and also
soaking wet, cleaning cloth only.
reduces static electricity.
BE SURE TO
READ CAUTIONS
INSIDE HOPPER
GRIND
SHIELD
Using Cleaning Brush
Removing Grind Shield
10
REMOVING THE DECHAFFER
AND CUTTING BURR - If a small
piece of foreign material becomes
jammed in the lower cutting burr,
disassemble and clean as follows;
Step 5. Remove hex screw - Using
hex key, remove the screw from the
center of the dechaffer. This screw
has left-hand threads and must
be turned clockwise.
Step 1. Unplug the unit - Be sure
to remove the plug from the outlet.
Step 6. Remove parts and clean Remove the dechaffer and the burr.
Brush and clean as required.
Step 2. Locate and remove the
hex key - The hex key is located
below the power cord on the back
of the unit. Remove the hex key.
Step 3. Empty hopper - Remove
the coffee collector and hopper lid.
Empty the coffee beans from the
hopper.
Step 4. Locate hex screw - Turn
the coffee grinder upside down and
locate the hex head screw in the
center of the dechaffer. Be sure to
read WARNING label.
Step 7. Reassemble - Make sure
the motor shaft aligns with the
rotating burr and that no foreign
material is in this area. The screw
has left-hand threads and must
be turned counterclockwise.
Store the hex key.
SERVICE - DO NOT disassemble
the unit. No user serviceable parts
are inside. Refer to Page 14 if
service is necessary.
NOTE: TURN SCREW
CLOCKWISE TO REMOVE
HEX
KEY
LOCATION
HEX SCREW
DECHAFFER
CUTTING
BURR
Removing Cutting Burr
Locating Hex Key
11
COFFEE FUNDAMENTALS
Your new Bunn® grinder allows you
to grind coffee exactly as you like it,
and when combined with a Bunn®
Coffee Brewer, you will have perfect
coffee every time.
The process of brewing delicious
coffee is very similar to the
preparation of any other favorite
food item in that it requires a good
recipe. Proper brewing techniques
require precise control of the
following functions; the water
temperature, volume of water, and
the proper brew time. All Bunn®
coffee makers are designed to
perform these functions perfectly.
Other important components to the
recipe are the type of grind and
amount of coffee used.
✔ Blending Beans - Coffee beans
are generally named by country of
origin and are graded for quality by
physical appearance and taste.
✔ Roasting Methods - The type
of beans and the method of roasting
determines the flavor and aroma.
Chemical changes during roasting
yields the various roasts ranging
from light to dark. The most
common roast in America is a light
roast which has a milder flavor than
a darker roast. The darkest roast is
characterized by a heavier flavor
and aroma. The longer roasting time
brings out the oils to create a heavier,
more caramelized flavor.
The actual amount of coffee required is generally determined by
the grind setting. The finer (smaller
particles) grinds require less coffee.
For best results, we recommend
using a drip (medium) grind and a
liberal amount of coffee (2 oz. for a
full 48 ounce pot of water). Using
too small an amount of coffee can
cause over-extraction and bitterness.
✔ Types of Grinding - The finer
the grind of coffee, the greater the
surface area exposed to water which
results in a greater degree of
extraction. A coarse grind exposes
less coffee bean surface and
therefore reduces the degree of
extraction.
The terms Bitterness and Strength
are often confused. Coffee strength
increases as the amount of coffee
increases. Conversely, Coffee
bitterness increases as the amount
of coffee used decreases. This is the
direct result of coffee over
extraction.
12
✔ Brewing - Good coffee is the
direct result of proper brewing
methods. The difference between a
poor blend of coffee and a fine blend
of coffee is very small when the
coffee is improperly prepared.
However, when it is properly
prepared, the difference becomes
very dramatic.
3) Accurate Temperature - The
temperature of the water is very
important and is carefully
maintained by the Bunn® Coffee
Brewer for both brewing and
holding coffee on the warmer.
4) Proper Grind - The correct
coffee grind is one that permits the
water to pass through the coffee
grounds in the correct time with
the minimum amount of sediment.
The Bunn® BCG coffee grinder does
allow you to grind coffee perfectly
time after time.
The basic process for brewing coffee
is the extraction of desirable coffee
flavor and aroma by the use of hot
water. However, making good
coffee requires considerable
experience and care. Some basic
requirements for proper coffee 5) Fresh Ground Coffee - Using
preparation include the following: fresh ground coffee ensures
maximum flavor and aroma.
1) Clean Equipment - Brewing
equipment should be thoroughly 6) Best Formula - A common
cleaned and completely free from formula for good results using a drip
contamination and off-odors.
(medium) grind is 2 ounces of coffee
for a full 48 ounce pot of water.
2) Good Water - For coffee However, the real criteria is personal
brewing, water should be cleaned taste.
and good tasting. If necessary, it
may be purified through an activated
carbon filter water conditioner to
remove sediment, foreign taste and
odors.
13
COFFEE STORAGE
Coffee beans stored in your Bunn®
Coffee Grinder will remain fully
fresh for several days. However,
coffee does begin to lose flavor and
aroma as soon as it is ground.
Therefore, it is recommended that
only enough coffee for brewing is
ground at one time. Roasted bean
coffee has a much longer shelf life
than that of ground coffee.
The storage area should be cool,
dry, clean and free from outside
odors. Do not store next to heating
units, or in proximity to foods (such
as onions) with strong odors. If the
coffee is to be stored in the
refrigerator, it should be placed in
a covered container.
SPECIFICATIONS
Electrical - UL listed for household use only. The coffee grinder has an
attached, polarized cord and requires 2-wire service with ground rated at
120 volts ac, 1 amp, single phase, 60Hz. 135 watts total.
Hopper Capacity - Hopper holds approximately 1 pound of coffee beans
Dimensions - 10 inches high; 4.3 inches wide; 8 inches deep
Weight - 4.5 pounds
AUTHORIZED SERVICE
For service (whether or not warranty is still in effect), carefully pack the
grinder so it is fully protected against breakage and send it to one of the
authorized Bunn-O-Matic facilities listed below;
Bunn-O-Matic Corporation
Retail Products Division
1400 Stevenson Drive
Springfield, Illinois 62703
(800) 352-2866
Bunn-O-Matic Corporation
Retail Products Division
16431 Carmenita Road
Cerritos, California 90701
(800) 637-2866
14
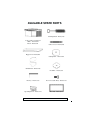
AVAILABLE SPARE PARTS
Cleaning Brush - 14002.9100
Coffee Collector with Seal
White - 14002.8610
Black - 14002.8611
Collector Seal - 14002.5800
Hopper Lid - 14002.5400
Cutting Burr - 14002.0400
Grind Shield - 14002.2100
Dechaffer - 14002.3000
Hex key - 14002.7700
Hex Screw (L.H. Thd) - 14002.1100
Operating Knob - 14002.7210
Base Pad - 14002.4900
15
LIMITED WARRANTY
Bunn-O-Matic warrants the Bunn Coffee Grinder (“Grinder”), to be free
from defects in material and workmanship existing at the time of manufacture
and appearing within three (3) years from the date of original purchase. If
such a defect appears during the warranty period, we will (at our sole
option) repair or replace the defective unit with no charge for service or
parts, provided that the unit is delivered at the customer’s expense to one
of the authorized service centers listed.
This warranty does not cover claims resulting from misuse, failure to follow
instructions on installation and use, neglect, use of unauthorized
attachments, commercial use, use when foreign material is present with
the coffee beans, use on a current or voltage other than specified on the
grinder, or unauthorized service during the warranty period on conditions
otherwise covered by warranty.
THIS WARRANTY SHALL BE EXCLUSIVE AND SHALL BE IN LIEU OF ANY
OTHER EXPRESS WARRANTY, WRITTEN OR ORAL, INCLUDING BUT
NOT LIMITED TO ANY EXPRESS WARRANTY OF MERCHANTABILITY OR
FITNESS FOR A PARTICULAR PURPOSE. THE DURATION OF ANY IMPLIED
WARRANTIES, INCLUDING BUT NOT LIMITED TO ANY IMPLIED
WARRANTIES OF MERCHANTABILITY OR FITNESS FOR A PARTICULAR
PURPOSE, IS EXPRESSLY LIMITED TO THE THREE YEAR PERIOD OF
DURATION OF THE LIMITED WARRANTY.
Some states do not allow limitations on how long an implied warranty lasts,
so the above limitation may not apply to you.
THE CUSTOMER’S EXCLUSIVE REMEDY FOR BREACH OF THIS WARRANTY
OR OF ANY IMPLIED WARRANTY OR OF ANY OTHER OBLIGATION
ARISING BY OPERATION OF LAW OR OTHERWISE SHALL BE LIMITED AS
SPECIFIED HEREIN TO REPAIR OR REPLACEMENT, AT OUR SOLE OPTION.
IN ANY EVENT, RESPONSIBILITY FOR SPECIAL INCIDENTAL AND
CONSEQUENTIAL DAMAGES IS EXPRESSLY EXCLUDED.
Some states do not allow the exclusion or limitation of incidental or
consequential damages, so the above limitation or exclusion may not apply
to you.
This warranty gives you specific legal rights, and you may have other rights
which vary from state to state.