1
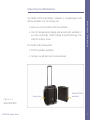
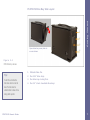
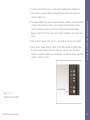
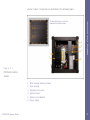
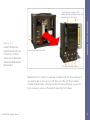
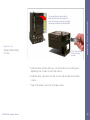
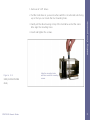
Welcome to your BSI (Broadax Systems, Inc.) FieldGo PCATX-R9 portable
workstation. Your FieldGo PCATX-R9 workstation is one member of an entire
family of portable computers and workstations designed by BSI.
Founded in 1986, BSI is one of the pioneers in the portable computer industry. BSI started by producing a transportable PC with an integrated monochrome CRT display. In 1987, BSI introduced its first flat panel portable PC-AT
system with a backlit supertwist nematic monochrome LCD. It represented
BSI's successful effort in reducing the overall size and weight of a portable
PC, while retaining all the expansion capacities of a desktop computer. Since
then, BSI has continued to expand to the current lines we now have.
Introduction
Chapter 1
Introduction
Your FieldGo PCATX-R9 workstation is designed to provide the full power of a
desktop computer, and the ability to use standard add-on cards in a rugged
portable package suitable for use in harsh environments. It features five drive
bays, a large, bright flat panel LCD, detachable keyboard with integrated
pointing device, 300W power supply, and a carrying case.
Combining cutting-edge processors and peripherals, your new FieldGo
PCATX-R9 sets a new standard for portable computational power by delivering performance, versatile system configuration, high level of expandability,
and reliability that can ultimately increase your productivity.
PCATX-R9 User’s Guide
1
This is your guide to setting up your workstation and adding new components
in it. You’ll also find contact information here.
This guide tells you how to:
w Setup and start your workstation.
w Use the LCD on-screen display (OSD).
Introduction
About This User’s Guide
w Add new expansion cards and drives.
w Care for your workstation.
This guide, however, contains no information regarding configuration of your
add-on cards or additional drives. Refer to the setup information for those
devices to complete your installation.
Your FieldGo PCATX-R9 workstation can be configured with a dual processor
capable main board. If you initially purchased a single processor in a dualprocessor capable system, BSI recommends that when you decide to add a
second processor, you do so with professional assistance from BSI.
Any updates to this user’s guide as well as additional technical information
can be found on our web site: http://www.bsicomputer.com. Updates are
referenced by their version numbers. Your current version number can be
found on the inside cover of this guide.
PCATX-R9 User’s Guide
2
Before You Start
Important:
Always verify that your portable
power supply voltage matches
your local AC supply voltage. Most
systems are shipped with an autosensing power supply that switches
automatically to your AC supply
voltage. A non-autosensing power
supply comes with a two position
switch that sets the power supply
for 115V or 230V AC input
voltage. Be sure to select the
correct AC input voltage if you
have a non-autosensing type
power supply.
Before you unpack and start using your FieldGo PCATX-R9 workstation,
please take a few minutes to read these first few pages to prevent problems
from arising due to shipping damages, missing items, or possible misuse of
your workstation.
Getting Started
Chapter 2
Getting Started
Important Safety Instructions
Read the following safety instructions to make sure you use the workstation
safely and effectively:
w Use your workstation on a stable surface.
w Before making any hardware installation, make sure both the system
and the external devices are turned OFF. Disconnect the power cord
from the workstation. Sudden surges of power could damage sensitive
components.
w Before installing internal add-on cards or components, always ground
yourself first to prevent static electricity from damaging the components.
You can touch the metal housing of the power supply to discharge any
PCATX-R9 User’s Guide
3
w Do not block or cover the ventilation openings on the left and right-hand
sides of the workstation chassis.
w Do not drop the chassis! Prevent any sharp or hard objects from hitting
the LCD panel! The LCD panel is made of glass that can easily crack if
dropped.
w Occasionally you may want to clean or dust off the external chassis and
the LCD panel. Turn OFF the system power and disconnect the power
cord before cleaning. Clean the chassis using a cloth only. Do not spray
any liquid cleaner directly onto the screen.
Getting Started
electrostatic charge on your body, or use a grounding wrist strap attached to the chassis. Leave all electronic components in their antistatic
containers until you’re ready to install them.
w Do not open the system’s back cover except for adding or removing
expansion cards or drives. Except as specifically explained in this User’s
Guide, do not attempt to service the workstation yourself, this may void
your warranty.
w Before transporting your workstation, securely lock the keyboard in
place.
PCATX-R9 User’s Guide
4
BSI provides technical assistance through on-line support and telephone
services during regular work hours.
The following lists contact information:
Corporate Headquarters Contact Information:
Broadax Systems, Inc.
17539 E. Rowland St.
Getting Started
Where To Get Help
City Of Industry, CA 91748
(626)964-2600
(626)964-2665 (fax)
1-800-872-4547
E-mail: [email protected]
On the web: www.bsicomputer.com
Technical Support Contact Information:
(626)964-2750
(626)964-2661 (fax)
E-mail: [email protected]
PCATX-R9 User’s Guide
5
w Write down exactly what occurred, including the configuration of your
system and exact nature of the problem. Have this information ready
when you call tech support.
PCATX-R9 User’s Guide
Getting Started
Phone support is available Monday through Friday, from 8:30 AM to 5:30 PM
Pacific time. To let our support staff quickly identify the exact item you have. If
you have your invoice with you, write down the invoice number too.
6
Your FieldGo PCATX-R9 workstation is shipped in a corrugated paper carton
with the workstation in its soft carrying case.
w Remove all packing materials from the workstation.
w Check for damage during shipping while unpacking the workstation. If
you notice any damage, notify the shipper to report the damage. Then
notify BSI customer service.
You should find the following items:
Getting Started
Unpacking Your Workstation
w PCATX-R9 portable workstation.
w Carrying case with telescopic handle and wheels.
Carrying case
FieldGo PCATX-R9
workstation
Figure 2.1
Unpacking FieldGo PCATX-R9.
PCATX-R9 User’s Guide
7
w Power cord.
w Drivers and user’s manuals for installed components.
w Any software that you may have purchased with the system.
The LCD panel is covered with a clear plastic protective film. Peel it off before
you start your workstation. Save all packing materials in case you want to
transport it in the future.
PCATX-R9 User’s Guide
Getting Started
w Hardware User’s Guide.
8
Take a moment to familiarize yourself with the components and external
controls/connectors of your workstation with the help of the following illustrations.
PCATX-R9 Front View
Getting Started
Identifying The Components
Drive bay cover release screw
Keyboard
Keyboard tilt-up feet
Figure 2.2
PCATX-R9 front view.
PCATX-R9 User’s Guide
9
Keyboard release latches -- slide
both latches up to release keyboard.
1
2
3
Getting Started
PCATX-R9 Front Controls And Components
4
5
6
Figure 2.3
PCATX-R9 front view showing
components and controls.
7
1. Drive bay door release screw.
2. System Power ON and Hard Drive Busy LED indicators.
3. LCD on-screen display controls.
4. System reset.
5. Power ON/OFF push-button switch.
6. Touchpad pointing device (depending on the keyboard you selected, your
pointing device may differ from that shown in the illustration).
7. Primary and secondary pointing device buttons (on a standard keyboard).
PCATX-R9 User’s Guide
10
1
2
3
Open drive bay cover plate to
access drives.
Getting Started
PCATX-R9 Drive Bay Side Layout
4
Figure 2.4
PCATX-R9 drive bay side view.
1. Filtered intake fan.
Tip:
You don’t have to remove the
metal cover unless to access the
drives. The metal cover has
ventilation holes to allow air flow
during system operation.
PCATX-R9 User’s Guide
2. Two 5.25” drive bays.
3. Two drive bay cooling fans.
4. Two 3.5” shock-mounted drive bays.
11
1
4
Getting Started
PCATX-R9 Left Side Layout
2
5
3
6
7
Figure 2.5
PCATX-R9 left side view.
1. Expansion slot covers.
Important:
If you find an INPUT VOLTAGE
selector switch near the power
supply fan, be sure it’s correctly
set for your local AC supply
voltage.
PCATX-R9 User’s Guide
2. Power supply and exhaust fan.
3. AC power connector.
4. Video adpater connector.
5. Input/output ports.
6. Fan speed switch.
7. Keyboard and pointing device connectors.
12
Before you turn on your system, observing the following steps will prevent any
start-up problems.
w If you don’t have an auto-sensing power supply make sure the input
voltage selector switch on the power supply is set correctly to either
115V or 230V depending on your local outlet voltage.
w Heat generated by PCATX-R9 internal components is removed by fans
working in a push-pull fashion. A filtered intake fan and two drive bay
fans are located on the right-hand side of the chassis to draw air into the
chassis. On the left-hand side, the power supply has a built-in exhaust
fan. Leave enough space around your workstation to allow adequate
airflow through the system.
Using Your Workstation
Chapter 3
Using Your Workstation
Starting Your System
Your PCATX-R9 is a self-contained portable computer with a flat panel LCD
and a detachable keyboard. The keyboard is securely attached to the chassis
by two latches. To start your system, follow these steps:
1. Set your workstation down on a flat and stable surface so you can
detach and lay down the keyboard.
PCATX-R9 User’s Guide
13
3. The keyboard/pointing device cable should be already connected to their
sockets on the left side of the chassis. Remove the left side cover to
confirm; otherwise align the notches on the keyboard and pointing
device connectors to their respective sockets and firmly push them into
place.
4. Plug in the AC power cord. You are now ready to turn on your system.
5. Press the AC power ON/OFF switch to the ON position and then press
the front power ON/OFF button to start your system. If an operating
system is already installed, your workstation should boot to the operating
system’s start-up screen.
Using Your Workstation
2. Face the front of the chassis. Remove the keyboard by sliding the release latches up and pulling the keyboard away from the chassis as
shown in Figure 2.3.
Power ON/OFF
Figure 2.6
Power ON/OFF push-button switch.
PCATX-R9 User’s Guide
14
The PCATX-R9 series of portable workstations is available with different combinations of video controllers and LCDs. The LCD is an active matrix type
incorporating amorphous silicon thin-film-technology (TFT). The 15.1” model
has 1024x768 addressable pixels. The 15.4” model has 1280x1024 addressable pixels. Both are capable of displaying color images from a palette of up
to 16 million colors.
The LCD is driven by either a single digital video card installed in the AGP slot,
or a combination of a PCI analog/digital conversion board and an AGP video
card. This configuration offers compatibility with standard off-the-shelf analog
video cards.
The LCD image is already optimized for many display modes. However, four
push-button controls located on the right side of the LCD panel are available
to adjust the following characteristics of your LCD through an OSD (on-screen
display) menu:
Using Your Workstation
PCATX-R9 Video Subsystem
w Horizontal (H-Posi) and vertical (V-Posi) screen position: Adjusts the
horizontal or vertical image position within the display area of the LCD.
w Contrast: Adjusts image brightness in relation to the background.
w R, G, B-Contrast: Adjusts contrast levels for red, green and blue.
w Brightness: Adjusts overall image quality and background screen brightness.
w Horizontal size (H-Size): If you select a display mode lower than
PCATX-R9 User’s Guide
15
w Clock delay: LCD controller generates the pixel clock to ensure that the
red, green, and blue components of each pixel precisely align with each
other as each line is scanned. Adjust this to reduce noise in the video
signals that may show as shimmering in the image.
w Clock phase: Fine adjustment of the pixel clock.
w C-Temp: Selects a color mode. Four settings are available to set white
point reference in terms of color temperature measured in degrees
Kelvin. Your LCD is initially set at “USER” setting.
w Horizontal and vertical sync: Unlike CRTs, regular desktop monitors,
which benefit from high refresh rates, LCDs are inherently flicker-free.
There is little difference between 45Hz, 60Hz, or 75Hz refresh rates for
your LCD. These values are factory set and are not user adjustable.
Using Your Workstation
1024x768, this control can expand the image up to your LCD’s native
addressable pixels.
w AutoReset: Resets all parameters to factory optimized setting.
w Luminance: Luminance affects the brightness of the display. This is an
on/off toggle switch that sets luminance to 100% or 50%. Lowering the
luminance prolongs the lifetime of the LCD backlight.
Follow these steps to activate the on-screen menu and make any adjustments to suit your preference:
1. Turn on the system and wait for about twenty minutes before making
any screen adjustments. The LCD needs time to become thermally
stable to achieve more accurate results.
PCATX-R9 User’s Guide
16
2. Press either menué or menuê
button (1) to invoke the onscreen menu.
Figure 2.7
OSD menu controls.
Using Your Workstation
1
3. Press either menué or menuê
again to step through the options. The selected item will be
highlighted.
2
4. Press either + or - button (2) to
modify the highlighted setting.
Pressing a button once increases or decreases the numerical setting by a single digit.
Holding down a button for more
than two seconds increases the
rate of change.
5. After you’ve made your adjustments release the button
and wait a few seconds for
the on-screen menu to automatically disengage.
VESA
1024x768
H-POSI
V-POSI
CONTRAST
CONTRAST
CONTRAST
CONTRAST
128
128
128
128
128
128
Display Mode
Selected Item
Selected Item Level
PCATX-R9 User’s Guide
17
Your workstation is available with two types of keyboards. The standard
keyboard has an integrated touchpad pointing device compatible with the
Microsoft PS/2 mouse. A sealed membrane keyboard compliant with NEMA
4/12 specifications for water and dust resistance is available as an option. The
optional keyboard comes with a Hula-Point pointing device. You can configure
your pointing device through the operating system’s control panel. Please
refer to your operating system setup guide for more information.
Using The Standard Keyboard
To move the pointer, lightly glide your finger across the surface of the
touchpad. It responds best to a light touch; no pressure is required.
Using Your Workstation
Using Your Input Devices
To ‘click’, do one of the following:
1. Press the left button. Button function is dependent on how the touchpad
is configured. The default setting configures the left button as the primary button--similar to how your left mouse button works.
2. Gently and quickly tap the surface of the touchpad. A single tap is a
single click while two rapid taps correspond to a double click.
To drag or highlight, do one of the following:
1. Move the pointer to the object you want to drag or to the location you
want to highlight. Press and hold down the left button and drag the
pointer.
PCATX-R9 User’s Guide
18
Using The Sealed Membrane Keyboard
To move the pointer, gently rock the ... with your finger.
To ‘click’, press the left button. Button function is dependent on how the
touchpad is configured. The default setting configures the left button as the
primary button--similar to how your left mouse button works.
To drag or highlight, move the pointer to the object you want to drag or to the
location you want to highlight. Press and hold down the left button and drag
the pointer.
PCATX-R9 User’s Guide
Using Your Workstation
2. Double tap the surface, hold on the second tap and drag to the desired
position. To drag further than the surface of the touchpad, press and
hold down the left button as you drag.
19
The multi-slot design of your PCATX-R9 portable workstation supports a wide
range of industry standard add-on cards through available expansion slots on
the system board. The number of available slots and slot types depends on
how your system was initially configured.
Your workstation has a total of 5 drive bays for storage devices. Two 5.25”
and two 3.5” drive bays are externally accessible. Your can install removable
media drives in any open drive bay. There is also an internal drive bay for a
3.5”, half-height hard drive.
Adding Components
Chapter 4
Adding Components
This section provides you with procedures and illustrations to help you install
add-on cards and drives. Before you start, shut down the system, ground
yourself and disconnect the AC power cord.
Opening The System Chassis
Caution:
Always turn off the power,
disconnect the power cord and
ground yourself before you add or
remove internal components.
PCATX-R9 User’s Guide
Follow these steps to remove the back cover:
1. Place your workstation on a stable surface.
2. Face the back side of your workstation and remove the back cover by
first removing all the screws as shown in Figure 3.1.
20
To take off the back cover, first
remove all of these screws.
3
4
5
1
2
Adding Components
Internal system components are illustrated in the following figure.
6
Figure 3.1
PCATX-R9 open back view of key
components.
7
1. Drive housing retaining screws.
2. Drive housing.
3. Expansion slot cover.
4. System board.
5. Add-on card stabilizer.
6. Power supply.
PCATX-R9 User’s Guide
21
Before installing add-on cards, first determine the type of open slots available
in your system. In general, ISA slots are black in color and about 6” long. PCI
slots are about 3.5” long and are usually white in color. AGP slot is brown in
color and approximately 3” long. Once you’ve determined that your system
has the slot type for your add-on card follow these steps to install it:
1. Remove the card stabilizer. The stabilizer consists of a metal bars with
adjustable plastic hold-down clamps. The clamps helps to keep the
add-on cards securely installed in their slots. The stabilizer is attached to
the chassis by screws located at both ends of the metal bars. Remove
the screws and then the card stabilizer.
To take off the card stabilizer, remove
screws at A and B.
Figure 3.2
Adding Components
Installing Add-on Cards
B
A
Removing the add-on card stabilizer.
PCATX-R9 User’s Guide
22
2. Locate an open slot compatible with your add-on card bus type.
4. Hold your card by its edges taking care not to touch the gold-plated
edge connectors. Insert the card firmly into the expansion slot.
5. Reinstall the slot cover screw.
Align card with slot and firmly push it
into the slot socket.
Adding Components
3. Remove the screw that holds the slot cover and then remove and set
aside the metal slot cover.
Figure 3.3
Adding expansion card.
PCATX-R9 User’s Guide
23
1. Locate the clamp that will be positioned directly above the add-on
card.
2. The clamps are secured in their metal brackets. Loosen the screw so
that the plastic clamp can slide freely inside the metal bracket.
Adding Components
Next you need to adjust the hold-down clamps and reinstall the card stabilizer. The plastic hold-down clamps are designed to securely hold down
your add-on cards in their slots. The plastic clamps can be adjusted to
accommodate add-on cards of different height. Follow these steps to finish
installing your add-on card:
Loosen this screw to adjust
clamp height.
Figure 3.4
Loosen the screw so that the plastic
hold-down clamp can be adjusted for
different add-on card height.
3. With the clamp still free to move up and down, reinstall the metal
stabilizer bar.
PCATX-R9 User’s Guide
24
4. Push down on the clamp so that it comes in contact with the add-on
card.
6. Cut off any excessive part of the plastic clamp.
PCATX-R9 User’s Guide
Adding Components
5. Set the clamp by tightening the metal bracket screw.
25
Your FieldGo workstation has space for five half-height drives. Two 5.25” and
two 3.5” drives are externally accessible. One internal drive space accommodates a 3.5” drive.
To begin installing or removing a drive, follow these steps to detach the drive
housing from the chassis:
1. Shut down the system and unplug the power cord from the power
supply.
2. Set your workstation in its upright position with the back cover facing
you.
Adding Components
Installing Internal Drives
3. Refer to Figure 3.1 to first remove the back cover.
4. Internal space is tight. You’ll need to pull out the drive housing to add or
remove a drive. Carefully unplug data and power cables attached to
drives already installed in the system. Make a note of how they were
originally connected. Especially note the orientation of the flat ribbon
cables.
5. The drive housing is attached to the system chassis by screws indicated
by the arrows in Figure 3.5. Remove those screws.
6. Carefully pull out the entire drive cage assembly towards you.
PCATX-R9 User’s Guide
26
Adding Components
Top mounting screws for 5.25”
drives. Bottom mounting screws are
blocked by the 3.5” drives.
B
A
Figure 3.5
Procedures for removing the drive
housing from the system chassis to add
or remove drives: (1) First remove
screws at A and B. (2) Remove all data
and power cables and then carefully pull
the drive housing out.
Remove screws at A and B.
3.5” drive mounting screws.
Note that the 5.25” drives are vertically mounted inside the drive housing. If
you need to add or remove any 5.25” drive, all of the 3.5” drives initially
installed inside the drive housing must be first removed to give you access
to the mounting screws on the bottom side of the 5.25” drives.
PCATX-R9 User’s Guide
27
Adding or removing a 3.5” drive is straight forward. Just remove the mounting
screws indicated in Figure 3.5. Note that the 3.5” drive bays provides vibration
damping rubber grommets to protect your hard drive. BSI strongly recommends installing your hard drives in these spaces.
Installing Or Removing 5.25” Drives
Adding or removing 5.25” drives requires that you first remove all 3.5” drives
already installed in the system. This gives you access to the bottom side
panel of the 5.25” drive bay bracket that would otherwise be blocked by the
3.5” drives. Follow these steps to add or remove a 5.25” drive:
Adding Components
Installing Or Removing 3.5” Drives
1. Assuming that your system already has a 3.5” floppy drive and a 3.5”
hard drive installed, first remove all 3.5“ drive mounting screws.
2. Slide the 3.5” drives out of the drive bay. Avoid touching the circuit
boards.
3. Now that you have access to all mounting screw holes on both top and
bottom side panels of the 5.25” drive bay, you can proceed to install or
remove your 5.25” drive.
4. Open drive bay front openings are covered. Remove the covers so you
can slide the drives into the drive housing.
PCATX-R9 User’s Guide
28
Figure 3.6
Procedures for adding or removing
5.25” drives.
5.25” drive bottom
side mounting
screws.
Adding Components
The metal plate is used only for
fastening the drive housing to the
chassis. Removing the top mounting
screws also loosens this metal plate.
5. Slide the drive into the drive bay. Secure the drive by inserting and
tightening four screws on both side panels.
6. Slide the drive cage back into the chassis and reinstall all mounting
screws.
7. Plug in the power connector and signal cable.
PCATX-R9 User’s Guide
29
Your workstation provides an internal drive bay space for a 3.5” drive. This
drive is externally inaccessible.
To install a drive in the hidden drive bay, you must first remove all 5.25”
drives. You mount the drive using mounting screw holes on the bottom of the
drive to attach it to the drive housing. Figure 3.7 and 3.8 illustrate how to
install a 3.5” drive in the hidden bay.
mounting holes
Adding Components
Installing 3.5” Drive In The Hidden Drive Bay
mounting holes
Figure 3.7
Location of the hidden drive bay.
PCATX-R9 User’s Guide
30
1. Remove all 5.25” drives.
3. Gently set the drive housing on top of the hard drive and at the same
time align the mounting holes.
4. Insert and tighten the screws.
Figure 3.8
Installing a hard drive in the hidden
drive bay.
PCATX-R9 User’s Guide
Adding Components
2. Put the hard drive on your work surface with the circuit board side facing
up so that you can locate the four mounting holes.
Align the mounting holes
and then insert the mounting
screws.
31
Care For Your Workstation
Your workstation has a filtered intake fan providing ventilation for internal
components. After using your workstation for a period of time dust and lint
may accumulate on the filter and block air flow. Follow these steps to clean
the fan filter:
1. Remove the filter cover by pinching the top and bottom sides of the
plastic filter cover as shown in Figure 3.9 and gently pull it away from the
chassis.
2. Take out the filter and clean it by rinsing it under cold water.
Adding Components
Cleaning The Cooling Fan Filter
3. Let the filter dry and then reinstall the filter and the cover plate.
Filter cover
Figure 3.9
Intake fan and filter.
PCATX-R9 User’s Guide
Filter
32
The LCD is made of glass. It may break or crack by rough handling, excessive pressure, being struck by a hard object or if your system is accidentally
dropped.
If the LCD panel is soiled or if occasionally you want to wipe off any dust or
finger prints from the LCD surface do so with a damp cloth. Never spray
cleaning fluids directly onto the LCD surface. Never use solvents or abrasives.
Long contact with water may cause discoloration or spots on the LCD surface. Wipe off water drops immediately.
PCATX-R9 User’s Guide
Adding Components
Proper Care For The LCD
33
Limited Product Warranty
All hardware products are warranted to be free from manufacturing and
material defects for one year from date of purchase. Products that become
defective during such period shall be repaired or, at BSI's option, replaced at
BSI service center. This warranty is made solely to Purchaser. This limited
warranty is contingent upon proper use of the hardware products covered
and does not cover products which have been modified or which have been
subjected to unusual physical or electrical stress.
Service And Warranty
Appendix A
Service And Warranty
BSI's sole obligation (and Purchaser's remedy) in the event of breach of warranty shall be the repair or replacement of defective goods. In no event shall
BSI be liable to purchaser or any other party for loss, damage, or injury of any
kind arising out of or in connection with these terms and conditions, or any
performance or nonperformance under these terms and conditions by Seller,
its employees or agents, in excess of the net purchase price of goods and/or
services actually delivered and paid for by purchaser. In no event shall BSI be
liable for any incidental or consequential damages of any kind, including but
not limited to any interruption of service, loss of business, loss of good will or
loss of anticipated profits, even if BSI is notified of the possibility of such damages.
PCATX-R9 User’s Guide
34
BSI shall not be obligated to repair or replace goods rendered defective, in
whole or in part, by causes external to the goods, such as, but not limited to,
catastrophe, power failure or transients, over voltage on interfaces, environmental extremes, or use of unauthorized parts.
BSI makes no other express or implied warranty with respect to hardware
products other than the limited warranty referred to above. All implied warranties including but not limited to implied warranty of merchantability and fitness
for a particular purpose is hereby excluded.
Disclaimer Of Warranties On All Software
Service And Warranty
BSI, its hardware or software suppliers, make no warranty, express or implied, concerning the applicability of any hardware or software to any specific
purpose.
BSI makes no warranties, express or implied, with respect to all software and
accompanying manuals and materials, regardless of their source, their quality, performance, merchantability or fitness for any particular purpose. All such
items are sold or licensed to Purchaser by BSI on an "AS IS" basis. The entire
risk as to their quality and performance is with the Purchaser. Should such
software prove defective following their purchase, Purchaser (and not BSI or
its suppliers), assumes the entire cost of all necessary service, repair or
correction and any incidental or consequential damages resulting form any
defect in such software. In no event will BSI or its suppliers be liable for direct,
indirect or consequential damages resulting from any defect in any software,
even if BSI has been advised of the possibility of such damages.
PCATX-R9 User’s Guide
35
Call BSI tech support to obtain an RMA number prior to returning any product
for service. Always have your invoice and serial number ready when calling
tech support. Mark the RMA number on the mailing label and enclose a copy
of the invoice with a description of the problem.
Warranty repair covers labor and parts only. Purchaser pays for shipping to
and from BSI. Return shipping charges will be COD unless other arrangements are made. For units whose warranty is close to expiration, to get warranty service, unit must arrive at BSI on or before date of invoice. BSI is not
responsible for service items abandoned for more than 90 days.
Out Of Warranty Service
Service And Warranty
Service Policy And Procedures
BSI warrants that the parts installed will perform satisfactorily under normal
conditions for a period of ninety (90) days. Parts replaced by BSI that become
defective during this period shall be repaired, or at BSI's option, replaced free
of charge, at BSI's service center. This warranty applies only to parts replaced
and does not cover any other part already in the equipment. There is no
warranty or guarantee of merchantability, or fitness for a particular purpose,
with respect to the services performed or parts furnished by BSI. If repairs
later become necessary due to other defective parts, they will be charged
separately.
PCATX-R9 User’s Guide
36
Mechanical Drawings
PCATX-R9 Front View (all dimension in inches)
PCATX-R9 User’s Guide
Technical Specifications
Appendix B
Technical Specifications
37
Technical Specifications
PCATX-R9 Back View
PCATX-R9 User’s Guide
38
Technical Specifications
PCATX-R9 Side Views
PCATX-R9 User’s Guide
39
Technical Specifications
PCATX-R9 Standard Keyboard
PCATX-R9 Optional NEMA 4/12 Keyboard
PCATX-R9 User’s Guide
40