1
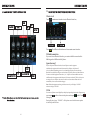
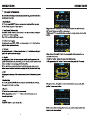
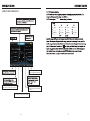
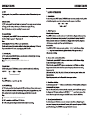
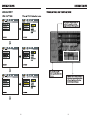
19.ACCESSORY
6.2
BV9362BI
And
Accessory
Quantity
User Manual
1PC
Warmly Suggestion
04
Wire
1PC
Notice Item
05
USB Cable
1PC
Features
06
Remote Controller
1.Front Panel Function Instruction
07
1PC
2.Basic Function
08
2PCS
3.Remote Control Function
10
4.Main menu touch operation
12
5.RDS User Operation
16
6.Radio Operation
17
7.Audio
19
8.Disc Play Touch Operation
20
9.DVD Basic Operation
25
10.VCD Basic Operation
35
11.CD Basic Operation
38
12.MP3/USB/SD Operation
40
13.Bluetooth Function Instruction
41
14.IPOD READY
43
15.Other Play Mode
46
16.Trouble Shooting
47
17.Wiring Diagram
48
18.Specifications
49
19.Accessory
50
Warranty card
50
03
Welcome
18.SPECIFICATIONS
Amp Rating
80 WattsX4 Channels
European frequency range
USA frequency range
87.5-107.9MHz
20-30dBuv
European frequency range
USA frequency range
04
522-1620kHz
530-1710kHz
49
17.WIRING DIAGRAM
This player is equipped with ISO standard connector, please follow below instruction:
●
Red - ACC ON (+12V)
●
Grey/Grey black - Right front speaker (+/-)
●
Yellow – 12 V Constant
●
White/White black - Left front speaker (+-)
●
Black – Ground wire
●
Purple/Purple black - Right rear speaker (+/-)
●
Blue - Power Antenna / Remote Amp Turn On
●
Green/Green black - Left rear speaker (+/-)
●
Orange – Back-Up Camera Trigger (+)
●
Pink – Parking Brake (-)
NOTE: Be sure the unit is connected to a 12 Volts battery,
A
not connected to a 24 Volts battery.
B
B
C
D
A: Yellow with yellow tip: rear view video input (optional)
Black with black tip: IPOD connection (optional)
Black with black tip: radio antenna
Black with black tip: back USB (optional)
C: Dark grey with red-white tip: front RCA audio output
(red right white left)
Grey with red-white tip: rear RCA audio output
(red right white left)
Black with red-white tip: AUX audio input
(red right white left)
Blue with red-white tip: background audio output
(red right white left) (optional)
Brown with brown tip: subwoofer output (optional)
D: Black with yellow tip: external video input
grey with yellow tip/Dark grey with yellow tip: 2
channel video output
Black with black tip: rear USB connection (optional)
Note:
The “PARKING BRAKE” wire must be connected to the parking brake system
of your car. When the parking brake is engages, the LCD will be allowed to view
your video. If not, the screen will produce an image saying, “PARKING BRAKE”.
This is a safety feature designed for the driver not to watch a video while driving.
The video output on this unit will not be affected by this.
48
05
FEATURES
16.TROUBLE SHOOTING
DVD PLAYER
1.MPEG-4 Decoder Technology
2.Compatible with MP4(AVI/5.X),DVD(DVD-R/DVD-RW),VCD,SVCD,CD-RW,
WMA,MP3,JPEG
3.Supporting Multiles Subtitles,Angles,Languages
4.Child lock function
5.4-Channel Audio Output
6.Pause, play, UP/Down, Stop, Zoom, PBC Function
RADIO
1.AM/FM Radio Tuner
2.30 Radio Preset Stations (18FM, 12AM)
BULETOOTH FUNCTION
1.Bluetooth wireless transfers
2.Displaying bluetooth paring and connection status, call status, and caller's ID
3.Fast performance, fast connection, accurate and sensible search of devices in range
4.Support A2DP, AVRCP, HS/HF for handing calls and playing music
06
47
15.OTHER PLAY MODE
1
10
9
12
2
3
4
5
6
7
8
1.SRC Button
2.MUTE/TFT on/off Button
3.MODE Button
4.SD Slot
5.RESET Button
6.SEL/VOL Button
7.AUX IN
8.USB Slot
9.Disk Load Slot
10.OPEN Button
11.Remote Control Receiver
12.MIC Input
46
07
11
INSTRUCTIONS
“Ipod” Video mode setting:
Select “Video” on the main menu of the “ipod” player. If not ready the video
mode setting, will never play the video file. The setting instruction as below:
(1) TV Out : ON
(2) TV signal : PAL/NTSC
(3) Full Screen: OFF
1.SRC Button
2.MUTE/TFT on/off Button
When selecting video mode, must switch to “ipod”" operation mode. Unless the
unit will only with voice but not picture.
About ”ipod” players operation instruction, please refer to the ipod player's
instruction manual.
3.MODE Button
After plugging in ipod player and switch to ipod mode, and enter the ipod UI
screen. At that time ipod player will display the “Sunplus” logo as the picture
bleow.
Bluetooth
4.SD Slot
This is a high-spees transmission interface, which can read high-capacity date in
MP3 or MP4 format.
When you see this picture, the ipod player is out of control
Above operation instruction is according to the “ipod” edition 1.3
5.RESET Button
Press this button and this unit will be restored to the initial state.
6.SEL/VOL Button
Turn this button can adjust the volume,Press this button can adjust the
mode according to personal likes.
08
Note:
Since “ipod” edition keeping up-date, some edition software of the “ipod” player
may not working with this unit, Sometimes, may happen compatible problem.
Sorry for the inconvenience.
45
For example: As PIC 2, touch certain category you want, then touch “ok” to inter
the category. After that, touch any file to play. It shows like the PIC 3 below.
7.
8.USB Slot
9.Disk Load Slot
Opening for disks to enter or retreat.
10.OPEN Button
Press this button can eject the disc
11.Remote Control Receiver
12.MIC Input
Bluetooth MIC input.
4. Video Play
In the files menu, touch any part of the touch screen, then touch the
”MOD” on the screen control (see PIC 4) to enter the “ipod” mode.
Main menu, picture 4:
Touch “VIDEO“ on the main menu and the unit will switch to " ipod "operation
mode, while, control the “ipod” player, and select the video file you want to play,
while the video picture will transfer to the unit screen. During the unit playing
the video, ”ipod” player must set as Video mode, if not the unit only with audio
but not video.
44
09
14. IPOD READY
MODE
VOL
10
43
4.Incoming display
If there is incoming, under any mode, system will automatically switch to
Bluetooth hand-free function interface. And it have incoming sound and
incoming display note you to answer telephone.
5.Answer phone
When there is an incoming call, Touch
to connect and touch
to refuse to connect.
6.Call logs
Under Bluetooth mode, press call logs button will enter call logs interface, as following:
(1)Press [dialed calls] function position, you will search
telephone number which you have dialed.
(2)Press [received calls] function position, you will
search telephone number which you have answered
(3)Press [missed calls] function position, you will
search telephone number which you have missed.
42
11
13.
1.Enter/exit
Touch
Press
on main menu interface to enter Bluetooth interface;
will exit Bluetooth interface and return main menu interface.
2.Match/connection
If you want to use Bluetooth function, you must establish a connection first.
Matching unit with Bluetooth cell phone..
[operation way]
Set your cell phone to Bluetooth mode, and use cell phone to search equipment.
After Bluetooth equipment of this unit has been search by cell phone, cell phone will
Ask you for Bluetooth matching password.. touch matching setup button on unit and input
Bluetooth Password(0000) on cell phone and confirm it. Cell phone will note to whether authorize
Connection with this equipment. Please select “yes” . cell phone will auto establish connection
with Bluetooth of the equipment within 20seconds. Under any mode(radio, DVD etc. if there is an
incoming call to your cell phone, the unit will switch from current statue to Bluetooth. It will
automatically restore current mode after hang-up.
Note: if Bluetooth equipment matching with this unit correctly, it will display “LINK OK”
otherwise it display “NO LINK”.
3.Dial
You can use cell phone or touch digital key on display to input telephone number. If input wrong,
you can press
to hang-up.
to delete. After enter telephone number, press
to dial.. Touch
During call period, press “CHANGE” will let phone sound switch between speaker
of unit and speaker of Phone.
12
41
12.
KEY
KEY
JAPAN
40
13
39
11.
EQ
38
15
5.RDS USER OPERATION
ST/PROG
FM1
87.50MHz
87.50MHz
106.00MHz
90.00MHz
108.00MHz
98.00MHz
87.5MHz
Press PTY, when PTY is on, it means
there is strong RDS signals output.
Press "SEL" to enter the audio inferface,
Please refer to article 19 pages function.
Press this button to choose radio
channels'name, please refer to details
user manual.
Press TA, When TA is on, it means the unit
is automatically track RDS radio channels
16
37
6.
Longer
When playing VCD disk, if PBC is on, RDM will not work .
PROG
MONO
This function can be worked by the remote control
36
17
10.
RDS
1. EON (RDS Mark)
Indicate main unit is on auto tracking RDS mode.
2. AF (RDS Auto Tracking Mark)
Indicate radio is auto tracking RDS channel.
3. TA (RDS Signal Increasing Output)
Indicate RDS channel have signal increasing output.
4. TP (RDS Channel Stereo Mark)
Indicate RDS channel is on stereo playing mode.
5. POP.M (RDS Channel Mark)
Indicate RDS channel name.
I. RDS Tracking System
Press AF button in FM mode, and then press
/
last 2 seconds, RDS will auto search
channel up and down, it will stop searching when RDS channel be founded, but “AF”
will keep remaining on the screen and waits for the next traffic emergency report.
II. RDS Tracking on Playing Mode
In playing mode, “AF” tracking system keeps on opening and waits for traffic
emergency report.
1)PTY: RDS button, press once will show music mode POP, press 1-6 function
memory button, every group have 2 channel.
POP M
ROCK M
EASY M
LIGHT M CLASSICS M OTHER M
JAZZ
COUNTRY
NATION
2)Press PTY button twice and then press 1-6 function memory button, every
button have 3 channel.
NEWS
AFFAIRS
INFORMATION
SPORT
EDUCATION DRAMA
CULTURE
SCIENCE
CHILDREN
SOCIETT
TELIGION
PHONING
TRAVEL
Note: RDS channel in broken line is available.
AF: RDS auto search button, in radio mode also can press this button shortly auto
tracking RDS channel, press this button shortly can cancel RDS function.
TA: In RDS mode, press this button can output TA signal, and check RDS channel is
exist or not, if no RDS signal TFT will show “NO. TA. TP”.
18
7.
Press "version set up " to entry the interfaces as below:
Press once loud on, press again to turn off.
34
19
25
24
ZOOM
20
ZOOM
33
26
27
Back main menu
25.Color adjustment
26.
27.
level
PBC
32
21
In DVD interface, touch setup"
interface as following.
"button into the audio/video setup
AUDIO SETTING ON TOUCH SCREEN
pop
22
31
30
23
Calibration to re-gain touch
24
29
9.DVD BASIC OPERATION
28
25
6
Subtitle
that
26
27