1
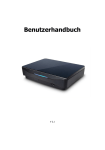
1. Precautions Before attempting to connect, or operate this product, please read the manual completely. TO REDUCE THE RISK OF ELECTRIC SHOCK, DO NOT REMOVE THE COVER (OR BACK). NO USERSERVICEABLE PARTS ARE INSIDE. REFER SERVICING TO QUALIFIED SERVICE PERSONNEL. This symbol indicates dangerous voltage inside the product that presents a risk of electric shock or personal injury. This symbol indicates important instructions accompanying the product. CAUTION: THIS UNIT HAS BEEN ADAPTED WITH AN INVISIBLE CLASS 1 LASER BEAM WHICH CAN CAUSE HAZARDOUS RADIATION EXPOSURE IF DIRECTED. BE SURE TO OPERATE THE UNIT CORRECTLY AS INSTRUCTED. Caution: This product satisfies FCC regulations when shielded cables and connectors are used to connect the unit to other equipment. To prevent electromagnetic interference with electric appliances, such as radios and televisions, use shielded cables and connectors for connections. FCC NOTE (for U.S.A): This equipment has been tested and found to comply with the limits for a Class B digital device, pursuant to Part 15 of the FCC rules. These limits are designed to provide reasonable protection against harmful interference in a residential installation. This equipment generates, uses and can radiate radio frequency energy and, if not installed and used in accordance with the instructions, may cause harmful interference to radio or television reception, which can be determined by turning the equipment off and on, the user is encouraged to try to correct the interference by one or more of the following measures. • Reorient or relocate the receiving antenna. • Increase the separation between the equipment and receiver. • Connect this equipment into an outlet on a circuit different form that to which the receiver is connected. • Consult the dealer or an experienced radio/TV technician for CLASS 1 LASER PRODUCT help. This class B digital apparatus meets all requirements of KLASSE 1 LASER PRODUKT the Canadian lnterference - Causing Equipment Regulations. LUOKAN 1 KLASS 1 LASER LAITE LASER APPARAT WARNING To reduce the risk of fire or shock hazard, do not expose this DVD player to rain or moisture. CAUTION THIS PRODUCT UTILIZES A LASER. USE OF CONTROLS OR ADJUSTMENTS OR PERFORMANCE OF PROCEDURES OTHER THAN THOSE SPECIFIED HEREIN MAY RESULT IN HAZARDOUS RADIATION EXPOSURE. DO NOT OPEN COVER AND DO NOT REPAIR YOURSELF. REFER SERVICING TO QUALIFIED PERSONNEL. 1 1. Precautions . . . . . . . . . . . . . . . . . . . . . . . . . . . . . . . . . . . . . . . . . . . . . . . . . . . . . . . . . 1 2. Safety Precautions . . . . . . . . . . . . . . . . . . . . . . . . . . . . . . . . . . . . . . . . . . . . . . . . . . . 3 3. About This OWNERS MANUAL . . . . . . . . . . . . . . . . . . . . . . . . . . . . . . . . . . . . . . . . . 5 4. About DVD . . . . . . . . . . . . . . . . . . . . . . . . . . . . . . . . . . . . . . . . . . . . . . . . . . . . . . . . . . 6 5. Identification of Controls 5-1. Main Chassis (front panel) . . . . . . . . . . . . . . . . . . . . . . . . . . . . . . . . . . . . . . . . . . . . . . . . 7 5-2. Main Chassis (side view) . . . . . . . . . . . . . . . . . . . . . . . . . . . . . . . . . . . . . . . . . . . . . . . . . 7 5-3. Main Chassis (rear view) . . . . . . . . . . . . . . . . . . . . . . . . . . . . . . . . . . . . . . . . . . . . . . . . . 7 5-4. OPERATING STATUS display . . . . . . . . . . . . . . . . . . . . . . . . . . . . . . . . . . . . . . . . . . . . . 8 5-5. Accessories . . . . . . . . . . . . . . . . . . . . . . . . . . . . . . . . . . . . . . . . . . . . . . . . . . . . . . . . . . 8 5-6. Remote Control . . . . . . . . . . . . . . . . . . . . . . . . . . . . . . . . . . . . . . . . . . . . . . . . . . . . . . . 9 6. Connecting to System 6-1. Connecting to TV/Monitor/Power . . . . . . . . . . . . . . . . . . . . . . . . . . . . . . . . . . . . . . . . . 10 6-2. Connecting to Amplifier with built-in Dolby Digital Decoder . . . . . . . . . . . . . . . . . . . . . . . 11 6-3. Connecting to an VCR/CAMCORDER/GAME PLAYER . . . . . . . . . . . . . . . . . . . . . . . . 12 6-4. Connecting to TV Antenna (DVD-ME3 only) . . . . . . . . . . . . . . . . . . . . . . . . . . . . . . . . . . 13 7. DVD Player Operations . . . . . . . . . . . . . . . . . . . . . . . . . . . . . . . . . . . . . . . . . . . . . . . 14 8. Function Buttons 8-1. Screen Display . . . . . . . . . . . . . . . . . . . . . . . . . . . . . . . . . . . . . . . . . . . . . . . . . . . . . . . 15 8-2. PBC Function . . . . . . . . . . . . . . . . . . . . . . . . . . . . . . . . . . . . . . . . . . . . . . . . . . . . . . . . 15 8-3. Audio (Selecting audio language) . . . . . . . . . . . . . . . . . . . . . . . . . . . . . . . . . . . . . . . . . . 16 8-4. Angle (Selecting watch angle) . . . . . . . . . . . . . . . . . . . . . . . . . . . . . . . . . . . . . . . . . . . . 16 8-5. Subtitle (Selecting subtitle language) . . . . . . . . . . . . . . . . . . . . . . . . . . . . . . . . . . . . . . . 16 8-6. Four Way Rocker (Moving to various directions) . . . . . . . . . . . . . . . . . . . . . . . . . . . . . . . 16 8-7. Number button . . . . . . . . . . . . . . . . . . . . . . . . . . . . . . . . . . . . . . . . . . . . . . . . . . . . . . . 16 8-8. GO TO (Selecting the location to play) . . . . . . . . . . . . . . . . . . . . . . . . . . . . . . . . . . . . . 17 8-9. A-B (Playing between two specific points) . . . . . . . . . . . . . . . . . . . . . . . . . . . . . . . . . . . 17 8-10. REPEAT (Repeat setup) . . . . . . . . . . . . . . . . . . . . . . . . . . . . . . . . . . . . . . . . . . . . . . . . 17 8-11. ZOOM (Screen zoom-in or zoom-out) . . . . . . . . . . . . . . . . . . . . . . . . . . . . . . . . . . . . . . 17 8-12. VOLUME (Adjusting volume/key) . . . . . . . . . . . . . . . . . . . . . . . . . . . . . . . . . . . . . . . . . . 17 8-13. MUTE (No sound) . . . . . . . . . . . . . . . . . . . . . . . . . . . . . . . . . . . . . . . . . . . . . . . . . . . . . 18 8-14. PLAY/STOP . . . . . . . . . . . . . . . . . . . . . . . . . . . . . . . . . . . . . . . . . . . . . . . . . . . . . . . . . 18 8-15. FAST (Forward/search)/skip button . . . . . . . . . . . . . . . . . . . . . . . . . . . . . . . . . . . . . . . . 18 8-16. Pause/Step (Still picture) . . . . . . . . . . . . . . . . . . . . . . . . . . . . . . . . . . . . . . . . . . . . . . . . 18 8-17. Slow . . . . . . . . . . . . . . . . . . . . . . . . . . . . . . . . . . . . . . . . . . . . . . . . . . . . . . . . . . . . . . . 18 8-18. Equalizer . . . . . . . . . . . . . . . . . . . . . . . . . . . . . . . . . . . . . . . . . . . . . . . . . . . . . . . . . . . . 18 9. SETUP . . . . . . . . . . . . . . . . . . . . . . . . . . . . . . . . . . . . . . . . . . . . . . . . . . . . . . . . . . . . 19 9-1. GENERAL SETUP . . . . . . . . . . . . . . . . . . . . . . . . . . . . . . . . . . . . . . . . . . . . . . . . . . . . 20 9-2. AUDIO SETUP . . . . . . . . . . . . . . . . . . . . . . . . . . . . . . . . . . . . . . . . . . . . . . . . . . . . . . . 21 9-3. DOLBY DIGITAL SETUP . . . . . . . . . . . . . . . . . . . . . . . . . . . . . . . . . . . . . . . . . . . . . . . 22 9-4. PREFERENCES . . . . . . . . . . . . . . . . . . . . . . . . . . . . . . . . . . . . . . . . . . . . . . . . . . . . . 22 10. Other Functions 10-1. LAST SCENE MEMORY Function . . . . . . . . . . . . . . . . . . . . . . . . . . . . . . . . . . . . . . . . 24 10-2. MP3 Disc Operations . . . . . . . . . . . . . . . . . . . . . . . . . . . . . . . . . . . . . . . . . . . . . . . . . . 24 11. How to install Mounting Brackets . . . . . . . . . . . . . . . . . . . . . . . . . . . . . . . . . . . . . . 25 12. Specifications . . . . . . . . . . . . . . . . . . . . . . . . . . . . . . . . . . . . . . . . . . . . . . . . . . . . . . 26 2 ENGLISH TABLE OF CONTENTS 2. Safety Precautions 1. Before Operating Your Unit 3. Warning Install this unit in a well ventilated place with at least 2.8” (7cm) on the top and 4” (10cm) on the left, right, and at the back of this unit. Do not obstruct the ventilation holes. Do not place any objects on top of this unit. Do not place other equipment (including amplifiers) that produce heat on top of this unit. Be sure to remove the disc when moving this unit. Never disassemble the main unit in any way. Electric shock or exposure to an invisible laser beam may result. Do not look inside the DVD player. 2. Caution Install this unit away from moisture, heat sources, and places exposed to strong magnetic or electric fields. Disconnect the power cable from the main electricity supply when the unit malfunctions. When condensation forms inside the player or on the surface of the disc due to sudden temperature changes from cold to hot, the player may not operate correctly. If this occurs, leave the player at room temperature for about 2 hours or until the player becomes operational. This unit is designed for DC12V~24V and 3A (minimum). For home use, the recommended home adapter is 12V/3A. AC adapter is not supplied in accessories. Do not view while driving. 3 4. Batteries The batteries used in the remote control contain the chemical that are harmful to the environment. Properly dispose of batteries. 5. Handling the Main Unit For safety reasons, • Do not use benzene or other solvents when cleaning. • Wipe the main unit with a soft cloth. 2. Safety Precautions ENGLISH 1 7Cm 10Cm 10Cm 10Cm 2 3 4 5 4 3. About This OWNER'S MANUAL • This OWNER'S MANUAL describes basic operation for this unit. • Subject to the type of DVD disc, some features may not be operated as described in this manual. • Please read and follow instructions displayed on the monitor. • icon will be displayed on the monitor. This icon means that the designated functions will not work with the specific discs. Region Number Region Number Region (Deleted as appropriate) 1. North America such as U.S., Canada 2. Japan, Europe (except Eastern Europe), Middle East, South Africa 3. Korea and Southeast Asia 4. Oceania such as Australia. New Zealand, Central and South America 5. India, East Europe, Africa, Russia 6. China All All countries DVD players and DVD discs are marked for the Region number to be played in the relevant country as shown in the above table. This device conforms to Region Code 1. Playable Discs in this DVD player DVD/SVCD/VCD/CD-R/CD-RW/MP3 5 Manufactured under license from Dolby Laboratories. "Dolby", "Pro Logic", and the double-D symbol are trademarks of Dolby Laboratories. This product incorporates copyright protection technology that is protected by method Claims of certain U.S. patents and other intellectual property rights owned by Macrovision Corporation and other rights owners. Use of this copyright protection technology must be Authorized by Macrovision Corporation, and is intended for home and other limited viewing uses only unless otherwise authorized by Macrovision Corporation. Reverse engineering or disassembly is prohibited. 4. About DVD ENGLISH Stand-Alone DVD Player Caution Do not insert a 3.1” (80mm) disc. This unit is not designed for the use of a 3.1” (80mm) disc. DVD Features • Dolby Digital You may enjoy high quality multi-channel sound reproduction when you connect this product to a Dolby Digital receiver. • High definition Clear image to be played with 10 bits video D/A converter. • High quality of sound Signal regeneration of 96KHz/24bit PCM mode is excellent for seamless quality of DVD standard. • DTS (Digital Theater System) You can enjoy high-quality digital surround sound by connecting this product to DTS decoder or any Amp equipped with it. • Multi audio Audio sound track supports maximum 8 languages (different by titles). • Multi captions Maximum 32 language captions can be supported (different by titles). • Multi angles You can see screens photographed from 9 different angles(only for a title photographed from multi angles). • Protection of your children It prohibits children or juveniles from playing inappropriate or unapproved material. Caution This unit employs a laser system. To ensure proper use of the unit, read this manual carefully and keep it for future reference. If the unit requires servicing, contact the retailer and/or Blaupunkt Service Center - see “Limited Warranty Information”. To prevent direct exposure to the laser radiation, do not open the cabinet or back of the unit. 6 5. Identification of Controls 5-1. Main Chassis (front panel) PLAY/PAUSE EJECT STOP NEXT POWER A/V IN LAST 5-2. Main Chassis (side view) Remote Eye Jack Wiring Cable Assy Input Jack 5-3. Main Chassis (rear view) 12V Input (Cigarette jack or Home Use, adapter not included) 7 display LCD Display Details (Blue Color) ENGLISH 5-4. OPERATING STATUS 5-5. Accessories POWER OPEN/CLOSE SCAN DVD/TV/EXT A-B DISPLAY ZOOM ANGLE AUDIO SUBTITLE SKIP U EN M SAV/ERS REP SURROUND VOLUME MUTE S ETUP U T.MEN EQU AL IZE R CH+ ENTER/PLAY CHSL OW STO P/RET URN PAUSE/STEP T FAS 1 2 3 4 5 6 7 8 +10 0 4 Mounting screws 9 GOTO Remote Control Batteries (2 pcs.) (AAA 1.5V) RCA Cable (Audio/Video) Remote eye OWNERS MANUAL Wiring Cable Assembly Mounting Brackets (3 pcs.) Caution 4 Stands • AC adapter is not included in this player. If you use AC adapter, please use an adapter of 3A or higher. 8 5-6. Remote Control For more details, please refer to chapter 8 for function buttons and chapter 9 for setup. Some buttons do not work subject to models and some specific discs. 9 6. Connecting to System ENGLISH 6-1. Connecting to TV/Monitor/Power (AV output & input) AUDIO OUT VIDEO OUT R L Audio IN(R) Audio IN(L) ACC (Red) Video IN Battery (Yellow) GROUND (Black) ›§ A/V DC IN 10 6. Connecting to System 6-2. Connecting to Amplifier with built-in Dolby Digital Decoder Digital Out Video Out VIDEO IN 11 6. Connecting to System ENGLISH 6-3. Connecting to VCR/CAMCORDER/GAME PLAYER Audio In VCR CAMCODER GAME PLAYER VIDEO OUT Video In AUDIO OUT To change DVD mode to Aux mode while a disc is (being) played in DVD mode, press "DVD/TV/EXT" button of the remote controller. 12 6. Connecting to System 6-4. Connecting to TV. Antenna (DVD-ME3 only) AUDIO OUT R L Audio IN(R) Audio IN(L) Video IN 13 VIDEO OUT ❋ After connection to the system is completed according to Chapter 6, check the operation by using the following steps. 7-1. TV Operation (DVD-ME3 only) STEP 1: STEP 1: Press the POWER button. Starting logo is then displayed on the screen. With Power "ON", press "DVD/TUNER/AUX" button one time from DVD Mode, TV Channel "2" is displayed as default value. When a disc is loaded DISC LOADING When a disc is not loaded NO DISC STEP 2: You may select TV Channel by pressing "CH" up & down button or Number key of Remote Controller. Ex): How to use Number key To watch CH "15", press No. 1 and 5 each. It will display CH "15". To watch Ch "4", press No. 4 only or press "0" and "4" each. (The Maximum TV Channel supported is up to CH 69) STEP 3: While watching TV, to get the TV channel number displayed on the screen, please press "display" button one time. If pressed again, Channel No. will disappear. (However Channel No. is displayed on the Unit) STEP 2: STEP 4: Insert a disc, the player identifies disc type automatically and disc type will be displayed in the left top of TV screen. It will automatically start to play. To change mode from TV, please press "DVD/TUNER/AUX" button again. The Mode will be displayed DVD > TV > AUX AV. STEP 3: ❋ If TV signal is too low to watch, The screen shall display Mute screen with the text of "Weak TV signal...." If the power button of the unit or remote controller is pressed, the unit converts to stand-by Mode (Blue LED "ON"). If the power button is pressed again, the power turns on (Blue LED "off") and the unit starts to play (Blue LCD of window "ON"). ❋ To watch other program or play game, please press "DVD/TUNER/AUX" button one more time from "TV" Mode. Caution • Do not insert a 3.1" (80mm) disc. This unit is not designed for 80mm discs. 14 ENGLISH 7. DVD Player Operations 8. Function Buttons... 8-1. Screen Display During playback, press the DISPLAY button several times, the following screen is displayed. If "Display" button is pressed several times. (Subject to disc type, some screens cannot be displayed.) During playback of a DVD disc TITEL01/03 CHAPTER 001/008 02:03:12 TITLE REMAIN 01:21:12 CHAPTER ELAPSED 00:01:12 CHAPTER REMAIN 00:11:34 OFF 00:11:52 TOTAL ELAPSED 00:54:12 TOTAL REMAIN 00:11:34 OFF 00:11:52 During playback of a SVCD, CVD, DVCD, VCD, CD SINGLE ELAPSED 00:00:12 SINGLE REMAIN 00:08:12 During playback of MP3 CHAPTER REMAIN 00:11:34 CHAPTER ELAPSED 00:54:12 OFF 00:11:52 8-2. PBC FUNCTION PBC ON: If ‘Playback Control" is written in VCD 2.0 disc or the case, specific scene or information can be selected using main menu displayed on the TV/monitor. 1) Press number buttons (0~9) to select a desired main menu displayed. when selecting a desired main menu, the submenu is displayed on TV/monitor. 2) Select specific submenu to be played. 3) Press STOP button to stop play. It moves on the prior submenu. 4) Press STOP button again to move on main menu. 15 8. Function Buttons... Press the Audio button in remote control several times to select various audio languages. This player supports up to 8 audio languages. (This function will work only if the DVD disc supports this function) AUDIO 1/8: ENGLISH AC-3 5.1CH ENGLISH 8-3. Audio (Selecting audio language) 8-4. Angle (Selecting watch angle) When a DVD disc such as sports or game is viewed, press the ANGLE button on the remote control several times to watch the same scene from different angles. (This function will work only if the DVD disc supports this function) 8-5. Subtitle (Selecting subtitle language) Press the SUBTITLE button in remote control several times to select various subtitle languages. (This function will work only if the DVD disc supports this function) SUBTITLE 01/02 ENGLISH SUBTITLE 02/02 KOREAN 8-6. Four Way Rocker (Moving to various directions) Use the four way directional pad to set up other items conveniently. 8-7. Number button Use the number button to input certain chapters. To input number 10 or more, press the +10 button and press the next number button. 16 8. Function Buttons... 8-8. GO TO (Selecting the location to play) 1) Press the GO TO button and select the desired title and chapter or time, playing is started from the selected part. At this time, press the PLAY button to start. 2) Press the GO TO button first and input the desired Title and Chapter. 3) Input the desired starting time by pressing the GO TO Button once more. GOTO TITLE 01/01 CHAPTER 001/008 TITLE 01/01 TIME – –,– –,– – 8-9. A-B (Playing between two specific points) 1) Press the A-B button once, starting point is specified. 2) Press the A-B button twice, ending point is specified. Then, disc is played between specified A and B point repeatedly. 3) Press the A-B button three times, A-B Repeat Play function is finished. A TO B SET A A TO B SET B REPEAT OFF 8-10. Repeat (Repeat setup) Title of chapter can be repeated. In addition, the whole playing back track or title can be displayed repeatedly. During playback of a DVD disc. CHAPTER REPEAT ON TITLE REPEAT ON REPEAT OFF 8-11. Zoom (Screen zoom-in or zoom-out) Every time the ZOOM button is pressed, the screen can be zoomed in 1.5X, 2X and 4X. ZOOM 8-12. Volume (Adjusting volume/key) Press the + or Up button of VOLUME buttons to raise the volume. In contrast, press the - or Down button to lower the volume. 17 VOLUME ZOOM x 2 8. Function Buttons... 8-13. Mute (No sound) MENU MUTE ENGLISH Press the MUTE button on the remote control once and the sound will be muted. Press the MUTE again for sound. MUTE OFF 8-14. PLAY & STOP During playback, press the STOP button in this player or STOP button in remote control once, stopped point is remembered. At this time, press the PLAY button, playback is started from the stopped point. If once again, press STOP Button of the Remote Controller or the Unit, It will completely stop to play. PLAY PRESS PLAY TO CONTINUE CH+ STOP ENTER/PLAY CHSL OW STO P/RET URN T FAS P PAUSE/STE ❋ VCD PLAY To replay from the stopped scene of VCD, please press PBC button firstly to make PBC OFF as the unit is originally set on PBC ON, And then press STOP button and RESUME button in order. If you do not Press PBC button firstly to keep PBC ON, and then do press STOP button, It automatically go to the first scene. 8-15. FAST (Forward/search)/skip button Press the Fast button in remote control repeatedly, screen is played forward at 2X, 4X, 8X, and 20X. If you play a disc at the normal speed, press the PLAY button again. (Subject to disc type, disc can be played at 2X, 3X, 4X, 6X, and 8X). 8-16. Pause/Step (still picture) T FAS PAUSE/STE P Every time the STEP button is pressed on the remote control, each scene can be displayed. Press the PLAY button to continue. 8-17. Slow Each time the SLOW button is pressed on the remote control, It plays 1/2, 1/4, 1/8 times in forward Direction and 1/2, 1/4, 1/8 times in backward Direction. If you want to play normal mode, press the PLAY button. 8-18. Equalizer AL IZE R Press the EQUALIZER button to display it on the Screen. EQU 18 9. Setup Insert a DVD disc and press the SETUP button, initial settings screen is displayed. (At times, when the SETUP button is pressed, you are required to input a password, if this occurs input 0000) To exit the initial settings screen, press the SETUP button again. You can select the following items in the SETUP menu. Initial Screen GENERAL SETUP AUDIO SETUP Sub-screen Sub-screen TV DISPLAY NORMAL/PS, NORMAL/LB, WIDE TV TYPE MULTI, NTSC, PAL PIC MODE AUTO, HI-RES, N-FLICKER ANGLE MARK ON, OFF OSD LANG ENGLISH AUDIO OUT ANALOG, SPDIF/RAW, SPDIF/PCM CAPTIONS ON, OFF SCR SAVER ON, OFF AUDIO MODE LT/RT, STEREO OP MODE DOLBY DIGITAL DUAL MONO SETUP DYNAMIC PREFERENCES EXIT SETUP 19 LINE OUT, RF REMOD STEREO, L-MONO, R-MONO, MIX-MONO OFF, 2/8, 4/8, 6/8, FULL AUDIO ENGLISH, FRENCH, SPANISH, CHINESE, JAPANESE SUBTITLE ENGLISH, FRENCH, SPANISH, CHINESE, JAPANESE, OFF DISC MENU ENGLISH, CHINESE, FRENCH, SPANISH, JAPANESE LOCALE CHINA, FRANCE, HONG KONG, JAPAN, TAIWAN, GBR, USA PARENTAL 1 G - NO PARENTAL PASSWORD CHANGE DEFAULTS RESET 9. Setup In the GENERAL SETUP menu, select audio and video output. 1) TV DISPLAY In initial settings, TV Aspect of screen is set to 4:3. In the TV DISPLAY menu, adjust the appropriate screen type according to the TV set up. 2) TV TYPE This Unit supports various TV signal types. The Unit has been default with its country requirement. In addition MULTI, NTSC, and PAL can be selected. 3) PIC MODE This menu is used for setting screen mode, AUTO, HI-RES, and N-FLICKER. ENGLISH 9-1. GENERAL SETUP 4) ANGLE MARK If the DVD disc supports various watching angles, they can be selected using this menu. 5) OSD LANG Select OSD displayed language. 20 9. Setup 6) AUDIO OUT DVD disc can support various audio out and you can select analog or digital (SPDIF/RAW, SPDIF/PCM) type by the desired Amp or other audio systems. If the Amp or other audio system can receive digital audio input, connect the cable to the Digital audio out jack on the rear panel of the player and then select SPDIF/RAW or SPDIF/PCM type. If digital audio out signal is supplied to audio system or receiver unavailable of digital decoding, it causes high-tone noise and can damage the speakers. DTS DVD disc sound is displayed only if DVD player is connected to Amp equipped with DTS decoder. 8) SCR SAVER Select the screen saver function using this menu. 9-2. AUDIO SETUP In the GENERAL SETUP, select the ANALOG in the audio out menu. Then, DOWN MIX setting menu is displayed. 1) AUDIO MODE If the TV/Monitor has only one audio input, connect the TV/Monitor to L or R jack on the rear part of the player and select LT/RT in the menu. When the TV/Monitor or Amp is used for stereo input, select STEREO in the menu. 7) CAPTION You can select CAPTION or non-CAPTION mode in screen by setting this menu. 21 9. Setup 1) OP MODE In this mode, select LINE OUT or RF REMOD. In general, select LINE OUT; If using headphones or other devices, select RF REMOD. 2) DUAL MONO If you use Amp and speaker with 2 channel using Dolby digital for audio out, enjoy Dolby sound by selecting STEREO, MONO(L), MONO(R), and MIX MONO. 9-4. PREFERENCES Control this menu only on tray opened or title unloaded. 1) AUDIO DVD disc supports up to 8 various title languages. Use this menu to select the desired language. (This feature is only available if the DVD Disc supports this function) 2) SUBTITLE DVD disc supports up to 32 various subtitles . Use this menu to select the desired language. (This feature is only available if the DVD Disc supports this function) 3) Dynamic This menu is used to adjust dynamic level of voice. To use max dynamic level, then select FULL in the menu. 22 ENGLISH 9-3. Dolby Digital SETUP 9. Setup 3) DISC MENU DVD disc contains menu with various languages by regions. Use this menu to select the desired language. (This feature is only available if the DVD Disc supports this function) 5 PASSWORD In delivery, password is set to 0000. The password can be changed using this menu. 6 DEFAULTS Select the DEFAULTS function, all settings are returned to defaults in delivery. 4) PARENTAL Some DVD discs contain violent and erotic scenes. This function is to prohibit children from playing such DVD discs with password setting function. This DVD player also includes 8 rating restriction function. Caution * For DVD discs rated higher than the level you selected, enter a password to watch. 23 10. Other Functions ENGLISH 10-1. Last Scene Memory (L.S.M) Function. This function makes a user watch the last scene memory conveniently without any search when a user replay this unit. It makes a user watch the last scene conveniently when a user replay this unit without any search process even though the power (car engine) is off unexpectedly. MP3 Disc Operations. DVD, VCD, CD Disc support above feature except MP3 disc. 10-2. MP3 Disc Operations 1) When a MP3 disc is played, select Last/Next and PLAY button on the Remote Controller to enjoy the desired track. 2) To select another folder, press the STOP button, move to the desired folder by pressing the ARROW (direction) buttons, and press the PLAY button. 24 11. How to Install Mounting Brackets Please refer to these special notes before installation & USE of this unit. • 3.1” (80mm) discs are not compatible with this unit. • Vertical installation requires use of 3 brackets to secure the unit. • For higher quality sound we recommend converting MP3 files with a sampling frequency of 128kbps or higher. • Note that the unit may not play tracks in the order that you record them on the disc. Under the Trunk (2 brackets) Inside the Center Console (3 brackets) On the Floor (2 brackets) Under the Roof (3 brackets) 25 General Power supply: DC 12V ~24V Consumption power: 15W Weight: 3.7 lbs. (1.7kg) Size: ENGLISH 12. Specifications 0.7"(W) x 0.8"(D) x 0.24"(H) 175(W) x 198(D) x 60(H) mm Playable Disc Type Temperature for normal operation: 32°F ~ 122°F (0°C~50°C) Storage temperature: -4°F ~ 158°F (-20°C~70°C) Humidity for normal operation: 10%~75% DVD (Digital Versatile Disc) 3.49~3.84m/sec CD (Compact Disc): 12cm Video - CD: 12cm Max. Play speed: 135 minutes Scanning speed: 1.2~1.4m/sec Max. play speed: 74minutes Scanning speed: 1.2~1.4m/sec Max. play speed: 74 minutes (Video + Audio) Video Output Mixing Video: 2 Channels: Output Level 1.0Vp-p (75 ohm load) Left and Right Analog sound: 2Vrms (1khz) Digital sound: 1.15Vp-p Audio Output Frequency Response 48khz sampling: 4Hz~22khz 96khz sampling: 4Hz~44khz Digital Output: COAXIAL Analog Output: RCA 2CH 26 Limited Warranty Information (United States Only) Robert Bosch Corporation warrants new Blaupunkt car audio and video products it distributes in the United States through authorized Blaupunkt dealers, or which are imported as original vehicle equipment by the automobile manufacturer, to be free from defects in material and workmanship, in accordance with the following: For twelve (12) months after delivery to you, the original consumer purchaser, we will repair or at our option replace at no charge to you any car audio and video product which, under normal conditions of use and service, proves to be defective in materials or workmanship. However, this warranty does not cover expenses incurred in the removal or reinstallation of any car audio and video product, whether or not proven defective, and does not cover products not purchased from an authorized Blaupunkt dealer. This warranty is limited to the original consumer purchaser and is not transferable. Repaired and replacement car audio and video products shall assume the identity of the original for purpose of this warranty and this warranty shall not be extended with respect to such products. To obtain performance of this warranty, contact the nearest Blaupunkt authorized repair facility or our nearest office. A dated purchase receipt or other proof that the product is within the warranty period will be required in order to honor your claim. Carefully pack the unit and ship prepaid to the servicing location. For further information, write to the Robert Bosch Corporation, 2800 South 25th Avenue, Broadview, Illinois, 60155, attention Blaupunkt Customer Service Department or call 1-800-2662528. Specifically excluded from this warranty are failures caused by misuse, neglect, abuse, improper operation or installation, dropping or damaging, unauthorized service or parts, or failure to follow maintenance instructions or perform normal maintenance activities. Normal maintenance activities for car audio and video products include but are not limited to cleaning and other minor maintenance activities and adjustments that are outlined in the owner's manual or that are normally required for continued proper operation. Also excluded from this warranty is the correction of improper installation and the elimination of any external electromagnetic interference. This warranty sets 27 forth your exclusive remedies with respect to the products covered by it. We shall not be liable for any incidental, consequential, special or punitive damages arising from the sale or use of any Blaupunkt car audio and video products, whether such claim is in contract or tort. No attempt to alter, modify, or amend this warranty shall be effective unless authorized in writing by an officer of Robert Bosch Corporation. THIS WARRANTY IS IN LIEU OF ALL OTHER WARRANTIES OR REPRESENTATIONS, EXPRESS OR IMPLIED, INCLUDING ANY WARRANTY IMPLIED BY LAW, WHETHER FOR MERCHANTABILITY OR FITNESS FOR A PARTICULAR PURPOSE OR OTHERWISE AND SHALL BE EFFECTIVE ONLY FOR THE PERIOD THAT THIS EXPRESS WARRANTY IS EFFECTIVE. In the event any provision, or any part or portion of this warranty shall be held invalid, void or otherwise unenforceable, such holding shall not affect the remaining part or portions of that provision or any other provision hereof. NOTICE TO CALIFORNIA OWNERS: If your Blaupunkt car audio product needs warranty repair service and there is no authorized service center reasonably close to you, you can return the defective unit to the dealer from whom you purchased it, or you can return it to any dealer who sells Blaupunkt car audio and video products. The dealer may, at the dealer's option, replace, repair or refund the purchase price for any Blaupunkt car audio and video products which prove defective under conditions of normal use. If the dealer fails to repair, replace, or partially refund your money, you may take your Blaupunkt car audio and video product to any repair shop and they can repair your unit at our expense unless the repair cost exceeds the depreciated value of the unit, but you must contact Blaupunkt to receive authorization to do this before your car audio and video product is repaired. ROBERT BOSCH CORPORATION BLAUPUNKT CUSTOMER SERVICE 2800 SOUTH 25TH AVENUE BROADVIEW, IL 60155 TEL: 1-800-266-2528 Robert Bosch Corporation Sales Group - Blaupunkt Division 2800 S. 25th Avenue, Broadview, Illinois 60155 U.S.A. www.BlaupunktUSA.com Copyright 2003 by the Robert Bosch Corporation No portion of this work may be reproduced in any form without the written consent of the Robert Bosch Corporation Printed in Korea (5/03)