1
TABLE OF CONTENT
1. INSTALLATION GUIDE ........................................................................................................... 3
2. FUNCTION KEYS ...................................................................................................................... 4
2.1 FRONT PANEL OF FUNCTIONS ............................................................................................................ 4
3. MONITOR TROUBLE SHOOTING ....................................................................................... 4
3.1 NO POWER ............................................................................................................................................... 4
3.2 REMOTE CONTROL NOT FUNCTIONING ............................................................................................ 4
3.3 NO DISPLAY OR PICTURE NOT CLEAR ............................................................................................... 4
4. SPECIFICATIONS ...................................................................................................................... 5
5. ACCESSORIES ............................................................................................................................ 5
6. TYPES OF DISCS PLAYABLE ON THIS PLAYER................................................................ 6
6-1 FRONT PANEL FUNCTION ................................................................................................................... 6
7. PART NAMES AND FUNCTIONS ............................................................................................ 7
7.1 REMOTE CONTROL UNIT - MAIN BUTTONS ....................................................................................... 7
7.2 REMOTE CONTROL UNIT - OTHER BUTTONS ................................................................................... 8
8. PLAYBACK FUNCTIONS ....................................................................................................... 9
8.1 LOADING DISC ..................................................................................................................................... 9
8.2 PLAYING DISC ...................................................................................................................................... 9
8.3 DVD ........................................................................................................................................................ 9
8.4 TO DISPLAY THE MENU SCREEN ...................................................................................................... 9
8.5 STOPPING THE DISC ........................................................................................................................... 9
8.6 PAUSING THE DISC ............................................................................................................................. 10
8.7 SCANNING FORWARD AND BACKWARD ......................................................................................... 10
8.8 RETURNING TO THE PREVIOUS CHAPTER OR TRACK OF DVDS, VIDEO CDS AND CDS ....... 10
8.9 MOVING AHEAD TO THE NEXT CHAPTER OR TRACK OF DVDS, VIDEO CDS AND CDS ...... 10
8.10 REMOVING DISCS ............................................................................................................................. 10
9. VARIOUS LANGUAGE AND SUBTITLE SETTINGS ........................................................ 11
DISC SETTING ............................................................................................................................................. 11
10. SETTING THE PARENTAL LOCK LEVEL ....................................................................... 11
11. OTHER SETTING ................................................................................................................... 12
11.1 VIDEO SETTING .................................................................................................................................. 12
11.2 DOLBY DIGITAL SETTING .................................................................................................................. 12
11.3 DISPLAY SETTING ............................................................................................................................... 12
12. ADVANCED FUNCTIONS ..................................................................................................... 13
12.1
12.2
12.3
12.4
SEARCH FOR A SPECIFIC SCENE ................................................................................................... 13
VIEWING IN SLOW MOTION DVDS AND VIDEO CDS ................................................................... 13
REPEAT PLAY DVDS, VIDEO CDS AND CDS .................................................................................. 13
SELECTING THE PICTURE’S ANGLE (MULTI-ANGLE) ................................................................ 13
13. CAUTIONS ON USE ............................................................................................................... 14
13.1
13.2
13.3
13.4
HANDING ............................................................................................................................................ 14
STORING DISCS .................................................................................................................................. 14
CLEANING DISCS ............................................................................................................................... 14
IRREGULARLY SHAPED DISCS ........................................................................................................ 14
14. TROUBLE SHOOTING .......................................................................................................... 15
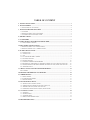
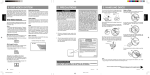
1. INSTALLATION GUIDE
1. On a towel or soft cloth, gently place the monitor unit "facedown" on a stable work
surface.
2. Locate the pigtail with the DIN connector.
3. Connect the DIN connector to the interface cable provided.
4. Connect the RED wire to the positive (+) battery terminal.
5. Connect the Black wire to a chassis electrical ground point.
6. Connect the cable with YELLOW RCA jack to Video Input sources for your Video
Program material.
7. Connect the cable with RED and WHITE RCA jacks to Audio sources for your Audio
Program material.
8. Dome Light Circuit: (NOT SHOWN IN PICTURE) Connect the Black to Ground.
Connect one white lead to the dome light circuit that is positive (+) when the door is
open. Connect the red lead to a constant positive (+).
3
2. FUNCTION KEYS
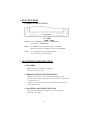
2.1 FRONT PANEL FUNCTIONS
POWER: Press the "POWER" button once, To "POWER ON."
Press it again, to "POWER OFF."
MENU:
Press MENU to Display OSD. Press again to exit MENU.
When in sub-menus, press "MENU" to return to the main MENU
UP/DN:
Use to make item selection in OSD menus and to
increase/decrease selection parameters.
3. MONITOR TROUBLE SHOOTING
3.1 NO POWER
1. Make sure the power cable has been pluged in.
2. Check power source for +12V.
3.2 REMOTE CONTROL NOT FUNCTIONING
1. Make sure the batteries are in good condition and installed properly.
2. Be sure to aim the remote control at the receiver and check to see there are no
obstacles in between.
3. Perhaps, it is too far away from the receiver. Normal operating distance is
approximately 20 feet.
3.3 NO DISPLAY OR PICTURE NOT CLEAR
1. Check the video signal wires to ensure they are connected properly.
2. Check for source signal.
4
4. SPECIFICATIONS
ITEM
DESCRIPTION
LCD Panel:
15.3" TFT 16:9
Active Area
334.08 (W) x 200.448 (H) mm
Resolution:
1280(H) x 3(RGB) x 768(V)
Display Colors:
262,144 colors
Pixel Pitch (mm):
0.261 (H) x 0.261 (V) mm
Backlight Unit
CCFL Side-light type (two lamp)
Contrast Ratio:
300:1
Brightness (cd/m2):
300
Power Supply:
DC12V+10% less than 1.6A
Viewing angle:
Horizontal: 60° (typ.,left side) , 60° (typ.,right side)
Vertical: 40° (typ.,up side) , 60° (typ.,down side)
IR Transmitter
Yes
Power management:
20W power consumption (typ.), less than 3W
when in backlight sleep mode.
User’s Control:
Power on/off, OSD control
System
1. Auto detection between NTSC/PAL
2. SECAM is available
Dimensional outline(mm):
418mm (W) x 328mm (H) x 38mm (D)
Weight
3.2 kg
Safety certifications
UL, FCC, CE, TUV,
Environmental Condition:
Operation Temp.: 0~50 degree C
Storage Temp.: -20~60 degree C
Humidity: 10~90%
Disc Format
DVD, DVD+/-R, DVD+/-RW, VCD, MP3, CD,
CD-R, CD-RW
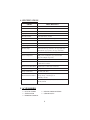
5. ACCESSORIES
✎ PS2/CAR CABLE
✎ INSTALLATION BRACKET
✎ SCREW PACK
✎ USER MANUAL
✎ REMOTE CONTROL
5
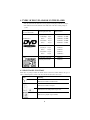
6. TYPES OF DISCS PLAYABLE ON THIS PLAYER
• The discs listed on the table below can be played on this player without an adapter.
• The marks shown on the table below are indicated on the disc’s label, package or
jacket
Types of playable
Discs and their marks
DVD video
CD
Diameter/playable sides
Playback time
DVD video
12cm/singleSided
2cm/doubleSided
1 layer
2 layer
1 layer
2 layer
MPEG2 format:
133minutes (4.7GB)
242minutes (8.5GB)
266minutes (9.4GB)
484minutes (17GB)
DVD video
8cm/singleSided
8cm/doubleSided
1 layer
2 layer
1 layer
2 layer
MPEG2 format:
41minutes
75minutes
82minutes
150minutes
12cm/single-sided CD
8cm/single-sided CD
74minutes
20minutes
6-1 FRONT PANEL FUNCTIONS
DVD discs of packages include the marks shown below. These marks indicate the type of
video or audio signals recorded on the disc and the functions that can be used.
Mark
Meaning
Indicates the number of audio tracks.
Indicates the number of angles.
Indicates the selectable picture aspect ratio.
Indicates the playable region number.
6
7. PART NAMES AND FUNCTIONS
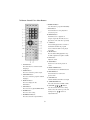
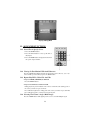
7.1 Remote Control Unit - Main Buttons
6. STOP Button
Press this button to stop playback of the
picture or sound.
7. STEP Button
Press this button for step-by-step
playback.
8. TITLE Button
Press this button to display the DVD’s
title.
9. UP Button
Press this button to increase value.
10. MODE Button
Press this button to switch LCD mode:
Monitor, Brightness, Color, Reverse.
Then press / to adjust:
Monitor: Screen size--16:9 or 4:3
Brightness: Level 0 to Level 100
Color: Level 0 to Level 100
11. AV1/AV2 Button
Press this button to switch between
AV1 and AV2 functions.
1. POWER Button
The power turns on or off when this
button is pressed.
12. EJECT Button
Press this to slide the disc out or in.
2. PRE/NEXT Buttons
Use these buttons to search for the
beginnings of tracks or chapters.
13. SEARCH Button
Locating a title/ chapter/ time and
playing.
3. REV/FWD-Scan Buttons
Use these buttons to scan forward or
backward pictures or sound.
14. DOWN Button
Press this button to decrease value.
4. PLAY/PAUSE Button
Use this button to play picture or sound
or stop temporarily.
5. MENU Button
Press this button to display the DVD’s
menu screen
7
15. 10+ Button
This button is used to select a program
of which the sequence number on the
disc is more than 10.
7.2 Remote Control Unit - Other Buttons
8. PROGRAM Button
Use this button to program individually.
9. SLOW Button
Press this button to slow playback at
1/2,1/4,1/6 speed.
10. REPEAT Button
For DVDs, use it to play title or
chapters repeatedly. For CDs, use it to
play tracks or the entire disc repeatedly.
11. A-B Button
Press it during playback to set Point A
and Point B and then the program
between Point A and B can be played
repeatedly.
12. MUTE Button
Press the button during playback to stop
the audio output. Press it again to resume.
13. PBC Button
Playback control
14. ZOOM Button
Zoom in or zoom out the picture on
screen.
15. BOOK- MARK Button
Press this button to bookmark function.
16. RETURN Button
Press this button to return to the
previous item
17. CLEAR Button
Clear the numbers which have been input.
18. VIDEO MODE Button
Select the video mode as NTSC or PAL.
19. CURSOR ( / / / ) Button
Use these buttons when select setting
items to move the cursor up, down, left
and right. Press
/
buttons to
adjust LCD mode.
1. AUDIO Button
Press this button to switch the audio
Languages.
2. ANGLE Button
Press it to switch the picture’s angle.
3. SUBTITLE Button
Press it to switch the program’s subtitle
languages.
4. DISPLAY Button
Press it to display the disc
Information.
5. SETUP Button
Press it to enter or quit the SETUP Menu.
6. ENTER Button
Press it to enter setting.
7. NUMERICAL Buttons
Press these buttons to input numbers.
8
8. PLAYBACK FUNCTIONS
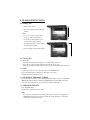
8.1 Loading Disc
1. Push to insert the disc
2. If no power supply, the disc will not be
inhaled.
Notes:
• Do not use cracked or warped discs.
Doing so could result in damage.
• Set the disc securely. Failure to set it
securely could result in damage.
• Set single-sided DVDs or CDs with the
label sidefacing upwards.
1
3. The disc will be automatically inhaled.
3
8.2 Playing Disc
Loading the disc
• One of the following messages appears on the LCD: DVD, VCD, CD.
• For some discs, playback starts automatically when the disc is close.
• When discs for which program memories are set, playback starts automatically in the order.
8.3 DVD
Use the cursor buttons to select the item, then press the ENTER button.
Press the numeral button on the remote control unit to select item.
Example: For DVDs with menu screen
8.4 TO DISPLAY THE MENU SCREEN
The way in which the menu screen is displayed differs from disc to disc. Press the MENU,
TITLE button during playback of DVDs, the RETURN button during PBC playback of
video CDs. For details, refer to the documentation included with the disc.
8.5 STOPPING THE DISC
Press the STOP button.
Resume function (DVDs and Video CDs)
Hint:
• For some discs, playback may not start from the position at which was stopped. If the
STOP button then the previous is pressed while the resume function is on, playback
starts from the beginning of the title.
9
8.6 PAUSING THE DISC
Press the PLAY/PAUSE button.
Press the button again to resume playback.
8.7 Scanning Forward And Backward
During playback, press the PRE or NEXT button. Reverse direction. Forward direction
8.8 RETURNING TO THE PREVIOUS CHAPTER OR TRACK OF
DVDS, VIDEO CDS AND CDS
Press the PRE button during playback.
When pressed, playback returns to the beginning of the previous chapter or track.
8.9 MOVING AHEAD TO THE NEXT CHAPTER OR TRACK OF
DVDS, VIDEO CDS AND CDS.
Press the NEXT button during playback.
When pressed once, playback moves forward to the next chapter or track.
8.10 REMOVING DISCS
1. Press the STOP button.
2. Press EJECT button to open the disc.
3. Remove the disc.
CAUTION:
When connecting the player to an external TV monitor, please make sure that (for better audio
and visual performance) you switch/adjust the "TV Output Type" (marked ➔ ) as NTSC
(default setting) or PAL according to local TV system, as the below SETUP MENU shows:
OUTPUT TYPE Setting Menu
10
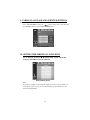
9. VARIOUS LANGUAGE AND SUBTITLE SETTINGS
Disc Setting
Select "DISC SETTING" by using the " / " button on the remote control unit, then
press ‘ENTER’ button to enter the DISC SETTING menu.
Disc Setting Menu
10. SETTING THE PARENTAL LOCK LEVEL
Select ‘Parental’ by using " / " button on the remote control unit,
then press ‘ENTER’ to enter the submenu.
Rating Setting Screen
Note:
To avoid the possibility of others using the default password to set the parental level
and change the password, you can record this default password in another area and
delete it from this Manual.
11
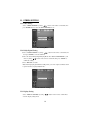
11. OTHER SETTING
11.1 Video Setting
Select "VIDEO SETTING" by using " / " button on the remote control unit, then
press ENTER button to enter the VIDEO SETTING screen.
Disc Setting Menu
11.2 Dolby Digital Setting
a) Select "DOLBY DIGITAL" by using " / " button on the remote control unit, and
then press ENTER to enter the submenu.
b) Select the desired Dolby Digital Playing Mode either PCM or BITSTREAM to your
choice by using " / "button on the remote control unit, then press ‘ENTER’ to
confirm the setting.
c) Press ’RETURN’ to return.
Note: Normal playing by PCM mode will provide you a non-compressed music which
is preferred when you play CD/DVD disc.
DOLBY DIGITAL Setting
11.3 Display Setting
Select "DISPLAY SETTING" by using "
enter the display setting menu.
12
/
" button on the remote control unit to
Display Setting Menu
12. ADVANCED FUNCTIONS
12.1 Search For A Specific Scene
1. Press the SEARCH button.
2. Press the numeral button to select specific time or
title/chapter.
3. Press the ENTER button and playback starts from
the specific chapter number.
12.2 Viewing In Slow Motion DVDs And Video CDs
Press the SLOW button during playback, the playback speed becomes 1/2, 1/4, or 1/6
of the normal speed each time you press the SLOW button.
12.3 Repeat Play DVDs, Video CDs And CDs
• Repeat A TITLE ,CHAPTER, Or TRACK
Press the REPEAT button.
• Repeat A Section Between Point A And B.
During playback, press A-B button on the remote control unit at the starting point of
the section you want to repeat. (Point A)
Press A-B button again at the ending point of the section you want to repeat. (Point B)
Press A-B button again to cancel the A-B repeat function.
12.4 Selecting The Picture’s Angle (Multi-Angle)
Press the ANGLE button while playing back a scene record with multiple angels.
13
13. CAUTIONS ON USE
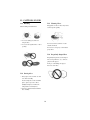
13.1 Handing
13.3 Cleaning Discs
When holding with both hands
Fingerprints or dust on discs may reduce
sound or picture quality.
• Do not use damaged (cracked or
warped) discs.
• Do not scratch signal surface or let it
get dirty.
Do not use benzene, thinner or other
volatile chemicals.
Do not use record spray or an antistatic
spray either.
13.4 Irregularly shaped discs
Irregularly shaped discs (heart-shaped
discs, hexagonal discs, etc.) cannot be
played on this player.
Doing so could damage the player.
Never use such discs.
13.2 Storing discs
• Always place discs in their case and
store them vertically.
Avoid storing discs in hot or humid
places, places exposed to direct
Sunlight and places in which the
temperature is extremely low.
• Read any cautions included with the
disc carefully.
14
14. TROUBLE SHOOTING
Picture Disturbed When A DVD Is Recoded On A VCR Or Played Via
A VCR
➔ This player is compatible with analog copy protect type copy guard. Some discs include
copy prohibit signals. Such discs will not play properly when played via a VCR when
recoded on a VCR.
Play Cannot Be Operated With The Remote Control Unit
➔ Remote control unit is too far from the main unit or at too strong an angle with respect to
the remote sensor.
➔ Remote control unit’s battery is worn out.
TV & Other Device Operate Erroneously
➔ The player’s remote control unit may cause some TVs with wireless remote control to
operate erroneously.
No Sound Is Produced From Speakers Or Sound Is Distorted
➔
➔
➔
➔
For some discs, 96KHZ digital output of linear PCM audio signals is prohibited.
Disc is dirty
Pause or slow play mode is set.
Main unit’s volume is set to the minimum.
Volume Different For DVDs And CDs
➔ This is due to the different recording methods.
No Sound Is Produced Or Sound Is Distorted When Connected To A
TV, An Amplifier, Etc.
➔
➔
➔
➔
Connection cords are not securely plugged in or not connected.
Connection plugs or jacks are dirty
Audio cables are not properly connected.
DTS audio digital output is connected to a non-compatible AV amplifier, etc.
Player Gets Hot
➔ This is normal.
Note:
The player may stop operating properly due to static electricity or other external
influences. In this case, unplugging the power cord then plugging it back in will usually
resolve the problem. If not, consult your nearest service center.
Liquid Crystal Display
With liquid crystal display, a few picture elements may be black or shine particular color.
This is normal.
15