1
Antispyware
User's guide
Copyright © 2005 SOFTWIN
Antispyware
BitDefender 9 Antispyware
BitDefender 9 Antispyware
User's guide
SOFTWIN
Published 2005.11.02
Build 9.0.1
Copyright © 2005 SOFTWIN
Legal Notice
All rights reserved. No part of this book may be reproduced or transmitted in any form or by any
means, electronic or mechanical, including photocopying, recording, or by any information storage
and retrieval system, without written permission from SOFTWIN, except for the inclusion of brief
quotations in reviews. The content can not be modified in any way.
Warning and Disclaimer.
This product and its documentation are protected by copyright. The
information in this document is provided on an "as is" basis, without warranty. Although every
precaution has been taken in the preparation of this document, the authors will not have any liability to any person or entity with respect to any loss or damage caused or alleged to be caused
directly or indirectly by the information contained in this work.
This book contains links to third-party Websites that are not under the control of SOFTWIN, and
SOFTWIN is not responsible for the content of any linked site. If you access a third-party website
mentioned in this guide, you will do so at your own risk. SOFTWIN provides these links only as a
convenience, and the inclusion of the link does not imply that SOFTWIN endorses or accepts any
responsibility for the content of those third-party sites.
Trademarks.
Trademark names may appear in this book. All registered and unregistered trademarks in this document are the sole property of their respective owners.
BitDefender 9 Antispyware
OK, so you're a Ph.D. Just don't touch anything.
BitDefender 9 Antispyware
BitDefender 9 Antispyware
Table of Contents
License and Warranty . . . . . . . . . . . . . . . . . . . . . . . . . . . . . . . . . . . . . . . . . . . . . . . . . ix
Preface . . . . . . . . . . . . . . . . . . . . . . . . . . . . . . . . . . . . . . . . . . . . . . . . . . . . . . . . . . . . . xiii
1. Conventions used in this book . . . . . . . . . . . . . . . . . . . . . . . . . . . . . . . . . . . . . . . . . .
1.1. Typographical conventions . . . . . . . . . . . . . . . . . . . . . . . . . . . . . . . . . . . . . . . . .
1.2. Admonitions . . . . . . . . . . . . . . . . . . . . . . . . . . . . . . . . . . . . . . . . . . . . . . . . . . .
2. The book structure . . . . . . . . . . . . . . . . . . . . . . . . . . . . . . . . . . . . . . . . . . . . . . . . . .
3. Request for Comments . . . . . . . . . . . . . . . . . . . . . . . . . . . . . . . . . . . . . . . . . . . . . . . .
xiii
xiii
xiv
xiv
xv
Product installation ................................................ 1
1. BitDefender 9 Antispyware installation . . . . . . . . . . . . . . . . . . . . . . . . . . . . . 3
1.1.
1.2.
1.3.
1.4.
System requirements . . . . . . . . . . . . . . . . . . . . . . . . . . . . . . . . . . . . . . . . . . . . . .
Installation steps . . . . . . . . . . . . . . . . . . . . . . . . . . . . . . . . . . . . . . . . . . . . . . . . .
Upgrade . . . . . . . . . . . . . . . . . . . . . . . . . . . . . . . . . . . . . . . . . . . . . . . . . . . . . . .
Removing, repairing or modifying BitDefender features . . . . . . . . . . . . . . . . . . . . .
3
3
6
6
Description and features .......................................... 9
2. Overview . . . . . . . . . . . . . . . . . . . . . . . . . . . . . . . . . . . . . . . . . . . . . . . . . . . . . . 11
2.1. Why BitDefender? . . . . . . . . . . . . . . . . . . . . . . . . . . . . . . . . . . . . . . . . . . . . . . . 11
2.2. Data Security Division . . . . . . . . . . . . . . . . . . . . . . . . . . . . . . . . . . . . . . . . . . . . 13
2.3. SOFTWIN . . . . . . . . . . . . . . . . . . . . . . . . . . . . . . . . . . . . . . . . . . . . . . . . . . . . . 13
3. BitDefender 9 Antispyware . . . . . . . . . . . . . . . . . . . . . . . . . . . . . . . . . . . . . . 15
3.1. Antispyware . . . . . . . . . . . . . . . . . . . . . . . . . . . . . . . . . . . . . . . . . . . . . . . . . . . 15
3.2. Other Features . . . . . . . . . . . . . . . . . . . . . . . . . . . . . . . . . . . . . . . . . . . . . . . . . . 15
4. BitDefender modules . . . . . . . . . . . . . . . . . . . . . . . . . . . . . . . . . . . . . . . . . . . . 17
4.1. General module . . . . . . . . . . . . . . . . . . . . . . . . . . . . . . . . . . . . . . . . . . . . . . . . . 17
4.2. Antispyware module . . . . . . . . . . . . . . . . . . . . . . . . . . . . . . . . . . . . . . . . . . . . . 17
4.3. Update module . . . . . . . . . . . . . . . . . . . . . . . . . . . . . . . . . . . . . . . . . . . . . . . . . 17
Management console ............................................ 19
5. Overview . . . . . . . . . . . . . . . . . . . . . . . . . . . . . . . . . . . . . . . . . . . . . . . . . . . . . . 21
5.1. System tray . . . . . . . . . . . . . . . . . . . . . . . . . . . . . . . . . . . . . . . . . . . . . . . . . . . 22
5.2. Scan activity bar . . . . . . . . . . . . . . . . . . . . . . . . . . . . . . . . . . . . . . . . . . . . . . . . 23
6. General module . . . . . . . . . . . . . . . . . . . . . . . . . . . . . . . . . . . . . . . . . . . . . . . . . 25
v
BitDefender 9 Antispyware
6.1. General information . . . . . . . . . . . . . . . . . . . . . . . . . . . . . . . . . . . . . . . . . . . . . .
6.1.1. Firewall . . . . . . . . . . . . . . . . . . . . . . . . . . . . . . . . . . . . . . . . . . . . . . . . . . .
6.1.2. Automatic Update . . . . . . . . . . . . . . . . . . . . . . . . . . . . . . . . . . . . . . . . . . .
6.2. Product registration . . . . . . . . . . . . . . . . . . . . . . . . . . . . . . . . . . . . . . . . . . . . . .
6.3. Management console settings . . . . . . . . . . . . . . . . . . . . . . . . . . . . . . . . . . . . . .
6.4. Events . . . . . . . . . . . . . . . . . . . . . . . . . . . . . . . . . . . . . . . . . . . . . . . . . . . . . . . .
6.5. About . . . . . . . . . . . . . . . . . . . . . . . . . . . . . . . . . . . . . . . . . . . . . . . . . . . . . . . .
25
26
27
27
29
32
34
7. Antispyware module . . . . . . . . . . . . . . . . . . . . . . . . . . . . . . . . . . . . . . . . . . . . 37
7.1. On-access scanning . . . . . . . . . . . . . . . . . . . . . . . . . . . . . . . . . . . . . . . . . . . . . .
7.1.1. Files Control . . . . . . . . . . . . . . . . . . . . . . . . . . . . . . . . . . . . . . . . . . . . . . .
7.1.2. Dial Control . . . . . . . . . . . . . . . . . . . . . . . . . . . . . . . . . . . . . . . . . . . . . . .
7.1.3. Script Control . . . . . . . . . . . . . . . . . . . . . . . . . . . . . . . . . . . . . . . . . . . . . .
7.1.4. Cookies Control . . . . . . . . . . . . . . . . . . . . . . . . . . . . . . . . . . . . . . . . . . . .
7.1.5. Registry Control . . . . . . . . . . . . . . . . . . . . . . . . . . . . . . . . . . . . . . . . . . . .
7.2. On-demand scanning . . . . . . . . . . . . . . . . . . . . . . . . . . . . . . . . . . . . . . . . . . . . .
7.2.1. Immediate scanning . . . . . . . . . . . . . . . . . . . . . . . . . . . . . . . . . . . . . . . . .
7.2.2. Contextual scanning . . . . . . . . . . . . . . . . . . . . . . . . . . . . . . . . . . . . . . . . .
7.2.3. Drag&Drop Scanning . . . . . . . . . . . . . . . . . . . . . . . . . . . . . . . . . . . . . . . .
7.2.4. Scheduled scanning . . . . . . . . . . . . . . . . . . . . . . . . . . . . . . . . . . . . . . . . . .
7.3. System Information . . . . . . . . . . . . . . . . . . . . . . . . . . . . . . . . . . . . . . . . . . . . . .
7.4. Quarantine . . . . . . . . . . . . . . . . . . . . . . . . . . . . . . . . . . . . . . . . . . . . . . . . . . . .
7.5. Report . . . . . . . . . . . . . . . . . . . . . . . . . . . . . . . . . . . . . . . . . . . . . . . . . . . . . . . .
37
39
41
45
48
52
54
55
62
63
64
75
76
79
8. Update module . . . . . . . . . . . . . . . . . . . . . . . . . . . . . . . . . . . . . . . . . . . . . . . . . 83
8.1. Automatic update . . . . . . . . . . . . . . . . . . . . . . . . . . . . . . . . . . . . . . . . . . . . . . .
8.2. Update settings . . . . . . . . . . . . . . . . . . . . . . . . . . . . . . . . . . . . . . . . . . . . . . . . .
8.2.1. Update location settings . . . . . . . . . . . . . . . . . . . . . . . . . . . . . . . . . . . . . .
8.2.2. Automatic update options . . . . . . . . . . . . . . . . . . . . . . . . . . . . . . . . . . . . .
8.2.3. Manual update type . . . . . . . . . . . . . . . . . . . . . . . . . . . . . . . . . . . . . . . . .
8.2.4. Interface options . . . . . . . . . . . . . . . . . . . . . . . . . . . . . . . . . . . . . . . . . . . .
83
85
86
87
87
87
Best practices .................................................... 89
9. Best practices . . . . . . . . . . . . . . . . . . . . . . . . . . . . . . . . . . . . . . . . . . . . . . . . . . 91
9.1. Antispyware . . . . . . . . . . . . . . . . . . . . . . . . . . . . . . . . . . . . . . . . . . . . . . . . . . . 91
Getting help ...................................................... 93
10. Support . . . . . . . . . . . . . . . . . . . . . . . . . . . . . . . . . . . . . . . . . . . . . . . . . . . . . . . 95
10.1. Support department . . . . . . . . . . . . . . . . . . . . . . . . . . . . . . . . . . . . . . . . . . . . .
10.2. On-line help . . . . . . . . . . . . . . . . . . . . . . . . . . . . . . . . . . . . . . . . . . . . . . . . . . .
10.2.1. BitDefender Knowledge Base . . . . . . . . . . . . . . . . . . . . . . . . . . . . . . . . . .
10.3. Contact information . . . . . . . . . . . . . . . . . . . . . . . . . . . . . . . . . . . . . . . . . . . . .
10.3.1. Web addresses . . . . . . . . . . . . . . . . . . . . . . . . . . . . . . . . . . . . . . . . . . . .
10.3.2. Address . . . . . . . . . . . . . . . . . . . . . . . . . . . . . . . . . . . . . . . . . . . . . . . . . .
vi
95
95
95
96
96
97
BitDefender 9 Antispyware
11. Frequently Asked Questions . . . . . . . . . . . . . . . . . . . . . . . . . . . . . . . . . . . . 99
Glossary . . . . . . . . . . . . . . . . . . . . . . . . . . . . . . . . . . . . . . . . . . . . . . . . . . . . . . . . . . . 101
vii
BitDefender 9 Antispyware
viii
License and Warranty
License and Warranty
This License Agreement is a legal agreement between you (either an individual or a
single entity end user) and SOFTWIN for use of the SOFTWIN software product
identified above, which includes computer software and may include associated
media, printed materials, and "online" or electronic documentation ("BitDefender"),
all of which are protected by U.S. and international copyright laws and international
treaty protection. By installing, copying, or otherwise using BitDefender, you agree
to be bound by the terms of this agreement. If you do not agree to the terms of this
agreement, do not install or use BitDefender; you may, however, return it to your
place of purchase for a full refund within 30 days after your purchase. Verification
of your purchase may be required.
BitDefender is protected by copyright laws and international copyright treaties, as
well as other intellectual property laws and treaties. BitDefender is licensed, not sold.
GRANT OF LICENSE. SOFTWIN hereby grants you and only you the following nonexclusive license to use BitDefender:
APPLICATION SOFTWARE. You may install and use one copy of BitDefender, or any
prior version for the same operating system, on a single computer terminal. The
primary user of the computer on which BitDefender is installed may make one additional (i.e. second) copy for his or her exclusive use on a portable computer.
NETWORK USE. You may also store or install a copy of BitDefender on a storage
device, such as a network server, used only to install or run the BitDefender on your
other computers over an internal network; however, you must purchase and dedicate
a separate license for each separate computer terminal on which BitDefender is installed or run from the storage device. A license for BitDefender may not be shared
or used concurrently on different computers or computer terminals. You should
purchase a license pack if you require multiple licenses for use on multiple computers
or computer terminals.
LICENSE PACKS. If you purchase a License Pack and you have acquired this License
Agreement for multiple licenses of BitDefender, you may make the number of additional copies of the computer software portion of BitDefender specified above as
ix
License and Warranty
"Licensed copies." You are also entitled to make a corresponding number of secondary
copies for portable computer use as specified above in the section entitled "Application Software".
TERM OF LICENSE. The license granted hereunder shall commence on the date that
you install, copy or otherwise first use BitDefender and shall continue only on the
computer on which it is initially installed.
UPGRADES. If BitDefender is labeled as an upgrade, you must be properly licensed
to use a product identified by SOFTWIN as being eligible for the upgrade in order to
use the BitDefender. An BitDefender labeled as an upgrade replaces and/or supplements the product that formed the basis for your eligibility for the upgrade. You may
use the resulting upgraded product only in accordance with the terms of this License
Agreement. If BitDefender is an upgrade of a component of a package of software
programs that you licensed as a single product, BitDefender may be used and
transferred only as part of that single product package and may not be separated
for use on more than one computer.
COPYRIGHT. All right, title and interest in and to BitDefender and all copyright rights
in and to BitDefender (including but not limited to any images, photographs, logos,
animations, video, audio, music, text, and "applets" incorporated into BitDefender),
the accompanying printed materials, and any copies of BitDefender are owned by
SOFTWIN. BitDefender is protected by copyright laws and international treaty provisions. Therefore, you must treat BitDefender like any other copyrighted material except that you may install BitDefender on a single computer provided you keep the
original solely for backup or archival purposes. You may not copy the printed materials accompanying BitDefender. You must produce and include all copyright notices
in their original form for all copies created irrespective of the media or form in which
BitDefender exists. You may not sub-license, rent, sell, or lease BitDefender. You
may not reverse engineer, recompile, disassemble, create derivative works, modify,
translate, or make any attempt to discover the source code for BitDefender.
LIMITED WARRANTY. SOFTWIN warrants that the media on which BitDefender is
distributed is free from defects for a period of thirty days from the date of delivery
of BitDefender to you. Your sole remedy for a breach of this warranty will be that
SOFTWIN , at its option, may replace the defective media upon receipt of the damaged media, or refund the money you paid for BitDefender. SOFTWIN does not
warrant that BitDefender will be uninterrupted or error free or that the errors will be
corrected. SOFTWIN does not warrant that BitDefender will meet your requirements.
SOFTWIN HEREBY DISCLAIMS ALL OTHER WARRANTIES FOR BITDEFENDER,
WHETHER EXPRESSED OR IMPLIED. THE ABOVE WARRANTY IS EXCLUSIVE AND
x
License and Warranty
IN LIEU OF ALL OTHER WARRANTIES, WHETHER EXPRESSED OR IMPLIED, INCLUDING THE IMPLIED WARRANTIES OF MERCHANTABILITY, FITNESS FOR A PARTICULAR PURPOSE, OR NON INFRINGEMENT. THIS WARRANTY GIVES YOU SPECIFIC
LEGAL RIGHTS. YOU MAY HAVE OTHER RIGHTS, WHICH VARY FROM STATE TO
STATE.
DISCLAIMER OF DAMAGES. Anyone using, testing, or evaluating BitDefender bears
all risk to the quality and performance of BitDefender. In no event shall SOFTWIN
be liable for any damages of any kind, including, without limitation, direct or indirect
damages arising out of the use, performance, or delivery of BitDefender, even if
SOFTWIN has been advised of the existence or possibility of such damages. SOME
STATES DO NOT ALLOW THE LIMITATION OR EXCLUSION OF LIABILITY FOR INCIDENTAL OR CONSEQUENTIAL DAMAGES, SO THE ABOVE LIMITATION OR EXCLUSION MAY NOT APPLY TO YOU. IN NO CASE SHALL SOFTWIN'S LIABILITY
EXCEED THE PURCHASE PRICE PAID BY YOU FOR BITDEFENDER. The disclaimers
and limitations set forth above will apply regardless of whether you accept or use,
evaluate, or test BitDefender.
IMPORTANT NOTICE TO USERS. THIS SOFTWARE IS NOT FAULT-TOLERANT AND
IS NOT DESIGNED OR INTENDED FOR USE IN ANY HAZARDOUS ENVIRONMENT
REQUIRING FAIL-SAFE PERFORMANCE OR OPERATION. THIS SOFTWARE IS NOT
FOR USE IN THE OPERATION OF AIRCRAFT NAVIGATION, NUCLEAR FACILITIES,
OR COMMUNICATION SYSTEMS, WEAPONS SYSTEMS, DIRECT OR INDIRECT LIFESUPPORT SYSTEMS, AIR TRAFFIC CONTROL, OR ANY APPLICATION OR INSTALLATION WHERE FAILURE COULD RESULT IN DEATH, SEVERE PHYSICAL INJURY
OR PROPERTY DAMAGE.
GOVERNMENT RESTRICTED RIGHTS/RESTRICTED RIGHTS LEGEND. Use, duplication,
or disclosure by the Government is subject to restrictions as set forth in subparagraph
(c)(1)(ii) of the Rights in Technical Data and Computer Software clause at DFARS
252.227-7013 or subparagraphs (c)(1) and (2) of Commercial Computer SoftwareRestricted Rights clause at 48 CFR 52.227-19, as applicable. Contact SOFTWIN, at
5, F-ca de Glucoza str., 72322-Sect.2, Bucharest, Romania, or at Tel No: 40-212330780 or Fax:40-21-2330763.
GENERAL. This Agreement will be governed by the laws of Romania and by the international copyright regulations and treaties. This Agreement may only be modified
by a license addendum, which accompanies this Agreement or by a written document
which has been signed, by both you and SOFTWIN. This Agreement has been written
in the English language only and is not to be translated or interpreted in any other
language. Prices, costs and fees for use of BitDefender are subject to change without
xi
License and Warranty
prior notice to you. In the event of invalidity of any provision of this Agreement, the
invalidity shall not affect the validity of the remaining portions of this Agreement.
BitDefender and BitDefender logos are trademarks of SOFTWIN. Microsoft, Windows,
Excel, Word, the Windows logo, Windows NT, Windows 2000 are registered trademarks of Microsoft Corporation. All other trademarks are the property of their respective owners.
xii
Preface
Preface
This guide is intended to all users who have chosen BitDefender 9 Antispyware as
a security solution for their personal computers. The information presented in this
book is suitable not only for computer literates, it is accessible to everyone who is
able to work under Windows.
This book will describe for you BitDefender 9 Antispyware, the Company and the
team who built it, will guide you through the installation process, will teach you how
to configure it. You will find out how to use BitDefender 9 Antispyware, how to
update, test and customize it. You will learn how to get best from BitDefender.
We wish you a pleasant and useful lecture.
1. Conventions used in this book
1.1. Typographical conventions
Several text styles are used in the book for an improved readability. Their aspect
and meaning are presented in the table below.
Appearance
Description
sample syntax
Syntax samples are printed with monospaced
characters.
http://www.bitdefender.com
The URL links is pointing to some external location, on http or ftp servers.
<[email protected]>
E-mail messages are inserted in the text for contact information.
xiii
Preface
Appearance
Description
“Preface” (p. xiii)
This is an internal link, towards some location inside the document.
filename
File and directories are printed using monospaced
font.
option
All the product options are printed using strong
characters.
sample code listing
The code listing is printed with monospaced characters.
1.2. Admonitions
The admonitions are in-text notes, graphically marked, bringing to your attention
additional information related to the current paragraph.
Note
The note is just a short observation. Although you can omit it, the notes can provide
valuable information, such as specific feature or a link to some related topic.
Important
This requires your attention and is not recommended to skip over it. Usually, it
provides non-critical but significant information.
Warning
This is critical information you should treat with increased caution. Nothing bad will
happen if you follow the indications. You should read and understand it, because
it describes something extremely risky.
2. The book structure
The book consists of five parts, containing the major topics: Description and features,
Installation, Management Console, Getting help and Best practices. Moreover, a
glossary is provided to clarify some technical terms.
xiv
Preface
Description and features.
A short introduction to BitDefender. It explains who
BitDefender is, who SOFTWIN and Data Security Division are. BitDefender 9 Antispyware, its features and the product modules are presented to you.
Installation.
Step by step instructions for installing BitDefender on a workstation.
This is a comprehensive tutorial on installing BitDefender 9 Antispyware. Starting
with the prerequisites for a successfully installation, you are guided through the
whole installation process. Finally, the removing procedure is described in case you
need to uninstall BitDefender.
Management console.
Description of basic administration and maintenance of
BitDefender. The chapters explain in detail all options of BitDefender 9 Antispyware,
how to register the product, how to scan your computer and how to perform the
updates.
Getting help.
Where to look and where to ask for help if something goes unexpected appears. It includes a FAQ section too.
Best practices.
Follow the steps described in here in order to ensure a computer
free from viruses.
Glossary.
The Glossary tries to explain some technical and uncommon terms you
will find in the pages of this document.
3. Request for Comments
We invite you to help us improve the book. We have tested and verified all of the
information to the best of our ability. Please write to tell us about any flaws you find
in this book or how you think it could be improved, to help us provide you with the
best documentation possible.
Let us know by sending an e-mail to <[email protected]>.
xv
Preface
xvi
Product installation
Product installation
Product installation
BitDefender 9 Antispyware installation
Product
installation
01
1. BitDefender 9 Antispyware
installation
The BitDefender 9 Antispyware installation section of this user guide contains the
following topics:
•
•
•
•
System requirements
Installation steps
Upgrade
Removing, repairing or modifying BitDefender features
1.1. System requirements
To ensure a proper functioning of the product, before installation, verify that the
following system requirements are met:
•
•
•
•
Minimum Processor - Pentium MMX 200 MHz
Minimum hard disk space - 40MB
Minimum RAM Memory - 64MB (128MB Recommended)
Operating system - Windows 98/ME/2000/XP; Internet Explorer 5.5 (+)
1.2. Installation steps
Locate the setup file and double-click it. This will launch a wizard, which will guide
you through the setup process:
Installation steps:
3
Product
installation
01
BitDefender 9 Antispyware installation
Installation steps
1.
Click Next to continue or click Cancel if you want to quit installation.
2.
Please read the License Agreement, select I accept the terms in the License
Agreement and click Next. If you do not agree with these terms click Cancel.
The installation process will be abandoned and you will exit setup.
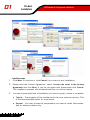
3.
You can choose what kind of installation you want: typical, custom or complete.
• Typical - The program will be installed with the most common options. This
is the recommended option for most users.
• Custom - You may choose the components you want to install. Recommended for advanced users only.
4
BitDefender 9 Antispyware installation
Product
installation
01
• Complete - For full installation of the product. All BitDefender modules will
be installed.
If you select Typical or Complete you will skip step 5
4.
If you have selected Custom, a new window will appear containing all the BitDefender components listed so that you may select the ones you would like to install.
If you click any component name, a short description (including the minimum
space required on the hard disk) will appear on the right side. If you click any
component icon a window will appear where you can choose to install or not
the selected module.
You can select the folder where you want to install the product. The default
folder is C:\Program Files\Softwin\BitDefender 9.
If you want to select another folder, click Browse and in the window that will
open, select the folder you wish BitDefender to be installed in. Click Next.
5.
Click Next.
6.
You have four options selected by default:
• Update BitDefender - to update BitDefender at the end of the installation.
Your system must be connected to the Internet to update.
• Open readme file - to open the readme file at the end of the installation.
• Place a shortcut on the desktop - to place a shortcut to BitDefender on your
desktop at the end of the installation.
Click Install in order to begin the installation of the product.
7.
Click Finish to complete the product installation. If you have accepted the default
settings for the installation path, a new folder named Softwin is created in Program Files and it contains the subfolder BitDefender 9.
Note
You may be asked to restart your system so that the setup wizard can complete
the installation process.
5
Product
installation
01
BitDefender 9 Antispyware installation
1.3. Upgrade
The upgrade procedure can be done in one of the following ways:
• Install without removing the previous version - v8 to v9 only
Double-click the setup file and follow the wizard described in the “Installation
steps” (p. 3) section.
Important
During the installation process an error message caused by the Filespy service, will appear. Click OK to continue the installation.
• Uninstall your previous version and install the new one - for all BitDefender versions
First of all you have to remove your previously version, restart the computer and
install the new one as described in the “Installation steps” (p. 3) section.
Important
If you upgrade from v8 to v9 we recommend you to save BitDefender settings.
After the upgrading process is over you may load them.
1.4. Removing, repairing or modifying BitDefender
features
If you want to modify, repair or remove BitDefender 9 Antispyware, follow the path
from the Windows start menu: Start -> Programs -> BitDefender 9 -> Modify,
Repair or Uninstall.
You will be requested to confirm your choice by clicking Next. A new window will
appear where you can select:
• Modify - to select new program components to add or to select currently installed
components to remove;
• Repair - to re-install all program components installed by the previous setup;
6
BitDefender 9 Antispyware installation
Product
installation
01
Important
Before repairing the product we recommend you to save the BitDefender settings.
After the repairing process is over you may load them.
• Remove - to remove all installed components.
To continue setup, select one of the three options listed above. We recommend that
you choose Remove for a clean re-installation. After the uninstall process is over,
we recommend that you delete the Softwin folder from the Program Files.
7
Product
installation
01
8
BitDefender 9 Antispyware installation
Description and features
Description and features
Description and features
Overview
Description
and features
02
2. Overview
BitDefender provides security solutions to satisfy the protection requirements of
today's computing environment, delivering effective threat management for over 41
million home and corporate users in more than 100 countries.
Designed to provide full protection for corporate network and systems, the BitDefender solution range comprises, beside antivirus protection, antispam, personal
firewall and security management solutions. BitDefender also specializes in providing
assistance with designing and establishing content security policies for corporate
networks.
BitDefender Professional was the third product of its kind in the world to receive
ICSA certification for Windows XP and the first to be awarded for groundbreaking
innovation by the European Commission and Academies. BitDefender Antivirus is
certified by all the major reviewers in the antivirus field - ICSA Labs, CheckMark,
CheckVir, TÜV and Virus Bulletin.
BitDefender is headquartered in Bucharest, Romania and has offices in Tettnang,
Germany, Barcelona, Spain and Florida, US. Website: http://www.bitdefender.com
2.1. Why BitDefender?
Proven. Most reactive antivirus producer.
BitDefender fast reactivity in case of
computer virus epidemic was confirmed beginning with the last outbreaks of CodeRed,
Nimda and Sircam, as well as Badtrans.B or other dangerous, fast-spreading malicious
codes. BitDefender was the first to provide antidotes against these codes and to
make them freely available on the Internet for all affected people. Now, with the
continuous expansion of the Klez virus - in various versions immediate antivirus
protection has become once more a critical need for any computer system.
Innovative. Awarded for innovation by the European Commission and EuroCase.
BitDefender has been proclaimed a winner of the European IST-Prize, awarded by
the European Commission and by representatives of 18 academies in Europe. Now
11
Description
and features
02
Overview
in its eighth year, the European IST Prize is a reward for groundbreaking products
that represent the best of European innovation in information technology.
Comprehensive. Covers every single point of your network, providing complete
security.
BitDefender security solutions for the corporate environment satisfy the
protection requirements of today's business environment, enabling management of
all complex threats that endanger a network, from a small local area to large multiserver, multi-platform WAN's.
Your Ultimate Protection. The final frontier for any possible threat to your computer
system.
As virus detection based on code analysis has not always offered good
results, BitDefender has implemented behavior based protection, providing security
against born-new malware.
These are the costs that organizations want to avoid and what the security products
are designed to prevent:
•
•
•
•
•
•
Worm attacks
Communication loss because of infected e-mails
E-mail breakdown
Cleaning and recovering systems
Lost productivity experienced by end users because systems are not available
Hacking, and unauthorized access that causes damage
Some simultaneously developments and benefits can be accomplished by using the
BitDefender security suite:
• Increase network availability by stopping the spread of malicious code attacks
(i.e., Nimda, Trojan horses, DDoS).
• Protect remote users from attacks.
• Reduce administrative costs and deploys rapidly with BitDefender Enterprise
management capabilities.
• Stop the spreading of malware through e-mail, using a BitDefender e-mail protection at the company's gateway.Temporarily or permanently block unauthorized,
vulnerable, and expensive application connections.
12
Overview
Description
and features
02
2.2. Data Security Division
Ever since the beginning, SOFTWIN's Data Security Division approached data protection in a specific manner, with the first intelligent update, requiring no user intervention, the first remote antivirus management through WAP technology or the first
Personal Firewall to be integrated within an antivirus engine to provide complete response to today's complex security threats.
Born to provide full data security at all critical levels in today's business environment,
Data Security Division aims to ensure systems protection against computer viruses,
to do antivirus research, to develop new technologies for monitoring all possible
ways to infect a system and, last but not least, to educate the IT&C public on the
danger of computer viruses.
BitDefender security solutions satisfy the protection requirements of today's business
environment, enabling management of all complex threats that endanger a network,
from a small local area to large multi-server, multi-platform WAN's.
2.3. SOFTWIN
Bucharest-based SOFTWIN is the leading provider of complex software solutions
and services in Romania.
SOFTWIN focuses on providing software solutions and services that enable fast
growing companies to solve critical business challenges and to capitalize on new
business opportunities.
SOFTWIN enables companies to focus on their core business and expand to new
markets, by outsourcing non-core activities.
SOFTWIN employs over 500 highly qualified professionals experienced in developing
customized solutions and services.
Since its establishment in 1990, SOFTWIN's average annual revenue has increased
by +30%.
SOFTWIN has 4 divisions, which also define the company's main business lines:
• CRM
13
02
Description
and features
Overview
• Business Information Solutions
• eContent Solutions
• Data Security Solutions
SOFTWIN provides services and solutions to customers worldwide. Over 90% of
the company's turnover is achieved from exports to the US and European Union.
Using cutting edge technologies, SOFTWIN successfully developed over 500 software
development projects, over 3,500 content structuring projects for international
partners, having over 43 million data security solutions users in 80 countries worldwide and more than 1,500,000 client calls handled annually for CRM services.
14
BitDefender 9 Antispyware
Description
and features
03
3. BitDefender 9 Antispyware
3.1. Antispyware
Monitor and prevent potential spyware threats in real-time, before they can damage
your system. By making use off a comprehensive database of spyware signatures,
your computer will remain spyware-free.
Real-Time Antispyware.
BitDefender monitors dozens of potential “hotspots” in
your system where spyware might act, and also checks any changes made to your
system and software. Known spyware threats are also blocked in real-time.
Spyware scanning and cleaning.
BitDefender can scan your system, or part of
it, for known spyware threats. The scan uses a constantly updated spyware signature
database.
Active Content Control.
Proactively blocks any potentially malicious application
such as: ActiveX, Java Applets or Java Scripts type codes.
Dial Control.
A configurable anti-dialer prevents malicious applications from running
up a huge telephone bill at your expense.
Cookie Control.
The firewall filters incoming and outgoing cookie type files,
keeping your identity and preferences confidential when you're browsing the Internet.
3.2. Other Features
Hourly Updates.
Your copy of BitDefender will be updated 24 times a day over
the Internet, directly or through a Proxy Server. The product is able to repair itself
if necessary, by downloading the damaged or missing files from BitDefender servers.
BitDefender license owners benefit from free virus definition updates and free product
upgrades.
15
03
Description
and features
BitDefender 9 Antispyware
24/7 Support.
Offered online by qualified support representatives and an online
database with answers to Frequently Asked Questions..
Rescue Disk.
BitDefender 9 Antispyware is delivered on a bootable CD (based
on LinuxDefender), which can be used to disinfect a system without booting it.
16
BitDefender modules
Description
and features
04
4. BitDefender modules
BitDefender 9 Antispyware contains the modules: General, Antispyware and Update.
4.1. General module
BitDefender comes fully configured for maximum security.
Essential status information about all the BitDefender modules is displayed in the
General module. Here you can register your product and you can set the overall behavior of BitDefender.
4.2. Antispyware module
BitDefender monitors dozens of potential “hotspots” in your system where spyware
might act, and also checks any changes made to your system and software. Known
spyware threats are also blocked in real-time. It is effective in blocking Trojan horses
and other tools installed by hackers, who try to compromise your privacy and send
your personal information, like credit card numbers, from your computer to the
hacker.
BitDefender can also scan your system, or part of it, for known spyware threats.
The scan uses a constantly updated spyware signature database.
4.3. Update module
New spywares are found and identified every day. This is why it is very important
to keep BitDefender up to date with the latest spyware signatures. By default, BitDefender automatically checks for updates every hour.
17
04
Description
and features
BitDefender modules
Updates come in the following ways:
• Updates for the antispyware engines - new spyware signatures will be added to
the database. This update type is also known as Antispyware Update.
• Product upgrades - when a new product version is released, new features and
scan techniques are introduced to the effect of improving the product's performance. This update type is also known as Product Update.
Moreover, from the user's intervention viewpoint, we may take into account:
• Automatic update - the antivirus automatically contacts the BitDefender server
in order to check if an update was released. If so, BitDefender is updated automatically. The automatic update can also be done anytime you want by clicking
Update now from the Update module.
18
Management console
Management console
Management console
Overview
Management
console
05
5. Overview
BitDefender 9 Antispyware was designed with a centralized management console,
which allows the configuration of the protection options for all BitDefender modules.
In other words, it is enough to open the management console in order to have access
to all modules: Antispyware and Update.
To access the management console, use the Windows Start menu, by following the
path Start -> Programs -> BitDefender 9 -> BitDefender 9 Antispyware or quicker,
double click the BitDefender icon from the system tray.
Management console
On the left side of the management console you can see the module selector:
21
Management
console
05
Overview
• General - in this section you can see a summary of all the BitDefender main settings, product details and contact information. Here you can also register the
product.
• Antispyware - in this section you can configure the Antispyware module.
• Update - in this section you can configure the Update module.
On the right side of the management console you can see information regarding the
section you are into. The More Help option, placed at the right bottom, opens the
Help file.
5.1. System tray
When the console is minimized, an icon will appear in the system tray:
If you double-click this icon, the management
console will open.
System tray
Also, by right-clicking it, a contextual menu
containing the following options, will appear.
Contextual menu
•
•
•
•
•
Show - opens the management console.
Close - minimizes the management console to system tray.
Options - opens the Settings section of the management console.
Help - opens the help file.
Update now - performs an immediate update.
22
Management
console
Overview
05
• Exit - shuts down the application. By selecting this option, the icon from the
system tray will disappear and in order to access the management console, you
will have to launch it again from the Windows Start menu.
Note
• The icon will turn into black, if you disable one or more of the BitDefender
modules. This way you will know if some modules are disabled without opening
the management console.
• The icon will blink when an update is available.
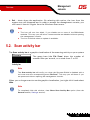
5.2. Scan activity bar
The Scan activity bar is a graphic visualization of the scanning activity on your system
The green bars (the File Zone) show the number of
scanned files per second, on a scale from 0 to 50.
Activity bar
Note
The Scan activity bar will notify you when the Spyware Shield is disabled with a
red cross over the corresponding area (File Zone). This way you will know if you
are protected without opening the management console.
When you no longer want to see the graphic visualization, just right-click it and select
Hide.
Note
To completely hide this window, clear Show Scan Activity Bar option (from the
General module, Settings section).
23
05
24
Management
console
Overview
General module
Management
console
06
6. General module
The General section of this user guide contains the following topics:
•
•
•
•
•
General information
Product registration
Management console settings
Events
About
Note
For more details regarding the General module check the description of the “General
module” (p. 17).
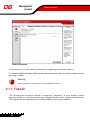
6.1. General information
To access this section click Status tab from the General module.
25
Management
console
06
General module
General information
In this section you can review information regarding the product status.
To enable/disable the main BitDefender features select/clear the check boxes corresponding to them.
Warning
Items marked in red require your immediate attention.
6.1.1. Firewall
The Antispyware monitors dozens of potential “hotspots” in your system where
spyware might act, and also checks any changes made to your system and software.
The figures shown represent the scanned objects during this session.
26
General module
Management
console
06
Note
To be protected against Spyware keep the Antispyware enabled.
6.1.2. Automatic Update
New spywares are found and identified every day. This is why it is very important
to keep BitDefender up to date with the latest spyware signatures. It displays the
date of the last update.
Note
To protect your critical data, BitDefender can perform automatic updates. Keep the
Automatic update option enabled.
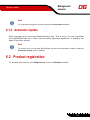
6.2. Product registration
To access this section click Register tab from the General module.
27
Management
console
06
General module
Product registration
This section contains information about the status of your BitDefender license. Here
you can register the product and you can see the expiring date.
The product is delivered with a trial registration key valid for thirty days. At the end
of the trial period, if you want to purchase the product you have to provide a new
license key. Click Buy now to get a new License Key from the BitDefender online
store.
Click Online registration to activate your BitDefender product in order to benefit from
free BitDefender technical support and other services.
To modify the default license key click Enter new key. The following window will
open:
28
General module
Management
console
06
Type in the license key in the Serial field.
Click Register to finish the registration process.
If you mistype the license key you will be
prompted to re-enter it.
Enter registration key
If you type in a valid license key a success message box appears.
In the Registration section now, you can see the expiring date of the new license
key.
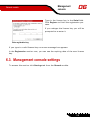
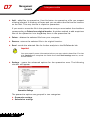
6.3. Management console settings
To access this section click Settings tab from the General module.
29
Management
console
06
General module
Management console settings
Here you can set the overall behavior of BitDefender. By default, BitDefender is
loaded at Windows startup and then runs minimized in the taskbar.
The following options are available:
• Enable password protection - enables setting a password in order to protect the
BitDefender Management Console configuration;
Note
If you are not the only person using this computer, it is recommended that you
protect your BitDefender settings with a password.
If you select this option, the next window will appear:
30
Management
console
General module
06
Type in the password in the Password field, retype it in the Retype password field and click
OK.
Enter password
From now on, if you want to change the BitDefender configuration options, you
will be asked to introduce the password.
Important
If you forgot the password you will have to repair the product in order to modify
the BitDefender configuration.
• Load BitDefender when Windows starts - automatically launches BitDefender at
system startup.
Note
We recommend you to keep this option selected.
• Start minimized - minimizes the BitDefender management console after it has
been loaded at system startup. Only the BitDefender Icon will appear in the system
tray.
• Receive security notifications - receives from time to time security notifications
regarding virus outbreaks, sent by the BitDefender server.
• Send virus reports - sends to the BitDefender Labs reports regarding viruses
identified in your computer. It helps us keep track of virus-outbreaks.
The reports will contain no confidential data, such as your name, IP address or
others, and will not be used for commercial purposes. The information supplied
will contain only the virus name and will be used solely to create statistic reports.
• Show on-screen notes - shows pop-up windows regarding the product status.
31
06
Management
console
General module
• Enable multiuser support - allows other users that may be using this computer to
have their own settings for BitDefender.
Note
This option can only be enabled or disabled by users with administrator rights
on the local machine.
• Enable activity bar - enables/disables the “ Scan activity bar ” (p. 23).
• Choose skin - allows you to select the color of the management console. The
skin represents the background image on the interface. In order to select a different
skin, click the corresponding color.
Use the Save All Settings / Load All Settings buttons to save / load the settings
you have made for BitDefender to a desired location. This way you can use the same
settings after you reinstall or repair your BitDefender product.
Click Apply to save the changes. If you click Default you will load the default settings.
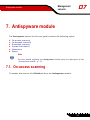
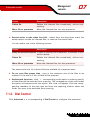
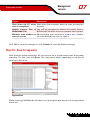
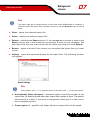
6.4. Events
To access this section click Events tab from the General module.
32
Management
console
General module
06
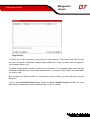
Events
In this section all the events generated by BitDefender are displayed.
There are 3 types of events:
Information,
Warning and
Critical.
Examples of events:
• Information - when an e-mail was scanned;
• Warning - when a suspected file was detected;
• Critical - when an infected file was detected.
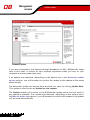
For each event the following information are offered: the date and the time when
the event occurred, a small description and its source (Antivirus or Update). Doubleclick an event to see its properties.
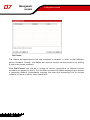
You can filter these events in 2 ways (by type or by source):
• Click Filter to select what types of event to display;
• Select the event source from the drop-down men.;
33
Management
console
06
General module
If the management console is open at the Events section and at the same time an
event occurs you must click Refresh to see that event.
To delete all the events from the list click Clear log.
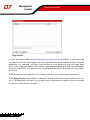
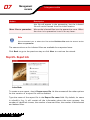
6.5. About
To access this section click About tab in the General module.
In this section you can find the contact information and the product details.
General information
BitDefender provides security solutions to satisfy the protection requirements of
today's computing environment, delivering effective threat management for over
41million home and corporate users in more than 100 countries.
34
General module
Management
console
06
BitDefender is certified by all the major independent reviewers - ICSA Labs, CheckMark and Virus Bulletin, and is the only security product to have received an IST
Prize.
35
06
36
Management
console
General module
Antispyware module
Management
console
07
7. Antispyware module
The Antispyware section of this user guide contains the following topics:
•
•
•
•
•
•
On-access scanning
On-demand scanning
Scheduled scanning
System Information
Quarantine
Report
Note
For more details regarding the Antispyware module check the description of the
“Antispyware module” (p. 17).
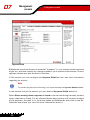
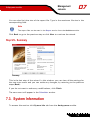
7.1. On-access scanning
To access this section click Shield tab from the Antispyware module.
37
Management
console
07
Antispyware module
Spyware Shield
BitDefender monitors dozens of potential “hotspots” in your system where spyware
might act, and also checks any changes made to your system and software. Known
spyware threats are also blocked in real-time.
In this section you can configure the Spyware Shield and you can view information
regarding its activity.
Note
To prevent spyware from infecting your computer keep the Spyware Shield enabled.
In the bottom side of the section you can see the Spyware Shield statistics.
Select Show warning when a spyware is found to be noticed through an alert window
when a spyware is found. For an infected file the alert window will contain the name
of the spyware, the path to it, the action taken by BitDefender and a link to the BitDefender site where you can find more information about it.
38
Antispyware module
Management
console
07
In case a suspicious file is detected you can launch a wizard from the alert window
that will help you to send that file to the BitDefender Lab for further analysis. You
can type in your e-mail address to receive information regarding this report.
The Spyware Shield protects your computer against spywares through 5 important
protection controls.
•
•
•
•
•
Files Control
Dial Control
Script Control
Cookies Control
Registry Control
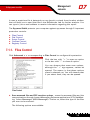
7.1.1. Files Control
Click Advanced >>>corresponding to Files Control to configure this protection.
Click the box with "+" to open an option
or the box with "-" to close an option.
You can observe that some scan options,
although the "+" sign appears, cannot be
opened. The reason is that these options
weren't selected yet. You will observe that
if you select them, they can be opened.
Files Control
• Scan accessed files and P2P transfers options - scans the accessed files and the
communications through Instant Messaging Software applications (ICQ, NetMeeting, Yahoo Messenger, MSN Messenger). Further on, select the type of the files
you want to be scanned.
The following options are available:
39
Management
console
07
Antispyware module
Option
Description
Scan all files
All the accessed files will be scanned, regardless their
type.
Scan program files only
Only the program files will be scanned. This means
only the files with the following extensions: .exe;
.bat; .com; .dll; .ocx; .scr; .bin; .dat; .386; .vxd;
.sys; .wdm; .cla; .class; .ovl; .ole; .exe; .hlp;
.doc; .dot; .xls; .ppt; .wbk; .wiz; .pot; .ppa; .xla;
.xlt; .vbs; .vbe; .mdb; .rtf; .htm; .hta; .html; .xml;
.xtp; .php; .asp; .js; .shs; .chm; .lnk; .pif; .prc;
.url; .smm; .pdf; .msi; .ini; .csc; .cmd; .bas; .eml
and .nws.
Scan user defined exten- Only the files with the extensions specified by the
sions
user will be scanned. These extensions must be
separated by ";".
Exclude extensions from The files with the extensions specified by the user
scan
will NOT be scanned. These extensions must be
separated by ";".
Scan inside archives
The accessed archives will be scanned. With this
option on, the computer will slow down.
Scan packed files
All packed files will be scanned.
• Scan floppy drive on access - scans the floppy drive, when it is accessed.
• Action to take when an infected file is found - select from the drop-down menu
the first action to take on infected files. BitDefender allows selecting two actions
in case an infected file is found.
You can select one of the following actions:
Action
Description
Deny access and continue In case an infected file is detected, the access to this
will be denied.
Clean file
40
Disinfects the infected file.
Management
console
Antispyware module
07
Action
Description
Delete file
Deletes the infected files immediately, without any
warning.
Move file to quarantine
Move the infected files into the quarantine.
• Second action to take when first fails - select from the drop-down menu the
second action to take on infected files, in case the first action fails.
You can select one of the following actions:
Action
Description
Deny access and continue In case an infected file is detected, the access to this
will be denied.
Delete file
Deletes the infected files immediately, without any
warning.
Move file to quarantine
Move the infected files into the quarantine.
The same actions as for infected files are available for suspected ones.
• Do not scan files greater than - type in the maximum size of the files to be
scanned. If the size is 0 Kb, all files will be scanned
• Exclude path from scan - click "+" corresponding to this option in order to specify
a folder that will be excluded from scanning. The consequence of this will be that
the option will expand and a new option, New item, will appear. Click the corresponding checkbox of the new item and from the exploring window select the
folder you want to be excluded from scanning
7.1.2. Dial Control
Click Advanced >>>corresponding to Dial Control to configure this protection.
41
Management
console
07
Antispyware module
Dial Control
The dialers are applications that use computer's modems in order to dial different
phone numbers. Usually, the dialers are used to access various locations by dialing
a high-cost phone numbers.
With Dial Control you will be in charge of which connections to different phone
numbers you permit or block. This function monitors all dialers attempting to access
a computer modem, immediately warning the user and prompting him to choose
whether to block or allow such operations:
42
Management
console
Antispyware module
07
You can see the name of the application and the
phone number.
Check Remember this answer option and click Yes
or No and a rule will be created, applied and listed
in the rules table. You will no longer be notified
when the application tries to dial the same phone
number.
Dial Control alert
Every rule that has been remembered can be accessed in the Dial section for further
fine-tuning.
Important
The rules are listed in order of their priority starting from the top, meaning the first
rule has the highest priority. Drag&drop rules in order to change their priority.
To delete a rule, just select it and click Delete. To modify a rule’s attribute just double
click its field. To temporarily deactivate a rule without deleting it, clear the corresponding checkbox.
The rules can be input automatically (through the alert window) or manually (click
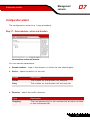
New rule and choose the parameters for the rule). The configuration wizard will appear.
Configuration wizard
The configuration wizard is a 2 steps procedure.
43
Management
console
07
Antispyware module
Step 1/2 - Select application and action
Select application and action
You can set the parameters:
• Application - select the application for the rule. You can choose only one application (click Select file, then Browse and select the application) or all the applications (just click Any).
• Action - select the action of the rule.
Action
Description
Permit
The action will be permitted.
Deny
The action will be denied.
Click Next.
44
Antispyware module
Management
console
07
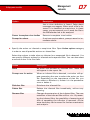
Step 2/2 - Select the phone numbers
Select the phone numbers
Click Specify phone numbers, type in the phone number for which the rule will be
applied and click Add.
Note
You can use wild cards in your list of banned phone number; e.g.: 1900* means
all numbers beginning with 1900 will be blocked.
Check Any if you want this rule to apply for any phone number. To delete a phone
number select it and click Remove.
Note
You can also create a rule that permits a certain program to dial only certain numbers
(such as that of your Internet Service Provider or your fax news service).
Click Finish.
Click Apply to save the changes.
7.1.3. Script Control
Click Advanced >>>corresponding to Script Control to configure this protection.
45
Management
console
07
Antispyware module
Script Control
Scripts and other codes such as ActiveX controls and Java applets, which are used
to create interactive web pages, can be programmed to have harmful effects. ActiveX
elements, for example, can gain total access to your data and they can read data
from your computer, delete information, capture passwords and intercept messages
while you're online. You should only accept active content from sites you fully know
and trust.
BitDefender lets you choose to run these elements or to block their execution.
With Script Control you will be in charge of which websites you trust and which you
don't. BitDefender will ask you for permission whenever a website tries to activate
a script or other active content:
46
Management
console
Antispyware module
07
You can see the name of the resource.
Check Remember this answer option and click Yes
or No and a rule will be created, applied and listed
in the rules table. You will no longer be notified
when the same site tries to send you active content.
Script Control alert
Every rule that has been remembered can be accessed in the Script section for further
fine-tuning.
Important
The rules are listed in order of their priority starting from the top, meaning the first
rule has the highest priority. Drag&drop rules in order to change their priority.
To delete a rule, just select it and click Delete. To modify a rule’s attribute just double
click its field. To temporarily deactivate a rule without deleting it, clear the corresponding checkbox.
The rules can be input automatically (through the alert window) or manually (click
New rule and choose the parameters for the rule). The configuration wizard will appear.
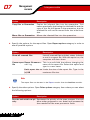
Configuration wizard
The configuration wizard is a 1 step procedure.
47
Management
console
07
Antispyware module
Step 1/1 - Select address and action
Select address and action
You can set the parameters:
• Domain address - type in the domain on which the rule should apply.
• Action - select the action of the rule.
Action
Description
Permit
The scripts on that domain will execute.
Deny
The scripts on that domain will not execute.
Click Finish.
Click Apply to save the changes.
7.1.4. Cookies Control
Click Advanced >>>corresponding to Cookies Control to configure this protection.
48
Antispyware module
Management
console
07
Script Control
Cookies are a very common occurrence on the Internet. They are small files stored
on your computer. Websites create these cookies in order to keep track of specific
information about you.
Cookies are generally made to make your life easier. For example they can help the
website remember your name and preferences, so that you don't have to enter them
on every visit.
But cookies can also be used to compromise your privacy, by tracking your surfing
patterns.
This is where Cookie Control helps. When enabled, Cookie Control will ask for your
permission whenever a new website tries to set a cookie:
49
Management
console
07
Antispyware module
You can see the name of the application that is
trying to send the cookie file.
Check Remember this answer option and click Yes
or No and a rule will be created, applied and listed
in the rules table. You will no longer be notified the
next time when you connect to the same site.
Cookie Control alert
This will help you to choose which websites you trust and which you don't.
Note
Because of the great number of cookies used on the Internet today, Cookie Control
can be quite bothersome to begin with. At first, it will ask a lot of questions about
sites trying to place cookies on your computer. As soon as you add your regular
sites to the rule-list, surfing will become as easy as before.
Every rule that has been remembered can be accessed in the Cookies Control section
for further fine-tuning.
Important
The rules are listed in order of their priority starting from the top, meaning the first
rule has the highest priority. Drag&drop rules in order to change their priority.
To delete a rule, just select it and click Delete. To modify a rule’s attribute just double
click its field. To temporarily deactivate a rule without deleting it, clear the corresponding checkbox.
The rules can be input automatically (through the alert window) or manually (click
New rule and choose the parameters for the rule). The configuration wizard will appear.
50
Management
console
Antispyware module
07
Configuration wizard
The configuration wizard is a 1 step procedure.
Step 1/1 - Select address, action and direction
Select address, action and direction
You can set the parameters:
• Domain address - type in the domain on which the rule should apply.
• Action - select the action of the rule.
Action
Description
Permit
The cookies on that domain will execute.
Deny
The cookies on that domain will not execute.
• Direction - select the traffic direction.
Type
Description
Outgoing
The rule applies only for the cookies that are sent out back
to the connected site.
51
Management
console
07
Antispyware module
Type
Description
Incoming
The rule applies only for the cookies that are received from
the connected site.
Both
The rule applies in both directions.
Click Finish.
Note
You can accept cookies but never return them by setting the action to Deny and
the direction to Outgoing.
Click Apply to save the changes.
7.1.5. Registry Control
A very important part of the Windows operating system is called the Registry. This
is where Windows keeps its settings, installed programs, user information and so
on.
The Registry is also used to define which programs should be launched automatically
when Windows is started. Viruses often use this in order to be automatically launched
when the user restarts his computer.
Registry Control keeps an eye on the Windows Registry - this is again useful for detecting Trojan horses. It will alert you whenever a program will try to modify a registry
entry in order to be executed at Windows start-up.
52
Management
console
Antispyware module
07
You can deny this modification by clicking No or
you can allow it by clicking Yes.
If you want BitDefender to remember your answer
you must select the checkbox: Remember this answer.
Registry Alert
Note
Your answers will be the basis of the rule-list.
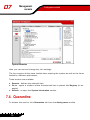
If you want to see the registry entries list, click Advanced >>>corresponding to
Registry Control.
For each application a small expandable
menu will be created; it contains all the
modifications to the registry.
To delete a registry entry, just select it and
click Delete. To temporarily deactivate a registry entry without deleting it, clear the
checkbox corresponding to it.
Registry access control
53
Management
console
07
Antispyware module
Note
BitDefender will usually alert you when you install new programs that need to run
after the next startup of your computer. In most cases, these programs are legitimate
and can be trusted
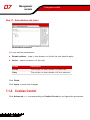
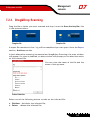
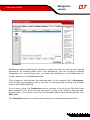
7.2. On-demand scanning
To access this section click Scan tab from the Antispyware module.
Scan
In this section you can configure BitDefender to scan your computer.
The main objective for BitDefender is to keep your computer clean of spywares. This
is first and foremost done by keeping new spywares out of your computer and by
scanning your e-mail messages and any new files downloaded or copied to your
system.
54
Antispyware module
Management
console
07
There is a risk that a spyware is already lodged in your system, before you even install
BitDefender. This is why it's a very good idea to scan your computer for resident
spywares after you've installed BitDefender. And it's definitely a good idea to frequently scan your computer for spywares.
BitDefender allows four types of on demand scan:
• Immediate scanning - there are a few steps to follow in order to scan your computer for spywares;
• Contextual scanning - right-click on a file or a folder and select BitDefender Antivirus v9;
• Drag& Drop scanning - drag and drop a file or a folder over the Scan Activity Bar;
• Scheduled scanning - you can program BitDefender to scan your system for
spywares periodically.
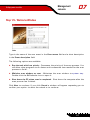
7.2.1. Immediate scanning
To scan your computer for viruses, please follow the next steps:
Step 1/5 - Close all open programs
In order for BitDefender to make a complete scanning, you need to shut down all
open programs. Especially your email-client (i.e. Outlook, Outlook Express or Eudora)
is important to shut down.
Step 2/5 - Make sure that BitDefender knows the latest spywares
Before you let BitDefender scan your computer you should make sure that BitDefender
is up to date with its spyware signatures, since new spywares are found and identified
every day. You can verify when the last update was made in the upper side of the
Update module.
55
Management
console
07
Antispyware module
Step 3/5 - Choose scan targets
In the management console, enter the Antivirus module and click Scan tab. By default,
the section contains an image of the system’s partition structure. Besides this, some
buttons and scan options can also be observed.
You can select from 2 scan types:
• Quick scan - if you select this options only the registry entries, cookies, processes
and some specific files will be scanned against spywares;
• Deep scan - If you select this option you have the possibility to select some other
settings.
For antispyware scan you have 3 options:
• Scan processes - scans all processes from memory against spywares;
• Scan cookies - scans all cookie files against spywares;
• Scan registry - scans all registry entries against spywares.
The section contains the following buttons:
• Add file(s) - opens, a browsing window, where you can select the file(s), you
want to scan.
• Add folder(s) - same as above, but you select which folder(s) you want BitDefender
to scan instead of which file(s).
Note
You can also use drag and drop to add files/folders to the list.
• Remove item(s) - removes the file(s) / folder(s) that has been previously selected
from the list of objects to be scanned.
Note
Only the file(s) / folder(s) that were added afterwards can be deleted, but not
those that were automatically "seen" by BitDefender.
• Advanced - opens a window where you can specify which files to be scanned,
the action on the infected files, generating alert messages, saving scan results
in report files.
56
Management
console
Antispyware module
07
• Scan - launches the system scanning, taking in account the selected scan options.
Important
If you are not that familiar with computers, now is the time to just click the Scan
button. BitDefender will start the scanning of your computer using the standard
settings, which are sufficient.
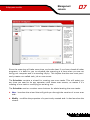
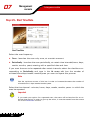
Step 4/5 - Select the scan options
Advanced users might want to take advantage of the scan-settings BitDefender offers.
The scanner can be set to skip file extensions, directories or archives that you know
to be harmless. This may greatly reduce scanning times and improve your computer
responsiveness during a scan.
Click Advanced from the Scan section to explore these options.
The scan options are organized like an expandable menu very much like the exploring
ones from Windows.
Scan settings
The scan options are grouped in four categories:
•
•
•
•
Scanning options
Action options
Report options
Other options
57
Management
console
07
Antispyware module
Note
Click the box with "+" to open an option or the box with "-" to close an option.
• Specify the type of objects to be scanned (archives, e-mail messages and so on)
and other options. This is made through the selection of certain options from
Scanning options category.
The following detection options are available:
Option
Description
Scan boot sectors
Scans the system’s boot sector.
Scan files
Scans all files, regardless of their type.
Scan all files
Scan program files Only the program files will be scanned. This
only
means only the files with the following extensions: exe; bat; com; dll; ocx; scr; bin; dat;
386; vxd; sys; wdm; cla; class; ovl; ole; exe;
hlp; doc; dot; xls; ppt; wbk; wiz; pot; ppa;
xla; xlt; vbs; vbe; mdb; rtf; htm; hta; html;
xml; xtp; php; asp; js; shs; chm; lnk; pif; prc;
url; smm; pdf; msi; ini; csc; cmd; bas; eml and
nws.
Scan user defined Scans only the files with the extensions speextensions
cified by the user. These extensions must be
separated by ";".
Exclude
user The files with the extensions specified by the
defined extensions user will NOT be scanned. These extensions
must be separated by ";".
Open packed pro- Scans packed files.
grams
Open archives
Open
archives
Use heuristic detection
58
Scans inside archives.
e - m a i l Scans inside mail archives.
To use heuristic scanning of the files. The aim
of heuristic scanning is to identify new viruses,
based on certain patterns and algorithms, be-
Management
console
Antispyware module
Option
07
Description
fore a virus definition is found. False alarm
messages can appear. When such a file is detected it is classified as suspicious. In these
cases, we recommend you to send the file to
the BitDefender lab to be analyzed
Detect incomplete virus bodies
Detects incomplete virus bodies.
Prompt for reboot
If actions require reboot, prompt users for immediate reboot.
• Specify the action on infected or suspicious files. Open Action options category
in order to see all possible actions on these files.
Select the actions to take when an infected or a suspected file is detected. You
can specify different actions for infected and suspected files. You can also select
a second action if the first fails.
Action
Description
None
No action will be taken on infected files. These files
will appear in the report file.
Prompt user for action
When an infected file is detected, a window will appear prompting the user to select the action on that
file. Depending on the importance of that file, you
can select to disinfect it, isolate it in the quarantine
zone or delete it.
Disinfect files
Disinfects the infected file.
Delete files
Deletes the infected files immediately, without any
warning.
Rename files
Changes the extension of the infected files. The new
extension of the infected files will be .vir. By renaming the infected files, the possibility of executing and
thus of spreading the infection is removed. At the
same time they can be saved for further examination
and analysis.
59
Management
console
07
Antispyware module
Action
Description
Copy files to Quarantine
Copies the infected files into the quarantine. This
means practically duplicating the infected file and the
copy of this file will appear in the quarantine, but the
infected file will not be moved from the initial location.
Move files to Quarantine
Moves the infected files into the quarantine.
• Specify the options for the report files. Open Report options category in order to
see all possible options.
Option
Description
Show all scanned files
Lists all scanned files and their status (infected
or not) in a report file. With this option on, the
computer will slow down.
Create report Report file namevs- This is an edit field that allows changing the
file
name of the report file. Select this option and
can.log
type in a new name.
Limit report size to Limits the size of the report file. Type in the
[x] KB
maximum file size.
Note
The report files can be seen in the Report section from the Antivirus module.
• Specify the other options. Open Other options category from where you can select
the following options:
Option
Description
Run the task with Low pri- Decreases the priority of the scan process. You will
ority
allow other programs to run faster and increase the
time needed for the scan process to finish.
60
Management
console
Antispyware module
Option
07
Description
Shut down the PC when Shut down the computer after the scan process has
scan is completed
finished.
Submit suspect files to You will be prompted to submit all suspect files to
BitDefender Lab
BitDefender lab after the scan process has finished.
Minimize scan window on Minimizes the scan window to system tray. Doublestart to systray
click the BitDefender icon to open it.
Click OK to save the changes or click Default to load the default settings.
Step 5/5 - Scan for spywares
With the scan options selected, all you have to do is to effectively start the system
scanning. For that, just click Scan. This may take a while, depending on the size of
your hard disk drive.
Spyware Scan
While scanning, BitDefender will show you its progress and alert you if any spywares
are found.
61
Management
console
07
Antispyware module
Select the checkbox corresponding to Show last scanned file and only the information
about the last scanned files will be visible.
Three buttons are available:
• Stop - opens a new window from where you can end the scan process. Click
Yes&Close to exit the scan window.
• Pause - stops temporally the scan process - you can continue it by clicking Resume.
• Show report - opens the scan report.
Note
The report file is saved automatically in the Report section from the Antivirus module.
An icon will appear in the system tray when a scan process is running.
7.2.2. Contextual scanning
Right-click the file or folder you want scanned and select the BitDefender Antivirus
v9.
A report file named vscan.log will be created and
you can open it from the Report section, Antivirus
module.
Contextual Scan
62
Management
console
Antispyware module
07
7.2.3. Drag&Drop Scanning
Drag the file or folder you want scanned and drop it over the Scan Activity Bar, like
in the pictures below.
Drag the file
Drop the file
A report file named activbar.log will be created and you can open it from the Report
section, Antivirus module.
In both alternative scanning (contextual and drag&drop Scanning) the scan window
will appear. If a virus is detected, an alert window will prompt you to select the action
on the infected file.
You can view the name of the file and the
name of the spyware.
Action Selection
Select one of the following actions to take on the infected file:
• Disinfect - disinfects the infected file;
• Delete - deletes the infected file;
63
07
Management
console
Antispyware module
• Copy to quarantine - copies the infected file into the quarantine;
• Move to quarantine - moves the infected file into the quarantine;
• Rename - changes the extension of the infected files. The new extension of the
infected files will be .vir..
• Ignore - ignores the infection. No action will be taken on the infected file.
If you scan a folder, and you wish the action on the infected files to be the same
for all, select the checkbox corresponding to Apply to all.
Note
If the Disinfect option is not enabled, it means the file cannot be disinfected. The
best choice is to isolate it in the quarantine zone and send it to us for analysis or
delete it
Click OK.
7.2.4. Scheduled scanning
To access this section click Scheduler tab from the Antispyware module.
64
Antispyware module
Management
console
07
Scheduler
Since the scanning will take some time, and works best if you have closed all other
programs, it is best for you to schedule the scanning at a time when you are not
using your computer and it is standing idly by. This implies that the user must previously create a so-called task, job or scan event.
The Scheduler contains a wizard for creating new scan tasks. This will assist you
any time you need to do any operation with these scan events, no matter if it's
creating a new task or modifying an existing one.
The Scheduler section contains some buttons for administrating the scan tasks.
• New - launches the wizard that will guide you through the creation of a new scan
task.
• Modify - modifies the properties of a previously created task. It also launches the
wizard.
65
07
Management
console
Antispyware module
Note
If you modify the event's name, a new event will be created, under the newly
introduced name.
• Delete - deletes a selected task.
• Run Now - runs the selected task.
• Properties - opens the properties of the selected task.
The Scheduler's screen also contains a list where all the scan tasks can be seen,
with their names, the date of the first execution, the date of the next execution and
the task's type (periodically or one time only).
If you right-click a scheduled event, a contextual menu with options similar to those
described above will appear.
Note
The Scheduler allows an unlimited number of scheduled scan events
You can also navigate through the scan events using the keyboard: press the Delete
button to erase the selected scan event, press the Enter button in order to view the
selected event properties or press the Insert button in order to create a new event
(the wizard will appear).
Note
Press the navigation buttons in order to scroll the page up or down or right to left.
Click New to set up a new entry in the scheduler. This will launch the scheduler
wizard, which step by step will allow you to define your scan.
66
Antispyware module
Management
console
07
Step 1/9 - Welcome Window
Intro
Type in the name of the new event in the Event name field and a short description
in the Event description field.
The following options are available:
• Run the task with Low priority - Decreases the priority of the scan process. You
will allow other programs to run faster and increase the time needed for the scan
process to finish.
• Minimize scan window on start - Minimizes the scan window to system tray.
Double-click the BitDefender icon to open it.
• Shut down the PC when scan is completed - Shut down the computer after the
scan process has finished.
Click Next to continue. If you click Cancel a window will appear requesting you to
confirm your option: to abort the wizard or to continue.
67
Management
console
07
Antispyware module
Step 2/9 - Start Time/Date
Start Time/Date
Select the scan frequency:
• Once - launches the scan only once, at a certain moment.
• Periodically - launches the scan periodically, at certain time intervals(hours, days,
weeks, months, years) starting with a specified date and time.
If you want the scan to be repeated after certain intervals, select the checkbox corresponding to Periodically and type in the At every edit box the number of
minutes/hours/days/weeks/ months/years you want to repeat this process.
Note
Use the up/down arrows of this box in order to increase/decrease the number of
minutes/hours/ days/weeks/months/years.
Select the time interval - minutes, hours, days, weeks, months, years - to which the
scan be repeated.
Important
If you made your option for a repeated scan, the event will be launched for an unlimited time-period. In order to give up the event, it must be erased from the events
list of the Scheduler window.
68
Antispyware module
Management
console
07
If you want to automatically close the scan window if no infected or suspected files
were found during the scan process, select the checkbox corresponding to this option.
Click Back to go to the previous step or click Next to continue the wizard.
Step 3/9 - Target Objects
Target Objects
Select the objects you want to be scanned:
•
•
•
•
•
•
•
•
•
Boot - scans the boot sector, in order to identify the boot viruses;
Files - scans files;
Mail Database - scans mail archives in order to detect mail viruses;
Archives - scans inside archives;
Packed Files - scans packed files.
Cookies - scans cookie files against spyware.
Registry - scans registry entries against spyware.
Memory - scans memory against spyware.
Files - scans files against spyware.
Select one or more objects to scan, by simply selecting the corresponding checkboxes.
Click Back to go to the previous step or click Next to continue the wizard.
69
Management
console
07
Antispyware module
Step 4/9 - Target Path
Target Path
Specify the path to the objects that will be scanned.
This screen is actually an exploring window that lets you select the partitions and
folders to be scanned. When the cursor is placed on a folder, the complete path to
the folder will appear in the field placed under this exploring window.
Note
Click the box with "+" to open an option or the box with "-" to close an option.
Also, in order to select the locations to be scanned, you can use the fast-selection
options placed on the topside of the window:
• Local drives - scans all local drives;
• Network drives - scans all network drives.
Click Back to go to the previous step or click Next to continue the wizard.
70
Antispyware module
Management
console
07
Step 5/9 - File Mask
File Mask
Specify the types of the files that will be scanned. This step is necessary if you have
selected to scan files in the third step.
The following options are available:
• All - scans all files, no matter what their type is;
• Executables and documents - scans only the program files and documents;
• From list - scans only the files whose extensions appear in the list.
Note
These extensions must be separated by a semicolon “;”.
If you wish to see the information about all scanned files, infected or not, select the
option List all scanned files. With this option checked, the computer will slow down.
Click Back to go to the previous step or click Next to continue the wizard.
71
Management
console
07
Antispyware module
Step 6/9 - Analysis Type
Analysis Type
Select the scan type:
• Non Heuristic - means scanning the files with the procedure based on known
virus signatures;
• Heuristic - represents a method based on certain algorithms, whose aim is to
identify new unknown viruses. Occasionally, it may report a suspicious code in
normal programs, generating the so-called "false positive".
You have the following options:
• Send suspect files to BitDefender Lab - You will be prompted to submit all suspect
files to BitDefender lab after the scan process has finished.
• Scan for riskware - Scan for threats other than viruses, such as dialers, spyware,
and adware. These files will be treated as infected files. Software that includes
adware components might stop working if this option is enabled.
Click Back to go to the previous step or click Next to continue the wizard.
72
Management
console
Antispyware module
07
Step 7/9 - Action Mode
Action Mode
BitDefender allows selecting two actions in case an infected or a suspected file is
found. Select the actions for infected and suspected files.
Action
Description
None
No action will be taken on infected files. These files will
appear in the report file.
Prompt user for action
When an infected file is detected, a window will appear
prompting the user to select the action on that file. Depending on the importance of that file, you can select
to disinfect it, isolate it in the quarantine zone or delete
it.
Disinfect files
Disinfects the infected file.
Delete files
Deletes the infected files immediately, without any
warning.
Rename files
Changes the extension of the infected files. The new
extension of the infected files will be .vir. By renaming
the infected files, the possibility of executing and thus
of spreading the infection is removed. At the same time
they can be saved for further examination and analysis.
Copy files to quarantine
Copies the infected files into the quarantine. This means
practically duplicating the infected file and the copy of
73
Management
console
07
Action
Antispyware module
Description
this file will appear in the quarantine, but the infected
file will not be moved from the initial location.
Move files to quarantine
Moves the infected files into the quarantine zone. When
the virus is in quarantine it can't do any harm.
Note
We recommend you to select the first action Disinfect files and the second action
Move to quarantine.
The same actions as for infected files are available for suspected ones.
Click Back to go to the previous step or click Next to continue the wizard.
Step 8/9 - Report Info
Action Mode
To create a scan report, check Create report file. At this moment all the other options
for the creation of a report file will be enabled.
Type the name of the report file in the Report file name field. By default, its name
is schedule.log. It will contain all the information about the scan process: the
number of identified viruses, the number of scanned files, the number of disinfected
and deleted files.
74
Antispyware module
Management
console
07
You can also limit the size of the report file. Type in the maximum file size in the
corresponding field.
Note
The report files can be seen in the Report section from the Antivirus module.
Click Back to go to the previous step or click Next to continue the wizard.
Step 9/9 - Summary
Summary
This is the last step of the wizard. In this window you can view all the settings for
the new scan event and you can make any changes, by returning to the previous
steps (Back).
If you do not want to make any modifications, click Finish.
The new event will appear in the Scheduler section.
7.3. System Information
To access this section click System Info tab from the Antispyware module.
75
Management
console
07
Antispyware module
System Information
Here you can see and change key info settings.
The list contains all the items loaded when starting the system as well as the items
loaded by different applications.
Three buttons are available:
• Remove - deletes the selected item.
• Go to - opens a window where the selected item is placed (the Registry for example).
• Refresh - re-open the System Information section.
7.4. Quarantine
To access this section click Quarantine tab from the Antispyware module.
76
Antispyware module
Management
console
07
Quarantine
BitDefender allows isolating the infected or suspicious files in a secure area, named
quarantine. By isolating these files in the quarantine, the risk of getting infected
disappears and, at the same time, you have the possibility to send these files for
further analysis to the BitDefender lab.
The component that ensures the administration of the isolated files is Quarantine.
This module was designed with a function for automatically sending the infected
files to the BitDefender lab.
As you may notice, the Quarantine section contains a list of all the files that have
been isolated so far. Every file has enclosed its name, size, isolating date and submission date. If you want to see more information about the quarantined files click
More info.
The Quarantine section contains some buttons for administrating these files.
77
Management
console
07
Antispyware module
• Add - adds files to quarantine. Use this button to quarantine a file you suspect
of being infected. A window will open and you can select the file from its location
on the disk. This way the file is copied to quarantine.
If you want to move the file in the quarantine zone you must select the checkbox
corresponding to Delete from original location. A quicker method to add suspicious
files to the quarantine is to drag&drop them in the quarantine list.
• Delete - deletes the selected file from your computer;
• Restore - returns the selected file to its original location.
• Send - sends the selected files for further analysis to the BitDefender lab.
Important
You must specify some information before you may submit these files. For that
click Settings and complete the fields from the E-mail settings section, as described below.
• Settings - opens the advanced options for the quarantine zone. The following
window will appear:
Quarantine Settings
The quarantine options are grouped in two categories:
• Quarantine settings
• Submission settings
78
Antispyware module
Management
console
07
Note
Click the box with "+" to open an option or the box with "-" to close an option.
Quarantine settings
• Limit the size of quarantine folder - maintains under control the size of the
quarantine. This option is enabled by default and its size is 12000 kB. If you
want to change this value type in a new one in the corresponding field.
• Automatically send quarantine - sends automatically the quarantined files to
the BitDefender Labs for further analysis. You can set the time period between
two consecutive sending processes in minutes in the Send quarantine every
field.
• Automatically delete sent files - deletes automatically the quarantined files
after sending them to the BitDefender Lab for analysis.
• Drag&Drop settings - if you are using the Drag&Drop method to add files to
the quarantine here you can specify the action: copy, move or prompt user.
Submission settings
• Your address - type in your e-mail address in case you want to receive e-mail
messages from our experts, regarding the suspicious files submitted for analysis.
7.5. Report
To access this section click Report tab from the Antispyware module.
79
Management
console
07
Antispyware module
Report
The Report section contains a list of all the report files generated so far. Every file
has enclosed its name, size and the date of the last modification.
When launching a scan process, the user has the possibility to opt for creating a report
file where he can see information about the scan process. The user may open these
reports from the management console.
BitDefender will keep track of its own activity on your computer. The default report
files are the following:
• Vscan.log is created when you scan your system immediately;
• Schedule.log is from the scheduled scans you may have set up;
• Activbar.log is created when you scan by drag&drop feature.
The Report section contains some buttons created for the administration of these
report files. The function of each button is explained further:
80
Antispyware module
Management
console
07
Note
The report files are by default saved in the folder where BitDefender is installed. If
you have saved the report files in another directory, use the Browse button to locate
them.
• Show - opens the selected report file;
• Delete - deletes the selected report file;
• Refresh - refreshes the Report section. If the management console is open at the
Report section and in the meantime you perform a scan of your computer, the
new report file with the scan results will be visible only after you click Refresh.
• Browse - opens a window from where you can select the report files you want
to see.
• Settings - opens the advanced options for the report files. The following window
will appear:
Report Settings
Note
Click the box with "+" to open an option or the box with "-" to close an option.
• Automatically delete old reports - maintains under control the number of the
report files, by deleting those older than a specified number of days. The default
time interval is 3 days. If you want to change this value type in a new one in
the corresponding field.
• Create reports in - specifies the folder where the report files will be saved.
81
Management
console
07
Antispyware module
Click Apply to save the changes. If you click Default you will load the default
settings.
82
Management
console
Update module
08
8. Update module
The Update section of this user guide contains the following topics:
• Automatic update
• Update settings
Note
For more details regarding the Update module check the description of the “Update
module” (p. 17).
8.1. Automatic update
To access this section click Update tab from the Update module.
83
Management
console
08
Update module
Automatic Update
If you are connected to the Internet through broadband or DSL, BitDefender takes
care of this itself. It checks for new spyware signatures when you turn on your
computer and every hour after that.
If an update was detected, depending on the options set in the Automatic update
options section, you will be asked to confirm the update or the update will be made
automatically.
The automatic update can also be done anytime you want by clicking Update Now.
This update is also known as Update by user request.
The Update module will connect to the BitDefender update server and will verify if
any update is available. If an update was detected, depending on the options set in
the Manual update type section, you will be asked to confirm the update or the update
will be made automatically.
84
Management
console
Update module
08
Important
It may be necessary to restart the computer when you have completed the update.
We recommend doing it as soon as possible.
Note
If you are connected to the Internet through a dial-up connection, then it's a good
idea to make it a regular habit to update BitDefender by user request.
8.2. Update settings
To access this section click Update tab from the Settings module.
Update Settings
The updates can be performed from the local network, over the Internet, directly or
through a proxy server.
85
Management
console
08
Update module
The window with the update settings contains 4 categories of options (Update location settings, Automatic update options, Manual update type and Interface options)
organized in an expandable menu, similar to the ones from Windows.
Note
Click the box labeled "+" to open a category or click the one labeled "-" to close
it.
8.2.1. Update location settings
For more reliable and faster updates, you can configure two update locations: a
Primary update location and an Alternate update location. For both of them you must
configure the following options:
• Update location - If you are connected to a local network that has BitDefender
virus signatures placed locally, you can change the location of the updates here.
By default this is: http://upgrade.bitdefender.com.
• Use proxy - In case the company uses a proxy server check this option. The following settings must be specified:
• Proxy sets - type in the IP or the name of the proxy server and the port BitDefender uses to connect to the proxy server.
Important
Syntax: name:port or ip:port.
• Proxy user - type in a user name recognized by the proxy.
Important
Syntax: domain\user.
• Proxy password - type in the valid password for the previously specified user.
86
Management
console
Update module
08
8.2.2. Automatic update options
• Automatic check for updates - BitDefender automatically checks our servers for
available updates.
• Verify every x hours - Sets how often BitDefender checks for updates The default
time interval is 1hour.
• Silent update - BitDefender automatically downloads and implements the update.
• Ask before download - every time an update is available, you will asked before
download.
• Ask before install - every time an update was downloaded, you will asked before
installing it.
Important
If you select Ask before download or Ask before install and you close&exit the
management console the automatic update will not be performed.
8.2.3. Manual update type
• Silent update - the manual update will be made automatically in background.
• Ask before download - every time you perform a manual update you will asked
before downloading and installing the updates.
Important
If you select Ask before download and you close&exit the management console the
manual update will not be performed.
8.2.4. Interface options
• Wait for reboot, instead of prompting - If an update requires a reboot, the product
will keep working with the old files until the system is rebooting. The user will
87
Management
console
08
Update module
not be prompted for rebooting, therefore the BitDefender update process will not
interfere with the user’s work.
Click Apply to save the changes or click Default to load the default settings.
88
Best practices
Best practices
Best practices
Best practices
Best practices
09
9. Best practices
The Best practices section of this user guide contains the topic:
• Antispyware
9.1. Antispyware
Steps to be followed in order to ensure a spyware-free computer:
1.
Perform an update by user request of your spyware signatures as described in
the “Automatic update” (p. 83) section.
2.
Perform a full scan of your system as described in the “ Immediate scanning ”
(p. 55) section.
3.
In the Status section of the General module, keep enabled Antispyware and
Automatic update.
4.
In the Shield section of the Antispyware module, keep enabled the most important
controls of BitDefender: Files Control, Dial Control and Registry Control.
5.
Program your BitDefender to scan your system at least once a week as described
in the “Scheduled scanning” (p. 64) section.
91
09
92
Best practices
Best practices
Getting help
Getting help
Getting help
Support
Getting help
10
10. Support
10.1. Support department
As a valued provider, SOFTWIN strives to provide its customers with an unparallel
level of fast and accurate support. The Support Center listed below is continually
being updated with the newest virus descriptions and answers to common questions,
so that you obtain the necessary information in a timely manner.
At SOFTWIN, dedication to saving its customers time and money by providing the
most advanced products at the fairest prices has always been a top priority. Moreover,
we think that a successful business is based on a good communication and a commitment to excellence in customer support.
You are welcome to ask for support at <[email protected]> any time. For
a prompt response, please include in your email as many details as you can about
your BitDefender, about your system and describe the problem as accurate as possible.
10.2. On-line help
10.2.1. BitDefender Knowledge Base
The BitDefender Knowledge Base is an online repository of information about BitDefender products. It stores, in an easily accessible format reports on the results of
the ongoing technical support and bugfixing activities of the BitDefender support
and development teams, along with more general articles about virus prevention,
the management of BitDefender solutions and detailed explanations, and many other
articles.
95
Getting help
10
Support
The BitDefender Knowledge Base is open to the public and freely searchable. This
welth of information is yet another way to provide BitDefender customers with the
technical knowledge and insight they need. All valid requests for information or bug
reports coming from BitDefender clients eventually find their way into the BitDefender
Knowledge Base, as bugfix reports, workaround cheatsheets or informational articles
to supplement product helpfiles.
The BitDefender Knowledge Base is available any time at http://kb.bitdefender.com.
10.3. Contact information
Efficient communication is the key to a successful business. For the past 10 years
SOFTWIN has established an indisputable reputation in exceeding the expectations
of clients and partners, by constantly striving for better communications. Please do
not hesitate to contact us regarding any issues or questions you might have
10.3.1. Web addresses
Sales department: <[email protected]>
Technical support: <[email protected]>
Documentation: <[email protected]>
Partner Program: <[email protected]>
Marketing: <[email protected]>
Media Relations: <[email protected]>
Job Opportunities: <[email protected]>
Virus Submissions: <[email protected]>
Spam Submissions: <[email protected]>
Report Abuse: <[email protected]>
Product web site: http://www.bitdefender.com
Product ftp archives: ftp://ftp.bitdefender.com/pub
Local distributors: http://www.bitdefender.com/partner_list
BitDefender Knowledge Base: http://kb.bitdefender.com
96
Support
Getting help
10
10.3.2. Address
The BitDefender offices are ready to respond to any inquiries regarding their areas
of operations, in both commercial and general matters. Their respective addresses
and contacts are listed below.
Germany
Softwin GmbH
Karlsdorfer Straße 56 88069
Tettnang
Technischer Support: <[email protected]>
Vertrieb: <[email protected]>
Phone: 07542/94 44 44
Fax: 07542/94 44 99
Product web site: http://www.bitdefender.de
Spain
Constelación Negocial, S.L
C/ Balmes 195, 2ª planta, 08006
Barcelona
Soporte técnico: <[email protected]>
Ventas: <[email protected]>
Phone: +34 932189615
Fax: +34 932179128
Sitio web del producto: http://www.bitdefender-es.com
U.S.A
BitDefender LLC
6301 NW 5th Way, Suite 3500
Fort Lauderdale, Florida 33308
Technical support: <[email protected]>
Sales: <[email protected]>
Phone: 954 776 62 62, 800 388 80 62
97
Getting help
10
Support
Fax: 954 776 64 62, 800 388 80 64
Product web site: http://www.bitdefender.us
Romania
SOFTWIN
5th Fabrica de Glucoza St.
PO BOX 52-93
Bucharest
Technical support: <[email protected]>
Sales: <[email protected]>
Phone: +40 21 2330780
Fax: +40 21 2330763
Product web site: http://www.bitdefender.ro
98
Frequently Asked Questions
Getting help
11
11. Frequently Asked Questions
11.1. General
Q:
How can I tell if BitDefender is actually working?
A:
In the General module, access the Status section and look at the statistics.
Q:
What are the system requirements?
A:
You will find them in the “System requirements” (p. 3)section.
Q:
How do I uninstall BitDefender?
A:
The removing procedure is described in the “Removing, repairing or modifying
BitDefender features” (p. 6)section.
Q:
How can I register BitDefender?
A:
The registration procedure is described in the “Product registration” (p. 27)section.
11.2. Antispyware
Q:
What is a quick scan?
A:
A quick scan is a scan process against spywares. Only the registry entries, cookies,
processes and some specific files will be scanned.
Q:
What is the difference between quick scan and deep scan?
A:
The difference is that when you perform a deep scan, you can select to scan
cookies, processes or registry, too.
Q:
What does Dial Control do?
99
Getting help
11
Frequently Asked Questions
A:
The Dial Control monitors all dialers attempting to access a computer modem, immediately warning the user and prompting him to choose whether to block or allow
such operations.
Q:
What does Script Control do?
A:
The Script Control monitors all websites that are trying to activate a script or
other active content. You will be in charge of which websites you trust and which
you don't.
Q:
What does Cookie Control do?
A:
The Cookie Control ensures your privacy when you use the Internet.
11.3. Update
Q:
Why is it necessary to update BitDefender?
A:
Every time you perform an update new antispyware signatures will be added to
the database.
Q:
How can I update BitDefender?
A:
By default, BitDefender will automatically update every hour. But you can also
update manually or change the time interval for the automatic update in the Update
module.
100
Glossary
Glossary
ActiveX
ActiveX is a model for writing programs so that other programs and the operating system can call them. ActiveX
technology is used with Microsoft Internet Explorer to make
interactive Web pages that look and behave like computer
programs, rather than static pages. With ActiveX, users can
ask or answer questions, use push buttons, and interact in
other ways with the Web page. ActiveX controls are often
written using Visual Basic.
Active X is notable for a complete lack of security controls;
computer security experts discourage its use over the Internet.
Adware
Adware is often combined with a host application that is
provided at no charge as long as the user agrees to accept
the adware. Because adware applications are usually installed
after the user has agreed to a licensing agreement that states
the purpose of the application, no offense is committed.
However, pop-up advertisements can become an annoyance,
and in some cases degrade system performance. Also, the
information that some of these applications collect may cause
privacy concerns for users who were not fully aware of the
terms in the license agreement.
Archive
A disk, tape, or directory that contains files that have been
backed up.
A file that contains one or more files in a compressed format.
Backdoor
A hole in the security of a system deliberately left in place
by designers or maintainers. The motivation for such holes
is not always sinister; some operating systems, for example,
come out of the box with privileged accounts intended for
101
Glossary
use by field service technicians or the vendor's maintenance
programmers.
Boot sector
A sector at the beginning of each disk that identifies the
disk's architecture (sector size, cluster size, and so on). For
startup disks, the boot sector also contains a program that
loads the operating system.
Boot virus
A virus that infects the boot sector of a fixed or floppy disk.
An attempt to boot from a diskette infected with a boot
sector virus will cause the virus to become active in memory.
Every time you boot your system from that point on, you
will have the virus active in memory.
Browser
Short for Web browser, a software application used to locate
and display Web pages. The two most popular browsers are
Netscape Navigator and Microsoft Internet Explorer. Both of
these are graphical browsers, which means that they can
display graphics as well as text. In addition, most modern
browsers can present multimedia information, including sound
and video, though they require plug-ins for some formats.
Command line
In a command line interface, the user types commands in
the space provided directly on the screen using command
language
Cookie
Within the Internet industry, cookies are described as small
files containing information about individual computers that
can be analyzed and used by advertisers to track your online
interests and tastes. In this realm, cookie technology is still
being developed and the intention is to target ads directly to
what you've said your interests are. It's a double-edge sword
for many people because on one hand, it's efficient and
pertinent as you only see ads about what you're interested
in. On the other hand, it involves actually "tracking" and
"following" where you go and what you click. Understandably
so, there is a debate over privacy and many people feel offended by the notion that they are viewed as a "SKU number"
(you know, the bar code on the back of packages that gets
scanned at the grocery check-out line). While this viewpoint
may be extreme, in some cases it is accurate.
102
Glossary
Disk drive
It's a machine that reads data from and writes data onto a
disk.
A hard disk drive reads and writes hard disks.
A floppy drive accesses floppy disks.
Disk drives can be either internal (housed within a computer)
or external (housed in a separate box that connects to the
computer).
Download
To copy data (usually an entire file) from a main source to a
peripheral device. The term is often used to describe the
process of copying a file from an online service to one's own
computer. Downloading can also refer to copying a file from
a network file server to a computer on the network.
E-mail
Electronic mail. A service that sends messages on computers
via local or global networks.
Events
An action or occurrence detected by a program. Events can
be user actions, such as clicking a mouse button or pressing
a key, or system occurrences, such as running out of
memory.
False positive
Occurs when a scanner identifies a file as infected when in
fact it is not.
Filename extension
The portion of a filename, following the final point, which
indicates the kind of data stored in the file.
:call CVScommit() Many operating systems use filename
extensions, e.g. Unix, VMS, and MS-DOS. They are usually
from one to three letters (some sad old OSes support no
more than three). Examples include "c" for C source code,
"ps" for PostScript, "txt" for arbitrary text.
Heuristic
A rule-based method of identifying new viruses. This method
of scanning does not rely on specific virus signatures. The
advantage of the heuristic scan is that it is not fooled by a
new variant of an existing virus. However, it might occasion-
103
Glossary
ally report suspicious code in normal programs, generating
the so-called "false positive".
IP
Internet Protocol - A routable protocol in the TCP/IP protocol
suite that is responsible for IP addressing, routing, and the
fragmentation and reassembly of IP packets.
Java applet
A Java program which is designed to run only on a web
page. To use an applet on a web page, you would specify
the name of the applet and the size (length and width, in
pixels) that the applet can utilize. When the web page is accessed, the browser downloads the applet from a server and
runs it on the user's machine (the client). Applets differ from
applications in that they are governed by a strict security
protocol.
For example, even though applets run on the client, they
cannot read or write data onto the client's machine. Additionally, applets are further restricted so that they can only read
and write data from the same domain that they are served
from.
Macro virus
A type of computer virus that is encoded as a macro embedded in a document. Many applications, such as Microsoft
Word and Excel, support powerful macro languages.
These applications allow you to embed a macro in a document, and have the macro execute each time the document
is opened.
Mail client
An e-mail client is an application that enables you to send
and receive e-mail.
Memory
Internal storage areas in the computer. The term memory
identifies data storage that comes in the form of chips, and
the word storage is used for memory that exists on tapes or
disks. Every computer comes with a certain amount of
physical memory, usually referred to as main memory or
RAM.
Non-heuristic
This method of scanning relies on specific virus signatures.
The advantage of the non-heuristic scan is that it is not fooled
104
Glossary
by what might seem to be a virus, and does not generate
false alarms.
Packed programs
A file in a compression format. Many operating systems and
applications contain commands that enable you to pack a
file so that it takes up less memory. For example, suppose
you have a text file containing ten consecutive space characters. Normally, this would require ten bytes of storage.
However, a program that packs files would replace the space
characters by a special space-series character followed by
the number of spaces being replaced. In this case, the ten
spaces would require only two bytes. This is just one packing
technique - there are many more.
Path
The exact directions to a file on a computer. These directions
are usually described by means of the hierarchical filing system from the top down.
The route between any two points, such as the communications channel between two computers.
Phishing
The act of sending an e-mail to a user falsely claiming to be
an established legitimate enterprise in an attempt to scam
the user into surrendering private information that will be
used for identity theft. The e-mail directs the user to visit a
Web site where they are asked to update personal information, such as passwords and credit card, social security, and
bank account numbers, that the legitimate organization
already has. The Web site, however, is bogus and set up
only to steal the user’s information.
Polymorphic virus
A virus that changes its form with each file it infects. Since
they have no consistent binary pattern, such viruses are hard
to identify.
Port
An interface on a computer to which you can connect a
device. Personal computers have various types of ports. Internally, there are several ports for connecting disk drives,
display screens, and keyboards. Externally, personal com-
105
Glossary
puters have ports for connecting modems, printers, mice,
and other peripheral devices.
In TCP/IP and UDP networks, an endpoint to a logical connection. The port number identifies what type of port it is.
For example, port 80 is used for HTTP traffic.
Report file
A file that lists actions that have occurred. BitDefender
maintains a report file listing the path scanned, the folders,
the number of archives and files scanned, how many infected
and suspicious files were found.
Script
Another term for macro or batch file, a script is a list of
commands that can be executed without user interaction.
Spam
Electronic junk mail or junk newsgroup postings. Generally
known as any unsolicited e-mail.
Spyware
Any software that covertly gathers user information through
the user's Internet connection without his or her knowledge,
usually for advertising purposes. Spyware applications are
typically bundled as a hidden component of freeware or
shareware programs that can be downloaded from the Internet; however, it should be noted that the majority of shareware and freeware applications do not come with spyware.
Once installed, the spyware monitors user activity on the
Internet and transmits that information in the background to
someone else. Spyware can also gather information about
e-mail addresses and even passwords and credit card numbers.
Spyware's similarity to a Trojan horse is the fact that users
unwittingly install the product when they install something
else. A common way to become a victim of spyware is to
download certain peer-to-peer file swapping products that
are available today.
Aside from the questions of ethics and privacy, spyware
steals from the user by using the computer's memory resources and also by eating bandwidth as it sends information
back to the spyware's home base via the user's Internet
106
Glossary
connection. Because spyware is using memory and system
resources, the applications running in the background can
lead to system crashes or general system instability.
Startup items
Any files placed in this folder will open when the computer
starts. For example, a startup screen, a sound file to be
played when the computer first starts, a reminder calendar,
or application programs can be startup items. Normally, an
alias of a file is placed in this folder rather than the file itself.
System tray
Introduced with Windows 95, the system tray is located in
the Windows taskbar (usually at the bottom next to the clock)
and contains miniature icons for easy access to system
functions such as fax, printer, modem, volume, and more.
Double click or right click an icon to view and access the
details and controls.
TCP/IP
Transmission Control Protocol/Internet Protocol - A set of
networking protocols widely used on the Internet that
provides communications across interconnected networks
of computers with diverse hardware architectures and various
operating systems. TCP/IP includes standards for how computers communicate and conventions for connecting networks and routing traffic.
Trojan
A destructive program that masquerades as a benign application. Unlike viruses, Trojan horses do not replicate themselves but they can be just as destructive. One of the most
insidious types of Trojan horse is a program that claims to
rid your computer of viruses but instead introduces viruses
onto your computer.
The term comes from a story in Homer's Iliad, in which the
Greeks give a giant wooden horse to their foes, the Trojans,
ostensibly as a peace offering. But after the Trojans drag the
horse inside their city walls, Greek soldiers sneak out of the
horse's hollow belly and open the city gates, allowing their
compatriots to pour in and capture Troy.
Update
A new version of a software or hardware product designed
to replace an older version of the same product. In addition,
107
Glossary
the installation routines for updates often check to make sure
that an older version is already installed on your computer;
if not, you cannot install the update.
BitDefender has it's own update module that allows you to
manually check for updates, or let it automatically update
the product.
Virus
A program or piece of code that is loaded onto your computer
without your knowledge and runs against your will. Most
viruses can also replicate themselves. All computer viruses
are manmade. A simple virus that can copy itself over and
over again is relatively easy to produce. Even such a simple
virus is dangerous because it will quickly use all available
memory and bring the system to a halt. An even more dangerous type of virus is one capable of transmitting itself
across networks and bypassing security systems.
Virus definition
The binary pattern of a virus, used by the antivirus program
to detect and eliminate the virus.
Worm
A program that propagates itself over a network, reproducing
itself as it goes. It cannot attach itself to other programs.
108