1
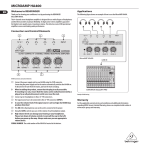
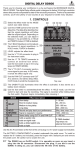
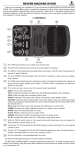
MICROMON MA400
Welcome to BEHRINGER
(5) GND LIFT button:
Thank you for showing your confidence in us by purchasing the BEHRINGER MICROMON
MA400, a monitor headphone amplifier that is both flexible and compact. On your
headphones, you can simultaneously listen to two audio signals:
• one from a microphone
• one from a mixer or a Hi-Fi unit
You can even emphasize one signal over the other. Hear yourself sing, or concentrate on the
main audio program. Both are possible.
◊ Please read the safety instructions that appear at the end of this document.
Connectors and Control Elements
(1)
(3)
(2) (7)
(8)
(4)
(9)
(10)
(5)
(6)
(11)
Fig. 1: MA400 connectors and control elements
◊ High volumes can damage your hearing and your headphones. Before you
use the MA400, turn the MIC LEVEL and MON LEVEL controls to 0 (zero).
(1) 12 V connector:
To connect the power supply unit to the MA400, use the 12 V connector.
Connecting the power supply unit to the mains automatically switches the MA400 on.
To disconnect the unit from the mains, pull out the main cord plug.
(2) ON LED:
As soon as the unit is connected to the mains, the ON LED is illuminated.
(3) MIC INPUT connector:
To send a microphone signal to the MA400, you need an audio cable that includes
XLR connectors.
Plug:
• one XLR connector into the MIC INPUT connector
• the other XLR connector into the microphone
(4) MIC THRU connector:
If you want to route the microphone signal from the MA400 to a mixer, you need an
audio cable that includes XLR connectors.
Plug:
• one XLR connector into the MIC THRU connector
• the other XLR connector into a mic input on the mixer
When you connect a mixer to the MA400, keep this button pushed out to maintain a
ground connection to the mixer.
This connection prevents electrostatic charges from interfering with your
audio signals.
However, if ground-loop hum interferes with your audio signals, you can break
the ground connection between the MA400 and the mixer. To do this, push in the
GND LIFT button.
(6) MONITOR INPUT connector:
To send a signal from a mixer or Hi-Fi unit to the MA400, you need an audio cable that
includes ¼" connectors (unbalanced/stereo TRS or unbalanced/mono TS).
Plug:
• one ¼" connector into the MONITOR INPUT connector
• the other ¼" connector into the AUX SEND of a mixer or, alternatively the output
of a Hi-Fi unit
(7) ¼" PHONES connector, (8) 1/8" PHONES connector: To connect headphones to the
MA400, use the ¼" or, alternatively the 1/8" PHONES connector.
◊ Do not simultaneously use both PHONES connectors.
(9) MONO / STEREO switch:
To specify the type of mixer or Hi-Fi signal the MA400 receives, use this switch.
If you plugged:
• a TS connector into the MONITOR INPUT, the MA400 receives a mono signal.
Push this switch to MONO.
• a TRS connector into the MONITOR INPUT, the MA400 receives a stereo signal.
Push this switch to STEREO.
(10) MIC LEVEL control:
To adjust the volume of the microphone signal, slowly turn this control toward 0
(minimum volume) or, alternatively 10 (maximum volume).
(11) MON LEVEL control:
To adjust the volume of the mixer or Hi-Fi signal, slowly turn this control toward 0
(minimum volume) or, alternatively 10 (maximum volume).
SERIAL NUMBER: To register your unit, use the serial number that is located on the bottom
of the MA400.
Warranty
For our current warranty terms, please refer to our website at http://behringer.com.
Die deutsche Anleitung ist erhältlich @ behringer.com
Manuel francophone en téléchargement sur behringer.com
Manual en español disponible en behringer.com
Manuali italiani disponibili @ behringer.com
Русскоязычное руководство @ behringer.com
Polska instrukcja dostêpna jest pod adresem @ behringer.com
Nederlandse handleiding beschikbaar @ behringer.com
Suomenkielinen käyttöohje saatavilla osoitteesta behringer.com
Svensk manual finns tillgänglig på behringer.com
Dansk vejledning findes på @ behringer.com
Manual português disponível @ behringer.com
Ελληνικό εγχειρίδιο υπάρχει διαθέσιμο στη διεύθυνση behringer.com
@ behringer.com
@ behringer.com
MICROMON MA400
Specifications
Mic Input
Type
Impedance
Max. input level
CMRR
Gain
Bandwidth
XLR connector
approx. 2 kΩ (balanced)
-18 dBu
typically 40 dB, >50 dB @ 1 kHz
40 dB
15 Hz to 25 kHz
Mic Thru
Type
XLR connector
Instrucciones de
seguridad
Monitor Input
Type
Gain
Bandwidth
¼" TRS or ¼" TS connector
10 dB
10 Hz to 80 kHz
Phones Output
Type
Impedance
Max. output level
¼" and 1/8" TRS connectors
min. 30 Ω
approx. +10 dBu (60 mW) @ 100 Ω load
System Specifications
THD
Signal-to-noise ratio
0.005% typ. (100 Ω loading)
-90 dBu @ 0 dBu, A-weighted
Powersupply
Mains connection
external power supply, 12 V / 150 mA
Power Range
USA/Canada
China/Korea
U.K./Australia
Europe
Japan
Power consumption
120 V~, 60 Hz
220 V~, 50 Hz
240 V~, 50 Hz
230 V~, 50 Hz
100 V~, 50 - 60 Hz
approx. 2 W
Dimensions/Weight
Dimensions (H x D x W)
Weight
approx. 1 5/6" x 4" x 2 ½"
approx. 47 x 103 x 64 mm
approx. 0.84 lbs / 0.38 kg
BEHRINGER is constantly striving to maintain the highest professional standards. As a result of these efforts,
modifications may be made from time to time to existing products without prior notice. Specifications and appearance
may differ from those listed or illustrated.
Important Safety
Instructions
1) Read these instructions.
2) Keep these instructions.
3) Heed all warnings.
4) Follow all instructions.
5) Do not use this apparatus near water.
6) Clean only with dry cloth.
7) Do not block any ventilation openings. Install in accordance with the manufacturer’s instructions.
8) Do not install near any heat sources such as radiators, heat registers, stoves, or other apparatus (including amplifiers)
that produce heat.
9) Do not defeat the safety purpose of the polarized or grounding-type plug. A polarized plug has two blades with
one wider than the other. A grounding type plug has two blades and a third grounding prong. The wide blade or the
third prong are provided for your safety. If the provided plug does not fit into your outlet, consult an electrician for
replacement of the obsolete outlet.
10) Protect the power cord from being walked on or pinched particularly at plugs, convenience receptacles, and the point
where they exit from the apparatus.
11) Only use attachments/accessories specified by the manufacturer.
12) Use only with the cart, stand, tripod, bracket, or table specified by the manufacturer, or sold with the apparatus.
When a cart is used, use caution when moving the cart/apparatus combination to avoid injury from tip-over.
13) Unplug this apparatus during lightning storms or when unused for long periods of time.
14) Refer all servicing to qualified service personnel. Servicing is required when the apparatus has been damaged in any
way, such as power supply cord or plug is damaged, liquid has been spilled or objects have fallen into the apparatus,
the apparatus has been exposed to rain or moisture, does not operate normally, or has been dropped.
1) Lea las instrucciones.
2) Conserve estas instrucciones.
3) Preste atención a todas las advertencias.
4) Siga todas las instrucciones.
5) No use este aparato cerca del agua.
6) Limpie este aparato con un paño seco.
7) No instale el equipo cerca de fuentes de calor.
8) Proteja los cables de suministro de energía de tal forma que no sean pisados o doblados.
9) Use únicamente los dispositivos o accesorios especificados por el fabricante.
10) Desenchufe el equipo durante tormentas o si no va a utilizarlo durante un periodo largo.
11) Confíe las reparaciones únicamente a servicios técnicos cualificados. Se requiere mantenimiento siempre que la
unidad haya sufrido algún daño.
Важные указания по
ехнике безопасности
1) Прочитайте эти указания.
2) Сохраните эти указания.
3) Выполняйте эти указания.
4) Следуйте всем инструкциям по обслуживанию.
5) Не пользуйтесь прибором в непосредственной близости от воды.
6) Протирайте прибор сухой тряпкой.
7) Не располагайте прибор рядом с источниками тепла.
8) Прокладывайте сетевой кабель таким образом, чтобы он был защищён от обуви и острых кромок и не мог
быть повреждён.
9) Применяйте только рекомендованные производи-телем дополнительные приборы/принадлежности.
10) Вынимайте вилку из розетки при грозе и дли-тельных перерывах в эксплуатации прибора.
11) Поручайте выполнение работ по обслуживанию прибора только квалифицированному персоналу сервисной
службы. Техническое обслуживание требуется если прибор был каким-то образом поврежден.
重要的安全须知
1) 请您阅读这些说明。
2) 请您妥善保存这些说明。
3) 请您注意所有的警告说明。
4) 请您遵守所有的操作说明。
5) 请您不要在水附近运行此机器。
6) 请您用干布清洁此机器。
7) 请您不要将此机器放置在热源附近。
8) 请您正确铺设电源线, 使其不会被踩踏和被尖角损坏。
9) 请您只使用制造厂认为合适的附加机器 / 配件。
10) 在雷雨时或长期不使用机器时请您将电源插头拔出。
11) 请您只允许具备资格的服务人员进行保养工作。 当机器有损坏时, 要进行维修保养。
TECHNICAL SPECIFICATIONS AND APPEARANCES ARE SUBJECT TO CHANGE WITHOUT NOTICE AND ACCURACY IS NOT GUARANTEED. BEHRINGER,
KLARK TEKNIK, MIDAS, BUGERA, AND TURBOSOUND ARE PART OF THE MUSIC GROUP (MUSIC-GROUP.COM). ALL TRADEMARKS ARE THE PROPERTY
OF THEIR RESPECTIVE OWNERS. MUSIC GROUP ACCEPTS NO LIABILITY FOR ANY LOSS WHICH MAY BE SUFFERED BY ANY PERSON WHO RELIES
EITHER WHOLLY OR IN PART UPON ANY DESCRIPTION, PHOTOGRAPH OR STATEMENT CONTAINED HEREIN. COLORS AND SPECIFICATIONS MAY VARY
FROM ACTUAL PRODUCT. MUSIC GROUP PRODUCTS ARE SOLD THROUGH AUTHORIZED FULLFILLERS AND RESELLERS ONLY. FULLFILLERS AND
RESELLERS ARE NOT AGENTS OF MUSIC GROUP AND HAVE ABSOLUTELY NO AUTHORITY TO BIND MUSIC GROUP BY ANY EXPRESS OR IMPLIED
UNDERTAKING OR REPRESENTATION. THIS MANUAL IS COPYRIGHTED. NO PART OF THIS MANUAL MAY BE REPRODUCED OR TRANSMITTED IN
ANY FORM OR BY ANY MEANS, ELECTRONIC OR MECHANICAL, INCLUDING PHOTOCOPYING AND RECORDING OF ANY KIND, FOR ANY PURPOSE,
WITHOUT THE EXPRESS WRITTEN PERMISSION OF MUSIC GROUP IP LTD.
ALL RIGHTS RESERVED. © 2013 MUSIC Group IP Ltd. Trident Chambers, Wickhams Cay, P.O. Box 146, Road Town, Tortola, British Virgin Islands