1
User Manual
EUROGRAND
EG2280USB/EG8280USB
Enjoy the Sound of a Concert Grand - Play Straight Away
with Included Piano Learning Software and Internal
USB Interface
behringer.com
2
EUROGRAND EG2280USB/EG8280USB User Manual
Table of Contents
Thank you........................................................................ 2
Important Safety Instructions....................................... 3
Legal Disclaimer.............................................................. 3
Limited Warranty............................................................ 3
1. Before You Get Started.............................................. 5
2. Quick Start.................................................................. 5
3. Control Elements and Connections.......................... 7
4. Basic Operation.......................................................... 9
5. Advanced Operation................................................ 11
6. Connection to External Equipment........................ 21
7. Troubleshooting....................................................... 26
8. Specifications............................................................ 27
9. Appendix................................................................... 28
Thank you
Thank you for choosing the EG2280USB/EG8280USB digital piano from
BEHRINGER. This versatile instrument combines the sound and feel of an
authentic acoustic piano with the flexibility of modern technology such as RSM
tone generation, digital effects and 2 track sequencing. 88 full-size, weighted,
hammer-action keys, elegant finish and foot pedals give a professional look
and feel for the home or stage. The addition of USB audio/MIDI connectivity
opens up a whole new world of recording, performing and podcasting options.
The keyboard also comes with a power cable, USB cable and DVD that contains
a bundle of software such as eMedia Starter Piano and Keyboard Lessons,
energyXT2.5 Compact BEHRINGER Edition and numerous podcasting programs.
The EG2280USB/EG8280USB is the ideal piano for home or stage use.
behringer.com
3
EUROGRAND EG2280USB/EG8280USB User Manual
Important Safety
Instructions
Terminals marked with this symbol carry
electrical current of sufficient magnitude to
constitute risk of electric shock. Use only
high-quality commercially-available speaker cables with
¼" TS plugs pre-installed. All other installation or
modification should be performed only by
qualified personnel.
9. Do not defeat the safety purpose of the polarized
or grounding-type plug. A polarized plug has two blades
with one wider than the other. A grounding-type plug
has two blades and a third grounding prong. The wide
blade or the third prong are provided for your safety. If the
provided plug does not fit into your outlet, consult an
electrician for replacement of the obsolete outlet.
10. Protect the power cord from being walked on or
pinched particularly at plugs, convenience receptacles,
and the point where they exit from the apparatus.
11. Use only attachments/accessories specified by
the manufacturer.
12. Use only with the
cart, stand, tripod, bracket,
or table specified by the
manufacturer, or sold with
the apparatus. When a cart
is used, use caution when
moving the cart/apparatus
combination to avoid
This symbol, wherever it appears, alerts you
to the presence of uninsulated dangerous
voltage inside the enclosure - voltage that
may be sufficient to constitute a risk of shock.
This symbol, wherever it appears, alerts you
to important operating and maintenance
instructions in the accompanying literature.
Please read the manual.
Caution
To reduce the risk of electric shock, do not
remove the top cover (or the rear section).
No user serviceable parts inside. Refer servicing to
qualified personnel.
Caution
To reduce the risk of fire or electric shock,
do not expose this appliance to rain and
moisture. The apparatus shall not be exposed to dripping
or splashing liquids and no objects filled with liquids, such
as vases, shall be placed on the apparatus.
injury from tip-over.
13. Unplug this apparatus during lightning storms or
when unused for long periods of time.
14. Refer all servicing to qualified service personnel.
Servicing is required when the apparatus has been
damaged in any way, such as power supply cord or plug
is damaged, liquid has been spilled or objects have fallen
into the apparatus, the apparatus has been exposed
to rain or moisture, does not operate normally, or has
been dropped.
15. The apparatus shall be connected to a MAINS socket
outlet with a protective earthing connection.
16. Where the MAINS plug or an appliance coupler is
used as the disconnect device, the disconnect device shall
remain readily operable.
Caution
These service instructions are for use
by qualified service personnel only.
To reduce the risk of electric shock do not perform any
servicing other than that contained in the operation
instructions. Repairs have to be performed by qualified
service personnel.
1. Read these instructions.
2. Keep these instructions.
3. Heed all warnings.
4. Follow all instructions.
5. Do not use this apparatus near water.
6. Clean only with dry cloth.
7. Do not block any ventilation openings. Install in
accordance with the manufacturer’s instructions.
8. Do not install near any heat sources such as
radiators, heat registers, stoves, or other apparatus
(including amplifiers) that produce heat.
Limit
§ 1 Warranty
[1] This limited warranty is valid only if you purchased
the product from a BEHRINGER authorized dealer in the
country of purchase. A list of authorized dealers can be
found on BEHRINGER’s website behringer.com under
“Where to Buy“, or you can contact the BEHRINGER office
closest to you.
[2] MUSIC Group* warrants the mechanical and
electronic components of this product to be free of defects
in material and workmanship if used under normal
operating conditions for a period of one (1) year from
the original date of purchase (see the Limited Warranty
terms in § 4 below), unless a longer minimum warranty
period is mandated by applicable local laws. If the product
shows any defects within the specified warranty period
and that defect is not excluded under § 4, MUSIC Group
shall, at its discretion, either replace or repair the product
using suitable new or reconditioned product or parts.
In case MUSIC Group decides to replace the entire product,
this limited warranty shall apply to the replacement
product for the remaining initial warranty period, i.e.,
one (1) year (or otherwise applicable minimum warranty
period) from the date of purchase of the original product.
[3] Upon validation of the warranty claim, the repaired
or replacement product will be returned to the user freight
prepaid by MUSIC Group.
[4] Warranty claims other than those indicated above
are expressly excluded.
PLEASE RETAIN YOUR SALES RECEIPT. IT IS YOUR PROOF
OF PURCHASE COVERING YOUR LIMITED WARRANTY.
THIS LIMITED WARRANTY IS VOID WITHOUT SUCH PROOF
OF PURCHASE.
§ 2 Online registration
Please do remember to register your new BEHRINGER
equipment right after your purchase at behringer.com
under “Support” and kindly read the terms and conditions
of our limited warranty carefully. Registering your
purchase and equipment with us helps us process
your repair claims quicker and more efficiently.
Thank you for your cooperation!
§ 3 Return materials authorization
Legal Disclaimer
Technical specifications and appearance are subject to change without
notice. The information contained herein is correct at the time of printing.
All trademarks are the property of their respective owners. MUSIC Group
accepts no liability for any loss which may be suffered by any person
who relies either wholly or in part upon any description, photograph or
statement contained herein. Colors and specifications may vary slightly from
product. BEHRINGER products are sold through authorized dealers only.
Distributors and dealers are not agents of MUSIC Group and have absolutely
no authority to bind MUSIC Group by any express or implied undertaking
or representation. This manual is copyrighted. No part of this manual may
be reproduced or transmitted in any form or by any means, electronic or
mechanical, including photocopying and recording of any kind, for any
purpose, without the express written permission of Red Chip Company Ltd.
ALL RIGHTS RESERVED.
© 2010 Red Chip Company Ltd.
Trident Chambers, Wickhams Cay, P.O. Box 146,
Road Town, Tortola, British Virgin Islands
behringer.com
Limited Warranty
[1] To obtain warranty service, please contact the
retailer from whom the equipment was purchased.
Should your BEHRINGER dealer not be located in your
vicinity, you may contact the BEHRINGER distributor for
your country listed under “Support” at behringer.com.
If your country is not listed, please check if your problem
can be dealt with by our “Online Support” which may
also be found under “Support” at behringer.com.
Alternatively, please submit an online warranty claim at
behringer.com BEFORE returning the product. All inquiries
must be accompanied by a description of the problem
and the serial number of the product. After verifying
the product’s warranty eligibility with the original sales
receipt, MUSIC Group will then issue a Return Materials
Authorization (“RMA”) number.
Lega
4
EUROGRAND EG2280USB/EG8280USB User Manual
[2] Subsequently, the product must be returned in
its original shipping carton, together with the return
authorization number to the address indicated by
MUSIC Group.
[3] Shipments without freight prepaid will not
be accepted.
§ 4 Warranty Exclusions
[1] This limited warranty does not cover consumable
parts including, but not limited to, fuses and batteries.
Where applicable, MUSIC Group warrants the valves or
meters contained in the product to be free from defects in
material and workmanship for a period of ninety (90) days
from date of purchase.
[2] This limited warranty does not cover the product
if it has been electronically or mechanically modified
in any way. If the product needs to be modified or
adapted in order to comply with applicable technical
or safety standards on a national or local level, in any
country which is not the country for which the product
was originally developed and manufactured, this
modification/adaptation shall not be considered a defect
in materials or workmanship. This limited warranty does
not cover any such modification/adaptation, regardless
of whether it was carried out properly or not. Under the
terms of this limited warranty, MUSIC Group shall not
be held responsible for any cost resulting from such a
modification/adaptation.
[3] This limited warranty covers only the product
hardware. It does not cover technical assistance for
hardware or software usage and it does not cover
any software products whether or not contained in
the product. Any such software is provided “AS IS”
unless expressly provided for in any enclosed software
limited warranty.
[4] This limited warranty is invalid if the factoryapplied serial number has been altered or removed from
the product.
[5] Free inspections and maintenance/repair work
are expressly excluded from this limited warranty, in
particular, if caused by improper handling of the product
by the user. This also applies to defects caused by normal
wear and tear, in particular, of faders, crossfaders,
potentiometers, keys/buttons, guitar strings, illuminants
and similar parts.
[6] Damage/defects caused by the following conditions
are not covered by this limited warranty:
• improper handling, neglect or failure to operate the
unit in compliance with the instructions given in
BEHRINGER user or service manuals;
• connection or operation of the unit in any way
that does not comply with the technical or safety
regulations applicable in the country where the
product is used;
• damage/defects caused by acts of God/Nature
(accident, fire, flood, etc) or any other condition that
is beyond the control of MUSIC Group.
behringer.com
[7] Any repair or opening of the unit carried out by
unauthorized personnel (user included) will void the
limited warranty.
[8] If an inspection of the product by MUSIC Group
shows that the defect in question is not covered by the
limited warranty, the inspection costs are payable by
the customer.
[9] Products which do not meet the terms of this
limited warranty will be repaired exclusively at the buyer’s
expense. MUSIC Group or its authorized service center will
inform the buyer of any such circumstance. If the buyer
fails to submit a written repair order within 6 weeks after
notification, MUSIC Group will return the unit C.O.D. with
a separate invoice for freight and packing. Such costs will
also be invoiced separately when the buyer has sent in a
written repair order.
[10] Authorized BEHRINGER dealers do not sell new
products directly in online auctions. Purchases made
through an online auction are on a “buyer beware” basis.
Online auction confirmations or sales receipts are not
accepted for warranty verification and MUSIC Group will
not repair or replace any product purchased through an
online auction.
§ 5 Warranty transferability
This limited warranty is extended exclusively to the
original buyer (customer of authorized retail dealer) and
is not transferable to anyone who may subsequently
purchase this product. No other person (retail dealer, etc.)
shall be entitled to give any warranty promise on behalf
of MUSIC Group.
§ 6 Claim for damage
Subject only to the operation of mandatory applicable
local laws, MUSIC Group shall have no liability to the buyer
under this warranty for any consequential or indirect
loss or damage of any kind. In no event shall the liability
of MUSIC Group under this limited warranty exceed the
invoiced value of the product.
§ 7 Limitation of liability
This limited warranty is the complete and exclusive
warranty between you and MUSIC Group. It supersedes
all other written or oral communications related to this
product. MUSIC Group provides no other warranties for
this product.
§ 8 Other warranty rights and
national law
[1] This limited warranty does not exclude or limit the
buyer’s statutory rights as a consumer in any way.
[2] The limited warranty regulations mentioned herein
are applicable unless they constitute an infringement of
applicable mandatory local laws.
[3] This warranty does not detract from the seller’s
obligations in regard to any lack of conformity of the
product and any hidden defect.
§ 9 Amendment
Warranty service conditions are subject to change without
notice. For the latest warranty terms and conditions
and additional information regarding MUSIC Group’s
limited warranty, please see complete details online at
behringer.com.
* MUSIC Group Macao Commercial Offshore Limited of
Rue de Pequim No. 202-A, Macau Finance Centre 9/J, Macau,
including all MUSIC Group companies
5
EUROGRAND EG2280USB/EG8280USB User Manual
1. Before You Get Started
2. Quick Start
1.1 Shipment
2.1 Power on/off
Your EG2280USB/EG8280USB was carefully packed at the factory, and the
packaging was designed to protect the unit from rough handling.
Nevertheless, we recommend that you carefully examine the packaging and its
contents for any signs of physical damage that may have occurred during transit.
The EG2280USB/EG8280USB is a digital, i.e. electronic, piano. Therefore,
mains power is required to operate the instrument and it has to be switched on or
off. The following section describes how to connect the unit to the mains.
◊ If the unit is damaged, please do NOT return it to BEHRINGER.
Instead, notify your dealer and the shipping company immediately.
Otherwise, claims for damage or replacement may not be honored.
◊ Always use the original packing carton to prevent damage during
storage or transport.
◊ Make sure that no children are left unsupervised with the
EG2280USB/EG8280USB or its packaging.
◊ Please ensure proper disposal of all packing materials.
1.2 Initial operation
Be sure that there is enough space around the unit for cooling and please do not
place the EG2280USB/EG8280USB on high temperature devices such as radiators
etc. to avoid overheating.
◊ Blown fuses must be replaced by fuses of the same type and rating!
Please refer to the “Specifications” for details.
The mains connection of the EG2280USB/EG8280USB is made by using
the enclosed mains cable and a standard IEC receptacle. It meets all of the
international safety certification requirements.
◊ Please make sure that all units have a proper ground connection.
For your own safety, never remove or disable the ground conductor
from the unit or of the AC power cord.
◊ The EG2280USB/EG8280USB is an electronic piano. Unlike an acoustic
piano, this instrument does not need to be tuned.
◊ The POWER switch to the left of the keyboard must be in the “off”
position when you connect the unit to the mains.
FUSE HOLDER / IEC RECEPTACLE
The EG2280USB/EG8280USB is connected to the mains using a standard IEC
receptacle. All required safety regulations have been adhered to. A matching
power cable is included with the unit. Blown fuses must be replaced with a fuse
of the same type and rating.
1) Connect the power cable supplied with the unit to the connector provided on
the underside of the instrument and to a wall socket.
2) Press the POWER switch to the left of the keyboard to switch the instrument
on or off. The LED on the front panel lights up when the EG2280USB/
EG8280USB is ready for operation.
◊ After playing, switch off the unit with
the POWER switch. The POWER LED on
the front panel will go out. Please note:
Merely switching the unit off does not mean
that it is fully disconnected from the mains.
If you do not plan to use your piano for a
prolonged period of time, please disconnect
it from the mains by unplugging the power
cable from the wall outlet.
2.2 Adjusting the volume
The volume of the built-in loudspeakers and headphones can be adjusted
as follows:
◊ The sound quality may diminish within the range of powerful
broadcasting stations and high-frequency sources. Increase the
distance between the transmitter and the device and use shielded
cables for all connections.
1.3 Online registration
Please register your new BEHRINGER equipment right after your purchase
by visiting http://behringer.com and read the terms and conditions of our
warranty carefully.
Should your BEHRINGER product malfunction, it is our intention to have it
repaired as quickly as possible. To arrange for warranty service, please contact
the BEHRINGER retailer from whom the equipment was purchased. Should your
BEHRINGER dealer not be located in your vicinity, you may directly contact
one of our subsidiaries. Corresponding contact information is included in the
original equipment packaging (Global Contact Information/European Contact
Information). Should your country not be listed, please contact the distributor
nearest you. A list of distributors can be found in the support area of our website
(http://behringer.com).
Registering your purchase and equipment with us helps us process your repair
claims more quickly and efficiently.
Thank you for your cooperation!
behringer.com
1) Set the VOLUME control to mid-travel position, between MIN and MAX.
2) Adjust the volume as desired by moving the control to the right (up) or
left (down).
!!
Caution
◊ The EG2280USB/EG8280USB is capable of producing extreme volumes.
Please bear in mind that high sound pressures not only temporarily
affect your sense of hearing, but can also cause permanent damage.
Be careful to select a suitable volume at all times, particularly when
you are playing with headphones.
6
EUROGRAND EG2280USB/EG8280USB User Manual
2.3 Demo playback
The display reads:
The EG2280USB/EG8280USB offers you 14 sound and 15 piano music demos.
These music pieces give you an impression of the instrument’s versatility and
range of sounds.
1 . . . 15:
2.3.1 Playing back the sound demos
SHF:Playback of all music pieces. The pieces are played in
random order.
This section describes how to play back the 14 sound demos. These demos are
specially designed to highlight the various sounds and their features and show
you what can be done with your instrument.
Number of the selected music piece.
All:Playback of all music pieces. The pieces are played in
chronological order.
3) Press the
button in the SEQUENCER section to start playback.
4) Press the
button again to stop playback.
1) Press the DEMO button.
2) Press one of the 14 buttons in the TONE section to play back an audio demo
of the selected sound color.
◊ Press the DEMO button again to quit DEMO mode.
◊ During demo playback, the EG2280USB/EG8280USB does not receive or
send MIDI data.
◊ The music sequencer (see chapter 5.5) must not be set to playback or
record-ready mode when you switch to DEMO mode.
2.3.2 Playing back the piano music demos
The following section describes how to play back the 15 piano music demos.
These demos show you the versatility of the GRAND PIANO sounds.
5) Repeat steps 2 to 4 to play back other pieces.
◊ Press the DEMO button again to quit DEMO mode.
◊ A list of all the music pieces can be found in chapter 9.3.
◊ The music sequencer (see chapter 5.5) must not be set to playback or
record-ready mode when you switch to DEMO mode.
◊ You can adjust the playback tempo of the piano music demos
(see chapter 5.4).
◊ Select any sound you like to accompany the piano music demos; you can
also add the room, modulation and brilliance effects (see chapter 4.2).
Select and set the sound colour before you enter DEMO mode.
2.4 Selecting and playing sounds
The EG2280USB/EG8280USB comes with 14 different sound colours covering a
wide spectrum of sounds. You can select a sound in the TONE section.
1) Press the DEMO button.
2) Use the -/NO and +/YES buttons in the VALUE/SONG section to select the
music piece of your choice.
behringer.com
1) Press one of the 14 buttons in the TONE section to select the sound of
your choice.
7
EUROGRAND EG2280USB/EG8280USB User Manual
The LED above the sound button lights up to show that the corresponding sound
has been selected. The selected sound can be played over the entire keyboard.
[4] DEMO: Enables/disables DEMO mode.
◊ The volume of the sound depends on how heavily you play the keys
(not applicable to CEMBALO 1 and 2, CHURCH 1 and 2, and CLICK ORGAN).
◊ TIP: You can also select two sounds at the same time.
3. Control Elements and
Connections
3.1 Control panel
[5]
[6]
[7]
[8]
[9]
[5] CLICK: Is used to start/stop the metronome click.
[6] TRACK 1: Selects track 1 for playback or recording. The REC LED lights up
when the track has been activated for recording. The PLAY LED lights up
when the track has been set for playback and already contains musical data.
[7] TRACK 2: Selects track 2 for playback or recording. The REC LED lights up
when the track has been activated for recording. The PLAY LED lights up
when the track has been set for playback and already contains musical data.
Is used to start/stop playback or recording of the music sequencer.
[8]
[9] REC: Activates record mode.
[11]
[13]
Fig. 3.1: Control elements of the EG2280USB/EG8280USB
The control elements of the EG2280USB/EG8280USB are described below. To give
you a clear overview of the control panel, its elements have been grouped in
separate sections.
[1]
[2]
[10]
[12]
[10] MODE: Selects the TEMPO parameter and menu pages for EDIT mode.
The EDIT MODE LED shows in EDIT mode, the TEMPO LED in TEMPO mode.
[11] Down/Up: Depending on which mode you have selected with the MODE
button, these two buttons can be used to enter the tempo or to scroll
through the EDIT mode menu pages.
[2]
[4]
[1] VOLUME: is used to adjust the volume of the built-in loudspeakers and
headphone outputs.
[2] COLOR: Varies the sound character from soft (left) to bright (right).
[3] SPEAKERS OFF: Switches the built-in loudspeakers on and off.
The MUTE LED lights up only when the built-in loudspeakers are switched
off. When you insert your headphones this will automatically switch off the
built-in loudspeakers.
behringer.com
[12] Display: Depending on the function used, the display reads the tempo,
menu numbers or parameter values.
8
EUROGRAND EG2280USB/EG8280USB User Manual
[13] -/NO, +/YES: Is used to raise/lower the parameter values shown in
the display. Additionally, the +/YES button executes certain EDIT functions.
3.2 Connectors
The connectors of the EG2280USB/EG8280USB are located on the back panel
(EG2280USB) or bottom side (EG8280USB) of the keyboard.
[14]
[19]
[20]
[21]
[21]
[14] TONE: These 14 buttons are used for sound selection. In DEMO mode they
are used to select individual sound color demos.
[23]
[24]
[25]
Fig. 3.2: Connectors of the EG2280USB/EG8280USB
[15]
[16]
[17]
[18]
[15] REVERB: Selects one of four room effects (CHAMBER, CONCERT, CHURCH,
THEATER) for the selected sound. An LED shows which effect is currently
active. If no LED lights up, no room effect is active.
[16] SPECIAL: Is used to select one of four modulation effects (CHORUS, FLANGER,
TREMOLO, DELAY) for the selected sound. An LED shows which effect is
currently active. If no LED lights up, no modulation effect is active.
[17] KEYS: Is used to set the key velocity to SOFT, MEDIUM or HARD. An LED
shows which setting is currently active. If no LED lights up, no key velocity
has been selected and playing a key always triggers a fixed volume level,
irrespective of how hard you play the key.
[18] TRANSPOSE: Is used for setting keyboard/pitch transposition.
[19] MIC IN: Connect a dynamic or condenser microphone to this input using a
standard XLR cable. The jack automatically supplies 15 V of phantom power.
Adjust the input sensitivity with the adjacent GAIN control.
NOTE: If the microphone signal begins to distort, turn the GAIN knob
counter-clockwise.
[20] AUX IN: Connect external sound sources such as a CD or MP3 player using a
1⁄8" plug.
[21] LINE IN: Connect external sound sources such as CD players, mixers or drum
machines using RCA cables.
[22] LINE OUT: Connect the EG2280USB/EG8280USB to an external sound system
or recording device using RCA cables.
[23] PEDALS: Connect the foot pedals of the EG2280USB/EG8280USB to this jack
using the included 5-pin cable.
[24] MIDI: Connect external devices such as synthesizers, sequencers, etc. to the
EG2280USB/EG8280USB using 5-pin DIN cables (MIDI cables).
• MIDI IN receives data that controls the EG2280USB/EG8280USB
internal sound generator.
• MIDI OUT sends controlling data from the EG2280USB/EG8280USB's
keys and pedals to other MIDI devices.
• MIDI THRU transmits data from the MIDI IN jack to other MIDI
devices without altering the data.
[25] USB: Connect the EG2280USB/EG8280USB to a computer using a type B USB
connector. This connection will transmit both the audio from the internal
sound generator and the input connectors as well as MIDI data. You may use
this to record performances or control software on your computer via MIDI.
behringer.com
9
EUROGRAND EG2280USB/EG8280USB User Manual
3.3 Foot pedals
4. Basic Operation
The EG2280USB/EG8280USB has three pedals similar to those found on acoustic
grand pianos.
The following chapters describe some further basic functions which you can use
in addition to those already explained.
4.1 Using two sounds (layer mode)
Instead of a single sound you can also play two sounds simultaneously on the
EG2280USB/EG8280USB. These sounds are layered and can be played together
over the entire keyboard.
1) In the TONE section, simultaneously press the buttons of the sounds to
be layered.
[26]
[27]
[27]
The LEDs above the buttons light up to show that the associated sounds have
been selected.
[26] Soft/Piano pedal: Use this to reduce the volume of a particular passage.
[27] Sostenuto pedal: This pedal sustains notes that allow distinct advantages:
• Play a note or chord on the keys
• While holding the note(s), press the sostenuto pedal
• Notes played before the pedal was pressed will continue to sustain,
while those played after the pedal was pressed decay normally
[28] Damper/Forte pedal: All notes sustain when the damper/forte pedal is
pressed, even if you release the key(s).
[29]
In our example the sounds “GRAND 1” and “STRINGS” are layered.
◊ To quit layer mode, press any button in the TONE section. This will also
select one single sound again.
4.2 Changing the sound character
You can change the sound character by using a room and a modulation effect as
well as a color equalizer.
4.2.1 Color equalizer
Use the Color equalizer to change the sound character and make it softer or
more brilliant.
1) Change the sound character with the COLOR control as follows:
[29] Power: Press this button to turn the EG2280USB/EG8280USB on and off.
• Move the control to the left ( ) for a softer sound that is darker
in tone.
• Move the control to the right (
[30]
[30] Phones jacks: Connect headphones to these jacks using ¼" and/or
1⁄8" plugs. The jacks may be used simultaneously, but the volume cannot be
controlled separately.
behringer.com
) for a more brilliant sound.
10
EUROGRAND EG2280USB/EG8280USB User Manual
4.2.2 Room effects
4.2.3 Modulation effects
The EG2280USB/EG8280USB provides room effects simulating four reverb rooms
of different sizes. When you select a sound, the EG2280USB/EG8280USB also
selects an appropriate effect. If required, however, you can always select any
other effect. The following reverb room simulations are available:
The EG2280USB/EG8280USB provides a modulation effect featuring four
different types of effect. When you select a sound, the EG2280USB/EG8280USB
automatically adds an appropriate effect for some of the sounds. If required,
however, you can always select any other effect. The following modulation
effects are available:
CHAMBER:
Simulates a small room.
CONCERT:
Simulates a small concert hall.
CHURCH:
Simulates a large concert hall.
THEATER:
Simulates a typical stage ambience.
1) Keep pressing the REVERB button until the effect of your choice has
been selected.
CHORUS:
Chorus effect. ”widens” the sound.
FLANGER:
Time-shifted layering of sounds. Produces a “floating” sound.
TREMOLO:
Rapid, constantly repeated changes in the volume of
the sound.
DELAY:
Echo effect. Produces time-shifted repetitions of the sound
that decay over time.
1) Keep pressing the SPECIAL button until the effect of your choice has
been selected.
The active effect is shown by an LED lighting up next to the effect name.
◊ If none of the four LEDs lights up, the room effect is disabled.
2) Keep the REVERB button pressed while adjusting the original vs. effect signal
ratio in the VALUE/SONG section using the -/ NO and +/YES buttons.
The selected effect is shown by an LED lighting up next to the effect name.
◊ If none of the four LEDs lights up, the modulation effect is disabled.
2) Keep the SPECIAL button pressed while adjusting the original vs. effect
signal ratio in the VALUE/SONG section using the -/ NO and +/YES buttons.
+
+
The display reads:
0 . . . 20:
Effect intensity
(0 = no effect, 20 = maximum effect)
3) If you want to restore the default settings, keep the REVERB button pressed,
then press -/NO and +/YES simultaneously.
The display reads:
0 . . . 20:
Effect intensity
(0 = no effect, 20 = maximum effect)
3) If you want to restore the default settings, keep the SPECIAL button pressed,
then press -/NO and +/YES simultaneously
4.3 Using the pedals
The EG2280USB/EG8280USB is equipped with three foot pedals performing the
same functions as the pedals on an acoustic grand piano. Normally, the pedals
are used in accordance with the instructions given in the music, where they are
marked by special symbols. It is useful to know how sound is produced on an
acoustic piano to better understand how the pedals work.
When you strike a key, a hammer hits several strings for each note; the strings
produce a tone with a defined pitch. When you let go of the key, a damper felt
falls down on the strings to stop them from vibrating any longer. As a result,
the tone decays quickly. However, if the key is held down, the tone is sustained
for a while before it decays completely. In this case, the tone decays only after a
certain time.
behringer.com
11
EUROGRAND EG2280USB/EG8280USB User Manual
This decay characteristic can be influenced using the three foot pedals.
• Soft/piano pedal (left): The soft pedal produces a soft and intimate
sound. Use this pedal for particularly soft musical passages (pianissimo).
2) Connect your headphones to a free headphone jack on the underside of the
playing console.
3) While playing, adjust the volume as desired using the VOLUME control.
On an acoustic piano this soft sound results from a smaller distance between
hammer and strings. On a grand piano, however, the position of the hammer
changes, so that the hammer does not hit all strings.
1) Press the pedal to dampen all tones played afterwards with the pedal down.
2) Let go of the pedal for normal playing.
◊ You can adjust the effect of the damper pedal (see chapter 5.6.2).
• Sostenuto pedal (middle): Use the sostenuto pedal to sustain
individual tones. The notes already played – as long as they have
not yet decayed – will be sustained as soon as you press the pedal.
All notes played subsequently will be dampened as described
above. This allows you to play and sustain a certain note using
the pedal, while all subsequent tones will be played in a staccato
(detached) manner.
When you sustain single notes on an acoustic piano using the sostenuto
pedal, the damper felts of the notes already played do not dampen the
strings when you release the keys, but are held in their position.
4) If required, the
button allows you to switch the built-in loudspeakers
of the EG2280USB/EG8280USB on or off.
◊ The built-in loudspeakers of the EG2280USB/
EG8280USB are switched off as soon as you connect a
pair of headphones; the MUTE LED above the
button lights up.
◊ When you disconnect your headphone from the
headphones jack, the built-in loudspeakers of the EG2280USB/
EG8280USB are switched on again and the MUTE LED above the
button goes out.
1) Play the notes to be sustained.
2) Press the pedal to sustain the tones you just played.
3) Play the next notes. These are played with normal decay.
4) Release the pedal for normal playing.
• Damper/Forte pedal (right): The damper pedal allows you to
sustain the notes already played (and held) plus all subsequent
notes, without having to hold the keys down. The damper pedal is
often used to achieve a richer sound. This is the pedal that is used
most often. You can also use it very subtly, for example, by holding
it down only half-way.
On the acoustic piano notes are sustained by keeping all the damper
felts in their raised position even after releasing the keys. This allows
the notes played to decay quite naturally.
1) Play the notes to be sustained.
5. Advanced Operation
The following chapters provide information on advanced operating functions of
the EG2280USB/EG8280USB.
5.1 Using EDIT mode
Many advanced operating functions of the EG2280USB/EG8280USB are available
in EDIT mode. The following sections describe how to adjust these functions in
EDIT mode.
◊ Whenever you are prompted to enter EDIT mode, please follow the
step-by-step instructions given below to select a function and adjust
its parameters.
1) Keep pressing the MODE button in the TEMPO/EDIT MODE section until the
EDIT MODE LED lights up.
2) Press the pedal to sustain the notes you just played plus all
subsequent notes.
3) Release the pedal for normal playing.
4.4 Using headphones
The EG2280USB/EG8280USB is equipped with two headphone jacks located
on the underside of the playing console (front left). Headphones are ideal for
practicing without disturbing others. The second headphone jack allows another
person, for example a music teacher, to listen as well so that piano lessons can
also be held using headphones. Both ¼" and 1/8" inputs are available.
1) Use the VOLUME control to turn the volume down (move the slide control to
the left half of its control range).
behringer.com
2) Scroll through the functions using the Down/Up buttons, until the
appropriate function (e.g. E1) has been selected.
12
EUROGRAND EG2280USB/EG8280USB User Manual
3) Use the -/NO- and +/YES buttons in the VALUE/SONG section to adjust the
value of your choice.
The display reads:
0:
No transposition (default setting)
1 . . . 12:
Keyboard is transposed up by the number of
half-tones selected.
-1 . . . -12:
Keyboard is transposed down by the number of
half-tones selected.
2) Release the TRANSPOSE button when the desired value has been selected.
◊ The LED above the TRANSPOSE button lights up when the transposition
5.1.1 Quick access to layer mode functions
Use the following operating procedure for direct access to the layer mode
menu pages.
1) Press and hold down the two sound buttons selected for layer mode
(e.g. GRAND 1 and STRINGS) and press the MODE button in the TEMPO/EDIT
MODE section.
feature is active, i.e. when a value other than zero has been set.
◊ If a transposition interval has already been set, you can enable/disable
the transposition function using the TRANSPOSE button.
5.3 Layer mode settings
In layer mode you can effect additional settings for advanced playing with two
sounds at the same time.
All sounds are numbered internally from 1 through 14. This order of sounds
determines which sound is addressed internally as voice #1, voice #2, etc.,
which in turn is important for making changes to the sounds selected.
+
1
2
3
4
5
6
7
8
9
10
11
12
13
14
In our example the two sounds GRAND 1 and STRINGS are being used in layer
mode. Internally, GRAND 1 is #1, STRINGS is #11. The sound with the lower
number is addressed internally as voice #1 (here: GRAND 1), the sound with the
higher number as voice #2 (here: STRINGS).
The EDIT LED lights up and the EDIT page E3.1 is displayed.
5.2 Transposition
The sounds produced by the EG2280USB/EG8280USB can be transposed up
or down by half-tones (key by key). This is useful, for example if you want to
play a piece in a key that is easier to play because it has few or no accidentals
at all (e.g. C major), but intend the piece to sound in a difficult key with lots of
accidentals (e.g. D flat major).
Example: D flat major has five flats (accidentals). In this key you would have to
play a lot of black keys. However, if you transpose the sounds up by one half-tone,
you can easily play the piece on the white keys (C major). It can be helpful to
transpose the keyboard by an octave (12 halftones), for example to play low notes
in the middle register where they can be played more comfortably.
1) Press and hold the TRANSPOSE button and use the -/NO and +/YES buttons
in the VALUE/SONG section to adjust the transposition value of your choice in
half-tone steps.
+
behringer.com
◊ Please note the order of voices used in the sound combination selected,
in order to understand which settings apply to which voice in the
examples below.
◊ A layer combination consisting of two sounds must be set up before you
can adjust the following functions (see chapter 4.1).
5.3.1 Volume ratio
Use this function to adjust the volume ratio of the selected sounds.
◊ Please enter EDIT mode (see chapter 5.1) and select the
following function.
Function:
E3.1
Value:
0 . . . 20
Description:
10:
Same volume for voice #1 and voice #2
<10:
Voice #2 louder than voice #1
>10:
Voice #1 louder than voice #2
13
EUROGRAND EG2280USB/EG8280USB User Manual
5.3.2 Detune
5.3.5 Reset
This function allows you to detune the selected sounds slightly against
each other.
Use this function to reset all settings in layer mode.
◊ Please enter EDIT mode (see chapter 5.1) and select the
following function.
◊ Please enter EDIT mode (see chapter 5.1) and select the
following function.
Function:
E3.7
Function:
E3.2
Value:
-
Value:
-10 . . . 10
Description:
Description:
Press the +/YES button to execute this function.
0:
Same pitch for voice #1 and voice #2
<0:
Voice #2 higher than voice #1
>0:
Voice #1 higher than voice #2
5.3.3 Transposition
Use this function to transpose the selected sounds up or down by one octave.
Depending on which sounds are used in a combination, the tranpose function can
help make the sounds more homogeneous.
Example:
In a combination of GRAND 1 and STRINGS, the STRINGS sound too low. In this
case, it helps to transpose the STRINGS up by one octave.
◊ Please enter EDIT mode (see chapter 5.1) and select the
following function.
Function:
E3.3 (voice #1 transposed by an octave)
E3.4 (voice #2 transposed by an octave)
Value:
-1 . . . 1
5.4 Using the metronome
The EG2280USB/EG8280USB features a built-in metronome which can be used for
practising or to make recordings with the internal music sequencer.
To use the metronome, please proceed as follows:
1. Press the CLICK button to start or stop the metronome.
Description:
0:
No transposition
-1:
Transposition down by one octave
1:
Transposition up by one octave
5.3.4 Effect intensity
The metronome beats are shown by flashing dots on the display. At the
beginning of a measure all dots light up simultaneously.
2) Keep pressing the MODE button in the TEMPO/EDIT MODE section until the
TEMPO LED lights up.
This function allows you to edit the effect intensity of the modulation effect for
the selected sounds.
◊ Please enter EDIT mode (see chapter 5.1) and select the
following function.
Function:
E3. 5 (effect intensity voice #1)
E3.6 (effect intensity voice #2)
Value:
0 . . . 20
Description:
1 . . . 20:
Effect intensity (default setting)
0:
No effect
behringer.com
3) Use the two Down/Up buttons to adjust a tempo of your choice.
14
EUROGRAND EG2280USB/EG8280USB User Manual
4) Press and hold the CLICK button while adjusting the number of beats per
measure using the -/NO and +/YES button in the VALUE/SONG section.
5.5.1 Recording pieces of music
This section describes how to record music pieces with the built-in
music sequencer.
1) Press the REC button. The REC LED above the TRACK-1 or TRACK-2 button
lights up. The dots in the display start flashing in the adjusted metronome
tempo, thus indicating the beat. Now, the EG2280USB/EG8280USB is set to
record mode.
+
The display reads:
04:
No stressed beats (default setting)
24, 34, 44, 54, 64, 74: Quarter meter (e. g. 2/4)
38, 68, 78, 98, 128:
Eighth-note meter (e. g. 3/8)
5.4.1 Metronome volume
Use this function to adjust the metronome volume.
◊ Please enter EDIT mode (see chapter 5.1) and select the
following function.
Function:
E5
Value:
1 . . . 20
Description:
1 . . . 20:
Metronome volume (1 = low, 20 = high)
Proceed as follows for direct access to the metronome volume menu page.
1) Press and hold the CLICK button, then hit the MODE button in the
TEMPO/EDIT MODE section.
◊ The memory of the music sequencer can store up to 10,000 notes.
However, this number can decrease depending on how much pedaling
information is stored.
◊ You can quit record mode by pressing the REC button again.
2) If necessary, adjust the metronome tempo and meter as described in
chapter 5.4.
3) Keep pressing the TRACK-1 button until the REC LED above the corresponding
button lights up red. Now, track 1 is selected for recording. If you did a
recording take before, the last track selected will be used for recording.
Depending on which track is currently used, you will have to select the other
track for recording.
+
◊ TIP: If the PLAY LED for one of the tracks lights up, this warns you that
notes have already been recorded on this track. If you select this track
again for recording (REC LED lights up red), the previous recording will
be lost.
4) Select a sound in the TONE section. You can also use a sound combination
(see chapter 4.1) for recording.
The EDIT MODE LED lights up and the EDIT page E5 is displayed.
5.5 Music sequencer
The EG2280USB/EG8280USB provides a built-in 2-track sequencer which allows
you to record and play back a piece of music . For each of the two tracks you can
select one or two sounds for recording. This means that the music sequencer can
play back up to four sounds at the same time. While playing back a music piece
you can also play on the keyboard to produce complex performances with up to
six different sounds.
What is more, you can use the music sequencer for practicing. For example,
you could record the left and right-hand parts of a piece separately on the two
tracks. During playback, switch off one track (=hand) and play the muted part
yourself. Thus, you can practice each part individually within its musical context.
behringer.com
15
EUROGRAND EG2280USB/EG8280USB User Manual
5) Switch on the acoustic CLICK signal by pressing the CLICK button, if you want
to make a metronome backed recording.
1) If you do not want to hear the previously recorded track while you record the
second one, press the TRACK button of the track until its green PLAY LED
goes out. Do this BEFORE you enter record mode. If you want to hear the
previously recorded track, continue with step #2.
6) Start recording by pressing the
button or simply start playing on
the keyboard. The current meter is counted in the display.
2) Press the REC button. The REC LED above the TRACK 1 or TRACK 2 button
lights up. The dots on the display start flashing in the metronome tempo
that has been set, thus indicating the beat. Now, the EG2280USB/EG8280USB
is set to record mode.
◊ If the display starts flashing during recording and reads the message
FUL, this is to warn you that the recording memory has been used
up. All data recorded up to this point will be stored, but the recording
process will be terminated.
7) Once your recording is finished stop the sequencer by pressing the
button again.
◊ The memory of the music sequencer can store up to 10,000 notes.
However, this number can decrease depending on how much pedaling
information is stored.
◊ You can quit record mode by pressing the REC button again.
3) Press the TRACK button of the track you want to record until the REC LED
above the button lights up red. Now the selected track is record-ready. If you
did a recording take before, the last track selected will be used for recording.
Depending on which track is currently used, you will have to select the other
track for recording.
◊ Recording mode will thus be canceled automatically.
8) Repeat the whole procedure to record a second track. This time, however,
select TRACK 2 instead of TRACK 1 in step #3.
◊ TIP: If the right-hand part of a music piece you want to practice
has been recorded on track 2 and the left-hand part on track 1
(for example, by your piano teacher), you can mute one of the two
tracks during playback to practice the corresponding part.
◊ TIP: Press the CLICK button again to stop the metronome click.
5.5.2 Editing pieces of music
This section describes how to edit a recording by replacing a recorded track with
a new recording. What is more, you can see how to record a track without playing
back the second track, which can be useful when you record two different pieces
of music.
◊ You must have recorded at least one track before you can carry out the
steps described below.
◊ If you are not sure whether a track has been recorded or not, check this
by pressing the TRACK 1 and TRACK 2 button, BEFORE you enter record
mode. If one of the PLAY LEDs above the TRACK buttons light up,
this shows you that something has been recorded on this track.
behringer.com
◊ Tip: If you select a track for recording, which already contains note
information, all previously recorded notes on this track will be erased!
4) Select a sound in the TONE section. You can also use a sound combination
(see chapter 4.1) for recording.
16
EUROGRAND EG2280USB/EG8280USB User Manual
5) Switch on the acoustic metronome signal by pressing the CLICK button,
if you want to make a metronome-backed recording.
◊ You can only activate those tracks for playback which actually contain
note information.
2) If you want to have a metronome-backed playback, press the CLICK button
to switch on the metronome.
6) Start recording by pressing the
button or simply start playing on
the keyboard. The current meter is constantly shown in the display.
3) Press the MODE button in the TEMPO/EDIT MODE section until the
TEMPO LED lights up, then use the two Down/Up buttons to adjust the
playback tempo.
◊ If the display starts flashing during recording and reads the message
FUL, this is to warn you that the recording memory has been used up.
All data recorded up to this point will be stored, however, but recording
process will be terminated.
7) Once your recording is finished stop the sequencer by pressing the
button again.
◊ You can play back a recording at its original tempo by pressing the two
Down/Up buttons at the same time.
4) Press the
button to play back the recording. The current meter is
constantly shown in the display.
◊ Recording mode will thus be canceled automatically.
5.5.3 Playing back pieces of music
◊ During playback the two tracks can be switched on/off at any time.
This section describes how to play back the music piece you have just recorded.
◊ You can accompany the music sequencer playback with the currently
1) Press the TRACK 1 and TRACK 2 buttons until the green PLAY LED above the
buttons lights up. This is to activate the tracks for playback.
selected sound.
◊ TIP: If the right-hand part has been recorded on track 2 and the
left-hand part on track 1, you can switch off either of the tracks and
practice its part live during playback. The volume of the muted track is
adjustable. If necessary you can play it back in the background at low
volume for support (see chapter 5.5.5).
5) To stop the playback, press the
behringer.com
button
17
EUROGRAND EG2280USB/EG8280USB User Manual
5.5.4 Repeating musical passages for practicing
The display reads:
The following section describes how to play back a specific passage of a recorded
music piece repeatedly. This function is ideal for practicing a specific difficult
passage recorded by your piano teacher.
A-b:
◊ To make the best use of this function, the left and righthand parts
should be recorded separately on tracks 1 and 2. In this case, you can
play back one part only with the music sequencer, while you practice
the other part.
Ending point of the loop is set.
The musical passage is now repeated continuously, so that you can practice it
to perfection.
5) When you want to stop practicing, press the
the playback.
button again to stop
1) Select the track to be played back, so that the PLAY LED above the
corresponding TRACK button lights up.
◊ Press the MODE button again to quit repetition mode.
◊ The passage marked as a loop for repetition is automatically erased
when you quit music sequencer mode.
◊ The volume of a muted track is adjustable (see chapter 5.5.5).
2) Press the
button to play back the selected track.
5.5.5 Setting the volume of muted tracks
1) This function allows you to set the volume of muted tracks.
◊ Please enter EDIT mode (see chapter 5.1) and select the
following function.
Function:
E6
Value:
0 . . . 20
Description:
3) Press the MODE button in the TEMPO/EDIT MODE section when the playback
has reached the point from which you want to start repeating a passage.
1 . . . 20:
Volume of muted track
0:
Muted tracks are not audible
5.5.6 Editing the music sequencer settings
The following paragraphs explain how to edit the playback settings of recordings
made with the music sequencer.
The following settings can be edited separately for each of the two tracks:
• Sound (see chapter 2.4)
• Room effect intensity (see chapter 4.2.2)
• Modulation effect intensity (see chapter 4.2.3)
• Layered sounds (see chapters 4.1 and 5.3)
The following global settings can be made for the whole music piece:
The display reads:
A-:
Starting point of the loop is set.
4) Press the MODE button again when the playback reaches the point where
you want to end the repetition of a passage.
• Tempo (see chapter 5.4)
• Meter (see chapter 5.4)
• Type of room effect (see chapter 4.2.2)
• Type of modulation effect (see chapter 4.2.3)
behringer.com
18
EUROGRAND EG2280USB/EG8280USB User Manual
1) Press the REC button in the SEQUENCER section to enter record mode.
The REC LED above the TRACK 1 or TRACK 2 buttons lights up and the dots in
the display start flashing in the rhythm of the selected metronome tempo,
thus indicating the beat.
5.5.7 Sync start
You can set the music sequencer playback-ready, so that it will start playback as
soon as you play a key on the keyboard. This function can be very helpful when
the music sequencer is used as an “accompanist”. The function is also available in
DEMO mode.
1) Make sure that the playback tracks are active (PLAY LED above the
corresponding TRACK button lights up green). If necessary, activate the
tracks by pressing their TRACK buttons in the SEQUENCER section.
◊ Be sure not to press the
button during the following steps.
Otherwise, a new recording would be made on the selected track
erasing all the data recorded before.
2) Use the TRACK button to select the track whose settings you wish to edit.
If you want to edit global settings (e.g. tempo, measure, etc.) you can select
either one of the two tracks.
2) Press and hold one of the active TRACK buttons, then press the
button in the SEQUENCER section.
+
3) Edit the settings as described in the chapters mentioned above.
4) If necessary, repeat step 2 for the second track.
5) Press the REC button to quit record mode.
A dot in the lower right-hand corner of the display starts flashing in the tempo
of the metronome, thus signaling that the instrument is set to sync start mode.
The sequencer starts playback as soon as you play a key on the keyboard.
The changes made have now been stored in the music sequencer. When you play
back the music piece, the new settings will be effective. All previous settings
are deleted.
◊ If you want to quit sync start mode, simply repeat step 2.
5.5.8 Start the music sequencer with foot pedal
This function allows you to reprogram the left soft pedal, so that it can be used to
start/stop the music sequencer. This is useful when you are playing a music piece
live and want to start a sequencer accompaniment at a later point during the
piece. When the pedal has been set accordingly, you can also use it to start/stop
playback in DEMO mode.
◊ Please enter EDIT mode (see chapter 5.1) and select the
following function.
Function:
E4.1
Value:
1, 2
Description:
behringer.com
1:
Soft pedal function (default setting)
2:
Music sequencer
19
EUROGRAND EG2280USB/EG8280USB User Manual
5.6 System settings
5.6.2 Soft pedal intensity
The EG2280USB/EG8280USB provides several setting options to control the global
functions of the instrument. Please read below which options are available and
how you can edit their settings.
Use this function to adjust the intensity of the soft pedal effect.
5.6.1 Key velocity
Function:
E4.2
This parameter determines the volume of the sounds with reference to the key
velocity applied, i.e. you can set here how hard you have to strike a key to achieve
maximum volume.
Value:
1 . . . 5
The following section describes how to change the key velocity.
1) Press the KEYS button to select one of the following settings:
HARD:
MEDIUM:
The keys must be played very hard to
achieve maximum volume.
The keys must be played with medium
velocity to achieve maximum volume
(default setting).
SOFT:
The keys must be played only lightly to
achieve maximum volume.
OFF:
If none of the LEDs lights up, each key
stroke will produce a defined volume, irrespective of how hard
you play the keys.
An LED above the button lights up to show the current setting. If all LEDs are
out, key velocity is switched off. In this case you can adjust a fixed volume level
as follows:
2) Press and hold the KEYS button, then use the -/NO and +/YES buttons to set
the volume level to be produced when you play a key on the keyboard,
irrespective of the key velocity applied.
+
The display reads:
1 . . . 127: Fixed volume level produced when you play a key on the
keyboard (default setting: 64)
3) Keep the KEYS button pressed, then press the -/NO and +/YES buttons
simultaneously to recall the standard setting.
◊ Please enter EDIT mode (see chapter 5.1) and select the
following function.
Description:
3:
Normal soft pedal intensity (default setting)
1:
Low soft pedal intensity
5:
High soft pedal intensity
◊ The function will be effective only if the left pedal is used as a soft
pedal, but NOT to start/stop the music sequencer (see chapter 5.5.8).
5.6.3 Fine tuning
The EG2280USB/EG8280USB can be detuned slightly to adapt it to other
instruments or tunings. The setting made here affects the pitch of all keys.
The following section describes how to adjust the fine tuning of the
EG2280USB/EG8280USB. The tuning shown in the display is referenced to the
EG2280USB/EG8280USB pitch “A” in Hertz (Hz).
◊ Please enter EDIT mode (see chapter 5.1) and select the
following function.
Function:
E1
Value:
427 . . . 453
Description:
440:
Western European equal tuning (default setting)
453:
Maximum detuning upwards
427:
Maximum detuning downwards
1/5-Hz steps are shown as follows (figures separated by one or two dots):
440:
440 Hz
4.4 0:
440,2 Hz
44.0:
440,4 Hz
440.:
440,6 Hz
4.4 0.:
440,8 Hz
5.6.4 Tunings
The EG2280USB/EG8280USB provides different tunings developed during the
past few centuries. The tuning used most often today is called equal tuning and
has been a characteristic element of the music composed from the 19th century
up to the present. However, for some baroque pieces (e.g. by J. S. Bach) it can be
interesting to use an older tuning system.
◊ The key velocity setting has no effect on the following sounds:
CEMBALO 1 and 2, CHURCH 1 and 2, and CLICK ORGAN.
◊ TIP: young pianists might find it easier to use a SOFT key
velocity setting.
behringer.com
In the history of music, the development of the individual tunings can be traced
back to the development of scales and polyphony and the resulting adaptation
of instruments and their tuning. Apart from these historical reasons, the limited
tuning aids available in former times played an important role for the practical
implementation of tunings.
20
EUROGRAND EG2280USB/EG8280USB User Manual
The EG2280USB/EG8280USB provides the following tunings:
With the exception of equal tuning, all tunings must be marked by a basic note.
• Equal tuning (default setting)
Here’s how to set the basic note:
Equal tuning divides one octave into twelve intervals of equal size or spacing.
Thus, each half-tone is detuned slightly to the same extent, with the octave
being the only perfect interval. This has been the most common tuning since the
19th century, as it makes it possible to play all twelve major/minor keys.
Function:
E2.2
Value:
C . . . B
• Pure major/minor intonation
Altered notes are marked by dashes above or below the note name. A dash above
the note name raises a note, a dash below the note lowers it.
This tuning is based on the perfect tuning of the seven notes of one scale
(e.g. C major). Triads played one fifth above or below are also perfect, since they
use the notes of the basic key. However, all other keys are not playable, since their
frequency relationships change depending on the basic note.
This tuning can only be used for music that strictly follows a classical cadence
comprising tonic, dominant and subdominant.
• Pythagorean tuning
The Pythagorean tuning is based on perfect fifths. As a consequence, all thirds
are impure.
This tuning was used for early music up to the late Middle Ages. The homophonic
or two-part polyphonic music of the time did not use any thirds, but only perfect
unison, fourth, fifth and octave intervals.
• Meantone tuning
Meantone tuning resulted from the change in the perception of dissonant
intervals during the Renaissance period and from the beginnings of chromaticism
and polyphony. Polyphony made the third the most important interval in music.
Therefore, meantone tuning is based on perfect thirds rather than perfect fifths
to tune the twelve notes of a scale. However, this also means that some scales
are unplayable.
Today, the meantone tuning can still be used for works from the early 16th and
17th centuries (e.g. G. F. Handel).
Description:
The display shows:
c-:
c sharp (C#)
e-:
e flat (Eb)
5.6.5 Saving parameter settings
The EG2280USB/EG8280USB allows you to save the changes made to the
instrument’s settings, so that they won’t get lost when the unit is powered
down. When the save function is not active, all changes made to the settings –
except for the music sequencer data – will be lost when you switch the piano
off. When switched back on, the EG2280USB/EG8280USB recalls the factory
default settings.
The save function can be activated separately for the following groups of
functions: sounds, MIDI, tuning and damper pedal.
◊ Please enter EDIT mode (see chapter 5.1) and select the
following function.
• Sounds
You can save the following settings for this group of functions:
• Sounds (see chapter 2.4)
• Layer mode settings (see chapters 4.1 and 5.3)
• Werckmeister/Kirnberger tuning
• Type of room effect and intensity (see chapter 4.2.2)
The Werkmeister and Kirnberger tunings result from first attempts to realize a
well-tempered tuning which – unlike the Pythagorean and meantone tunings
– allows for playing in all twelve keys. The advantages of the Pythagorean and
meantone tunings, i.e. the slight detuning of some fifth intervals, have also been
included in the Werkmeister/Kirnberger tunings.
• Type of modulation effect and intensity (see chapter 4.2.3)
Both tunings are interesting to use for works from the baroque period
(e.g. J. S. Bach). Werkmeister is a popular tuning for organ works.
The following section describes how to change the tuning of the
EG2280USB/EG8280USB.
◊ Please enter EDIT mode (see chapter 5.1) and select the
following function.
Function:
E2.1
Value:
1 . . . 7
Description:
• Key velocity (see chapter 5.6.1)
• Metronome meter and tempo (see chapter 5.4)
• Dimmed volume (see chapter 5.5.5)
Function:
E8.1
Value:
On, Off
Description:
Off:
Save function for sounds is disabled (default setting)
On:
Save function for sounds is enabled
• MIDI
You can save the following settings for this group of functions:
• All MIDI settings (see chapter 6.3.3)
1:
Equal tuning (default setting)
2:
Pure major tuning
3:
Pure minor tuning
4:
Pythagorean tuning
Off:
Save function for MIDI settings is disabled (default setting)
5:
Meantone tuning
On:
Save function for MIDI settings is enabled
6:
Werckmeister tuning
7:
Kirnberger tuning
behringer.com
Function:
E8.2
Value:
On, Off
Description:
21
EUROGRAND EG2280USB/EG8280USB User Manual
• Tuning
An alternative procedure is described below:
You can save the following settings for this group of functions:
1) Use the POWER switch to switch the instrument off (if not already done).
• Transposition (see chapter 5.2)
• Fine tuning (see chapter 5.6.3)
2) Press and hold down the TRACK 1 and TRACK 2 buttons, then switch the
EG2280USB/EG8280USB back on.
• Tuning (see chapter 5.6.4)
Function:
E8.3
Value:
On, Off
Description:
Off:
Save function for tuning settings is disabled (default setting)
On:
Save function for tuning settings is enabled
• Soft pedal
You can save the following settings for this group of functions:
+
• Soft pedal function (see chapter 5.5.8)
• Soft pedal intensity (see chapter 5.6.2)
Function:
E8.4
Value:
On, Off
Description:
Off:
Save function for soft pedal settings is disabled
(default setting)
On:
Save function for soft pedal settings is enabled
5.6.6 Restoring the factory default settings
Use the following procedure to recall the factory default settings.
◊ Tip: All saved parameters as well as the music sequencer data will be
lost during either one of the following procedures.
1) Use the POWER switch to switch the instrument off (if not already done).
2) Play and hold down the top C key on the keyboard, then switch the
EG2280USB/EG8280USB back on.
3) Let go of the TRACK buttons after about 5 seconds.
6. Connection to External Equipment
The EG2280USB/EG8280USB provides a variety of connectors for connecting the
instrument to external devices.
!!
Caution
◊ Be sure that all devices are switched off before you make
any connection.
◊ NEVER connect the LINE IN connectors of the EG2280USB/EG8280USB
+
to its LINE OUT connectors. This will cause a feedback loop producing
high volume levels which could damage both the instrument and
your hearing!
6.1 Connecting external sound sources
The EG2280USB/EG8280USB is equipped with a stereo LINE IN connector for
connecting external sound sources to your digital piano. These signals are
reproduced through the internal loudspeakers and connected headphones.
If you wish to practice with musical accompaniment, you can use this input to
connect a CD player or drum computer. In the same way, you could connect an
external synthesizer or sound module and use its sound generator with your
instrument. An additional MIDI connection enables you to play an external sound
generator from the keyboard of the EG2280USB/EG8280USB (see chapter 6.3.1).
The keyboard also has a MIC input for the connection of dynamic or condenser
microphones, and an AUX IN jack for sound sources that use 1/8" plugs.
behringer.com
22
EUROGRAND EG2280USB/EG8280USB User Manual
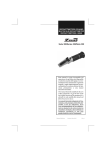
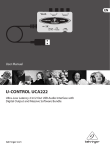
6.1.1 LINE IN jacks
The LINE IN jacks can be used to connect external sound sources such as
CD players, DVD players, or external sound modules that are being controlled by
the EG2280USB/EG8280USB’s MIDI function (see fig. 6.3). The following diagram
shows a wiring example comprising the EG2280USB/EG8280USB and a CD player.
You need one or two cables fitted with RCA plugs (see chapter 9.1.3). As an
alternative, you can also use a ¼" cable with an appropriate adapter plug.
CD Player
Microphone
MP3 Player
MD recorder
Keyboard
amplifier
LINE OUT
MIC IN
LINE IN
AUX IN
Digital Piano
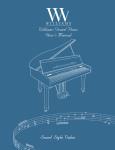
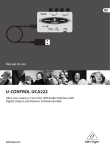
Fig. 6.2: Connecting amplifiers and recording equipment
1) Connect the LINE OUT jacks to the inputs of an external amplifier or
recording device.
Digital Piano
Fig. 6.1: Connecting external signal sources
1) Connect the outputs of the CD player to the LINE IN jacks of the
EG2280USB/EG8280USB.
6.1.2 AUX IN jack
This 1/8" jack is ideal for the connection of MP3 players, portable CD players,
MD players, etc. Most applications will require a 1/8" TRS cable, but adaptors may
also be used.
6.1.3 MIC IN jack
Connect a microphone to the MIC IN jack using a standard XLR cable. You may use
dynamic (handheld) or condenser microphones. The jack always supplies 15 V of
phantom power to enable the use of most condenser mics.
Adjust the input signal of the microphone with the GAIN knob. If your voice
begins to distort, turn the GAIN knob down.
NOTE: The internal effects do not affect the microphone input.
6.2 Connection to amplifiers and
recording equipment
The EG2280USB/EG8280USB is equipped with LINE OUT connectors for connecting
the digital piano to external keyboard amplifiers, P.A. systems or home stereo
systems. For performances in larger rooms (e.g. stages, hall) it can be necessary
to use external amplifiers.
You can also use the outputs to connect recording equipment (e.g. computer,
cassette recorder, MD recorder). Unlike the built-in music sequencer, recording on
external audio equipment gives you the advantage that you can play back your
music completely independently of the EG2280USB/EG8280USB. For example,
you can give your friends a recorded CD or MP3 or archive music pieces on any
recording medium.
behringer.com
!!
Caution
◊ Be sure to switch the EG2280USB/EG8280USB on BEFORE you
switch on the external amplifier, so as to avoid switch-on thumps
being amplified. Such signals could damage the amplifier and the
loudspeakers. Switch off the equipment in reverse order.
6.3 MIDI functions
MIDI is an interface and protocol for transmitting of playing data to other MIDI
equipment. The most important playing data are pitch and length of notes,
key velocity and channel volume, program changes and various controller data
generated, for example, by controllers such as the pedals.
The MIDI interface does not transmit electrical audio signals but control data
only . The MIDI protocol provides for the transmission of data on 16 independent
channels. Playing data are always channel-specific data.
The EG2280USB/EG8280USB is equipped with three MIDI jacks for connecting
additional MIDI sound modules or software/hardware sequencers:
• Use the MIDI OUT to connect additional synthesizers or a music computer
receiving MIDI data from the EG2280USB/EG8280USB.
• Use the MIDI IN to send playing data from other MIDI controller keyboards or
a music computer to the sound generator of the EG2280USB/EG8280USB.
• The MIDI THRU jacks passes on the MIDI data received via the MIDI IN jack
without modification. In combination with a music computer you can thus
integrate another keyboard or sound module into the MIDI chain comprising
EG2280USB/EG8280USB and music computer.
23
EUROGRAND EG2280USB/EG8280USB User Manual
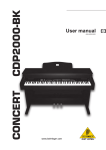
6.3.1 MIDI connection to other sound modules
You can use the EG2280USB/EG8280USB to control external sound modules
via MIDI. This allows you to use the keyboard and pedals of the digital
piano to control the sound generators of other synthesizers or sound
modules not equipped with a keyboard. When you also connect the audio
signal of the external sound module to the EG2280USB/EG8280USB,
as described in chapter 6.1, all sounds played in addition to the sounds of the
EG2280USB/EG8280USB can be heard through the internal loudspeakers.
The following illustration shows a set-up comprising the EG2280USB/EG8280USB
and a music computer. The connection of an external sound module is optional.
Audio
MIDI
The following illustration shows a set-up comprising the EG2280USB/EG8280USB
and an external sound module.
Sound module
Sound module
Audio
MIDI OUT
LINE IN
USB
MIDI
MIDI OUT
LINE IN
Digital Piano
Digital Piano
Fig. 6.3: Controlling external MIDI sound modules
1) Connect the MIDI OUT jack of the EG2280USB/EG8280USB to the MIDI IN jack
of the external sound module.
Fig. 6.4: USB connection with an external sound module.
1) Connect the piano's USB jack to a free USB port on your computer.
2) Connect the MIDI IN jack of the sound module to the MIDI OUT jack of the
EG2280USB/EG8280USB.
2) Be sure to set the MIDI transmit/receive channels of both instruments to the
same number (see chapter 6.3.3).
3) Connect the audio outputs of the sound module to the LINE IN jacks of the
EG2280USB/EG8280USB if you want to play back the sounds of the external
device through the digital piano loudspeakers.
3) Connect the audio outputs of the sound module to the LINE IN jacks of the
EG2280USB/EG8280USB, if you want to play back the sounds of the external
device through the digital piano loudspeakers.
6.3.3 MIDI settings
6.3.2 USB connection to a computer with
sequencing software
You can operate the EG2280USB/EG8280USB in combination with a sequencing
program such as “Cubase”, “Logic” or the included “energyXT2.5 Compact
BEHRINGER Edition.” Sequencing software gives you a wealth of powerful
functions to record and process MIDI data. For example, you can record several
tracks to create complex music pieces. Additional options are the production of
sheet music or playback of music pieces. What is more, you can transfer the data
of the built-in music sequencer to your computer for permanent archiving.
The EG2280USB/EG8280USB provides eight different functions to determine how
the instrument processes MIDI information.
◊ Please enter EDIT mode (see chapter 5.1) and select the
following functions.
• Setting the MIDI transmit channel
Use this function to set the transmit channel on which the
EG2280USB/EG8280USB is to send MIDI data. MIDI devices must send and receive
on the same MIDI channels to ensure successful MIDI communication.
Function:
E7.1
Value:
1 . . . 16, Off
Description:
1 . . . 16:
The EG2280USB/EG8280USB transmits MIDI data on the
specified MIDI channel. (Default setting: 1)
Off:
The EG2280USB/EG8280USB transmits no MIDI data
◊ In layer mode voice #1 transmits MIDI data on the specified MIDI
channel, while voice #2 transmits on the next higher channel.
behringer.com
24
EUROGRAND EG2280USB/EG8280USB User Manual
◊ Demo song and music sequencer data are not transmitted via the
MIDI output. However, you can transmit a music piece recorded
with the built-in music sequencer using the MIDI dump feature
(see “Sending music sequencer data” below).
• Setting the MIDI receive channel
Use this function to set the receive channel on which the EG2280USB/EG8280USB
is to receive MIDI data. MIDI devices must transmit and receive on the same MIDI
channels to ensure successful MIDI communication. Select the default setting
ALL for proper operation in combination with a music computer.
Function:
E7.2
Value:
All, 1-2, 1 . . . 16
Description:
All:
Simultaneous multi-timbral reception of MIDI data
on all 16 MIDI channels. Also known as "Omni" mode.
(Default setting)
1-2:
Reception of MIDI data on channels 1 and 2
1 . . . 16:
Reception of MIDI data on the specified MIDI channel
◊ The multi-timbral reception of MIDI data allows you to use the
EG2280USB/EG8280USB in combination with a sequencing program as a
sound generator for multi-track recordings (see chapter 6.3.2).
• Enable/disable sound generator (Local on/off)
This function allows you to determine whether the built-in sound generator
directly plays the notes you play on the keyboard or whether it only responds to
MIDI note information received via the MIDI IN jack. The latter setting is quite
useful, for example, in sequencer mode. A closed MIDI chain may cause the
EG2280USB/EG8280USB to play the same sound twice, before and after it is sent
to an external device.
When the EG2280USB/EG8280USB is set to Local Off, the MIDI data is only sent to
the sequencer. The notes are played only once when the MIDI signals come back
from the sequencer.
Function:
E7.3
Value:
On, Off
Description:
On:
Off:
Sound generator responds to keyboard and MIDI notes
(default setting)
Sound generator does not respond to the keyboard but to MIDI
notes only
• Accept/ignore program changes
Use this function to determine how the EG2280USB/EG8280USB responds to
MIDI program change commands. These commands are used, for example,
to select sounds of the EG2280USB/EG8280USB using MIDI commands sent from a
sequencing program. Conversely, program change commands can be sent via the
MIDI output of the EG2280USB/EG8280USB whenever you select a sound in the
TONE section (see chapter 9.2).
• Accept/ignore MIDI controller information
Use this function to determine how the EG2280USB/EG8280USB responds to MIDI
controller data. MIDI uses a variety of controller informaiton to control sound
changes (e.g. pedal status, volume, effect intensity).
Function:
E7. 5
Value:
On, Off
Description:
On:
Controller data are sent and received (default setting)
Off:
Controller data are neither sent nor received
◊ The EG2280USB/EG8280USB only responds to the commands listed
in the MIDI implementation chart if controller data are enabled
(see chapter 9.4).
• MIDI transposition
This function determines whether outgoing MIDI data are transposed
independently of the built-in sound generator. This can be useful to play the
sounds of an external sound module whose sound generator is controlled from
the keyboard of the EG2280USB/EG8280USB in a different pitch than the internal
sounds of the EG2280USB/EG8280USB.
Function:
E7.6
Value:
-12 . . . 12
Description:
0:
No transposition of the pitch at the MIDI output
(default setting)
1 ..1
. 2:
Pitch is transposed up by the number of halftones selected
-1 . . . -12:
Pitch is transposed down by the number of halftones selected
◊ This setting has no effect on the sound generator of the
EG2280USB/EG8280USB.
• Send control panel settings (snapshot)
Use this function to transmit the current settings of the EG2280USB/EG8280USB
(e.g. sounds and effects, channel volume) via the MIDI output. This type of
transmission only includes system-exclusive data packages (MIDI dump).
Function:
E7.7
Value:
-
Description:
1) Connect the EG2280USB/EG8280USB to
a computer or hardware sequencer as
described in chapter 6.3.2.
2) Set the MIDI sequencer to
reception-ready mode.
3) Select the function E7.7 in EDIT mode.
Function:
E7.4
4) Press the +/YES button to execute
the transmission.
Value:
On, Off
When the transmission is complete, the display shows End.
◊ You can send the data back to the EG2280USB/EG8280USB at
Description:
On:
Program change commands are sent and received
(default setting)
Off:
Program change commands are neither sent nor received
behringer.com
a later date. To do this, use the MIDI IN jack to connect the
EG2280USB/EG8280USB to the device that received the data before.
As soon as you start the transmission from the MIDI sequencer,
the EG2280USB/EG8280USB will automatically receive the data.
Make sure that neither DEMO, EDIT or music sequencer mode is active!
25
EUROGRAND EG2280USB/EG8280USB User Manual
• Sending music sequencer data
6.4.2 USB audio and MIDI settings
Use this function to send music sequencer data via the MIDI output of the
EG2280USB/EG8280USB. This allows you to archive recorded music pieces on your
music computer or hardware MIDI sequencer. This type of transmission is only for
system-exclusive data packages (MIDI dump), but not for MIDI playing data.
When you connect the EG2280USB/EG8280USB to your computer for the first
time, you will likely need to perform certain setup procedures in your software
to ensure proper audio and MIDI interface. Once the USB cable is connected,
the computer will recognize two different USB devices: Audio and MIDI.
This example will use the included energyXT2.5 Compact BEHRINGER Edition
software, but most recording and sequencing programs use a similar procedure.
Function:
E7.8
Value:
-
Description:
1) Connect the EG2280USB/EG8280USB to
a computer or hardware sequencer as
described in chapter 6.3.2.
2) Set the MIDI sequencer to
reception-ready mode.
3) Select the function E7.8 in EDIT mode.
4) Press the +/YES button to execute
the transmission.
NOTE: PC users are encouraged to install the ASIO driver for low-latency USB
connection. The driver is included on the DVD. Mac computers do not require any
additional drivers to achieve low-latency operation.
Follow these steps to connect the EG2280USB/EG8280USB to your computer.
1. Connect the included USB cable to the EG2280USB/EG8280USB and to a free
USB port on your computer.
2. Your computer should automatically recognize the USB audio and MIDI
connection. If so, you may continue to the software setup. If not, you must
manually select the audio and MIDI connections.
3. If using a PC, click on the Start menu and select Control Panel.
When the transmission is complete, the display shows End.
4. When the new window opens, select Sounds and Audio Devices.
◊ You can send the data back to the EG2280USB/EG8280USB at
5. In the next window, click the Audio tab.
a later date. To do this, use the MIDI IN jack to connect the
EG2280USB/EG8280USB to the device that received the data before.
As soon as you start the transmission from the MIDI sequencer,
the EG2280USB/EG8280USB will automatically receive the data.
Make sure that neither DEMO, EDIT or music sequencer mode is active!
6.4 USB connection
The EG2280USB/EG8280USB features a built-in USB audio/MIDI interface to
open up a world of computer software compatibility. The audio portion allows
you to record your performances using studio software such as the included
energyXT2.5 Compact BEHRINGER Edition, as well as play back audio from
your computer through the keyboard’s speakers. You can also send MIDI data
to a sequencer software program on your computer to trigger synth tones,
drum beats, transport functions, etc. The USB connection can also receive
MIDI data from the computer, allowing your sequencer software to utilize the
EG2280USB/EG8280USB's sound generator and speakers.
6.4.1 Audio routing
The USB audio output of the EG2280USB/EG8280USB includes the tones
generated by the keys and internal sound generator, as well as the signals
connected to the LINE IN, AUX IN and MIC IN jacks. However, the VOLUME control
and SPEAKERS OFF button do not affect this signal.
The USB audio input returning from the computer is not affected by the
EG2280USB/EG8280USB's sound generator or effects engine, and goes directly to
the LINE OUT jacks, PHONES jacks and internal speakers. The VOLUME control and
SPEAKERS OFF button only affect the PHONES and speakers.
behringer.com
6. Select USB AUDIO DEVICE in the Sound playback, Sound recording and MIDI
music playback menus. Your computer is now set to send and receive audio
and MIDI signals from the EG2280USB/EG8280USB.
Follow these steps to set up the audio connection in your music software.
1. Open energyXT2.5 Compact BEHRINGER Edition.
2. Click the ‘File’ tab and select ‘Setup.’
3. A window will pop up with several options. Click the ‘Audio’ tab.
4. Select ‘ASIO’ in the ‘Device’ pull down menu. In the next menu, select the
‘BEHRINGER USB Audio’ driver.
5. In the ‘Sample Rate’ menu, we recommend selecting ‘44100.’
6. In the ‘Record’ menu, select ‘16-bit.’
7. In the ‘Audio inputs’ menu, select ‘USB AUDIO DEVICE.’
8. In the ‘Audio outputs’ menu, select ‘USB AUDIO DEVICE.’
Follow these steps to set up the MIDI connection for the EG2280USB/EG8280USB.
1. Repeat steps 1 and 2 above.
2. Once the Setup window appears, click the ‘MIDI’ tab.
3. For both MIDI inputs and MIDI outputs, select ‘USB AUDIO DEVICE.’
NOTE: When USB MIDI is connected to the EG2280USB/EG8280USB, it overrides
the MIDI IN and THRU jacks. Only the MIDI OUT jack can be used in conjunction
with USB MIDI.
26
EUROGRAND EG2280USB/EG8280USB User Manual
7. Troubleshooting
Problem
Remedy
The instrument cannot be switched on
•• Check the connection between mains plug and wall outlet (see chapter 2.1).
•• Check the position of the VOLUME control (see chapter 2.2).
•• Check the SPEAKER OFF button status (see chapter 4.4).
•• Check that the sound generator is switched on (see chapter 6.3.3).
•• Check that the pedal cable is properly connected to the PEDAL jack on the underside of the piano
(see chapter 3.3).
No sound
The foot pedals do not work properly
The left foot pedal has no effect
Audio signal is distorted
Sound is too low/high
Effect is not audible
Music sequencer/DEMO mode cannot be selected
The music recorded with the music sequencer
has been lost
Music sequencer playback cannot be started
The music sequencer has not stored the
entire recording
The display shows FUL
The music piece recorded on the music sequencer
plays back too slow/fast
•• Check in EDIT menu E4.1 that the soft pedal function is enabled (see chapter 5.4.8).
•• Cut back the volume using the VOLUME control.
•• Check whether the LED above the TRANSPOSE switch is lit. If so, transposition is active.
Press the button to switch if off.
•• Perhaps no effect has been selected or its intensity is too low. Check that the REVERB and
SPECIAL LEDs are lit and select an appropriate effect intensity (see chapters 4.2.2).
•• DEMO mode must not be active when you switch to music sequencer mode.
Conversely, the music sequencer must be off before you can switch to DEMO mode.
•• When you re-record a track,this will automatically erase the previously recorded data on
this track.
•• Playback can only be started when the memory of the music sequencer contains data.
•• Perhaps no data has been recorded.
•• Perhaps no tracks have been activated for playback. Proceed as described in chapter 5.4.3.
•• The music sequencer is limited in its capacity (approx. 10,000 notes). When the memory is full,
all further data will be lost. Play only as many notes as the sequencer can store before the display
starts flashing, thus signaling that the memory is full.
•• The memory of the music sequencer is full. If you do not want to erase/re-record your recording,
be sure to save the recorded song via MIDI to a music computer (see chapters 6.3.2 and 6.3.3)
before you start a new recording.
•• The playback tempo of the music sequencer follows the current tempo setting. Press the MODE
button until the TEMPO LED lights up, then simultaneously press the DOWN and UP buttons to
play back the recording at its original tempo.
When the instrument is switched off all settings
are lost
•• Check the settings in the EDIT menus E1 and E2.1 and adjust them if necessary, as described in
chapter 5.5.3 and 5.5.4. Standard setting: 440 Hz, equal tuning.
•• Check whether one of the LEDs above the KEYS button is lit. If necessary activate the dynamic
response of your choice by pressing the KEYS button (see chapter 3.1).
•• Some sounds do not respond to key velocity (see chapter 9.2).
•• When first switched on, the piano always uses the default settings. To save your personal
settings please set the memory function as described in chapter 5.5.5.
The piano does not play back notes received
via MIDI IN
•• Set the receive channel on which the piano is to receive MIDI data in the EDIT menu E7.2,
as described in chapter 6.3.3.
The piano does not transmit MIDI data
via MIDI OUT
•• Set the transmit channel, on which the piano is to send MIDI data, in the EDIT menu E7.1,
as described in chapter 6.3.3. Demo and music sequencer data are not transmitted via MIDI.
•• The piano supports only those commands listed in the MIDI Implementation Chart.
•• Be sure that the device sending MIDI data and the piano do not have a MIDI filter activated
(see chapter 6.3.3).
•• Check whether one of the LEDs above the SPECIAL button is lit, i.e. whether a modulation effect is
active. If so, press the button until all LEDs are off, i.e. no effect is active.
•• Perhaps you have selected two sounds at the same time. Press one of the sound buttons in the
TONE section to select a single sound.
•• An internal error has occurred. Switch the instrument off, wait for about 30 seconds, then switch
it back on. If the error message shows again, please contact your BEHRINGER support desk.
Further information can be found at: behringer. com.
The tuning of the instrument does not match the
tuning of other instruments
Key velocity does not work properly
The piano does not respond to all MIDI commands
The piano sounds strange
The display shows ERR
behringer.com
27
EUROGRAND EG2280USB/EG8280USB User Manual
8. Specifications
Keyboard
USB
88 weighted keys with hammer action (A-1 to C7)
Sound Generation
RSM (Real Sound Modeling) dynamic stereo sampling
Polyphony
Connector
Type B
Converter
16-bit
Sample Rate
48 kHz
MIDI
IN, OUT
Audio
Stereo In/Out
64 notes max.
Amplifier
Sounds
Output power 2 x 40 W
14
Power Supply
Effects
Room effects 4 types (CHAMBER, CONCERT, CHURCH, THEATER)
Mains voltages and fuse values
100 - 120 V~, 50/60 Hz T 2,50 A H 250 V
220 - 230 V~, 50/60 Hz T 1,25 A H 250 V
Modulation effects 4 types (CHORUS, FLANGER, TREMOLO, DELAY)
Power consumption
approx. 135 W
Sequencer
Dimensions/Weight
Type 2-track
Memory 1 Song, approx. 10,000 notes
Pedals
3 (soft-, sostenuto-, damper)
MIC IN
Connector
XLR, balanced
Phantom Power
15 V
AUX IN
Connector
1/8" TRS jack
LINE IN
Connectors RCA jacks, unbalanced
Impedance approx. 10 kΩ
LINE OUT
Connectors RCA, unbalanced
Impedance approx. 100 Ω, unbalanced
Max. output level +7 dBu
Phones
Connectors ¼" TRS jack, 1/8" TRS jack
Max. output level +13 dBu/120 mW @ 100 Ω load
MIDI
Connectors
behringer.com
IN, OUT, THRU
EG2280USB
Dimensions (H x W x D)
34.65 x 55.31 x 20.67"
880 x 1,405 x 525 mm
Weight
151.7 lbs / 68.8 kg
EG8280USB
Dimensions (H x W x D)
33.2 x 54.3 x 39.6"
843 x 1,378 x 1,005 mm
Weight
199.7 lbs / 90.6 kg
28
EUROGRAND EG2280USB/EG8280USB User Manual
9.1.2 RCA cables
9. Appendix
9.1 Cables
Below you will find an overview of all cables you need to connect your digital
piano. The cables are not supplied with the piano. Depending on the intended
use, adapter cables will be necessary to interface the various connectors. You can
use adapter cables or plugs (e.g. ¼" to RCA). Cable adapters are better than
adapter plugs, as the latter may affect the signal quality due to insufficient
contact of the plugs with each other.
RCA cables are often used for hi-fi applications to connect CD players,
MD recorders and other devices to home stereo systems. You will need this type
of cable to connect the EG2280USB/EG8280USB to hi-fi recording equipment.
Usually, these cables are supplied in pairs to form one stereo cable. The plugs
are in most cases red (right) and white (left). Make sure that the wiring between
recording device and EG2280USB/EG8280USB follows this color code, so as not to
mix up the left/right signals.
9.1.1 Unbalanced ¼" cable
Unbalanced ¼" cables are equipped with a ¼" TS plugs at each end. They are
used to connect external keyboard amps and devices with ¼" outputs
(e.g. synthesizers, drum computers) to the EG2280USB/EG8280USB.
tip
tip
sleeve
shield
sleeve
Fig. 9.2: Hi-fi RCA cable
tip
signal
9.1.3 ¼" to RCA cable
sleeve
ground/shield
tip
¼" to RCA cables are required for connecting a hi-fi playback device
(e.g. CD player) to the EG2280USB/EG8280USB. As an alternative, you can also use
an unbalanced ¼" cable with an appropriate RCA adapter.
Sleeve
Sleeve
Tip
Tip
sleeve
strain relief clamp
Fig. 9.3: ¼" to RCA cable
9.1.4 MIDI cables
strain relief clamp
sleeve
MIDI cables are required for connecting MIDI equipment. These cables have a
5-pin DIN plug at each end. Be sure to use cables marked as MIDI cables (wiring as
shown), since there are also similar cables with a different wiring available for
hi-fi equipment. MIDI cable lengths should be as short as possible. Avoid cable
lengths exceeding 10 m, as these could lead to errors during the transmission
of signals.
tip
Unused
Pin 3
Unused
Pin 2
sleeve
ground/shield
Pin 1
(ground)
tip
signal
Fig. 9.1: Unbalanced ¼" cable with ¼" TS plugs
behringer.com
Fig. 9.4: MIDI plug pin assignment
29
EUROGRAND EG2280USB/EG8280USB User Manual
9.1.5 1/8" TRS cable
A 1/8" to 1/8" TRS cable is necessary to connect a CD or MP3 player to the
EG2280USB/EG8280USB AUX IN jack. This carries a stereo signal in a single cable.
tip left signal
ring right signal
sleeve ground/shield
tip
sleeve
strain relief clamp
strain relief clamp
sleeve
tip
sleeve ground/shield
ring right signal
tip left signal
9.1.6 Headphones
The PHONES inputs of the EG2280USB/EG8280USB accept both 1/4" and 1/8" plugs.
To use both jacks simultaneously, you may need an adapter.
behringer.com
30
EUROGRAND EG2280USB/EG8280USB User Manual
9.2 Presets on the EG2280USB/EG8280USB
MIDI commands
Sound
VINTAGE PIANO
Description
Classic sound of a concert grand piano
with a soft tonal character
Brilliant sound of a concert grand piano,
particularly suited to pop and rock music
Typical bell-like FM electric piano of
the 80's
Nostalgic retro sound of a classic
electric piano
CEMBALO 1
Typical sound of a baroque harpsichord
CEMBALO 2
Full dual-octave harpsichord sound
VIBES
Extremely dynamic vibraphone sound
CHURCH 1
CHURCH 2
Soft wooden pipe sound of a small
baroque organ
Sound of full-size church organ with
all registers
CLICK ORGAN
Sound of a typical jazz organ with
percussive attack
STRINGS
Natural sound of a big string orchestra
PAD
Soft sound of a string ensemble with
slow attack
Mixed choir with pitch-dependent
combination of voices
Sound of a classical concert guitar with a
warm character
GRAND 1
GRAND 2
FM PIANO
CHOIR
NYLON GUITAR
behringer.com
Key velocity
Release
samples
MSB/LSB
Program change
commands
0/122
0
0/112
0
0/122
5
0/122
4
0/122
6
0/123
6
0/122
11
0/123
19
0/122
19
0/122
16
0/122
48
0/122
49
0/122
52
0/122
24
31
EUROGRAND EG2280USB/EG8280USB User Manual
9.3 List of demo music pieces included
No.
1
2
3
4
5
6
7
8
9
10
11
12
13
14
15
Piece
Invention no. 1, C major, BWV 772
Piano sonata no. 16, 1st movement, C major, KV 545
Piano sonata, op. 13, no. 8 "Pathétique", 2nd mvt., A flat major
Piano sonata, op. 49, no. 2, 1st movement, G major
Impromptu, op. 90, no. 2, E flat major
Frühlingslied ("Spring Song"), op. 62, no. 6, A major
Fantasie Impromptu, op. 66, c sharp minor
Prelude, op.28, no. 15 "Raindrop", D flat major
Etude, op. 10, no. 12 "Revolution", c minor
Waltz, op. 64, no. 1 "Minute Waltz/Petit chien", D flat major
Waltz, op. 64, no. 2, c sharp minor
Liebestraum no. 3, A flat major
Arabesque no. 1, E major
Children´s Corner: Golliwog´s Cakewalk, E flat major
Maple Leaf Rag, A flat major
Composer
Johann Sebastian Bach
Wolfgang Amadeus Mozart
Ludwig van Beethoven
Ludwig van Beethoven
Franz Schubert
Felix Mendelssohn Bartholdy
Frédéric Chopin
Frédéric Chopin
Frédéric Chopin
Frédéric Chopin
Frédéric Chopin
Franz Liszt
Claude Debussy
Claude Debussy
Scott Joplin
9.4 MIDI implementation chart
Function
Basic Channel
Mode
Note Number
Velocity
After Touch
Pitch Bend
Control Change
Default
Changed
Default
Messages
Altered
True Voice
Note ON
Note OFF
Keys
Channels
0.32
7
11
64
66
67
91
94
Program Change
System Exclusive
System Common
System Real Time
Aux Messages
Notes
O = YES, X = NO
Mode 1:
Mode 3:
behringer.com
Song Pos.
Song Sel.
Tune
Clock
Commands
Local ON/OFF
All notes OFF
Active Sense
Reset
All sound off
Reset all ctrl
OMNI ON, POLY
OMNI OFF, POLY
Transmitted
1
1 - 16
3
X
X
9-120, v=1-127
X
O
X
X
X
X
O
O
O
O
O
O
O
O
O
O
X
X
X
O
O
X
O
O
X
O
O
Recognized
1
1 - 16
1
X
X
0-127, v=1-127
0-127
O
X
X
X
X
O
O
O
O
O
O
O
O
O
O
X
X
X
O
O
O (122)
O (123-125)
O
X
O (120, 126, 127)
O (121)
Remarks
Poly mode only
Bank select
Volume
Expression
Damper
Sostenuto
Soft pedal
Reverb depth
Effect depth
32
EUROGRAND EG2280USB/EG8280USB User Manual
9.5 EDIT parameter
Category
Abbreviated name
Description
Function
Values
Default setting
Tuning
Fine tuning
General fine tuning in 1/5-Hz steps
E1
427 - 453
440
Tuning
Tuning
Selection of temperament (scale)
E2.1
1 ... 7
1
(equal temper)
Basic note
Selection of basic note
of temperament
E2.2
C ... B
C
Volume
Volume ratio of voice #1 vs. voice #2
E3.1
0 . . . 20
-
Detune
Detuning of voice #1 vs. voice #2
E3.2
-10 . . . 10
-
Octave transposition voice #1
Octave position of voice #1
E3. 3
-1, 0, 1
-
Octave transposition voice #2
Octave position of voice #2
E3.4
-1, 0, 1
-
Effect intensity voice #1
Portion of voice #1 volume
channeled to the effect
E3. 5
0 . . . 20
-
Effect intensity voice #2
Portion of voice #2 volume
channeled to the effect
E3.6
0 . . . 20
-
Reset
Reset of layer mode settings
E3.7
-
-
Function
Function of soft pedal:
1) soft pedal, 2) music sequencer
E4.1
1, 2
1
Effect
Intensity of soft pedal on sound
E4.2
1 ... 5
3
Metronome
Volume
Volume of metronome click
E5
1 . . . 20
10
Sequencer
Dimmed volume
Volume of the muted track in music
sequencer mode
E6
0 . . . 20
0
MIDI
Transmit channel
MIDI channel on which MIDI data
are transmitted
E7.1
1 . . . 16, OFF
1
Receive channel
MIDI channel on which MIDI data
are received
E7.2
All, 1-2, 1 . . . 16
All
Sound generator
(Local on/off)
Enables/disables the built-in sound
generator for keyboard data
E7. 3
On, Off
On
Program change
Accept or ignore program change
data (send/receive)
E7.4
On, Off
On
Controller commands
Accept or ignore controller
commands (send/receive)
E7. 5
On, Off
On
Transposition
Transposition of notes during
MIDI transmission
E7.6
-12 . . . 12
0
Control panel settings
MIDI transmission of all current
settings (dump)
E7.7
-
-
Music sequencer data
MIDI transmission of music
sequencer data (dump)
E7.8
-
-
Sounds
Permanent saving of sound settings
E8.1
On, Off
Off
MIDI
Permanent saving of MIDI settings
E8.2
On, Off
Off
Tuning
Permanent saving of transposition
and tunings
E8. 3
On, Off
Off
Soft pedal
Permanent saving of
soft pedal settings
E8.4
On, Off
Off
Layer mode
Soft pedal
Save
*Default settings depend on the selected sound combination
behringer.com
33
EUROGRAND EG2280USB/EG8280USB User Manual
FEDERAL COMMUNICATIONS
COMMISSION COMPLIANCE
INFORMATION
EUROGRAND EG2280USB/EG8280USB
Responsible party name:
MUSIC Group Services USA, Inc.
Address:
18912 North Creek Parkway,
Suite 200 Bothell, WA 98011,
USA
Phone/Fax No.:
Phone: +1 425 672 0816
Fax: +1 425 673 7647
EUROGRAND EG2280USB/EG8280USB
complies with the FCC rules as mentioned in the following paragraph:
This equipment has been tested and found to comply with the limits for a Class B
digital device, pursuant to part 15 of the FCC Rules. These limits are designed
to provide reasonable protection against harmful interference in a residential
installation. This equipment generates, uses and can radiate radio frequency
energy and, if not installed and used in accordance with the instructions, may cause
harmful interference to radio communications. However, there is no guarantee that
interference will not occur in a particular installation. If this equipment does cause
harmful interference to radio or television reception, which can be determined
by turning the equipment off and on, the user is encouraged to try to correct the
interference by one or more of the following measures:
• Reorient or relocate the receiving antenna.
• Increase the separation between the equipment and receiver.
• Connect the equipment into an outlet on a circuit different from that to which the
receiver is connected.
• Consult the dealer or an experienced radio/TV technician for help.
This device complies with Part 15 of the FCC rules. Operation is subject to the
following two conditions:
(1) this device may not cause harmful interference, and
(2) this device must accept any interference received, including interference that may
cause undesired operation.
Important information:
Changes or modifications to the equipment not expressly approved by MUSIC Group
can void the user’s authority to use the equipment.
behringer.com
behringer.com