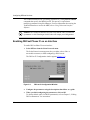
1
Configuring DECnet
Services
Router Software Version 11.0
Site Manager Software Version 5.0
Part No. 114050 Rev. A
August 1996
4401 Great America Parkway
Santa Clara, CA 95054
8 Federal Street
Billerica, MA 01821
Copyright © 1988–1996 Bay Networks, Inc.
All rights reserved. Printed in the USA. August 1996.
The information in this document is subject to change without notice. The statements, configurations, technical data,
and recommendations in this document are believed to be accurate and reliable, but are presented without express or
implied warranty. Users must take full responsibility for their applications of any products specified in this document.
The information in this document is proprietary to Bay Networks, Inc.
The software described in this document is furnished under a license agreement and may only be used in accordance
with the terms of that license. A summary of the Software License is included in this document.
Restricted Rights Legend
Use, duplication, or disclosure by the United States Government is subject to restrictions as set forth in subparagraph
(c)(1)(ii) of the Rights in Technical Data and Computer Software clause at DFARS 252.227-7013.
Notice for All Other Executive Agencies
Notwithstanding any other license agreement that may pertain to, or accompany the delivery of, this computer
software, the rights of the United States Government regarding its use, reproduction, and disclosure are as set forth in
the Commercial Computer Software-Restricted Rights clause at FAR 52.227-19.
Trademarks of Bay Networks, Inc.
ACE, AFN, AN, BCN, BLN, BN, BNX, CN, FN, FRE, GAME, LN, Optivity, PPX, SynOptics, SynOptics
Communications, Wellfleet and the Wellfleet logo are registered trademarks and ANH, ASN, Bay•SIS, BCNX,
BLNX, EZ Install, EZ Internetwork, EZ LAN, PathMan, PhonePlus, Quick2Config, RouterMan, SPEX,
Bay Networks, Bay Networks Press, the Bay Networks logo and the SynOptics logo are trademarks of
Bay Networks, Inc.
Third-Party Trademarks
All other trademarks and registered trademarks are the property of their respective owners.
Statement of Conditions
In the interest of improving internal design, operational function, and/or reliability, Bay Networks, Inc. reserves the
right to make changes to the products described in this document without notice.
Bay Networks, Inc. does not assume any liability that may occur due to the use or application of the product(s) or
circuit layout(s) described herein.
Portions of the code in this software product are Copyright © 1988, Regents of the University of California. All rights
reserved. Redistribution and use in source and binary forms of such portions are permitted, provided that the above
copyright notice and this paragraph are duplicated in all such forms and that any documentation, advertising materials,
and other materials related to such distribution and use acknowledge that such portions of the software were
developed by the University of California, Berkeley. The name of the University may not be used to endorse or
promote products derived from such portions of the software without specific prior written permission.
SUCH PORTIONS OF THE SOFTWARE ARE PROVIDED “AS IS” AND WITHOUT ANY EXPRESS OR
IMPLIED WARRANTIES, INCLUDING, WITHOUT LIMITATION, THE IMPLIED WARRANTIES OF
MERCHANTABILITY AND FITNESS FOR A PARTICULAR PURPOSE.
In addition, the program and information contained herein are licensed only pursuant to a license agreement that
contains restrictions on use and disclosure (that may incorporate by reference certain limitations and notices imposed
by third parties).
ii
114050 Rev. A
Bay Networks Software License
Note: This is Bay Networks basic license document. In the absence of a
software license agreement specifying varying terms, this license -- or the
license included with the particular product -- shall govern licensee’s use of
Bay Networks software.
This Software License shall govern the licensing of all software provided to licensee by Bay Networks (“Software”).
Bay Networks will provide licensee with Software in machine-readable form and related documentation
(“Documentation”). The Software provided under this license is proprietary to Bay Networks and to third parties from
whom Bay Networks has acquired license rights. Bay Networks will not grant any Software license whatsoever, either
explicitly or implicitly, except by acceptance of an order for either Software or for a Bay Networks product
(“Equipment”) that is packaged with Software. Each such license is subject to the following restrictions:
1.
Upon delivery of the Software, Bay Networks grants to licensee a personal, nontransferable, nonexclusive license
to use the Software with the Equipment with which or for which it was originally acquired, including use at any
of licensee’s facilities to which the Equipment may be transferred, for the useful life of the Equipment unless
earlier terminated by default or cancellation. Use of the Software shall be limited to such Equipment and to such
facility. Software which is licensed for use on hardware not offered by Bay Networks is not subject to restricted
use on any Equipment, however, unless otherwise specified on the Documentation, each licensed copy of such
Software may only be installed on one hardware item at any time.
2.
Licensee may use the Software with backup Equipment only if the Equipment with which or for which it was
acquired is inoperative.
3.
Licensee may make a single copy of the Software (but not firmware) for safekeeping (archives) or backup
purposes.
4.
Licensee may modify Software (but not firmware), or combine it with other software, subject to the provision
that those portions of the resulting software which incorporate Software are subject to the restrictions of this
license. Licensee shall not make the resulting software available for use by any third party.
5.
Neither title nor ownership to Software passes to licensee.
6.
Licensee shall not provide, or otherwise make available, any Software, in whole or in part, in any form, to any
third party. Third parties do not include consultants, subcontractors, or agents of licensee who have licensee’s
permission to use the Software at licensee’s facility, and who have agreed in writing to use the Software only in
accordance with the restrictions of this license.
7.
Third-party owners from whom Bay Networks has acquired license rights to software that is incorporated into
Bay Networks products shall have the right to enforce the provisions of this license against licensee.
8.
Licensee shall not remove or obscure any copyright, patent, trademark, trade secret, or similar intellectual
property or restricted rights notice within or affixed to any Software and shall reproduce and affix such notice on
any backup copy of Software or copies of software resulting from modification or combination performed by
licensee as permitted by this license.
114050 Rev. A
iii
Bay Networks Software License (continued)
9.
Licensee shall not reverse assemble, reverse compile, or in any way reverse engineer the Software. [Note: For
licensees in the European Community, the Software Directive dated 14 May 1991 (as may be amended from time
to time) shall apply for interoperability purposes. Licensee must notify Bay Networks in writing of any such
intended examination of the Software and Bay Networks may provide review and assistance.]
10. Notwithstanding any foregoing terms to the contrary, if licensee licenses the Bay Networks product “Site
Manager,” licensee may duplicate and install the Site Manager product as specified in the Documentation. This
right is granted solely as necessary for use of Site Manager on hardware installed with licensee’s network.
11. This license will automatically terminate upon improper handling of Software, such as by disclosure, or Bay
Networks may terminate this license by written notice to licensee if licensee fails to comply with any of the
material provisions of this license and fails to cure such failure within thirty (30) days after the receipt of written
notice from Bay Networks. Upon termination of this license, licensee shall discontinue all use of the Software
and return the Software and Documentation, including all copies, to Bay Networks.
12. Licensee’s obligations under this license shall survive expiration or termination of this license.
iv
114050 Rev. A
Contents
Configuring DECnet Services
About This Guide
Before You Begin .............................................................................................................xiii
Conventions .................................................................................................................... xiv
Acronyms ......................................................................................................................... xv
Ordering Bay Networks Publications ............................................................................... xv
Technical Support and Online Services
Bay Networks Customer Service ...................................................................................xviii
Bay Networks Information Services ................................................................................ xix
World Wide Web ...................................................................................................... xix
Customer Service FTP ............................................................................................. xix
Support Source CD ................................................................................................... xx
CompuServe ............................................................................................................. xx
InfoFACTS ................................................................................................................ xxi
How to Get Help ....................................................................................................... xxi
Chapter 1
DECnet Overview
DECnet Network Organization .......................................................................................1-1
DECnet Phase IV Organization ................................................................................1-1
DECnet Phase V Organization .................................................................................1-3
Routing DECnet Packets across the Network ................................................................1-4
The Routing Process ................................................................................................1-5
Update Process .................................................................................................1-5
Listening Process ..............................................................................................1-6
Decision Process ...............................................................................................1-6
Forwarding Process ...........................................................................................1-8
The Designated Router ............................................................................................1-9
114050 Rev. A
v
DECnet IV to V Transition .............................................................................................1-10
Translating DECnet Addresses ..............................................................................1-10
Translating Data Packets ........................................................................................1-11
Phase IV to Phase V ..............................................................................................1-12
Phase V to Phase IV ..............................................................................................1-12
Advertising Routes .................................................................................................1-13
DECnet IV to V Basic Transition Strategy ..............................................................1-13
Static Routes ................................................................................................................1-14
Static Adjacency Support .............................................................................................1-16
For More Information ....................................................................................................1-19
Chapter 2
Enabling DECnet Services
Enabling DECnet Phase IV on an Interface ....................................................................2-2
Chapter 3
Editing DECnet Parameters
Accessing DECnet Parameters ......................................................................................3-2
Editing DECnet Global Parameters ................................................................................3-3
DECnet Global Parameter Descriptions ...................................................................3-4
Editing DECnet Interface Parameters .............................................................................3-9
DECnet Interface Parameter Descriptions .............................................................3-11
Configuring Static Routes .............................................................................................3-18
Adding a Static Route ............................................................................................3-18
DECnet Static Route Parameter Descriptions .................................................3-19
Editing Static Route Parameters ............................................................................3-23
Deleting a Static Route ..........................................................................................3-23
Configuring Static Adjacencies .....................................................................................3-23
Adding a Static Adjacency .....................................................................................3-24
DECnet Static Adjacency Parameter Descriptions ..........................................3-27
Editing Static Adjacency Parameters .....................................................................3-29
Deleting a Static Adjacency ...................................................................................3-30
Configuring the DECnet IV to V Transition ...................................................................3-30
Creating the DECnet IV to V Transition ..................................................................3-31
DECnet IV to V Transition Parameter Descriptions .........................................3-31
Editing the DECnet IV to V Transition Parameters .................................................3-33
vi
114050 Rev. A
Deleting the DECnet IV to V Transition ..................................................................3-33
Deleting DECnet from the Router .................................................................................3-34
Appendix A
DECnet Parameter Default Settings
Index
114050 Rev. A
vii
Figures
Figure 1-1.
Figure 1-2.
Figure 1-3.
Figure 1-4.
Figure 1-5.
Figure 1-6.
DECnet Phase IV Address .......................................................................1-2
Bay Networks Router with Multiple DECnet Addresses ...........................1-3
Calculating the Least-Cost Path ...............................................................1-6
Least-Cost Path to a Destination .............................................................1-8
DECnet Phase IV to Phase V Address Mapping ...................................1-11
Translation of a DECnet Phase IV Data Packet to a
Phase V CLNP Packet ...........................................................................1-12
Figure 1-7. Static Routes Defined for Routers Residing in Different Areas ..............1-15
Figure 1-8. Static Adjacencies Defined for Routers Residing in the Same Area ......1-17
Figure 1-9. Static Adjacencies Defined for Routers Residing
in Different Areas ...................................................................................1-18
Figure 2-1. DECnet IV Configuration Window ............................................................2-2
Figure 3-1. Configuration Manager Window ...............................................................3-2
Figure 3-2. Edit DECnet Global Parameters Window .................................................3-3
Figure 3-3. DECnet IV Interface List Window ...........................................................3-10
Figure 3-4. DECnet Static Routes List Window ........................................................3-18
Figure 3-5. DECnet Static Routes Configuration Window ........................................3-19
Figure 3-6. Circuit List Window ................................................................................3-24
Figure 3-7. Circuit Definition Window .......................................................................3-25
Figure 3-8. DECnet Static Adjacent Hosts List Window ...........................................3-26
Figure 3-9. DECnet Static Adjacency Configuration Window ...................................3-26
Figure 3-10. Create DECnet IV to V Transition Parameters Window .........................3-31
114050 Rev. A
ix
Tables
Table 1-1.
Table A-1.
Table A-2.
Table A-3.
Table A-4.
Table A-5.
114050 Rev. A
Router Forwarding Based on the Destination Address
in the Packet Header ................................................................................1-9
DECnet Phase IV Global Parameters ..................................................... A-1
DECnet Phase IV Interface Parameters ................................................. A-2
DECnet Static Route Parameters ........................................................... A-2
DECnet Static Adjacency Parameters .................................................... A-3
DECnet IV to V Transition Parameters .................................................... A-3
xi
About This Guide
If you are responsible for configuring Bay Networks™ router software for DECnet
services, you need to read this guide. It explains
•
How DECnet services work (Chapter 1)
•
How you configure a DECnet interface (Chapter 2)
•
How to edit DECnet global and interface parameters and configure static
routes, static adjacencies, and the DECnet IV to V Transition (Chapter 3)
Before You Begin
Before using this guide, you must complete the following procedures. For a new
router:
•
Install the router (refer to the installation manual that came with your router).
•
Connect the router to the network and create a pilot configuration file (refer to
Quick-Starting Routers and BNX Platforms, Connecting BayStack AN and
ANH Systems to a Network, or Connecting ASN Routers and BNX Platforms
to a Network).
•
Create and save a configuration file that has at least one DECnet interface
(refer to Configuring Routers for instructions).
•
Retrieve the configuration file in local, remote, or dynamic mode (refer to
Configuring Routers for instructions).
Make sure that you are running the latest version of Bay Networks Site Manager
and router software. For instructions, refer to Upgrading Routers from Version
7–10.xx to Version 11.0.
114050 Rev. A
xiii
Configuring DECnet Services
Conventions
bold text
Indicates text that you need to enter, command names,
and buttons in menu paths.
Example: Enter wfsm &
Example: Use the dinfo command.
Example: ATM DXI > Interfaces > PVCs identifies the
PVCs button in the window that appears when you
select the Interfaces option from the ATM DXI menu.
italic text
Indicates variable values in command syntax
descriptions, new terms, file and directory names, and
book titles.
quotation marks (“ ”)
Indicate the title of a chapter or section within a book.
screen text
Indicates data that appears on the screen.
Example: Set Bay Networks Trap Monitor Filters
separator ( > )
Separates menu and option names in instructions and
internal pin-to-pin wire connections.
Example: Protocols > AppleTalk identifies the
AppleTalk option in the Protocols menu.
Example: Pin 7 > 19 > 20
vertical line (|)
Indicates that you enter only one of the parts of the
command. The vertical line separates choices. Do not
type the vertical line when entering the command.
Example: If the command syntax is
show at routes | nets, you enter either
show at routes or show at nets, but not both.
xiv
114050 Rev. A
About This Guide
Acronyms
AFI
authority format identifier
CLNP
Connectionless Network Protocol
DSP
Domain Specific Part
ES-IS
End System to Intermediate System
IDI
Initial Domain Identifier
IDP
Initial Domain Part
IS-IS
Intermediate System to Intermediate System
MAC
media access control
MIB
Management Information Base
NSAP
Network Service Access Point
OSI
Open Systems Interconnection
SMDS
Switched Multimegabit Data Services
WAN
wide area network
Ordering Bay Networks Publications
To purchase additional copies of this document or other Bay Networks
publications, order by part number from the Bay Networks Press™ at the following
telephone or fax numbers:
• Telephone - U.S./Canada
• Telephone - International
• Fax
1-888-4BAYPRESS
1-510-490-4752
1-510-498-2609
You can also use these numbers to request a free catalog of Bay Networks Press
product publications.
114050 Rev. A
xv
Technical Support and Online Services
To ensure comprehensive network support to our customers and partners
worldwide, Bay Networks Customer Service has Technical Response Centers
in key locations around the globe:
•
•
•
•
•
Billerica, Massachusetts
Santa Clara, California
Sydney, Australia
Tokyo, Japan
Valbonne, France
The Technical Response Centers are connected via a redundant Frame Relay
Network to a Common Problem Resolution system, enabling them to transmit and
share information, and to provide live, around-the-clock support 365 days a year.
Bay Networks Information Services complement the Bay Networks Service
program portfolio by giving customers and partners access to the most current
technical and support information through a choice of access/retrieval means.
These include the World Wide Web, CompuServe, Support Source CD, Customer
Support FTP, and InfoFACTS document fax service.
114050 Rev. A
xvii
Configuring DECnet Services
Bay Networks Customer Service
If you purchased your Bay Networks product from a distributor or authorized
reseller, contact that distributor’s or reseller’s technical support staff for assistance
with installation, configuration, troubleshooting, or integration issues.
Customers can also purchase direct support from Bay Networks through a variety
of service programs. As part of our PhonePlus™ program, Bay Networks Service
sets the industry standard, with 24-hour, 7-days-a-week telephone support
available worldwide at no extra cost. Our complete range of contract and
noncontract services also includes equipment staging and integration, installation
support, on-site services, and replacement parts delivery -- within approximately
4 hours.
To purchase any of the Bay Networks support programs, or if you have questions
on program features, use the following numbers:
Region
Telephone Number
Fax Number
United States and
Canada
1-800-2LANWAN; enter Express Routing
Code (ERC) 290 when prompted
(508) 670-8766
(508) 436-8880 (direct)
Europe
(33) 92-968-300
(33) 92-968-301
Asia/Pacific Region
(612) 9927-8800
(612) 9927-8811
Latin America
(407) 997-1713
(407) 997-1714
In addition, you can receive information on support programs from your local
Bay Networks field sales office, or purchase Bay Networks support directly
from your authorized partner.
xviii
114050 Rev. A
Technical Support and Online Services
Bay Networks Information Services
Bay Networks Information Services provide up-to-date support information as a
first-line resource for network administration, expansion, and maintenance. This
information is available from a variety of sources.
World Wide Web
The Bay Networks Customer Support Web Server offers a diverse library of
technical documents, software agents, and other important technical information
to Bay Networks customers and partners.
A special benefit for contracted customers and resellers is the ability to access the
Web Server to perform Case Management. This feature enables your support staff
to interact directly with the network experts in our worldwide Technical Response
Centers. A registered contact with a valid Site ID can
•
View a listing of support cases and determine the current status of any open
case. Case history data includes severity designation, and telephone, e-mail,
or other logs associated with the case.
•
Customize the listing of cases according to a variety of criteria, including
date, severity, status, and case ID.
•
Log notes to existing open cases.
•
Create new cases for rapid, efficient handling of noncritical network
situations.
•
Communicate directly via e-mail with the specific technical resources
assigned to your case.
The Bay Networks URL is http://www.baynetworks.com. Customer Service is a
menu item on that home page.
Customer Service FTP
Accessible via URL ftp://support.baynetworks.com (134.177.3.26), this site
combines and organizes support files and documentation from across the
Bay Networks product suite, including switching products from our Centillion™
and Xylogics® business units. Central management and sponsorship of this FTP
site lets you quickly locate information on any of your Bay Networks products.
114050 Rev. A
xix
Configuring DECnet Services
Support Source CD
This CD-ROM -- sent quarterly to all contracted customers -- is a complete Bay
Networks Service troubleshooting knowledge database with an intelligent text
search engine.
The Support Source CD contains extracts from our problem-tracking database;
information from the Bay Networks Forum on CompuServe; comprehensive
technical documentation, such as Customer Support Bulletins, Release Notes,
software patches and fixes; and complete information on all Bay Networks
Service programs.
You can run a single version on Macintosh Windows 3.1, Windows 95,
Windows NT, DOS, or UNIX computing platforms. A Web links feature enables
you to go directly from the CD to various Bay Networks Web pages.
CompuServe
For assistance with noncritical network support issues, Bay Networks Information
Services maintain an active forum on CompuServe, a global bulletin-board
system. This forum provides file services, technology conferences, and a message
section to get assistance from other users.
The message section is monitored by Bay Networks engineers, who provide
assistance wherever possible. Customers and resellers holding Bay Networks
service contracts also have access to special libraries for advanced levels of
support documentation and software. To take advantage of CompuServe’s
recently enhanced menu options, the Bay Networks Forum has been
re-engineered to allow links to our Web sites and FTP sites.
We recommend the use of CompuServe Information Manager software to access
these Bay Networks Information Services resources. To open an account and
receive a local dial-up number in the United States, call CompuServe at
1-800-524-3388. Outside the United States, call 1-614-529-1349, or your nearest
CompuServe office. Ask for Representative No. 591. When you are on line with
your CompuServe account, you can reach us with the command GO BAYNET.
xx
114050 Rev. A
Technical Support and Online Services
InfoFACTS
InfoFACTS is the Bay Networks free 24-hour fax-on-demand service. This
automated system has libraries of technical and product documents designed to
help you manage and troubleshoot your Bay Networks products. The system
responds to a fax from the caller or to a third party within minutes of being
accessed.
To use InfoFACTS in the United States or Canada, call toll-free 1-800-786-3228.
Outside North America, toll calls can be made to 1-408-764-1002. In Europe,
toll-free numbers are also available for contacting both InfoFACTS and
CompuServe. Please check our Web page for the listing in your country.
How to Get Help
Use the following numbers to reach your Bay Networks Technical Response
Center:
114050 Rev. A
Technical Response Center Telephone Number
Fax Number
Billerica, MA
1-800-2LANWAN
(508) 670-8765
Santa Clara, CA
1-800-2LANWAN
(408) 764-1188
Valbonne, France
(33) 92-968-968
(33) 92-966-998
Sydney, Australia
(612) 9927-8800
(612) 9927-8811
Tokyo, Japan
(81) 3-5402-0180
(81) 3-5402-0173
xxi
Chapter 1
DECnet Overview
This chapter shows how Bay Networks router software works with DECnet
services and describes the
•
Organization of end nodes and routers in a DECnet network
•
Transmission of messages from the Bay Networks router through the DECnet
network
•
Routing decision process for a DECnet network
•
DECnet IV to V Transition feature
•
Purpose of static routes
•
Static adjacency support
DECnet Network Organization
A DECnet network contains two types of nodes: end nodes and routers. End nodes
send and receive messages. Routers transmit messages to end nodes and other
routers on the network.
DECnet Phase IV Organization
DECnet Phase IV is a networking protocol that supports large networks (up to
approximately 64,000 nodes). You can divide each network into as many as 63
distinct areas; each area contains up to 1023 nodes. You must assign to each area
an Area ID, unique to the network. You must also assign to each node within an
area a Node ID, unique to the area.
114050 Rev. A
1-1
Configuring DECnet Services
Together, the Area ID and Node ID form a 16-bit DECnet Phase IV address
(Figure 1-1). The first 6 bits identify the area in which the node resides; the last 10
bits identify the node itself. Each DECnet Phase IV address must be unique within
the network.
6 bits
10 bits
Area ID
Node ID
DEC0001A
Figure 1-1.
DECnet Phase IV Address
A Bay Networks router running the routing software for a DECnet Phase IV
network can service multiple areas; that is, you can assign a DECnet Phase IV
address to each of the router’s individual interfaces, rather than to the entire router.
For example, if a router resides in multiple areas (has circuits connecting to more
than one area), you assign an Area ID and Node ID for each area to which it
connects. A router can also have several interfaces (each one with a unique Node
ID) in the same area.
In Figure 1-2, circuits E21 and E22 have different DECnet addresses, even though
they connect to the same router. Note that each circuit’s address is still unique
within its area and within the DECnet network.
1-2
114050 Rev. A
DECnet Overview
Area 1
2
Area 10
1
101
Circuit E21
3
Area ID = 1
102
103
Circuit E22
100
Node ID = 3
DECnet Phase IV Address for
Circuit E21 = 1.3
Area ID = 10
Key
End Node
Node ID = 100
DECnet Phase IV Address
for Circuit E21 = 10.100
Router
DEC0002A
Figure 1-2.
Bay Networks Router with Multiple DECnet Addresses
DECnet Phase V Organization
DECnet Phase V is an implementation of the Open Systems Interconnection
(OSI) Connectionless-mode Network Layer protocols. These protocols include
Connectionless Network Protocol (CLNP), End System to Intermediate System
(ES-IS) protocol, and Intermediate System to Intermediate System (IS-IS)
protocol.
114050 Rev. A
1-3
Configuring DECnet Services
Each system in a DECnet Phase V network is assigned a Network Service Access
Point (NSAP) address. Each DECnet Phase V NSAP address must be globally
unique and can be from 10 to 20 bytes in length. However, a local DECnet
network does not need a unique address.
For more information about Phase V network organization and addressing, refer
to Chapter 1 of Configuring OSI Services.
Routing DECnet Packets across the Network
The Bay Networks routing software for DECnet services uses a datagram service
to route packets through the DECnet network. Routing within an area is called
Level 1 (or intra-area) routing; routing between areas is called Level 2 (or
interarea) routing.
You can configure the Bay Networks routing software to perform either Level 1
and Level 2 routing, or to perform Level 1 Only routing.
•
Use Level 1 and Level 2 routing to maintain paths to all areas within a
DECnet network.
•
Use Level 1 Only routing to maintain paths to only those systems within the
router’s local area. Level 1 Only routing prevents the sending of Level 2
routing updates, thus reducing traffic on an interface.
By default, the Bay Networks routing software for DECnet services performs both
types of routing. When the router performs both Level 1 and Level 2 routing, you
can configure each router interface as either Level 1 and Level 2, or as Level 1
Only.
When you configure the router to perform Level 1 Only routing, the router
maintains paths only to those systems within its local area. When the router
performs Level 1 Only routing, you must configure all router interfaces as Level 1
Only.
1-4
114050 Rev. A
DECnet Overview
When a Bay Networks router receives a packet, it examines the destination
address contained in the packet header. If the destination address is within the
same area as the router, the router forwards the packet toward the destination
system using the least-cost path. If the address is to another area, the router
behaves differently depending on whether the interface performs Level 1 and
Level 2 routing or Level 1 Only routing:
•
If the router interface performs both Level 1 and Level 2 routing, the router
forwards the packet to the specified area using the least-cost path.
•
If the router interface performs Level 1 Only routing, the router forwards the
packet to the nearest Level 2 router.
•
If the router and all of its interfaces perform Level 1 Only routing, the router
forwards the packet to the nearest Level 2 router.
The Routing Process
Routing a DECnet packet through the network involves
•
Updating adjacent routers on the availability of surrounding nodes and
circuits
•
Listening for messages from adjacent routers identifying available nodes and
circuits
•
Determining the routing path with the least cost
•
Forwarding the packet to the specified adjacent node
Update Process
The Bay Networks router software for DECnet services continually monitors the
circuits directly attached to it. It periodically receives routing control messages
from its adjacent routers. These routing updates inform the router of the current
network topology. For example, if a circuit on a router fails, or another circuit is
added, the network topology changes. The router then generates and transmits
routing updates to all adjacent routers informing them of the changes. Timers
control how often the router sends out updates.
Routing updates describe which nodes in the local area are reachable (called node
or Level 1 topology updates), and which other areas in the network are reachable
(called area or Level 2 topology updates). Routers use this information to update
their routing tables.
114050 Rev. A
1-5
Configuring DECnet Services
Listening Process
The router periodically receives Hello messages from its adjacent routers,
informing it of their identity and of the circuits the router can use to reach the
adjacent nodes. The router stores this information in an adjacency table, thus
creating a database of next hops to use to forward data packets. A hop is the
logical distance between two nodes.
Decision Process
The router calculates the least-cost paths from itself to all other systems it can
reach, using information it receives from other routers and stores in routing tables.
If the least-cost path is disabled, or a node fails, the router finds an alternate path,
if one exists.
Site Manager assigns every circuit on a DECnet network a default cost. During the
decision process, the router running DECnet calculates the total path cost of
forwarding a datagram along each possible path toward its destination. The total
path cost is the sum of the costs of the outbound circuits that make up the path
(Figure 1-3). The least-cost path is the one that the router prefers.
2
10
A
5
10
B
Cost from A to B = 12
Cost from B to A = 15
Key
End Node
Router
DEC0003A
Figure 1-3.
1-6
Calculating the Least-Cost Path
114050 Rev. A
DECnet Overview
When deciding among multiple paths to a destination, the router chooses the path
that is assigned a lower path cost over one assigned a higher cost, even if the
lower-cost path is longer (Figure 1-4). If two paths have the same cost, the router
chooses the path whose next hop has the higher address. The amount of traffic on
a circuit does not affect the path selected by the router.
Once the router determines the least-cost path to a destination, it stores the
identity of the corresponding adjacent router in its forwarding database. The
adjacent router is the next hop on the path toward the destination.
The router keeps separate forwarding databases for intra-area and interarea
routing. If you configure the router to perform Level 1 Only routing, it does not
process Level 2 updates. Instead, it forwards interarea traffic to the nearest Level 2
router.
The complete distance (or number of hops) that a packet travels from the source to
its destination is the path length. The maximum number of hops the routing
algorithm will forward a packet to is called the maximum hops value. (To set the
maximum hops value, refer to Chapter 3.) If the distance between the source and
destination exceeds the maximum hops value, the packet is returned or dropped.
114050 Rev. A
1-7
Configuring DECnet Services
10
C
10
B
EN
10
2
5
C
5
D
Key
End Node
Router
Router A wants to route a packet to the end node. Three different paths are available.
Router A forwards the packet along path choice 3 because it has the lowest Total Path Cost (12).
Path Choice
Path Length
Path Cost
A to B, B to EN
2 hops
20
A to D, D to EN
2 hops
15
A to C, C to D, D to EN
3 hops
12
DEC0004A
Figure 1-4.
Least-Cost Path to a Destination
Forwarding Process
When a router receives a packet, it examines the destination address contained in
the packet header to determine whether to route the packet locally (intra-area) or
forward it to another destination (interarea).
Table 1-1 shows how the router forwards a packet, based on the destination
address in the packet header and whether the router is configured for Level 1 Only
routing or Level 1 and Level 2 routing.
1-8
114050 Rev. A
DECnet Overview
Table 1-1.
Router Forwarding Based on the Destination Address in the
Packet Header
Destination Address
Router Configuration
(Level 1 and Level 2 or
Level 1 Only)
Intra-area
either
Forwards the packet toward
the destination system.
Interarea
Level 1 and Level 2
Forwards the packet to the
next-hop router, node, or end
system specified in its
forwarding database.
Interarea
Level 1 Only
Forwards the packet to the
nearest Level 2 router.
Unknown
either
Returns the packet to the
source node if the return to
sender flag is set in the data
packet.
Unreachable
(for example, if the
maximum hops value is
exceeded)
Level 1 and Level 2
Drops the packet.
Router Action
The Designated Router
You assign a designated router to each circuit in a DECnet network. If an end
node on an Ethernet segment receives a packet it cannot forward (either because
the destination node’s address is not in the end node’s destination address cache,
or the destination node does not reside on the circuit), the end node forwards the
packet to the designated router. The designated router then forwards the packet
toward the destination.
You specify a designated router by assigning a router the highest priority value
among all routers on the Ethernet circuit. If you do not choose a designated router,
or if you assign two or more routers the same priority, the router assigned with the
highest Node ID becomes the designated router by default. refer to Chapter 3 for
details on assigning the designated router.
114050 Rev. A
1-9
Configuring DECnet Services
DECnet IV to V Transition
The DECnet IV to V Transition feature provides the following capabilities:
•
Routers running DECnet Phase V can map DECnet Phase IV network layer
addresses to compatible Phase V NSAP addresses, and convert Phase IV data
packets to Phase V Connectionless Network Protocol (CLNP) packets before
forwarding them to a Phase V end node.
•
Routers running DECnet Phase IV can map DECnet Phase V NSAP addresses
to compatible Phase IV addresses, and convert Phase V CLNP packets to
Phase IV data packets before forwarding them to a Phase IV end node.
•
Routers running Phase V can learn and advertise adjacent Phase IV end node
addresses.
•
Routers running Phase IV can learn and advertise adjacent Phase V end node
addresses.
•
Routers running DECnet Phase IV or DECnet Phase V can forward packets
without translation when routing their native protocols.
Translating DECnet Addresses
With the DECnet IV to V Transition feature enabled, a router can always translate
a DECnet Phase IV network layer address to a Phase V NSAP address. However,
because a Phase V address is larger than a Phase IV address, a router can translate
a Phase V address only if it is Phase IV-compatible.
A Phase V address is Phase IV-compatible if
•
The leading bytes of the Phase V address match the configured local Phase IV
Prefix. The local Phase IV Prefix defines the addresses eligible for translation
within a local Phase IV routing domain.
•
The high-order value of the Phase V System ID is AA000400, which is the
DECnet architectural constant.
•
The Area component of the Phase IV address in the Phase V System ID is the
same as the Area field of the Phase V Area Address.
Figure 1-5 shows how a router maps a DECnet Phase V address so that it is Phase
IV-compatible.
1-10
114050 Rev. A
DECnet Overview
DECnet IV Address
Area
Local Phase IV
Prefix
Area
Node ID
High Order =
AA000400
DECnet IV
Address
(byte swapped)
NSEL
System ID
Area Address
DECnet V Address
DEC0005A
Figure 1-5.
DECnet Phase IV to Phase V Address Mapping
The local Phase IV Prefix and Area fields of the Phase IV-compatible address
make up the Area Address. The Area Address identifies the area in a DECnet
network where a node resides. The High Order and DECnet IV Address fields of
the Phase IV-compatible address make up the System ID. The System ID identifies
a node within an area.
Translating Data Packets
With the DECnet IV to V Transition feature enabled, a router can always translate
a Phase IV data packet to a Phase V CLNP packet. However, there are restrictions
when a router translates a Phase V packet to a Phase IV packet:
114050 Rev. A
•
The packet cannot be fragmented.
•
The packet must fit the Phase IV maximum transmission unit (MTU) size of
1498 bytes.
1-11
Configuring DECnet Services
Phase IV to Phase V
A router running DECnet Phase IV always attempts to forward a Phase IV data
packet by looking up the destination address in the DECnet Phase IV forwarding
tables. If you enable the DECnet IV to V Transition feature, the router performs
the following actions:
1.
If the router does not find the destination address in the Phase IV
forwarding table, the router maps the Phase IV address to a Phase V
address and looks up its destination in the Phase V forwarding table.
2.
If the router finds the destination address in the Phase V forwarding
table, the router running Phase V translates the source address and
Phase IV data packet header to a Phase V CLNP packet header.
3.
If the router does not find the destination address in the Phase V
forwarding table, the router running Phase V returns the packet to the
router running Phase IV for error processing.
IV Host
IV and V
Data packet
is sent to
Phase V
host.
Phase IV
router routes
packet.
IV only
Phase IV router
routes packet.
IV and V
Phase IV router
gives packet to
Phase V router
for translation.
V Host
Phase V host
gets Phase V
packet.
DEC0006A
Figure 1-6.
Translation of a DECnet Phase IV Data Packet to a Phase V CLNP Packet
Phase V to Phase IV
In the same way, a router running DECnet Phase V always attempts to forward a
Phase V CLNP packet by looking up the destination address in the DECnet Phase
V forwarding tables. If you enable the DECnet IV to V Transition feature and the
router does not find the destination address, the router performs the following
actions:
1.
1-12
If the address is Phase IV-compatible, the router maps the Phase V
address to a Phase IV address and looks up its destination in the Phase IV
forwarding table.
114050 Rev. A
DECnet Overview
2.
If the router finds the destination address in the Phase IV forwarding
table, the DECnet router running Phase IV translates the source address
and Phase V CLNP packet header to a Phase IV data packet header.
3.
If the router does not find the destination address in the Phase IV
forwarding table, the router running Phase IV returns the packet to the
router running Phase V for error processing.
Figure 1-6 illustrates the translation of a DECnet Phase IV data packet to a Phase
V CLNP packet. Routers in the network are configured either with Phase IV only
or with both Phase IV and Phase V.
1.
A Phase IV host sends a data packet to a Phase V end node. The Phase IV
host routes the packet to a router running both Phase IV and Phase V.
2.
Because the router has Phase IV configured, it routes the Phase IV data
packet to the next router on the network, which also has Phase IV
configured.
3.
This router routes the Phase IV data packet to the next router on the
network, which has both Phase IV and Phase V configured.
4.
Because the destination address of the packet is a Phase V end node, the
router maps the address to a Phase V address, and then looks it up in the
Phase V forwarding tables. The router then translates the source address
and packet header.
5.
The router then forwards the packet to the Phase V end node.
Advertising Routes
With the DECnet IV to V Transition feature enabled, the only routing information
exchanged between DECnet Phase IV and Phase V is end node addresses.
The Phase IV router advertises Phase V end nodes in Level 1 topology update
packets. The DECnet Phase V router can reside in only one area. Therefore, the
Phase V router advertises Phase IV end nodes in Level 1 link state packets only
for the areas in common between Phase IV and Phase V.
DECnet IV to V Basic Transition Strategy
Bay Networks uses a dual-stack approach to support the DECnet IV to V
Transition feature. This approach provides the following advantages:
114050 Rev. A
1-13
Configuring DECnet Services
•
Phase IV and Phase V routing are done in parallel. A router routes packets
whose source and destination nodes operate the same phase of DECnet, using
their native routing protocol.
•
A router translates a packet when necessary and only once.
•
You can transition routers incrementally rather than all at once.
The following strategy allows you to use the DECnet IV to V Transition feature to
support a graceful migration from a Phase IV network to a Phase V network.
1.
All routers run Phase IV with contiguous areas and contiguous Level 2
backbone.
2.
All routers continue to run Phase IV. On an individual basis, routers run
Phase V with the DECnet IV to V Transition feature enabled. All routers
running Phase V are contiguous within areas.
3.
All routers in the routing domain run Phase IV and Phase V with the
DECnet IV to V Transition feature enabled.
4.
Phase IV is turned off on an individual basis; continuity is not necessary
at this point. If Phase IV routing fails for a particular DECnet data
packet, then the router forwards the packet using Phase V.
5.
All routers run Phase V. Only routers with adjacent Phase IV-only end
nodes run Phase IV and Phase V with the DECnet IV to V Transition
feature enabled. A Phase V host runs in Phase IV-compatible mode when
it is on the same local area network (LAN) segment as a Phase IV host.
For details on adding the DECnet IV to V Transition feature and editing the
parameters, refer to Chapter 3.
Static Routes
The Bay Networks routing software for DECnet services allows you to configure
static routes to another network or node for the Bay Networks router. Static routes
are manually configured routes that specify the transmission path a datagram must
follow based on the datagram’s destination address.
Use static routes and disable the sending of Level 1 and Level 2 topology update
packets to reduce traffic over wide area networks (WANs) or slow links. Static
routes restrict the paths that datagrams follow to paths you specifically configure.
1-14
114050 Rev. A
DECnet Overview
For example, Figure 1-7 shows three Level 2 routers that reside in different areas.
To configure a static route from Router A to Router C, you must specify the
source address, next hop, and destination address. Because this is a route from
Area 1 to Area 2, the static route type is Level 2.
2.2
C
1.3
A
B
1.1
Key
Next Hop
Destination
Router
DEC0007A
Figure 1-7.
Static Routes Defined for Routers Residing in Different Areas
You can refer to “Configuring Static Routes” in Chapter 3 for details on adding,
editing, and deleting static routes.
114050 Rev. A
1-15
Configuring DECnet Services
Static Adjacency Support
The Bay Networks routing software for DECnet services creates and maintains its
adjacency database by periodically broadcasting Hello messages to its neighbors.
In DECnet terminology, an adjacency is a directly connected circuit-neighbor pair
toward which packets are forwarded by the router (a neighbor is an adjacent host).
The neighbor can be a Level 1 or Level 2 router, or an end node.
The Bay Networks routing software for DECnet services allows you to configure
static adjacencies for the Bay Networks router. Static adjacencies specify the
DECnet and data link layer address of the neighbor, and the circuit used to reach
the neighbor.
Unless a static adjacency is explicitly deleted from the system, it remains in the
router’s adjacency database -- even if the router never receives Hello messages
from the adjacent host. Thus, by configuring static adjacencies and disabling
Hello message generation, you reduce Hello message traffic between the router
and its neighbors.
Note: Static adjacencies are recommended over wide area network lines to
help reduce overhead traffic. Static adjacencies are not recommended over
local area network connections, because if a remote node is removed from the
network, the local router does not recognize the topology change.
For example, DECnet Routers A and B reside in the same area (Figure 1-8).
1-16
114050 Rev. A
DECnet Overview
With static adjacencies defined,
you can turn off Hello message
generation on interfaces S1 and S2.
1.2
1.1
S1
S2
A
B
Area 1
Key
End Node
Router
DEC0008A
Figure 1-8.
Static Adjacencies Defined for Routers Residing in the Same Area
The only network information the routers need to exchange is Level 1 topology
information. To reduce traffic overhead, do the following:
•
Configure a static adjacency for interface S1 that specifies its neighbor
—interface S2 on Router B.
•
Configure a static adjacency for interface S2 that specifies its neighbor
—interface S1 on Router A.
•
Set the Router Hello parameter to Disable for both interfaces.
As a result, the routers know about each other’s existence, even though no Hello
messages are exchanged.
114050 Rev. A
1-17
Configuring DECnet Services
If two Level 2 routers reside in different areas, you can reduce both Hello message
traffic and Level 1 topology traffic between the two systems by disabling the
Router Hello parameter and the Level 1 Topology Update parameter for the
connecting interfaces (Figure 1-9). If you disable the Level 1 Topology Update
parameter, you prevent the Bay Networks router running DECnet from sending
Level 1 topology update packets to other routers.
With static adjacencies defined, turn off
Hello message generation and disable
Level 1 Topology Update generation.
2.2
1.1
S1
A
Area 1
S2
B
Area 2
Key
End Node
Router
DEC0009A
Figure 1-9.
Static Adjacencies Defined for Routers Residing
in Different Areas
You can also disable the Level 2 Topology Update parameter if you want to
prevent the Bay Networks router running DECnet from sending Level 2 topology
update packets to other routers. In this case, you use static routes to establish
transmission paths between connected routers.
Refer to Chapter 3 for details about configuring static adjacencies and setting the
Router Hello, Level 1 Topology Update, and Level 2 Topology Update
parameters.
1-18
114050 Rev. A
DECnet Overview
For More Information
For technical details about DECnet protocol implementation, see DECnet Digital
Network Architecture Phase IV Routing Layer Function Specification, Version 2.0
(Digital Equipment Corporation, December 1983).
114050 Rev. A
1-19
Chapter 2
Enabling DECnet Services
This chapter describes how to enable DECnet Phase IV services. It assumes you
have read Configuring Routers and that you have
1.
Opened a configuration file
2.
Specified router hardware if this is a local mode configuration file
3.
Selected the link- or net-module connector on which you are enabling
DECnet Phase IV, or configured a WAN circuit if this connector requires
one
When you enable DECnet services, you are required to specify only a few
parameters. The Configuration Manager supplies default values for the remaining
parameters. If you want to edit these default values, refer to Chapter 3, “Editing
DECnet Parameters.”
Note: Although you can accept the default values for most DECnet
parameters, we recommend that you try to tune your DECnet configuration to
closely match your actual configuration. Typically, when you customize the
parameters, DECnet uses less local memory, enhancing DECnet performance.
For each DECnet parameter, this guide provides the default setting, valid
parameter options, the parameter function, instructions for setting the parameter,
and the Management Information Base (MIB) object ID.
114050 Rev. A
2-1
Configuring DECnet Services
The Technician Interface lets you modify parameters by issuing set and commit
commands that specify the MIB object ID. This process is equivalent to
modifying parameters using Site Manager. For more information about using the
Technician Interface to access the MIB, refer to Using Technician Interface
Software.
Caution: The Technician Interface does not verify that the value you enter for
a parameter is valid. Entering an invalid value can corrupt your configuration.
Enabling DECnet Phase IV on an Interface
To enable DECnet Phase IV on an interface:
1.
Select DECnet from the Select Protocols menu.
The Select Protocols menu appears after you either select a link- or
net-module connector, or finish configuring a WAN circuit.
The DECnet IV Configuration window appears (Figure 2-1).
Figure 2-1.
DECnet IV Configuration Window
2.
Configure the parameters using the descriptions that follow as a guide.
3.
When you finish configuring the parameters, click on OK.
To edit the default values for DECnet parameters, refer to Chapter 3, “Editing
DECnet Parameters” for instructions.
2-2
114050 Rev. A
Enabling DECnet Services
•
Enable default DECnet Phase IV services. To do this, click on OK.
•
Edit the default values. To do this, click on Details. (Refer to Chapter 3,
Editing DECnet Parameters for instructions.)
Parameter:
Default:
Range:
Function:
Area ID
None
1 to 63
Specifies a unique DECnet Phase IV Area ID for this circuit.
The Area ID is the first 6 bits of a DECnet Phase IV node address. You
specify the Area ID on a circuit-by-circuit basis; that is, a single router
can have individual circuits residing in different areas.
Instructions:
MIB Object ID:
Parameter:
Default:
Range:
Function:
Enter the Area ID assigned to this circuit.
1.3.6.1.4.1.18.3.5.2.3.1.1
Node ID
None
1 to 1023
Specifies a unique DECnet Node ID for this circuit.
The Node ID is the last 10 bits of a DECnet node address. Note that
individual circuits on a Bay Networks router may have different Node
IDs.
Instructions:
MIB Object ID:
114050 Rev. A
Enter the Node ID assigned to this circuit.
1.3.6.1.4.1.18.3.5.2.3.1.2
2-3
Chapter 3
Editing DECnet Parameters
Once you enable a DECnet interface, you can use Site Manager to
•
Edit DECnet parameters
•
Add, edit, or delete a static route, a static adjacency, or the DECnet IV to V
Transition
•
Delete DECnet globally from the Bay Networks router
The instructions in this chapter assume that you have already configured at least
one DECnet interface. If you have not yet configured a DECnet interface, or if you
want to add additional DECnet interfaces, refer to Chapter 2, “Enabling DECnet
Services.”
Note: You must configure both DECnet Phase IV and OSI on each network
interface participating in a DECnet IV to V Transition.
If you have a mixed Phase IV and Phase V network, Configuring OSI Services for
details on configuring OSI. For instructions on configuring DECnet filters, see
Configuring Routers.
For each DECnet parameter, this guide provides the default setting, valid
parameter options, the parameter function, instructions for setting the parameter,
and the Management Information Base (MIB) object ID.
114050 Rev. A
3-1
Configuring DECnet Services
The Technician Interface lets you modify parameters by issuing set and commit
commands that specify the MIB object ID. This process is equivalent to
modifying parameters using Site Manager. For more information about using the
Technician Interface, refer to Using Technician Interface Software.
Caution: The Technician Interface does not verify that the value you enter for
a parameter is valid. Entering an invalid value can corrupt your configuration.
Accessing DECnet Parameters
You access all DECnet parameters from the Configuration Manager window
(Figure 3-1). See Configuring Routers for instructions on accessing this window.
Figure 3-1.
Configuration Manager Window
To customize the router software for DECnet services, edit any of these DECnet
parameters:
3-2
•
Global
•
Interface
•
Static route
•
Static adjacency
•
DECnet IV to V Transition
114050 Rev. A
Editing DECnet Parameters
Editing DECnet Global Parameters
To edit the DECnet global parameters, begin at the Configuration Manager
window (refer to Figure 3-1) and proceed as follows.
1.
Select Protocols > DECnet IV > Global.
The Edit DECnet Global Parameters window appears (Figure 3-2).
Figure 3-2.
Edit DECnet Global Parameters Window
2.
Edit the parameters, using the descriptions in the next section as a guide.
3.
Click on OK to save your changes and exit the window.
Site Manager returns you to the Configuration Manager window.
114050 Rev. A
3-3
Configuring DECnet Services
DECnet Global Parameter Descriptions
Use the following descriptions as a guide when you configure the parameters in
the Edit DECnet Global Parameters window (refer to Figure 3-2).
Parameter:
Route Enable
Default:
Enable
Options:
Enable | Disable
Function:
Instructions:
MIB Object ID:
Parameter:
Enables or disables DECnet routing on the entire Bay Networks router.
Set to Disable only if you want to globally disable DECnet routing on all
interfaces where it is configured. Otherwise, use the default setting.
1.3.6.1.4.1.18.3.5.2.1.2
Route Level
Default:
Level 1 and Level 2
Options:
Level 1 and Level 2 | Level 1 Only
Function:
Determines whether the router performs both Level 1 and Level 2 routing
or Level 1 Only routing.
Instructions:
Select Level 1 and Level 2 routing to maintain paths to all areas within a
DECnet network.
Select Level 1 Only to maintain paths to only those systems within the
router’s local area. If you select Level 1 Only routing, you can only
configure router interfaces as Level 1 Only.
MIB Object ID:
3-4
1.3.6.1.4.1.18.3.5.2.1.16
114050 Rev. A
Editing DECnet Parameters
Parameter:
Default:
Range:
Level 1 Only Area
1
1 to 63
Function:
Specifies the DECnet Area ID for all circuits if you configured the router
as Level 1 Only. The Area ID is the first 6 bits of a DECnet node address.
Instructions:
Specify the Area ID by entering a number between 1 and 63. You cannot
configure this parameter unless you first configure the router to perform
Level 1 Only routing.
MIB Object ID:
1.3.6.1.4.1.18.3.5.2.1.20
Parameter:
Broadcast Route Timer
Default:
Range:
Function:
Instructions:
MIB Object ID:
Parameter:
Default:
Range:
Function:
Instructions:
MIB Object ID:
114050 Rev. A
180
1 to 65535
Determines the maximum amount of time in seconds between routing
updates that the router issues. If no routing update occurs before this timer
expires, the router generates a routing update automatically.
Enter a number between 1 and 65535. If you want the Bay Networks
router to generate routing updates more frequently, enter a lower value
than the current one.
1.3.6.1.4.1.18.3.5.2.1.4
Route Max Addr
1023
1 to 1023
Specifies the highest Node ID contained within all areas.
We recommend accepting the default value. If you change the default,
make certain to use the same value for each router in the network.
1.3.6.1.4.1.18.3.5.2.1.6
3-5
Configuring DECnet Services
Parameter:
Default:
Range:
Function:
Instructions:
MIB Object ID:
Parameter:
Default:
Range:
64
0 to 1023
Specifies the maximum number of end node adjacencies residing on all
circuits for a single slot. The higher the number of adjacent end nodes, the
greater the impact on the router’s performance and memory use.
Consult your network topology drawing. If there are more than 64 end
node adjacencies on any of the router’s slots, increase this number to
reflect your network topology.
1.3.6.1.4.1.18.3.5.2.1.7
Max Broadcast Routers
32
0 to 1023
Function:
Specifies the maximum number of router adjacencies on all circuits for a
single slot.
Instructions:
Consult your network topology drawing. If there are more than 32 router
adjacencies on any of the router’s slots, increase this number to reflect
your network topology. Decrease this number if there are fewer than 32
router adjacencies on a single slot.
MIB Object ID:
Parameter:
Default:
Range:
Function:
Instructions:
MIB Object ID:
3-6
Max Broadcast Non Routers
1.3.6.1.4.1.18.3.5.2.1.8
Max Circuits
1024
1 to 1024
Specifies the highest circuit number that this router can recognize, that is,
the maximum number of circuits that this router can recognize.
We recommend accepting the default value.
1.3.6.1.4.1.18.3.5.2.1.9
114050 Rev. A
Editing DECnet Parameters
Parameter:
Default:
Range:
Function:
Max Cost
1022
1 to 1022
Specifies the maximum path cost from this router to any destination node
in the local area. The path cost is the sum of the individual circuit costs
between this router and the destination node.
The router declares a destination node unreachable if the least-cost path to
the destination node exceeds this number.
Instructions:
MIB Object ID:
Parameter:
Default:
Range:
Function:
Instructions:
MIB Object ID:
114050 Rev. A
Determine the maximum path cost between this router and any node in
the area, and enter it here.
1.3.6.1.4.1.18.3.5.2.1.10
Max Hops
30
1 to 30
Specifies the maximum path length in hops between this router and any
other destination node in the local area. A hop is the logical distance
between two nodes.
Calculate the maximum path length in hops from this router to any other
destination node in the area. Double this number and enter it here.
1.3.6.1.4.1.18.3.5.2.1.11
3-7
Configuring DECnet Services
Parameter:
Default:
Range:
Function:
Instructions:
MIB Object ID:
Parameter:
Default:
Range:
Function:
Instructions:
MIB Object ID:
Parameter:
Default:
Range:
63
1 to 63
Detects routing loops by enabling the packet lifetime control, which
limits the number of times a packet can pass through a router. If the router
receives a packet that (1) is not destined for the router, and (2) whose Max
Visits value is exceeded, the router discards the packet because it has
traversed too many nodes.
Determine the maximum path length in hops between the two nodes
farthest apart on the network. Enter a number that is at least as large as
this value.
1.3.6.1.4.1.18.3.5.2.1.12
Area Max Cost
1022
1 to 1022
Specifies the maximum path cost from this router to any other area in the
network. The router declares a destination area unreachable if the
least-cost path to the destination area exceeds this number.
Determine the total path cost of the longest path between this router and
any other area in the network and enter it here.
1.3.6.1.4.1.18.3.5.2.1.13
Area Max Hops
30
1 to 30
Function:
Specifies the maximum path length in hops from this router to any other
destination area in the network. The router declares a destination area
unreachable if the path length to the destination area exceeds this number.
Instructions:
Determine the maximum path length in hops from this router to any other
destination area in the network. Double this number, and enter it here.
MIB Object ID:
3-8
Max Visits
1.3.6.1.4.1.18.3.5.2.1.14
114050 Rev. A
Editing DECnet Parameters
Parameter:
Default:
63
Range:
Function:
Instructions:
MIB Object ID:
Max Area
1 to 63
Specifies the highest area number in your DECnet network, that is, the
number of areas in your DECnet network. You may want to set this value
lower than the default to conserve slot memory.
Refer to your network topology map, and then enter the highest area
number.
1.3.6.1.4.1.18.3.5.2.1.15
Editing DECnet Interface Parameters
To edit a DECnet interface, begin at the Configuration Manager window (refer to
Figure 3-1) and proceed as follows.
1.
Select Protocols > DECnet IV > Interfaces.
The DECnet IV Interface List window appears (Figure 3-3). The window
displays all interfaces on which DECnet is enabled.
114050 Rev. A
3-9
Configuring DECnet Services
Figure 3-3.
DECnet IV Interface List Window
2.
Click on the interface you want to edit.
3.
Edit the parameters, using the descriptions in the next section as a guide.
4.
Click on Apply to implement your changes.
5.
Click on Done to exit the window.
Site Manager returns you to the Configuration Manager window.
Note: When you reconfigure an interface in dynamic configuration mode,
DECnet restarts on that interface.
3-10
114050 Rev. A
Editing DECnet Parameters
DECnet Interface Parameter Descriptions
Use the following descriptions as a guide when you configure the parameters in
the DECnet IV Interface List window (refer to Figure 3-3).
Parameter:
Enable
Default:
Enable
Options:
Enable | Disable
Function:
Instructions:
MIB Object ID:
Parameter:
Enables or disables DECnet over this circuit.
To disable DECnet over this circuit, set to Disable. Otherwise, accept the
default setting.
1.3.6.1.4.1.18.3.5.2.2.1.2
Route Level
Default:
Level 1 and Level 2
Options:
Level 1 and Level 2 | Level 1 Only
Function:
Determines whether the circuit performs both Level 1 and Level 2 routing
or Level 1 Only routing.
If you configured the router as Level 1 Only, the router automatically
configures all circuits as Level 1 Only and this parameter does not appear
in the DECnet IV Interface List window. If, at a later time, you change the
router configuration to perform both Level 1 and Level 2 routing, all
circuits will remain configured as Level 1 Only until you change them.
Instructions:
MIB Object ID:
114050 Rev. A
Select Level 1 and Level 2 to maintain paths to all areas within a DECnet
network. Select Level 1 Only to maintain paths to only those systems
within the router’s local area.
1.3.6.1.4.1.1.18.3.5.2.2.1.41
3-11
Configuring DECnet Services
Parameter:
Default:
Range:
Function:
Area ID
None
1 to 63
Specifies a DECnet Area ID for this circuit.
The Area ID is the first 6 bits of a DECnet node address. You specify the
Area ID on a circuit-by-circuit basis, because a single Bay Networks
router can have individual circuits residing in different areas.
Instructions:
MIB Object ID:
Enter the Area ID assigned to this circuit.
1.3.6.1.4.1.18.3.5.2.2.1.4
Note: If you set the DECnet global parameter Route Level to Level 1 Only,
the Area ID you specify in the Edit DECnet Global Parameters window
overrides this parameter setting.
Parameter:
Default:
Range:
Function:
Node ID
None
1 to 1023
Specifies a unique DECnet Node ID for this circuit.
The Node ID is the last 10 bits of a DECnet node address. Note that
individual circuits on a Bay Networks router can have different Node IDs.
Instructions:
MIB Object ID:
3-12
Enter the Node ID assigned to this circuit.
1.3.6.1.4.1.18.3.5.2.2.1.5
114050 Rev. A
Editing DECnet Parameters
Parameter:
Default:
Range:
Function:
Cost
10
1 to 63
Specifies the relative cost of routing over this circuit.
The sum of the individual outbound circuit costs from a source node to a
destination node is the total path cost. When the router receives a data
packet, it decides which circuit to forward the packet over based on the
least-cost path toward the destination.
Instructions:
MIB Object ID:
Parameter:
Default:
Range:
If you want the circuit to be used on a regular basis, assign it a low cost;
similarly, assign the circuit a high cost if you do not want it used on a
regular basis.
1.3.6.1.4.1.18.3.5.2.2.1.9
Hello Timer
15
1 to 8191
Function:
Specifies in seconds how often the router broadcasts DECnet Hello
messages to all nodes on this circuit.
Instructions:
Increase the Hello Timer if you want to reduce the amount of traffic
traversing a slow line.
MIB Object ID:
1.3.6.1.4.1.18.3.5.2.2.1.10
Note: Inconsistent Hello Timer settings can cause confusion between DECnet
routers and end nodes when rerouting occurs. We recommend that you set the
Hello Timer parameter to the same value throughout your DECnet network.
114050 Rev. A
3-13
Configuring DECnet Services
Parameter:
Default:
Range:
Function:
Instructions:
MIB Object ID:
Parameter:
Default:
Range:
Function:
Max Routers
33
0 to 33
Specifies the maximum number of routers attached to this circuit,
including the router on which you are configuring DECnet services.
We recommend accepting the default value. If you change the default,
refer to your network topology drawing to determine the number of
routers and then enter it here.
1.3.6.1.4.1.18.3.5.2.2.1.12
Router Priority
64
0 to 127
Determines which router becomes the designated router on a circuit. The
designated router performs additional services for other nodes attached to
the circuit. (All these nodes know the address of the designated router.)
When an end node attempts to send a packet to a destination node that is
not in its destination address cache, or does not reside on the circuit, it
sends the packet to the designated router, which forwards the packet
toward the destination.
If you do not choose a designated router, or if you assign two or more
routers the same priority, the router with the highest Node ID becomes the
designated router by default.
Instructions:
MIB Object ID:
3-14
Enter a router priority value from 0 to 127. If you want this node to be the
designated router on this circuit, assign it the highest priority value among
all routers on the circuit.
1.3.6.1.4.1.18.3.5.2.2.1.13
114050 Rev. A
Editing DECnet Parameters
Parameter:
End Nodes MAC
Default:
None
Options:
Frame Relay multicasting address | SMDS group address
Function:
Assigns the All Endnodes multicast MAC address value to this circuit for
use over Frame Relay and SMDS WAN connections. The multicast MAC
address value you specify here determines the destination address for
DECnet end node broadcast traffic across the Frame Relay or SMDS
cloud. This parameter is valid only if this circuit is a Frame Relay or
SMDS circuit.
Instructions:
Enter the multicasting address (Frame Relay circuits) or group address
(SMDS circuits) that you obtain from your service provider. If you do not
specify a value for this parameter, broadcast traffic will be sent to all
virtual circuits configured on the interface.
MIB Object ID:
Parameter:
1.3.6.1.4.1.18.3.5.2.2.1.31
End Routers MAC
Default:
None
Options:
Frame Relay multicasting address | SMDS group address
Function:
Assigns the AllRouters multicast MAC address value to this circuit for
use over Frame Relay and SMDS WAN connections. This allows you to
specify a destination address for DECnet Level 1 broadcast traffic across
the Frame Relay or SMDS cloud. This parameter is valid only if this
circuit is a Frame Relay or SMDS circuit.
Instructions:
Enter the multicasting address (Frame Relay circuits) or group address
(SMDS circuits) that you obtain from your service provider. If you do not
specify a value for this parameter, broadcast traffic will be sent to all
virtual circuits configured on the interface.
MIB Object ID:
114050 Rev. A
1.3.6.1.4.1.18.3.5.2.2.1.32
3-15
Configuring DECnet Services
Parameter:
Default:
None
Options:
Frame Relay multicasting address | SMDS group address
Function:
Assigns the AllAreaRouters multicast MAC address value to this circuit
for use over Frame Relay and SMDS WAN connections. This allows you
to specify a destination address for DECnet Level 2 broadcast traffic
across the Frame Relay or SMDS cloud. This parameter is valid only if
this circuit is a Frame Relay or SMDS circuit.
Instructions:
Enter the multicasting address (Frame Relay circuits) or group address
(SMDS circuits) that you obtain from your service provider. If you do not
specify a value for this parameter, broadcast traffic will be sent to all
virtual circuits configured on the interface.
MIB Object ID:
Parameter:
1.3.6.1.4.1.18.3.5.2.2.1.33
Node Hello
Default:
Enable
Options:
Enable | Disable
Function:
When disabled, keeps the DECnet router from sending Hello packets to
end nodes. Use this parameter with a static adjacency to limit the amount
of traffic sent over a WAN connection.
Instructions:
To limit the amount of traffic traversing the WAN connection between
static adjacencies, set this value to Disable. Otherwise, accept the default
setting.
MIB Object ID:
3-16
Area Routers MAC
1.3.6.1.4.1.18.3.5.2.2.1.34
114050 Rev. A
Editing DECnet Parameters
Parameter:
Router Hello
Default:
Enable
Options:
Enable | Disable
Function:
Instructions:
When disabled, keeps the DECnet router from sending Hello packets to
other routers. Use this parameter with a static adjacency to limit the
amount of traffic sent over a WAN connection.
To limit the amount of traffic traversing the WAN connection between
static adjacencies, set this value to Disable. Otherwise, accept the default
setting.
MIB Object ID:
1.3.6.1.4.1.18.3.5.2.2.1.35
Parameter:
Level 1 Topology Update
Default:
Enable
Options:
Enable | Disable
Function:
When disabled, keeps the DECnet router from sending Level 1 topology
update packets to other routers. Use this parameter with a static adjacency
to limit the amount of traffic sent over a WAN connection.
Instructions:
To limit the amount of traffic traversing the WAN connection between
static adjacencies, set this value to Disable. Otherwise, accept the default
setting.
MIB Object ID:
1.3.6.1.4.1.18.3.5.2.2.1.36
Parameter:
Level 2 Topology Update
Default:
Enable
Options:
Enable | Disable
Function:
When disabled, keeps the DECnet router from sending Level 2 topology
update packets to other routers. Use this parameter with a static adjacency
to limit the amount of traffic sent over a WAN connection.
Instructions:
To limit the amount of traffic traversing the WAN connection between
static adjacencies, set this value to Disable. Otherwise, accept the default
setting.
MIB Object ID:
114050 Rev. A
1.3.6.1.4.1.18.3.5.2.2.1.40
3-17
Configuring DECnet Services
Configuring Static Routes
Configure static routes when you want to control which path the router uses to
route DECnet traffic to another network or node.
To configure a static route, select Protocols > DECnet IV > Static Routes from the
Configuration Manager window (refer to Figure 3-1). The DECnet Static Routes
List window appears (Figure 3-4). It lists all static routes that are defined. If you
did not add any static routes, none are listed.
Figure 3-4.
DECnet Static Routes List Window
Adding a Static Route
To add a static route:
1.
Click on Add in the DECnet Static Routes List window (refer to
Figure 3-4).
The DECnet Static Routes Configuration window appears (Figure 3-5).
3-18
114050 Rev. A
Editing DECnet Parameters
Figure 3-5.
DECnet Static Routes Configuration Window
2.
Define the static route parameters, using the descriptions in the next
section as a guide.
3.
Click on OK.
The DECnet Static Routes List window displays the new static route you
defined.
4.
Repeat Steps 1 through 3 to add more static routes.
DECnet Static Route Parameter Descriptions
Use the following descriptions as a guide when you configure the parameters in
the DECnet Static Routes List and DECnet Static Routes Configuration windows
(refer to Figure 3-4 and Figure 3-5).
114050 Rev. A
3-19
Configuring DECnet Services
Parameter:
Static Route Enable
Default:
Enable
Options:
Enable | Disable
Function:
Specifies the state (active or inactive) of the static route record in the
DECnet routing tables.
Instructions:
Select Disable to make the static route record inactive in the DECnet
routing table; the DECnet router will not consider this static route.
Select Enable to make the static route record active again in the DECnet
routing table.
If you did not first add a static route, no default is displayed and you
cannot configure this parameter. When you add a static route, this
parameter defaults to Enable.
MIB Object ID:
Parameter:
1.3.6.1.4.1.18.3.5.2.8.1.2
Route Type
Default:
Level 2
Options:
Level 1 | Level 2
Function:
Instructions:
Specifies the type of traffic that is routed over this interface. Level 1
routing is for routing data within an area. Level 2 routing is for routing
data between areas.
Select the traffic type for this static route.
If you did not first add a static route, no default is displayed and you
cannot configure this parameter. When you add a static route, this
parameter defaults to Level 2.
MIB Object ID:
3-20
1.3.6.1.4.1.18.3.5.2.8.1.3
114050 Rev. A
Editing DECnet Parameters
Parameter:
Default:
Range:
Function:
Instructions:
Route Cost
10
1 to 63
Specifies the total cost of a route to a destination address. Keep in mind
that routes with lower costs are preferred routes. This means that you can
force traffic over particular routes if you like.
Enter the route cost assigned to the static route.
If you did not first add a static route, no default is displayed and you
cannot configure this parameter. When you add a static route, this
parameter defaults to 10.
MIB Object ID:
Parameter:
Default:
Range:
Function:
Instructions:
MIB Object ID:
Parameter:
Default:
Range:
Function:
Instructions:
MIB Object ID:
114050 Rev. A
1.3.6.1.4.1.18.3.5.2.8.1.6
Destination Area ID
None
1 to 63
Specifies the Area ID portion of the static route’s destination DECnet
address.
Enter the Area ID of the area in which the destination of this route resides.
1.3.6.1.4.1.18.3.5.2.8.1.4
Destination Node ID
None
1 to 1023
Specifies the Node ID portion of the static route’s destination DECnet
address.
Enter the Node ID of the destination end system of this static route.
1.3.6.1.4.1.18.3.5.2.8.1.5
3-21
Configuring DECnet Services
Parameter:
Default:
Range:
Function:
Instructions:
MIB Object ID:
Parameter:
Default:
Range:
Function:
Instructions:
MIB Object ID:
3-22
Next Hop Area ID
None
1 to 63
Specifies the DECnet Area ID of the intermediate system that is the next
hop on the path to the destination end system.
Enter the Area ID assigned to the next-hop intermediate system.
1.3.6.1.4.1.18.3.5.2.8.1.7
Next Hop Node ID
None
1 to 1023
Specifies the DECnet Node ID of the intermediate system that is the next
hop on the path to the destination end system.
Enter the Node ID assigned to the next-hop intermediate system.
1.3.6.1.4.1.18.3.5.2.8.1.8
114050 Rev. A
Editing DECnet Parameters
Editing Static Route Parameters
To edit a static route:
1.
Select the static route you want to edit from the list in the DECnet Static
Routes List window (refer to Figure 3-4).
2.
Edit the static route parameters, using the descriptions in the previous
section as a guide.
3.
Click on Apply to implement your changes.
4.
Repeat Steps 1 through 3 to edit additional static routes.
5.
Click on Done to exit the window.
Deleting a Static Route
To delete a static route:
1.
Select the static route you want to delete from the list in the DECnet
Static Routes List window (refer to Figure 3-4).
2.
Click on Delete.
The DECnet Static Routes List window no longer displays the static route.
3.
Repeat Steps 1 and 2 to delete additional static routes.
4.
Click on Done to exit the window.
Configuring Static Adjacencies
The DECnet router allows you to specify static transmission paths to adjacent
hosts. The static adjacency may or may not be another router.
114050 Rev. A
3-23
Configuring DECnet Services
Adding a Static Adjacency
To add a static adjacency, begin at the Configuration Manager window (refer to
Figure 3-1) and proceed as follows.
1.
Select Circuits > Edit Circuits.
The Circuit List window appears, which lists the circuits configured on the
router (Figure 3-6).
Figure 3-6.
2.
Circuit List Window
Select a DECnet circuit from the list and click on Edit.
The Circuit Definition window for that circuit appears (Figure 3-7).
3-24
114050 Rev. A
Editing DECnet Parameters
Figure 3-7.
3.
Circuit Definition Window
Select Protocols > Edit DECnet IV > Static Adjacencies in the Circuit
Definition window.
The DECnet Static Adjacent Hosts List window appears (Figure 3-8).
114050 Rev. A
3-25
Configuring DECnet Services
Figure 3-8.
4.
DECnet Static Adjacent Hosts List Window
Click on Add.
The DECnet Static Adjacency Configuration window appears (Figure 3-9).
Figure 3-9.
5.
3-26
DECnet Static Adjacency Configuration Window
Enter an adjacent Area ID and an adjacent Node ID, using the
descriptions in the next section as a guide.
114050 Rev. A
Editing DECnet Parameters
Click on OK to exit the window and save your changes.
6.
The DECnet Static Adjacent Hosts List window reappears. The static
adjacency you configured is displayed in the list.
Repeat Steps 4 through 6 to add additional static adjacencies.
7.
DECnet Static Adjacency Parameter Descriptions
Use the following descriptions as a guide when you configure the parameters in
the DECnet Static Adjacent Hosts List window (refer to Figure 3-8) and the
DECnet Static Adjacency Configuration window (refer to Figure 3-9).
Parameter:
Adjacency Enable
Default:
Enable
Options:
Enable | Disable
Function:
Instructions:
Specifies the state of the static adjacency record in the DECnet router’s
routing tables.
Select Disable to make the static adjacency record inactive in the DECnet
routing table; the router will not consider this static adjacency.
Select Enable to make this static adjacency record active again.
This parameter defaults to Enable when you click on Add in the DECnet
Static Adjacent Hosts List window.
MIB Object ID:
Parameter:
1.3.6.1.4.1.18.3.5.2.7.2
Adjacency Type
Default:
Area
Options:
Area | Routing IV | Non-Routing IV
Function:
Instructions:
MIB Object ID:
114050 Rev. A
Specifies whether the static adjacency is another router or an end node.
Select Area if the static adjacency is a Level 2 router, select Routing IV if
the static adjacency is a Level 1 router, or select Non-Routing IV if the
static adjacency is an end node.
1.3.6.1.4.1.18.3.5.2.7.7
3-27
Configuring DECnet Services
Parameter:
Default:
Range:
Function:
Adjacency Priority
None
0 to 127
If the static adjacency is another router, this parameter specifies the
router’s priority for becoming the designated router on the network. The
designated router performs additional services for other nodes attached to
the circuit. (All these nodes know the address of the designated router.)
If you do not choose a designated router, or if you assign two or more
routers the same priority, the router with the highest Node ID becomes the
designated router by default.
Instructions:
MIB Object ID:
Parameter:
1.3.6.1.4.1.18.3.5.2.7.8
Destination MAC Address
Default:
None
Options:
Any valid MAC address
Function:
Instructions:
MIB Object ID:
Parameter:
Default:
Range:
Function:
Instructions:
MIB Object ID:
3-28
Enter a router priority value from 0 to 127. If you want this node to be the
designated router on this circuit, assign it the highest priority value among
all routers on the circuit.
Specifies the 48-bit Ethernet address of the static adjacency.
Enter the MAC address as a 12-digit hexadecimal number.
1.3.6.1.4.1.18.3.5.2.7.9
Adjacent Area ID
None
1 to 63
Specifies the Area ID portion of the static adjacency’s DECnet address.
Enter the Area ID assigned to the static adjacency.
1.3.6.1.4.1.18.3.5.2.7.1.3
114050 Rev. A
Editing DECnet Parameters
Parameter:
Default:
Adjacent Node ID
None
Range:
Function:
Instructions:
MIB Object ID:
1 to 1023
Specifies the Node ID portion of the static adjacency’s DECnet address.
Enter the Node ID assigned to the static adjacency.
1.3.6.1.4.1.18.3.5.2.7.1.4
Editing Static Adjacency Parameters
To edit the parameters for an existing static adjacency:
1.
Select Circuits > Edit Circuits in the Configuration Manager window
(refer to Figure 3-1).
The Circuit List window appears (refer to Figure 3-6), listing the circuits
configured on the router.
2.
Select a DECnet circuit from this list and click on Edit.
The Circuit Definition window for the circuit appears (refer to Figure 3-7).
3.
Select Protocols > Edit DECnet IV > Static Adjacencies in the Circuit
Definition window.
The DECnet Static Adjacent Hosts List window appears (refer to Figure 3-8).
114050 Rev. A
4.
Click on the static adjacent host whose parameters you want to modify.
5.
Edit the parameters you want to change.
6.
Click on Apply to implement your changes.
7.
Repeat Steps 4 through 6 to edit additional static adjacencies.
8.
Click on Done to exit the window.
3-29
Configuring DECnet Services
Deleting a Static Adjacency
To delete a static adjacency:
1.
Select Circuits > Edit Circuits in the Configuration Manager window
(refer to Figure 3-1).
The Circuit List window appears (refer to Figure 3-6), listing the circuits
configured on the router.
2.
Select a DECnet circuit from this list and click on Edit.
The Circuit Definition window for the circuit appears (refer to Figure 3-7).
3.
Select Protocols > Edit DECnet IV > Static Adjacencies in the Circuit
Definition window.
The DECnet Static Adjacent Hosts List window appears (refer to Figure 3-8).
4.
Click on the static adjacent host you want to delete.
5.
Click on Delete to delete the static adjacency.
6.
Repeat Steps 4 and 5 to delete additional static adjacencies.
7.
Click on Done to exit the window.
Configuring the DECnet IV to V Transition
You create, edit, and delete the DECnet IV to V Transition from the Configuration
Manager window. The following sections describe how to perform each of these
tasks.
Note: You must configure both DECnet Phase IV and OSI on each network
interface participating in a DECnet IV to V Transition. If you have a mixed
Phase IV and Phase V network, refer to Configuring OSI Services for details
on configuring OSI.
3-30
114050 Rev. A
Editing DECnet Parameters
Creating the DECnet IV to V Transition
To create the DECnet IV to V Transition:
1.
In the Configuration Manager window (refer to Figure 3-1), select
Protocols > OSI > Create DECnet IV to V Transition.
The Create DECnet IV to V Transition Parameters window appears
(Figure 3-10).
Figure 3-10.
Create DECnet IV to V Transition Parameters Window
2.
Edit the parameters, using the following descriptions as a guide.
3.
Click on OK to save your changes and exit the window.
DECnet IV to V Transition Parameter Descriptions
Use the following descriptions as a guide when you configure the parameters in
the Create DECnet IV to V Transition Parameters window (refer to Figure 3-10).
114050 Rev. A
3-31
Configuring DECnet Services
Parameter:
DECnet 4 to 5 Transition Enable
Default:
Enable
Options:
Enable | Disable
Function:
Instructions:
Enables or disables the DECnet IV to V Transition.
To enable the transition, select Enable. To turn this feature off, select
Disable.
After you enable the DECnet IV to V Transition feature, if you select
Protocols > OSI, you will see that the edit and delete options are
available.
MIB Object ID:
Parameter:
1.3.6.1.4.1.18.3.5.6.12.2
Area Address Alias 1 (hex)
Default:
None
Options:
Any valid area address
Function:
Assigns the first area address alias to the router. The alias is a different
area address that is assigned to the same router.
For the DECnet IV to V Transition feature, the area address alias defines
the Phase IV prefix and Phase IV area fields of the Phase IV-compatible
address. (Refer to “Translating DECnet Addresses” in Chapter 1.)
Instructions:
Enter the area address alias in hexadecimal format.
For the DECnet IV to V Transition feature, enter the Phase IV prefix
(from 1 to 9 bytes), followed by 2 bytes of the Phase IV area address.
MIB Object ID:
1.3.6.1.4.1.18.3.5.6.1.17
Note: Refer to Chapter 2 of Configuring OSI Services for more information
about the area address alias.
3-32
114050 Rev. A
Editing DECnet Parameters
Editing the DECnet IV to V Transition Parameters
To edit the DECnet IV to V Transition parameters, begin at the Configuration
Manager window (refer to Figure 3-1) and proceed as follows.
1.
Select Protocols > OSI > Edit DECnet IV to V Transition.
The Edit DECnet IV to V Transition Parameters window appears. This
window contains the same fields as the Create DECnet IV to V Transition
Parameters window (refer to Figure 3-10).
2.
Edit the parameters, using the descriptions in the previous section as a
guide.
3.
Click on OK to implement your changes and exit the window.
Deleting the DECnet IV to V Transition
To delete the DECnet IV to V Transition feature, begin at the Configuration
Manager window (refer to Figure 3-1) and proceed as follows.
1.
Select Protocols > OSI > Delete DECnet IV to V Transition.
A window pops up and prompts:
Do you REALLY want to delete OSI DECnet IV to V Transition?
2.
Click on OK.
The Configuration Manager window appears. The DECnet IV to V Transition
feature is no longer configured on the router.
114050 Rev. A
3-33
Configuring DECnet Services
Deleting DECnet from the Router
To delete the DECnet routing protocol from all router circuits on which it is
currently enabled, begin at the Configuration Manager window (refer to
Figure 3-1) and proceed as follows.
1.
Select Protocols > DECnet IV > Delete DECnet IV.
A window pops up and prompts
Do you REALLY want to delete DECnet IV?
2.
Click on OK.
The Configuration Manager window appears. DECnet is no longer configured
on the router.
If you examine the Configuration Manager window, you see that the connectors
for circuits on which DECnet was the only protocol enabled are no longer
highlighted. You must reconfigure the circuits for these connectors. Refer to
Configuring Routers for details on configuring circuits.
3-34
114050 Rev. A
Appendix A
DECnet Parameter Default Settings
Tables A-1 through A-5 show the default settings for the DECnet Phase IV and
DECnet Phase IV to V Transition parameters in Site Manager. Use the
Configuration Manager to edit any of the default settings listed here (refer to
Chapter 3).
Table A-1.
114050 Rev. A
DECnet Phase IV Global Parameters
Parameter
Default
Route Enable
Enable
Route Level
Level 1 + Level 2
Level 1 Only Area
1
Broadcast Route Timer
180 s
Route Max Addr
1023
Max Broadcast Non Routers
64
Max Broadcast Routers
32
Max Circuits
1024
Max Cost
1022
Max Hops
30
Max Visits
63
Area Max Cost
1022
Area Max Hops
30
Max Area
63
A-1
Configuring DECnet Services
Table A-2.
Parameter
Default
Enable
Enable
Route Level
Level 1 + Level 2
Area ID
None
Node ID
None
Cost
10
Hello Timer
15 s
Max Routers
33
Router Priority
64
End Nodes MAC
None
End Routers MAC
None
Area Routers MAC
None
Node Hello
Enable
Router Hello
Enable
Level 1 Topology Update
Enable
Level 2 Topology Update
Enable
Table A-3.
A-2
DECnet Phase IV Interface Parameters
DECnet Static Route Parameters
Parameter
Default
Static Route Enable
Enable
Route Type
Level 2
Route Cost
10
Destination Area ID
None
Destination Node ID
None
Next Hop Area ID
None
Next Hop Node ID
None
114050 Rev. A
DECnet Parameter Default Settings
Table A-4.
Parameter
Default
Adjacency Enable
Enable
Adjacency Type
Area
Adjacency Priority
None
Destination MAC Address
None
Adjacent Area ID
None
Adjacent Node ID
None
Table A-5.
114050 Rev. A
DECnet Static Adjacency Parameters
DECnet IV to V Transition Parameters
Parameter
Default
DECnet 4 to 5 Transition Enable
Enable
Area Address Alias 1 (hex)
None
A-3
Index
A
accessing DECnet parameters, 3-2
adding
static adjacency, 3-24 to 3-27
static route, 3-18
Adjacency Enable parameter, 3-27
Adjacency Priority parameter, 3-28
Adjacency Type parameter, 3-27
adjacency. See static adjacency
Adjacent Area ID parameter, 3-28
Adjacent Node ID parameter, 3-29
Area Address Alias 1 parameter, 3-32
Area ID
and DECnet Phase V address mapping, 1-10
defined, 1-2
specifying
for an interface, 2-3, 3-12
for static adjacency, 3-27
for static route, 3-21
globally, 3-5
area ID, 3-5
Area ID parameter, 2-3, 3-12
Area Max Cost parameter, 3-8
Area Max Hops parameter, 3-8
Area Routers MAC parameter, 3-16
B
Bay Networks
CompuServe forum, xx
Customer Service FTP, xix
home page on World Wide Web, xix
InfoFACTS service, xxi
114050 Rev. A
Bay Networks (continued)
publications, ordering, xv
support programs, xviii
Support Source CD, xx
Technical Response Center, xvii, xxi
technical support, xvii
Broadcast Route Timer parameter, 3-5
C
CompuServe, Bay Networks forum on, xx
Connectionless Network Protocol (CLNP) packet
(DECnet phase V), 1-10
Cost parameter, 3-13
Customer Service FTP, xix
customer support. See getting help
D
DECnet
configuration parameters. See individual
parameter names
defaults, A-1
deleting from the router, 3-34
enabling on the router, 2-2
Level 1 routing, 1-4
Level 2 routing, 1-4
listening process for, 1-6
overview of, 1-1
routing process for, 1-5 to 1-9
update process for, 1-5
DECnet 4 to 5 Transition Enable parameter, 3-32
DECnet architectural constant, 1-10
Index-1
Configuring DECnet Services
DECnet circuit costs
assigning
for interface, 3-13
for router, 3-7, 3-8
for static route, 3-21
calculating the least-cost path, 1-6, 1-7
DECnet Hello messages
disabling, 1-16, 3-17
purpose of, 1-6
DECnet hops
maximum number of, 3-8
DECnet IV to V Transition, 1-10 to 1-14
advertising routes for, 1-13
configuring, 3-30
creating, 3-31
deleting, 3-33
editing, 3-31
parameter descriptions, 3-31
transition strategy for, 1-13 to 1-14
translating data packets for, 1-11 to 1-14
translating DECnet network layer addresses
for, 1-10 to 1-11
DECnet Phase IV
data packet, 1-10, 1-11
network organization for, 1-1
parameters
defaults for, A-1
Node ID, 2-3
DECnet Phase V, 1-3, 1-14
address for, 1-4, 1-10
advertising routes for, 1-13
CLNP packet, 1-10, 1-11
link state packets, 1-13
network organization for, 1-3
DECnet services, 1-4 to 1-9
defaults for DECnet parameters, A-1 to A-3
deleting
DECnet from the router, 3-34
DECnet IV to V Transition, 3-33
static adjacencies, 3-30
static routes, 3-23
Index-2
designated router, 1-9
specifying, 3-14
Destination Area ID parameter, 3-21
Destination MAC Address parameter, 3-28
Destination Node ID parameter, 3-21
disabling Hello messages, 1-16, 3-16, 3-17
E
editing
DECnet global parameters, 3-3
DECnet interface parameters, 3-9
DECnet IV to V Transition parameters, 3-31
static adjacency parameters, 3-29
static route parameters, 3-19
editing parameters, 3-1
Enable parameter, 3-11
enabling DECnet on an interface, 2-2
End Nodes MAC parameter, 3-15
End Routers MAC parameter, 3-15
F
Frame Relay multicasting address, 3-15
G
getting help
from a Bay Networks Technical Response
Center, xxi
from the Support Source CD, xx
through CompuServe, xx
through Customer Service FTP, xix
through InfoFACTS service, xxi
through World Wide Web, xix
H
Hello messages
disabling, 1-16, 3-16, 3-17
purpose of, 1-6
Hello Timer parameter, 3-13
114050 Rev. A
Index
high-order value, 1-10
hops
maximum number of, 1-7, 3-7, 3-8
I
InfoFACTS service, xxi
interarea routing, 1-4
intra-area routing, 1-4
L
least-cost path
calculating, 1-6
Level 1 and Level 2 routing
configuring
for interface, 3-11
for router, 3-4
defined, 1-4
Level 1 Only Area parameter, 3-5
Level 1 Only routing
configuring
area for router, 3-5
for interface, 3-11
for router, 3-4
defined, 1-4
Level 1 topology update packets, 1-13, 1-14
Level 1 Topology Update parameter, 3-17
Level 2 backbone, 1-14
Level 2 topology update packets, 1-14
Level 2 Topology Update parameter, 3-17
link state packets, 1-13
Max Hops parameter, 3-7
Max Routers parameter, 3-14
Max Visits parameter, 3-8
maximum transmission unit (MTU), 1-11
N
Next Hop Area ID parameter, 3-22
Next Hop Node ID parameter, 3-22
Node Hello parameter, 3-16
Node ID
configuring
for interface, 2-3, 3-12
defined, 1-2
nodes
maximum number of, 1-1
types of, 1-1
NSAP (Network Service Access Point) address
(DECnet Phase V), 1-4, 1-10
O
Open Systems Interconnection (OSI), 1-3
Open Systems Interconnections (OSI), 3-30
P
parameters
defaults, A-1
parameters. See also individual parameter names
Phase IV prefix, 1-10
Phase IV-compatible address, 1-10
M
R
Max Area parameter, 3-9
Max Broadcast Non Routers parameter, 3-6
Max Broadcast Routers parameter, 3-6
Max Circuits parameter, 3-6
Max Cost parameter, 3-7
Route Cost parameter, 3-21
Route Enable parameter, 3-4
Route Level parameter, 3-4, 3-11
Route Max Addr parameter, 3-5
Route Type parameter, 3-20
114050 Rev. A
Index-3
Configuring DECnet Services
Router Hello parameter, 1-17, 3-17
Router Priority parameter, 3-14
S
Site Manager, 3-2
SMDS group address, 3-15, 3-16
static adjacency
adding, 3-24 to 3-27
configuring, 3-23
defined, 1-16
deleting, 3-30
editing, 3-27
parameter descriptions for, 3-27 to 3-29
static route
adding, 3-18
configuring, 3-18
defined, 1-14
deleting, 3-23
editing, 3-23
parameter descriptions for, 3-19 to 3-22
Static Route Enable parameter, 3-20
Support Source CD, xx
System ID, 1-10
W
wide area network, 1-14
World Wide Web, Bay Networks home page on,
xix
Index-4
114050 Rev. A