1
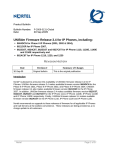
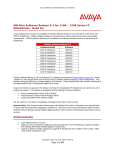
Avaya BCM Test Lab Business Communication Manager Release 5.0 Configuration Guide for PAETEC SIP Trunking Issue 1.1 Abstract This document provides guidelines for configuring a SIP Trunk between a BCM Release 5.0 and PAETEC SIP Trunk service. Reviewed: 03/25/2010 2009-00002460 BCM Test Lab Application Notes ©2010 Avaya Inc. All Rights Reserved. 1 of 13 BCM_Configuration_Guide_For PAETEC.doc Table of Contents 1. INTRODUCTION .............................................................................................................................................................. 3 1.1. DOCUMENT CHANGE HISTORY ......................................................................................................................................... 3 2. SYSTEM SOFTWARE / LOADWARE........................................................................................................................... 4 3. FEATURES......................................................................................................................................................................... 5 3.1. FEATURES SUPPORTED ..................................................................................................................................................... 5 3.2. TECHNICAL CAVEATS ...................................................................................................................................................... 5 4. NETWORK DIAGRAM.................................................................................................................................................... 6 5. SYSTEM CONFIGURATION.......................................................................................................................................... 7 5.1. BCM 5.1.1. 5.1.2. 5.1.3. 5.1.4. 5.1.5. 5.1.6. 5.1.7. 5.1.8. 5.1.9. 6. CONFIGURATION .................................................................................................................................................... 7 Line Pool Configuration ...................................................................................................................................... 7 Dial Plan Configuration ...................................................................................................................................... 7 SIP Routing Table Configuration ........................................................................................................................ 8 SIP Settings Configuration .................................................................................................................................. 9 SIP Media Parameters Configuration ................................................................................................................. 9 SIP Authentication Configuration........................................................................................................................ 9 IP Sets Media Parameters ................................................................................................................................. 10 Configuring Incoming Calls from PAETEC to BCM......................................................................................... 10 Giving Access to SIP Trunks.............................................................................................................................. 11 REFERENCES ................................................................................................................................................................. 12 Reviewed: 03/25/2010 2009-00002460 BCM Test Lab Application Notes ©2010 Avaya Inc. All Rights Reserved. 2 of 13 BCM_Configuration_Guide_For PAETEC.doc 1. Introduction This document provides a typical network deployment of Business Communication Manager (BCM) 50 Release 5.0 and BCM450 Rls 5.0 utilizing the PAETEC SIP Trunking service offering. The document provides the software line up, supported features as well as procedures for configuring a SIP trunk between the BCM Release 5.0 and PAETEC. This document should serve as general guideline only, since it is not possible to document every possible variation of configuration. Further information may be obtained from your Nortel support representative. 1.1. Document Change History Date Version December 17th 2009 V1.0 February 17th 2010, V1.1 Reviewed: 03/25/2010 2009-00002460 Summary of Changes Original publication Removed technical caveat about calling name restriction BCM Test Lab Application Notes ©2010 Avaya Inc. All Rights Reserved. 3 of 13 BCM_Configuration_Guide_For PAETEC.doc 2. System Software / Loadware To achieve successful interoperability between the BCM and PAETEC, the various network elements must the running the version of software as shown below: System BCM 50 Platform All platforms BCM450 All platforms Nortel IP Phone IP Phone 1120E IP Phone 1140E IP Phone 1220 IP soft phone 2050 Broadsoft AS Convergence (Acme) LGP SBC Genband SBC Firmware • • Base S/W: 9.0.1.00 Patch: BCM050.R500.SU.Syst em-001.200911 or higher • • Base S/W: 9.0.1.00 Patch: BCM450.R500.SU.Sys tem-001.200911 or higher 0624C6T or higher 0625C6T or higher 062AC6T or higher 3.3 or higher Rel_14.sp9_1.123 CXC-1250-DC Plexus 9000 ACME Net-Net 4250 C3/8000 Acme Net-Net 4250 3.5.5 (build 44959) Release 6.3.1.2.SP.8 SC6.1.0 Patch 3 (build 254) 7.1.40.40, patch 426 SC6.1.0 Patch 3 (build 254) Table 1 Validated Equipment and Software Reviewed: 03/25/2010 2009-00002460 BCM Test Lab Application Notes ©2010 Avaya Inc. All Rights Reserved. 4 of 13 BCM_Configuration_Guide_For PAETEC.doc 3. Features 3.1. Features Supported The following are capabilities provided by this solution: • Basic calls (G711a-law 20 ms, G729 20ms) • Calling line (number) identification presentation (CLIP) • DTMF (RFC2833) • Call hold • Call transfer (Blind and consultative transfers) • Ad hoc conference calls • Meet-Me conference calls hosted on the BCM • Call forward • Call Redirection to Voice Mail on BCM • Fax using G711 only • Inter-office tandem calls • Find Me Follow Me • Silent Recording 3.2. Technical Caveats The following are limitations with this solution: • Fax over T.38 is not supported by any of PAETEC’s SIP Trunking service • With PAETEC’s Broadworks SIP Trunking service, authentication of SIP requests from BCM are not supported by this solution. So when deploying with Broadworks, authentication must be turned off on the BroadWorks soft switch. • Deployments where BCM is located behind a NAT device is not supported • PAETEC’s LGP SIP trunking service sends DTMF digits both inband and using RFC2833 when G.711 is negotiated between the BCM and the LGP. BCM does not support inband DTMF. As a work around, on the BCM, configure G.729 as the first preferred codec and G.711 as the second preferred codec. Reviewed: 03/25/2010 2009-00002460 BCM Test Lab Application Notes ©2010 Avaya Inc. All Rights Reserved. 5 of 13 BCM_Configuration_Guide_For PAETEC.doc 4. Network Diagram Figure 1 shows a typical deployment of a SIP trunk between BCM Release 5.0 and PAETEC. In the diagram, there is no NAT between the BCM and PAETEC. Therefore the IP address of the BCM and any BCM IP phone must be routable from PAETEC. Public Public Internet Internet PSTN PAETEC SIP Trunking Service MG Soft SW Figure 1 SIP Trunking between BCM Rls 5.0 and PAETEC Reviewed: 03/25/2010 2009-00002460 BCM Test Lab Application Notes ©2010 Avaya Inc. All Rights Reserved. 6 of 13 BCM_Configuration_Guide_For PAETEC.doc 5. System Configuration This section provides procedures for configuring a SIP trunk on BCM Rls. 5.0 to PAETEC 5.1. BCM Configuration In order to configure a SIP trunk between BCM and PAETEC do the following: 5.1.1. Line Pool Configuration 1. Under Configuration Æ Telephony Æ Dialing Plan; select Line Pools. 2. Select BlocA. 3. Click on the “Add” button to add DNs of sets that need to access the above line pool. 5.1.2. Dial Plan Configuration 1. Under Configuration Æ Telephony Æ Dialing Plan Æ Public Network, define the Public Received number length to “4” digits 2. Set the Public Network Dialing Plan to Public (Unknown) 3. Under Configuration Æ Telephony Æ Dialing Plan Æ Routing, and select the Routes tab 4. Add a route by clicking on the Add button. 5. In the Add Route dialog box, provide an unused route and click on the OK button. 6. The Dialing Plan – Routing table will be displayed. 7. Click on the route just created 8. Under the Use Pool column, double click to select BlocA from the drop down list. 9. Under the DN Type column, double click to select Public (Unknown) from the drop down list 10. Click on the Destination Codes tab. 11. Configure a destination code to route dialed digits by clicking on the Add button. Digits that begin with this destination code will be presented to the SIP trunking component on the BCM for routing towards the Service Provider. 12. In the Add Destination Code dialog box, enter a numeric number for the destination code and click on the OK button. 13. Select the row representing the Destination Code entered in the previous step 14. Under Normal Route column, double click and enter the route entered in Step 4. 15. Under the Absorbed Length column, specify the number of digits that will be absorbed before sending the rest of the digits to the service provider. Reviewed: 03/25/2010 2009-00002460 BCM Test Lab Application Notes ©2010 Avaya Inc. All Rights Reserved. 7 of 13 BCM_Configuration_Guide_For PAETEC.doc 5.1.3. SIP Routing Table Configuration There are two possible ways to configure the BCM to route outbound SIP calls to the Service Provider: • Using the Routing Table tab found by clicking on IP Trunks module in Configuration Æ Resources Æ Telephony Resources. • Using the SIP Proxy tab found by clicking on IP Trunks module in Configuration Æ Resources Æ Telephony Resources. This guide illustrates how to do it using the Routing table. For details of how to use the SIP Proxy tab, see the BCM configuration guides. 1. Under Configuration Æ Resources Æ Telephony Resources; select module type “IP Trunks” and click on the “Routing Table” tab. 2. Add a “Remote Gateway” by clicking on the “Add” button. 3. In the “Add Remote Gateway” dialog box that is displayed, configure the fields as follows: • Description: Enter the logical name for the trunk destination • Destination Digits: Enter digits that identify the remote system as the call destination. • VoIP Protocol: SIP • Domain: SIP Domain name of PAETEC. This will be provided by PAETEC • IP Address: Provide the IP address of the SBC1. • Port: Provide the optional UDP port number to which the BCM will send SIP messages. • GW Type: Set this field to Other. • MCDN Protocol: Set to None. • QoS Monitor: Leave unchecked • Tx Threshold: Leave this field at its default value of 0.0 4. Click the OK button 1 This parameter is only required when configuring a SIP trunk between BCM and PAETEC’s BroadWorks SIP server. Reviewed: 03/25/2010 2009-00002460 BCM Test Lab Application Notes ©2010 Avaya Inc. All Rights Reserved. 8 of 13 BCM_Configuration_Guide_For PAETEC.doc 5.1.4. SIP Settings Configuration 1. Under Configuration Æ Resources Æ Telephony Resources: Select module type “IP Trunks” and click on the “SIP Settings” tab 2. In the SIP Settings sections: • Local Domain: Leave blank • Disable maddr in Contact: Checked to disable maddr in Contact header • Disable OPTIONS Caps: Checked to disable OPTIONS capability request by the BCM 3. Leave the rest of parameters under the SIP Settings tab at the default values 5.1.5. SIP Media Parameters Configuration 1. Under Configuration Æ Resources Æ Telephony Resources: Select module type “IP Trunks” and click on the “SIP Media Parameters” tab. 2. In the Preferred Codecs section, configure G.729, G.711-uLaw as the first and second preferred codec respectively. 3. In the codec Settings section, uncheck Enable Voice Activity Detection. 4. In the codec Settings section, select 20ms as the payload size for both G.729 and G.711 5. Again in the codec settings Section set G.711 as the Fax transport. 5.1.6. SIP Authentication Configuration 1. Under Configuration Æ Resources Æ Telephony Resources: Select module type “IP Trunks” and click on the “SIP Authentication” tab. 2. Create a new SIP Account by clicking on the “Add” button. 3. In the Add Auth Account dialog box that opens up, configure the parameters as follows: • Description: Provide a descriptive name for this SIP account. • Domain: Provide the SIP Domain name (provided by PAETEC) for PAETEC SIP trunking service • In the Account Identity section, select configure this SIP Account as either a Parent or Child account. A Parent account can be used by BCM Phone to place out going calls via the SIP Trunk between the BCM and PAETEC whereas as a Child account can only be used by a given BCM Phone. A Parent account will work for most deployments. Since authentication is not required for any of PAETEC SIP Trunking service, do not configure the User Credentials section. • • Reviewed: 03/25/2010 2009-00002460 Configure the parameters in the Message Handling section as follows: BCM Test Lab Application Notes ©2010 Avaya Inc. All Rights Reserved. 9 of 13 BCM_Configuration_Guide_For PAETEC.doc CLID Override: Provide the DID assigned to this account Display name Override: Provide the Display Name that will be presented to the called party. o Contact Override: Leave blank o Maddr in Contact: Leave unchecked o Local Domain Override: Leave blank For the BroadWorks SIP trunking Service enable Registration for this SIP Account by checking the checkbox next Registration. o In the Registration Details section for the BroadWorks service configure the registration details as follows: Registrar: IP address or Domain name of the Registrar or SBC (provided by PAETEC) where all SIP signaling must be sent. Registration Port: Provide the optional UDP port number for the registrar Expiry: Leave the default value Click the OK button o o • • 5.1.7. IP Sets Media Parameters 1. Under Configuration Æ Resources Æ Telephony Resources: Select module type “IP Sets” and click on “IP Terminals Global Settings”. 2. Set the “Default Codec” for IP sets to Auto and set the payload size (ms) for G.729 and G.711 to 20 5.1.8. Configuring Incoming Calls from PAETEC to BCM This can be done in one of two ways; 1. The DID associated with the PAETEC SIP account assigned to the BCM can be associated with a target line assigned to a group of set(s) and all calls to the DID will be routed those set(s). 2. All calls to the DID associated with the PAETEC SIP account assigned to the BCM can be answered by the Auto Attendant (AA) and from there, a DN can be entered to reach a phone on the BCM 5.1.8.1 Assigning DID to BCM Phones for Incoming Call 1. Navigate to ConfigurationÆ TelephonyÆ Lines Æ Target Line and click on an unused target line 2. On the selected Target Line, set the “Pub. Received #” to the last 4-digis of the PAETEC assigned DID. 3. Assign the DN of phones on the BCM that require an appearance on this target line. This will be the phones that will be alerted when call to the PAETEC assign DID is received. Reviewed: 03/25/2010 2009-00002460 BCM Test Lab Application Notes ©2010 Avaya Inc. All Rights Reserved. 10 of 13 BCM_Configuration_Guide_For PAETEC.doc a. Navigate to ConfigurationÆ TelephonyÆ Lines Æ Target Line and click on the Target Line configured in Step 2 above b. Click on the Assigned DNs tab c. Click the Add button to add the DN of set(s) to this Target Line. 5.1.8.2 Configuring AA to Answer Incoming Calls Alternatively, the AA on the BCM can be configured to answer incoming calls and then call routed to a target phone on the BCM by entering the extension of the set at the AA prompt. To do this, 1. Navigate to ConfigurationÆ TelephonyÆ Lines Æ Target Line and click on an unused target line 2. On the selected Target Line, set the “Pub. Received #” to the last 4-digis of the PAETEC assigned DID. 3. Navigate to ConfigurationÆApplicationÆVoice Messaging/Contact Center 4. Click on the Launch CallPilot Manager. 5. This launches a web browser to the BCM. Log in with the administrator credentials 6. On the left hand navigation menu, click on Auto Attendant 7. In the Line Administration web page, scroll down to the Target Line configured in Step 1. 8. Under the Command Column, click Change 9. In the Line Properties web page, select Auto-Attendant as the Answer Mode 10. Click the Submit button. 5.1.9. Giving Access to SIP Trunks To give access to BCM phones to make outgoing calls across the SIP trunk; 1. Navigate to ConfigurationÆTelephonyÆSetsÆActive Sets 2. Click on the Line Access tab 3. Click on the DN of each the registered BCM phones in turn and click on the Line Pool Access tab 4. Click on the Add button 5. In the Add Line Pool dialog box, type bloca 6. Click OK 7. Repeat steps 3 to 6 for each of active sets on the BCM. Reviewed: 03/25/2010 2009-00002460 BCM Test Lab Application Notes ©2010 Avaya Inc. All Rights Reserved. 11 of 13 BCM_Configuration_Guide_For PAETEC.doc 6. References The following are useful references to assist in this solution: 1. “BCM450 Technical Documentation”, http://support.nortel.com/go/main.jsp?cscat=DOCUMENTATION&poid=19781 2. “BCM50 Technical Documentation“, http://support.nortel.com/go/main.jsp?cscat=DOCUMENTATION&poid=15181 Reviewed: 03/25/2010 2009-00002460 BCM Test Lab Application Notes ©2010 Avaya Inc. All Rights Reserved. 12 of 13 BCM_Configuration_Guide_For PAETEC.doc ©2010 Avaya Inc. All Rights Reserved. Avaya and the Avaya Logo are trademarks of Avaya Inc. All trademarks identified by ® and ™ are registered trademarks or trademarks, respectively, of Avaya Inc. Nortel, Nortel Networks, the Nortel logo, and the Globemark are trademarks of Nortel Networks. All other trademarks are the property of their respective owners. The information provided in these Application Notes is subject to change without notice. The configurations, technical data, and recommendations provided in these Application Notes are believed to be accurate and dependable, but are presented without express or implied warranty. Users are responsible for their application of any products specified in these Application Notes. If you have any issues with the solution described in this document, please contact 1-800-4NORTEL Reviewed: 03/25/2010 2009-00002460 BCM Test Lab Application Notes ©2010 Avaya Inc. All Rights Reserved. 13 of 13 BCM_Configuration_Guide_For PAETEC.doc