Transcript
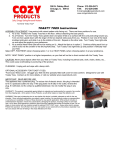
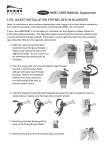
INSTALLATION GUIDE FOR THE:
PRO-PDA15
Power Door Lock Actuator
Printed in Taiwan
Form No. 128-6367A
ACTUATOR/DOOR LOCK INSTALLATION
1.)
2.)
3.)
4.)
5.)
Carefully remove the door panel.
Since the adjustable steel mounting strap is optional at this step, you can either attach strap to the door structure
(see Drawing #3) and mount actuator/door lock to the strap, or attach actuator/door lock onto the door structure.
Both mounting methods must ensure a suitable position is selected that will not hinder the window mechanism
and is close enough to operate the existing lock assembly.
Slide connector rod onto the end hole of actuator/door lock. Attach-connector rod clamp to the connector rod (see
Drawing #2).
Set door lock in the unlock position, then tighten connector rod clamp to the existing factory door rod supplied
with kit.
Pull connector rod until the actuator is fully extended, then tighten connector rod clamp to existing factory door
rod.
INSTALLATION DIAGRAM
CONNECTOR
ROD CLAMP
CONNECTOR ROD
HEX HEAD
SCREWS