1
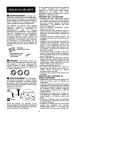
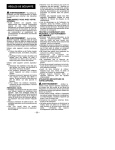
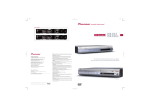
FP1210 User Manual
1286475
1
TABLE OF CONTENTS
TABLE OF CONTENTS
General Information ………………………………………………...2
Important Safety Instructions
…………………………………..2
Federal Communication Commission Information (FCC) ……….6
Getting Started
Package Contents ........................................................................... 7
Connection ....................................................................................... 8
Operation
Front Control Panel ........................................................................... 11
Remote Control …………………………………………………..….12
Power Management System ……………………………………...14
Technical Information
Specifications ……………………………………………………….15
Troubleshooting ……………………………………………………..16
2
General Information
Thank you for purchasing this 12.1" flat-screen TFT LCD monitor. It is
designed to meet the screen performance requirements of today's
demanding business applications. It delivers a larger display area,
higher resolutions and greater color accuracy.
The On Screen Display (OSD) microprocessor user control system
enhances and expands your ability to control your display. The
microprocessor-based memory stores your preferred screen settings.
Digital controls positioned on the front of the screen are easier to reach
and use and greatly improve your capabilities to adjust the screen
settings.
The tilt base allows you to adjust the monitor to your preferred angle of
vision.
Important Safety Instructions
Ø
Ø
Ø
Ø
Ø
Ø
Ø
Ø
Read Instructions -- All the safety and operating instructions should be
read before the product is operated.
Retain Instructions – The safety and operating instructions should be
retained for future references.
Heed Warnings – All Warnings on the product and in the operation
instructions should be adhered to.
Follow Instructions – All Operating and user instructions should be
followed.
Cleaning – Unplug this product from the wall outlet before cleaning. DO
NOT use liquid cleaners or aerosol cleaners. Use damp Cloth for cleaning.
Attachments – DO NOT use attachments not recommended by the
product manufacturer they may cause hazards.
Mounting – DO NOT place this product on an unstable cart, stand, tripod,
bracket, or table. The product may fall, causing serious injury to a child or
adult, and serious damage to the product. Use only with a cart, stand,
tripod, bracket, or table recommended by the manufacturer or sold with the
product. Any mounting of this product should follow the manufacture’s
instructions, and should use a mounting accessory recommended by the
manufacturer.
Heat – The Product should be situated away from heat source such as
radiators, heat registers, stoves or other products (including amplifiers)
that produce heat.
3
Important Safety Instructions (continued)
Ø
Ø
Ø
Ø
Ø
Ø
Ø
Ø
Ø
Water – DO NOT use this product near water. For example: Avoid placing
it near bathtub, washbowl, kitchen sink, or laundry tub, in a wet basement,
or near a swimming pool, ETC…
Cabinet Slots – NEVER push objects or any kind into the unit through the
cabinet slots as they may touch dangerous voltage points or short out parts
that could result in a fire or electric shock. NEVER spill liquid of any kind
on the product.
Ventilation – DO NOT block any ventilation openings. Install in
accordance with manufacture’s instructions. Slots and openings in the
cabinet and the back and bottom are provided for ventilation, and to ensure
reliable operation of the product and to protect it from Overheating. These
openings must NOT be blocked or covered. There should be at least 10cm
of space from these openings. The openings should never be blocked by
placing the unit on a bed, rug or other similar surface. This product should
NOT be placed in a built-in installation such as a bookcase unless proper
ventilation is provided.
Grounding or Polarization – This product may be equipped with a
polarized alternating current line plug (a plug having one blade wider then
the other). This plug will fit the power outlet only one way. This is a safety
feature. If you are unable to insert the plug fully into the outlet, try
reversing the plug. If the plug should still fail to fit, contact your electrician
to replace your obsolete outlet. DO NOT defeat the safety purpose of the
polarized plug.
Power – Cord Protection – Power supply cords should be routed so that
they are not likely to be walked on or pinched by items placed upon or
against them. Pay particular attention to cords at plugs, convenience
receptacles, and the point where they exit from the product.
Power Sources – This product should be operated only from the type of
power source indicated on the rear panel. If you are not sure of the type of
power supply to your home consult your product dealer or local power
company.
Lightning – For added protection for this product during a lightning storm,
or when it is left unattended and unused for a long period of time, unplug it
from the outlet and disconnect the antenna or cable system. This will
prevent damage to the product due to lightning and power-line surges.
Power Lines – An outside antenna system should not be located in the
vicinity of overhead power lines or other electric light or power circuits, or
where it can fall into such power lines or circuits. When installing an
outside antenna system, extreme care should be taken to keep from
touching such power lines or circuits as contact with them might be fatal.
Overload – DO NOT overload wall outlets, extension cords or integral
convenience receptacles as this can result in a risk of fire or electric shock.
4
Important Safety Instructions (continued)
Ø
Ø
Ø
Ø
Ø
Damages Requiring Service – Unplug this product from the wall outlet
and refer servicing to qualified service personnel under the following
conditions.
Ø When the power-supply cord or plug is damaged.
Ø If liquid has been spilled, or objects have fallen into the product.
Ø If the product has been exposed to rain or water.
Ø If the product does not operate normally after following the operating
instructions. Adjust only those controls that are covered by the
operating instructions as an improper adjustment of other controls
may result in damage and will often require extensive work by a
qualified technician to restore the product to its normal operation.
Ø If the product has been dropped or damaged in any way.
Ø When the product exhibits a distinct change in performance – this
indicates a need for service.
Replacement parts – When replacement parts are required, be sure the
service technician has used replacement parts specified by the
manufacturer or have the same characteristics as the original part.
UNAUTHORIZED substitution may result in fire, electric shock or other
hazards.
Safety Check – Upon completion of any service or repair to this product,
ask the service technician to perform safety checks to determine that the
product is in proper operating condition.
Important Information Regarding Use of Video Games, Computer,
Captions or other Fixed Image Displays .
Ø The Extended use of a fixed image program material can cause
permanent “Shadow Image” on the LCD Panel. The Background
image is viewable on normal programs in the form of stationary fixed
image. This type of irreversible LCD panel deterioration can be
limited by observing the following steps:
Ø Reduce the brightness/contrast setting to a minimum viewing
level.
Ø DO NOT display the fixed image for extended periods of time.
Ø Turn the power off when not in actual use.
Recycling – This product utilizes tin-lead solder, and has a
fluorescent lamp containing a small amount of mercury. Disposal of
these materials may be regulated in your community due to
environmental considerations. For disposal or recycling information
please contact you local authorities, or the Electronics Industries
Alliance: http://www.eiae.org/
5
Important Safety Instructions (continued)
The Lightning flash with the arrowhead symbol within an
equilateral triangle is intended to alert the user to the
presence of uninsulated “DANGEROUS VOLTAGE” within
the product’s enclosure that may be of sufficient magnitude
to constitute a risk or electric shock to persons.
The Ex clamation point within an equilateral triangle is
intended to alert the user to the presence of important
operating and maintenance (servicing instructions in the
literature accompanying the product).
6
Federal Communication Commission Information (FCC)
Ø
This Equipment has been tested and found to comply with the limits for a
TV Broadcast Receiver, pursuant to Part 15 of the FCC Rules. These
limits are designed to provide reasonable protection against harmful
interference in a residential installation. This equipment generates, uses
and can radiate radio frequency energy and, if not installed and used in
accordance with the instructions, may cause harmful interference to radio
communications If this equipment does cause or receive interference,
which can be determined by turning equipment off and on, the user is
encouraged to try to correct the interference by one of the following
measures:
Ø Reorient or relocate the TV antenna.
Ø Increase the separation between TV and other equipment.
Ø Connect TV into separate outlet from equipment.
Ø Consult the dealer or an experienced radio/TV technician for
assistance.
FCC Caution: Any changes or modifications not
expressly approved by the party responsible for
compliance could void the user’s authority to operate this
equipment
7
Getting Started
Package Contents
Your package includes the following:
1. 12.1” LCD Monitor
3. AC Power Adapter
5. 8 Pin Mini-DIN cable
7. RF antenna adapter
1
2. User’s Manual
4. RCA A/V Cable
6. Remote Control
8. 12V DC Cigarette adapter
2.
MANUAL
3.
4.
5.
6.
7.
8.
8
Connection
Rear Panel View
AV2 INPUT
DC 12V
VIDEO
L
AUDIO
AV3 INPUT
R
DVD / GAME
PORT
TV ANT
1
DC INPUT
DC 12V input jack
2
3
VIDEO
Composite Video input jack
AUDIO L&R
RCA Audio Left/Right input jacks
4
5
DVD / GAME PORT
Proprietary jack for S-Video input
TV ANT
CATV/Antenna input
9
Connecting the TV/ Monitor to A S-Video device
Note: Please be sure the AC power to your DVD/Game Machine is
turned OFF before connecting or disconnecting any display peripherals.
Failure to do so may cause serious personal injury as well as
permanent damage to your equipment.
n
Connect the mini 8 pin Mini-DIN cable that is provided with the
TV/Monitor unit to the DVD/GAME PORT on the unit. Connect the
S-Video cable (not supplied) from the device to the receiving
S-Video cable from the 8 Pin Cable
Connecting the TV / Monitor to your Cable TV or
antenna signal source
n
Connect your ‘F’ type Cable TV or antenna coaxial signal cable
to the provided RF antenna adapter. Once you have connected
the cable to the adapter, insert the adapter into the connector
labeled TV ANT.
10
Connecting the TV / Monitor to an RCA device
n
Connect the supplied RCA Audio/Video signal cable as follows:
Yellow: Composite Video Out on your DVD, VCR etc. to the
Composite VIDEO Input connector on the TV/Monitor.
White: Left Audio Output on your DVD, VCR etc. to the L AUDIO
Input on the TV/Monitor.
Red: Right Audio Output on your DVD, VCR etc. to the R AUDIO
Input on the TV/Monitor.
n
Connect the small end to the power adapter to the DC 12V input
on the back of the TV/Monitor. Connect the AC power cord to a
suitable AC power wall socket.
Note: This monitor is set to operate using a 100-240 volt AC, +/- 10%,
50/60Hz power supply. If the voltage in your home is different from this,
consult your dealer.
11
Operation
Front Control Panel
HiFi
HEADPHONE
POWER
TV/AV
VOLUME
CHANNEL
SENSOR
1
POWER
On/off
2
TV / AV
Select Video/Audio input source
3
VOLUME -
Push - to decrease volume.
4
VOLUME +
Push + to increase volume.
5
CHANNEL Down
Push
6
CHANNEL Up
Push
7
SENSOR
For remote control
8
Hi-Fi HEADPHONE
Headphone jack
?
?
12
to decrease channel
to Increase channel
Remote Control
2
1
TV/AV
1
2
3
4
5
6
5
3
PICTURE
+
--
4
VOLUME
7
8
0
1--
9
6
7
10
ADD
ERASS
MUTE
9
8
1.
Power button: Turn the TV/Monitor on and off.
2.
TV/AV: This button is used to select the desired Video input
source. (RCA, S-Video or TV)
3.
PICTURE: Press this button to switch between the
following OSD (On Screen Display) functions listed below:
Volume : Push Volume + to increase volume.
Push Volume - to decrease volume
Contrast : Push Volume +/- for adjustment.
Brightness: Push Volume +/- for adjustment.
RGB
Tint: Push Volume +/- for adjustment.
Color: Push Volume +/- for adjustment.
13
Remote Control (Continued)
4.
VOLUME: To control the sound level. Push + to increase the
volume. Push - to decrease volume.
5.
Keypad: Used to manually change to a desired TV channel.
6.
PROG (program) : This button is used for automatic scan for valid
channels and store these channels into memory.
7.
CHANNEL: Push this button to switch the channel. Push ? to
increase the channel upward. Push ? to decrease the channel
downward.
8.
MUTE: Temporarily disable the audio.
9.
ADD ERASE: Push this button to add or erase the channel
currently being viewed. (The button needs to be pressed 2x to
confirm)
10. TV/CATV: Press this button to select between TV or Cable TV
sources for viewing.
14
Power Management
System
IMAGE QUALITY
( not to scale )
Mode
Power Usage
Description
LED indicator
Full Power
24W
ON
Green
Monitor screen is blank
Off
Orange
6W
Recover time 1 second
15
Technical Information
Specifications
1. Panel
12.1 inches, TFT LCD
2. Input Signal
AV/TV Video composite video /75 ohm
System:NTSC
3. Display color
Analog Input, 262K colors
4. Resolution
Horizontal: 450 Line
Vertical: 350 Line
5. Display size
12.1” Horizontal: 246.0 mm
Vertical: 184.5 mm
6.Speaker Output Power 1.8W X 2
7. Power Supply
AC: 100-240 VAC, 60/50 Hz
DC: 12V (with Cigarette adapter)
8. Current Rating
0.5A~1.2A
9. Dimensions
341mm x 290.5mm x 160mm (WxHxD)
10. Weight
5.3 lb.
11. Environmental
Operating Temperature: 0 0C to 400C
Considerations
Storage Temperature: 100C to 600C
16
Troubleshooting
No power
n
Press power button ON.
n
Make sure A/C power cord is securely connected to back of
monitor and to a power outlet.
Power on but no screen image
n
Make sure video cable supplied with monitor is tightly secured to
video output port on back of AV peripheral.
n
Adjust the brightness and contrast.
Entire screen image scrolls (rolls) vertically
n
Make sure video input signals are within monitor’s specified
frequency range.
n
Try monitor with another power source, graphics card, or
computer system.
n
Connect video cable securely.
Contents are subject to change
without further notice.
17