1
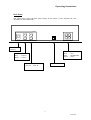
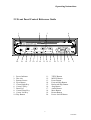
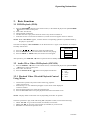
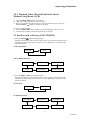
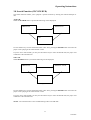
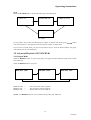
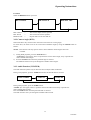
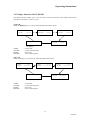
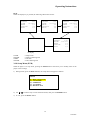
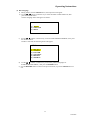
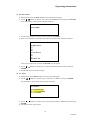
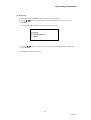
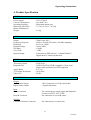
'9' In-Dash Single Disc DVD/CD Player Before operating the unit, please read these instructions carefully 128-5987 Operating Instructions Welcome Thank you for purchasing this DVD/CD player. Before operating the unit, please read this manual thoroughly and retain it for future reference. IMPORTANT NOTES To prevent an electrical system short which could cause serious damage to the unit, the vehicle, or cause personal injury, please follow the safety recommendations below: • Should there be requirement to replace a blown fuse, remember to first disconnect all power and switch off the unit before fuse replacement. Use a fuse with the correct rating to avoid damaging the unit. • During operation, if the unit overheats or the system malfunctions for some reason, switch off the unit and consult your dealer immediately. Please do not attempt to open up the unit; there are no serviceable parts inside. • This product utilizes a laser. Do not remove the cover. Use of controls or adjustments or performance of procedure other than those specified herein may result in hazardous radiation exposure. • To reduce the risk of fire or shock hazard, do not expose this equipment to rain or moisture. This unit is designed using high quality electronic components, and is manufactured under stringent quality control standards. The unit will provide many hours of quality performance if used correctly. To ensure quality performance, please comply with the following precautions during use: • The battery life of the remote control unit is approximately 6 months long. To ensure effective control, please replace the batteries regularly. Do not use new and used batteries at the same time; the good battery could be damaged. • Do not use any chemical solvent, cleaning agent or corrosive detergent to clean away dirt on the surface of the bezel. By so doing, you may cause irreversible damage to the surface. To clean off dirt or fingerprints, use a soft damp lens cleaning cloth. • Ensure that no metal or foreign materials fall into the player cabinet. If this happens, switch off the unit and contact your dealer immediately. • Allow adequate air circulation to prevent internal heat buildup. Do not install unit near heat sources such as radiators or air ducts, or in a place subject to direct sunlight or excessive dust. If the internal temperature of the vehicle is extremely high, allow a brief cool-down period before operating the unit. • Keep the unit away from equipment with strong magnets such as large loudspeakers. 2 128-5987 Operating Instructions • Depending on reception quality of the TV, noise interference may appear while a broadcast is being received with the DVD powered on. This is not a malfunction of the DVD or the TV. To watch a TV broadcast, turn off the DVD. • To prevent an operational malfunction, do not play discs other than DVD audio discs, DVD-ROMs, CD-ROMs, Photo CDs and DVDs with region numbers other than this player’s region number. • Only use the correct size of fasteners or cable connectors during installation. Failure to comply with this requirement may create a fire hazard. • Kindly refer to an authorized dealer if in doubt concerning any of the preceding items. When installing this unit together with a display monitor, please check that this configuration complies with your local traffic rules and regulations This product incorporates copyright protection technology that is protected by method claims of certain U.S. patents and other intellectual property rights owned by Macrovision Corporation and other rights owners. Use of this copyright protection technology must be authorized by Macrovision Corporation, and is intended for limited viewing uses only unless otherwise authorized by Macrovision Corporation. Reverse engineering or disassembly is prohibited. 3 128-5987 Operating Instructions INSTALLATION GUIDE Precautions: 1. This DVD/CD player should be install by qualified technician or service personnel. 2. The DVD/CD is designed to operate with a 12 Vdc, negative ground battery system. 3. Disconnect the ground wire from the battery terminal before connecting the unit to the electrical system. 4. The wiring from other units or accessories might display a similar color code to this product; however, they may not perform the same function. It is always advisable to refer to the electrical connection diagrams of a unit or its accessories before installation to avoid incorrect connections. 5. Use proper insulation and fastening materials to prevent electrical shortcircuiting. 6. Do not connect the yellow wire of the DVD/CD player directly to the battery terminal. Remember to connect the red wire to the ACC side of the ignition switch. Failure to do so may result in prematurely draining the battery charge. 7. Use only supplied accessories to avoid damaging the unit during installation. 8. Do not install the DVD/CD player at an incline angle exceeding 30°. 9. Do not install the DVD/CD player at a position that may cause injuries to the passenger(s) during an accident. 4 128-5987 Operating Instructions Back Panel The figure below shows the back panel design for the player. It also indicates the wire definition for interconnections. Control Unit Interface Yellow Red Blue Black Audio Output Red : Audio R White : Audio L Yellow 3 pin Con : Video Output : Rear IR : BATT : ACC : SIDEBRAKE : GND Optical Connector 5 128-5987 Operating Instructions 2.1 Remote Control Reference Guide 1. 2. 3. 4. 5. 6. 7. 8. 9. 10. 11. 12. 13 14. Power Button Setup Button Display Button Up Cursor Key Left Cursor Key Enter Key Previous/Reverse Skip Button Down Cursor Key Reverse Scan Button Play/Pause Button Subtitle On/Off Button Subtitle Selection Button Numeric Buttons Eject Button 15. 16. 17. 18. 19. 20. 21. 22. 23. 24. 25. 26. 27. Mute Button Title Button Menu/PBC Button Return Button Right Cursor Key Slow Button Next/Forward Skip Button Stop Button Forward Scan Button Audio Select Button Angle Select Button Search Button Repeat Button 6 128-5987 Operating Instructions 2.2 Front Panel Control Reference Guide 1 2 QHFYR[ 3 4 DXWR PRELOH GYG FG SOD\HU '9$; SENSOR 20 19 AUDIO 0 18 FR PAUSE FF MENU 0 $ 17 16 15 14 ¡s PLAY TITLE 1. Power Indicator 2. Disc slot 3. Remote Sensor 4. Eject Button 5. Cursor Right Key 6. Cursor Up Key 7. Enter Key 8. Cursor Down Key 9. Cursor Left Key 10. Play Button 11. 12. 13. 14. 15. 16. 17. 18. 19. 20. SEL 7 13 12 11 ¡t MUTE OFF STOP ¡s RETURN ¡t 10 9 8 7 '9' VIDEO 6 5 TITLE Button MENU Button Pause Button Forward Skip Button Backward Skip Button Stop Button Audio Button Mute Button Return Button Power On/Off Button 7 128-5987 Operating Instructions 3. Basic Functions 3.1 DVD Playback (DVD) 1) Press the POWER( ) button on the remote control, or the DVD/CD player front panel POWER ( ) button to switch on unit power. 2) Insert a disc into the unit. 3) DVD playback commences: • The disc will start to play if the disc does not have any menu recorded on it. • If the disc has one or more titles recorded on it, a menu screen will appear on the TV monitor. NOTE: When “INVALID” appears, it means that the corresponding operation is prohibited either by the player or by the disc. The DVD will display “INVALD DISC” if the DVD disc has a region code that does not compare favorably with the unit. TITLE MENU buttons to select the preferred title. 4) Press the / / / 5) Press the ENTER button: the selected item will now start playing. 6) Press the MENU or TITLE button; the menu screen will appear. 1. Fish 2. Bird 3. Dog After operation, press POWER ( ) button to place the unit in standby mode. 3.2 Audio CD or Video CD Playback (CD/VCD) 1) Press the POWER ( ) button on the remote control, or the DVD/CD player front panel POWER ( ) button to switch on unit power. 2) Insert a disc into the unit. 1. Dog 3) Press the PLAY/PAUSE ( ) button to start playback of the disc. 2. Cat 3.2.1 Playback Video CDs with Playback Control Using Menus 3. 4. 5. Sheep Cow Bird • This function operates only with a Video CD having playback control (Version 2.0). • Perform steps 1 to 3 as outlined in paragraph 3.2; the menu will be displayed on the TV monitor. 4) Press the numeric buttons to select the preferred track. 5) Press the RETURN button to stop the playback and return to the Menu screen. NOTE: The play details in the menu will vary depending on the disc in question. The basic operations to play Video CD having PBC (Playback Control) consist of the following: • NEXT TRK - To go to the next menu (if available) or next track. • PREV TRK - To go to the previous menu (if available) or previous track. • RETURN- To return to the previous menu. 8 128-5987 Operating Instructions 3.2.2 Playback Video CDs with Playback Control Without Using Menus (VCD) 1) Press the MENU/PBC button to set PCB off. 2) “PBC OFF” will be displayed on the TV screen. 3) Press the required track number button to select the preferred track, or press the PLAY/PAUSE ( ) button to commence playback. To return to menu playback: 1) Press the MENU/PBC button: “PBC ON” will be displayed on the TV screen. 2) The menu (if available) will be displayed on the TV monitor. 3.3 Fast Forward or Reverse (CD/VCD/DVD) 1) Press the F.FWD ( ) button during playback. Each time this button is pressed, the unit will go into a rapid advance playback mode. The following OSD will be shown on the TV screen, depending on the speed of the playback selected: Audio CD Playback FAST FW PLAY Video CD/DVD Playback FAST FWX2 FAST FWX4 FAST FWX8 PLAY FAST FWX32 FAST FWX16 2) Press the F.REV ( ) button during playback. Each time this button is pressed, the unit will go into a rapid reverse playback mode. The following OSD will be shown on the TV screen, depending on the speed of the playback selected: CD Playback FAST BW PLAY VCD/DVD Playback FAST BWX2 FAST BWX4 FAST BWX8 PLAY FAST BWX32 FAST BWX16 9 128-5987 Operating Instructions 3.4 Next track or previous track (CD/VCD/DVD) Press during playback. Audio CD and Video CD: The player will skip forward to the next track each time the button is pressed. “SKIP FW” will be displayed on the TV screen. DVD: The player will skip forward to the next title/chapter each time the button is pressed. “SKIP FW” will be displayed on the TV screen. Press during playback. Audio CD and Video CD: The player will skip to the beginning of the current track each time the button is pressed. The player will skip to the beginning of the previous track when the button is pressed twice consecutively. “SKIP BW” will be displayed on the TV screen. DVD: The player will skip to the beginning of the current chapter each time the button is pressed. The player will skip to the beginning of the previous chapter when the button is pressed twice consecutively. “SKIP BW” will be displayed on the TV screen. 3.5 Play / Pause (CD/VCD/DVD) Press the PLAY/PAUSE ( ) button during playback; the player will be placed in the pause mode. Press the PLAY/PAUSE ( ) button again; the player will return to normal playback 3.6 Slow Motion play (VCD/DVD) Each time the SLOW button is pressed, the unit will go into a slow motion playback mode. The following OSD will be shown on the TV screen: SLOW FWX2 SLOW FWX4 PLAY SLOW FWX8 SLOW FWX16 3.7 Stop (CD/VCD/DVD) 1) 2 During Audio CD playback, when the STOP ( ) button is pressed, the CD playback will stop. During VCD/DVD playback, when the STOP ( ) button is pressed, “PRE STOP” will appear. The player records the point where the STOP ( ) button is pressed (Resume playback function). 3) Press the PLAY/PAUSE ( ) button again and play will resume from this point. During “PRE STOP”, if the STOP ( ) button is pressed, “STOP” will appear and the resume playback function will be cleared. NOTE: The resume playback function is not available for Audio CDs. 10 128-5987 Operating Instructions 3.8 Search Function (CD/VCD/DVD) The Search function enables you to pinpoint a specific location by entering the time/track/chapter or title. Audio CD: When the SEARCH button is pressed the following will be displayed: TRACK xx TIME xx:xx CD Use the numeric keys to enter the desired track or disc time; pressing the ENTER button will cause the player to start playing at the selected track or time. If you are not in search mode, you may use the numeric keys to enter the desired track; the player will commence at the selected track. Video CD: When SEARCH button is pressed the following will be displayed: TRACK xx TIME xx: xx:xx No display Use the numeric keys to enter the desired track or disc time; pressing the ENTER button will cause the player to start playing at the selected track or time. If you are not in search mode, you may use the numeric keys to enter the desired track; the player will commence at the selected track. NOTE: The search function is not available during Video CD “PBC ON”. 11 128-5987 Operating Instructions DVD: When the SEARCH button is pressed the following will be displayed: TITLE xx CHAPTER xxx TIME xx:xx:xx No display Use the numeric keys to enter the desired title or chapter, or chapter time; pressing the ENTER button will cause the player to start playing at the selected title, chapter or chapter time. If you are not in search mode, you may use the numeric keys to enter the desired chapter; the player will commence at the selected chapter. 3.9 Advanced Playback (CD/VCD/DVD) 3.9.1 Repeat Mode When the REPEAT button is pressed, the player will toggle between different repeat modes (Audio CD/ Video CD) When the REPEAT button is pressed: REPEAT ONE REPEAT ONE REPEAT ALL REPEAT OFF = = = REPEAT ALL REPEAT OFF The current track will be repeated. The current disc will be repeated. Repeat mode will be switched off. NOTE: The REPEAT function is not available during Video CD “PBC ON”. 12 128-5987 Operating Instructions For DVD: When the REPEAT button is pressed: RPT CHAPT RPT CHAPT RPT TITLE REPEAT OFF = = = RPT TITLE REPEAT OFF The current chapter will be repeated The current title will be repeated Repeat mode will be switched off 3.9.2 Camera Angle (DVD) Some DVD discs may contain scenes which have more than one viewing angle. For these discs, the same scene can be viewed from a different angle by using the ANGLE button as follows: NOTE: This function will only operate on discs where different camera angles have been recorded. 1) During DVD playback, press the ANGLE button. “ANGLE x/y” will appear, where x represents the current camera angle, and y represents the total available camera angle. 2) Press the ANGLE button until the preferred angle is selected. The ANGLE selection will cycle through all available camera angles. 3.9.3 Audio Function (VCD/DVD) The audio function operates only for discs that have multiple audio soundtracks. During VCD playback, press the AUDIO button until the desired audio is selected. AUDIO STEREO AUDIO LL AUDIO RR During DVD playback, press the AUDIO button. “AUDIO x/y” will appear, where x represents the current audio stream and y represents the total available audio streams. Press the AUDIO button until the preferred audio is selected. The audio selection will cycle through all available audio streams. 13 128-5987 Operating Instructions 3.9.4 Subtitle (DVD) During DVD playback, you may change the subtitle language from the one selected at the initial setting to a different language, if available. 1) When the SUBTITLE ON/OFF button is pressed: SUBTITLE ON SUBTITLE OFF 2) During DVD playback with SUBTITLE ON, press the SUBTITLE button . “SUBTITLE x/y” will appear, where x represents the current subtitle and y represents the total available subtitle. Press the SUBTITLE button until the preferred subtitle is selected. The SUBTITLE selection will cycle through all available subtitles. NOTE: 1. The SUBTITLE works only for discs that have multiple subtitles. 2. In some cases, the subtitle is not changed immediately to the one selected. 3.9.5 DVD Menu (DVD) Most DVD discs have unique menu structures call DVD menus. The DVD menu contents and operation may differ from disc-to-disc. 1) During DVD playback, press the MENU button. The DVD menu available on the disc will be displayed. 2) Use the / / make a selection. / buttons to select the preferred item, or use the numeric buttons(s) to 3) Press the ENTER button; the selected item will start playing. 3.9.6 Title Menu (DVD) Some DVD discs may contain more than one title. If the disc has a title menu recorded on it, the TITLE button can be used to access it. 1) During DVD playback, press the TITLE button. A list of the titles may be displayed. 2) Use the / / / buttons to select the preferred item. 3) Press the ENTER button; the selected title will start playing. 14 128-5987 Operating Instructions 3.9.7 Display Function (CD/VCD/DVD) The display function enables you to view the status, current title number, track number and the total playing time of the disc on the TV screen. Audio CD: When the DISPLAY key is pressed, the following OSD will be shown: TRACK TTIME 1/15 01:41 TRACK TRTIME 1/15 02:30 TRACK DTIME TRACK DRTIME 1/15 11:37 1/15 58:50 No display TTIME TRTIME DTIME DRTIME = Track time = Track remaining time = Disc time = Disc remaining time Video CD: When the display key is pressed, the following OSD will be shown: TRACK TTIME 1/15 00:01:41 TRACK TRTIME 1/15 00:02:30 TRACK DTIME TRACK DRTIME 1/15 00:11:37 1/15 00:58:50 No display TTIME TRTIME DTIME DRTIME = Track time = Track remaining time = Disc time = Disc remaining time 15 128-5987 Operating Instructions DVD: When the display key is pressed, the following OSD will be shown: TITLE 1/8 CHAPTER 1/20 CTIME 02:14:21 ANGLE 1/3 SUBTITLE 2/3 AUDIO 1/3 TITLE 1/8 CHAPTER 1/20 CRIME 02:14:21 ANGLE 1/3 SUBTITLE 2/3 AUDIO 1/3 TITLE 1/8 CHAPTER 1/20 TTIME 020:14:21 ANGLE 1/3 SUBTITLE 2/3 AUDIO 1/3 TITLE 1/8 CHAPTER 1/20 TRTIME 21:14:21 ANGLE 1/3 SUBTITLE 2/3 AUDIO 1/3 No display CTIME CRTIME TTIME TRTIME = Chapter time = Chapter remaining time = Title time = Title remaining time 3.9.8 Setup Menu (DVD) When the player is in stop mode, pressing the SETUP button will allow you to modify some of the player’s basic settings. 1) During STOP, press the SETUP button, the setup menu will appear as follows: SETUP (1) (2) (3) (4) (5) 2) Use / DISC LANGUAGE PASSWORD PARENTAL TV ASPECT DIGITAL OUT or numeric key to select the desired item, then press the ENTER button: 3) To exit, press the SETUP button. 16 128-5987 Operating Instructions (1) Disc Language a) During STOP, press the SETUP button; the setup menu will appear. buttons or numeric key to select the DISC LANGUAGE item; then b) Use the / press the ENTER button. The disc language menu will appear as follows: DISC LANGUAGE (1) AUDIO (2) SUBTITLE (3) MENU c) Use the buttons or numeric key to select AUDIO/SUBTITLE/MENU, then press / the ENTER button. If audio is selected, the following menu will appear: AUDIO (1) (2) (3) (4) (5) (6) DEFAULT CHINESE ENGLISH JAPANESE FRENCH GERMAN d) Use the buttons or numeric key to select the preferred language for / AUDIO/SUBTITLE/MENU, then press the ENTER button. e) Use the RETURN button to return to the previous menu, or press the SETUP button to exit. 17 128-5987 Operating Instructions (2) Password NOTE: The factory default password is 1234 a) During STOP, press the SETUP button, the setup menu will appear. buttons or numeric key to select the PASSWORD item, then press the b) Use the / ENTER button. The change password menu will appear. CHANGE PASSWORD PARENTAL PASSWORD c) Use the numeric keys to enter the password; then press ENTER. d) If the correct password is entered, the user can now enter the new password. CHANGE PASSWORD NEW PASSWORD If the incorrect password is entered, the previous menu will be shown. e) Use the numeric keys to enter the new password; then press ENTER. f) The user is required to confirm the new password as shown. CHANGE PASSWORD CONFIRM PASSWORD g) If the new password and the confirm password agree, the SETUP menu will be shown again. 18 128-5987 Operating Instructions (3) Parental Control a) During STOP, press the SETUP button, the setup menu will appear. buttons or numeric key to select the PARENTAL item; then press ENTER. b) Use the / The DVD/CD player will request a parental password. PARENTAL PASSWORD PASSWORD c) Use the numeric keys to enter the password; then press ENTER. d) If the correct password is entered, the parental control menu will be shown as follows: PARENTAL CONTROL (8) KIDS ONLY (7) (6) (5) (4) NO ADULT (3) (2) (1) (0) VIEW ALL If an incorrect password is entered, “INVALID” will be appear. e) Use the / buttons or numeric key to select the desired parental control; then press ENTER. f) The SETUP menu will be shown again. (4) TV Aspect a) During STOP, press SETUP button, the setup menu will appear. buttons or numeric key to select the TV ASPECT; then press ENTER. b) Use the / The preferred TV aspect menu will be shown as follows: TV ASPECT (1) 4:3 PAN SCAN (2) 4:3 LETTERBOX (3) 16:9 WIDE c) Use the / buttons or numeric key to select the preferred TV ASPECT item; then press ENTER. d) The SETUP menu will be shown. 19 128-5987 Operating Instructions (5) Digital Out a) During STOP, press SETUP button, the setup menu will appear. buttons or numeric key to select the DIGITAL OUT item, then press b) Use the / ENTER. The preferred digital audio output will be shown as follows: DIGITAL AUDIO OUT (1) LPCM (2) DOLBY DIGITAL (3) MPEG buttons or numeric key to select the preferred digital audio output, then c) Use the / press ENTER. d) The SETUP menu will be shown. 20 128-5987 Operating Instructions 4. Product Specification GENERAL Power Supply Current Consumption Operating Positions Dimension (WxHxD) Inches (Millimeters) Weight : 12VDC Typical : Less than 3.0 A : Horizontal mount only : 7 (178) x 2 (50) x 7.4 (190) : 2.0 kg AUDIO Output Frequency Response Distortion Dynamic Range S/N Ratio Cross Talk Optical Output : 700mV rms, 600Ω : 20 Hz to 20 kHz (CD audio / 44.1kHz sampling) : 0.02% (at 1 kHz) : Above 85dB : ≥ 90dB : -75dB : Connection to DSP unit for 5.1 channel Dolby Digital & dts sound reproduction VIDEO Television System Playback Disc Aspect Ratio TV Encoder Resolution Video S/N : NTSC/PAL : DVD/VCD/CD & CD-R compatible (12cm, 8cm) Single-sided and dual layer DVD supported : 4:3, 16:9 : 10 bit DAC : 65 dB CONNECTORS Output Audio Video Output Digital Audio Output Input Power Connector : 3 RCA connectors for Video and Audio : 1 optical transmitter Rear IR Connector : For external power supply input and Sidebrake Consists of BATT, ACC, GND : For connection to a rear IR sensor Interface Controller Interface Connector : For connecting to a control unit 21 128-5987 Operating Instructions 5. Region Management Information This DVD/CD player is designed and manufactured to respond to the Region Management Information that is recorded on a DVD disc. If the Region number described on the DVD disc does not correspond to the Region number of this player, this player will not be able to play the DVD disc. This DVD/CD player is set to work only in a particular world region as labeled on the player. Region Number 1 2 3 4 5 6 Country Within the Region Canada, U.S, U.S Territories Japan, Europe, South Africa, Middle East (including Egypt) Southeast Asia, East Asia (including Hong Kong) Australia, New Zealand, Pacific Islands, Central America, Mexico, South America, Caribbean Former Soviet Union, Indian Subcontinent, Africa (also North Korea, Mongolia) China 22 128-5987